You pick up a plain glass bottle and suddenly the possibilities feel endless. Whether you're sprucing up a mantel, making a handmade gift, or styling a cozy reading nook, these vase decorating ideas give you simple ways to turn ordinary vessels into eye-catching accents. You'll find projects for every decor style—boho, farmhouse, cottagecore, Japandi—and techniques ranging from paint and decoupage to fiber wrapping and resin inlay.
I’ll walk you through 25 complete projects with exact materials, realistic quantities, drying times, and step-by-step instructions. A few tools make many of these easier: I reach for my Cricut Explore cutting machine for precise vinyl shapes, and a mid-temp hot glue gun handles most quick-adhesion tasks. Ready to experiment with paint, texture, and fiber? Grab a brush and let’s decorate some vases.
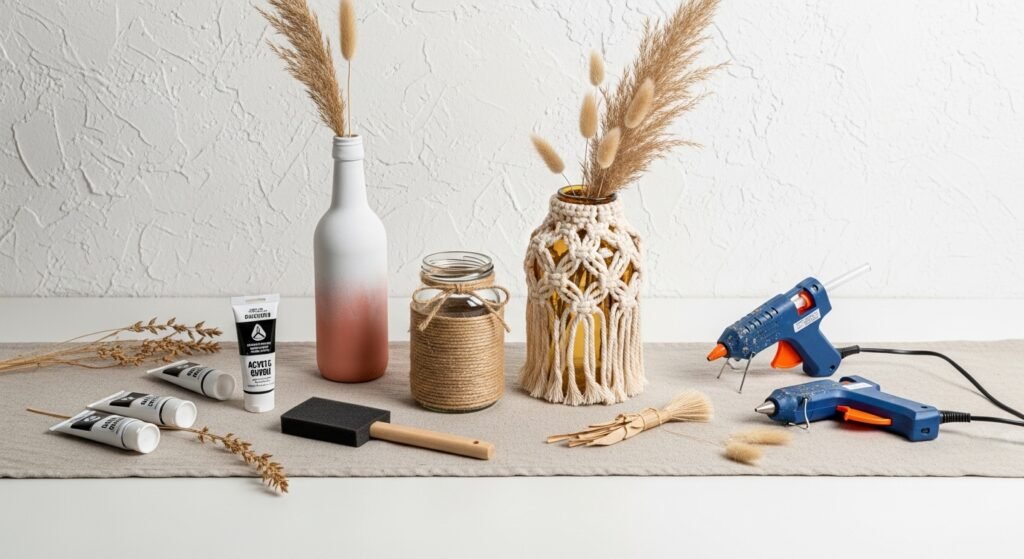
1. Soft Ombre Painted Vase

This ombre technique yields a satin, gradient finish that feels calm and modern. It’s forgiving for beginners because the colors blend naturally. You’ll end up with a smooth matte look that fits coastal, Japandi, or modern cottage decor. A flat foam brush makes the initial application fast and streak-free.
Materials
- One clean glass vase (12–14 oz), rim-free preferred
- 60 ml white chalk paint (matte)
- 60 ml soft blue acrylic chalk paint
- 1 2-inch flat foam brush
- 1 small plastic palette or plate for mixing
- 1 roll of painter’s tape (1-inch)
- Paper towels and rubbing alcohol for cleaning
Instructions
- Wash the vase with soap and water. Wipe with rubbing alcohol. Let dry 30 minutes.
- Mask the bottom rim with painter’s tape if you want a clean edge.
- Pour 15 ml white paint, 15 ml blue paint, and 10 ml water on the palette to thin slightly.
- Starting at the top, apply a band of blue with horizontal strokes. Work quickly in 10–15 cm sections.
- Feather white paint upward from the base, slightly overlapping the blue. Use the foam brush to blend where the colors meet for 30–60 seconds.
- Let the first coat dry 45 minutes. Apply a second thin coat if coverage is uneven.
- Remove painter’s tape after 10 minutes of drying to avoid peeling. Cure 24 hours before filling with water.
How to Display or Gift It
- Place with neutral dried stems for a soft vignette.
- Wrap the neck with a thin jute ribbon for a farmhouse touch.
- Stack flat in a craft organizer until fully cured if making multiples.
- Consider gifting in a kraft box with tissue paper and a sprig of dried lavender.
- For smoother blends, use a brayer roller to gently press paint layers.
2. Twine-Wrapped Rustic Vase

Twine wrapping creates warm texture and a handmade, farmhouse feel. The surface is tactile and forgiving—you can hide imperfect glue spots under a bead or knot. This project is great for beginners, gift makers, and quick craft nights.
Materials
- One recycled glass jar (16 oz)
- 20–25 feet natural jute twine (2 mm)
- 50 hot glue sticks (mini or full-size, as needed)
- 1 hot glue gun (mid-temp)
- 10 wooden beads (10–12 mm) optional
- Scissors and a ruler
Instructions
- Clean and dry the jar fully. Measure a small starting tail (about 2 inches) and secure with a dab of hot glue at the base.
- Tightly wrap the twine around the jar, adding small glue dabs every 3–4 inches to secure.
- When you reach the neck, finish with a double knot and trim excess; hide the knot under a bead if desired.
- Glue wooden beads as accents near the rim or base. Press firmly for 10 seconds.
- Let the glue cool 5–10 minutes; check for loose areas and reinforce with more glue if needed.
How to Display or Gift It
- Fill with wildflowers or cotton stems for a neutral vignette.
- Pack multiples in a kraft box with shredded paper for gifting.
- Store extra twine and beads in a craft organizer tray to keep parts tidy.
- Swap jute for colored macramé cord to match seasonal decor.
3. Decoupage Floral Pattern Vase

Decoupage lets you apply printed napkins, tissue, or scrapbook paper for instant pattern. The finish is slightly textured and vintage-forward—perfect for cottagecore or shabby-chic interiors. Mod Podge dries clear and is easy to work with.
Materials
- One glass or ceramic vase (10–12 oz)
- 4–6 floral paper napkins or 1 sheet of 12×12 scrapbook paper
- 50 ml Mod Podge (matte)
- 1 1-inch foam brush
- 1 pair of detail scissors or craft knife
- Sandpaper (220 grit) for roughening glossy surfaces
- Ruler and pencil
Instructions
- If the vase is glossy, sand the area to help adhesion. Wipe clean.
- Separate napkin plies and cut the pattern you want. Tear edges for a softer look.
- Apply a thin coat of Mod Podge to a small section. Lay the napkin piece down gently. Smooth with the foam brush from the center outward.
- Brush another thin coat of Mod Podge over the top to seal. Work in 10×10 cm sections.
- Let dry 60 minutes between coats. Apply 2 top coats for durability.
- Cure 24 hours before filling with water. For outdoor use, choose Mod Podge outdoor formula and cure 72 hours.
How to Display or Gift It
- Group several decoupaged vases of different heights for a centerpiece.
- Tie a ribbon around the neck for gifting; pack in a box with tissue.
- Store unused napkins in a stackable craft organizer.
4. Metallic Leaf Accent Vase

Gold or silver leaf adds luxe sparkle without heavy weight. The slightly imperfect application looks artisan-made and pairs beautifully with minimalist or glam decor. Use a soft gilding brush for a delicate finish.
Materials
- One glass vase (10–14 oz)
- 10 sheets gold leaf or silver leaf (size: 3×3 in)
- 30 ml gilding adhesive (size: small jar)
- 1 gilding brush (soft)
- 1 foam brush for base coat
- 1 clear sealer spray (matte or gloss)
- Paper towel
Instructions
- Clean and dry the vase. Apply a thin base coat of glue where you want leaf to stick. Wait 15–20 minutes until tacky.
- Gently lay a leaf sheet over the tacky adhesive. Press lightly with the gilding brush.
- Use the brush to remove excess leaf and to blend edges. Repeat for other areas.
- After 30 minutes, seal lightly with a clear sealer spray. Cure 24 hours before use.
How to Display or Gift It
- Pair with white blooms for modern contrast.
- Wrap in tissue and tuck a care note explaining metallic surfaces.
- Use a small soft-bristled gilding brush for neat application.
5. Marbled Nail Polish Vase
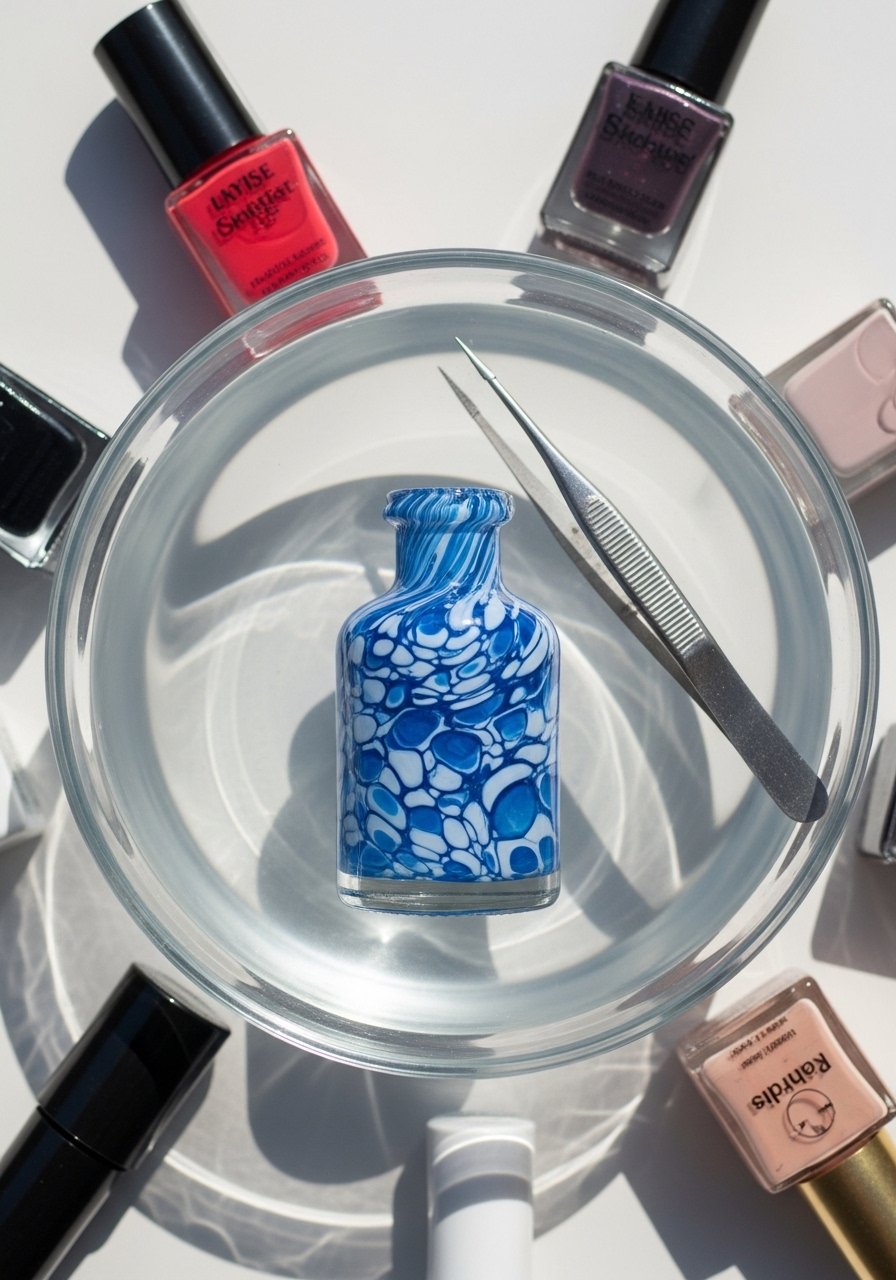
Water marbling with nail polish creates swirls that look like agate or marble. It’s vibrant and quick. This works best with small-neck bottles and yields a glossy, hard surface.
Materials
- One small glass bottle (6–8 oz) with straight sides
- 3–4 nail polish colors (10 ml each) — pick contrasting shades
- 1 disposable plastic bowl (large enough to dip bottle)
- 1 wooden skewer or toothpick
- Gloves and newspaper for cleanup
- Clear acrylic spray for sealing
Instructions
- Fill the bowl with room-temperature water. Work in a ventilated area.
- Add one drop of polish at a time into the water center. Repeat with alternating colors until you have a small bullseye.
- Use a toothpick to drag lines through the polish to create a marble pattern.
- Wearing gloves, slowly dip the bottle at a 45-degree angle, rotating to pick up polish. Lift and rinse under warm water gently.
- Let dry 30 minutes, then apply a light coat of clear acrylic spray. Cure 24 hours.
How to Display or Gift It
- Use as a single-stem bud vase on a bedside table.
- Pack in a padded box for gifting—include a small polishing cloth.
- Store leftover polish in a cool dark drawer to extend life.
6. Macramé-Covered Vase
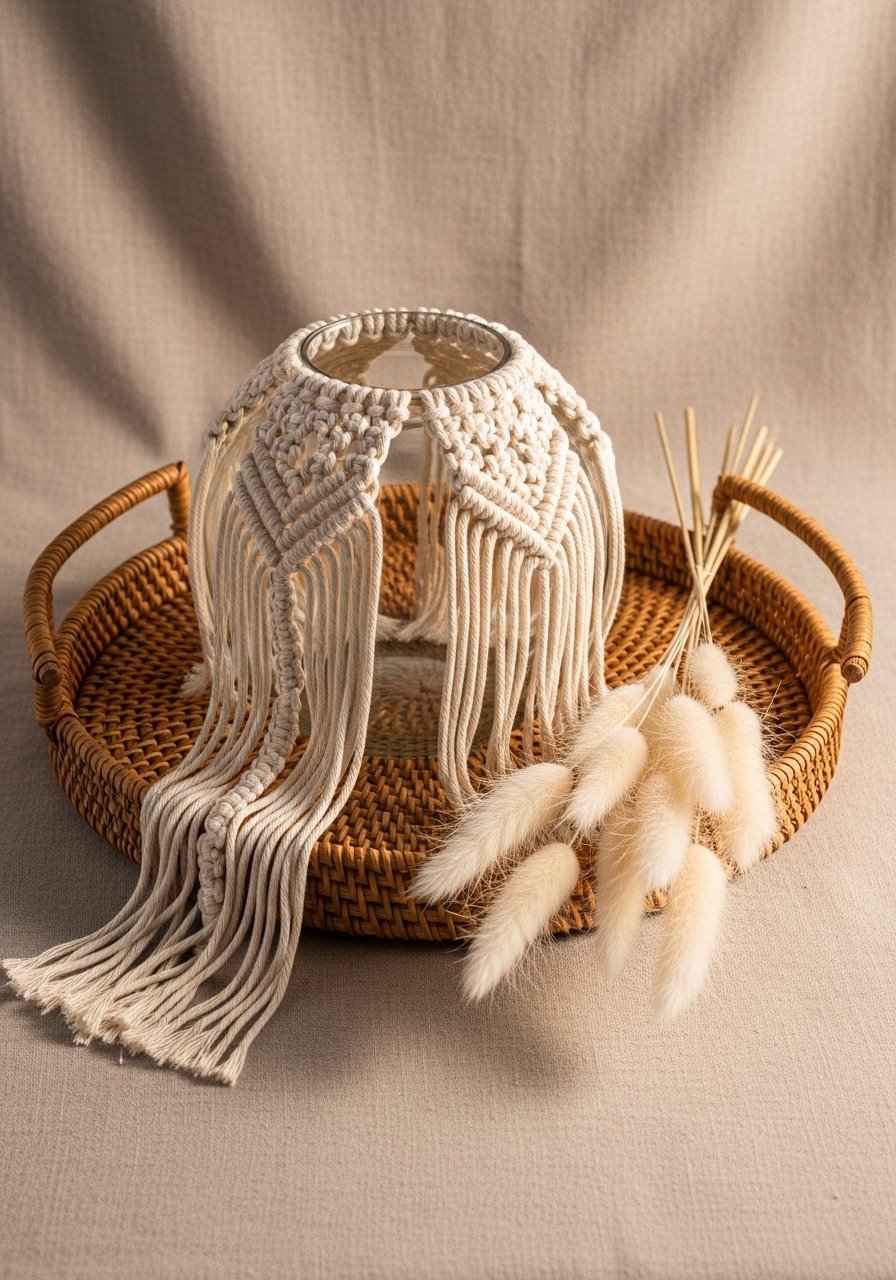
Macramé wrapping adds boho texture and warmth. Knots hug the glass and create a bohemian silhouette. This project is satisfying for crafters who enjoy tactile work and can be adjusted for any vase size.
Materials
- One rounded vase (12–16 oz)
- 30 feet 3mm cotton macramé cord (single-strand)
- 10 feet 5mm macramé cord for fringe accents
- 1 pair of sharp scissors
- 1 measuring tape
- 1 wooden bead (20–25 mm) optional
Instructions
- Measure your vase height. Cut four cords at 4× vase height + 6 inches.
- Create a gathered loop at the top using a Lark’s Head knot around a provisional ring (or use tape to simulate ring).
- Work a series of square knots in rows until you reach desired coverage (about 8–12 knots per side).
- Finish with a row of half knots to create fringe, trim fringe evenly to 3–4 inches.
- Slide on a wooden bead near the neck and secure with a small dab of glue if needed.
How to Display or Gift It
- Pair with dried pampas for a full boho look.
- Store extra cord on a craft spool organizer.
- Make matching sets in different colors for market-style gifts.
7. Mosaic Tile Vase
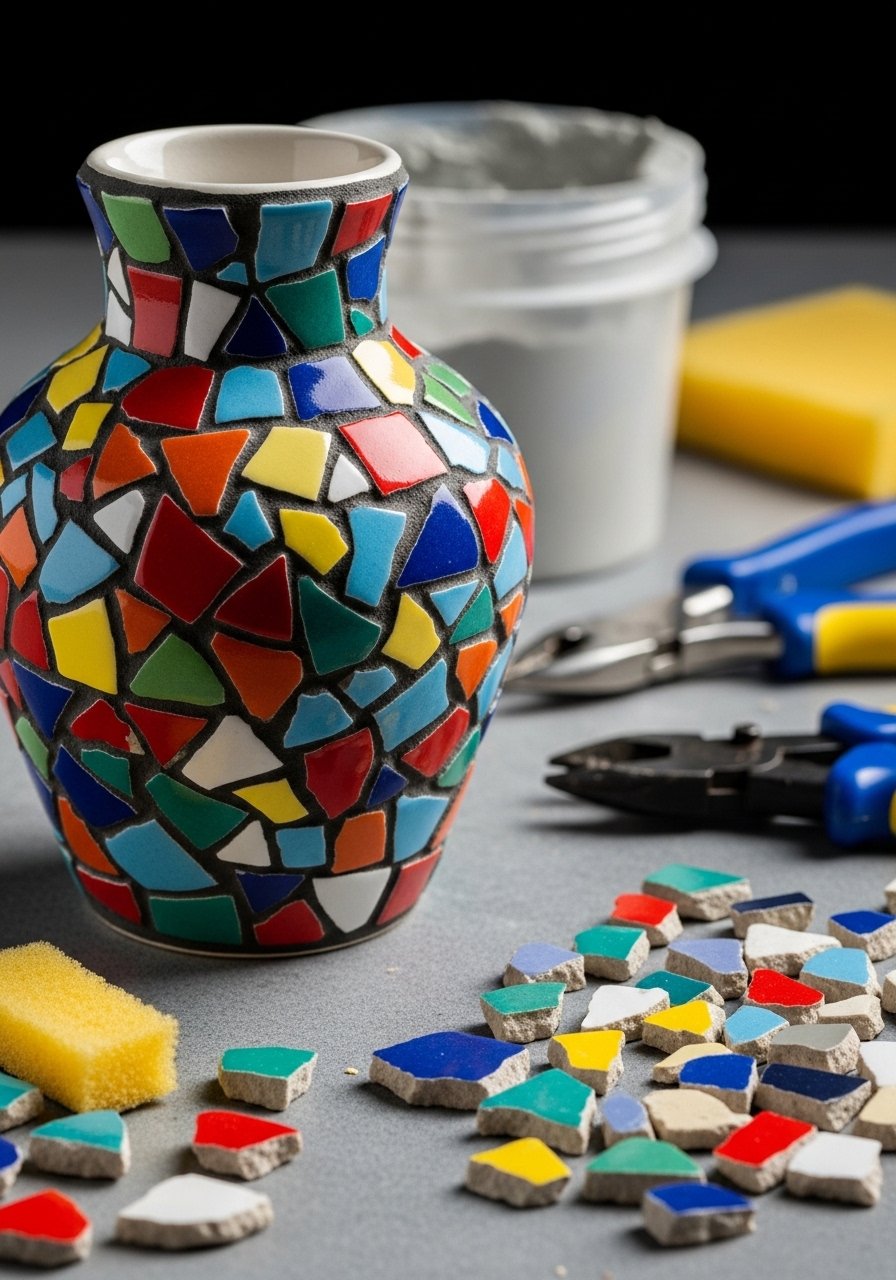
Mosaic adds a jewel-like, tactile surface and is great for thrifted pottery. Use broken ceramic, glass, or store-bought mosaic tiles. Grouting fills gaps and gives a polished finish.
Materials
- One ceramic vase (sturdy)
- 200 grams mixed mosaic tiles or recycled broken ceramic
- 1 pair of tile nippers or mosaic cutters
- 60 ml tile adhesive (small tub)
- 100 grams grout (sand-free is easier)
- Sponge, gloves, and safety glasses
Instructions
- Clean vase and plan tile layout. Use tile nippers to shape pieces. Wear eye protection.
- Apply small dabs of adhesive to the back of each tile and press onto vase. Leave 2–3 mm gaps.
- Let adhesive set 4–6 hours.
- Mix grout per package. Use a rubber float to press grout into gaps. Wipe excess with a damp sponge.
- Let grout cure 24–48 hours before sealing or using.
How to Display or Gift It
- Display as a colorful accent on a side table.
- Wrap carefully and include a small care note—avoid freezing temps.
- Store small tile pieces in a compartment organizer.
8. Embroidered Felt Sleeve Vase
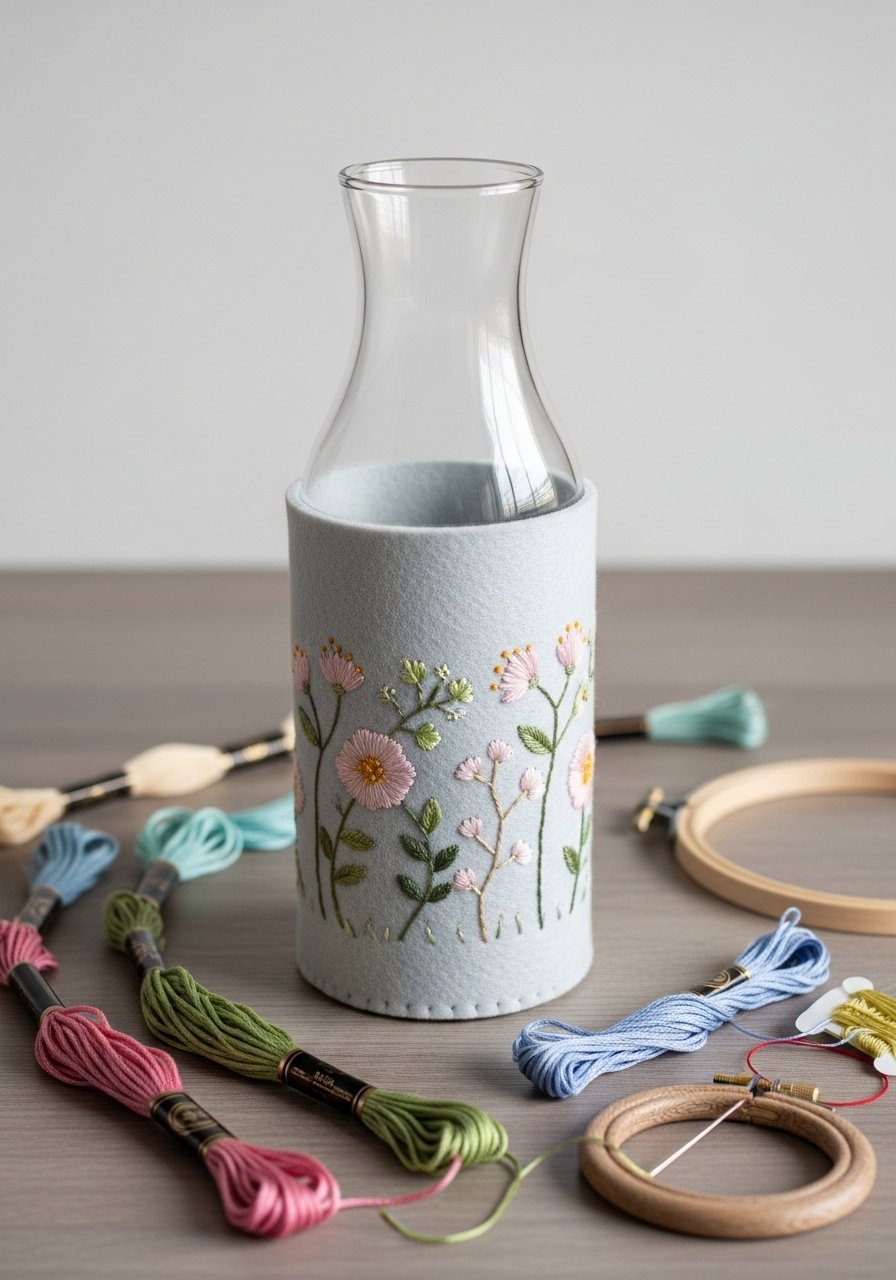
A felt sleeve gives a soft, textile look and makes glass feel cozy. Embroidery allows for custom motifs—perfect for gifting with monograms or dates.
Materials
- One straight-sided glass vase (10–12 oz)
- 1 sheet of wool-blend felt (9×12 in)
- 3–4 meters embroidery floss (varied colors)
- 1 embroidery needle and small hoop
- 1 fabric glue or small hand-sewing kit
- Scissors and ruler
Instructions
- Measure vase circumference and height. Cut a felt rectangle +1 cm seam allowance.
- Transfer a simple floral pattern with a pencil. Hoop the felt and stitch with backstitch and French knots.
- Fold the felt around the vase and glue or whip-stitch the short edge.
- Slip the sleeve onto the vase. For a secure fit, add a tiny dot of glue at the seam.
How to Display or Gift It
- Add a matching felt coaster for a gift set.
- Store sleeves flat in a fabric storage box.
- Swap felt colors for seasonal themes.
9. Chalkboard Painted Message Vase

Chalkboard paint makes the vase interactive—write messages, names, or meal labels. It's playful and practical for parties or table settings.
Materials
- One mason jar or glass vase (16 oz)
- 100 ml chalkboard paint (black)
- 1 1-inch flat paintbrush
- 1 piece of sandpaper (220 grit)
- 1 white chalk stick and eraser cloth
Instructions
- Sand the jar lightly to roughen the surface. Clean and dry.
- Apply a thin first coat of chalkboard paint. Dry 30 minutes.
- Apply a second coat and let cure 24 hours.
- Condition the surface by rubbing the entire area with chalk and wiping off. Now you can write and erase freely.
How to Display or Gift It
- Use for place settings at casual dinners.
- Gift with a small set of colored chalk in a kraft bag.
- Keep extras in a drawer or small craft box.
10. Resin River Inlay Vase

Epoxy resin gives a glass-like, deep finish—ideal for inlaying color bands or "river" effects. This technique needs care with measuring and curing, but the result is high-end and modern.
Materials
- One ceramic vase (matte finish recommended)
- 150 ml two-part epoxy resin kit (clear)
- 10–20 ml alcohol inks (turquoise or desired colors)
- 2 silicone mixing cups and wooden stir sticks
- 1 heat gun or torch (brief passes to remove bubbles)
- Gloves, respirator mask, and protective mat
Instructions
- Sand and clean vase surface. Tape off a shallow channel with painter’s tape to contain resin.
- Mix resin per kit instructions (usually 1:1). Stir for 2–3 minutes; scrape sides.
- Add a few drops of alcohol ink to create color. Pour into channel slowly.
- Use the heat gun in short 2–3 second bursts to remove bubbles.
- Let cure 24–72 hours depending on resin brand. Demold tape after tack-free. Full cure may take up to 7 days.
How to Display or Gift It
- Keep away from direct sun during curing to avoid ambering.
- Display as a console focal point paired with matte ceramics.
- Store resin kit components in a cool cabinet until next use.
- For safety, consider a low-odor epoxy resin kit.
11. Speckled Spray Paint Vase

Speckling creates an artisanal, ceramic-like surface with lots of character. It’s quick, inexpensive, and works on glass, ceramic, or metal.
Materials
- One glass or ceramic vase (10 oz)
- 1 can white spray paint (matte) — base coat
- 1 can black spray paint or acrylic for splatter
- 1 old toothbrush or stiff-bristle paint brush for splattering
- Drop cloth and gloves
Instructions
- Prime and spray the base coat of white evenly. Dry 30–45 minutes between coats; two thin coats recommended.
- Dip toothbrush bristles into thinned black paint. Holding the vase, flick bristles with your thumb to create splatters at arm’s length. Practice on scrap first.
- Let dry 60 minutes, then seal with a clear matte spray if desired.
How to Display or Gift It
- Group with other speckled pieces for a curated shelf.
- Pack in a box with bubble wrap for shipping.
- Keep spray caps and extra cans in a metal storage bin.
12. Lace-Imprinted Vase
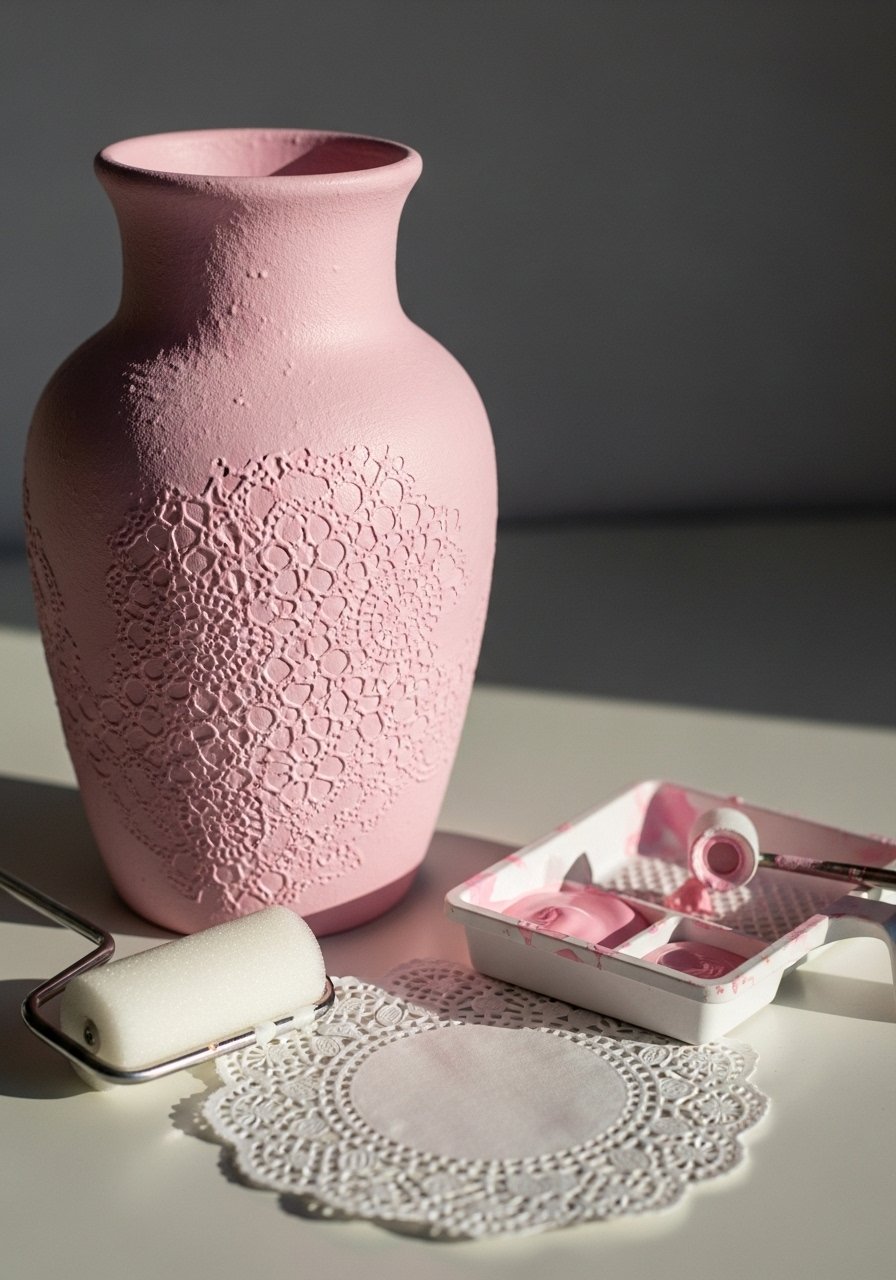
Using lace to imprint texture gives a romantic, vintage surface. It works nicely with chalk paint and wax finishes.
Materials
- One smooth glass or ceramic vase (12 oz)
- 100 ml chalk paint (soft pink or cream)
- 1 lace doily (large enough to wrap around)
- 1 small brayer roller or flat foam roller
- 1 jar of clear wax (optional for depth)
Instructions
- Wrap lace snugly around vase and secure with clips.
- Roll a thin coat of chalk paint over the lace with the brayer. Work quickly.
- Remove lace carefully while the paint is still tacky to reveal the imprint.
- Let dry 45 minutes, then apply a light coat of clear wax for depth and protection.
How to Display or Gift It
- Pair with soft, romantic florals like peonies.
- Store lace and rollers flat in a craft drawer organizer.
- Make sets for bridal showers.
13. Stenciled Geometric Vase

Stenciling creates crisp, repeatable patterns that suit modern, Scandinavian, or minimal interiors. Painter’s tape and a stencil brush help you get clean edges.
Materials
- One matte ceramic or glass vase (10–12 oz)
- 1 geometric stencil (reusable, 6×6 in)
- 30 ml acrylic paint (contrasting color)
- 1 small stencil brush or foam pouncer
- Painter’s tape and paper towel
Instructions
- Secure stencil with painter’s tape. Dab paint lightly using the stencil brush—avoid overloading.
- Build up color with thin layers; two coats usually works. Dry 20–30 minutes between coats.
- Remove stencil gently to avoid smudging. Cure 24 hours.
How to Display or Gift It
- Pair with clean-lined furniture and monochrome prints.
- Wrap in kraft paper with a label for gifting.
- Keep stencils flat in a stencil storage folder.
14. Pressed Flower Resin Vase Accent

Embedding pressed flowers in a thin resin band gives delicate, botanical detail without fuzz or mess. This is great for cottagecore and cottage garden aesthetics.
Materials
- One small glass bud vase (6–8 oz)
- 50 ml thin epoxy resin for small pours
- 5–10 pressed flowers (pre-pressed for 1–2 weeks)
- 2 silicone mixing cups and wooden stir stick
- Tweezers and a toothpick
- Gloves and small heat gun for bubbles
Instructions
- Mark a thin band where you want the flowers. Clean area.
- Mix resin per instructions. Pour a thin base layer (~2 mm). Let tack for 10–15 minutes.
- Place pressed flowers with tweezers into tacky resin. Cover with another thin resin layer.
- Remove bubbles with a heat gun in short bursts. Cure 24–48 hours.
How to Display or Gift It
- Use with a single freesia or ranunculus stem for a romantic look.
- Include a note about resin care when gifting.
- Store pressed flowers flat between parchment in a book until ready.
15. Washi Tape Patterned Vase

Washi tape offers a no-mess, removable way to decorate vases. It's perfect for renters or quick seasonal swaps.
Materials
- One glass or ceramic vase (any size)
- 4–6 rolls of washi tape (various widths and patterns)
- Scissors and a ruler
- Optional clear matte spray to fix edges
Instructions
- Clean vase and plan tape layout. Measure for even stripes if desired.
- Apply washi tape in straight strips, smoothing with your fingers. Trim excess with scissors.
- For longevity, seal lightly with clear matte spray and cure 1–2 hours.
How to Display or Gift It
- Mix and match washi designs for seasonal looks.
- Wrap in cellophane and tuck in a greeting card for gifting.
- Keep extra rolls in a washi tape dispenser.
16. Burlap-Wrapped Vintage Vase
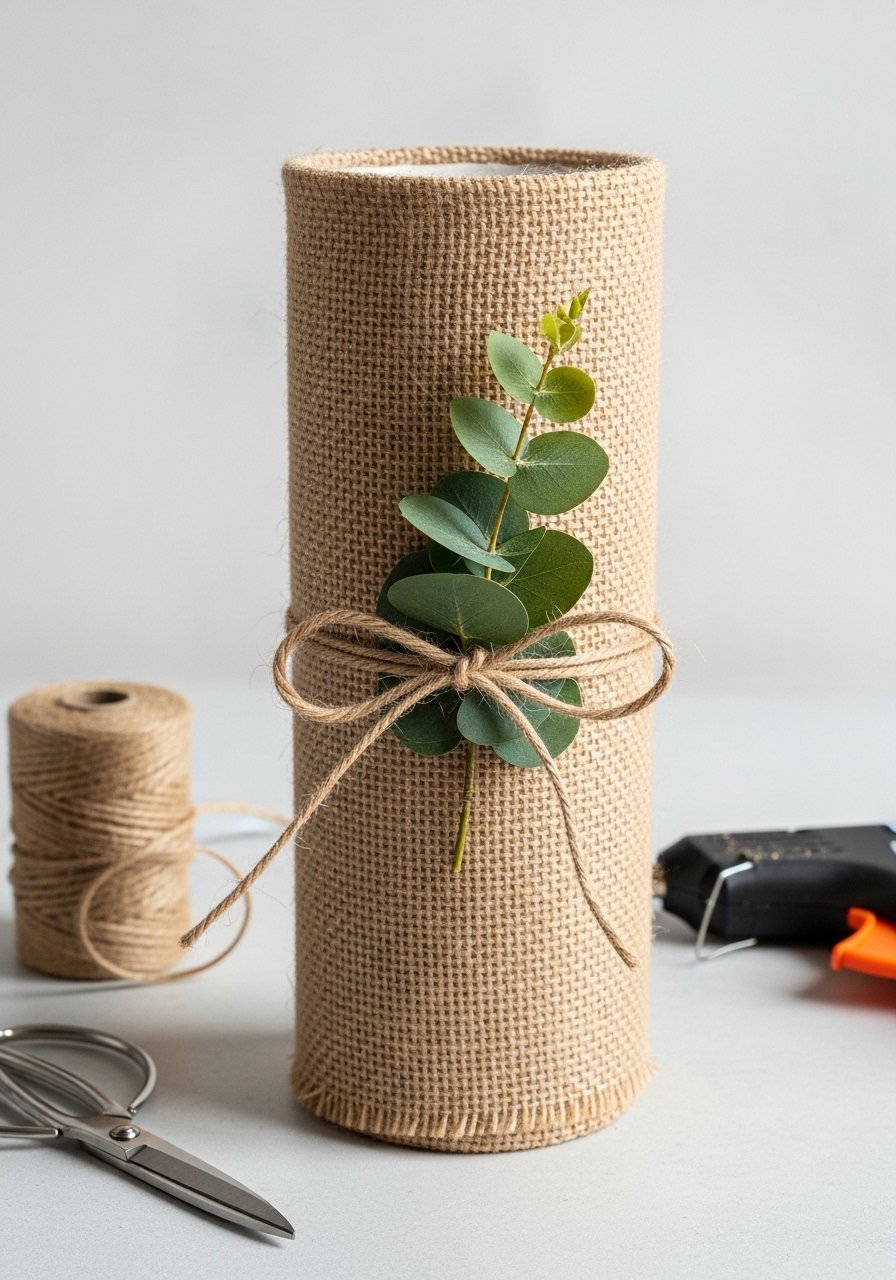
Burlap creates rustic texture that suits farmhouse and country styles. It’s affordable and forgiving when glued in place.
Materials
- One tall glass vase (16–20 oz)
- 40×15 cm piece of burlap fabric
- 5 feet natural jute twine
- 1 hot glue gun and glue sticks
- Scissors and fabric glue (optional)
Instructions
- Measure burlap around the vase with a 1 cm overlap. Trim to size.
- Dab hot glue along one short edge and press the burlap down to secure. Wrap and glue the final seam.
- Tie a twine bow near the neck. Add a sprig of dried eucalyptus if desired.
- Allow glue to cool 10 minutes before handling.
How to Display or Gift It
- Pair with sunflowers or dried lavender for a rustic centerpiece.
- Store burlap scraps in a fabric storage basket.
- Make multiples and place on a long dining table for farmhouse styling.
17. Painted Chalkboard Quote Vase

A chalkboard quote vase is a personalized piece that can change with the mood. Use chalk pens for crisp lettering.
Materials
- One slender vase (10–12 oz)
- 50 ml chalk paint (black) for writing area
- 1 white chalk pen or fine chalk stick
- 1 small foam brush
- Sandpaper and cleaning cloth
Instructions
- Paint a small rectangle area with chalk paint. Dry 30–45 minutes.
- Condition with chalk as before. Write your quote with a chalk pen or fine stick. Fix small smudges with a damp Q-tip.
How to Display or Gift It
- Rotate quotes for seasons or celebrations.
- Gift with a small pack of chalk pens in a kraft bag.
- Keep chalk pens in a pen organizer cup.
18. Ombre Yarn-Wrapped Bud Vase

Yarn wrapping gives soft color and cozy texture—great for small bud vases and seasonal swaps. The gradient look is surprisingly professional with simple color transitions.
Materials
- One small bud vase (6–8 oz)
- 50–80 grams gradient yarn (worsted weight)
- 1 tapestry needle for finishing tails
- Scissors and clear craft glue for starts/ends
Instructions
- Attach yarn tail with a small glue dot at the base. Wrap tightly, changing shades gradually every 3–4 cm.
- Tuck and glue the final tail on the inside of the vase with the tapestry needle.
- Trim any loose fibers. Works best with dry-stem arrangements.
How to Display or Gift It
- Combine several wrapped vases in a tray for a colorful centerpiece.
- Pack in a long box and cushion with tissue for shipping.
- Store leftover yarn in a yarn bowl.
19. Nautical Rope-Knotted Vase
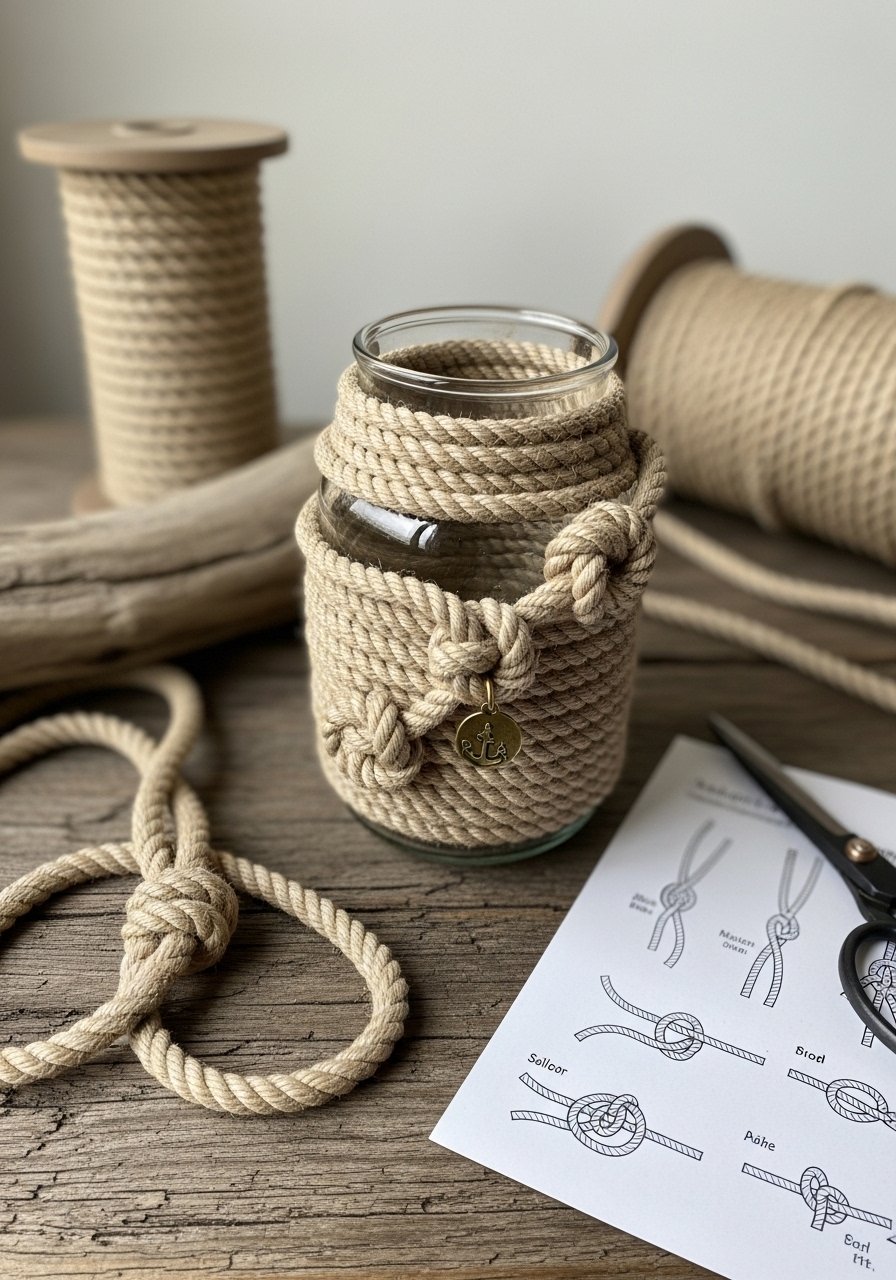
Sailor knots and rope give a crisp nautical look. The knots add interest and are practical for hiding joints.
Materials
- One squat vase (12 oz)
- 15 feet cotton or hemp rope (3–4 mm)
- 1 small brass charm or button (optional)
- 1 hot glue gun and glue sticks
- Scissors
Instructions
- Secure one rope end at the base with glue. Wrap rope tightly, adding glue every few inches.
- Create two or three small decorative knots and glue them in place near the neck.
- Trim and glue the tail on the inside.
How to Display or Gift It
- Pair with sea grasses or bleached branches.
- Keep rope and charms in a small hardware organizer.
- Make a set of varying heights for coastal decor.
20. Geode Slice Vase Collar

Creating a geode collar adds a bit of mineral sparkle and pairs well with contemporary decor. Use adhesives rated for stone-to-glass bonding.
Materials
- One glass vase (12–14 oz)
- 6–8 thin geode slices (10–15 mm thickness)
- 10–15 ml E6000 adhesive (or stone glue)
- Tweezers and gloves
- Soft cloth for cleanup
Instructions
- Plan the collar layout and dry-fit geodes.
- Apply a small dot of E6000 to the back of each geode and press onto the vase neck. Allow 10 minutes of initial set.
- Let cure undisturbed 24–72 hours depending on glue instructions.
How to Display or Gift It
- Use with minimalist interiors and simple stems to let the geodes shine.
- Wrap in layered tissue for safe gifting.
- Store extra geode slices in a small jewelry box.
21. Alcohol Ink Drift Vase

Alcohol inks produce luminous, fluid patterns that resemble watercolors. They cling to non-porous surfaces like glass and cure quickly.
Materials
- One small glass vase (6–8 oz)
- 3–4 alcohol ink colors (10 ml each)
- 1 bottle blending solution (30 ml)
- Gloves, cotton swabs, and paper towels
Instructions
- Clean the vase with alcohol to remove oils. Work in a well-ventilated area.
- Apply a drop of alcohol ink to the surface and add blending solution to spread. Tilt vase to move color.
- Layer drops of color until satisfied. Let dry 15–30 minutes. Seal with a clear spray if desired.
How to Display or Gift It
- Great for colorful modern displays.
- Pack with bubble wrap and a care card.
- Keep inks and solutions upright in a small chemical-safe storage bin.
22. Cork Mosaic Vase
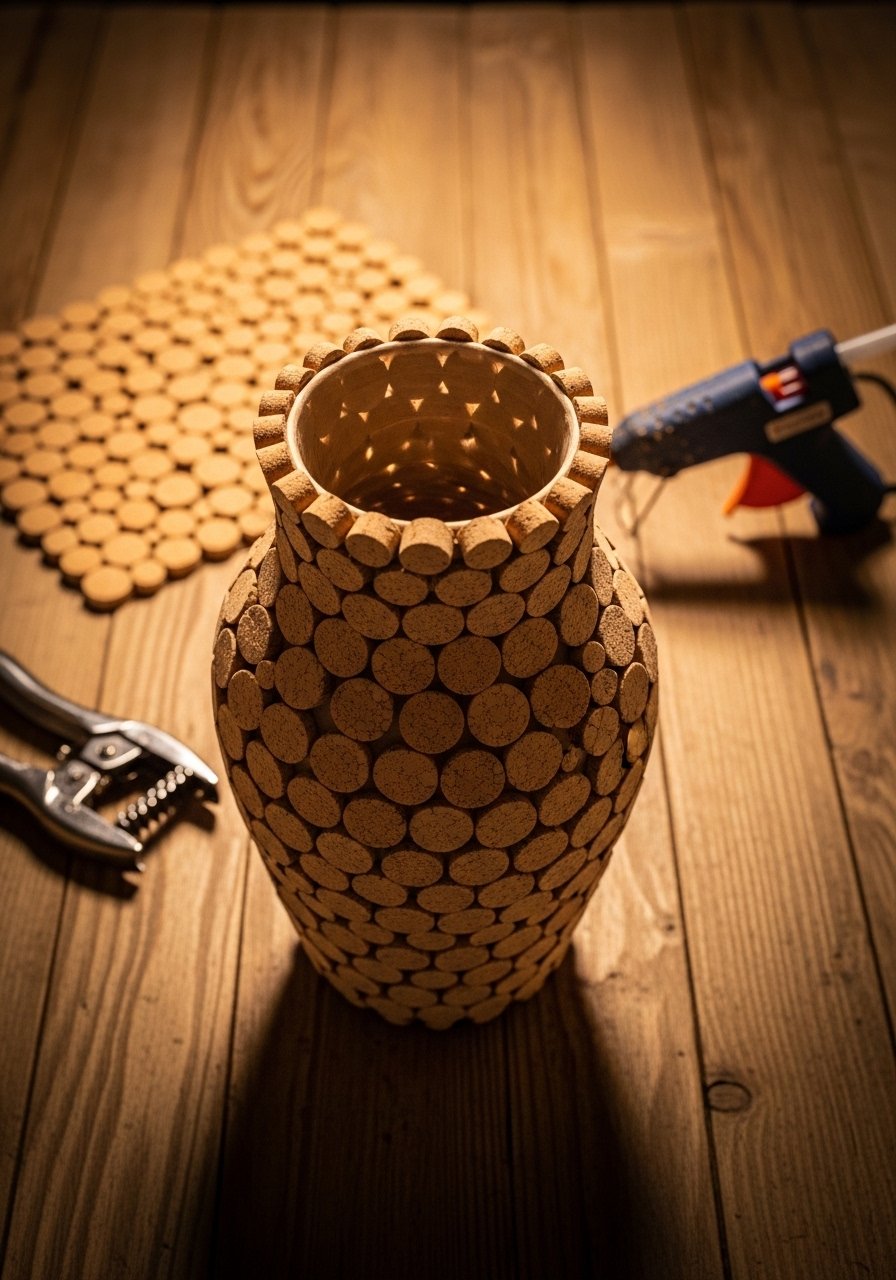
Cork slices create a cozy, tactile surface and are lightweight. They’re ideal for eco-friendly crafting and make a soft base for dried florals.
Materials
- One glass vase (12 oz)
- 100 cork slices (15–20 mm diameter) or 1 cork sheet to punch from
- 1 hot glue gun and sticks
- Hole punch (cork-compatible) or craft knife
Instructions
- Glue cork slices in staggered rows from base to neck. Work in 3–4 inch sections.
- If using a cork sheet, punch circles and glue them flat.
- Let glue cool 10–15 minutes. Check for any loose slices and reinforce.
How to Display or Gift It
- Use with dry stems to avoid water contact—insert a small sealed jar inside the cork-covered vase for fresh stems.
- Store extra cork slices in a zip-top craft storage bag.
23. Newspaper Decoupage Text Vase

Newspaper decoupage creates a high-contrast, graphic look. It’s inexpensive and ideal for eclectic or industrial decor.
Materials
- One glass vase (12–16 oz)
- 6–8 newspaper clippings or printouts (cut to size)
- 60 ml Mod Podge (matte)
- 1 foam brush and craft knife for trimming
- Clear spray sealer optional
Instructions
- Sand glossy surfaces and clean. Cut clippings into manageable pieces.
- Apply Mod Podge, lay paper, and smooth. Seal with two top coats, drying 60 minutes between coats.
- Cure 24 hours before use.
How to Display or Gift It
- Use for a modern bookshelf vignette.
- Wrap in recycled kraft paper for an eco-friendly gift.
- Store extra clippings in a paper file organizer.
24. Felt Pom-Pom Covered Vase
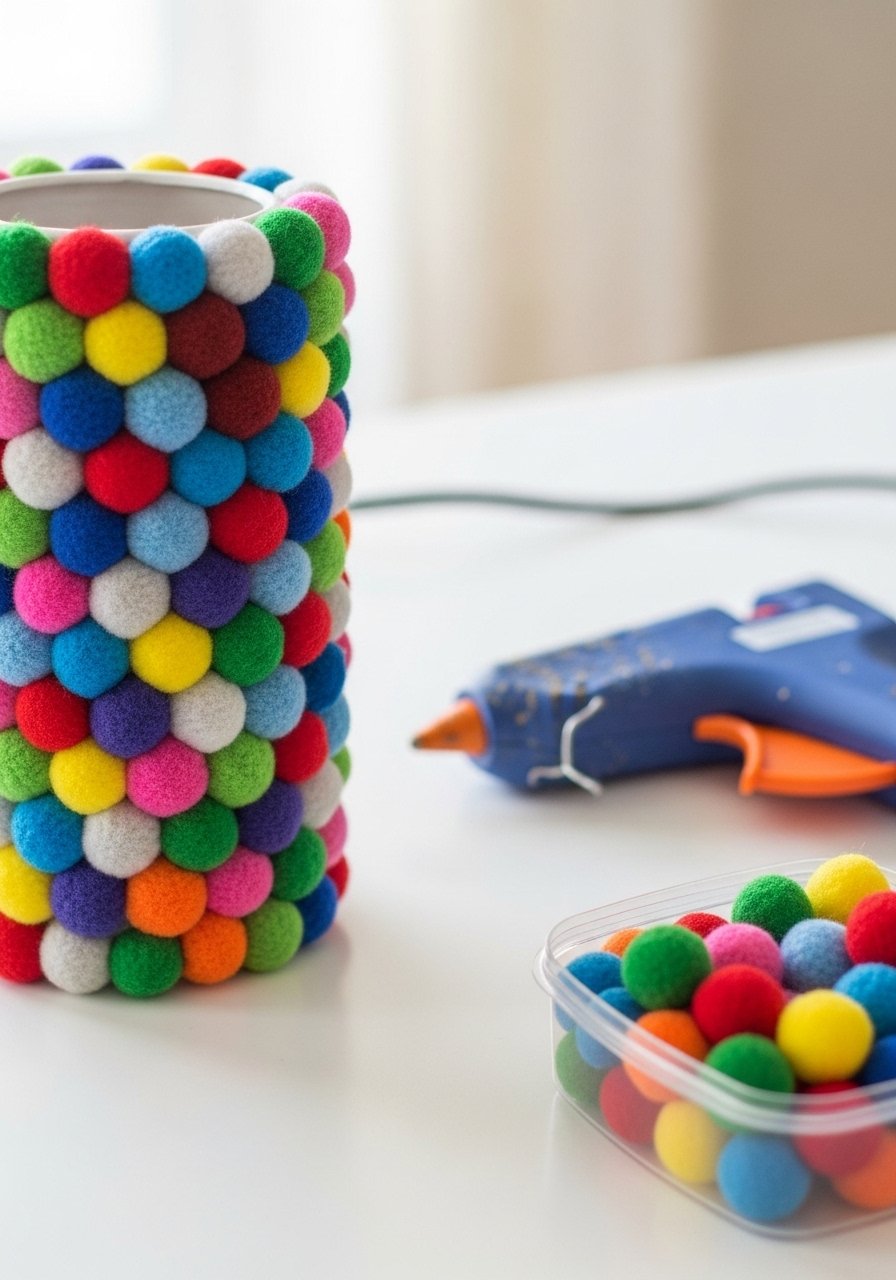
Pom-poms give playful dimension and color. This joyful style works for kids’ rooms, party decor, or eclectic spaces.
Materials
- One small squat vase (8–10 oz)
- 100–150 pre-made felt pom-poms (10–15 mm)
- 1 hot glue gun and glue sticks
- Tweezers for precise placement (optional)
Instructions
- Glue pom-poms in a tight grid starting at the base. Work in small sections to avoid cooling glue.
- Fill the surface completely, trimming as needed to maintain shape.
- Let cool 10–15 minutes before handling.
How to Display or Gift It
- Use as a party centerpiece with single blooms.
- Pack in a colorful box for a cheerful gift.
- Store extra pom-poms in a clear craft jar.
25. Minimal Matte Black Spray and Leather Wrap Vase

Matte black with a leather accent reads modern and a bit masculine—great for minimalist and industrial interiors. Leather adds warmth and a tactile contrast.
Materials
- One glass or ceramic vase (12–14 oz)
- 1 strip vegetable-tanned leather (2 cm × circumference)
- 1 can matte black spray paint (two thin coats)
- 1 leather punch and small rivet or strong fabric glue
- Ruler and scissors
Instructions
- Spray two thin coats of matte black paint, drying 30–45 minutes between coats.
- Cut leather to size, punch holes for a decorative rivet or secure with glue at the seam.
- Slide leather band around the neck. If glued, let set 2 hours before use.
How to Display or Gift It
- Pair with a single sculptural stem for a modern mantle.
- Gift with a small leather care kit in a kraft box.
- Store leather scraps neatly in a small flat file.
You’ve just explored 25 vase decorating ideas spanning paint, fiber, resin, and found-object techniques—everything from quick upcycles to slightly more advanced resin work. Try a few projects that match your time and tools; many techniques repeat across styles, so the skills transfer quickly. Pin this guide for later and share it with friends who love to craft—what project will you try first? If you’re building a simple toolkit, a reliable hot glue gun and a set of foam brushes will speed up nearly every project in this list. Happy crafting—can’t wait to see what you make!