You know that little shelf or narrow console that always looks like it needs a finishing touch? A pretty vase is the quickest answer. These 27 easy vase decorating ideas are designed to come together with simple supplies you probably already have — or can grab fast — and they create high-impact decor without fuss.
I kept every project approachable for beginners. You’ll find paint techniques, wrapping and texture ideas, decoupage and paper crafts, resin accents, and fiber treatments that fit cottagecore, boho, farmhouse, and Japandi vibes. Most use basic tools like a hot glue gun or a foam brush; if you want smooth paint every time, try my go-to foam brush set for even coats. For tape-and-stencil work, a roll of painter's tape makes clean lines painless.
Browse by style or scroll for a technique you’ve been meaning to try. Each project includes exact materials, step-by-step instructions, drying times, and styling ideas so you can finish a vase today and style it tonight.
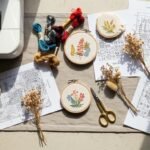
- Twine-Wrapped Vintage Bottle

This classic rustic look is all about texture. Wrapping a recycled bottle in jute or baker’s twine gives matte, tactile appeal that fits farmhouse and boho shelves. It’s forgiving for beginners and a great way to upcycle thrifted glass.
Materials
- One recycled glass bottle (approx. 8–10" tall)
- 50–75 ft natural jute twine (2–3 mm)
- Hot glue sticks (clear), about 6–8
- Craft scissors
- Small paint brush (for glue smoothing)
- Optional: small wooden beads, 10–12 (8 mm)
Instructions
- Clean and dry the bottle completely. Remove labels with warm soapy water; use rubbing alcohol to remove residue.
- Apply a small dab of hot glue at the base and press the twine into the glue to anchor.
- Wrap the twine tightly around the bottle, spacing turns close together so the glass doesn’t show. Add a dot of glue every 4–6 wraps. Use a hot glue gun with temperature control to avoid stringing.
- When you reach the neck, cut twine with scissors leaving 6–8" to tuck or knot.
- Tuck the end under the final wrap and secure with a final dab of glue. Smooth glue blobs with a small brush while warm.
- Glue on beads for added detail if desired. Let cool for 5–10 minutes until glue is firm.
How to Display or Gift It
- Pair with dried grasses or single-stem eucalyptus for a neutral look.
- Cluster two different-sized bottles on a tray for a quick vignette.
- Wrap the base in kraft tissue and tuck into a kraft gift bag for gifting.
- Store extra twine in a craft organizer box when not in use.
- Chalk-Painted Mason Jar (one of these easy vase decorating ideas)

Chalk paint gives a soft, velvety finish that feels cottagecore. This project works on glass or ceramic and you’ll love how the paint hides imperfections. It’s beginner-friendly and dries quickly to the touch.
Materials
- One 16 oz mason jar
- Chalk paint (matte) 120 ml
- Flat foam brush (1") or mini roller
- Sandpaper 120–220 grit
- Clear wax or matte sealer (60 ml)
- Painter’s tape
Instructions
- Wash and dry the jar. Remove labels and residue.
- Lightly sand any glossy areas so paint adheres.
- Apply painter’s tape where you want a clean edge (optional).
- Paint the first thin, even coat with a flat foam brush. Let dry 30 minutes.
- Apply a second thin coat. If needed, a third thin coat gives full coverage. Total dry time to touch 1 hour, full cure 24 hours.
- Once dry, sand gently for a worn look or leave smooth. Seal with a thin coat of clear wax or matte sealer; cure 24 hours.
How to Display or Gift It
- Fill with seasonal blooms or a cluster of birthday candles.
- For gifting, tie with twine and attach a small craft tag.
- Stack extra jars in a plastic drawer organizer for storage before decorating.
- Painted Geometric Vase — easy vase decorating ideas with painter's tape

If you like clean lines, this painted geometric vase feels modern and graphic. Painter’s tape creates those razor-clean edges and a brayer gives a flawless finish. Great for minimalist and Japandi styles.
Materials
- One cylinder glass vase (6–8" tall)
- Acrylic craft paints: white and navy (20–30 ml each)
- Painter’s tape (1/2" width)
- Small brayer roller
- Flat foam brush and detail brush
- Rubbing alcohol and lint-free cloth
Instructions
- Clean the vase with rubbing alcohol so paint adheres.
- Plan your geometric pattern and mark lightly with pencil.
- Apply painter’s tape to mask off shapes. Press firmly for sealed edges.
- Use a foam brush to apply thin coats of paint inside masked areas. Roll a brayer gently over tape edges for extra seal.
- Let each coat dry 20–30 minutes. Apply a second coat if needed for full opacity.
- Remove tape slowly at a 45-degree angle once paint is dry to the touch (about 30 minutes).
- Cure fully 24 hours before filling with water.
How to Display or Gift It
- Pair with sculptural dried stems, like bunny tails.
- Use as a desktop pen holder for a stylish workspace gift.
- Wrap in tissue and tuck into a kraft gift box set for presentation.
- Decoupage Floral Napkin Vase

Decoupage lets you add intricate floral patterns without painting skills. I prefer single-ply paper napkins or rice paper for smooth application. This technique adds a handmade wallpaper effect.
Materials
- One short glass vase (4–6" tall)
- Floral paper napkins or decoupage paper (1–2 sheets)
- Mod Podge (matte) 120 ml
- Flat foam brush
- Scissors and small ruler
- Sandpaper (220 grit) for smooth finish
Instructions
- Remove napkin layers so only the top printed layer remains.
- Cut pieces to fit the vase, leaving slight overlaps.
- Brush a thin coat of Mod Podge onto the vase with a flat foam brush.
- Gently lay the napkin on the wet surface, smoothing outward with your fingers or a soft sponge.
- Brush another thin coat over the napkin to seal. Avoid over-brushing which can tear the paper.
- Let dry 15–20 minutes between coats; apply 2–3 total coats. Full cure 24 hours.
- Lightly sand edges if needed for a seamless look.
How to Display or Gift It
- Fill with single-stem garden roses for a tea-party vibe.
- Wrap in tissue and tie with a ribbon for a bridal-shower gift.
- Store extra napkins flat in a document folder to prevent creases.
- Rope-Coil Terracotta Look Vase
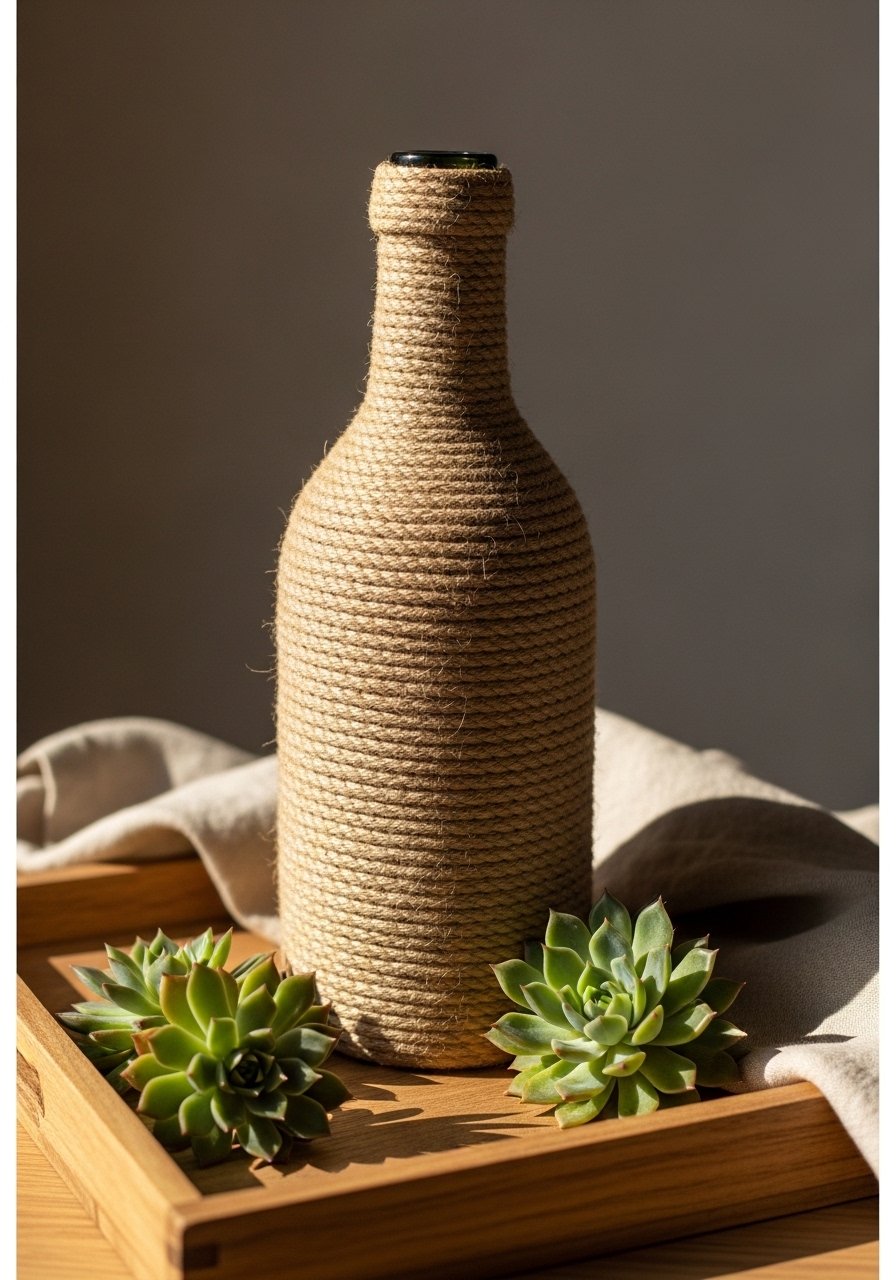
This coiling technique gives a rustic, earthen feel and is surprisingly sturdy. The rope provides insulation for cold stems and a tactile contrast on shelves.
Materials
- One glass or ceramic bottle (8–10" tall)
- 100 ft natural cotton rope (5mm)
- Fabric or all-purpose glue (4 oz)
- Hot glue gun for quick holds
- Scissors
- Optional: brown acrylic wash (20 ml)
Instructions
- Clean and dry the vase.
- Apply a line of all-purpose glue at the base and press rope into glue to start a tight coil.
- Continue coiling and gluing, working upward. Use occasional hot glue dots for instant hold.
- Keep coils snug so no gaps show. Trim rope at desired height and secure the end with glue.
- For a weathered terracotta look, dry-brush a light brown acrylic wash and wipe back.
- Allow glue to cure 24 hours before use.
How to Display or Gift It
- Tuck a small potted succulent beside it for a textured duo.
- Attach a small gift tag with twine and present in a kraft box.
- Store unused rope in a craft bin to avoid tangling.
- Metallic Leaf Accent Vase

Gold leaf turns a simple jar into a luxe focal point. Use adhesive size and apply leaf in patches for an artful, imperfect effect. Works beautifully for evening table decor.
Materials
- One jar or vase (any size)
- Gold leaf sheets (pack of 25)
- Gilding adhesive size (30 ml)
- Soft tip brush
- Sealer spray (matte or gloss)
- Cotton gloves (to handle leaf)
Instructions
- Clean the vase so surface is oil-free.
- Apply gilding adhesive size in small areas and let it haze (per manufacturer, ~10–15 minutes).
- Using a soft brush, press gold leaf onto adhesive sections. Allow scraps to overlay for texture.
- Brush away excess leaf with a soft brush.
- Seal with a clear spray to prevent flaking. Let dry 1 hour, cure 24 hours.
How to Display or Gift It
- Place a single bloom or taper candle inside for evening shimmer.
- Pair with neutral decor to let the gold gleam.
- Bubble-wrap and place in a gift box set when gifting.
- Ombre Dip-Dyed Vase (glass paint)

Dip-dye paint creates soft vertical gradients that read modern and playful. It works on glass with acrylic enamel paints and patience during drying for smooth blending.
Materials
- Two glass vases (6–8" tall)
- Acrylic enamel paints (3 shades of one color)
- Disposable cups for mixing
- Foam brush and sponge
- Painter’s tape
- Paper towels
Instructions
- Clean the vases thoroughly and de-grease with rubbing alcohol.
- Using foam brush, paint the lightest shade over the entire lower two-thirds.
- While wet, add the mid-tone above and blend with a sponge to soften the seam.
- Add the darkest shade to the rim area and feather down to create the ombre.
- Let dry 30–60 minutes between thin layers. Apply 2–3 thin coats for depth.
- Allow full cure 24 hours before use.
How to Display or Gift It
- Group three graduated ombre vases for a statement.
- Tuck in fresh peonies for a spring table.
- Store spare paints in a paint storage rack for future color-matching.
- Clay-Coated Textured Vase

Air-dry clay transforms ordinary jars into sculptural vessels. Press, carve, or stamp texture for a handmade, pottery-inspired piece without a kiln.
Materials
- Glass jar (small to medium)
- Air-dry clay (250 g)
- Clay modeling tools
- Rolling pin or acrylic tube
- Water and small sponge
- Sandpaper 220 grit
Instructions
- Condition clay by kneading until soft.
- Roll out to 2–3 mm thickness and cut to fit jar height.
- Moisten jar slightly and press clay onto glass, smoothing seams.
- Use tools to stamp or carve texture. Blend edges with water and sponge.
- Allow clay to dry 24–48 hours depending on thickness.
- Sand lightly for smoothness and paint or seal if desired with matte sealer; cure 24 hours.
How to Display or Gift It
- Fill with dried stems to avoid moisture contact (air-dry clay handles humidity but keep water minimal).
- Wrap in tissue and place in a flat-bottom gift box to protect texture.
- Store extra clay in airtight containers like a sealable craft tub.
- Washi-Tape Patterned Vase — easy vase decorating ideas for quick makeovers

Washi tape is the fastest way to change a vase’s personality. It’s removable and perfect for seasonal looks or kid-friendly crafts. Great for renters or last-minute party decor.
Materials
- Any glass or ceramic vase
- Assorted washi tape rolls (6–10 designs)
- Scissors and ruler
- Craft knife for precision
- Optional: clear acrylic sealer spray
Instructions
- Clean the vase surface.
- Plan your pattern and measure sections with a ruler.
- Apply washi tape, trimming edges with scissors or a craft knife for clean lines.
- Smooth tape with fingers to remove bubbles.
- Optional: spray a light coat of clear sealer to increase durability; let dry 30 minutes.
How to Display or Gift It
- Change tape seasonally for holiday decor.
- Let kids design a vase for grandparents—easy and low-mess.
- Pack with colorful tissue in a gift tote.
- Monogrammed Matte Vase with Vinyl

Vinyl monograms add personalization for weddings or gifts. Use a cutting machine for precise lettering, or cut simple shapes by hand. Matte paint underlay makes the vinyl pop.
Materials
- One vase (painted matte black) 6–10"
- Adhesive vinyl (contrasting color) sheets
- Transfer tape
- Weeding tool
- Cricut Explore or craft knife
Instructions
- Paint vase matte black and allow full cure 24 hours.
- Cut your monogram from vinyl using a cutting machine or freehand.
- Weed excess vinyl and apply transfer tape.
- Position and press vinyl onto the vase. Burnish with a credit card.
- Remove transfer tape slowly. Wait 1 hour before adding water.
How to Display or Gift It
- Perfect for wedding centerpieces. Add ribbon in wedding colors.
- Ship safely in bubble wrap and a sturdy mailing box.
- Embellished Burlap Wrap Vase

Burlap adds a tactile farmhouse vibe. Stitch or hot-glue felt shapes for a cozy handmade look — ideal for teacher gifts or seasonal craft markets.
Materials
- One wide-mouthed jar (quart size)
- Burlap fabric strip 12" x 6"
- Felt sheet for appliqué
- Embroidery thread and needle
- Hot glue gun
- Scissors
Instructions
- Cut burlap to wrap the jar snugly.
- Secure edge with hot glue at seam.
- Cut a felt heart or other shape and stitch or glue to the burlap.
- Add a twine bow and a vintage button for finishing.
- Let glue cool 10 minutes before handling.
How to Display or Gift It
- Fill with garden herbs and wrap in cellophane for a market-ready plant gift.
- Store leftover burlap in a fabric organizer.
- Speckled Paintware Vase

Speckling adds a playful artisan touch. It’s quick and forgiving — perfect for making sets with shared palettes.
Materials
- White primed vase (any size)
- Acrylic paint (black)
- Old toothbrush or stiff-bristled brush
- Disposable cup for paint
- Painter’s tape (if masking)
Instructions
- Thin black paint with water to a milk-like consistency.
- Dip toothbrush and run thumb across bristles toward vase to splatter.
- Practice on scrap paper first to control splatter.
- Apply multiple light layers, letting each dry 10–15 minutes between.
- Seal with a matte fixer if desired; cure 24 hours.
How to Display or Gift It
- Mix with solid-painted vases for balanced displays.
- Wrap in cellophane and tuck a handwritten note for gifting.
- Keep extra brushes in a tool cup.
- Mosaic-Tile Jar Vase

Broken tile or craft mosaic pieces create a colorful, tactile surface. Grouting takes a little patience but the result is studio-quality.
Materials
- One wide jar or small planter
- Mosaic tiles or cut ceramic pieces (enough to cover surface)
- Tile adhesive (small tub)
- Sanded grout (light color) 300 g
- Grout sponge and gloves
Instructions
- Arrange mosaic pieces dry to plan pattern.
- Apply tile adhesive in small sections and press pieces into place.
- Allow adhesive to set per manufacturer (typically 1–2 hours).
- Mix grout and spread over tiles, pushing into gaps.
- Wipe excess grout with a damp sponge and let grout cure 24–48 hours.
- Seal grout if desired with grout sealer; cure 24 hours.
How to Display or Gift It
- Use for a succulent centerpiece or small bouquet.
- Wrap in bubble wrap and drop into a sturdy gift box for safe shipping.
- Macramé Sleeve Vase

Macramé sleeves add a boho, tactile layer and can be removed to repurpose the vase. This uses basic knots and is great for beginners who want a fiber project.
Materials
- One slim glass vase (6–8" tall)
- Macramé cord 3 mm, 20–30 yards
- Wooden bead (optional)
- Scissors
- Measuring tape and clipboard for knotting base
Instructions
- Cut cords: 8 cords of 80 cm each for a small sleeve.
- Tie a lark’s head knot around a top ring or directly around the vase neck.
- Use square knots and spiral knots to build pattern to desired length.
- Add a wooden bead mid-panel for interest.
- Trim fringe to even length and lightly comb.
- Slide sleeve over vase and adjust; macramé is dry immediately.
How to Display or Gift It
- Use with dried pampas or pampas-like stems for boho styling.
- Include in a craft kit bag if gifting with supplies.
- Painted Lace Imprint Vase

Lace imprinting creates delicate texture. Press lace into wet paint or use as a stencil for romantic, vintage vibes.
Materials
- Small jar or bottle
- Plaster-effect paint or heavy-body acrylic (120 ml)
- Lace scrap (vintage or new)
- Foam roller
- Soft cloth for wiping
Instructions
- Apply a layer of plaster-effect paint with a foam roller.
- While wet, press lace onto the paint with even pressure.
- Gently remove lace to reveal texture.
- Apply a thin glaze wash in a contrasting color and wipe back to highlight pattern.
- Let cure 24 hours before handling.
How to Display or Gift It
- Use with a single spray of baby’s breath for vintage charm.
- Store unused lace in a fabric folder.
- Chalkboard Label Vase
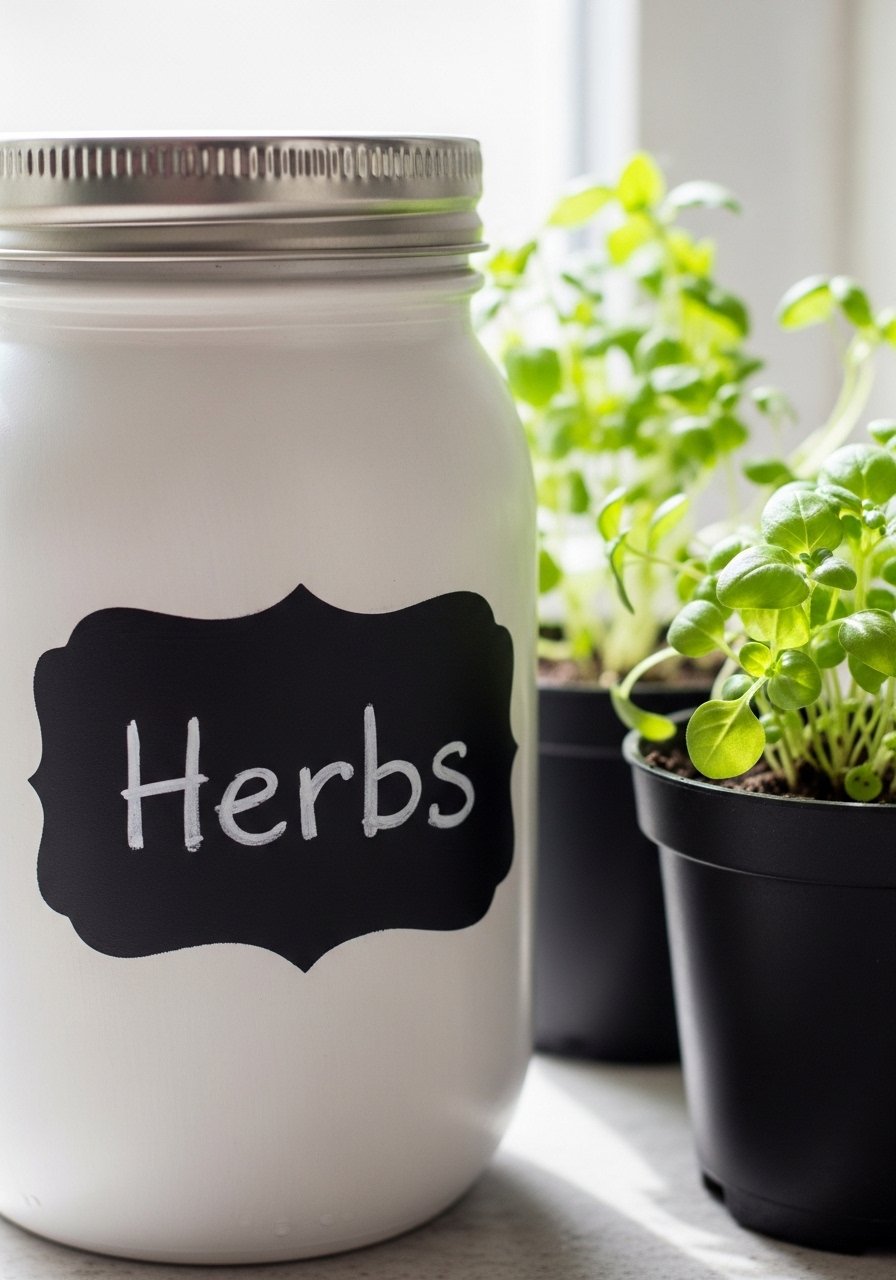
Chalkboard paint makes a functional, changeable label for herb planters or pantry vases. Perfect for kitchen counters or gift tags.
Materials
- Mason jar or small planter
- Chalkboard paint (60 ml)
- Small paintbrush
- Chalk or liquid chalk marker
- Painter’s tape (for crisp edges)
Instructions
- Tape off a rectangular area and apply two thin coats of chalkboard paint, drying 30 minutes between coats.
- Remove tape carefully; cure 24 hours before first use.
- Prime surface by rubbing chalk over entire area and wiping off.
- Write label with chalk or liquid chalk marker.
How to Display or Gift It
- Fill with parsley or basil and give as a hostess gift.
- Wrap with clear cellophane and a ribbon, tuck in a kitchen towel set.
- Resin-Coated Shells Vase — easy vase decorating ideas with coastal flair

Resin lets you embed shells, glitter, or tiny charms for a glossy, dimensional band. This coastal style reads high-end when cured to a glassy finish.
Materials
- Glass vase
- Clear epoxy resin kit (two-part) 30–60 ml
- Assorted small shells and sand
- Disposable mixing cups and stir sticks
- Painter’s tape and plastic wrap
- Heat gun for bubble removal (optional)
Instructions
- Tape the area to receive resin so you have a clean band.
- Arrange shells loosely on the vase before mixing resin to plan composition.
- Mix resin per kit instructions (usually 1:1), stir slowly for 2–3 minutes to minimize bubbles.
- Pour a thin layer and place shells; add more resin to cover shells.
- Remove bubbles with a heat gun for 3–5 seconds if needed.
- Cure 24–72 hours depending on resin; follow kit for full cure time.
How to Display or Gift It
- Style with driftwood and linen for coastal vignette.
- For gifting, include a small care card about not using resin surfaces for food.
- Store unused resin in original sealed containers per manufacturer recommendations.
- Lace-Wrapped Candleholder Vase

A lace wrap instantly softens any glass and makes a romantic candleholder or bud vase. Use fabric glue or a hot-glue dot at the seam.
Materials
- Small jar or candleholder
- Lace ribbon 30–50 cm
- Fabric glue or hot glue
- Thin satin ribbon for bow
- Scissors
Instructions
- Measure and cut lace to fit snugly around the jar.
- Secure seam with a dot of fabric glue or hot glue.
- Tie a small satin ribbon bow to conceal the seam.
- Let glue set 15–30 minutes before handling.
How to Display or Gift It
- Use as a wedding table candle or favor with a matchbox.
- Wrap in tissue and place in a small favor box.
- Painted Marble Effect Vase

Faux marble painting gives a luxe stone look without the weight. It’s a surprisingly simple technique with dramatic results.
Materials
- White or light base-painted vase
- Grey and black acrylic paints (small amounts)
- Fine liner paintbrush
- Small bowl of water and paper towels
- Matte sealer spray
Instructions
- Paint vase white and cure 24 hours.
- Thin grey paint slightly with water and pull fine veins with the liner brush.
- Smudge lines gently with a damp brush or sponge to soften.
- Add a few darker flecks for realism.
- Seal with matte sealer; cure 24 hours.
How to Display or Gift It
- Pair with concrete planters for an industrial-chic look.
- Gift with a single artisan candle in a candle gift box.
- Embossed Paint with Stencil Vase

Use texture paste under a stencil for raised patterns that you can paint afterward. This gives a sculptural, tactile feel.
Materials
- Vase (preferably primed)
- Texture paste (120 ml)
- Stencil of choice
- Palette knife
- Paints for topcoat
- Sandpaper 220 grit
Instructions
- Secure stencil and apply texture paste with a palette knife evenly.
- Remove stencil and let paste dry 1–2 hours depending on thickness.
- Lightly sand edges and paint over or highlight raised areas.
- Cure paint 24 hours before display.
How to Display or Gift It
- Pair with neutral linens to let texture show.
- For gifting, cushion in a gift basket.
- Botanical Pressed-Flower Vase
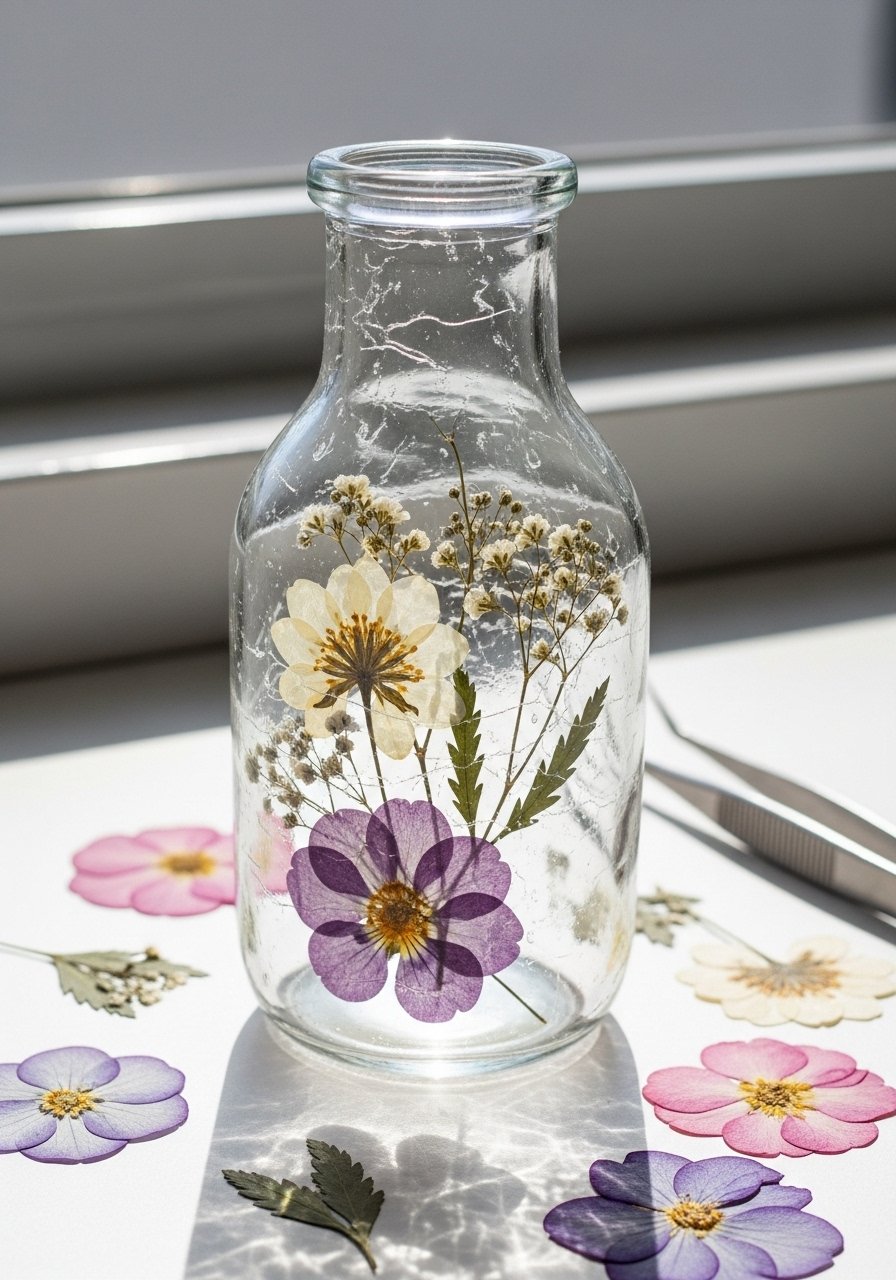
Pressed flowers create an elegant, botanical look. Use tweezers to position blooms and seal them with decoupage medium.
Materials
- Clear glass vase
- Pressed flowers (assorted)
- Mod Podge (gloss) 120 ml
- Fine-tipped tweezers
- Soft brush
Instructions
- Plan arrangement and pick flat pressed flowers.
- Apply a thin coat of Mod Podge and lay flower using tweezers.
- Brush a sealing layer over flowers carefully.
- Repeat with additional coats if necessary; let dry 15–20 minutes between coats.
- Full cure 24 hours.
How to Display or Gift It
- Perfect for wedding keepsakes or anniversary gifts.
- Store pressed flowers flat in a photo storage box until ready.
- Concrete-Finish Painted Vase
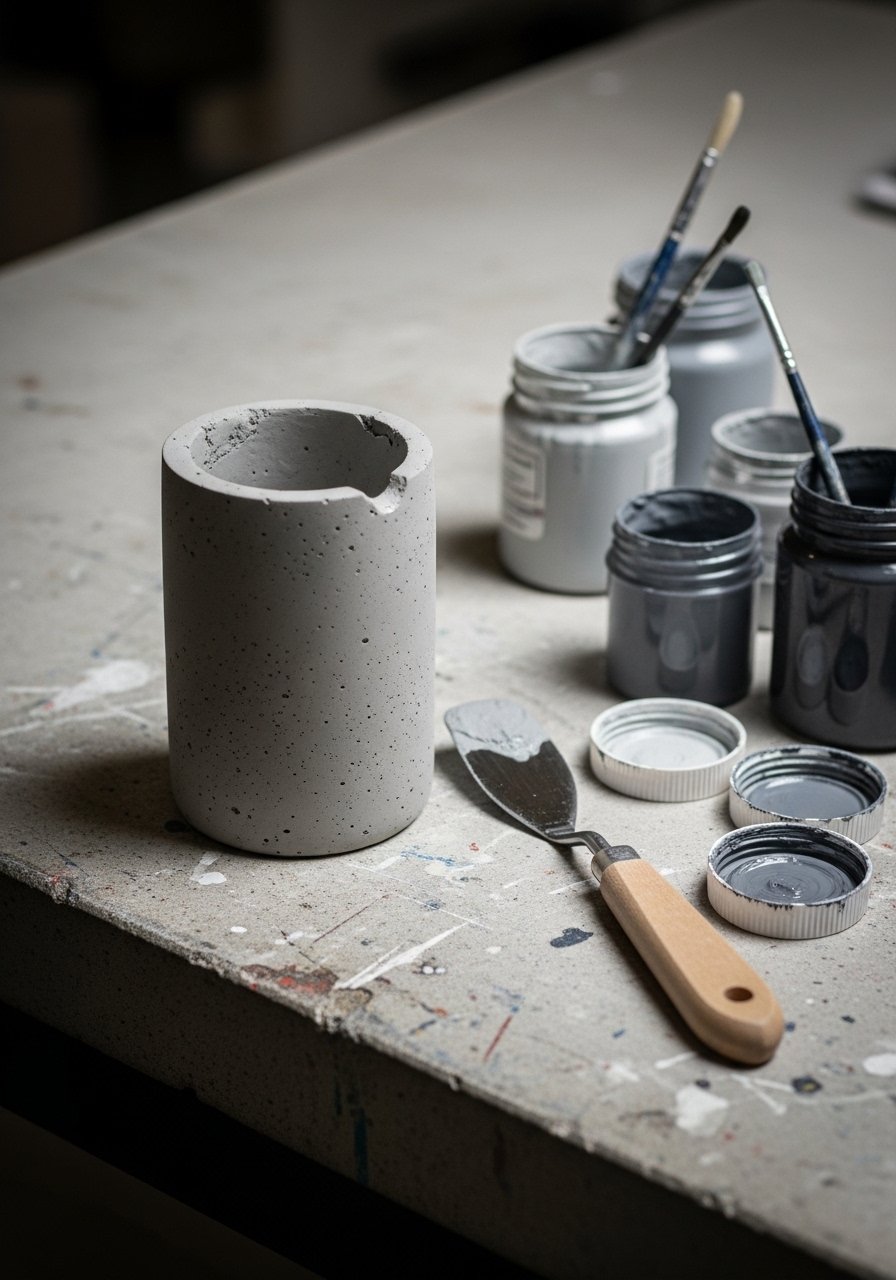
A faux concrete finish gives a modern, minimalist look that pairs well with greenery. It’s lightweight but reads architectural.
Materials
- Vase (any material)
- Concrete-effect paint or textured acrylic (120 ml)
- Sponge and fine brush
- Sandpaper 220 grit
- Matte sealer spray
Instructions
- Apply base coat in light grey.
- Dab textured paint with a sponge for irregular surface.
- Add darker and lighter grey dry-brushed accents for depth.
- Sand lightly to reveal subtle highlights.
- Seal with matte sealer; cure 24 hours.
How to Display or Gift It
- Combine with metal trays for a modern vignette.
- Wrap in kraft paper and tie with twine in a kraft wrap roll.
- Layered Ribbon & Bead Collar Vase

Ribbons and beads create a decorative collar that’s removable and perfect for holidays or event styling. Mix textures for visual interest.
Materials
- Glass bottle or vase
- Assorted ribbons (3–4 types)
- Wooden beads (10–20)
- Strong craft glue or glue gun
- Scissors
Instructions
- Measure ribbon lengths to wrap snugly around the neck.
- Glue ribbon layers from bottom to top, securing ends cleanly.
- String wooden beads onto twine and knot; glue onto ribbon for extra detail.
- Let glue set 15–30 minutes.
How to Display or Gift It
- Change ribbons seasonally for year-round use.
- Store spare ribbons on a ribbon organizer.
- Felt-Patch Appliqué Vase

Felt patches add a soft, modern color-blocked look. It’s child-friendly and quick, great for craft nights.
Materials
- Vase (any)
- Felt sheets (assorted colors)
- Fabric glue
- Scissors and craft knife
- Ruler
Instructions
- Cut felt into geometric shapes.
- Arrange shapes on the vase until satisfied.
- Glue pieces down with fabric glue, pressing firmly.
- Let dry 1–2 hours before handling.
How to Display or Gift It
- Use for colorful kids’ room decor or teacher gifts.
- Pack finished vases in a sturdy gift box.
- Alcohol-Ink Marbled Vase
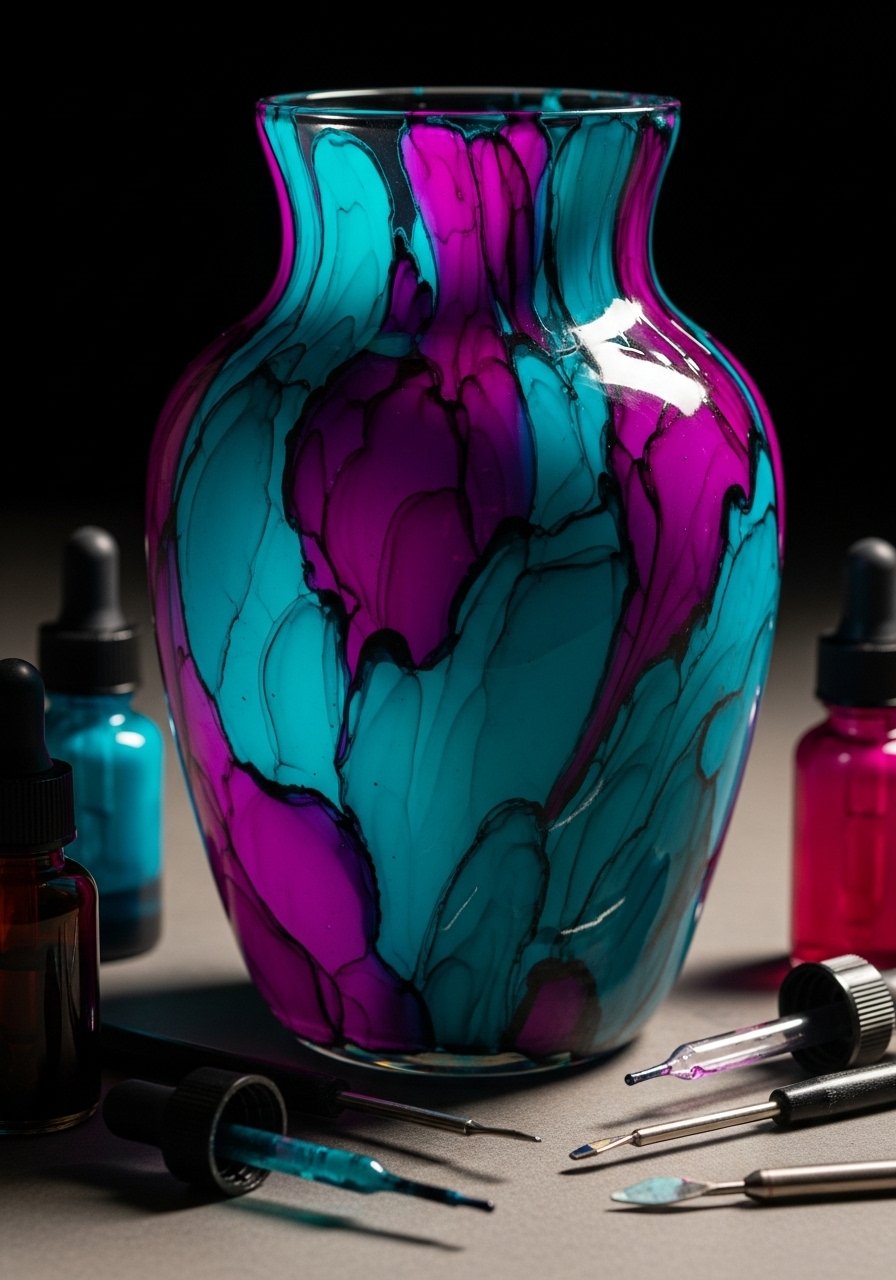
Alcohol inks create vivid, unpredictable marbling on non-porous surfaces. The results are one-of-a-kind and richly saturated.
Materials
- Glass vase (preferably glossy)
- Alcohol ink bottles (2–3 colors)
- Blending solution or isopropyl alcohol (91%+)
- Cotton swabs and felt applicator
- Gloves and protective mat
Instructions
- Protect surface and wear gloves.
- Drop inks and blending solution and tilt vase to encourage flow.
- Use cotton swabs to pull color or add more drops for depth.
- Let dry 20–30 minutes; seal with a clear spray for longevity.
- Cure 24 hours before filling.
How to Display or Gift It
- Bold centerpiece for modern parties.
- Wrap in kraft paper and place in a gift mailing tube for safe transit.
- Paper Quilling Collage Vase

Quilling adds intricate, charming detail. It’s time-consuming but perfect for a thoughtful gift with a handcrafted feel.
Materials
- Small glass vase
- Quilling paper strips (100+)
- Quilling tool and slotted tool
- Craft glue
- Tweezers
- Small template board
Instructions
- Roll paper strips into coils and pinch into shapes.
- Arrange motif on the vase with tweezers.
- Glue each piece in place and allow glue to dry 10–15 minutes per section.
- Build layers for depth. Full set cure 24 hours.
How to Display or Gift It
- Present as a keepsake for birthdays or anniversaries.
- Package in a gift box with window.
- Minimalist Matte Dip — easy vase decorating ideas for subtle style

This dip-paint look is clean and effortless. The matte finish pairs well with Scandinavian and Japandi interiors and is a zero-fuss way to refresh thrift finds.
Materials
- Small to medium vase
- Matte acrylic paint (white or muted color) 60–120 ml
- Painter’s tape
- Disposable cup for dipping
- Foam brush for touchups
Instructions
- Tape off the line where dip ends to get a crisp edge.
- Pour paint into a disposable cup and dip the vase to desired height.
- Let excess drip back into cup and set on a drying rack.
- Apply a second thin coat if needed after 30 minutes.
- Remove tape after paint is dry to touch (about 30 minutes).
- Full cure 24 hours before use.
How to Display or Gift It
- Fits neatly on a bedside table with a single stem.
- Stack and ship in a shipping box kit for gifting.
Thanks for making it this far — what a creative flight of ideas! You now have 27 different ways to refresh vases using paints, fibers, paper, resin, and simple tools that keep projects quick and satisfying. Try one tonight, or plan a small assembly session to make a set for gifting. Pin this post so you can come back when you’re ready to try the next look.
One final tip: a temperature-controlled hot glue gun and a small set of foam brushes will speed up most of these projects and reduce frustration — they changed how I craft small home decor pieces. Which vase will you try first? Share a photo with a friend or pin the one that inspired you.