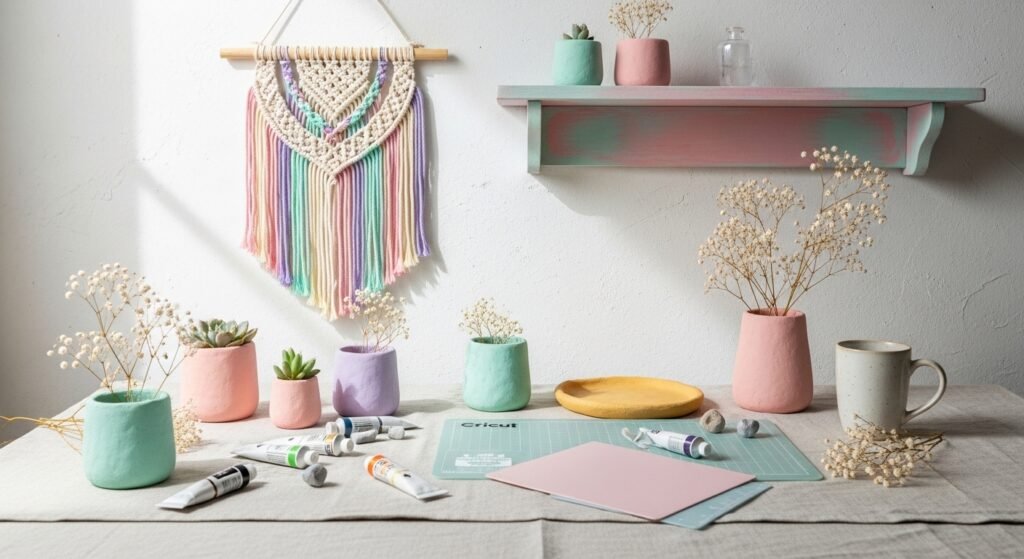
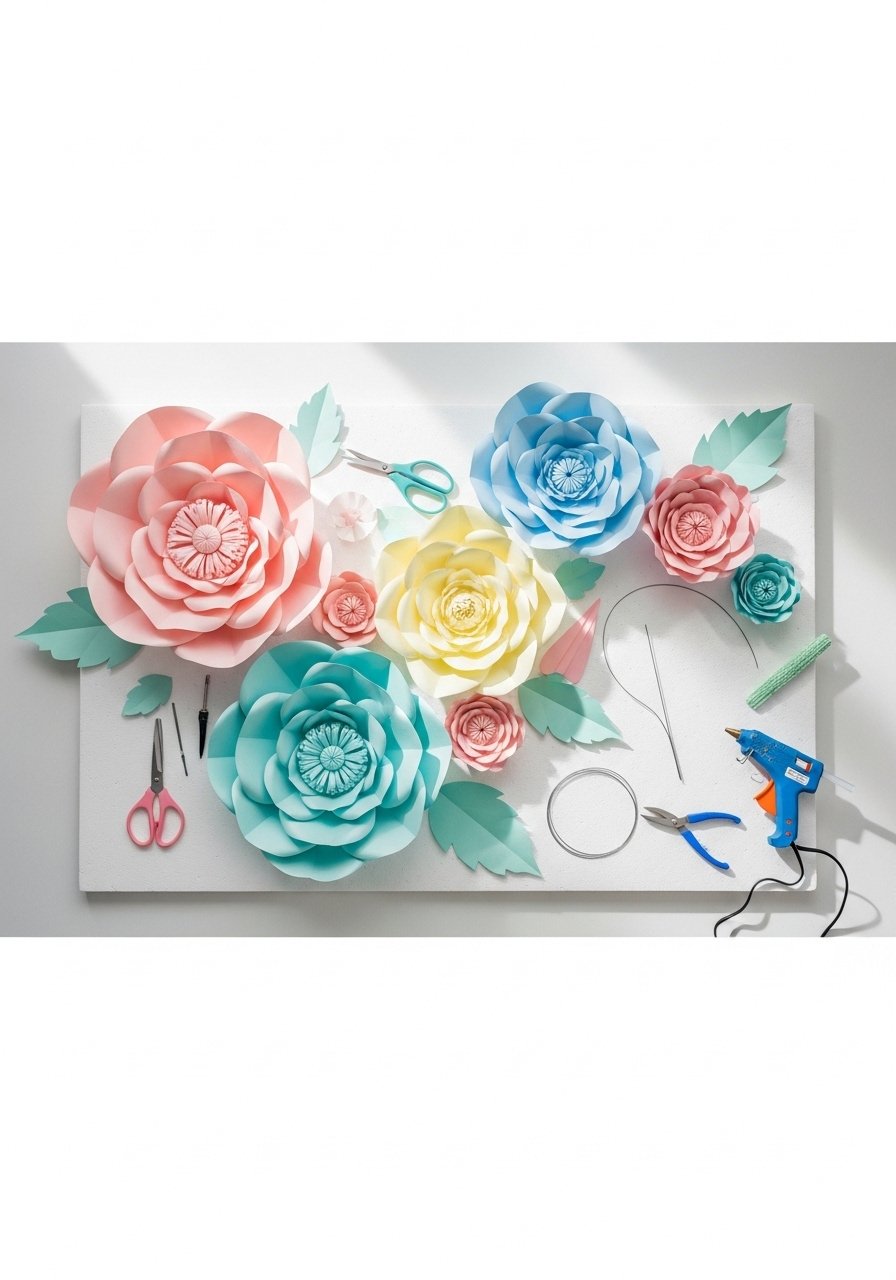
You know that soft, dreamy room that makes you want to slow down and take photos? That’s exactly what these pastel aesthetic room decor DIY projects deliver. I pulled together 22 easy, Instagram-friendly ideas that blend cottagecore, kawaii, and soft boho touches so you can create a calming, photographer-ready space without breaking the bank.
You’ll find simple small-scale projects (pastel felt garlands, resin cloud coasters) and statement pieces (painted dresser knobs, mini macramé curtains). Every project lists real materials with exact quantities, drying or cure times, and step-by-step instructions. I usually start small—my precision craft knife set and a low-temp hot glue gun are on my workspace for almost everything. Keep a self-healing cutting mat nearby and we’ll get crafting.
Ready to make soft, photo-ready decor? Pin the projects you love and let’s make your room the coziest corner online.
- Pastel Ombre Canvas Wall Art
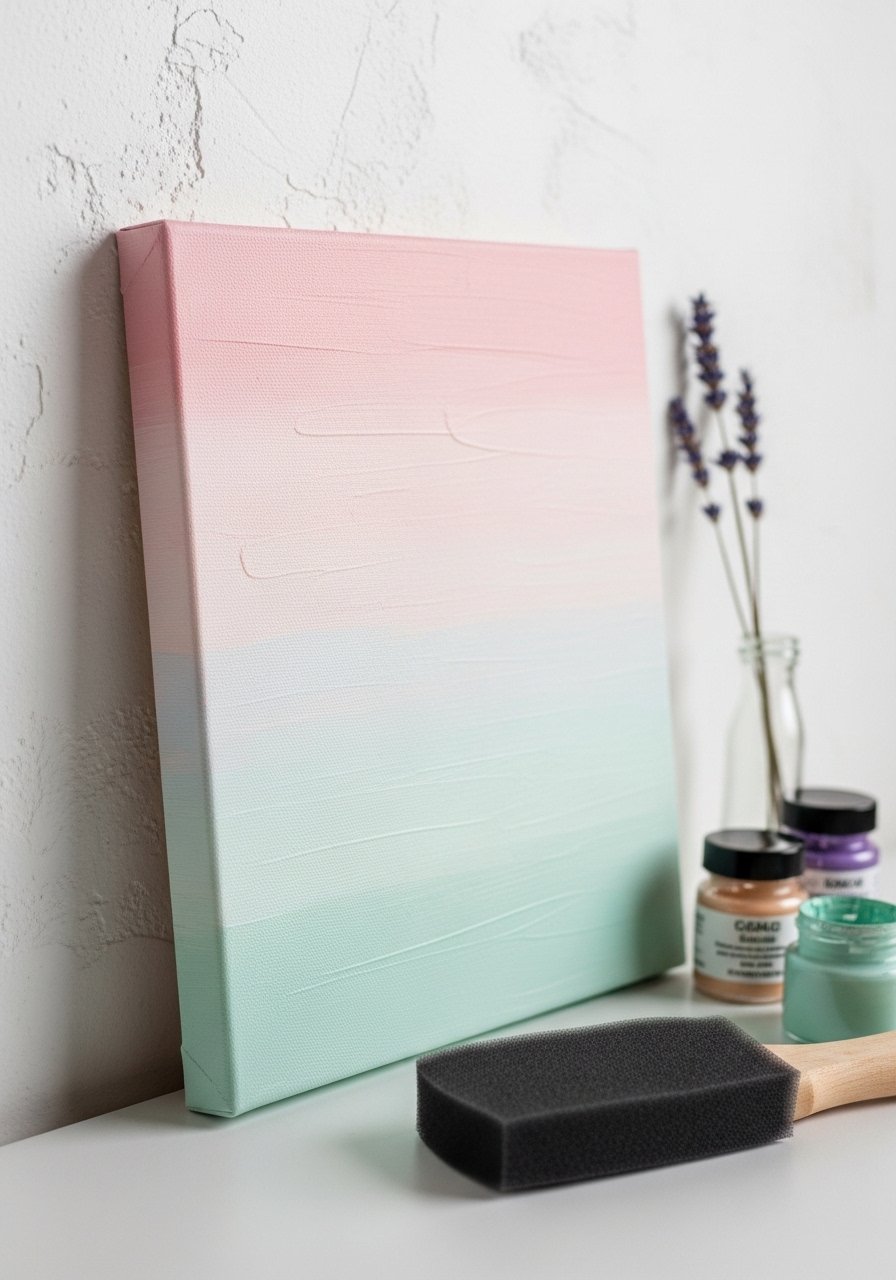
This pastel ombre canvas is a fast way to add dreamy color to any wall. It blends chalky acrylic paints for that velvety, soft-focus look that photographs beautifully. Beginners will love how forgiving the brush strokes are—perfect for a gallery wall or as a bedside anchor. I use a flat foam brush for the smooth gradients and a brayer roller for light blending.
Materials
- 1 12 x 12 inch stretched canvas (gallery wrap)
- Acrylic craft paint: 3 colors (rose, lilac, mint), 2 oz each
- White acrylic paint, 2 oz
- Flat foam brush, 1 inch
- Small brayer roller, 2–3 inch
- Palette or paper plate
- Painter’s tape, 1 inch
- Clear matte Mod Podge, 2 oz
- Paper towels
Instructions
- Tape the canvas edges to protect the sides. Lay canvas flat.
- Mix each pastel by blending 1 part color + 1.5 parts white on your palette.
- Paint the top third with the lightest shade using the foam brush. Work quickly.
- Paint the middle third with the second shade and the bottom with the third.
- Use the brayer roller to lightly roll across seams while paint is still wet to blend lines.
- Let dry 30–45 minutes. Apply a second thin coat if needed for uniform coverage.
- Once fully dry to the touch (about 1 hour), seal with one thin coat of Mod Podge and dry 20–30 minutes.
- Remove tape and touch up edges if necessary.
How to Display or Gift It
- Lean on a floating shelf or prop against a mirror for instant soft color.
- Tie a dried lavender sprig with baker’s twine and tuck it behind the canvas for a boutique gift.
- Stack with other pastel canvases for a mini gallery. Store flat in a protective sleeve until ready to hang.
- For shelf display, use a small wooden easel like a tabletop display easel.
- Mini Macramé Pastel Plant Hangers
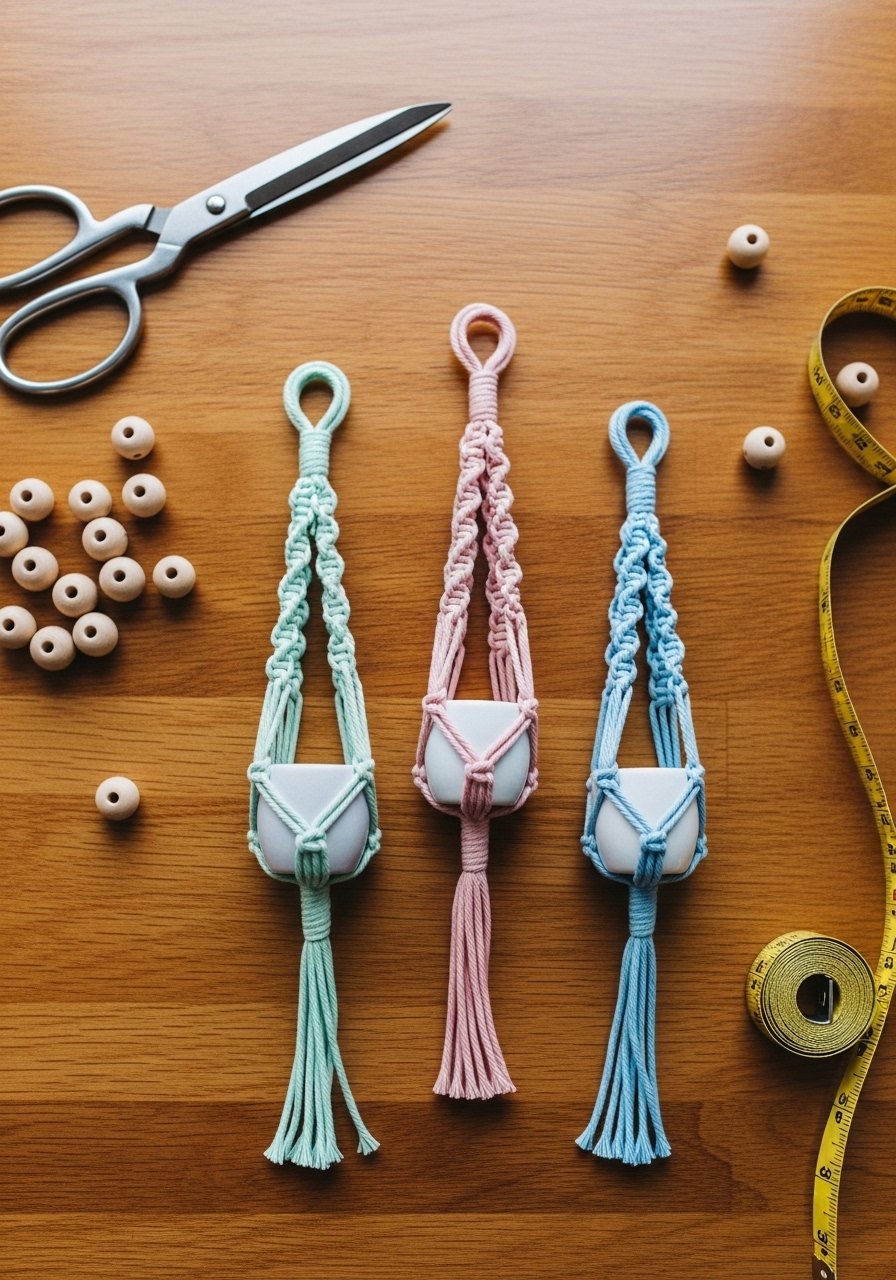
Tiny macramé hangers in pastel cord add texture and a calming boho vibe. These are scaled for 2–3 inch pots and work well in clustered groupings. If you haven’t knotted before, the square knot is forgiving, and 3mm cord gives a delicate, soft drape. I knot with a wooden dowel to keep spacing even.
Materials
- 3mm cotton macramé cord, 10 yards (pastel-dyed)
- Wooden dowel, 6 inches
- Small ceramic planters, 2–3 inch diameter, 3 pieces
- Wooden beads, 10 mm, 6 beads
- Scissors
- Measuring tape
- Comb for finished fringe
Instructions
- Cut 4 strands x 120 cm each. Fold over dowel and loop to attach.
- Arrange 4 groups of 4 cords. Measure so hangers end ~30 cm below dowel.
- Tie a row of square knots across the top, leaving 2 cm between knots.
- Create alternating half-square knot ladder for 6 cm to form the cradle.
- Thread wooden beads onto each hanger section, then finish with a gathering knot below the beads.
- Trim fringe evenly and comb out. Adjust pot fit; tighten knots if slippy.
- Hang and test with a pot; allow tension to settle overnight.
How to Display or Gift It
- Cluster three hangers at staggered heights by a sunlit window for a dreamy corner.
- Add a dried sprig or tiny charm on the dowel for gifting.
- Store wrapped around a cardboard tube to prevent tangles.
- A small set of ceramic planters makes this a sweet present when bundled in a kraft box.
- Pastel Marble Clay Trinket Dishes
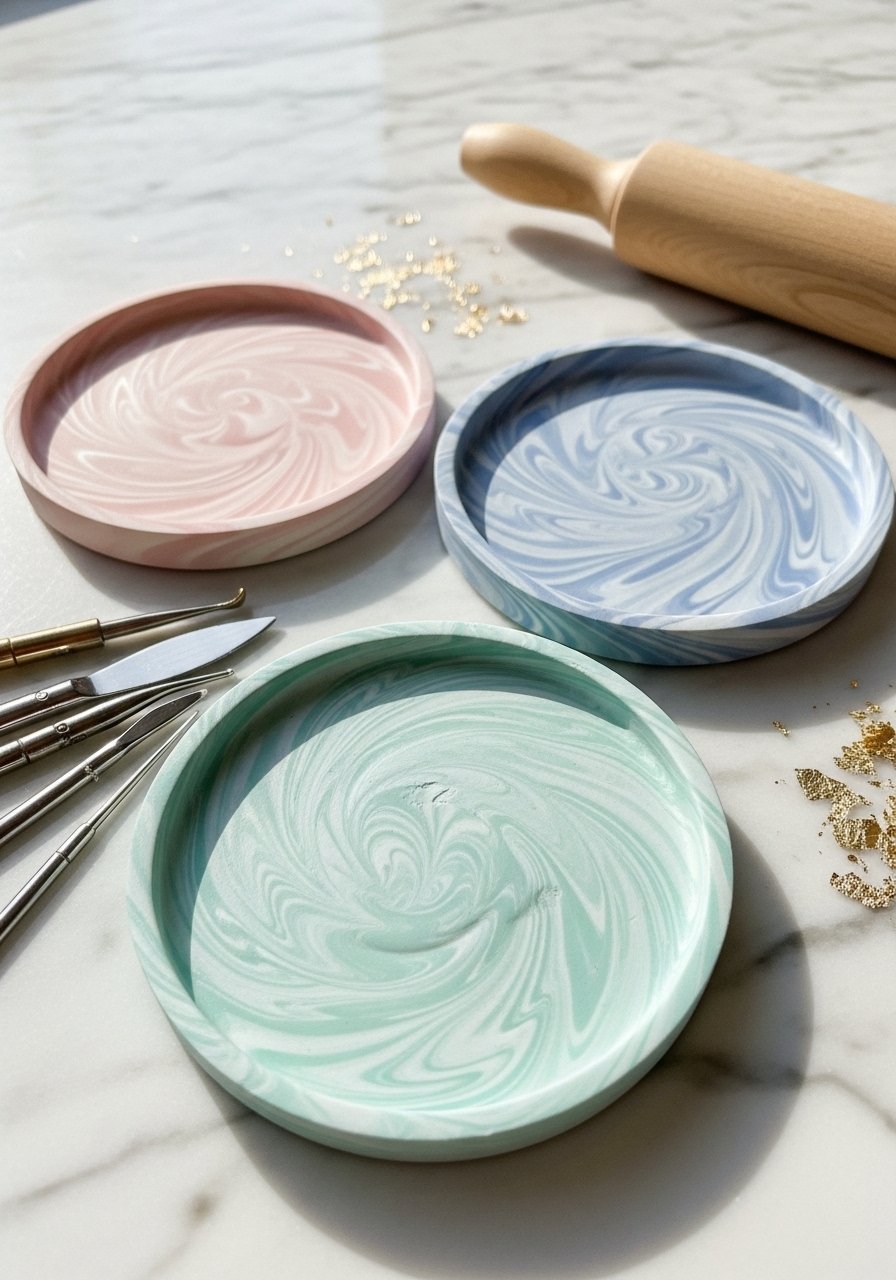
These delicate trinket dishes look like bakery confections but are sturdy enough for rings, clips, and desk clutter. Using polymer clay keeps the project low-heat—no kiln required. The marbling technique is forgiving; swirl just enough to keep soft pastel streaks. I bake for the recommended time, then buff edges smooth.
Materials
- Polymer clay in pastel colors (rose, mint, sky blue), 1 oz each
- White polymer clay, 1 oz
- Small clay rolling pin
- Round cookie cutter, 2.5 inches
- Clay blade or precision craft knife
- Aluminum baking tray & parchment
- Fine-grit sandpaper, 220–400
- Clear gloss glaze for polymer clay, 5 ml
- Soft cloth
Instructions
- Condition each clay color by kneading until soft.
- Take small pieces (pea-size) from each color and roll into ropes.
- Twist ropes together and fold once for gentle marbling. Don’t overmix.
- Roll to 3–4 mm thickness. Cut circles with the 2.5-inch cutter.
- Press edges onto the back of a bowl to form a shallow dish, smoothing seams.
- Bake on parchment per clay manufacturer directions (typically 15–30 minutes at 275°F).
- Let cool completely. Sand any rough edges lightly, then apply one thin coat of gloss glaze. Dry 24 hours.
How to Display or Gift It
- Group on a dresser or entry tray for keys and rings.
- Add a tiny label tied with twine and place in a small craft box for gifting.
- Store stacked with tissue paper to avoid scuffs.
- A compact craft organizer tray keeps finished pieces safe.
- Pastel Resin Cloud Coasters
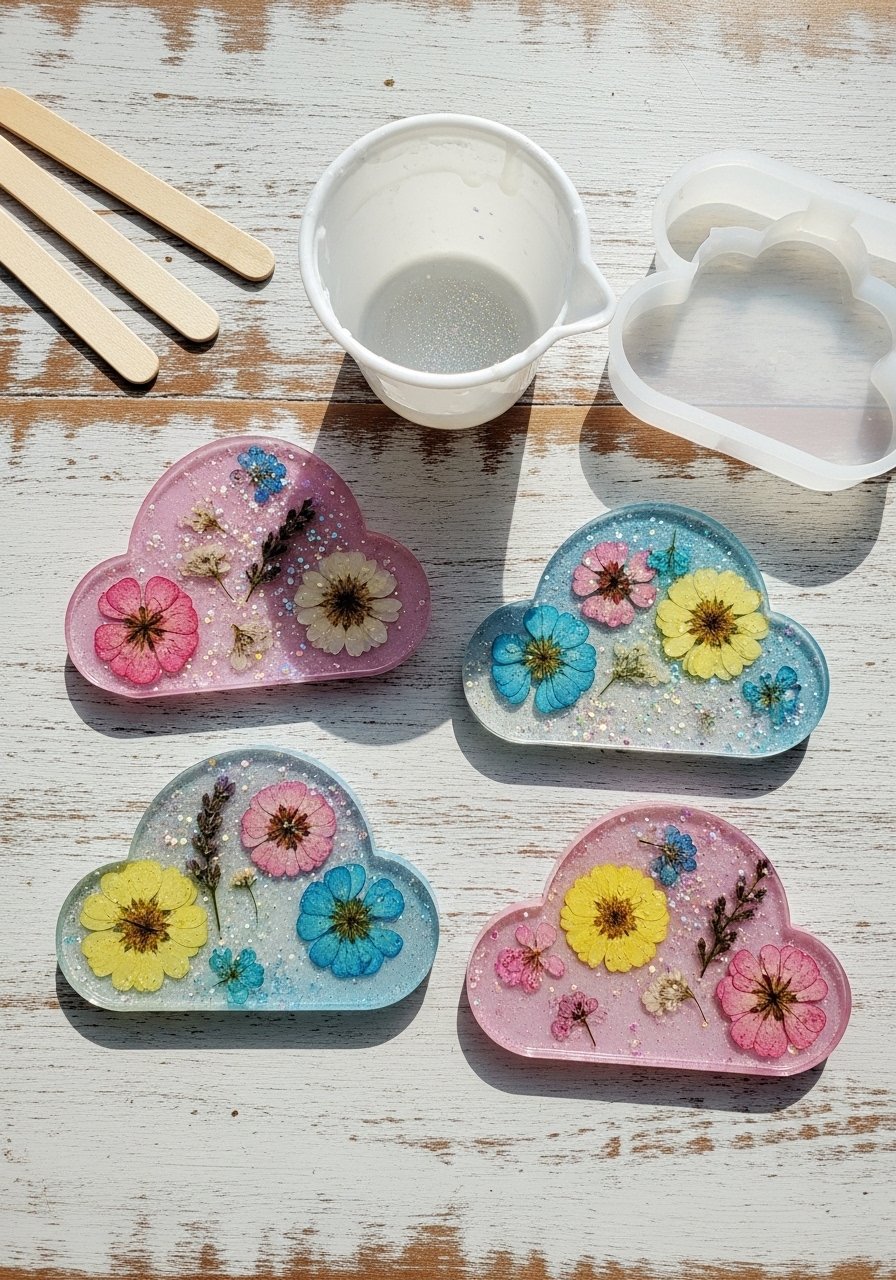
Cloud coasters are a Pinterest favorite—light, glossy, and perfect for sleepily styled mug shots. Use a clear epoxy resin and pigment powders for soft, translucent color. Work in a ventilated space and wear nitrile gloves. Cure times are real—plan for overnight handling and full cure in 72 hours.
Materials
- 2-part epoxy resin kit, 16 oz
- Pigment powders or alcohol inks (pastel shades), small vials
- Silicone cloud coaster molds, 4-cavity
- Mixing cups & sticks
- Nitrile gloves
- Tiny dried flowers or glitter, pinch each
- Torch or heat gun to pop bubbles (low heat)
- Disposable pipettes (optional)
Instructions
- Clean mold and workspace. Mix resin per kit instructions (usually 1:1 by volume).
- Divide resin into small cups; tint each with pigment to desired pastel.
- Pour a thin base layer into molds and add glitter or flowers as desired.
- Fill to the top with tinted resin, working quickly. Use a pipette for control.
- Pop bubbles with a torch or heat gun (hold 6–8 inches away) for a few seconds.
- Let cure 12–24 hours before demolding. Full cure 72 hours.
- Sand any rough edges with 600-grit if needed and buff to shine.
How to Display or Gift It
- Stack with tissue and tie with pastel ribbon for a boutique gift.
- Keep coasters in a small wooden tray near a coffee station.
- Avoid sharp knocks; resin can chip if dropped.
- A set of silicone molds lets you batch several sets—store in a flat, dust-free bin.
- Pastel Felt Heart Garland
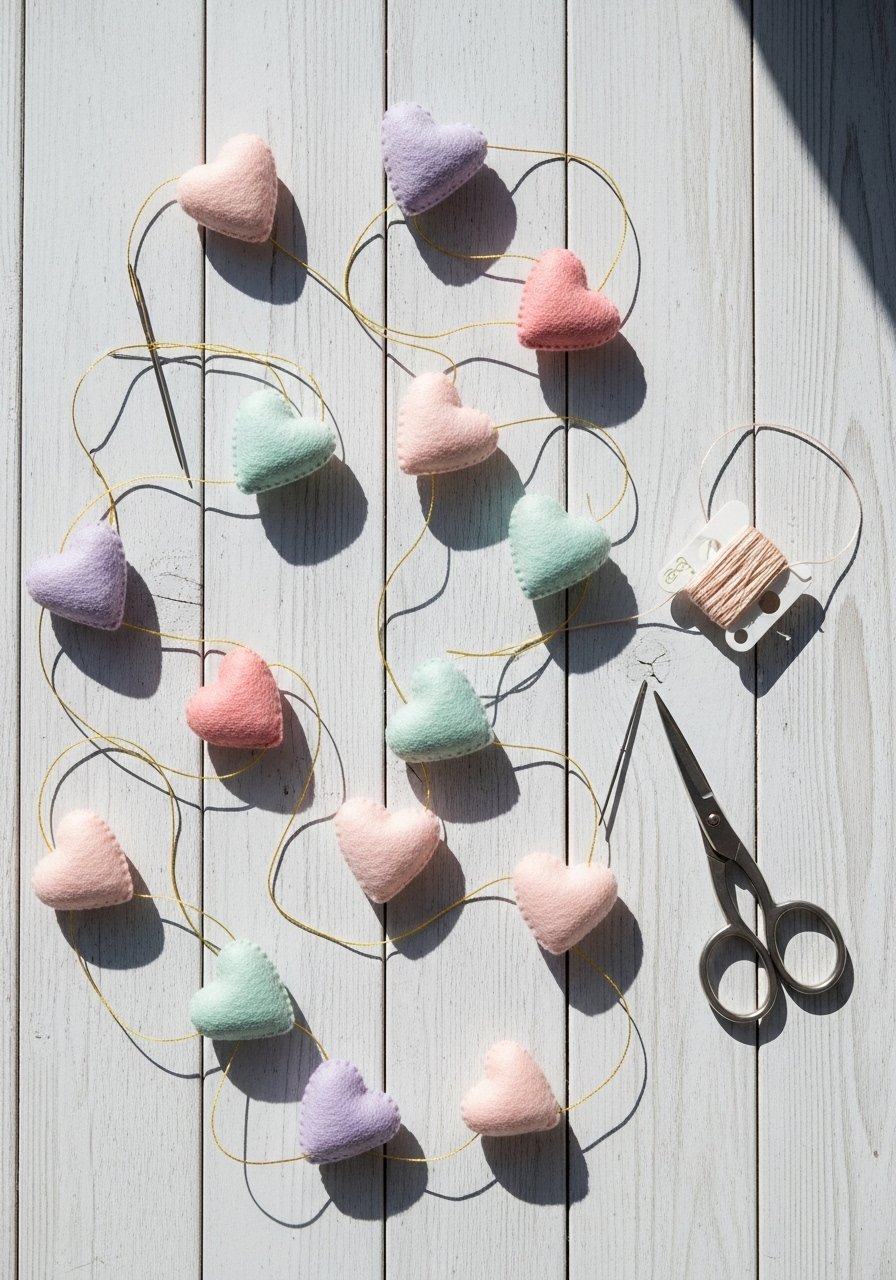
A felt heart garland is cheerful, cheap, and so quick you can make one in an afternoon. Felt keeps edges clean and the pastel palette reads soft on camera. Use a Fiskars small embroidery needle set for easy sewing through felt layers.
Materials
- Wool blend felt sheets, 6 x 9 inches, 6 sheets in mixed pastels
- Heart-shaped template, 2 inches tall
- Embroidery floss, pastel, 1 skein
- Needle (large-eye embroidery)
- Scissors
- Ribbon or thin twine, 2 meters
- Pins for layout
Instructions
- Trace heart template on felt. Cut 24 hearts (12 double-layer pairs).
- Pair hearts and sew around edges with running stitch leaving a 1 cm gap.
- Lightly stuff with tiny fleece scraps or batting for puff (optional).
- Finish stitching closed. Repeat for all hearts.
- Space hearts evenly on ribbon/twine and stitch through the top to secure—about 10 cm apart.
- Trim ends and knot for hanging.
How to Display or Gift It
- Drape above a crib, across a mirror, or along a shelf.
- For a gift, tuck into a kraft box with tissue and a dried flower.
- Store flat in a craft organizer box to avoid crushing.
- A spool of pastel embroidery floss keeps replacements handy.
- Pastel Painted Wooden Shelf
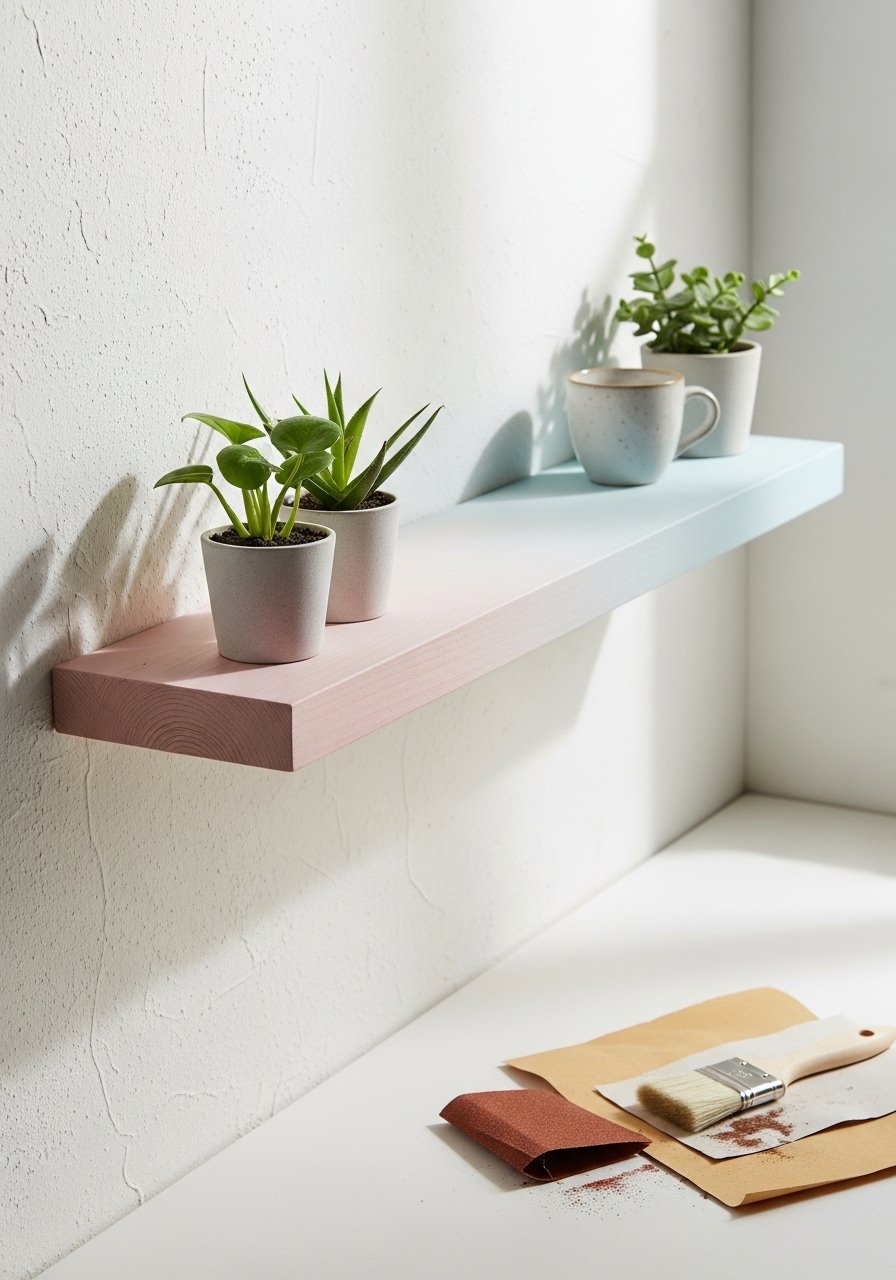
A painted shelf can change the whole vibe of a corner. This project uses chalk-style paint for that soft, matte finish and light sanding for vintage charm. I prefer a small foam roller to keep brush marks minimal. Use anchors appropriate for wall type.
Materials
- 1 unfinished pine board shelf, 24 x 6 x 1 inch
- Chalk-style craft paint, three pastel colors, 2 oz each
- White chalk paint, 2 oz
- Fine-grit sandpaper, 220 grit
- Foam roller, 2–3 inch
- Painter’s tape
- Wall anchors & screws for plaster
- Tack cloth
Instructions
- Sand shelf lightly and wipe with tack cloth.
- Tape off any area you want to keep raw (underside edge).
- Mix pastel shades with white as needed; apply top color with foam roller.
- Blend two colors using a damp brush for a soft ombre. Let dry 30–45 minutes.
- Lightly sand edges for a worn look. Wipe clean.
- Install wall anchors per manufacturer instructions and hang shelf. Wait 24 hours before loading heavy items.
How to Display or Gift It
- Style with small pastels: trinket dishes, candles, and a tiny vase.
- Use small wooden easels to prop art on the shelf for layered depth.
- Wrap in kraft paper and tie with ribbon if gifting.
- A pack of wall anchors helps with secure mounting.
- Pastel Tassel Curtain Tiebacks
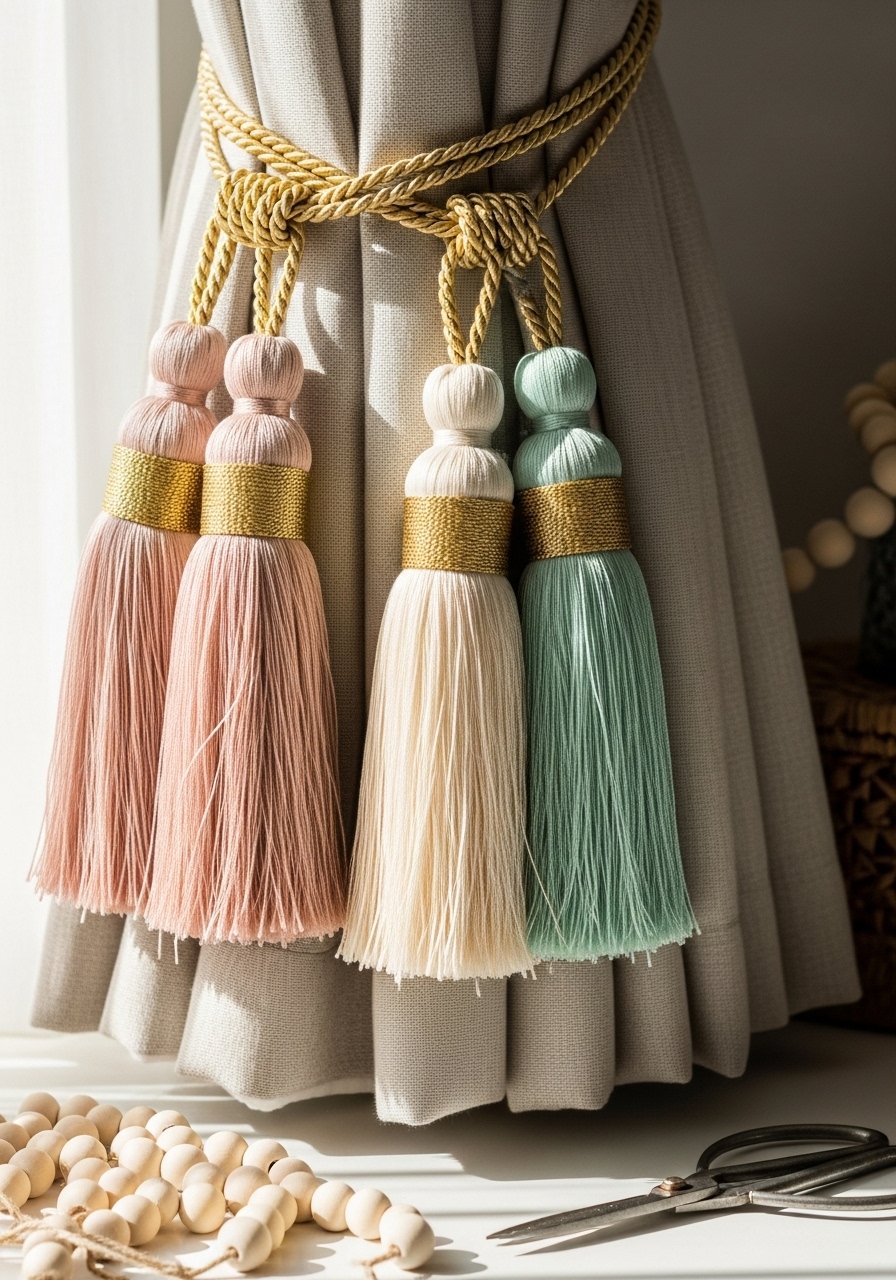
Tassel tiebacks add a subtle luxe touch. Using embroidery floss and a simple wooden ring, you can make them in under an hour. The wrapped top gives a polished finish and they photograph beautifully against linen curtains.
Materials
- Embroidery floss, pastel sets, 100 m per color
- Wooden rings, 2 x 1.25 inch
- Scissors
- Small gold thread for wrap accents, 1 meter
- Glue: a drop of fabric glue per tassel
- Measuring tape
Instructions
- Wrap floss around a 10 cm cardboard template until full; cut one end to create strands.
- Thread the strands through the wooden ring and fold in half to secure.
- Wrap gold thread around the top of the tassel, knot, and secure with a dab of fabric glue.
- Trim tassel ends evenly. Repeat for second tieback.
- Attach to curtain and adjust length so the tassel ends sit 20–25 cm from floor.
How to Display or Gift It
- Pair with linen or light cotton curtains for a soft window frame.
- Tie a tiny dried flower to the wooden ring for a romantic gift wrap.
- Store flat in a drawer to avoid flattened tassels.
- A spool of embroidery floss keeps supplies sorted for batch-making.
- Pastel Painted Ceramic Knobs
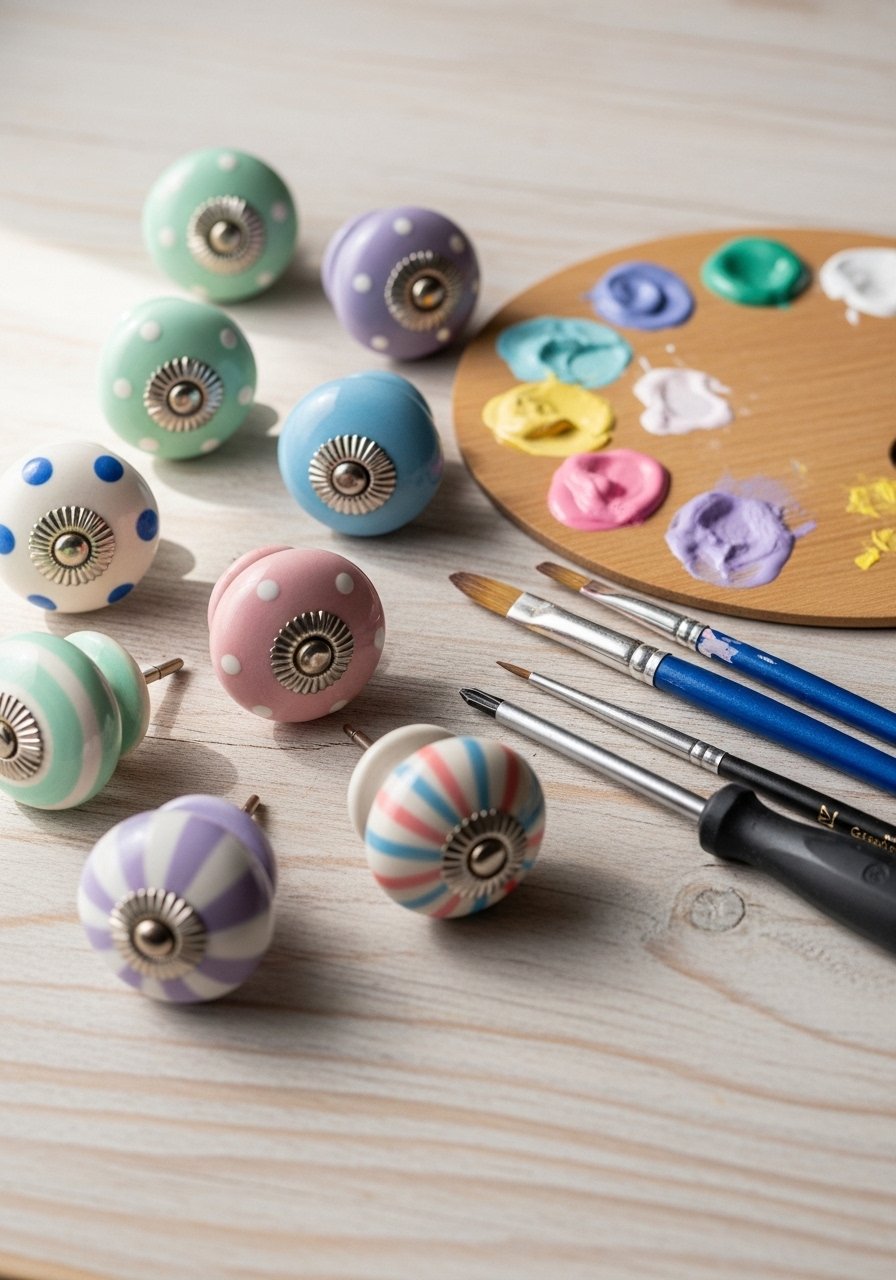
Fresh knobs can turn thrifted furniture into a pastel statement. Use acrylic enamel paint for durability, and protect with clear satin spray. Measure your existing screws to ensure compatibility before ordering.
Materials
- Ceramic knob set, 6 knobs
- Acrylic enamel paints, pastel set, small tubes
- Detail brushes (size 0–2)
- Clear satin spray sealer, 1 can
- Screwdriver
- Sandpaper, 320 grit
- Painter’s tape
Instructions
- Remove existing knobs and sand ceramic lightly to give paint a tooth.
- Clean with a tack cloth. Tape screw openings if desired.
- Paint base color and let dry 30 minutes. Apply a second coat if opaque coverage needed.
- Add dots, stripes, or tiny hearts with a detail brush. Dry 20–30 minutes.
- Seal with one thin coat of satin spray; dry 1 hour. Curing to full hardness 24 hours.
- Reattach knobs and tighten screws. Test fit and alignment.
How to Display or Gift It
- Use on a dresser, vanity, or a small cabinet for instant pastel charm.
- Package in a small kraft box with tissue for gifting.
- Keep spare knobs in a craft organizer for future projects.
- A small detail paint brush set helps with precise designs.
- Pastel Washi Tape Picture Frames
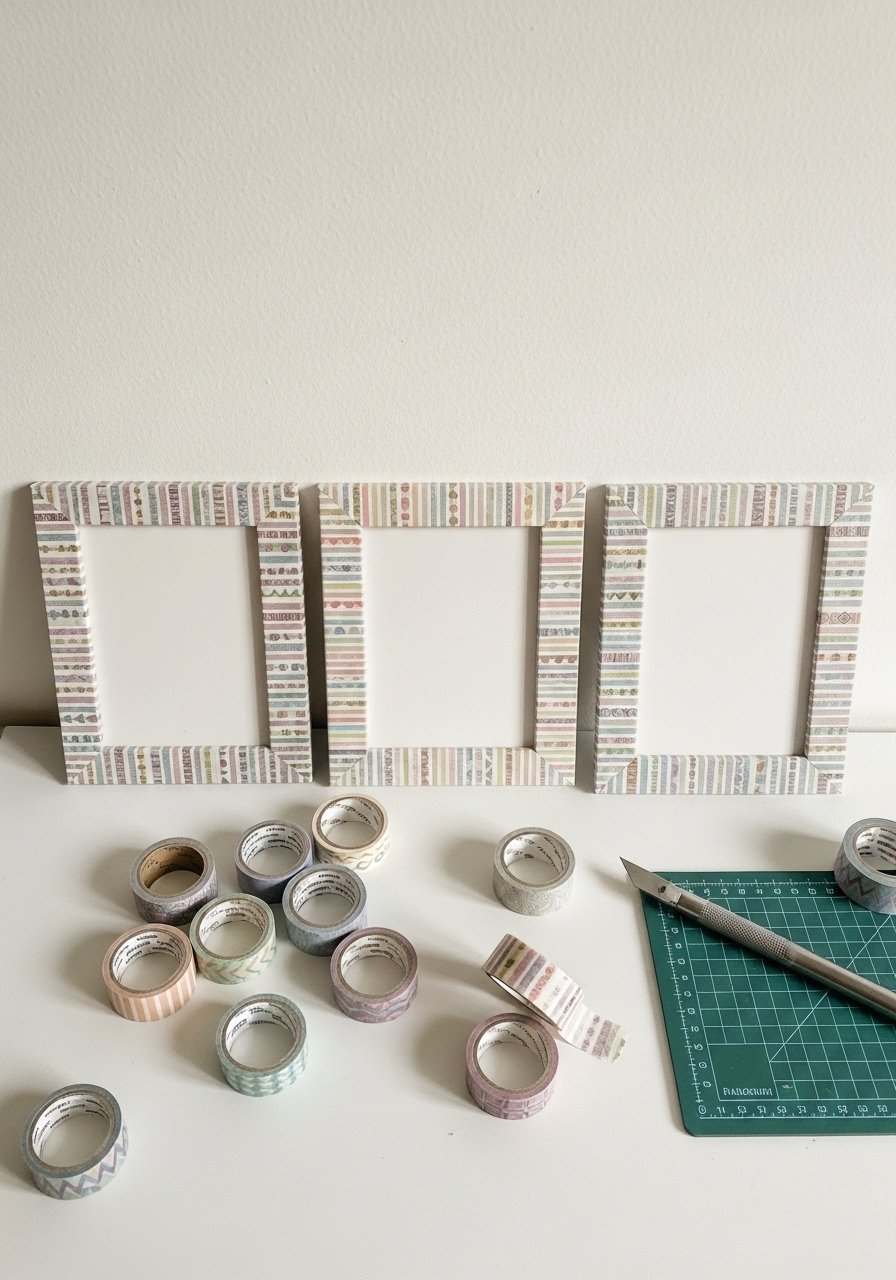
Washi tape makes framing effortless and photo-ready. This no-paint method preserves the original frame while adding delicate pattern and color. Use a self-healing cutting mat for crisp corners.
Materials
- Wooden or MDF frames, 3 frames (8 x 10 inch)
- Pastel washi tape, assorted rolls, 6 rolls
- Precision craft knife
- Self-healing cutting mat
- Ruler
- Microfiber cloth
Instructions
- Clean frame surface. Plan tape layout—horizontal, vertical, or diagonal.
- Apply washi tape strips along the frame length, slightly overlapping.
- At corners, fold tape neatly and trim excess with craft knife against the ruler.
- Smooth with a bone folder for adhesion and no air bubbles.
- Repeat until frame is fully covered. Use contrasting tape for inner edge for definition.
- Reinsert photo and hang.
How to Display or Gift It
- Pair with pastel prints or Polaroids for a cohesive set.
- Gift with a printed photo already inside and tied with ribbon.
- Store extra washi in a labeled washi organizer box.
- Ombre Yarn Wall Hanging
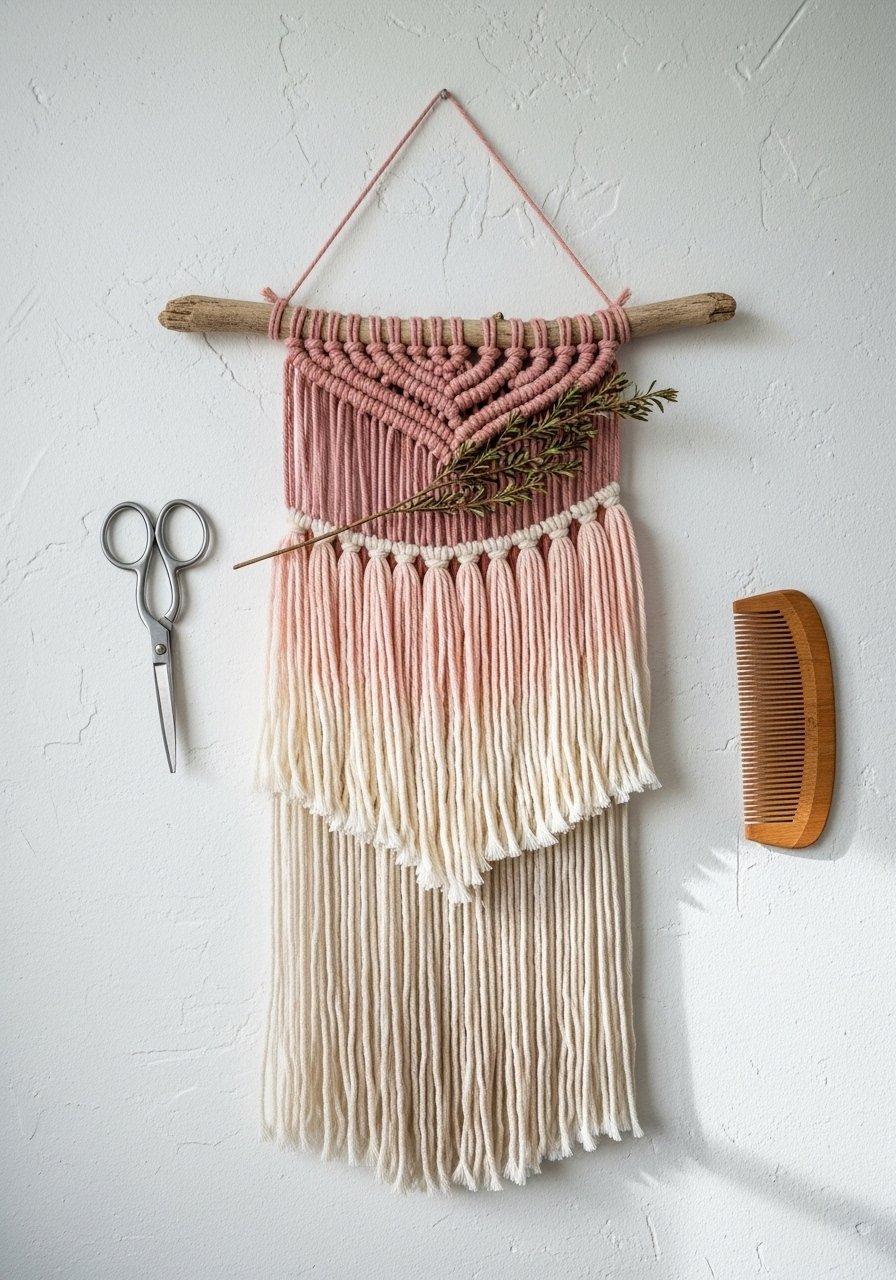
Yarn hangings are a classic way to bring soft texture into your pastel aesthetic room decor DIY lineup. A wooden dowel and graduated yarn lengths create motion and a cozy focal point. I like to use a wooden comb to tease the fringe for a fluffy finish.
Materials
- Wool/acrylic yarn, gradient pastels, 3 skeins (50 g each)
- Wooden dowel or driftwood, 12 inch
- Scissors
- Measuring tape
- Wooden comb
- Tassel maker (optional)
Instructions
- Cut yarn strands in graduated lengths (longest center 60 cm, shortest edges 20 cm).
- Fold each strand in half, loop over dowel using a lark’s head knot.
- Alternate colors to create an ombre effect across the dowel.
- Trim bottom to shape (V, straight, or rounded).
- Comb out yarn ends for full fringe. Tie hanging cord and adjust.
- Hang and fluff; yarn will relax over 24 hours.
How to Display or Gift It
- Hang above a headboard or small gallery wall for a soft anchor.
- Store by rolling gently in tissue to maintain fringe.
- Add wooden beads threaded on the dowel ends for a boutique touch.
- A driftwood dowel from a craft supplier gives organic texture.
- Pastel Linen Throw Pillow Covers (DIY Envelope)
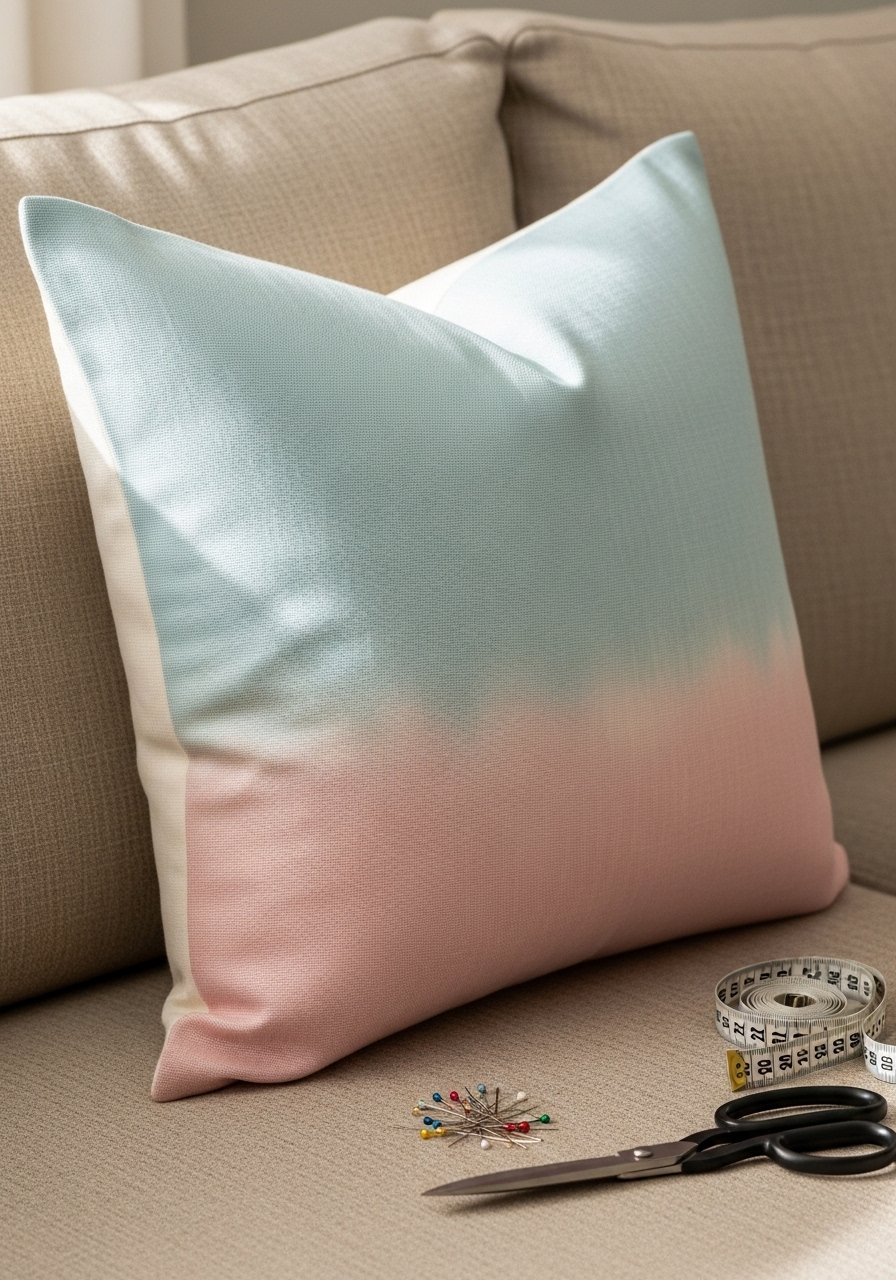
Make removable linen covers with a soft pastel dip-dye edge for a lived-in, dreamy look. Dip-dyeing with diluted fabric dye gives a subtly mottled finish. Sewing an envelope-style back means no zipper fuss, and covers are easy to wash.
Materials
- Linen fabric, 1/2 yard (prewashed)
- Fabric dye (pastel pink), 1 tsp
- Sponge or bowl for dye
- Thread, pastel, 1 spool
- Straight pins
- Sewing machine (or needle and thread)
- Scissors & ruler
- Pillow insert, 18 x 18 inch
Instructions
- Cut fabric into two 19 x 19-inch squares for seam allowance.
- Prepare dye bath diluted in 500 ml water for a soft shade. Test on a scrap.
- Dip edges (~5 cm) of both square pieces and blot for texture. Rinse and dry 24 hours.
- Place right sides together and sew three sides with 1 cm seam allowance, leaving one side open with overlapping flaps for envelope back.
- Turn right-side out, press edges, insert pillow.
- Hand- or machine-wash on gentle if needed.
How to Display or Gift It
- Mix with neutral pillows and a knitted throw for layered texture.
- Make a matching pair and tie with twine for a thoughtful housewarming gift.
- Store flat folded in a breathable fabric bag when not in use.
- A compact sewing kit is handy for small repairs.
- Pastel Beaded Curtain for a Doorway
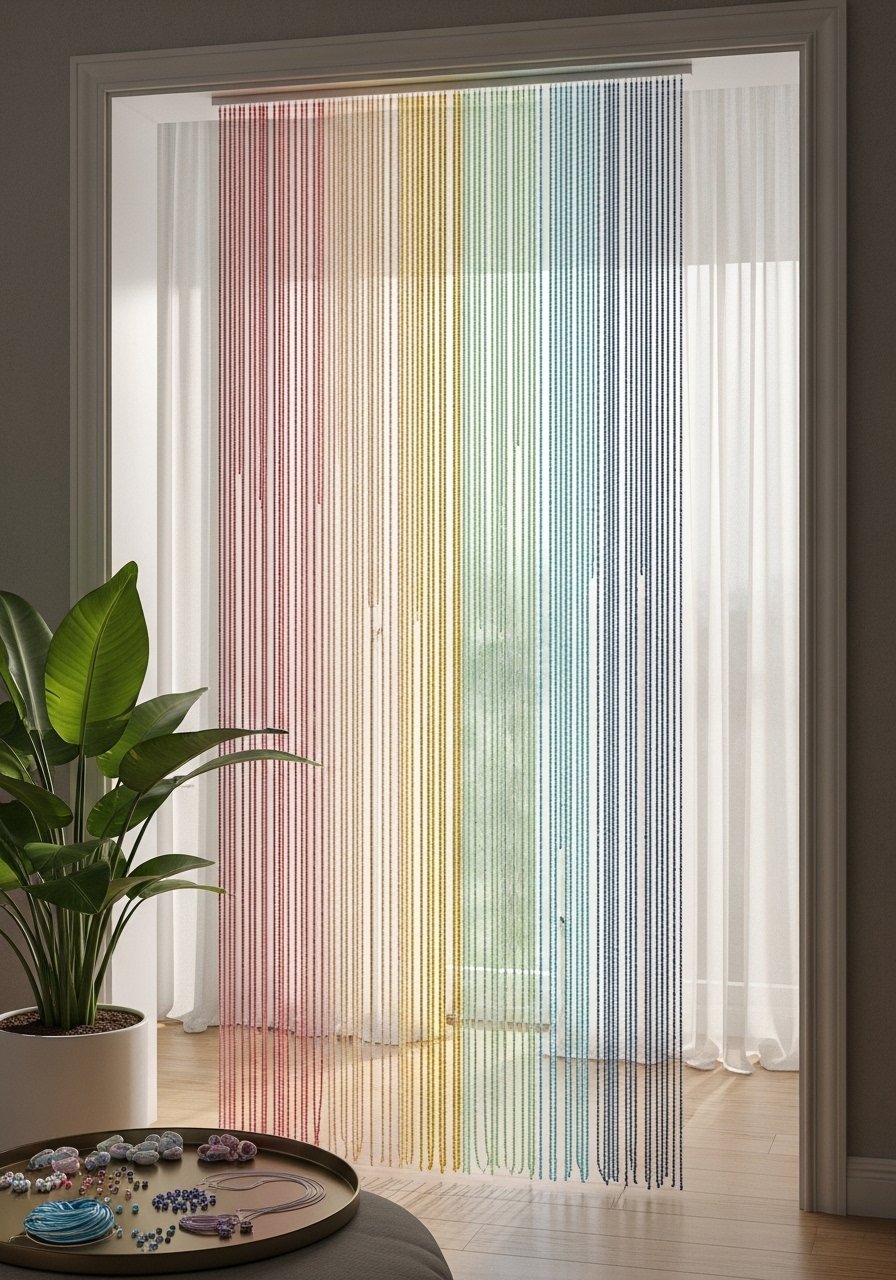
A beaded curtain gives instant boho-kawaii charm and moves gently in photos. Use acrylic or wooden beads painted in pastel tones. Work with a hand drill for clean holes on wooden beads.
Materials
- Acrylic or wooden beads, 8–12 mm, 200–300 beads depending on width
- Nylon cord or strong twine, 20 meters
- Wooden dowel, width of doorway
- Hand drill (if painting solid wood beads)
- Acrylic paints pastel set, small tubes
- Scissors
- Measuring tape
Instructions
- Paint wooden beads in pastel tones and let dry 30–45 minutes per coat. Two coats often gives solid color.
- Measure doorway width and cut cords to length plus 30 cm extra for knots.
- Thread beads in desired pattern; knot below each bead to secure.
- Attach cords to dowel using clove hitch or loop knot spaced 2–3 cm apart.
- Mount dowel in doorway and trim excess cord.
- Test movement and tighten knots if any beads shift.
How to Display or Gift It
- Use for a bedroom door, balcony entrance, or as a photo backdrop.
- For gifting, bundle with a small instruction card and a spare bead set.
- Store beads in a divided craft organizer to keep colors separated.
- A paint set for wood beads helps match your palette.
- Pastel Painted Mason Jar Vases
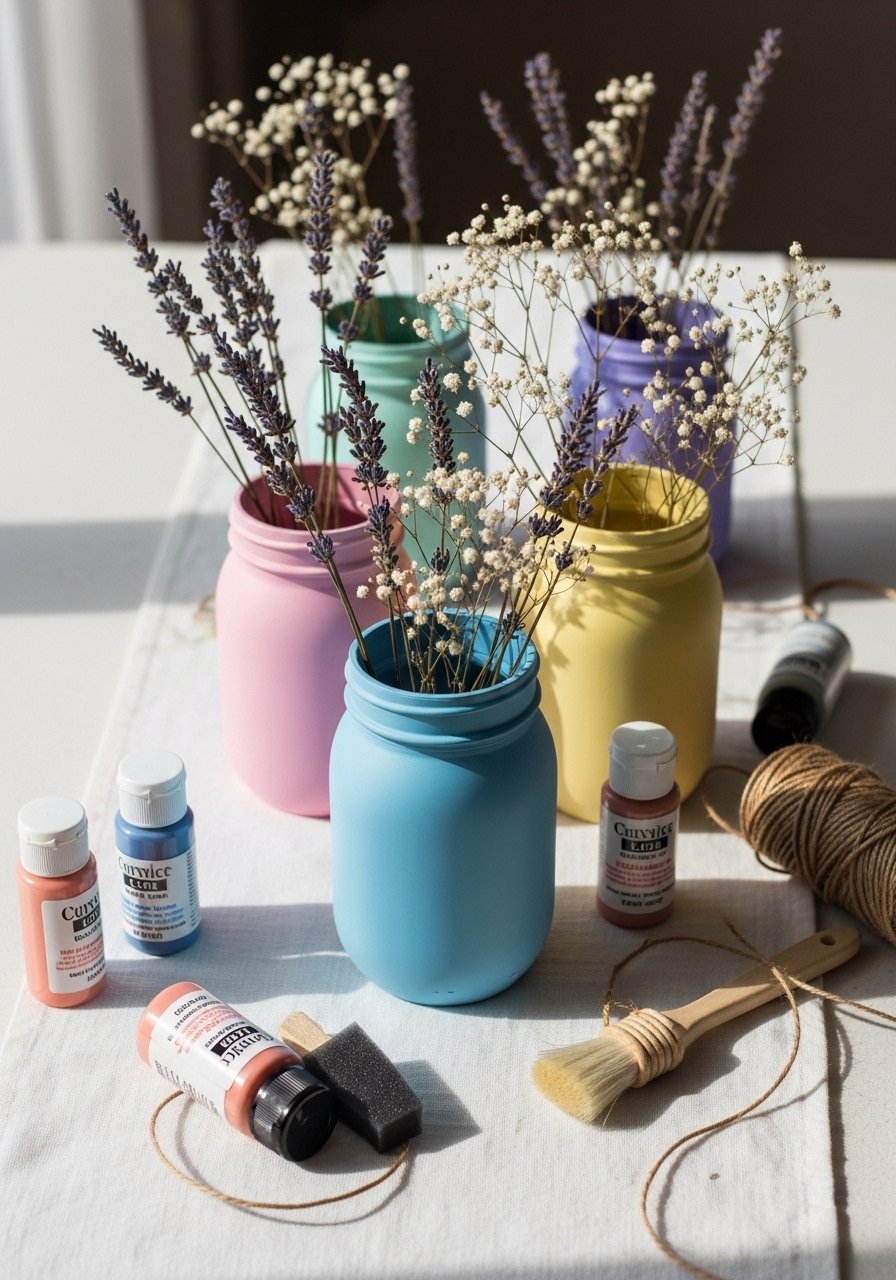
Mason jars become instant soft vases with frosted pastel paint. Diluted acrylic paint or chalk paint works well for a matte finish. Seal with a clear matte spray if the jars will hold water. These are easy to batch for party decor or gifting.
Materials
- Mason jars, 4 jars
- Chalk-style acrylic paint, pastel colors, 2 oz each
- Flat foam brush
- Clear matte sealer spray, 1 can
- Painter’s tape
- Twine for trims
- Dried flowers or faux stems
Instructions
- Clean jars and remove labels. Sand any rough spots lightly.
- Tape off the top rim if you want glass mouth exposed.
- Apply one thin coat of chalk paint with the foam brush; dry 20–30 minutes.
- Apply a second coat for full coverage. Dry 1 hour.
- Seal with a single thin coat of matte spray; dry 15–30 minutes.
- Tie twine around neck and fill with dried flowers.
How to Display or Gift It
- Group on a windowsill or bedside table. Mix heights for depth.
- Bundle several jars in a wooden crate for a rustic gift.
- Store spare painted jars in a dust-free cabinet.
- A pack of mason jar lids and rings is handy for multi-use jars.
- Pastel Dreamy Candle Holders (Painted Glass)
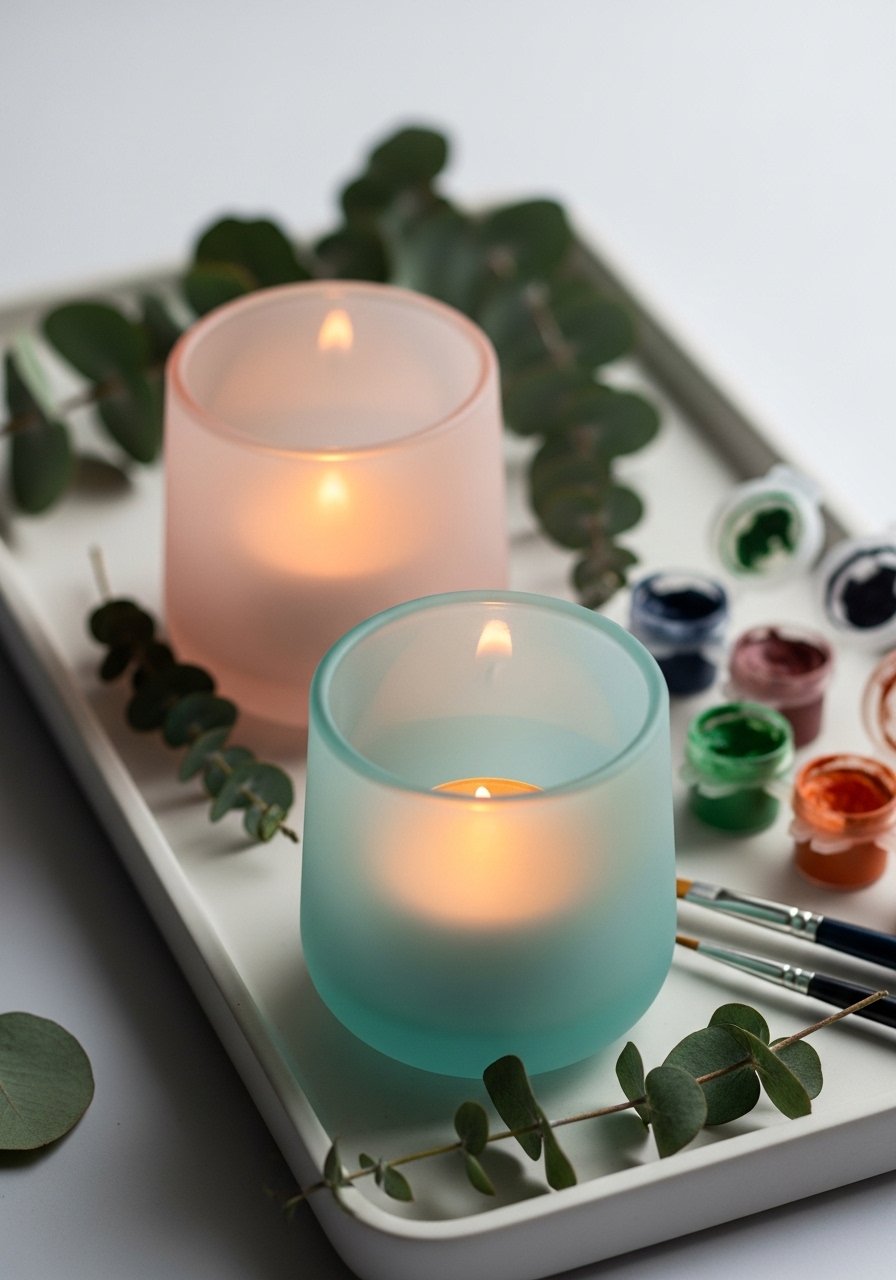
Painted glass candle holders create ambient, photograph-friendly light. Use glass-appropriate paint and cure per instructions to withstand warmth. Keep wax away from painted surfaces to avoid damage.
Materials
- Clear glass votive holders, 2–4 pieces
- Glass paint pastel set, 1 oz each
- Small detail brushes
- Painter’s tape
- Paper towels
- Tea lights or LED tea lights
Instructions
- Clean glass with rubbing alcohol. Tape any sections you want clear.
- Apply glass paint in thin coats; allow 15–20 minutes between coats.
- For a frosted look, dilute paint slightly with the manufacturer’s medium.
- Cure according to paint directions (air dry 24–48 hours, oven cure if recommended).
- Use LED tea lights for extended safety or real tea lights with supervision.
How to Display or Gift It
- Arrange on a tray with dried sprigs for a bedside vignette.
- For gifting, include a small matchbook or LED tealight in kraft packaging.
- Store in a padded box to prevent chips.
- A set of LED tea lights is great for safe display.
- Pastel Painted Pegboard Organizer
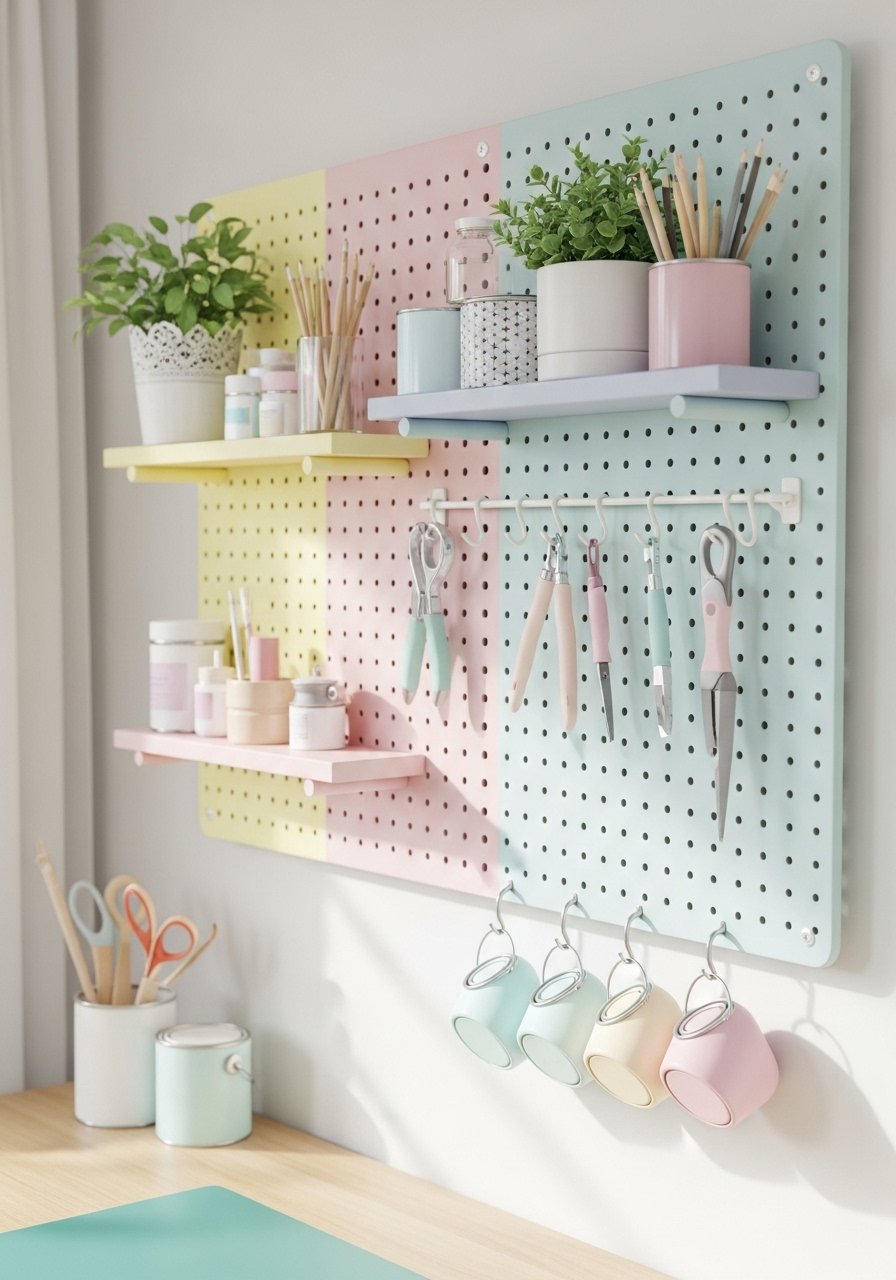
A pegboard painted in soft tones keeps your craft supplies tidy and Instagram-ready. Use pegboard hooks and small crates for flexible storage—perfect for a maker’s corner. Measure carefully before drilling.
Materials
- Pegboard, 24 x 18 inch
- Chalk-style paint, pastel, 2 oz
- Pegboard hooks & shelves set
- Screws & wall anchors
- Foam roller
- Small crates or tin cans for holders
- Measuring tape
Instructions
- Paint pegboard front and edges with one to two thin coats. Dry 30–45 minutes.
- Measure and mark wall studs; install spacers for clearance.
- Secure pegboard to wall with screws and anchors.
- Arrange hooks and shelves; adjust as needed.
- Load with frequently used tools and pretty supplies.
How to Display or Gift It
- Hang above a desk with coordinated storage boxes for color continuity.
- Use labeled tins and a pegboard accessory kit to keep small items organized.
- Make-ahead tip: Paint multiple pegboards to swap seasonal layouts.
- Pastel Paper Flower Wall Backdrop
Paper flower backdrops are lightweight and make dreamy photo walls. Use cardstock and a glue gun to assemble. Make varying sizes for depth and attach to foam board with hot glue for a sturdy display.
Materials
- Pastel cardstock, A3 size, 10 sheets
- Floral wire and tape
- Glue gun and glue sticks
- Scissors & craft knife
- Foam board, 36 x 24 inch
- Template petals in 3 sizes
Instructions
- Cut petal shapes in three sizes from cardstock.
- Ink edges lightly with pastel ink pad for depth (optional).
- Layer and glue petals around a small paper circle, rolling petals slightly for dimension.
- Make flowers in several sizes. Glue to foam board starting from center outward.
- Fill gaps with small paper buds and leaves.
- Hang backdrop with command strips or mount on an easel.
How to Display or Gift It
- Use as a wedding photo wall, nursery decor, or behind a vanity.
- For gifting, mount on a lightweight frame and wrap carefully.
- Store flat between cardboard sheets to avoid crushing.
- A reliable hot glue gun keeps petals secure.
- Pastel Chalkboard Paint Accent Wall Tile
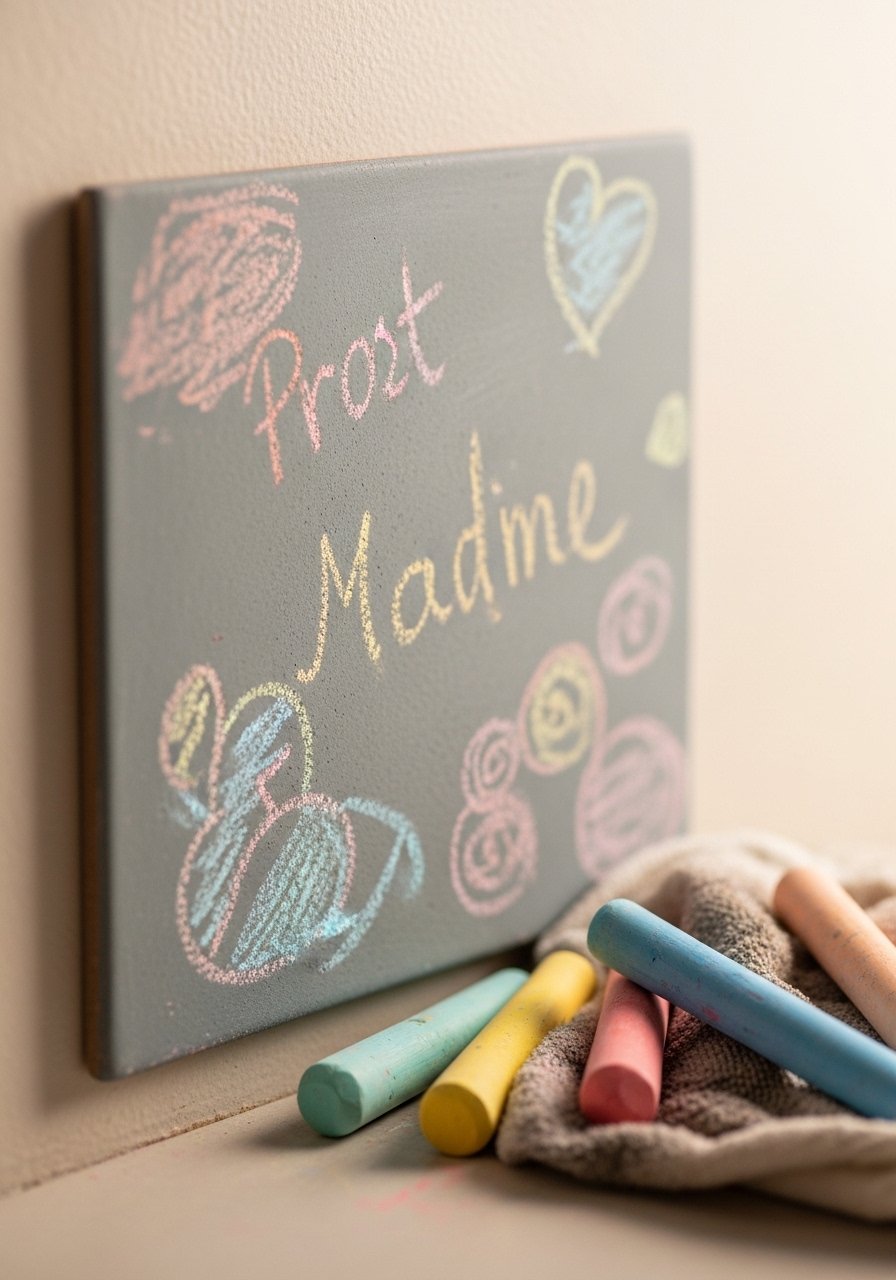
Create a small writable tile for notes or doodles using chalkboard paint in pastel chalkboard shades. Use sanded primer for best adhesion and allow full cure before heavy use.
Materials
- Small wooden or MDF tiles, 6 x 6 inches, 4 tiles
- Chalkboard paint in pastel colors, 2 oz each
- Sanded primer, 2 oz
- Foam brush
- Chalk sticks in white and pastel
- Painter’s tape
Instructions
- Prime tiles with sanded primer; dry 1 hour.
- Apply two thin coats of pastel chalkboard paint. Dry 2–3 hours between coats.
- Cure for 24–48 hours before using chalk.
- Season the board by rubbing full-width chalk then wiping off.
- Mount tiles in a grid for an accent spot.
How to Display or Gift It
- Use in a kitchen or entry for reminders and sweet quotes.
- Package as a small message board set for a friend with chalk included.
- Clean with a damp cloth; avoid harsh scrubbing.
- A small chalk set pairs perfectly.
- Pastel Photo Clip String Lights
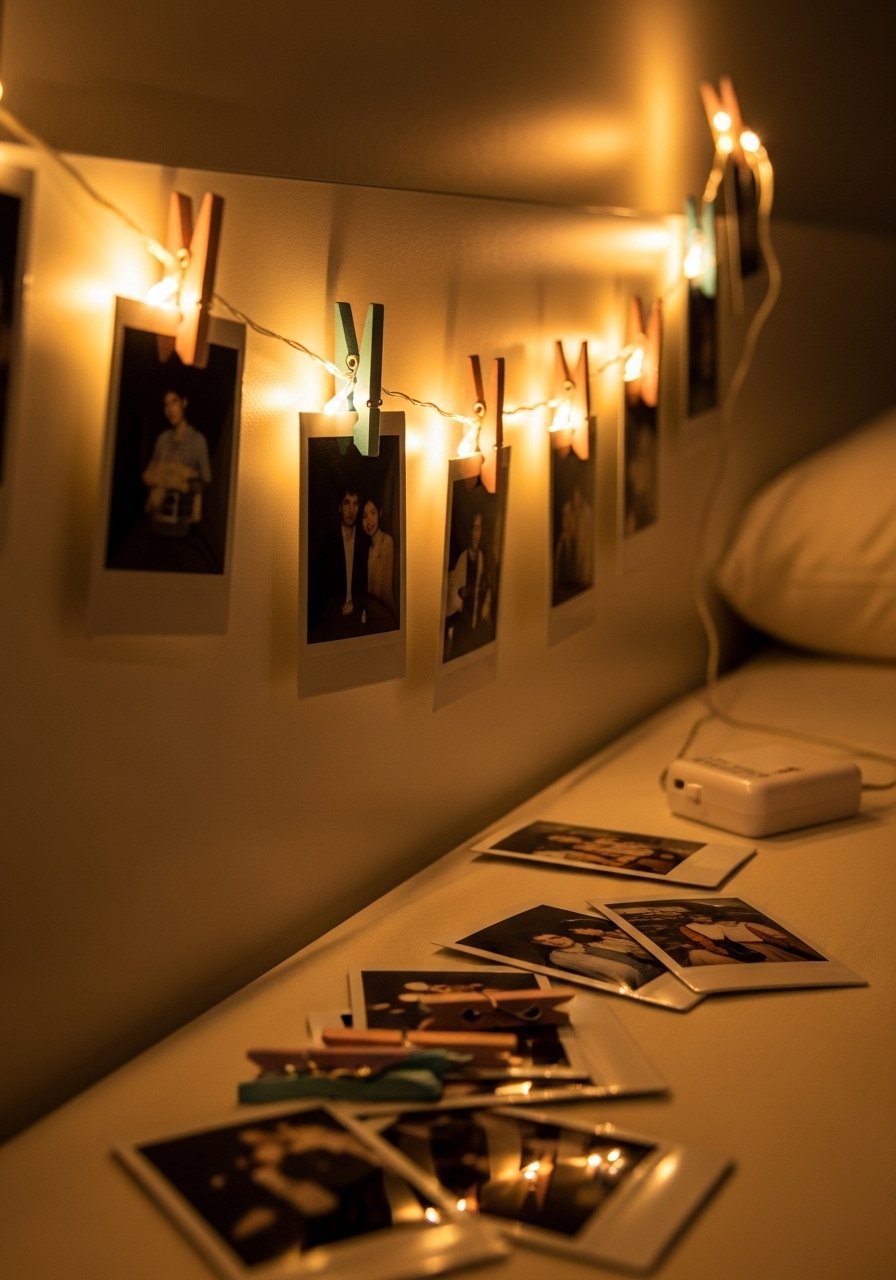
String lights with tiny clips let you change photos seasonally and add a warm glow to soft decor. Use battery-operated LED fairy lights so you can place them anywhere without cords.
Materials
- LED string lights, battery-operated, 1 set (6 ft)
- Mini wooden clothespins, pastel-painted, 30 pcs
- Printed photos or Polaroids, assorted
- Batteries (if needed)
- Small hook nails
Instructions
- Paint mini clothespins in pastel shades; dry 20–30 minutes.
- Attach lights around your headboard or frame.
- Clip photos to clothespins and space evenly along the lights.
- Use a timer on battery pack for automatic evening glow.
- Swap photos seasonally and replace batteries as needed.
How to Display or Gift It
- Great for bedrooms, dorms, or a cozy nook.
- Roll up with photos and lights in a gift box for a personalized present.
- Store photos in a labeled envelope when not displayed.
- A pack of battery-operated LED lights is ideal.
- Pastel Painted Wire Baskets
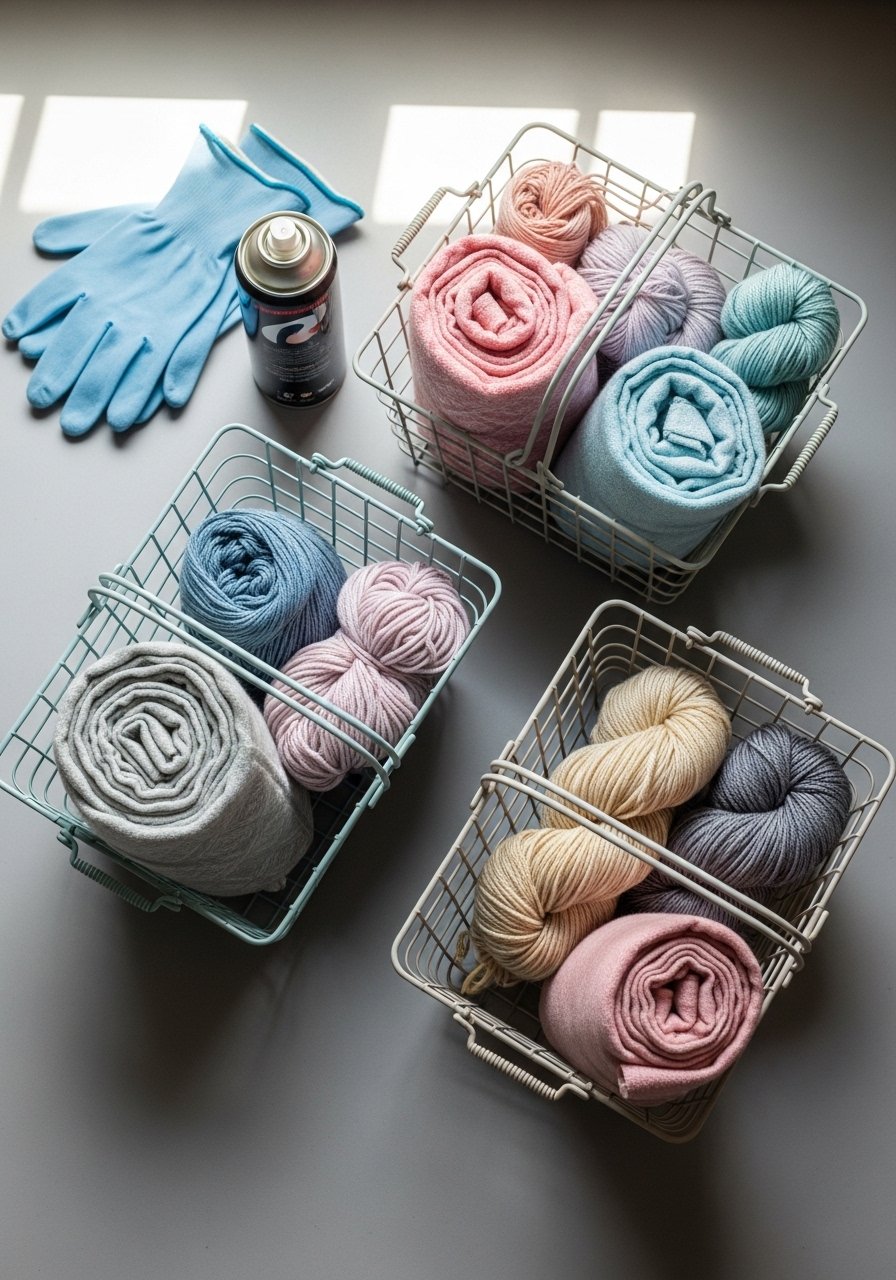
Wire baskets painted in dusty pastels become both functional and decorative. Use spray paint with a matte finish and follow safety precautions: ventilated area and gloves. They’re great for toy storage, yarn, or display.
Materials
- Wire baskets, small-medium, 3 pieces
- Spray paint matte finish, pastel colors, 1 can per color
- Gloves & mask
- Drop cloth
- Painter’s tape (if masking handles)
Instructions
- Clean and dry baskets. Cover surrounding area.
- Spray in thin even coats, holding can 25–30 cm away.
- Apply 2–3 thin coats, allowing 10–15 minutes between coats.
- Let cure fully 24 hours before use.
- Line with fabric if desired to protect delicate items.
How to Display or Gift It
- Use by the sofa for throws or in a nursery for tiny toys.
- Fill with coordinated yarn skeins for a maker’s gift basket.
- Stack when storing; place felt pads to avoid scratches.
- A set of metal spray paints gives consistent coverage.
- Pastel Wash Painted Picture Ledges

Light wash painting on picture ledges creates a soft, modern look while letting your framed photos pop. A watered-down acrylic gives that delicate color without hiding the wood grain. Seal to protect from scuffs.
Materials
- Thin picture ledges, 2 pieces
- Acrylic paint, diluted pastel color, 1 oz
- Flat brush
- Water & small cup
- Clear matte sealer, 1 can
- Sandpaper, 220 grit
Instructions
- Sand ledges lightly. Wipe clean.
- Mix paint with 2 parts water : 1 part paint for a wash.
- Brush on one thin coat, wiping excess with a paper towel to reveal grain.
- Allow 20–30 minutes to dry; apply a second wash if needed.
- Seal with a thin coat of matte spray and dry 1 hour.
- Mount and style with frames and small books.
How to Display or Gift It
- Use to create a small rotating gallery with seasonal prints.
- Gift a styled ledge with a few prints tucked in kraft paper.
- Store extra prints in a flat organizer to avoid curling.
- A set of small picture ledges is a practical staple.
- Pastel Painted Terracotta Planters
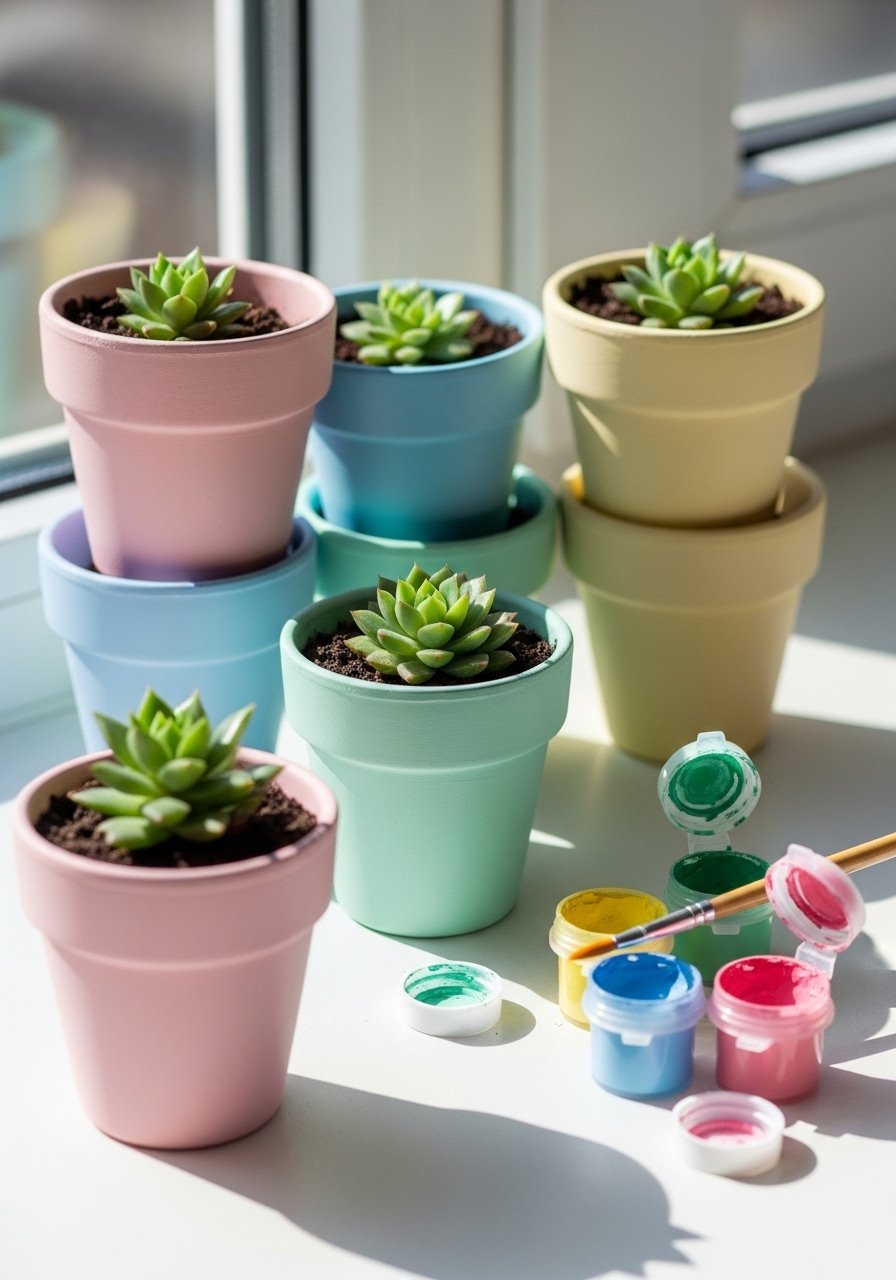
Terracotta planters soak up paint nicely and add an organic element to pastel decor. Use acrylic or chalk paint, and seal only if you’re using indoor decorative plants with wrapped drainage. Painted bases add a pop to shelves.
Materials
- Terracotta pots, assorted small sizes (3–4 pots)
- Acrylic or chalk paint, pastel shades, 2 oz each
- Foam brush
- Clear matte sealer (optional)
- Succulents or small plants
- Potting soil
Instructions
- Clean and dry pots. Paint base color with foam brush; dry 20–30 minutes.
- Apply a second coat for even coverage. Dry 1 hour.
- If planter will hold soil and water, consider painting only the exterior and avoid sealing inside drainage area.
- Plant succulents after paint is fully cured 24 hours.
- Water sparingly to protect finish.
How to Display or Gift It
- Arrange on windowsills, floating shelves, or a plant ladder.
- Make a trio of painted pots and gift with a small plant care card.
- Store unplanted pots stacked with paper between them.
- A small succulent potting mix helps plants thrive.
- Pastel Acrylic Pour Nightstand Top

A pastel acrylic pour adds a dreamy, marbled surface to a small nightstand. Use pour mediums and silicone oil for cell effects. Work on a leveled surface and allow a full 72-hour cure before placing items on top.
Materials
- Small nightstand or wooden top, sanded and primed
- Acrylic pour medium, 8 oz
- Acrylic paints, pastel set, 2 oz each
- Silicone oil, a few drops
- Cups & stir sticks
- Leveling spacers
- Heat gun (for popping bubbles and encouraging cells)
- Clear epoxy resin, 8 oz (to seal), full cure 72 hours
Instructions
- Mix each paint color with pour medium in separate cups (ratio usually 1 part paint : 2 parts medium).
- Layer small amounts of each mixture into a pouring cup.
- Pour over prepared tabletop and tilt to distribute. Add a few drops of silicone oil for cells.
- Use a heat gun briefly to pop bubbles and activate cells.
- Let sit on a level surface for 24 hours, then apply a protective epoxy resin coat per resin instructions. Resin cures 72 hours for full hardness.
- After full cure, lightly sand edges and wipe clean.
How to Display or Gift It
- Use as a bedside table or small accent table—avoid heavy, rough objects.
- For gifting, include care instructions and a small coaster set.
- Store indoors away from direct sunlight to avoid yellowing.
- A quality epoxy resin kit seals and protects your finish.
Soft, pastel colors and thoughtful textures are the heart of every project here—perfect for a calm, camera-ready room. Try a few small projects first (trinket dishes, mason jar vases, felt garland) and mix them with one statement piece like a yarn wall hanging or poured side table. Save or pin this article so you can come back when you’re ready to tackle the next craft afternoon.
Which project are you most excited to try first? Tell a friend, invite them over for a pastel craft night, or bundle a few small finished pieces for a heartfelt gift. Trust me, upgrading your glue gun to a temperature-controlled model changed how neat my finishing touches looked across almost every project — no more stringy glue mess.


