Leaves, twigs, rocks and other backyard finds are the kind of cheap, joyful materials that spark big imaginations. These 22 nature craft ideas for kids turn those outdoor treasures into keepsakes, gifts, and practical playthings you’ll actually want to display. Each project uses simple tools and clear steps, so you can craft alongside little hands or set up a supervised maker station.
You’ll find quick projects for toddlers (like leaf rubbings), slightly more detailed builds for school-age kids (twig frames, rock pets), and rainy-day options that start outside and finish at the table (resin leaf coasters). I reference kid-friendly tools throughout, like a low-temp hot glue gun for assembly and a Cricut Joy cutting machine if you want neat vinyl labels for nature journals. Read through and pick projects by time, skill, and materials — or pin a handful for the next nature walk.
- Leaf Lanterns (Pressed Leaf Luminaries)
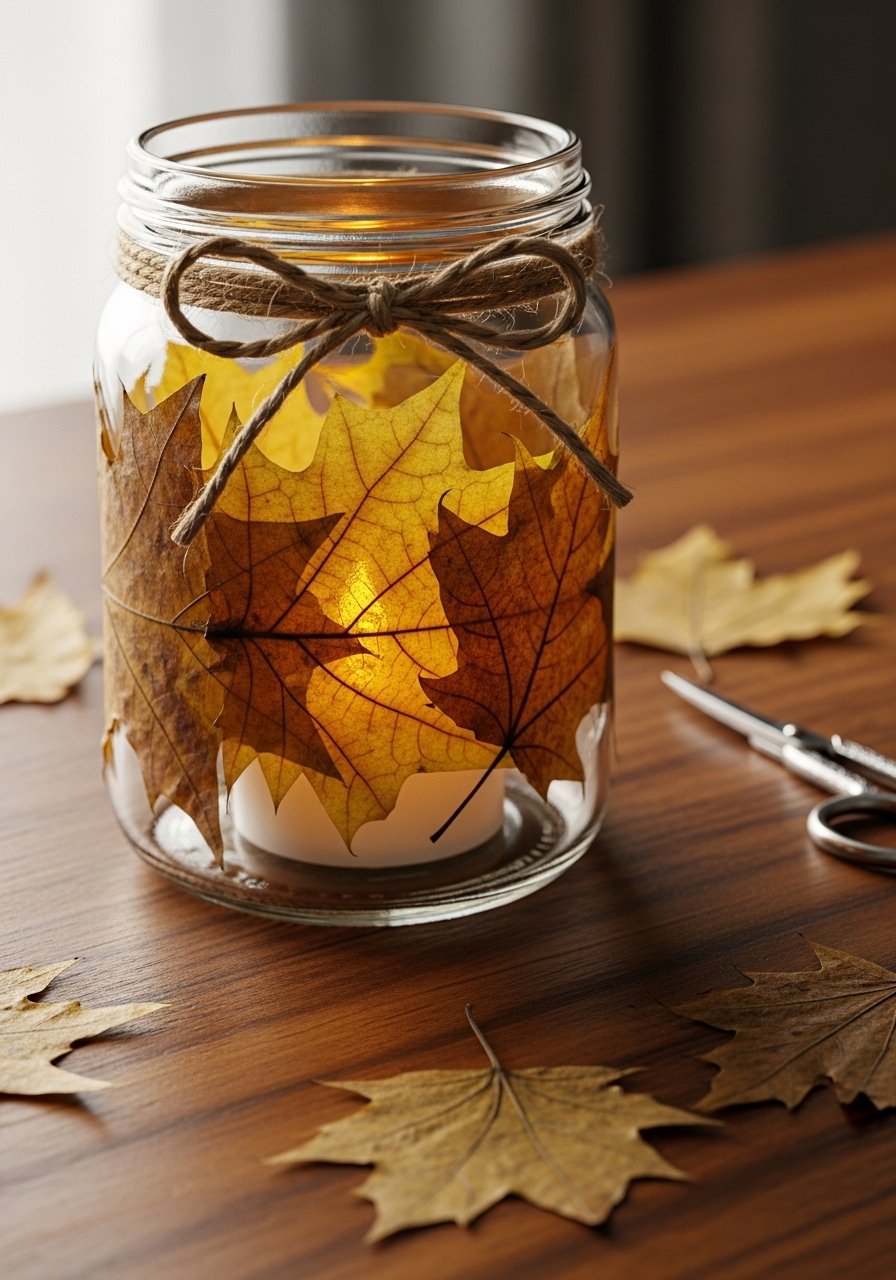
These leaf lanterns use pressed leaves to make cozy, translucent jars. They have a soft, cottagecore vibe and feel lovely on a porch or bedside. Kids love arranging colors and sizes. You’ll get slightly different results depending on leaf thickness — thin leaves press and adhere smoother.
Materials
- 1 clear glass jar (8–12 oz) per lantern, rinsed and dry
- 6–12 assorted pressed leaves (flattened under heavy books 24–48 hours)
- Mod Podge Outdoor, 8 oz (matte) — 2 thin coats
- Flat foam brush, 1-inch
- Low-temp hot glue gun and 6 glue sticks
- Natural twine, 2–3 ft per jar
- LED tea light (battery-operated), 1 per jar
Instructions
- Press fresh leaves for 24–48 hours between wax paper and heavy books; thin leaves flatten best.
- Trim leaves as needed to fit the jar.
- Brush a thin coat of Mod Podge onto the jar where the leaf will sit.
- Place the leaf gently and smooth with your finger from center outward. Avoid wrinkles; overlap leaves slightly for coverage.
- Apply a second thin coat of Mod Podge over the leaves. Let each coat dry 15–20 minutes to the touch.
- Add a final topcoat if the surface feels tacky after 20 minutes; fully cure 24 hours for outdoor use.
- Tie twine around the neck and secure with a dab of hot glue. Insert LED light.
How to Display or Gift It
- Line several on a windowsill for warm evening light.
- Wrap in kraft tissue and tuck a tea light beside it for a handmade gift.
- Store extra jars in a stackable craft organizer tray until sealed and ready.
- Make-ahead: press leaves up to a month in a labeled envelope.
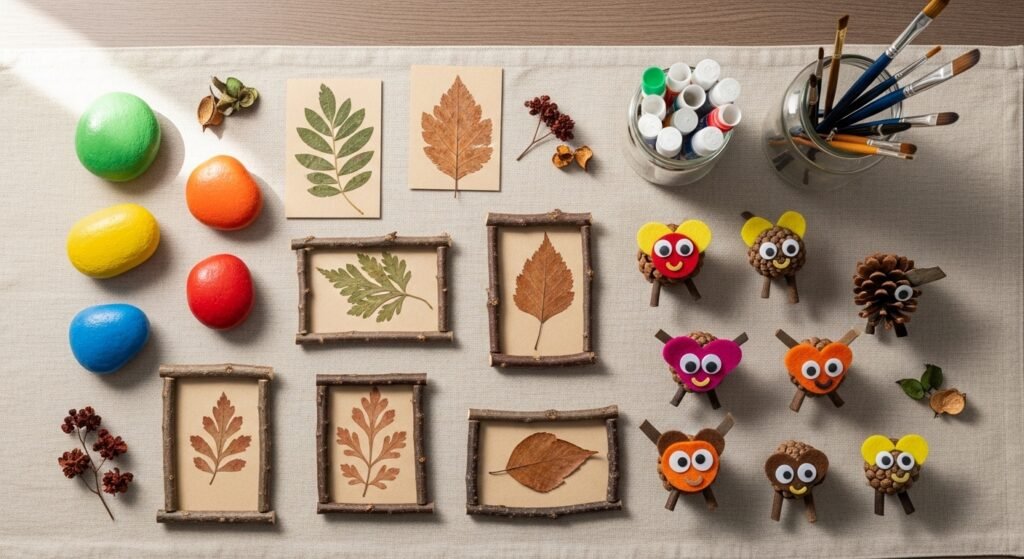
- Twig Photo Frame

A twig photo frame is tactile and forgiving — kids can glue twigs in different directions for a wild, boho look. The frame looks great with a simple wood base and a black-and-white photo. If you want perfect straight cuts, a small craft saw helps.
Materials
- 1 unfinished wooden plaque, 6” x 8” (walnut or birch)
- Small twigs, 20–30 pieces (4–6 in each), trimmed
- PVA craft glue (or E6000 for outdoor durability), 2 oz
- Sandpaper, 120 grit
- Small saw or heavy scissors for twig trimming
- Picture-hanging hardware (sawtooth hanger)
- Optional: acrylic craft paint, 1 oz
Instructions
- Sand the wood plaque smooth; wipe dust away.
- Plan twig layout around the photo area. Trim twigs to length with a small saw or heavy scissors.
- Test-fit twigs. Apply a thin line of PVA glue to the wood and press twigs into place. Work in small sections.
- Allow glue to set 30–45 minutes. If using E6000, allow 24 hours cure.
- Paint edges if desired; let dry 30 minutes between coats.
- Attach picture-hanging hardware on the back.
How to Display or Gift It
- Display on a shelf with a small wooden easel for a cottagecore vibe.
- Wrap with twine and a dried flower sprig for gifting.
- Store flat in a shallow craft organizer drawer until ready to hang.
- Make multiples for a gallery wall.
- Rock Pet Placeholders (Painted Pebble Friends)
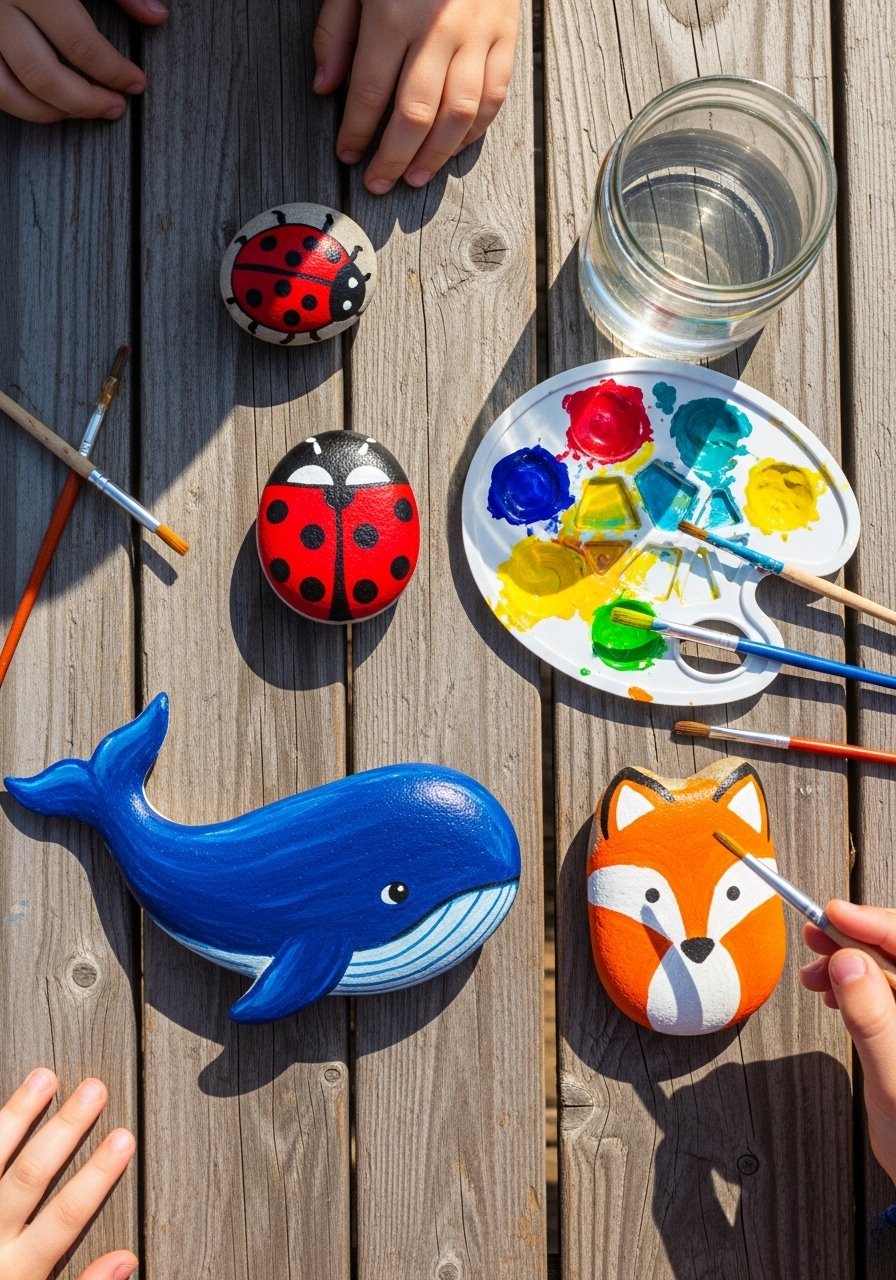
These painted rock friends double as place cards or mini worry stones. They’re a great way to learn simple shapes and practice dotting and lines. Use acrylic paints and a fine paint pen for details.
Materials
- Smooth flat rocks, 2–3 per child (2–3 in diameter)
- Acrylic craft paint set (12-color)
- Fine-tip paint pens (black, white)
- Foam brushes and small round paintbrush, sizes 0–6
- Clear acrylic sealer spray (matte), 1–2 light coats
- Paper towels and a small plastic tray
Instructions
- Wash and dry rocks; let air dry 30 minutes.
- Apply a white base coat if colors need to pop; dry 20 minutes.
- Paint main color with small round brush; let dry 15–20 minutes.
- Add details with paint pens or a fine brush. Use a dotting tool for perfect spots (a toothpick works).
- Seal with 1–2 light coats of acrylic sealer; dry 30 minutes between coats. Fully cure 24 hours.
- Write names on the back with a paint pen for placeholders.
How to Display or Gift It
- Line them along a dinner table for a kid-friendly place setting.
- Pack in a small kraft box with tissue for a party favor.
- Keep extras in a mason jar on a shelf for quick swapping.
- Store dry in a small mason jar set.
- Leaf Rubbing Bookmarks — nature craft ideas for kids
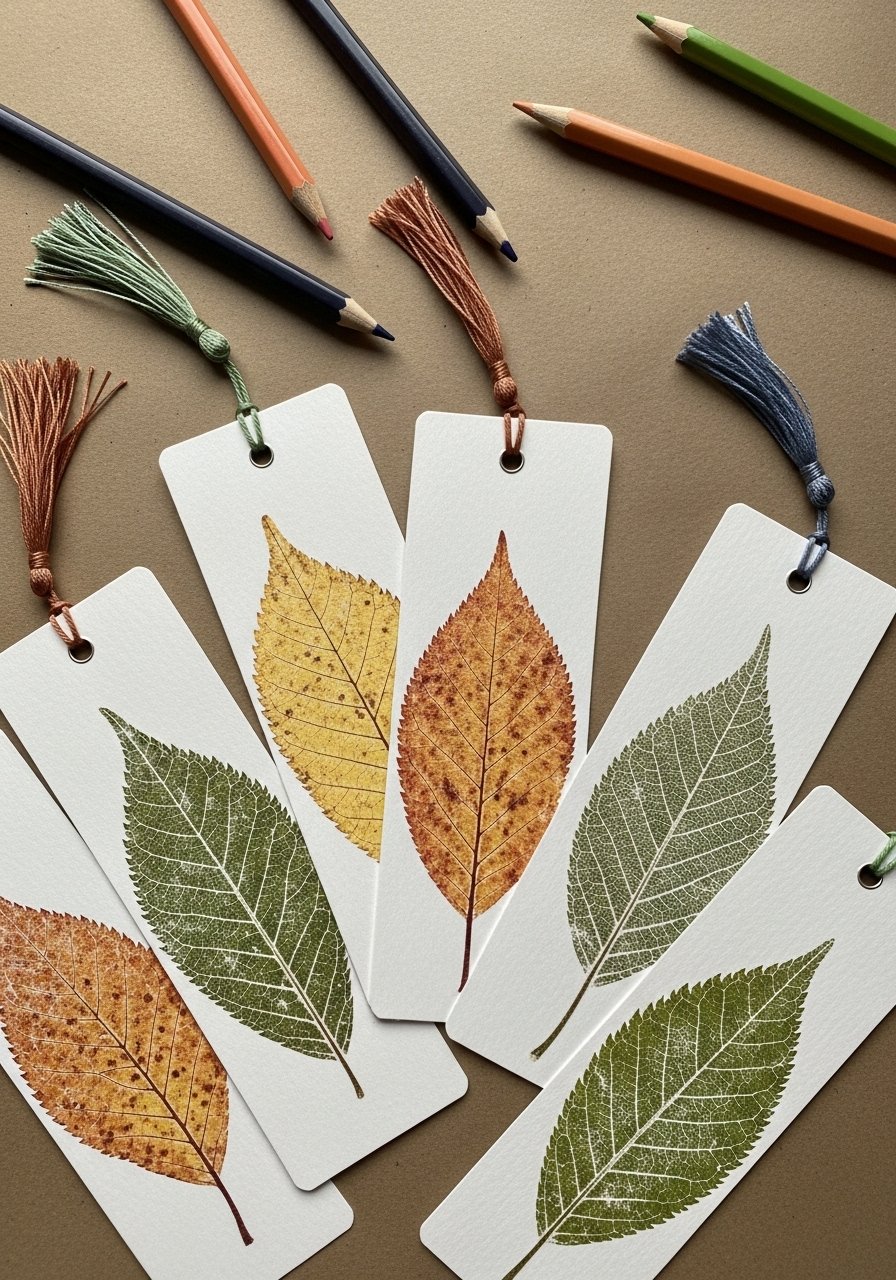
Leaf rubbings are fast, tactile, and magical for little ones. They show leaf veins beautifully and make lovely bookmarks parents will use. You can laminate for durability or coat with Mod Podge for a matte finish.
Materials
- Heavy cardstock, 8.5” x 11”, cut into 3” x 8” bookmarks (6 per sheet)
- Assorted leaves (flat, veined)
- Colored pencils, crayons, or graphite sticks
- Hole punch and natural twine, 6–8 in per bookmark
- Optional: laminator sheets or Mod Podge (matte), 2 thin coats
Instructions
- Place a leaf vein-side-up on a flat surface. Put the cardstock over it.
- Rub a colored pencil or crayon sideways over the leaf until the texture appears. Experiment with layering colors.
- Trim to final size and punch a hole at the top. Thread twine and tie a tassel.
- For durability, laminate with a laminator or brush 2 thin coats of Mod Podge, drying 15–20 minutes between coats. Fully cure 24 hours.
How to Display or Gift It
- Tie to a favorite paperback as a gift.
- Store flat in a scrapbook or gift in a cello sleeve.
- Laminate a batch for classroom bookmarks or party activities.
- Use a personal laminator for fast protection.
- Pinecone Critters
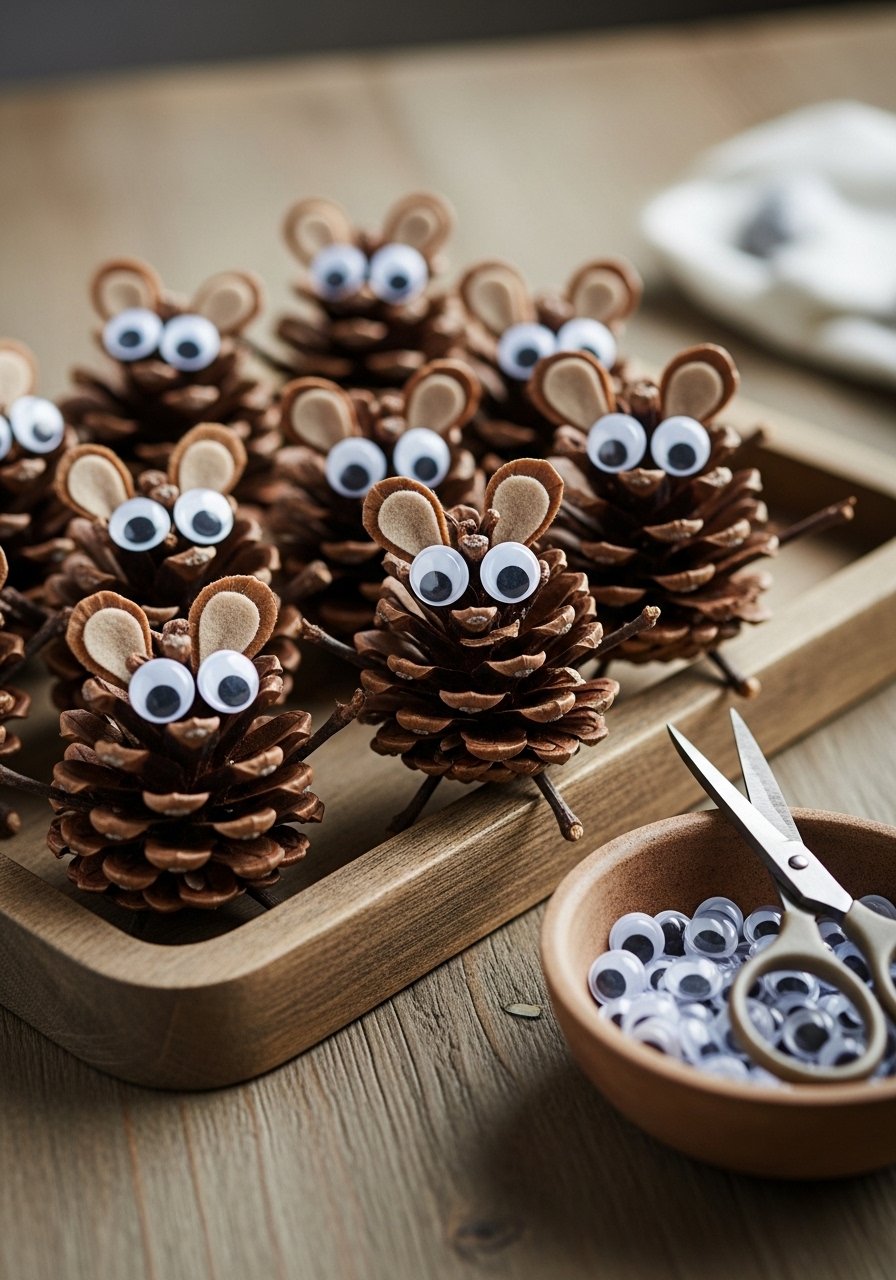
Pinecones become charming animals with a few felt scraps and glue. This is a no-sew craft ideal for preschoolers who like imaginative play. Low-temp glue keeps fingers safe.
Materials
- Pinecones, medium size, 1 per critter (cleaned and dried)
- Felt scraps, 2” x 4” pieces in assorted colors
- Googly eyes, 6–12 pack
- Low-temp hot glue gun and glue sticks
- Small twigs for arms, tiny pom-poms for noses
- Craft scissors and a small paintbrush for glue
Instructions
- Clean pinecones by tapping out debris. Let dry fully 24 hours if recently gathered.
- Cut felt into ears, wings, or tails.
- Glue eyes and nose onto the pinecone using the hot glue gun. Attach felt pieces and twig arms.
- Let glue cool 5–10 minutes before play.
How to Display or Gift It
- Display on a seasonal tray with moss and fairy lights.
- Pack several in a small kraft box as party favors.
- Store in a shallow craft box with paper dividers to keep shapes intact.
- Use a small craft storage box.
- Rock Tic-Tac-Toe
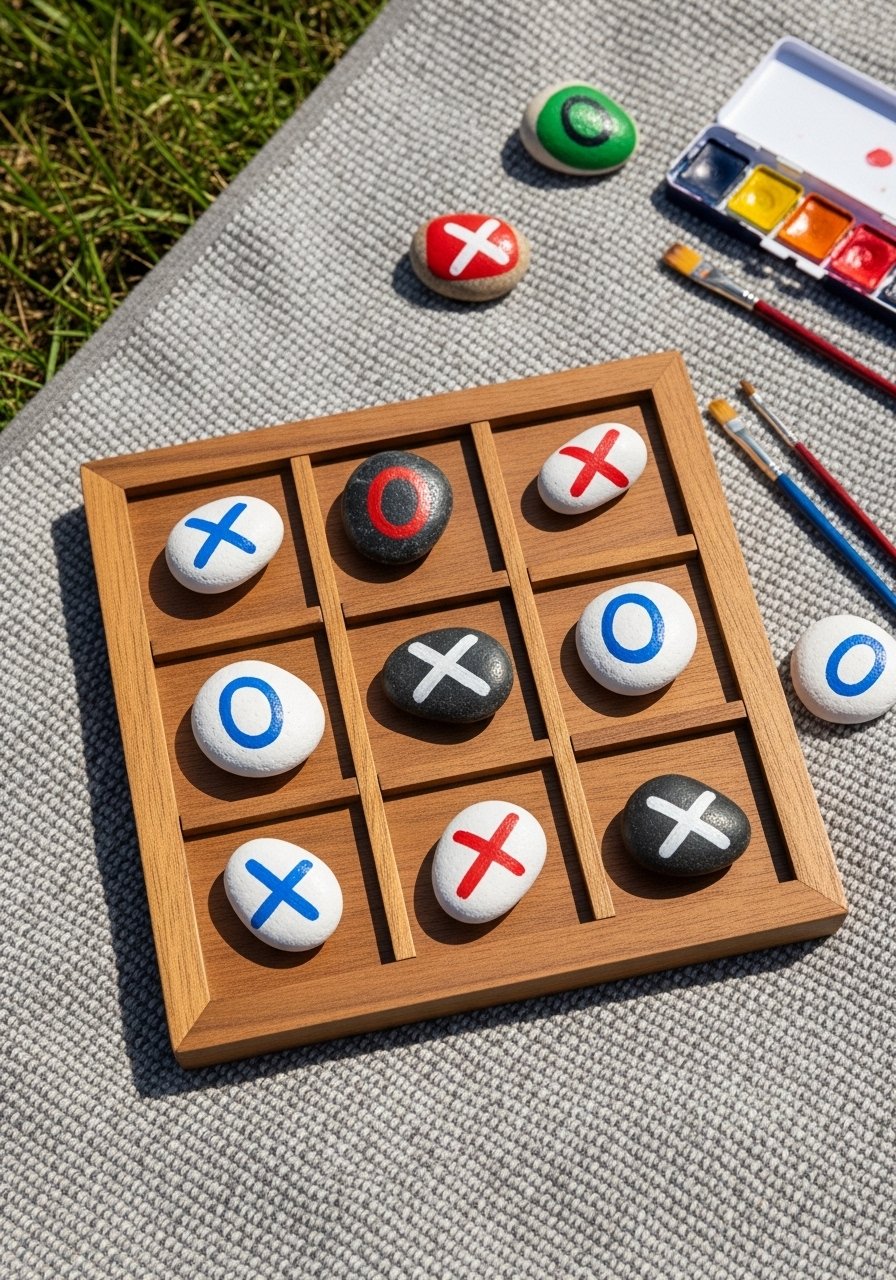
This outdoor tic-tac-toe set uses rocks as game pieces and a simple wooden board for play. It’s perfect for picnics and travel. The board can be stained or painted in a farmhouse or boho style.
Materials
- Smooth wooden board, 8” x 8” square, 0.5” thick
- 10–12 smooth flat rocks, 1–2 in diameter
- Acrylic paint set and small brushes
- Painter’s tape (for grid lines)
- Clear acrylic sealer (matte), 1–2 light coats
- Sandpaper, 120 grit
Instructions
- Sand the wood smooth and tape off a tic-tac-toe grid using painter’s tape.
- Paint the board background; remove tape once paint is tacky for clean lines.
- Paint rocks: five Xs and five Os, or two designs. Dry 20 minutes between coats.
- Seal board and rocks with 1–2 light coats of sealer; dry 30 minutes between coats. Full cure 24 hours.
- Store in a fabric pouch for travel.
How to Display or Gift It
- Pack in a linen drawstring bag for picnic-friendly play.
- Keep pieces in a small drawstring linen bag to avoid losing rocks.
- Paint seasonal versions for outdoor parties.
- Bark Texture Collage
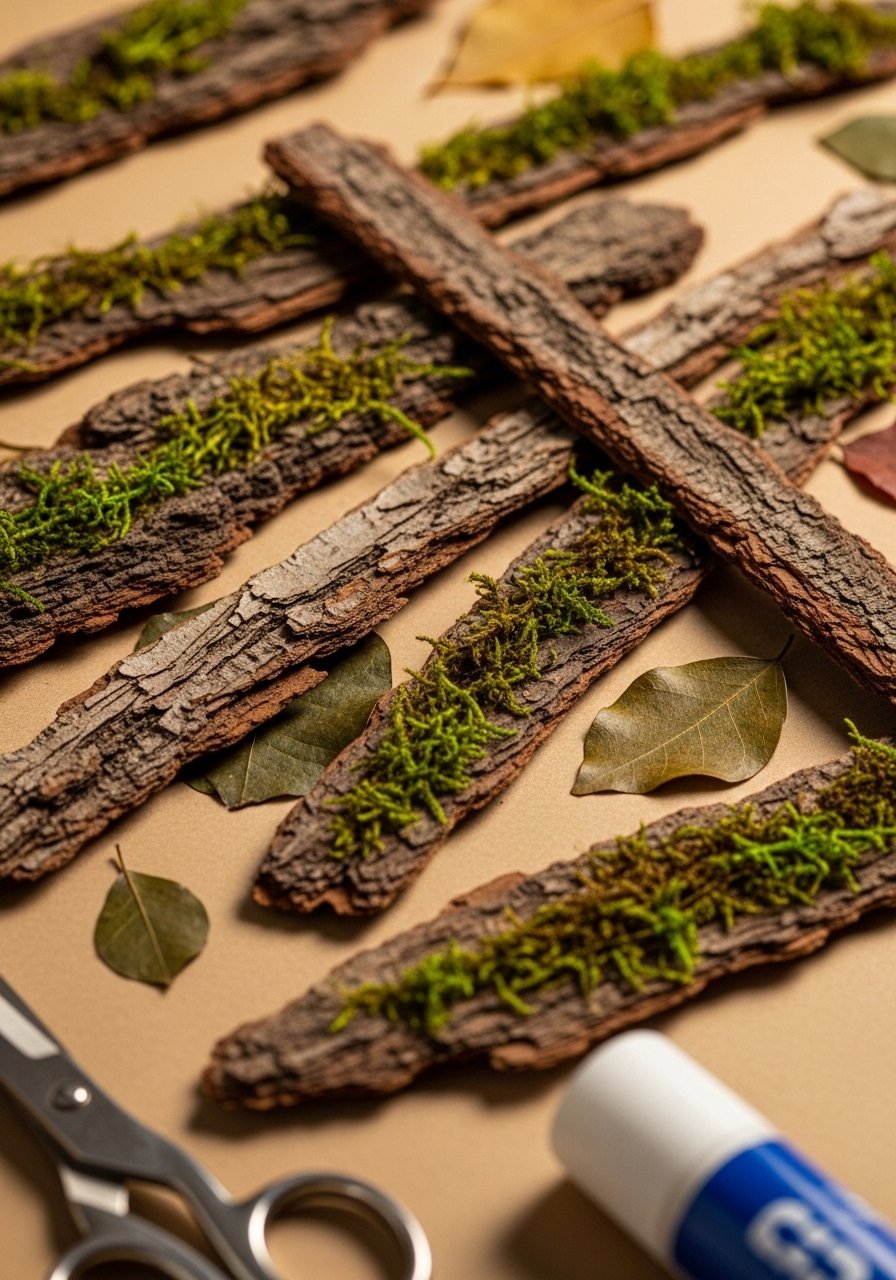
A bark collage is a sensory-rich project. Kids explore texture and composition while working with rough and soft natural elements. This project pairs well with simple sketching before gluing.
Materials
- Heavy kraft paper, 11” x 14”
- Assorted bark strips (small pieces), pressed moss, seed pods
- Glue stick and PVA craft glue for heavier pieces
- Scissors and tweezers for placement
- Optional: watercolor wash for background, 1 small pan set
Instructions
- Arrange a light watercolor wash on kraft paper and let dry 20 minutes.
- Plan collage layout. Use a glue stick for light items and PVA glue for heavier bark pieces.
- Press items firmly and weight with clean books for 30 minutes while drying.
- Trim edges if desired.
How to Display or Gift It
- Frame under glass for a textured art piece.
- Add a small label with the location of finds.
- Store completed pieces flat in a portfolio until framing.
- Use a portfolio storage case for protection.
- Nature Wind Chime (Sticks, Shells, and Beads)
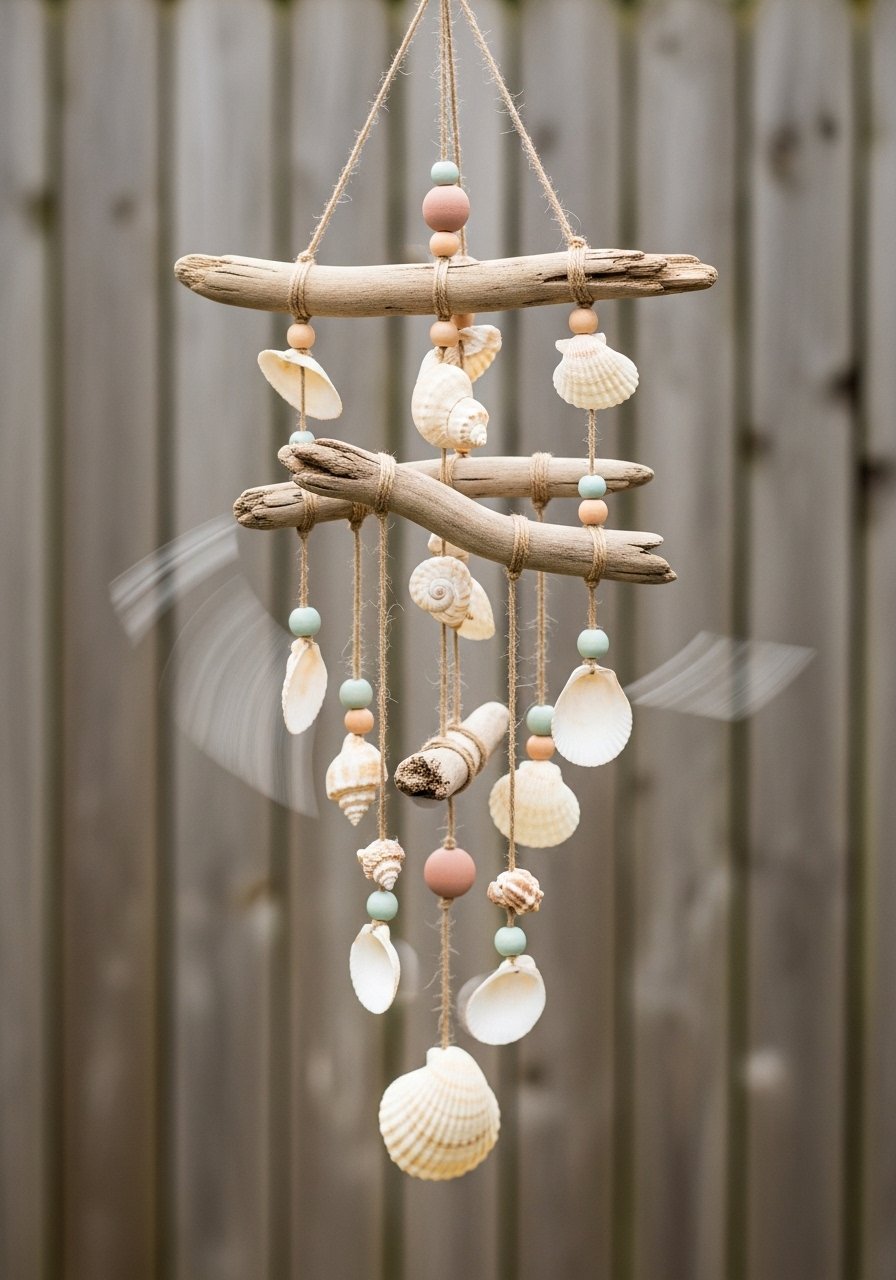
Wind chimes are charming and teach kids about balance and rhythm. Use a drill or a sharp awl to make holes in heavier materials; a hand drill bit works well for beads and shells.
Materials
- Driftwood or a straight stick, 10–14 in long
- Assorted shells, small drift pebbles, and beads (12–20 pieces)
- Nylon cord or natural jute twine, 5–8 yds
- Small drill bit or awl for making holes
- Scissors and a ruler
Instructions
- Cut lengths of twine (five to seven strands, 12–18 in each).
- Thread shells and beads, spacing as desired. Knot below and above larger pieces to secure.
- Tie strands evenly along the driftwood and make a hanging loop at each end.
- Test balance and adjust strand lengths so the chime hangs straight.
How to Display or Gift It
- Hang from a porch eave or near a window to catch breezes.
- Wrap in kraft paper and a ribbon for gifting.
- Store hanging in a garage or shed when not in use to avoid weathering.
- For neat storage, use a hardware organizer box.
- Leaf Print Tea Towels

Leaf printing on tea towels looks fresh and modern. Use fabric paint for washability. Kids can paint the leaf underside and press for mirror-like prints.
Materials
- Plain cotton tea towels, 18” x 28”, pre-washed
- Fabric paint (set of 6 colors)
- Foam brush and small roller (brayer)
- Assorted leaves, medium-large, washed and dried
- Cardboard to slide inside towel while printing
Instructions
- Insert cardboard into the towel to prevent bleed-through.
- Paint the underside of a leaf with an even layer of fabric paint using a foam brush.
- Press the painted side onto the towel, apply pressure with hands or a brayer. Lift carefully.
- Repeat with different leaves and colors. Let dry 1 hour, then heat-set with an iron per paint instructions (usually 3–4 minutes).
- Wash according to fabric paint directions.
How to Display or Gift It
- Fold and tie with twine for a kitchen gift.
- Use as a decorative runner on a breadboard.
- Keep spare towels in a kitchen drawer wrapped in tissue.
- A set of linen tea towels makes a nice base for printing.
- Seedpod Garland
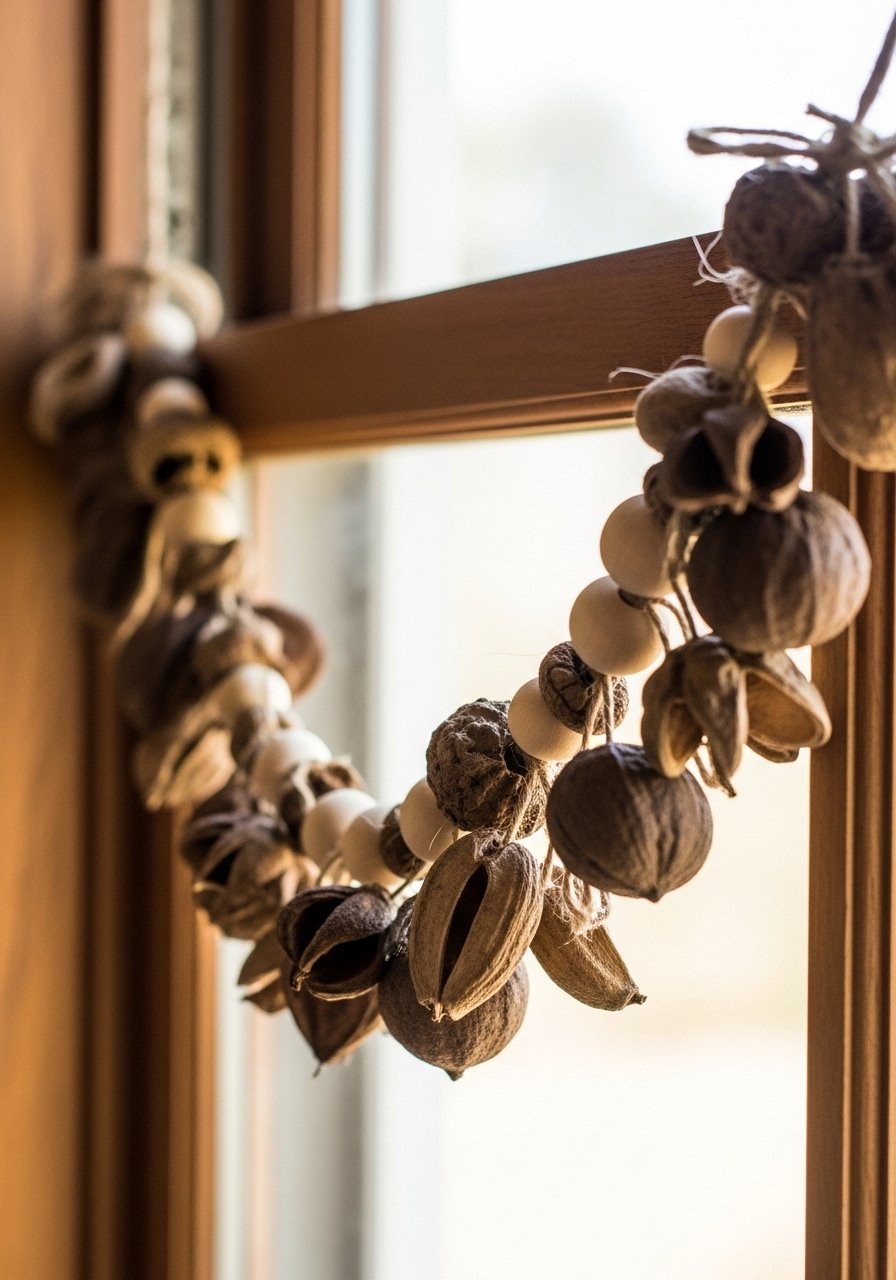
Seedpod garlands are lightweight and naturally elegant. Kids can string patterns or paint pods for a seasonal twist. Pre-drilling holes helps with tougher pods.
Materials
- Assorted seedpods (15–25), cleaned and dried
- Jute cord, 3–5 yds
- Small wooden beads, 20–30 pcs
- Hand drill or sharp awl for holes
- Scissors and a ruler
Instructions
- Drill or punch a small hole through each seedpod.
- Cut jute cord to final length, leaving a 6-inch tail on each end.
- String bead, seedpod, bead in a repeating pattern until garland is complete.
- Tie loops at ends for hanging. No drying time required.
How to Display or Gift It
- Drape across a mantel or over a window.
- Storage: coil loosely and keep in a breathable fabric storage bag.
- Paint a few pods metallic for holiday decor.
- Painted Leaf Mobiles
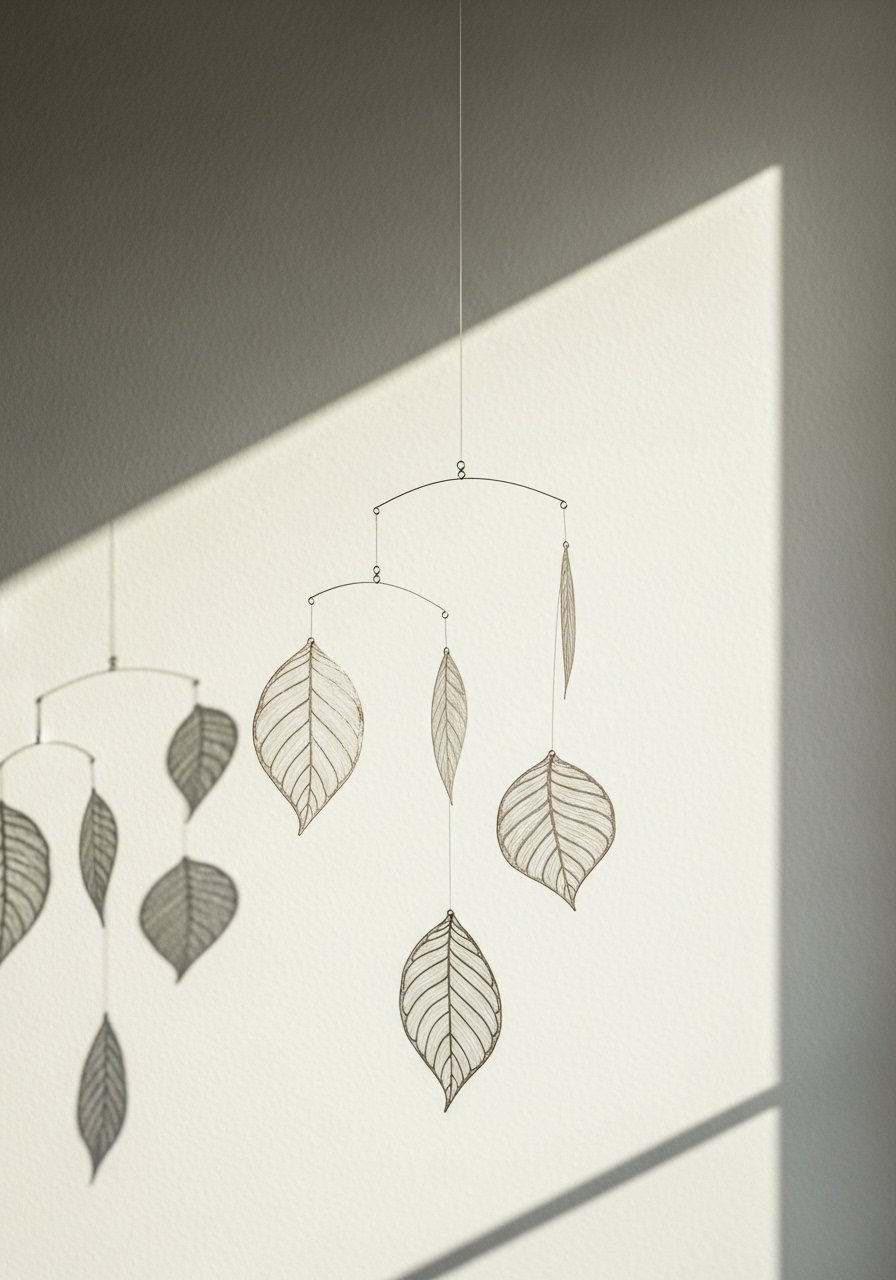
A painted leaf mobile turns found leaves into sculptural art. Use thin metal wire or embroidery hoop as the structure. Painting both sides gives longer-lasting color.
Materials
- Large sturdy leaves or faux pressed leaves, 6–10 pieces
- Acrylic paint or metallic leaf pens
- Thin craft wire or embroidery hoop, 6–8 in
- Needle-nose pliers and wire cutters
- Clear matte sealer spray
Instructions
- Paint leaves on both sides; dry 20 minutes between coats.
- Cut wire into lengths for each leaf, loop through base and twist secure.
- Attach wire strands to hoop at varying lengths. Balance the mobile by adjusting strand lengths.
- Spray with a clear matte sealer; dry 30 minutes.
How to Display or Gift It
- Hang above a reading nook or a baby’s crib (out of reach).
- Wrap in tissue and place in a small box for gifting.
- Store flat between sheets of tissue in a shallow box.
- Nature Stamped Clay Pins

Air-dry clay takes leaf textures beautifully and becomes wearable once cured. These pins are lightweight and make cute gifts.
Materials
- Air-dry clay, 8 oz block per 10 pins
- Assorted leaves for stamping
- Rolling pin and clay tools
- Pin backs with flat pad, 10 pcs
- Sanding sponge (fine) and acrylic sealer (matte)
Instructions
- Roll clay to 1/8” thickness. Press leaves firmly to leave clear impressions.
- Cut shapes with small cookie cutters or a craft knife. Smooth edges.
- Let dry 24–48 hours depending on thickness.
- Sand lightly and seal with a thin coat of acrylic sealer.
- Glue pin backs using E6000 and allow 24 hours cure.
How to Display or Gift It
- Add to a ribbon-wrapped card for gifting.
- Store pins in a small jewelry tray until ready to use.
- Make sets in seasonal palettes.
- Twig Star Ornaments
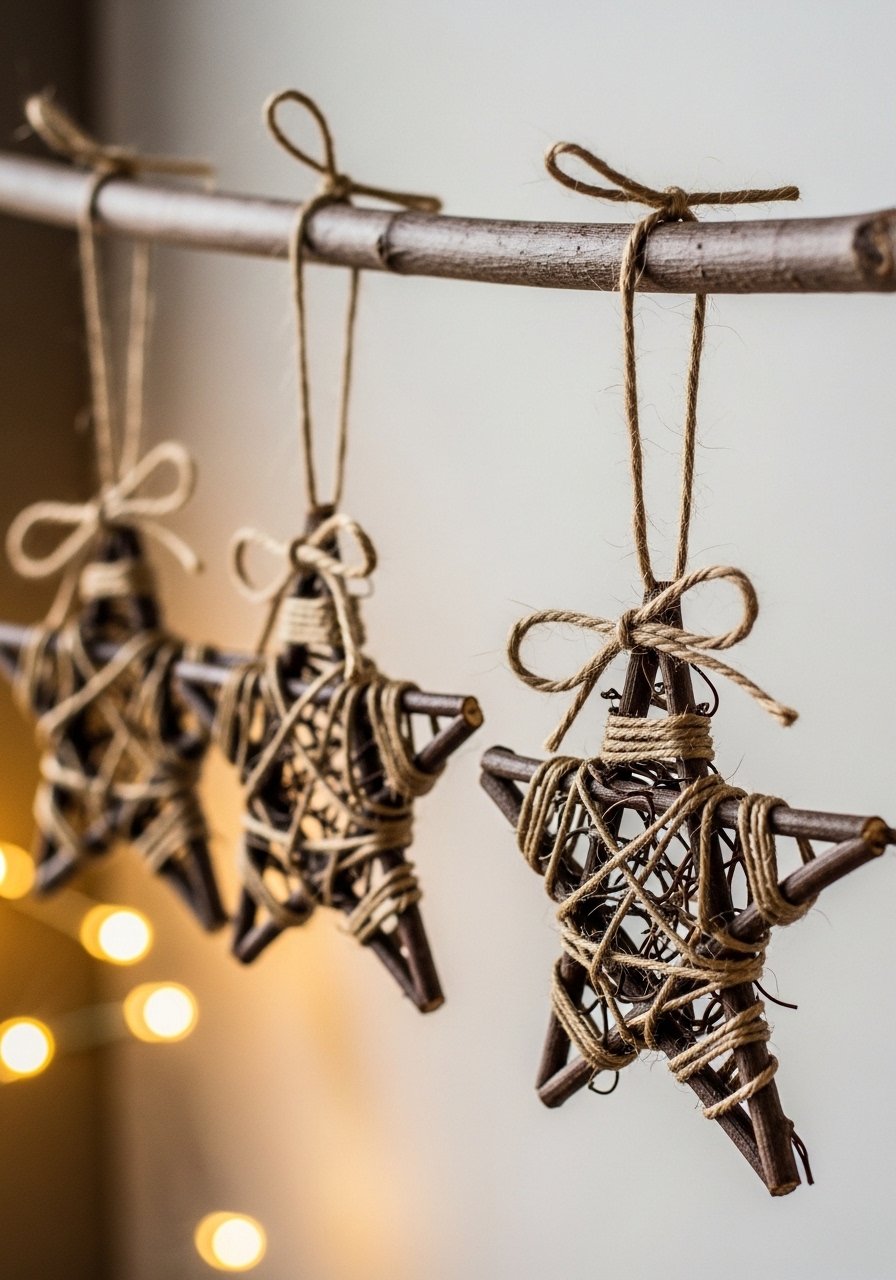
These twig stars are simple, geometric, and perfect for seasonal decorating. Younger kids can lay out shapes while adults glue or wire them.
Materials
- Small straight twigs, 6 per star, approx. 4–5 in each
- Twine or thin floral wire, 1–2 yds per 6 stars
- Hot glue gun or floral wire pliers
- Optional: glitter paint or gold leaf pen
Instructions
- Lay twigs in a star pattern. Secure intersections with glue or wrap with wire.
- Trim any uneven ends. Tie a loop of twine for hanging.
- Add a coat of sealant or paint for weather protection; dry 30 minutes.
How to Display or Gift It
- Hang on a mini garland across a mantel.
- Group in a clear box with tissue for a rustic gift.
- Store flat in a shallow ornament storage box.
- Painted Shell Rock Magnets
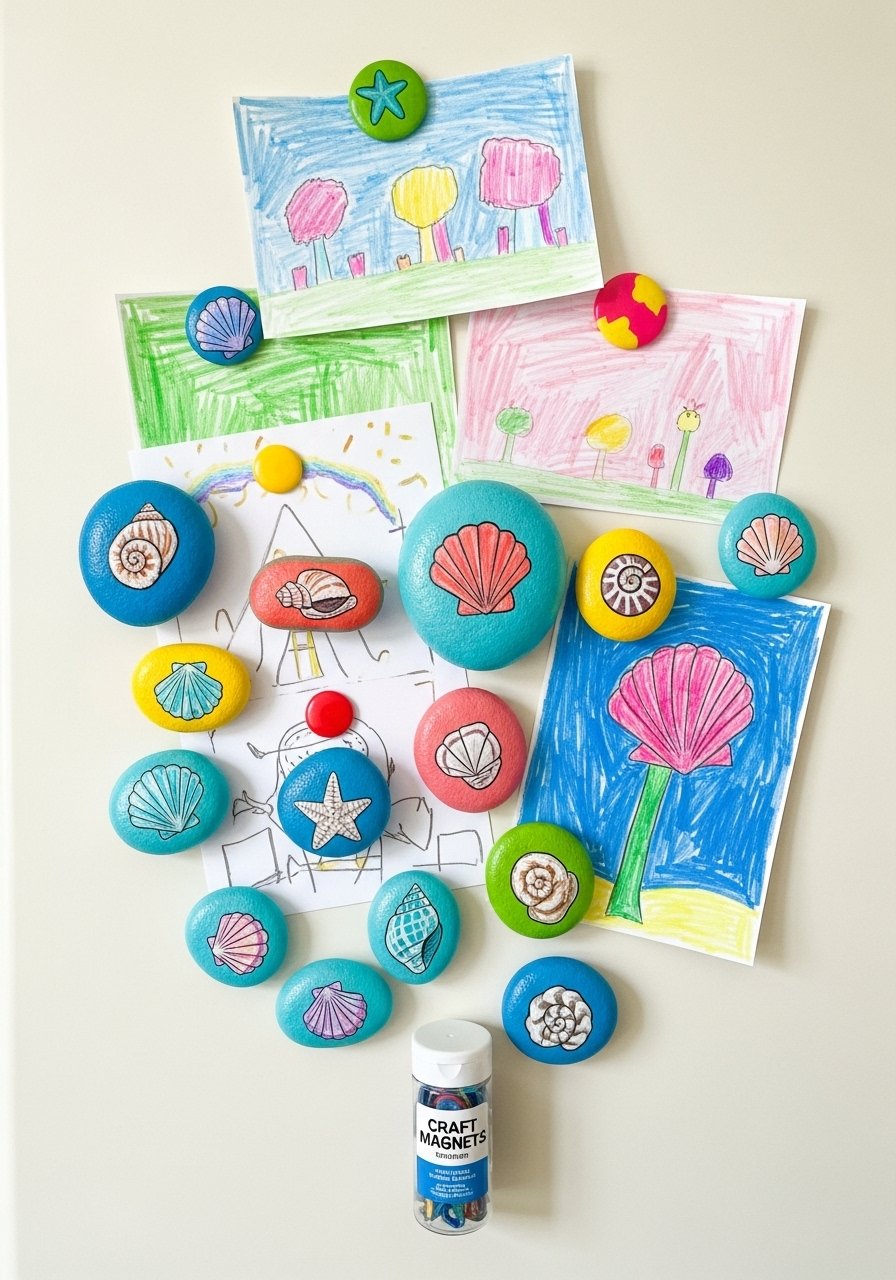
Combine rock painting with a magnet back for custom fridge art. Shell and sea motifs work wonderfully. Use strong disc magnets and epoxy for secure adhesion.
Materials
- Small flat rocks, 1–2 in diameter
- Acrylic paints and detail brushes
- Small disc magnets, 0.5 in diameter, 6–12 pcs
- Epoxy glue (5-minute) or E6000 for strong bond
- Clear acrylic sealer spray
Instructions
- Paint designs and let dry 20 minutes between coats.
- Seal painted surface with a light coat of sealer; dry 30 minutes.
- Glue magnet to the back with epoxy; clamp if needed for 5–10 minutes until set. Full cure 24 hours.
How to Display or Gift It
- Use as teacher gifts or stocking stuffers.
- Pack in a small kraft box with tissue.
- Store magnets in a magnetic strip on a craft board when not in use.
- Acorn Cap Doll Buttons
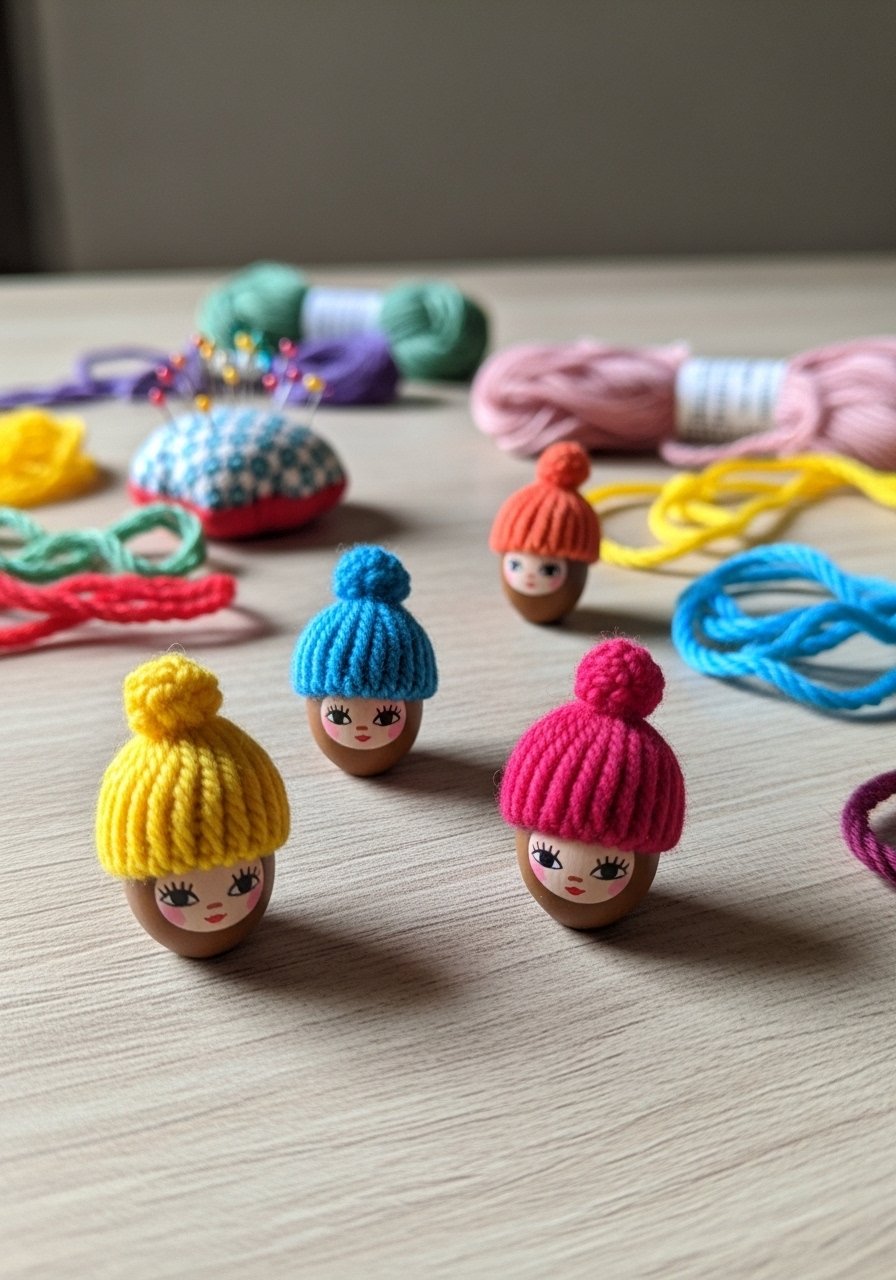
These tiny acorn-cap dolls are utterly charming and easy for small hands to customize. They’re perfect for dollhouses or as necklace pendants.
Materials
- Acorn caps, 20–30 cleaned and rinsed
- Small beads or painted wooden heads, 20–30
- Yarn scraps for hats, fabric glue and needle (optional)
- Fine-tip permanent marker for faces
- Jewelry chain or ribbon if making a pendant
Instructions
- Clean acorn caps and let dry 24 hours.
- Glue bead or wooden head into cap; allow glue to set 30 minutes.
- Add yarn hats glued into place. Draw tiny faces with a fine-tip marker.
- Attach loop of thread or ribbon for hanging if desired.
How to Display or Gift It
- String a set into a tiny mobile for a nursery.
- Present as a set in a small kraft jewelry box.
- Keep extras in a compartmentalized bead box.
- Nature Collage Stones (Memory Stones)

Memory stones preserve an outing by attaching small finds to a painted rock. Seal well for outdoor display. Kids can write a date or short note.
Materials
- Medium flat rocks, 3–4 in diameter
- Acrylic paint and paint pens
- Small collected items (mini shells, leaf bits)
- Clear epoxy resin (small kit) or strong outdoor Mod Podge
- Small foam brush
Instructions
- Paint a base color and let dry 20 minutes.
- Arrange small items on the rock. Use epoxy resin for a smooth, durable finish. Mix resin per kit instructions.
- Pour a thin layer of resin over the stone. Resin cures 24–72 hours depending on kit and temperature.
- For Mod Podge, apply 2–3 thin coats, drying 15–20 minutes between coats. Full cure 24 hours.
How to Display or Gift It
- Use as garden markers or paperweights.
- Wrap in cellophane for gifting.
- Store indoors if resin-cured pieces are fragile.
- A small epoxy resin kit works well for this project.
- Leafy Nature Crowns
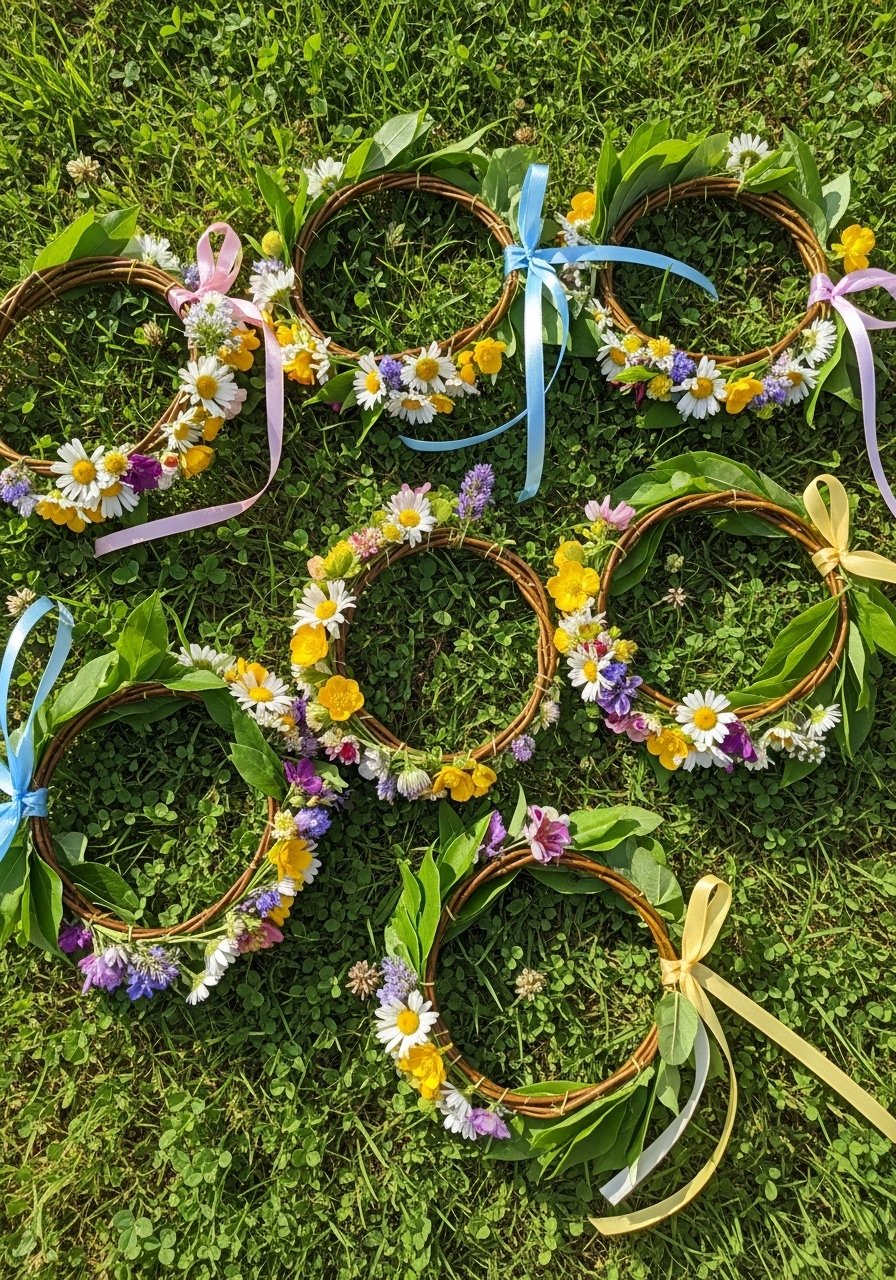
A nature crown is playful and ceremonial for dress-up. Use flexible stems like willow or grapevine for easy weaving. Secure leaves with floral wire.
Materials
- Flexible willow stems or grapevine, 3–4 stems per crown
- Assorted leaves and small flowers, fresh or dried
- Floral wire and wire cutters
- Ribbon for ties, 12–18 in
- Scissors
Instructions
- Braid stems into a 20–22 in crown base, overlapping ends and tucking them in. Secure with floral wire.
- Attach leaves and flowers with floral wire, spacing evenly.
- Tie ribbon at the back for size adjustment. No drying time required unless using glue for dried flowers.
How to Display or Gift It
- Wear for nature-themed parties or story time.
- Store flat wrapped in tissue to avoid crushing dried blooms.
- A floral wire roll keeps supplies organized.
- Nature-Themed Story Stones

Story stones encourage storytelling and are fun for group play. Paint simple icons and let kids invent tales based on the stones drawn.
Materials
- Small smooth stones, 6–12 per set
- Acrylic paint and fine brushes
- Small linen drawstring bag
- Clear matte sealer spray
Instructions
- Paint simple icon on each stone; dry 20 minutes between colors.
- Seal with 1–2 light coats of matte sealer; dry 30 minutes between coats.
- Place stones in a linen bag for storytelling games.
How to Display or Gift It
- Use as a bedtime storytelling ritual.
- Store in the drawstring bag when not in use.
- A linen drawstring pouch is perfect for portability.
- Bark and Bead Napkin Rings
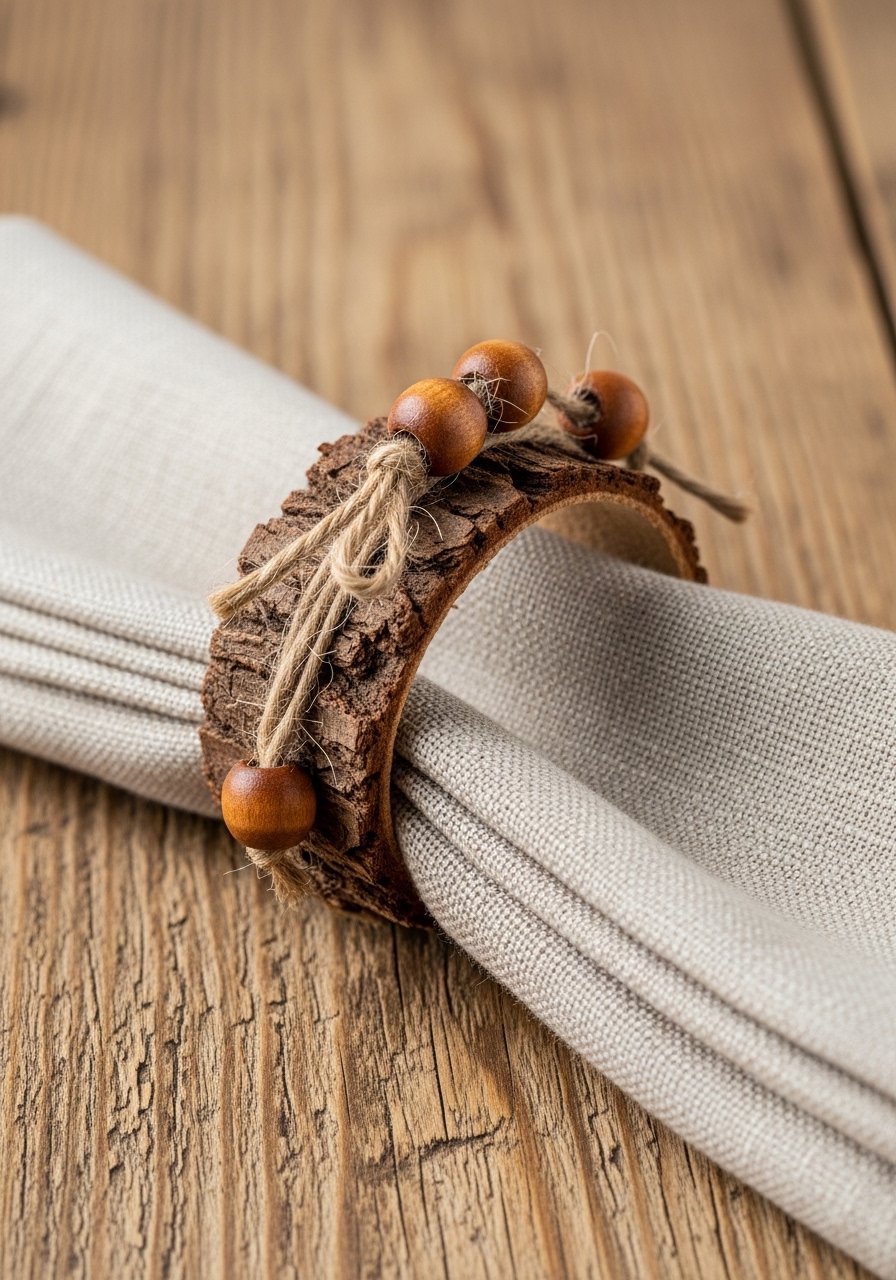
These napkin rings combine raw bark texture with smooth beads for a farmhouse table. They’re quick to assemble and customizable.
Materials
- Thin bark strips (or faux bark ribbon), 1.5” x 6” each
- Small wooden beads, 6–10 per ring
- Hot glue gun and glue sticks
- Twine for wrapping and finishing
Instructions
- Curl bark into a ring and glue the ends. Let sit 10 minutes to set.
- Thread beads onto twine and wrap across the ring; secure ends with glue.
- Trim excess twine and press ends under beads. Allow glue to set 10–15 minutes.
How to Display or Gift It
- Use for outdoor dinner parties or seasonal place settings.
- Store rings flat in a shallow tray between uses.
- A small wooden bead pack gives lots of options.
- Nature Treasure Suncatchers
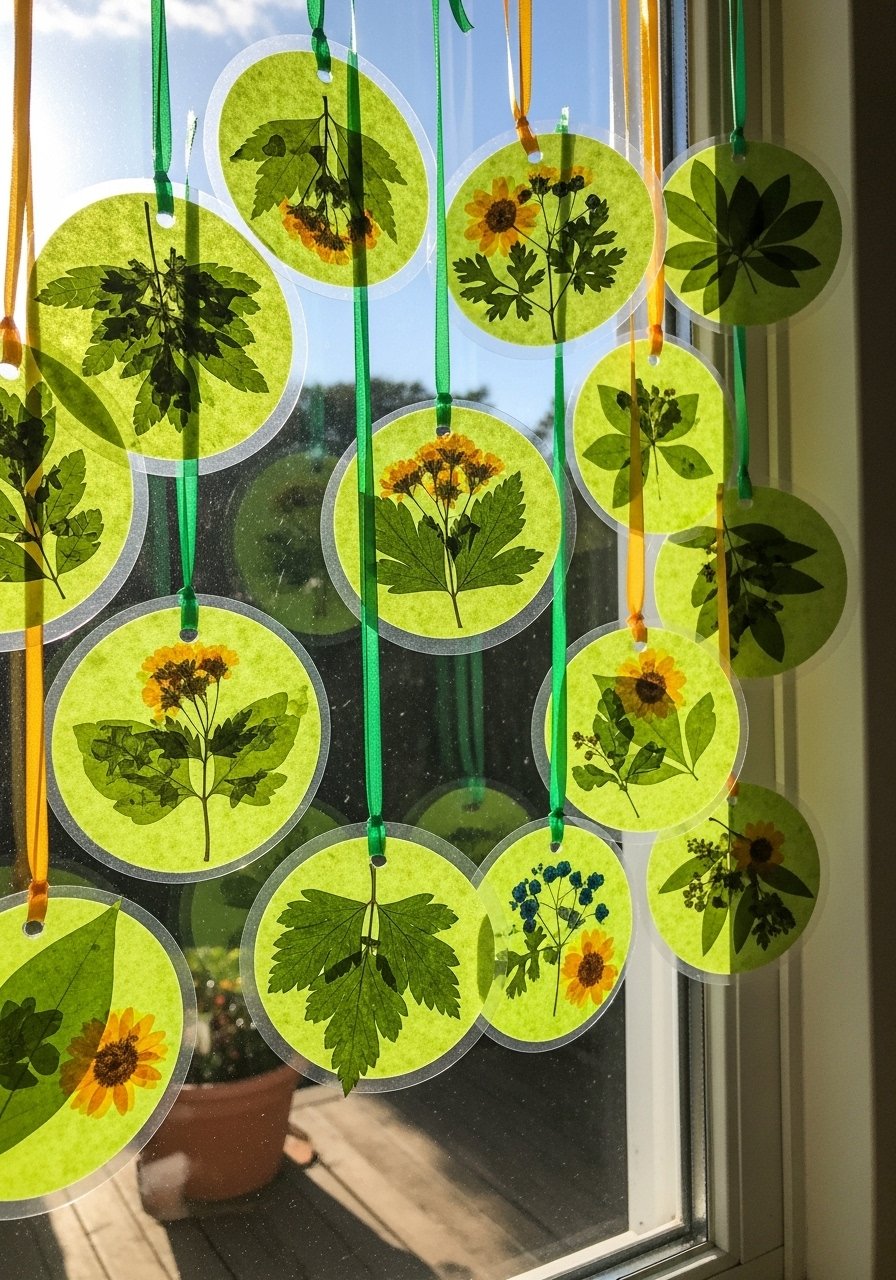
Suncatchers bring pressed nature inside and let light reveal tiny details. Self-adhesive laminating sheets make it safe and easy for kids.
Materials
- Self-adhesive laminating sheets, 8.5” x 11”, 5–10 sheets
- Pressed leaves and small flowers
- Hole punch and ribbon, 6–8 in per suncatcher
- Scissors and circle cutter (optional)
Instructions
- Arrange pressed items on the sticky side of a laminating sheet. Overlay with another sheet and smooth.
- Cut into shapes with scissors or a circle cutter. Hole punch top and thread ribbon.
- Hang in sunny windows. No drying time.
How to Display or Gift It
- Make a cluster of suncatchers for a bright window display.
- Pack flat for gifting in a cellophane sleeve.
- Painted Branch Hooks
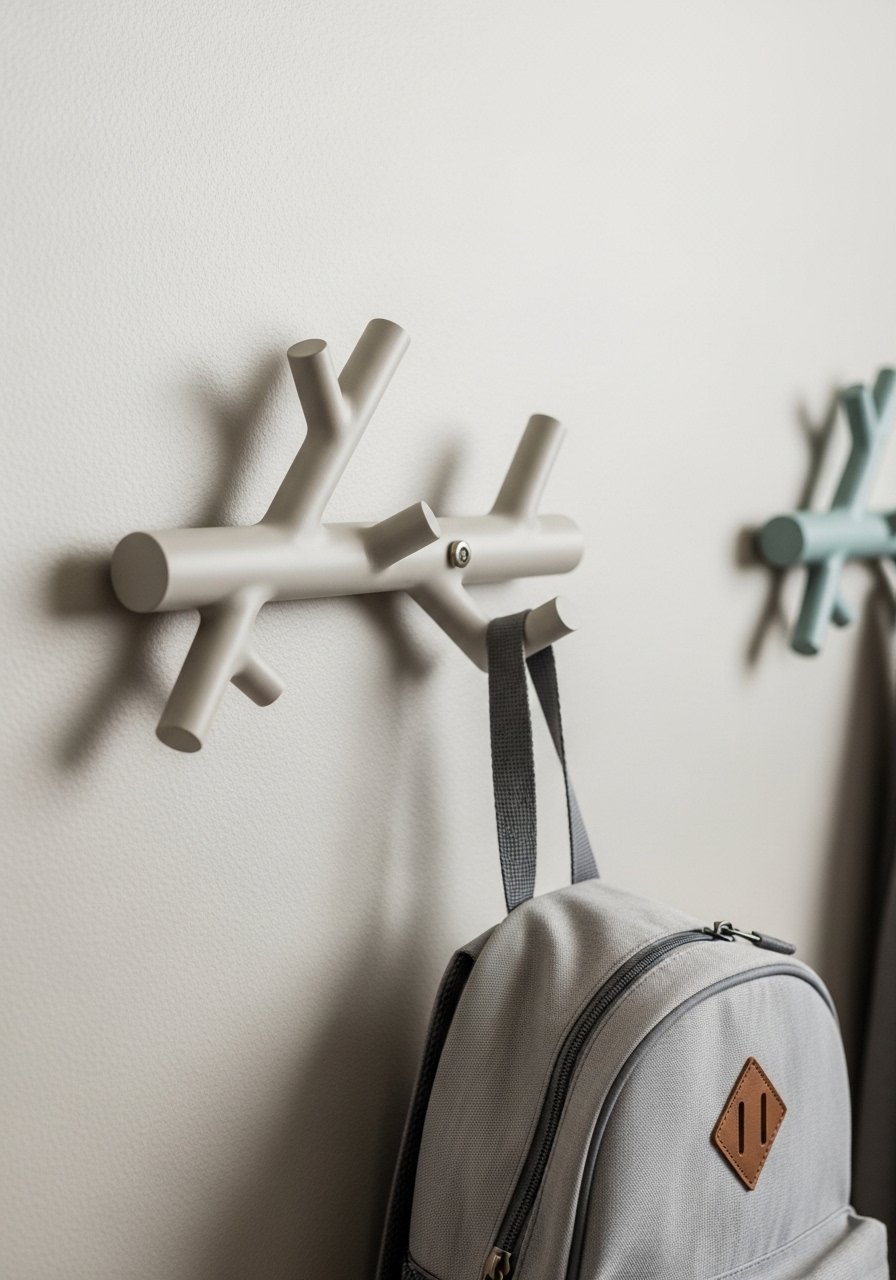
Turn a sturdy branch into a set of hooks for kids' coats. Sand and seal for durability. Attach with hidden screws for safety.
Materials
- Thick branch, 18–24 in long, sanded smooth
- Small screw-in coat hooks, 3–4 pcs
- Drill and screws for wall mounting
- Sandpaper and exterior-grade sealant (satin)
Instructions
- Sand branch smooth and test-fit hook locations.
- Pre-drill small pilot holes for hooks. Screw in hooks securely.
- Seal with 2 coats of exterior-grade sealant, drying 30 minutes between coats. Full cure 24 hours.
- Mount to wall with heavy-duty screws and anchors.
How to Display or Gift It
- Install in a mudroom at child-friendly height.
- Wrap in kraft paper for a rustic housewarming gift.
- A set of wall anchors and screws ensures secure mounting.
- Resin Leaf Coasters — nature craft ideas for kids
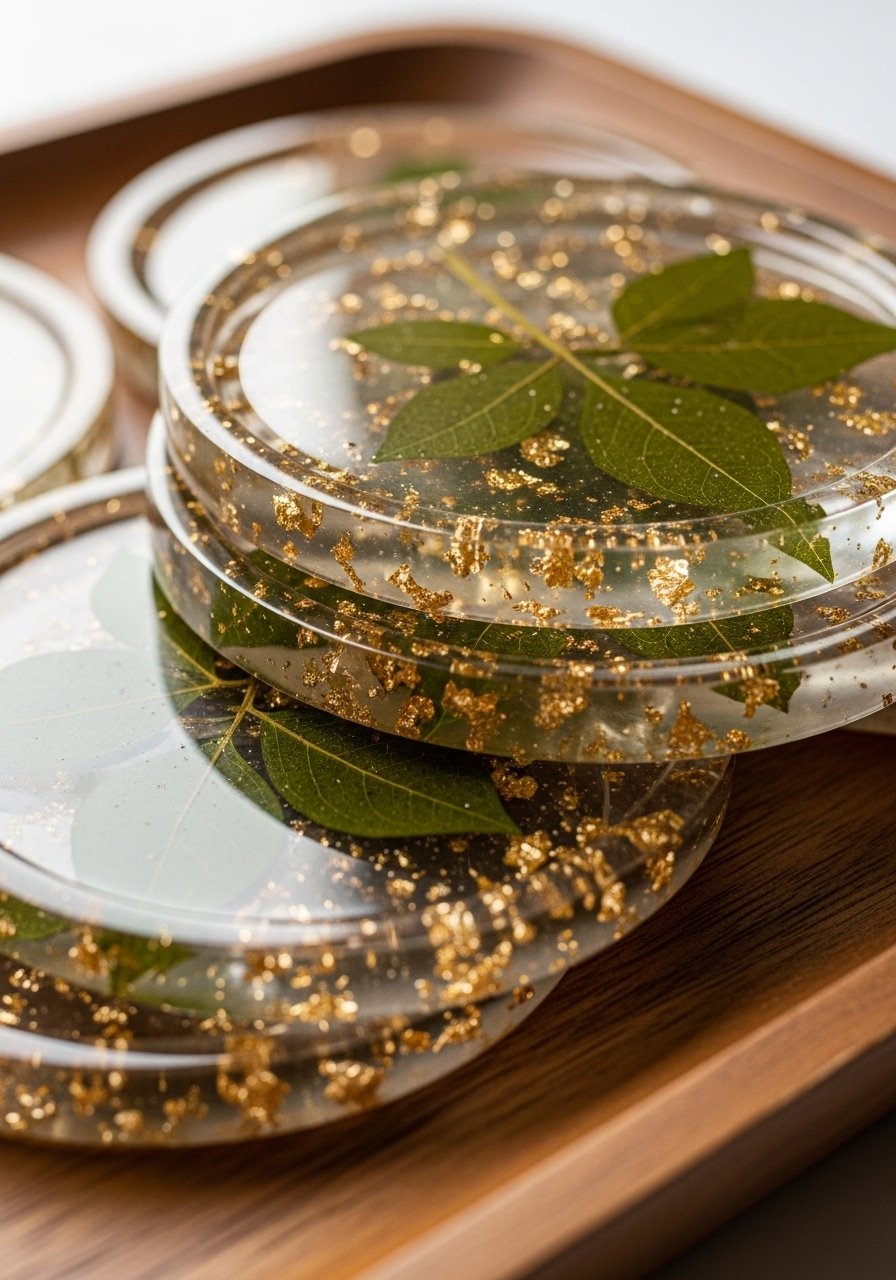
These glossy resin coasters lock in pressed leaves and look wonderfully modern. Resin requires adult supervision for mixing and pouring. Use silicone molds for uniform shapes.
Materials
- Silicone coaster molds (round, 4” diameter)
- Pressed leaves, fully flattened and dry
- Two-part epoxy resin kit (clear), small kit for 4 coasters
- Nitrile gloves, mixing cups, and stir sticks
- Fine sandpaper (400 grit) and polishing cloth
Instructions
- Ensure pressed leaves are fully dry (48 hours after pressing).
- Mix resin per kit instructions in a well-ventilated space. Wear gloves.
- Pour a thin base layer into mold and let sit 10–15 minutes to reduce bubbles. Place leaf gently.
- Pour remaining resin to cover leaf; use a heat gun for 2–3 seconds to pop surface bubbles.
- Let cure undisturbed 24–72 hours depending on resin. Demold and sand edges lightly if needed. Full cure may take up to 7 days for hardness.
- Polish with a soft cloth.
How to Display or Gift It
- Stack coasters and tie with a ribbon for a gift.
- Keep extras in a coaster holder on a coffee table.
- Store finished resin pieces flat and out of direct sun.
- A small resin toolkit makes these steps easier.
Thanks for crafting through all 22 projects! Whether you made a single set of leaf lanterns or a whole batch for gifts, you now have ideas that use leaves, sticks, rocks and other outdoor treasures in playful, display-worthy ways. Pin this list for your next nature walk and share a favorite project with a friend — which one will you try first?
Quick tip: a reliable low-temp hot glue gun handled gently will simplify assembly across many of these projects without scalding hands. Happy crafting — and don’t forget to tell me which nature craft ideas for kids were a hit with your group.


