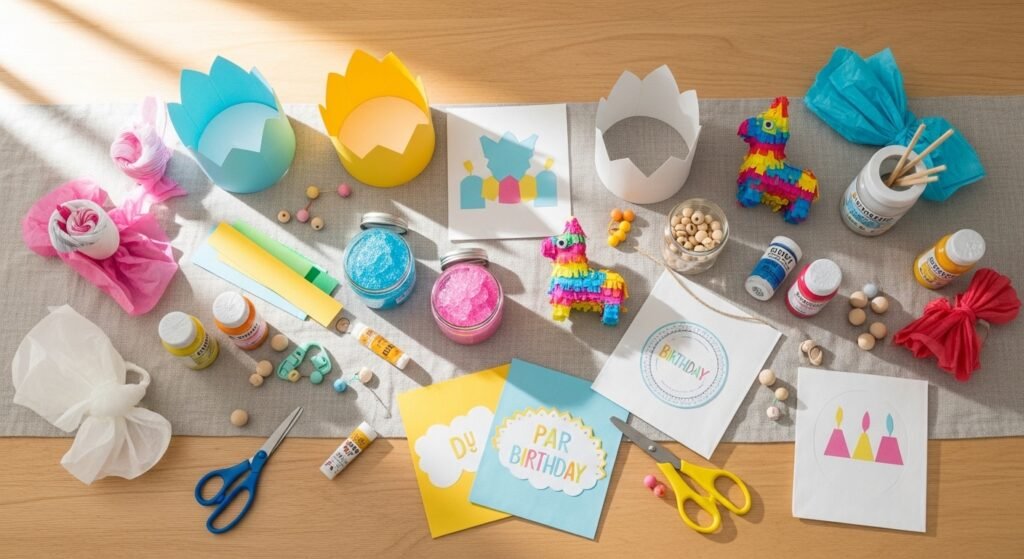
Throwing a kids party that feels personal and playful doesn't have to mean expensive entertainment. With a little prep and a stack of craft supplies, you can turn a simple celebration into a hands-on maker moment. These 29 craft ideas for kids birthday party cover quick favors, activity stations, and keepsake projects that match any theme — from boho fairy to superhero squad.
You’ll find projects that suit beginners and slightly older kids, plus clear materials lists, step-by-step instructions, and real tips to avoid sticky messes. I often start setting up with my hot glue gun and a roll of painter’s tape, but many of these crafts work perfectly with basic glue sticks and child-safe scissors too. Want crisp vinyl labels or dozens of identical shapes? Run them through a Cricut Explore cutting machine to save time.
Bookmark or pin this page — you'll have an activity-ready list for backyard parties, rainy-day celebrations, or craft-filled sleepovers. Ready to make something festive?
- DIY Felt Party Crowns

These felt crowns are soft on little heads and perfect for theme parties — princess, woodland, or space. They feel cozy and wearable, and the layered felt creates a plush look that's easy for kids to decorate. If you want perfectly shaped points, trace templates using a clear ruler and cut with a Fiskars detail scissors set.
Materials
- 3mm wool-blend felt sheets, assorted colors, 9 x 12 inches (3 sheets)
- Elastic cord, 1/4 inch wide, 18 inches per crown (cutable)
- Embroidery floss, 6-strand, small skeins
- Small pom-poms, 6mm, pack of 100
- Fabric glue or tacky glue, 2 oz
- Needle and size 7 embroidery needles
- Scissors (fabric)
- Optional: fabric glue gun sticks (for glue gun use)
Instructions
- Trace crown template on felt; each crown uses two mirrored pieces (front/back). Template width ~21 cm (8.25 in) and height ~12 cm (4.75 in).
- Cut two felt pieces per crown with sharp fabric scissors. Cut elastic to 18 inches and knot ends.
- Position elastic ends between the felt pieces at the base. Use pins to hold in place.
- Sew around the base with blanket stitch using embroidery floss, catching elastic knot into the stitch for security. Or, use fabric glue and press 30 seconds, then clamp with clips for 10 minutes.
- Add decorations: glue pom-poms along peaks, stitch felt stars, or add sequins.
- Let glue cure 24 hours for full bond before wearing.
How to Display or Gift It
- Place crowns on a low wooden shelf at the party craft table as a “make and wear” station.
- Tie one in tissue paper and tuck in a kraft favor bag for take-home costumes.
- Store flat in a stackable craft organizer to keep shapes from bending; use a sheet of parchment between crowns.
- For travel parties, pre-cut felt kits in resealable bags so kids can assemble during the event.
- Craft ideas for kids birthday party: Mini Piñata Kits

Mini piñatas are instantly festive and perfect as an activity station or take-home treat. These small versions are easy to fill and hang; kids love feathered textures and bright crepe layers. I use a low-temp hot glue gun for the seams — it holds fast without burning cardboard.
Materials
- Cardboard cones or small paper-mâché cones, 4–6 inch tall (3)
- Crepe paper streamers, assorted colors, 5 rolls
- Tissue fringe scissors or regular scissors
- Thin ribbon, 1/8 inch, 2 yards
- Candy or small toys for filling (wrapped)
- Craft glue or tacky glue, 4 oz
- Hole punch
- Optional: washi tape, small pom-poms
Instructions
- Cut crepe paper into 1.5 inch strips. Fringe edges with scissors (leave 1/4 inch uncut).
- Starting at the cone base, glue fringed strips in overlapping layers with tacky glue; press 10 seconds until set.
- Continue layering up to the tip. Let glue dry 20 minutes between sections.
- Punch two small holes near the base for ribbon. Thread ribbon through and tie a secure loop for hanging.
- Fill with wrapped treats through the top opening; seal with a last fringe layer.
- Hang and let kids gently pull the ribbon tails to open, or use a craft stick to break them open carefully.
How to Display or Gift It
- Hang a row of mini-piñatas from a low branch or dowel for a colorful backdrop.
- Use as table centerpieces with name tags for each guest.
- Pack as take-home party kits with a small stick and extra treats in a kraft bag.
- Store flat (unassembled cones) in a craft box until the party.
- Glitter Slime Station (craft ideas for kids birthday party)
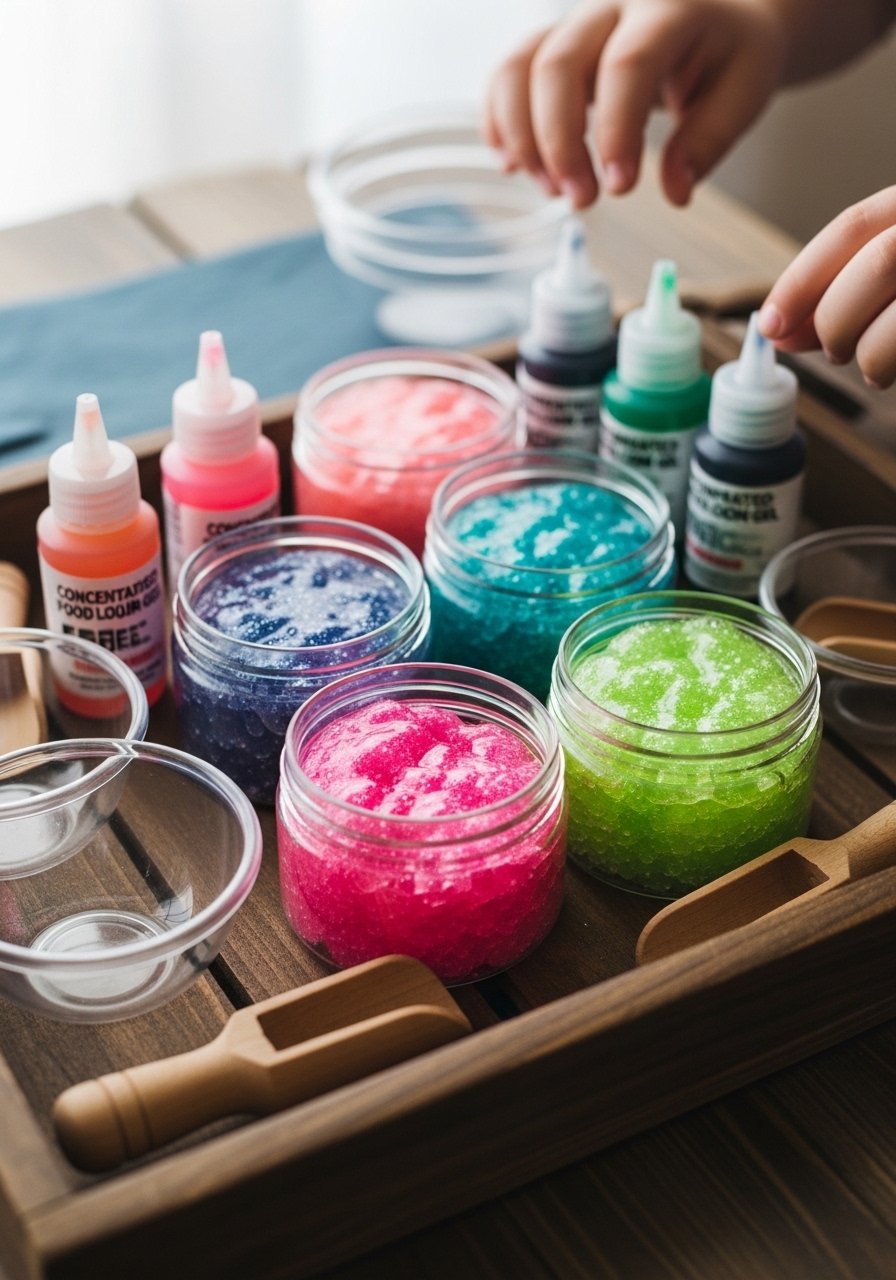
A slime station is an instant crowd-pleaser. This recipe stays less sticky and has fun stretch — great for supervised play. I keep a jar of clear school glue and contact lens solution for a reliable texture.
Materials
- Clear school glue, 4 oz per color
- Baking soda, 1/2 tsp per batch
- Contact lens solution with boric acid, 1 tbsp per batch
- Cosmetic-grade glitter, small jars, assorted
- Food coloring gels or liquid, a few drops
- Small plastic bowls for mixing
- Disposable spoons and storage jars with lids, 4 oz
- Optional: foam beads, sequins for texture
Instructions
- Pour 4 oz clear glue into a mixing bowl.
- Add 1/2 tsp baking soda and stir until combined.
- Add a few drops of gel color and desired glitter; mix well.
- Slowly add 1 tbsp contact solution while stirring until slime pulls away from the bowl.
- Knead with clean hands for 2–3 minutes; add contact solution in small increments if still sticky (up to another 1/2 tbsp).
- Store in airtight jars; let rest 30 minutes to reach best texture.
How to Display or Gift It
- Set out jars with scoops and labels for a decorate-your-own slime bar.
- Pack in clear jars for take-home favors; add a printed care card.
- For storage, keep in airtight containers at room temperature; use within 1–2 weeks.
- Pair with a small instruction card and a mini funnel to refill jars later.
- Paper Plate Tambourines
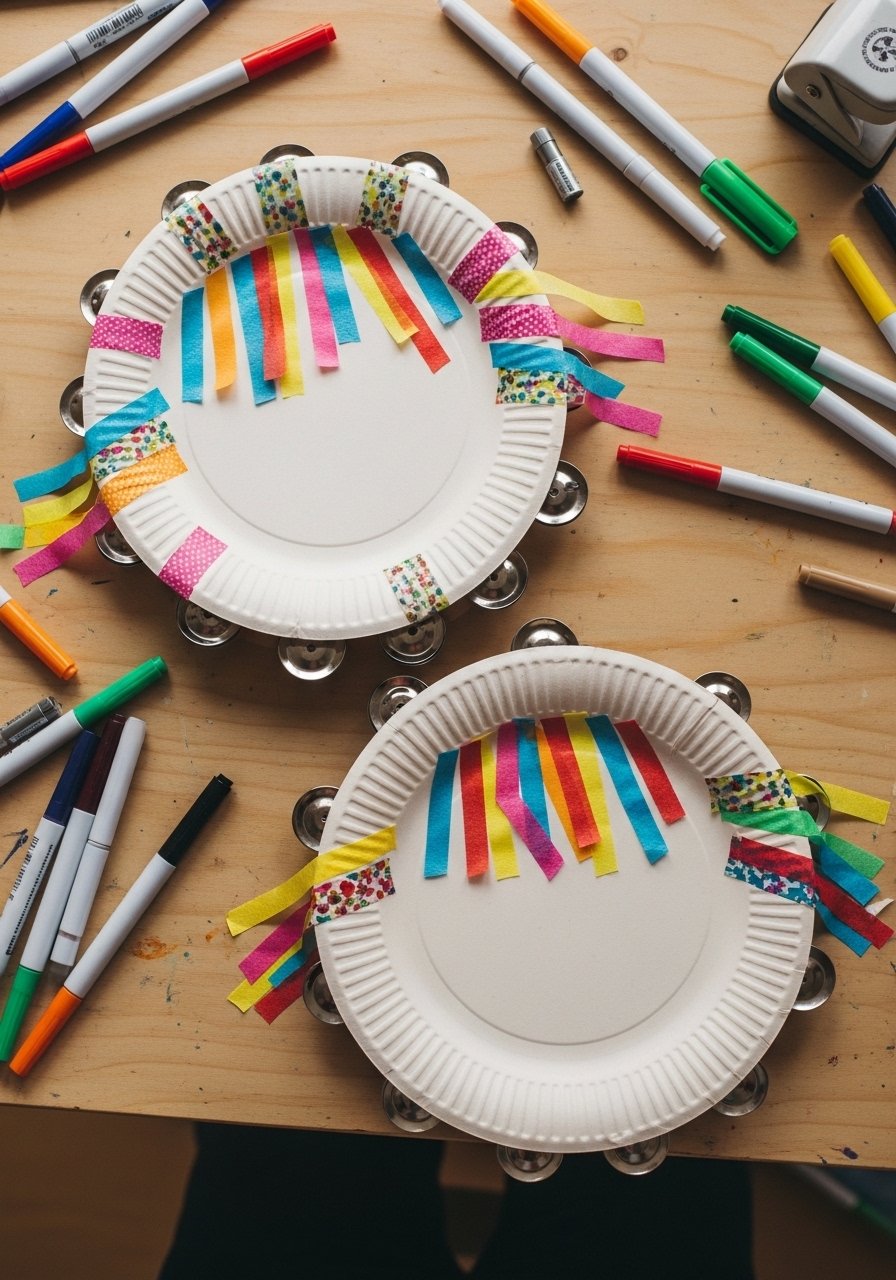
These tambourines are loud, bright, and easy for toddlers and older kids. They double as party instruments during a dance-off and are light enough to decorate extensively. If you want tidy edges, a 3-hole punch helps space bells evenly.
Materials
- Paper plates, 9-inch, 2 per tambourine (per child)
- Jingle bells, 6–8 small bells
- Hole punch or awl
- Yarn or ribbon, 18 inches
- Washi tape rolls, assorted
- Markers, acrylic paint pens
- Glue stick or tacky glue
- Optional: sequins, stickers
Instructions
- Let kids decorate the outside of one plate with markers, paint pens, or washi tape; let dry if using paint (~15 minutes).
- Punch holes around the rim of both plates spaced 1.25 inches apart.
- Tie short loops of yarn through each bell and thread them through paired holes around the edge, alternating bells between the two plates.
- Sandwich the two plates together and tie yarn through each hole, securing bells and plates.
- Tie off with a knot, trim yarn and hide ends with washi tape.
- Test sound; add more bells if needed. Let glue set 20 minutes if used.
How to Display or Gift It
- Use them during a party parade or musical game.
- Attach a ribbon loop for hanging on a party wall.
- Store flat in a shallow craft bin to avoid bells tangling.
- Include a small name sticker to personalize each instrument.
- Custom Stickers & Water Bottle Labels
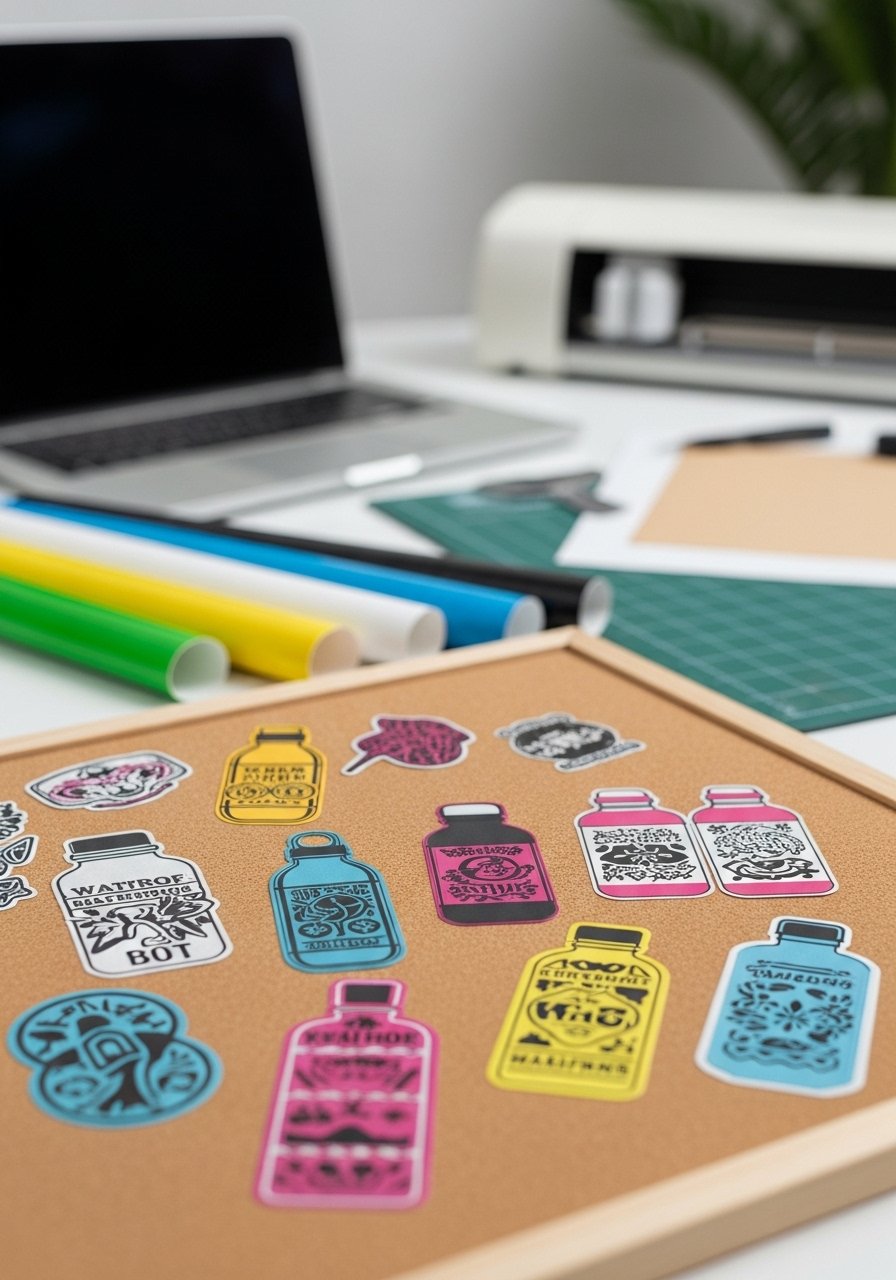
Personalized stickers and water bottle labels add a polished touch to favors. Design on a laptop and cut with a Cricut Explore cutting machine or hand-trim with a craft knife for sharp edges.
Materials
- Printable vinyl sticker sheets (waterproof), 8.5 x 11 in, pack of 10
- Clear laminate sheets (optional), 8.5 x 11 in
- Scissors or precision craft knife
- Ruler and cutting mat, 12 x 18 in
- A laptop with design files or printable templates
- Clear water bottles, 12 oz each
- Masking tape (to hold label while wrapping)
Instructions
- Design sticker graphics sized for bottles (label 7 x 2.5 in typical).
- Print onto vinyl sticker sheets. Let ink dry 10 minutes.
- Cover with clear laminate if extra durability is needed; smooth with a brayer roller to remove bubbles.
- Cut labels using a ruler and craft knife on a self-healing cutting mat for straight edges.
- Clean bottle surface with rubbing alcohol and dry.
- Wrap label around bottle, aligning seam, press firmly to adhere.
How to Display or Gift It
- Present bottles at each place-setting or in a chilled box.
- Use labels as part of a themed hydration station.
- Store unused labels flat in a resealable craft organizer.
- For weddings or grown-up events, pair labels with matching coasters or tags.
- Tie-Dye Bandana Favors
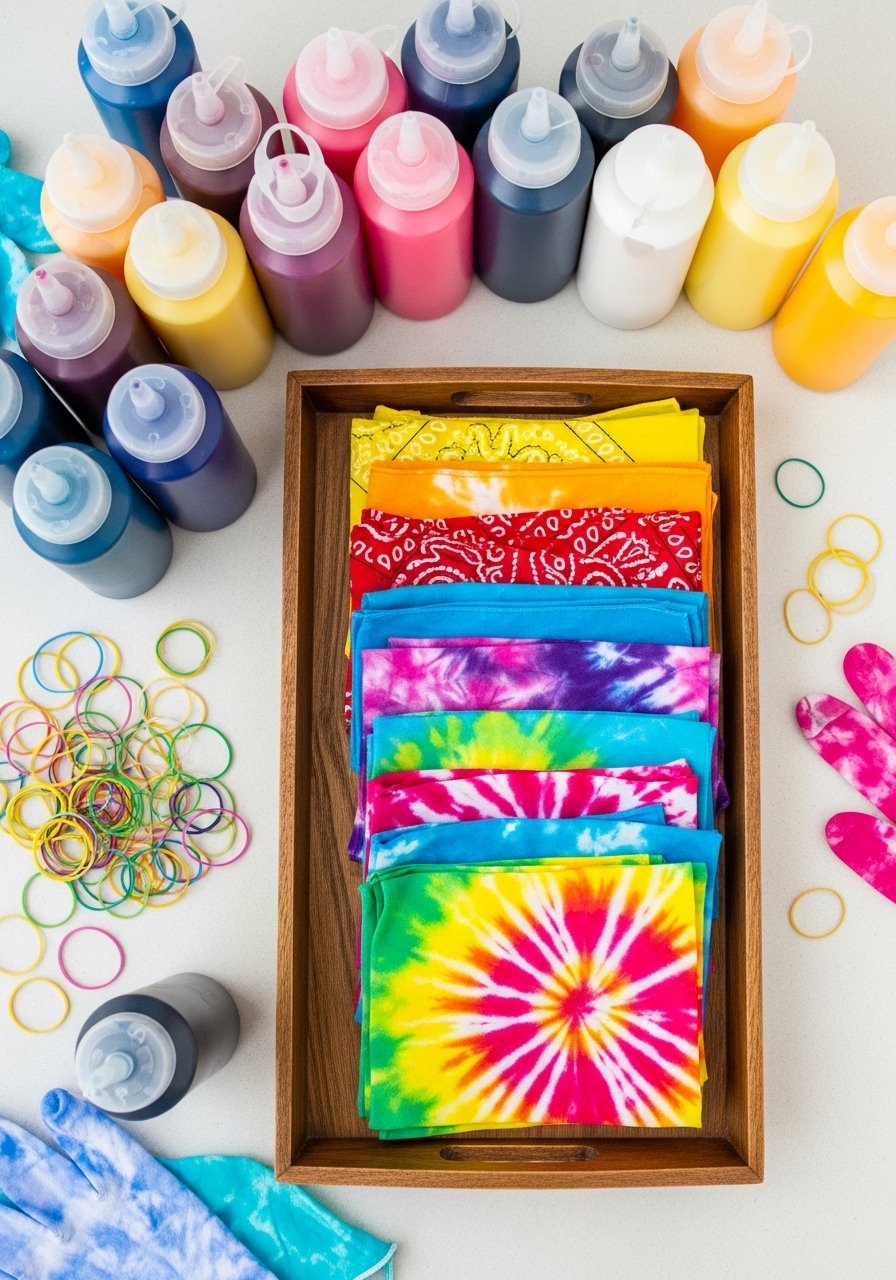
Bandanas make cute wearable favors and double as napkins or headbands. Use powdered fiber-reactive dye for vivid, wash-fast color; I squeeze dye from bottles for control. Wear gloves and protect surfaces with plastic.
Materials
- Cotton bandanas, 22 x 22 inches, pack of 12
- Fiber-reactive dye powder in squeeze bottles, assorted colors
- Rubber bands, assorted sizes
- Plastic squeeze bottles (if mixing dye)
- Disposable gloves and plastic table cover
- Large ziploc bags for setting
- Soda ash fixer, 1 cup per gallon of water (follow dye brand instructions)
Instructions
- Pre-soak bandanas in soda ash solution for 15 minutes; wring out excess.
- Twist/fold and secure with rubber bands in desired patterns.
- Apply dye generously; flip and saturate underside for full coverage.
- Place dyed bandana in a sealed ziploc bag and let set 6–8 hours (overnight for richer color).
- Rinse in cold water until water runs clear; wash alone with mild detergent and dry.
- Remove rubber bands and press lightly with an iron on cotton setting if desired.
How to Display or Gift It
- Fold and tie bandanas with twine for a natural look.
- Stack on a wooden tray for a DIY costume station.
- Store in breathable fabric boxes once dry.
- Use bandanas as table runners or chair sashes for thematic decor.
- Foam Crown and Mask Set
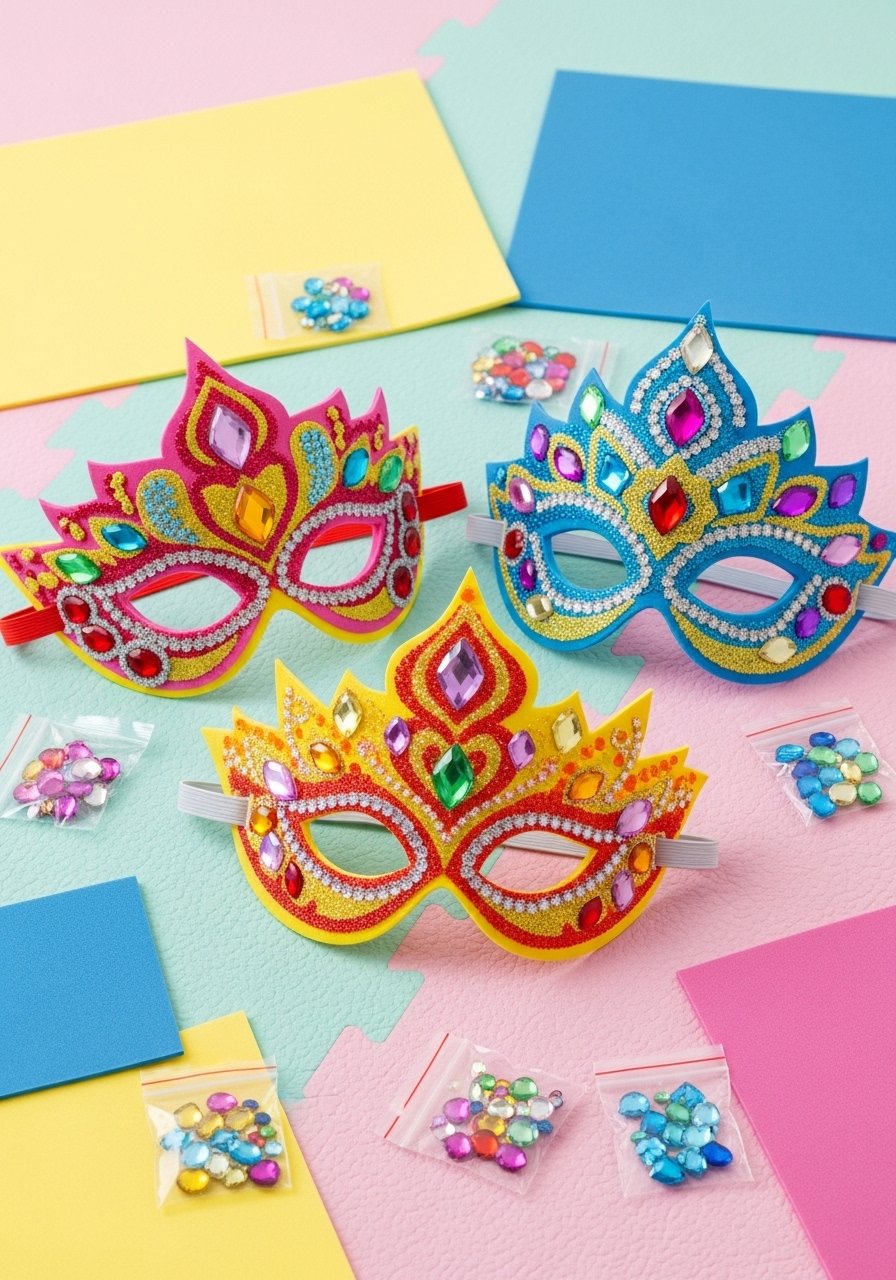
Foam crowns and masks are quick, washable, and sturdy for role-play. They’re tactile and great for younger crafters. A foam craft sheet pack gives plenty of color choices.
Materials
- EVA foam sheets, 8.5 x 11 in, pack (various colors)
- Elastic cord, 1/8 inch
- Self-adhesive gem packs or craft jewels
- Foam-safe glue or hot glue (low-temp)
- Scissors and hole punch
- Metallic paint pens or glitter glue
- Optional: Velcro strips for adjustable fit
Instructions
- Trace crown or mask template on foam and cut out.
- Punch holes on sides and thread elastic; knot and test fit.
- Decorate with glue-on gems, glitter glue, and paint pens. Let glitter glue dry 30 minutes.
- For crowns, glue an inner strip of foam as a headband for stability; let set 15 minutes.
- If using hot glue, press decorations firmly and allow to cool 1–2 minutes.
- Check fit and reinforce knots or add Velcro for adjustable sizing.
How to Display or Gift It
- Place on a craft table with ribbons and stickers for extra embellishment.
- Gift in cello bags with a name sticker.
- Store in a flat box to avoid bending.
- Use as party photo props on a small tabletop easel.
- DIY Cupcake Toppers (Theme Shapes)
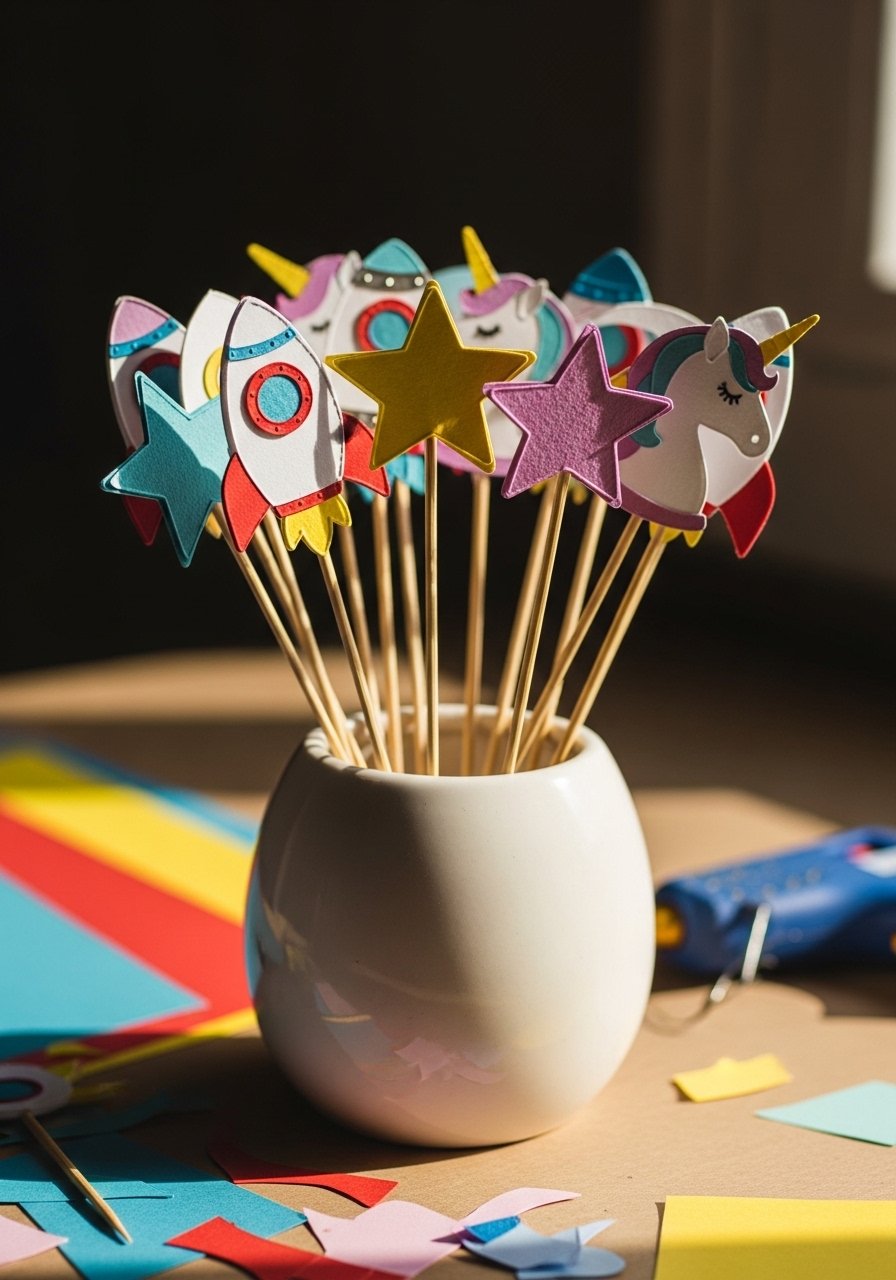
Cupcake toppers can be theme-specific and double as small keepsakes. Cut shapes from cardstock or use a cutting machine. For sturdy picks, mount on wooden skewers and seal with a coat of Mod Podge matte.
Materials
- Heavyweight cardstock, 110 lb, assorted colors
- Wooden skewers, 6-inch, pack of 100
- Mod Podge (matte) 8 oz
- Glue tacky glue or low-temp glue gun
- Glitter or paper accents
- Hole punch or cutting machine for shapes
- Small foam brush for sealant
Instructions
- Cut topper shapes from cardstock; each topper uses 1–2 layers for dimension.
- Glue layers together and press for 20 seconds until bond sets.
- Attach shape to skewer with glue; hold 10 seconds until tacky.
- Brush a thin coat of Mod Podge over topper; let dry 20 minutes. Apply second coat if using glitter; let dry 1 hour.
- Trim skewer length if needed and sand any sharp points.
- Store upright in a jar until use.
How to Display or Gift It
- Arrange in a small pot or mason jar as table centerpieces.
- Stick into cupcakes or small fruit skewers.
- Keep extras in a labeled craft drawer for future parties.
- Beaded Friendship Bracelets Station
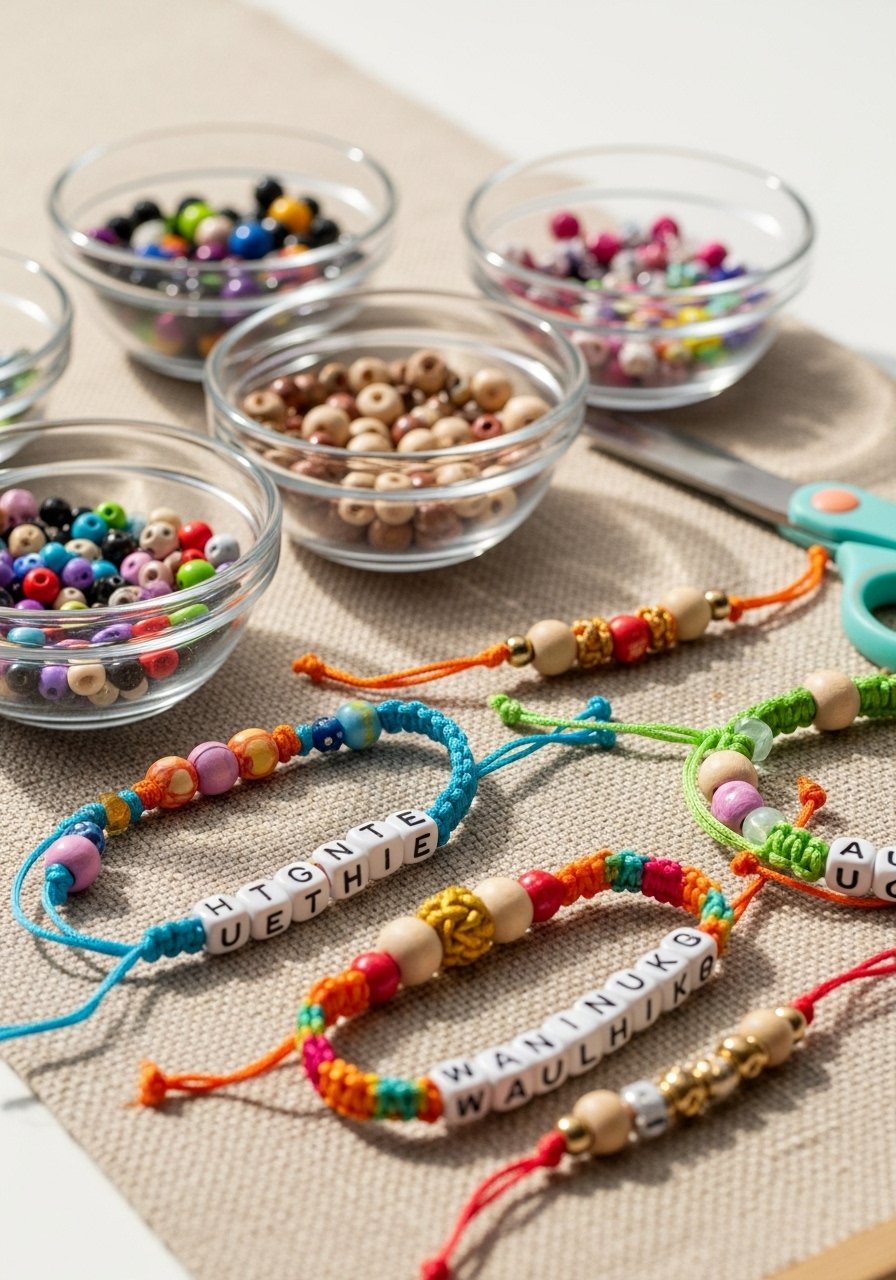
A friendship bracelet station is a calm, crafty activity kids love. Stretchy cord works well for younger hands. I use alphabet beads to personalize keepsakes.
Materials
- Stretchy elastic cord, 0.5 mm, 10 yards
- Wooden and acrylic beads (6–8mm), assorted pack
- Alphabet beads (6mm)
- Scissors and small bead trays
- Clear nail polish or glue to secure knots
- Optional: crimp beads and crimping pliers for extra security
Instructions
- Cut cord to 12 inches for comfortable wear.
- Tie a temporary knot at one end or use a bead stopper to prevent sliding.
- String beads in desired pattern; include one alphabet bead if personalizing.
- When length fits wrist, tie a square knot and pull tight.
- Apply a drop of clear nail polish or tacky glue to knot and let cure 10 minutes.
- Trim excess cord close to knot. For durability, clamp a small crimp bead over the knot.
How to Display or Gift It
- Set out bead bowls labeled by color or theme.
- Bundle finished bracelets in small organza bags for favors.
- Store leftover beads in compartment organizer boxes.
- Make-ahead options: pre-string simple patterns for younger kids to finish.
- Craft ideas for kids birthday party: Painted Wooden Medals
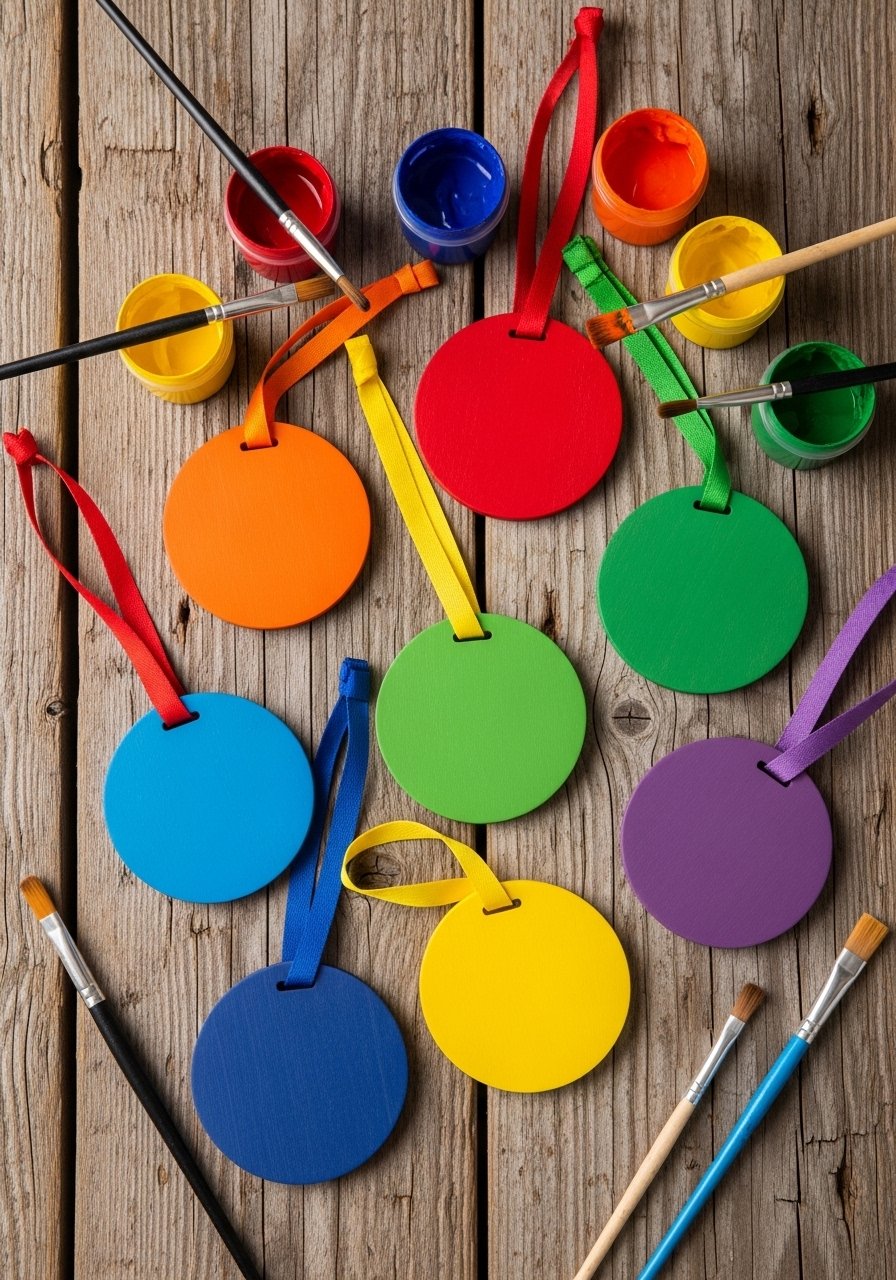
Wooden medals are a great prize for games or a quirky favor. They paint smoothly and feel substantial. Use acrylic craft paints and seal with a coat of clear acrylic sealer spray for washability.
Materials
- Wooden round blanks, 2.5 inch diameter, pack of 12
- Satin ribbon, 3/8 inch, 24 inches per medal
- Acrylic craft paints, assorted 2 oz pots
- Small paintbrush sets and foam brushes
- Drill or skewer to make center hole (if not pre-drilled)
- Clear acrylic sealer spray (matte or gloss)
- Optional: paint pens for lettering
Instructions
- Thread ribbon through blank hole and tie into a loop; set aside.
- Paint medal faces in base colors; allow 20 minutes drying between coats.
- Add designs or numbers with paint pens or fine brushes; let dry 30 minutes.
- Lightly sand edges if needed and wipe dust.
- Spray a light layer of acrylic sealer in a well-ventilated area; let cure 1 hour between coats. Two thin coats recommended.
- Let medals fully cure 24 hours before distributing.
How to Display or Gift It
- Use medals as awards for games like sack races or ring toss.
- Tie to a small certificate or goody bag.
- Store flat in a shallow box to prevent ribbon tangles.
- Flower Crown Station (Boho Aesthetic)

Flower crowns fit cottagecore and boho themes beautifully. Use floral wire and tape for structure, and tuck in dried botanicals for a lightweight, long-lasting crown. A pair of floral wire cutters makes trimming easy.
Materials
- Floral wire, 22 gauge, roll
- Floral tape (green), 1 roll
- Silk flowers and dried sprigs, assorted stems
- Wire cutters and small pliers
- Ribbon for ties, 1/2 inch
- Optional: floral glue gun for stubborn stems
Instructions
- Measure head circumference and cut a wire base 1 inch longer for overlap. Twist ends to secure.
- Wrap wire base with floral tape for comfort and grip.
- Trim flower stems to 1–2 inches and attach with floral tape, layering small bunches.
- Work around the base symmetrically, leaving a gap for ribbon ties.
- Tuck in smaller dried sprigs last and secure with tape or a dab of hot glue.
- Tie ribbons to ends for an adjustable fit.
How to Display or Gift It
- Place crowns on wooden pegs or a low branch display.
- Wrap in tissue and tie with twine as take-home hair accessories.
- Store flat between sheets of tissue paper to preserve shape.
- Pair with a small mirror station so kids can check their crowns.
- Painted Rocks for Place Settings
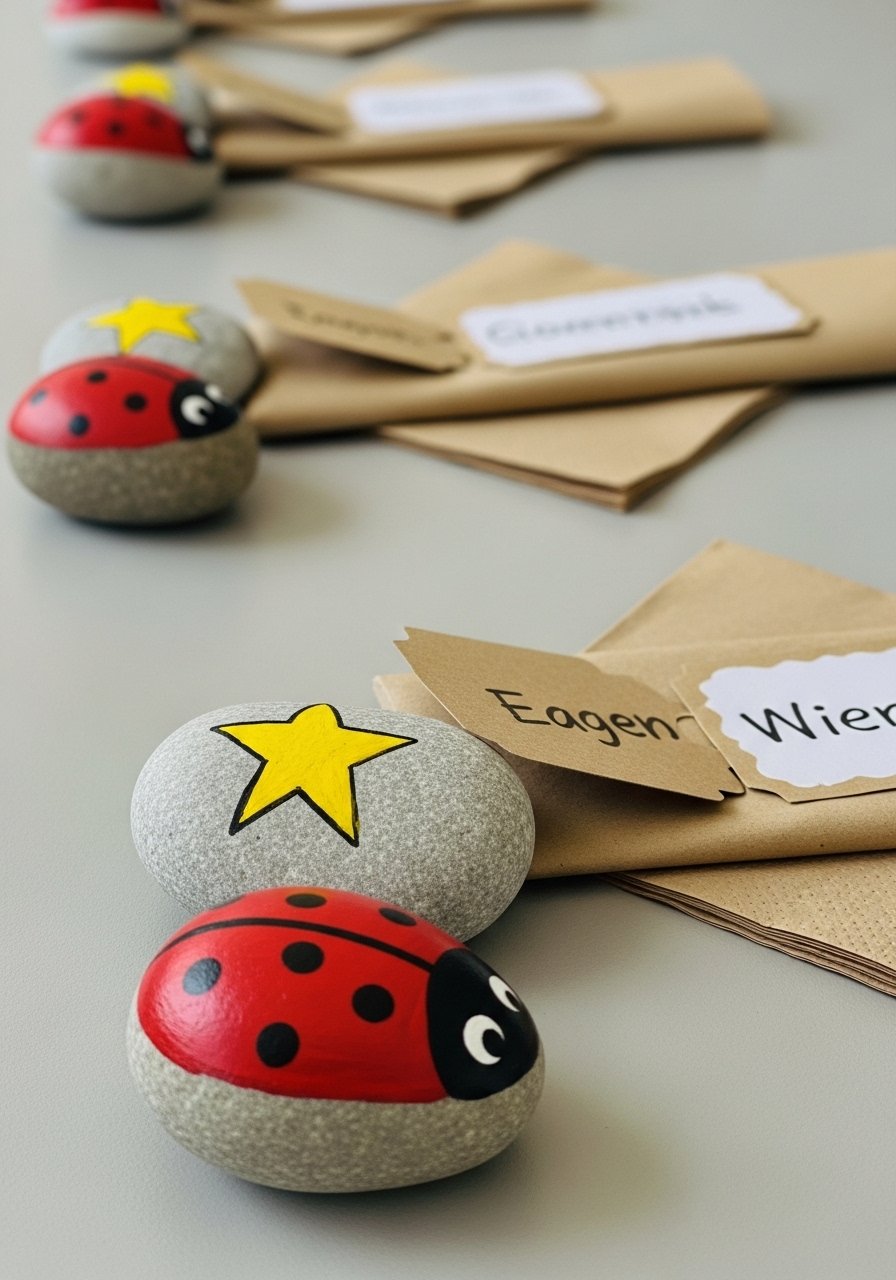
Painted rocks double as place cards and favors. They’re tactile and hold up well. Use acrylic paint pens for precise lines and a final coat of Mod Podge gloss to protect designs.
Materials
- Smooth river rocks, 2–3 inch diameter, pack of 12
- Acrylic paint pens or fine brushes
- Acrylic craft paints, 2 oz pots
- Mod Podge gloss, 4 oz
- Soft cloth and mild soap for cleaning rocks
- Optional: small wooden easels for display
Instructions
- Wash and dry rocks fully; let air dry 30 minutes.
- Prime with a thin coat of white craft paint; dry 20 minutes.
- Paint base design with acrylic paints; allow 30 minutes between layers.
- Add details with paint pens and let dry 15 minutes.
- Apply one thin coat of Mod Podge; dry 1 hour for tack-free; full cure 24 hours.
- Place at each setting or pack a few in a kraft bag for guests.
How to Display or Gift It
- Use rocks as heavy place cards on outdoor tables.
- Attach a small label with guest names using washi tape.
- Store in a shallow box with tissue between rocks.
- For gifting, include a mini easel to display the rock at home.
- Felt Animal Finger Puppets
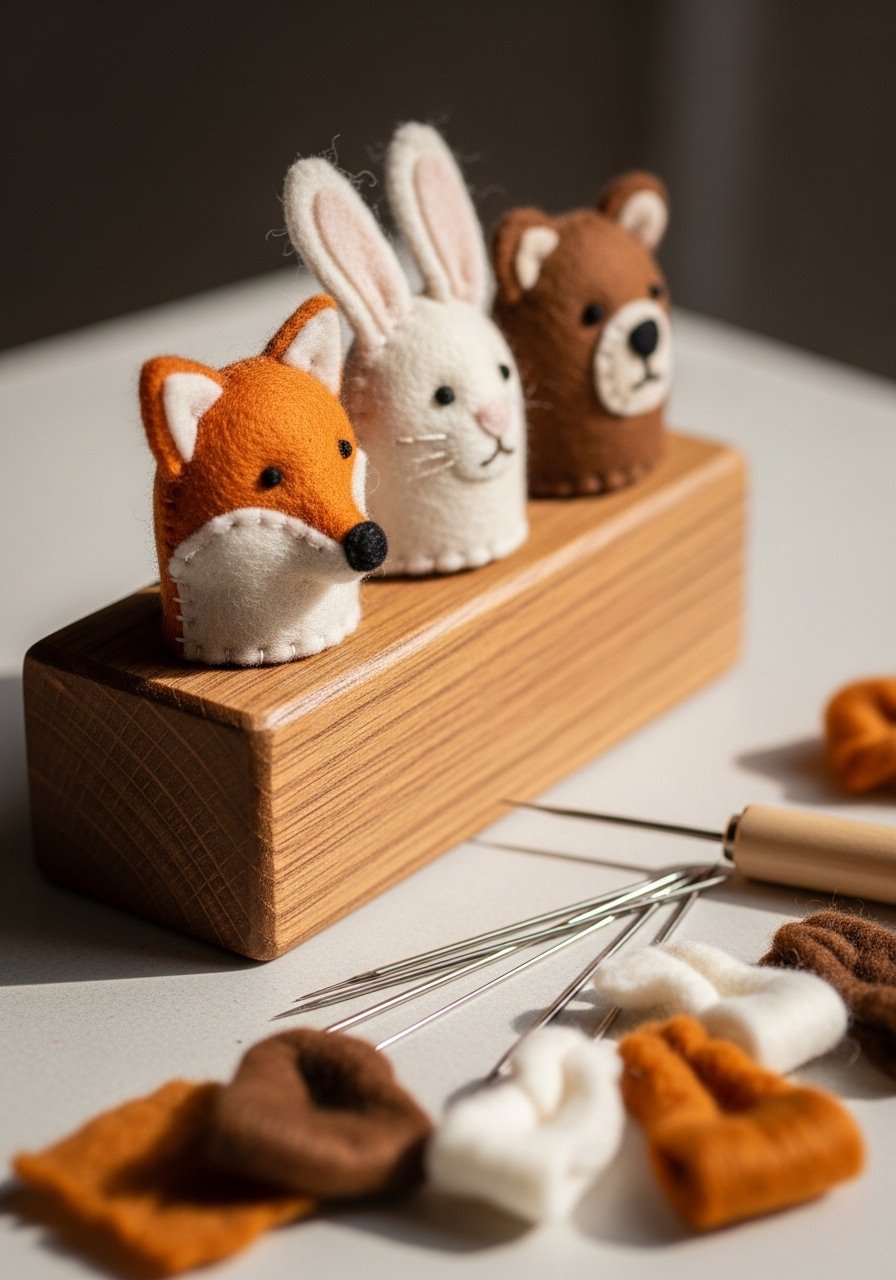
Finger puppets encourage imaginative play and are quick for kids to personalize. Use wool blend felt for softer textures, and a blunt tapestry needle if sewing isn’t preferred.
Materials
- Wool-blend felt sheets, 3 x 6 inches per puppet
- Embroidery floss and needles
- Small buttons or felt pieces for eyes and noses
- Fabric glue or hot glue (low-temp)
- Scissors and a seam marker
- Optional: small needle felting kit for texture
Instructions
- Cut two puppet shapes sized to fit a child’s finger (approx 4 inches tall).
- Sew sides with blanket stitch, leaving bottom open for finger.
- Attach small felt pieces or buttons for facial features with glue.
- Add tiny felt ears or accents and stitch in place.
- Trim loose threads and inspect seams.
- Let glue cure 24 hours if used heavily before play.
How to Display or Gift It
- Create a puppet theater pocket with a cardboard frame for storytelling.
- Pack a set of 3–5 puppets in a recycled tin as a favor.
- Store in a fabric drawer or small organizer to keep shapes.
- Use as quiet-time gifts during travel.
- Confetti Poppers (Safe Indoor Version)
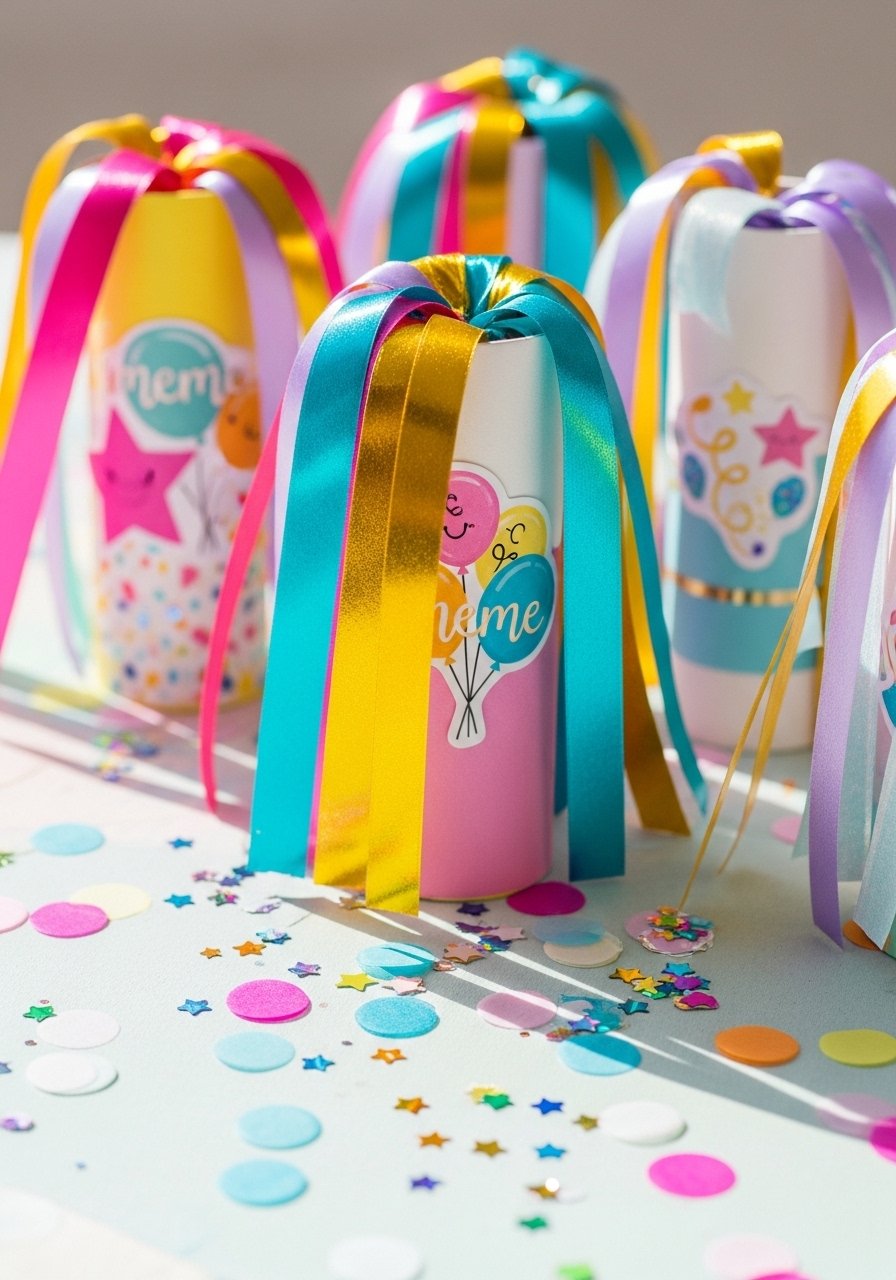
These poppers use tissue paper and a controlled pom-pom press for indoor fun without loud bangs. They’re simple and bright — perfect for a countdown moment.
Materials
- Cardboard tubes (toilet-paper size) or small kraft tubes
- Tissue paper sheets, assorted colors
- Pom-poms or confetti (paper), small handfuls
- Ribbon streamers, 1/4 inch
- Double-sided tape and glue stick
- Optional: printed stickers or labels for themes
Instructions
- Seal one end of the tube with a circle of tissue paper secured with tape.
- Fill 1/3 full with light paper confetti or pom-poms.
- Cover open end with tissue paper, hold tightly and curl the tube to build pressure.
- Secure tissue with ribbon and let kids pull ribbon to release confetti.
- Decorate outer tube with washi tape or stickers.
- Store flat until party; keep confetti in small labeled bags for refills.
How to Display or Gift It
- Place one at each place-setting for a surprise moment.
- Use as part of a parade or cake moment.
- Store unused confetti in small resealable bags inside a craft organizer.
- For outdoor parties, use biodegradable paper confetti.
- Handprint Art Keepsakes (Canvas)
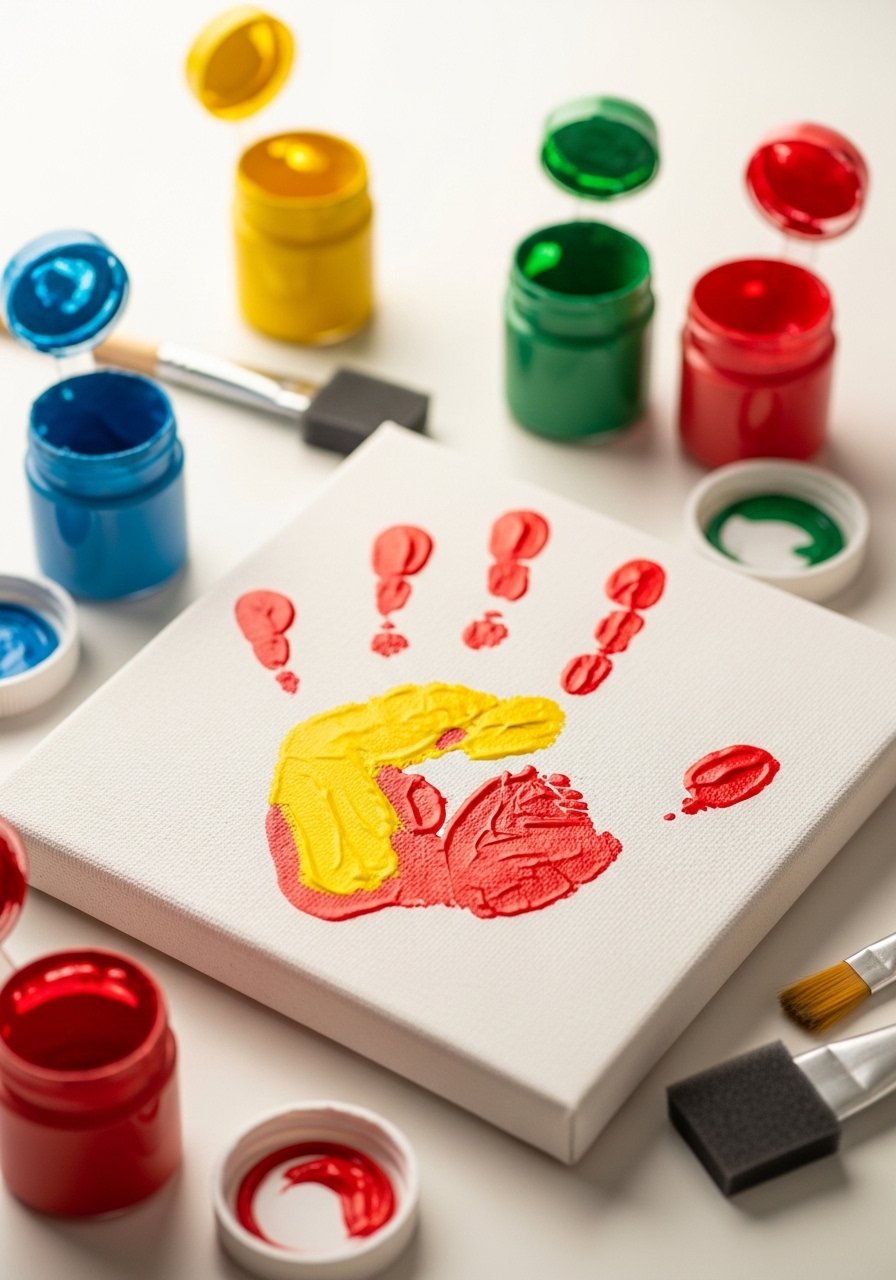
Handprint canvases are sentimental and great for a take-home memory. Use non-toxic acrylic paints and let each layer dry properly. A small pack of 6 x 6 inch canvases is perfect for little hands.
Materials
- Small stretched canvases, 6 x 6 inch, pack of 12
- Non-toxic acrylic paints, assorted
- Foam brushes and round brushes
- Palette or paper plate for mixing
- Wet wipes or water bucket for clean-up
- Optional: paint pens for adding names/dates
Instructions
- Set up a clean dipping station and choose paint colors.
- Apply a thin, even coat of paint to the child’s palm with a foam brush.
- Press hand firmly onto canvas and hold for 2–3 seconds, then lift straight up.
- Add accents like painted borders or stamped shapes once dry (20–30 minutes).
- After fully dry (1–2 hours depending on paint thickness), write name and date with paint pen.
- Let cure 24 hours before packaging.
How to Display or Gift It
- Display on small wooden easels as place cards.
- Wrap in tissue and tuck into a thin gift box.
- For storage, stack canvases flat with a sheet of parchment between each.
- Make-ahead: prime canvases in advance to speed the event.
- Mini Terrarium Jars (Fairy Garden Theme)
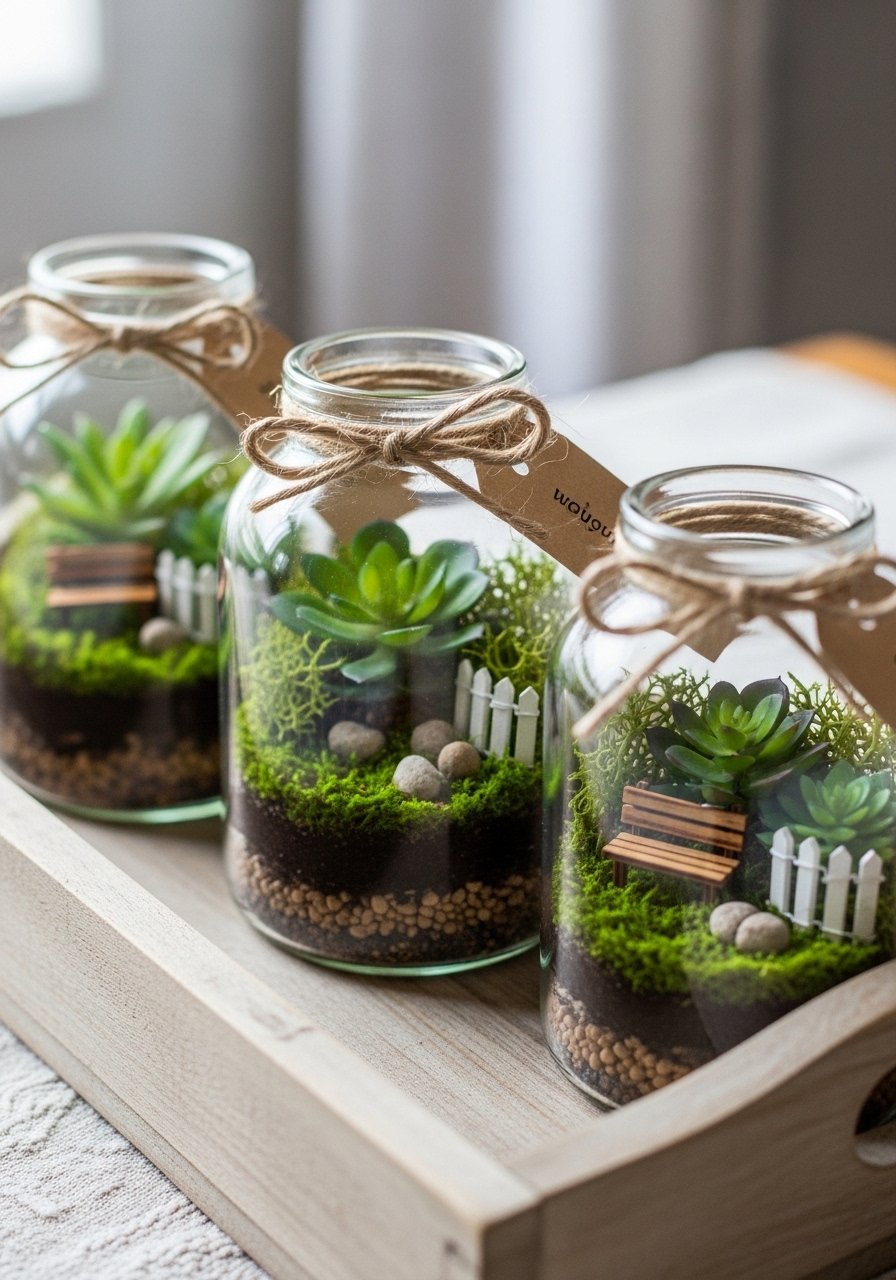
Mini terrariums are charming and low-maintenance if you use faux succulents. Glass jars with sealed lids keep contents neat for kids to carry home. Use a funnel when filling to keep layers tidy.
Materials
- Small glass jars with lids, 4 oz each
- Faux moss and miniature succulents
- Tiny fairy figures or wooden house charms
- Colored sand or gravel, 2 oz per jar
- Hot glue gun (low-temp) and glue sticks
- Funnel and small tweezers for placement
Instructions
- Layer 1/2 inch gravel or sand in the bottom of each jar.
- Add a layer of faux moss to cover gaps.
- Arrange miniature succulents and figures using tweezers.
- Secure items with a small dab of hot glue if needed; allow glue to cool 1–2 minutes.
- Seal the jar and tie a ribbon with a small tag.
- For live succulents, include care instructions and skip sealing to allow air exchange.
How to Display or Gift It
- Line jars on a centerpiece tray for a botanical table.
- Pack multiples in a small crate as take-home kits.
- Store unused jars nested in bubble wrap in a craft drawer.
- For seasons, swap fairy figures for tiny pumpkins or ornaments.
- Washi Tape Party Bunting
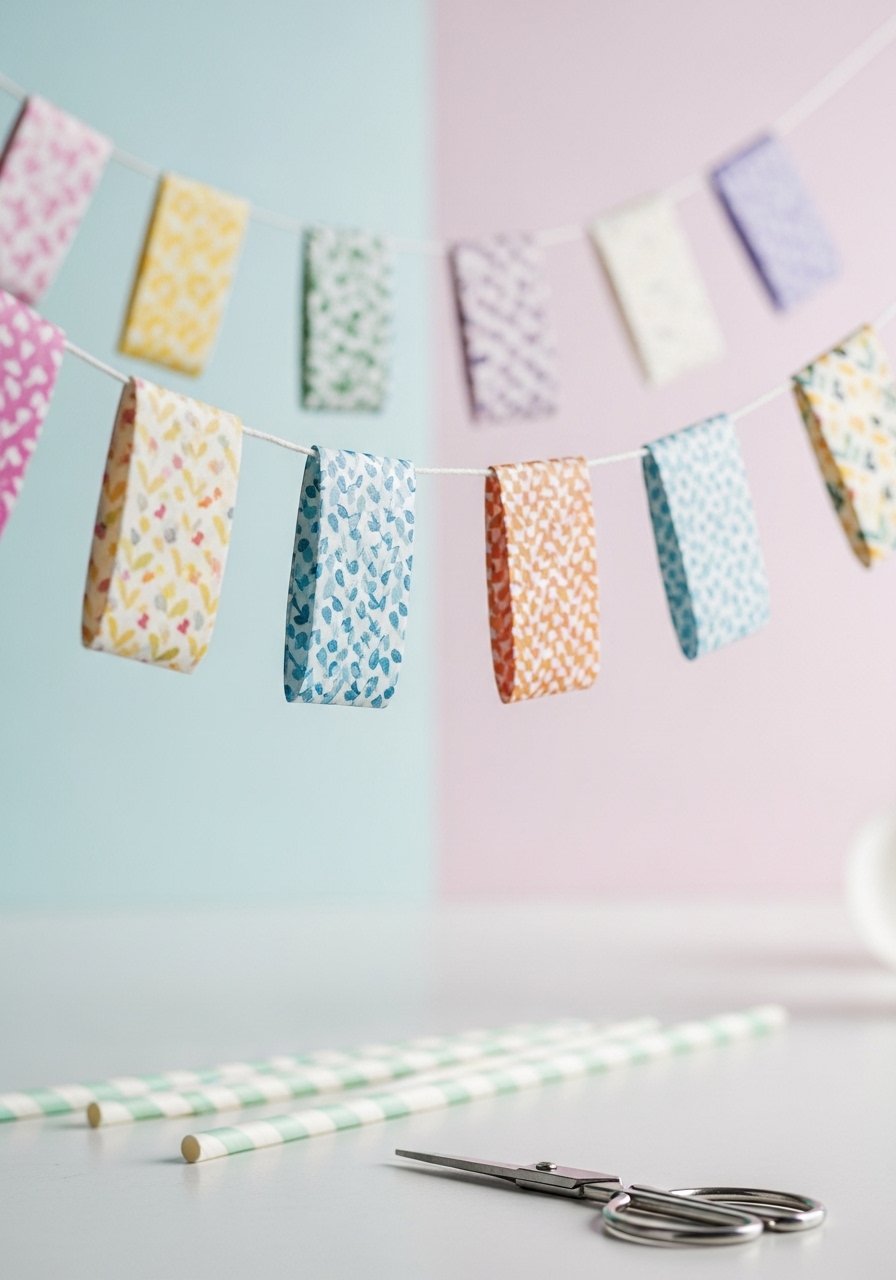
Washi bunting is lightweight, quick, and matches any palette. Use patterned washi rolls and a scissors set for varied edge shapes.
Materials
- Washi tape rolls, assorted patterns and widths
- Thin twine or baker’s twine, 10 feet
- Paper straws or toothpicks to anchor flags
- Scissors with decorative edges (optional)
- Optional: mini clothespins for attaching to string
Instructions
- Create flags by folding a 3 x 2 inch piece of washi tape over string, sticky sides together.
- Trim into a triangle or swallowtail shape with scissors.
- Repeat to make a 6–8 foot length of bunting.
- Attach to backdrop or across tables using tape or mini clothespins.
- For sturdier flags, place washi on cardstock first then cut.
- Store rolls together in a small craft bin for reuse.
How to Display or Gift It
- Drape above the dessert table or along a fence for outdoor parties.
- Use as cake toppers by wrapping bunting around straws.
- Roll and store in small washi dispensers to prevent tearing.
- Make mini garlands as place-setting embellishments.
- Craft ideas for kids birthday party: Button Art Canvas
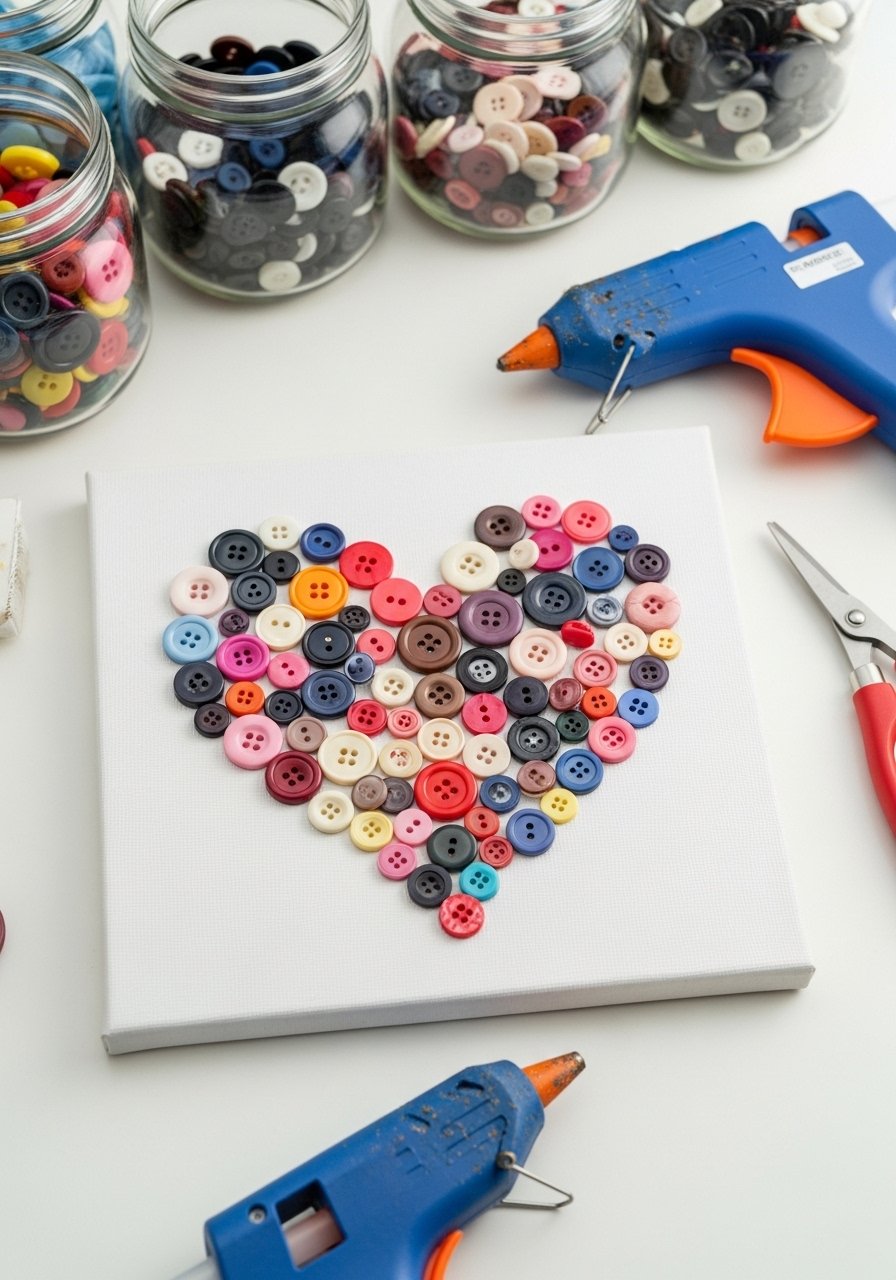
Button art is tactile, colorful, and forgiving for all ages. Buttons create delightful texture and visual interest; choose a canvas size like 8 x 10 inches for easy composition. Use Aleene’s tacky glue for small parts.
Materials
- Buttons assorted colors/sizes, pack (~200)
- Stretched canvas, 8 x 10 inch
- Pencil for sketching design
- Aleene’s tacky glue, 4 oz
- Small tweezers for placement
- Optional: strong craft glue (E6000) for large buttons
Instructions
- Sketch a simple design lightly on canvas (heart, initial, star).
- Apply a thin line of tacky glue to a small section.
- Place buttons starting from the center using tweezers, adding larger buttons first and filling gaps with smaller ones.
- Press gently to seat each button; continue in sections.
- Let glue dry 1–2 hours; inspect and press any loose buttons again.
- Full cure is 24 hours before hanging.
How to Display or Gift It
- Frame or hang on a small hook in a child’s room.
- Wrap in tissue and place in a shallow box for gifting.
- Store leftover buttons in a compartment organizer for future projects.
- Swap button shapes for sequins or small craft gems for sparkle.
- Printable Photo Booth Props

Photo booth props are instant smiles and require minimal supplies. Print designs on heavy cardstock and glue to dowels. A self-healing cutting mat and craft knife yield crisp edges.
Materials
- Heavyweight cardstock, 110 lb
- Printable prop templates (digital)
- Wooden dowels, 12 inch
- Double-sided tape or tacky glue
- Self-healing cutting mat and precision craft knife
- Optional: glitter, sequins, and markers for extra flair
Instructions
- Print prop templates on cardstock; trim using a craft knife on a cutting mat for clean edges.
- Attach dowel to the back of each prop with double-sided tape and reinforce with glue.
- Add glitter or sequins if desired; let glue dry 20 minutes.
- Prepare a backdrop and small tabletop sign with prompts.
- Keep a basket of props accessible for group photos.
- Store leftovers flat in a zipper folder to avoid bending.
How to Display or Gift It
- Set up a simple backdrop with streamers for fun photo moments.
- Bundle a few props in a cellophane bag for guests to take home.
- Store props in a portfolio or shipping tube to keep them pristine.
- No-Sew Tulle Tutus
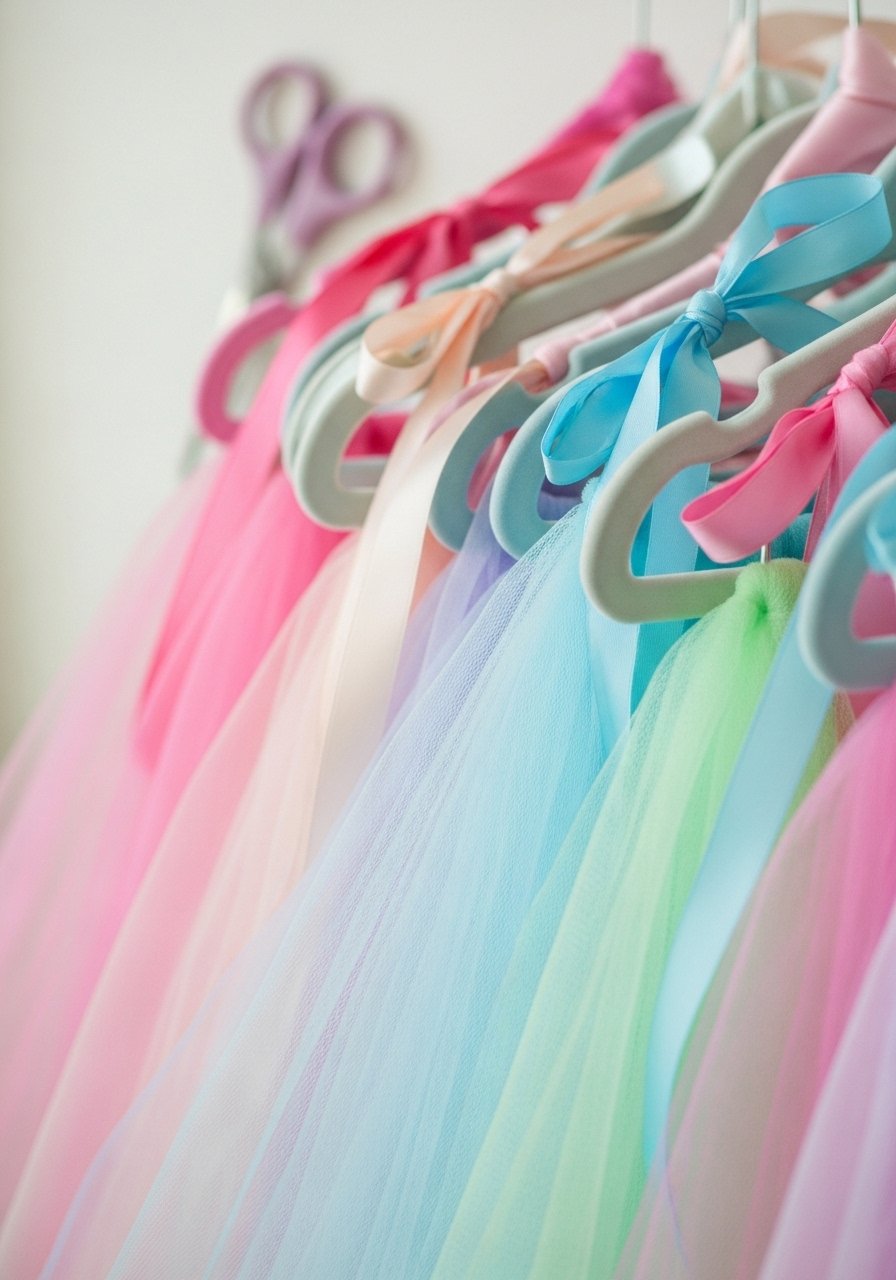
No-sew tutus are simple and create instant dress-up magic. Cut tulle strips and loop onto an elastic waist — no sewing machine required. A spool of elastic and a pair of sharp fabric scissors are the essential tools.
Materials
- Tulle rolls, 6-inch width, assorted colors (2-3 colors per tutu)
- Elastic band for waistband, 1 inch wide, cut to waist + 1 inch
- Fabric scissors
- Measuring tape
- Optional: ribbon for ties and sequins for embellishment
Instructions
- Measure elastic to fit waist snugly and knot; overlap and stitch or use a small piece of hot glue after knotting.
- Cut tulle into 6 x 24 inch strips.
- Fold strip in half, loop around elastic, and pull ends through the loop to secure (lark’s head knot).
- Continue adding strips until tutu looks full (approx 60–80 strips).
- Trim uneven ends and fluff to shape.
- Add ribbon tie or waistband embellishments if desired.
How to Display or Gift It
- Hang on child-sized hangers at the dress-up station.
- Pack in tissue in a garment box for gifting.
- Store flat or gently folded in a garment bag to keep fluff.
- Make-ahead tutus can be pre-made for quick dress-up.
- Painted Wooden Spoons Puppet Craft
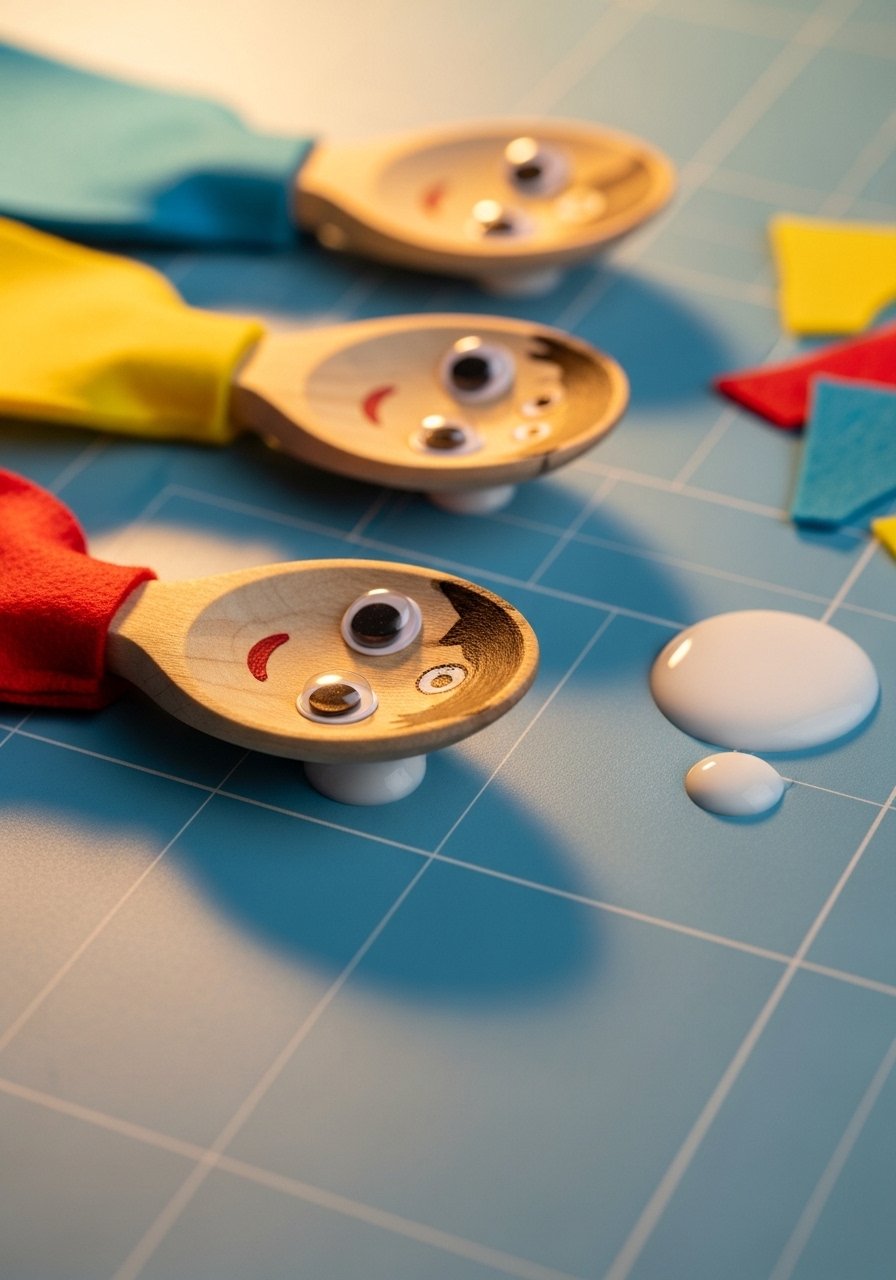
Wooden spoon puppets are charming and easy to personalize. They’re durable and good for storytelling improv. Use non-toxic acrylic paints and googly eyes pack for expression.
Materials
- Wooden spoons, 8–10 inch, pack of 12
- Acrylic paints and brushes
- Felt scraps for clothing
- Googly eyes (various sizes)
- Craft glue and hot glue (low-temp)
- Scissors and markers
Instructions
- Paint the spoon head with a base skin tone; dry 20 minutes.
- Glue on googly eyes and draw a mouth with a paint pen.
- Cut felt clothing shapes and glue to the handle as a shirt or cape.
- Add hair using yarn glued to the top; trim to length.
- Let glue cure 30 minutes before play.
- Use spoons in puppet shows or as favors in a small tote bag.
How to Display or Gift It
- Perform a short puppet show during the party.
- Pack one spoon puppet per child in a fabric bag.
- Store puppets in a flat drawer or upright mug for easy access.
- Paper Flower Backdrop (Photo Wall)
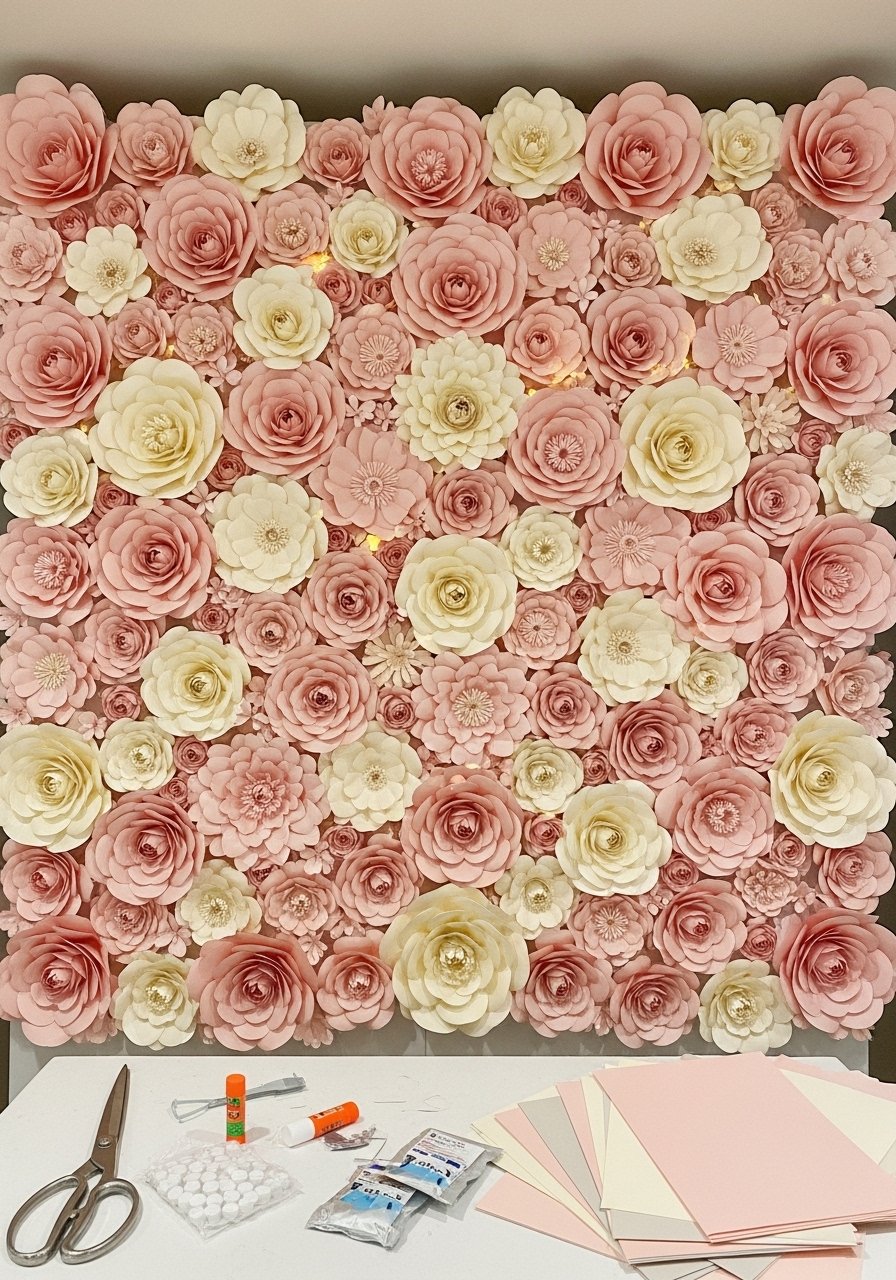
A paper flower backdrop makes a dramatic photo station and sets a floral tone. Use heavyweight crepe or poster paper and secure pieces with removable wall-safe tape.
Materials
- Heavyweight craft paper or cardstock, assorted colors
- Scissors and floral scissors for shape variation
- Glue dots or tacky glue
- Hot glue gun for layering
- Removable wall-safe mounting tape
- Optional: wire hoops or a wooden frame for structure
Instructions
- Cut petals in graduated sizes; stack layers (small to large).
- Glue center layers together with glue dots; add a pom-pom or button to the center.
- Attach flowers to a backing (foam board or directly to a frame) with hot glue.
- Fill gaps with leaves cut from green cardstock.
- Mount backdrop with removable tape or rest it against a wall.
- Store flat between sheets of tissue for reuse.
How to Display or Gift It
- Use as a photo booth wall or dessert table backdrop.
- Rent or lend to other party hosts by keeping it modular.
- For outdoor use, weigh base with sandbags or tie to a secure frame.
- Pack large paper flowers in flat boxes for transport.
- DIY Chalkboard Signs for Games
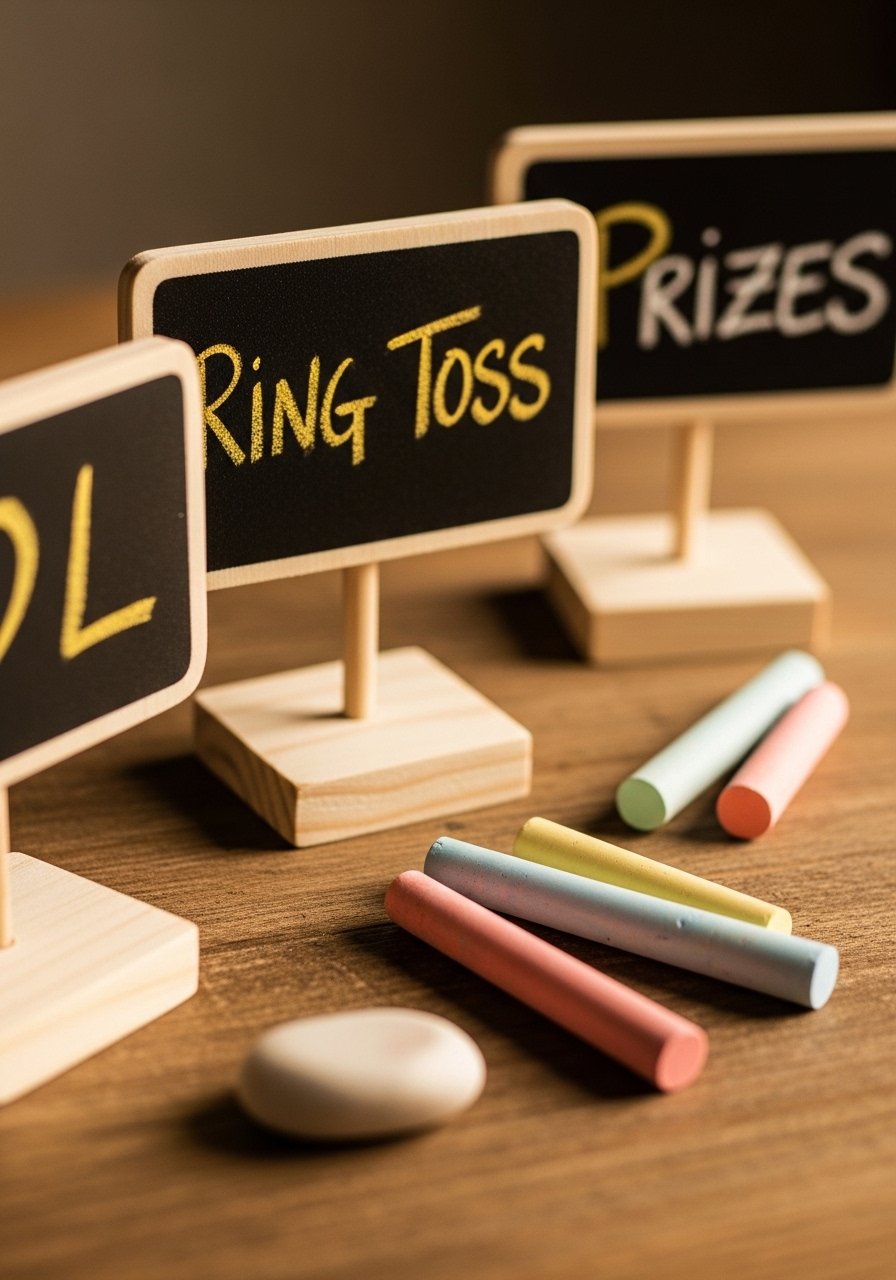
Chalkboard signs help direct guests and add handmade charm. Use mini pre-made chalkboards or paint wood with chalkboard paint. Chalk markers give bright, smudge-resistant lines.
Materials
- Mini chalkboard signs or small wood panels
- Chalkboard paint (if painting panels)
- Chalk markers (white and metallic)
- Small wooden easels for display
- Sandpaper for prep (if painting)
- Rubbing alcohol for cleaning surfaces
Instructions
- If painting wood, sand lightly and apply two thin coats of chalkboard paint; dry 1 hour between coats.
- Season a new chalkboard by rubbing the side of a chalk stick across and wiping off.
- Write event names or game rules with chalk markers.
- Place signs on small easels near games or stations.
- Clean with a damp cloth for reuse.
- Store in a flat box to avoid scratches.
How to Display or Gift It
- Label craft stations, snack bars, or favor tables.
- Give guests small take-home chalkboards to label jars at home.
- Store signs stacked with tissue between each to prevent smudging.
- DIY Party Favor Boxes (Decorated)
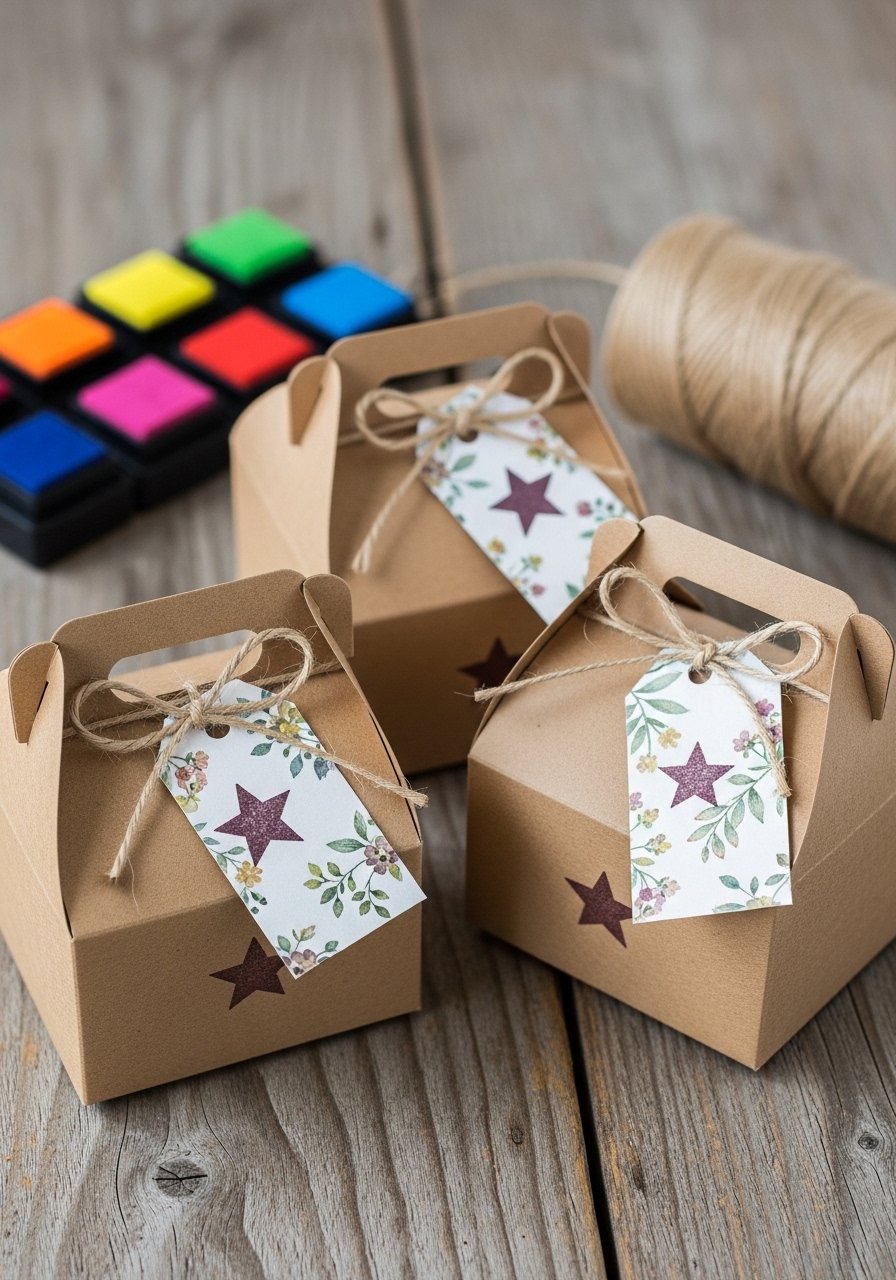
Customized favor boxes feel like boutique gifts. Decorate with stamps, stickers, or hand-painted motifs. A stamp set helps produce uniform designs quickly.
Materials
- Kraft favor boxes, 4 x 4 x 2.5 inches, pack of 12
- Ink pads and stamps or stickers
- Twine and small gift tags
- Tissue paper and small cellophane bags for treats
- Hole punch for ribbon
- Optional: craft paint pens for accents
Instructions
- Stamp or paint boxes before assembling for clean edges.
- Fill with treats in small cellophane bags; nest in tissue.
- Close box and punch a hole for twine or tie around box.
- Add a gift tag with guest name or a short message.
- Store assembled boxes flat until distribution.
- Make-ahead: prepare boxes up to 48 hours before party.
How to Display or Gift It
- Line boxes along the favor table or place one at each seat.
- Stack in a decorative crate for a rustic look.
- Use as part of a treasure hunt prize station.
- Keep extra boxes nested in a storage bin for next use.
- DIY Pom-Pom Garland
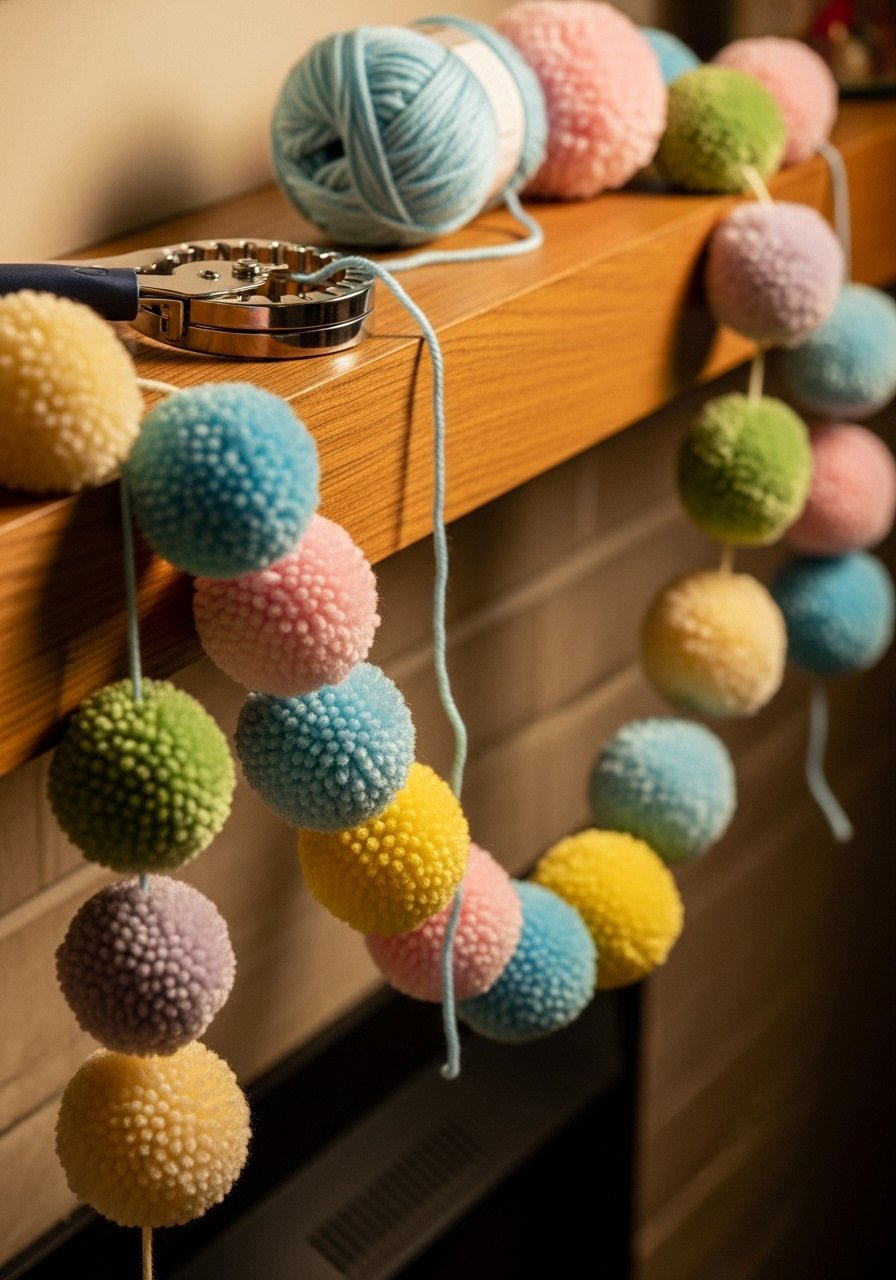
Pom-pom garlands add playful texture and match any palette. Use a pom-pom maker to speed production and get consistent sizes. A yarn pom-pom maker tool is handy for groups.
Materials
- Yarn skeins, assorted colors
- Pom-pom maker tool or cardboard templates
- Scissors and tapestry needle
- Twine or thin rope for stringing
- Optional: felt discs to sandwich pom-poms for sturdiness
Instructions
- Wrap yarn around the pom-pom maker following tool instructions for size.
- Tie center securely and cut loops to release pom-pom.
- Trim evenly into a neat round shape.
- Thread twine through pom-pom centers using a tapestry needle, spacing 3-4 inches apart.
- Adjust density and knot pom-poms onto twine so they stay put.
- Store garland loosely coiled to keep shape.
How to Display or Gift It
- Drape across a mantel, fence, or dessert table.
- Use as a colorful backdrop for photos.
- Pack flattened in a large tube for transport.
- Make sets of smaller garlands as take-home crafts.
- Button Badge Making Station
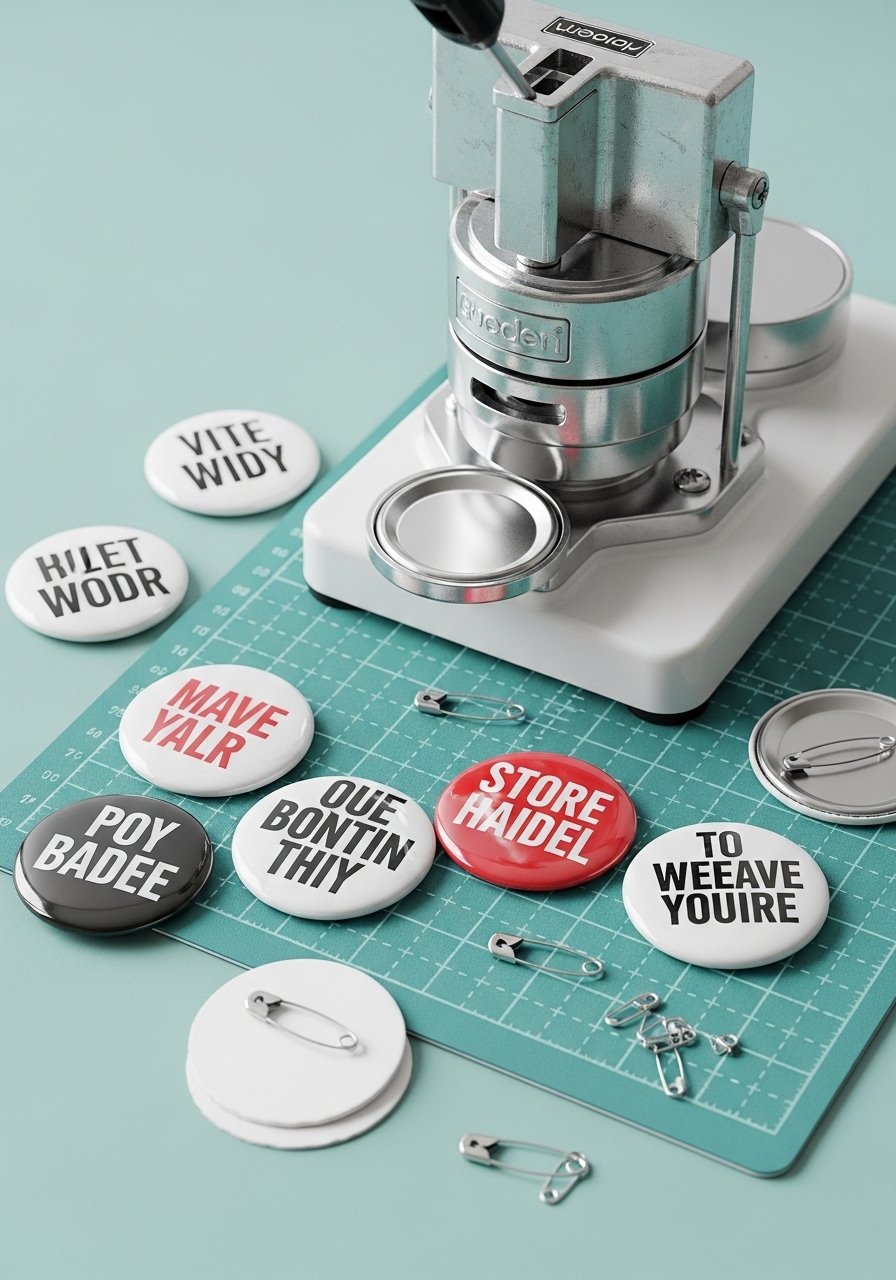
Badge making is interactive and lets kids design wearable reminders. A compact button badge maker machine speeds production for larger groups.
Materials
- Button badge maker machine (3-inch or 2.25-inch)
- Blank badge parts and mylar covers
- Printable paper backing circles (pre-sized)
- Safety pins for alternative backs
- Design templates and markers
- Optional: laminator for extra sheen
Instructions
- Print or draw designs on backing paper circles sized to machine specs.
- Layer backing, mylar, and metal shell and press according to machine instructions.
- Attach pin back with the machine or omit for a safer magnetic option.
- Let badges sit 10 minutes before distribution.
- Set out a design station so kids can personalize each badge.
- Store extra parts in a small organizer box.
How to Display or Gift It
- Kids can wear their badges during the party.
- Pack several badges per guest in small envelopes.
- Keep spare parts organized in a compartment tray for future use.
- Pom-Pom Pet Rocks

This playful mix of painted rocks and soft pom-poms makes cute companions. It’s a low-dry-time craft kids can personalize quickly.
Materials
- Smooth rocks, 2–3 inch
- Acrylic paints and brushes
- Pom-poms (various sizes)
- Googly eyes and craft glue
- Small paint palette
- Optional: tiny felt scraps for accessories
Instructions
- Clean and dry rocks. Paint base color and let dry 20 minutes.
- Glue googly eyes and small felt pieces for noses; allow glue to set 15 minutes.
- Attach pom-pom hats with a dab of craft glue; let cure 30 minutes.
- Add painted details like whiskers or spots.
- For durability, add a thin coat of Mod Podge and let cure 24 hours.
- Store in a shallow box with tissue between rocks.
How to Display or Gift It
- Place rocks in small nests of shredded paper for favors.
- Create a mini “adopt-a-pet” card explaining the pet’s name and personality.
- Store in a divided craft organizer to protect decorations.
- Painted Terracotta Pot Planting
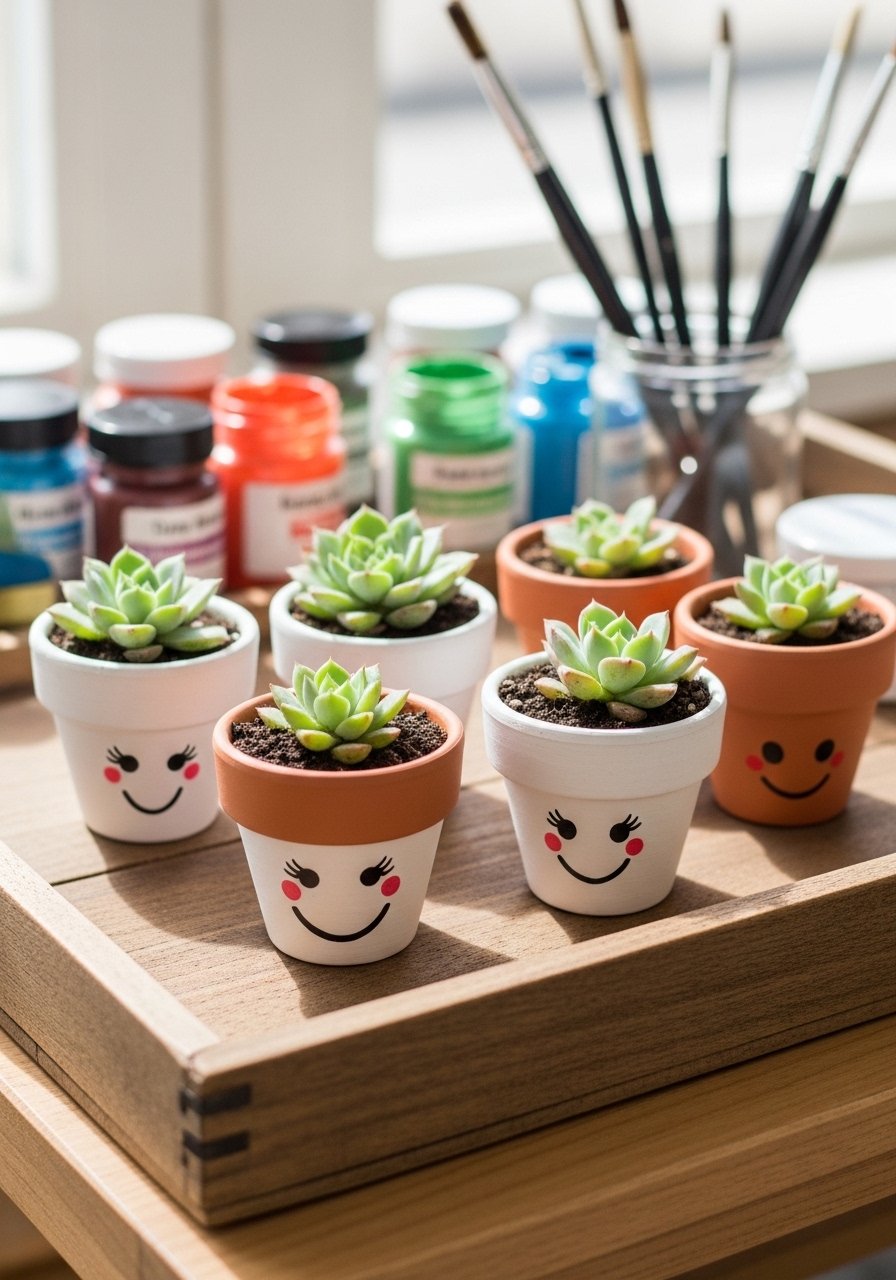
Painting terracotta pots and adding a succulent creates a practical, living favor. Use acrylic paints and let pots dry fully before planting. A small pack of succulents and potting mix works well for this size.
Materials
- Terracotta pots, 3-inch diameter
- Acrylic craft paints and paintbrushes
- Small succulents or faux succulents
- Potting soil, a few cups per batch
- Small scoops and watering droppers
- Optional: clear sealer for painted pots
Instructions
- Paint pot base color and add faces or patterns; dry 20 minutes between coats.
- Once fully dry (1 hour), add a thin coat of clear sealer if using.
- Fill pot partially with potting soil and add succulent; firm gently.
- Water sparingly and show kids care instructions.
- Let pots sit 24 hours before transporting to reduce soil spills.
- Store extras nested in a box with paper between pots.
How to Display or Gift It
- Arrange potted plants on a table as centerpieces guests can take home.
- Wrap in cellophane and tie with twine for gifting.
- Keep care cards on the table with watering tips.
- Treasure Chest Favor Boxes (Themed)

Tiny treasure chests make dramatic pirate or princess favors. Paint and distress wooden boxes and fill with themed goodies. A small sanding set and craft paint set make finishing easy.
Materials
- Small wooden chests or boxes, 4 x 3 x 2 inches
- Gold acrylic paint and distressing sandpaper
- Plastic gem packs and chocolate gold coins
- Tiny scroll notes or stickers
- Mod Podge for sealing
- Small paintbrushes and foam brushes
Instructions
- Paint the chest base and let dry 30 minutes between coats.
- Sand edges for a distressed look and wipe dust.
- Seal with Mod Podge and let cure 1 hour.
- Fill with small gems, coins, and a rolled message.
- Add a ribbon or twine bow to the latch.
- Store in a shallow box until distribution.
How to Display or Gift It
- Use as a prize for party treasure hunts.
- Present as a table favor at each place setting.
- Keep extras nested with tissue to prevent scratching.
- For seasonal themes, swap contents for themed candies or notes.
Thanks for crafting through this long list — what a great stash of ideas to match any kids birthday theme. This collection covers active stations, calm keepsakes, and easy favors that look thoughtful without hours of prep. Try one or mix and match: a slime station paired with painted medals makes an energetic, creative party, while terracotta pots and flower crowns create a softer, boho vibe.
Pin this post for later and share it with a friend planning a party — which project will you try first? I recommend picking up a quality low-temp hot glue gun if you’ll tackle several of these projects — it keeps small hands safer and speeds assembly without the stringy mess. Have fun crafting!


