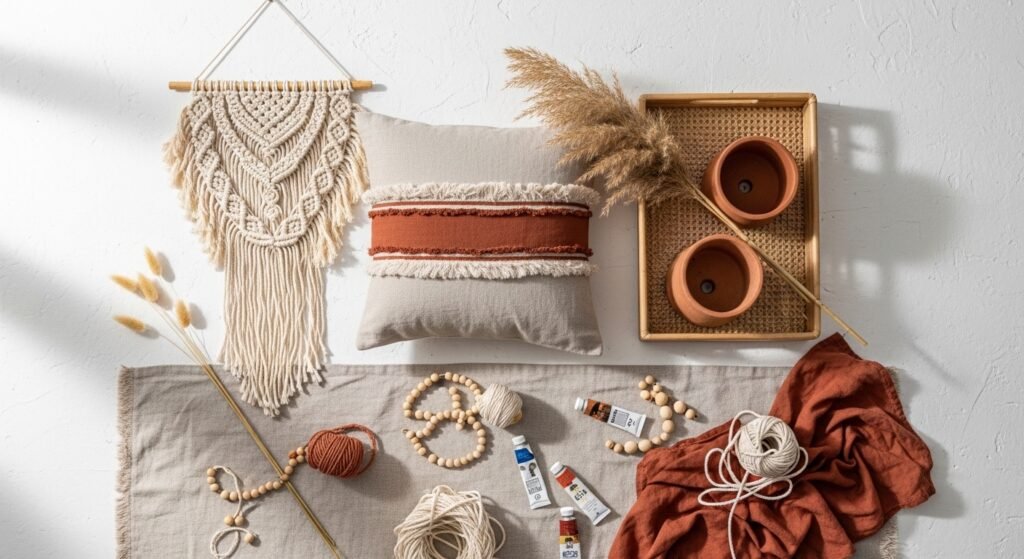
The moment I swapped one crisp pillow for a hand-tufted lumbar and a woven wall piece, my whole room felt softer, warmer, and lived-in. If you love textural, earthy looks, these 22 boho aesthetic room decor DIY ideas are made for you. Each project is grounded in natural fibers, warm neutrals, and layered textures—perfect for creating a cozy, boho aesthetic room decor DIY vibe without expensive store buys.
You’ll find projects for every skill level: quick no-sew planters, a calming macramé wall hanging, fiber-rich rugs, and a few tiny upgrades that read high-end. I mention the tools I actually use along the way—like my hot glue gun for fast assembly and a Cricut Explore cutting machine when I want crisp vinyl shapes. Each project includes a full materials list, step-by-step instructions with drying times, and styling tips so you can pin and start making today.
Ready to add earthy texture, warm neutrals, and handmade charm to your space? Let’s get crafting.
1. Driftwood & Macramé Wall Hanging — boho aesthetic room decor DIY favorite

This piece blends raw driftwood with chunky knots for a tactile focal point. The nubby 5mm cord and wooden beads add earthy weight. Beginners will love that basic square and half-square knots do most of the work. The finished piece feels breezy, textured, and very boho aesthetic room decor DIY-friendly.
Materials
- 5mm single-strand macramé cord, 30 yards total (cut into cords as directed)
- Driftwood branch, 14–22 inches long, sanded
- Wooden beads, 20–30, mixed sizes (8–20 mm)
- Scissors (sharp fabric scissors)
- Tape measure
- Small dowel holder/wood drill bit set (if drilling bead holes)
- Optional: clear fabric spray sealant, 1 can
Instructions
- Cut 12 cords at 6 feet, 6 cords at 4 feet. Fold each in half.
- Attach cords to the driftwood with a lark’s head knot across the branch center to create your base.
- Work outward with square knots (3–4 cm per knot) forming rows. Use alternating patterns for texture.
- Add wooden beads by threading onto individual cords before securing a knot. Space beads every 4–6 inches.
- For fringe, trim bottom cords to a gentle V shape—measure from center to edge (center 24 inches, edges 18 inches).
- Lightly brush the piece with a fabric sealant (if using) and let dry 30 minutes to set.
- Hang by a small loop on the driftwood. Adjust fringe after hanging.
How to Display or Gift It
- Hang above a low bed or sofa to anchor a gallery wall.
- Tuck a dried eucalyptus sprig into the knots for a farmhouse-boho mix.
- Wrap in kraft tissue and place in a long gift tube for safe transport.
- Store flat in a garment bag if making in batches.
- For pro display, use a small wooden picture hook or small wooden easel for tabletop versions.
2. Textured Clay Sunburst Mirror

This clay sunburst has rustic texture and imperfect edges for an organic, handmade look. Air-dry clay makes it approachable—no kiln required—and the chalky paint finish gives that relaxed boho feel.
Materials
- Air-dry clay, 500 g
- Small round mirror, 6 inches
- Craft knife or precision tool
- Rolling pin
- Sandpaper fine grit (220)
- Acrylic paint set (matte terracotta, sand, white)
- Foam brush
- Clear matte sealer spray
Instructions
- Roll clay to 1/4 inch thickness on parchment.
- Cut a circle slightly larger than the mirror (8 inches) for backing.
- Cut sunray shapes (~1–2 inches long) and attach around backing using a bit of water to score-and-slip.
- Press a shallow cavity for the mirror to sit; allow to dry 24–48 hours depending on humidity.
- Sand edges gently for a soft finish.
- Paint base with terracotta; dry 30 minutes between coats. Add dry-brushed sand and white for patina.
- Apply clear matte sealer and let cure 4 hours.
- Adhere mirror with craft glue and let set 24 hours.
How to Display or Gift It
- Prop on a small easel or hang above a console.
- Pair with a woven placemat or rattan tray.
- Wrap in tissue and place in a shallow gift box lined with shredded kraft.
- For safer storage, layer with felt between pieces in a craft organizer.
3. Tufted Linen Lumbar Pillow with Fringe
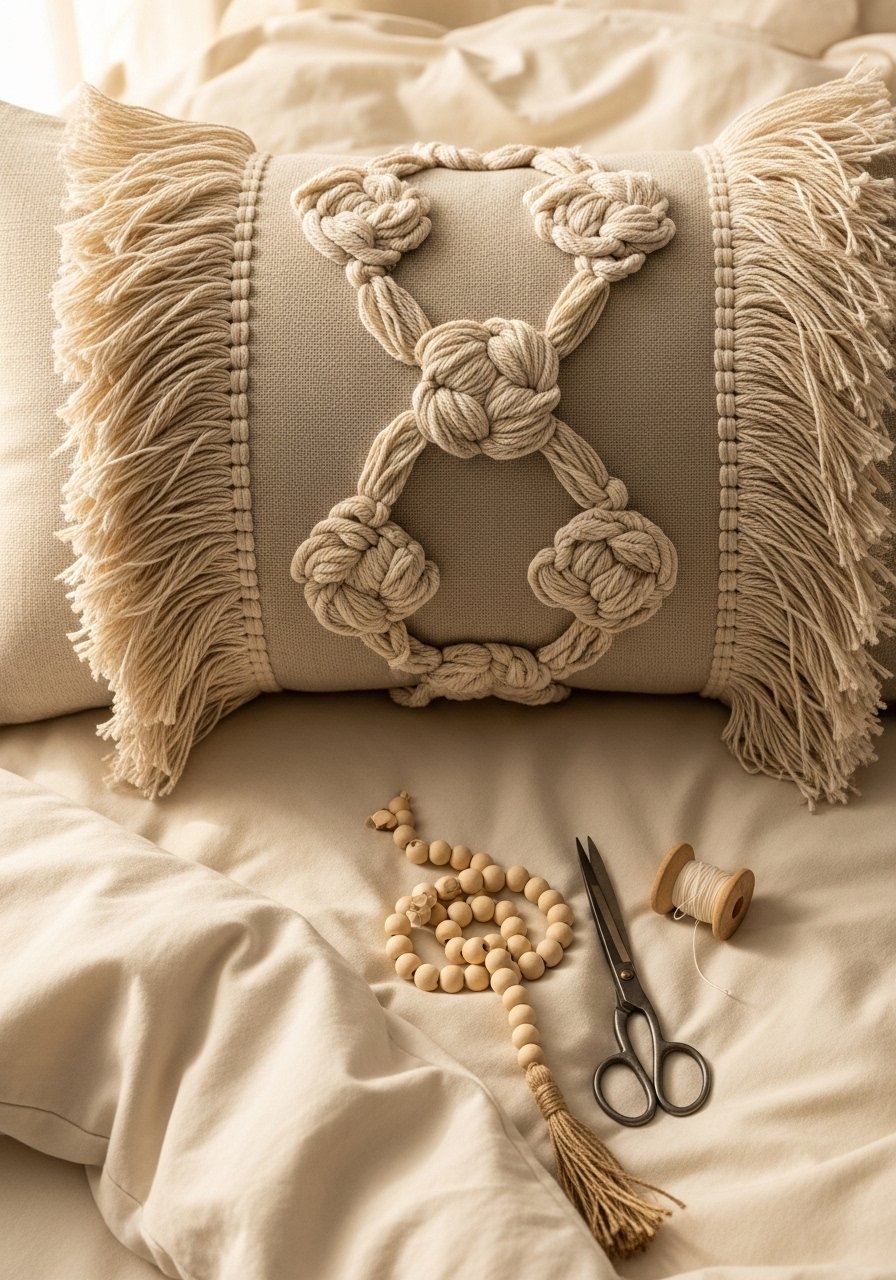
This pillow uses a simple tufting tool technique for those soft textured dimples. It reads handmade and luxe—perfect on a bed or woven daybed and wonderful for adding tactile contrast to smooth linens.
Materials
- Linen pillow cover, 12×20 inches
- Upholstery thread, 50 yards
- Tufting needle or heavy-duty upholstery needle
- Polyfill or down insert, 12×20 inches
- Chalk pencil
- Small embroidery scissors
- Tufting punch needle (optional)
Instructions
- Mark tuft points in a grid—4 rows of 6 across the lumbar (every 2.5 inches).
- Thread needle with 2 yards of upholstery thread; double for strength.
- Push through at marked point and pull snug to form a tuft. Tie secure knots on inside.
- Repeat across the grid. For deeper dimples, use a tufting punch tool to create loops then trim.
- Attach 6-inch fringe strips by hand-stitching along short edges.
- Insert cushion and fluff—let sit 24 hours for fabric to settle.
How to Display or Gift It
- Place on a rattan daybed or layered with a neutral throw.
- Add a wooden bead tassel to the zipper pull.
- Store covers flat in a fabric storage box to avoid creases.
- Great as a thoughtful housewarming gift tucked into a kraft pillow box.
4. Jute-Wrapped Terracotta Vase
Wrap plain terracotta in jute for instant boho texture. It's quick, budget-friendly, and toddler-safe when using low-heat gluing.
Materials
- Terracotta vase, 8–10 inches
- Natural jute twine, 100 feet
- Hot glue gun and glue sticks
- Scissors
- Painter’s tape
- Optional: E6000 craft glue for final bonds
Instructions
- Mark where you want to stop wrapping; secure the top edge with painter’s tape.
- Add a small dot of hot glue at the base and press twine into it. Begin wrapping tightly.
- Keep the twine snug; add glue every 2–3 inches.
- When reaching your stop point, cut twine and secure end with a generous dot of glue.
- Let glue cool and set 10 minutes.
- If adding beads, thread them onto the twine before finishing.
How to Display or Gift It
- Pair with dried grasses or eucalyptus for a textural centerpiece.
- Wrap base with kraft ribbon and add a handwritten tag for gifting.
- Store in a dry place—jute can weaken if constantly damp.
- Make a set in different sizes for a styled shelf display.
5. Beaded Macramé Plant Hanger — boho aesthetic room decor DIY

This beaded hanger combines classic macramé square knots with oversized beads for organic movement. It’s perfect for bringing plants down into the living area and adds instant earthiness.
Materials
- 3mm macramé cord, 40 feet
- Wooden beads, 6 large (20mm)
- Terracotta pot, 4–6 inches
- Metal O-ring for hanger top, 1
- Scissors
- Tape measure
- Plant hooks/ceiling hooks
Instructions
- Cut 8 cords at 6 feet. Fold and attach to O-ring.
- Create a band of square knots for the upper collar (about 3 inches).
- Divide into 4 groups and knot a diamond pattern; slide beads into the cords at intervals.
- Form a basket by knotting the groups together 8–10 inches below the top.
- Trim fringe to 4–6 inches or leave long.
- Hang on a secure hook that supports weight; test with the empty pot then add plant.
- Check knots monthly for slip; tighten if needed.
How to Display or Gift It
- Hang in a bright corner or clustered trio at varying heights.
- Pair with a matching jute-wrapped vase for a coordinated shelf.
- When gifting, include a small care card for the plant.
- Store flat and untangled by wrapping cords around a cardboard template.
6. Hand-Stamped Boho Wall Flags — boho aesthetic room decor DIY
Create a set of neutral wall flags with carved stamp patterns for a subtle artisan look. Stamped linen lets you play with negative space and muted pigments for a relaxed boho energy.
Materials
- Linen fabric rectangles, 3 pieces 8×12 inches
- Fabric ink pads in 'saddle tan' and 'ochre'
- Wooden stamps or DIY carved stamps
- Wooden dowels, 3 @ 12 inches
- Jute twine, 36 inches
- Fabric glue or sewing kit
- Fabric ink set
Instructions
- Cut linen to size and iron flat.
- Practice stamping on scrap linen to gauge ink pressure.
- Stamp patterns leaving small spaces for breathing room.
- Let ink dry 10–20 minutes and set with an iron (follow ink manufacturer directions).
- Fold the top over the dowel and glue or stitch into a sleeve.
- Tie twine to dowel ends for hanging.
How to Display or Gift It
- Arrange three flags staggered above a sofa for an organic gallery.
- Add a dried sprig tucked into the dowel for seasonal flair.
- Roll flags and secure with twine for gifting.
- Store flat in a fabric organizer to prevent creases.
7. Seagrass Woven Basket (Beginner Loom)

Weave a compact basket on a simple peg loom. The natural seagrass adds warmth and texture—great for corralling pillows, magazines, or succulents.
Materials
- Seagrass rope, 50 feet
- Small peg loom (or homemade pegboard)
- Scissors
- Wooden base disc (optional) 6 inches
- Clothespins for holding weave
- Weaving loom kit
Instructions
- Set warp cords across peg loom spacing 1/2 inch apart.
- Start weaving with seagrass rope in an over-under pattern.
- Push rows tightly together as you go.
- Shape sides by angling warp as basket height grows.
- Finish by tying off warp cords; secure to wooden base if used.
- Trim loose ends and tuck under with a blunt tool.
How to Display or Gift It
- Use as a catch-all on a console table with dried botanicals.
- Nest smaller baskets inside larger ones for gift sets.
- Wrap in tissue and tie with jute for gifting.
- Store small woven pieces stacked inside a craft organizer.
8. Ombre Painted Terracotta Planters

Ombre gives plain pots an earthy, layered look. Use chalk acrylic paint for a matte finish that reads natural.
Materials
- Terracotta planters, 3 sizes
- Chalk acrylic paint set (3-4 colors)
- Foam brushes (1-inch and 2-inch)
- Painter’s tape
- Sandpaper fine grit
- Sealant (matte)
- Acrylic paint set
Instructions
- Clean pots and sand rims lightly.
- Apply base coat and let dry 30 minutes.
- Mix intermediate shades for smooth gradation.
- Paint from darkest at bottom to lightest at top using horizontal strokes.
- Blend where colors meet with light brush strokes while paint is tacky.
- Apply a second coat if coverage is thin; dry 30 minutes between coats.
- Seal with matte spray; cure 1 hour before planting.
How to Display or Gift It
- Group planters on a windowsill or layered shelf.
- Use water-safe liner or plant succulents to avoid constant watering.
- Wrap pots in kraft and add plant care tags for gifting.
- Store unplanted pots nested to save space.
9. Driftwood Candle Tray — boho aesthetic room decor DIY

A driftwood candle tray brings coastal boho charm. Use a shallow driftwood piece and a few glass votives to keep the look organic and safe.
Materials
- Driftwood piece, 12–18 inches
- Glass votives, 3
- Tea light candles or LED alternatives
- Hot glue gun
- Moss, small pebbles
- Sandpaper
- LED tealight set (optional for safety)
Instructions
- Sand driftwood lightly to remove splinters.
- Arrange votives and mark glue spots.
- Glue votives lightly to driftwood; allow glue to set 10–15 minutes.
- Fill between with moss and pebbles for texture.
- If using real candles, ensure votives are heat-safe and never leave unattended.
How to Display or Gift It
- Center on a coffee table runner for a cozy focal point.
- Pair with a small stack of books and a ceramic bowl.
- Wrap carefully in bubble wrap and kraft for gifting.
- Store in a shallow box to keep shape and fragile pieces safe.
10. Pom-Pom Wool Garland

This garland adds soft, tactile layers to mantels or headboards. Wool pom-poms feel plush and warm—perfect for colder months or cozy corners.
Materials
- Wool roving or chunky yarn, 200–400 g
- Pom-pom maker or cardboard template
- Heavy-duty needle
- Twine for stringing, 5–6 feet
- Scissors
- Wool roving pack
Instructions
- Wrap wool around pom-pom maker or cardboard squared 100–150 wraps for large poms.
- Tie tightly in center; cut loops and fluff.
- Trim to even sphere shape.
- String pom-poms on twine with knots between each to hold spacing.
- Hang and adjust spacing to taste.
How to Display or Gift It
- Drape over a mantel or along a shelf edge.
- Use as a photo-prop or nursery accent.
- Bundle garlands into a tissue-wrapped tube for gifting.
- Store loosely in a breathable cotton bag to avoid matting.
11. Boho Aesthetic Room Decor DIY: Painted Wooden Bead Curtain

A bead curtain gives a doorway a soft bohemian divide. Paint mixed-size wooden beads for an earthy palette and string them densely for a satisfying rhythm.
Materials
- Wooden beads assorted sizes, 150–200
- Jute twine, 50 feet
- Wooden rod or dowel, 36 inches
- Paint (acrylic matte)
- Drill with 2–3 mm bit (to re-drill bead holes if needed)
- Wooden beads pack
Instructions
- Paint beads in desired colors; dry 30 minutes between coats.
- Re-drill holes if paint clog occurs using a small drill bit.
- Cut twine into 8–12 foot strands depending on doorway height.
- Knot a bead at the bottom of each strand to prevent slipping.
- String beads in pattern, keeping consistent spacing.
- Secure strands to dowel and test weight on the doorway before final hanging.
How to Display or Gift It
- Use as a soft divider between living areas or as a closet curtain.
- Pair with other textured hangings for a layered wall.
- Package as a DIY kit with extra beads and instructions for gifting.
- Store beads in small craft boxes to keep color groups together.
12. Natural Dye Shibori Pillow Covers

Shibori is a great way to introduce soft indigo tones and subtle patterns into a neutral boho palette. Natural dyes bleed into fibers for watercolor-like edges.
Materials
- White linen pillow covers, 2
- Indigo dye kit (or fabric dye)
- Rubber bands, clamps
- Plastic tub for dye
- Gloves and stirring stick
- Indigo dye kit
Instructions
- Wet pillow covers and fold into desired shibori pattern (accordion, clamp, twist).
- Secure with rubber bands.
- Prepare dye per kit instructions.
- Submerge fabric for 5–20 minutes depending on depth desired.
- Rinse until water runs clear; air dry overnight.
- Heat-set with iron if dye instructions require.
How to Display or Gift It
- Pair with natural linen throws or macramé wall pieces.
- Wrap bundled pillows in kraft and tie with twine for gifting.
- Store folded in breathable cotton totes to keep dyes vibrant.
13. Leather Tassel Key Hooks (Small Wall Accent)

Turn leather scraps into rich tassels hung from brass hooks for a subtle boho accent. These small pieces punch above their weight in texture.
Materials
- Vegetable-tanned leather scrap, 6×12 inches
- Brass hook set, 3
- Scissors
- Hole punch
- Wood plaque, 6×8 inches
- Wood stain (optional)
- Brass hooks pack
Instructions
- Cut leather into strips 1/4 inch wide.
- Roll and tie into tassel shapes; secure with small thread.
- Attach tassel to plaque with a small screw eye.
- Stain plaque if desired and attach hooks.
- Mount on wall with anchors rated to weight.
How to Display or Gift It
- Place near an entryway for keys and sunglasses.
- Gift with a small brass tray for a mini-entryway set.
- Store leather scraps flat to avoid creasing.
14. Boho Stenciled Wood Sign

A hand-stenciled sign brings handmade typography into your space. Use painter’s tape and a brayer for crisp, even stencil edges.
Materials
- Wood plaque, 12×6 inches
- Stencil (botanical or script)
- Chalk acrylic paints
- Foam brush or brayer roller
- Painter’s tape
- Sandpaper
- Brayer roller
Instructions
- Sand wood and apply base coat; dry 30 minutes.
- Position stencil and tape securely.
- Dab small amounts of paint with foam brush; remove excess on paper towel.
- Press with brayer for even coverage.
- Lift stencil carefully; touch up with detail brush if needed.
- Seal with a thin coat of matte Mod Podge; dry 20 minutes.
How to Display or Gift It
- Lean on a shelf with a small ceramic vase.
- Wrap in kraft and tie with twine for gifting.
- Store flat in a craft drawer to prevent warping.
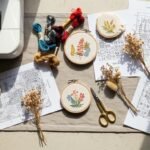
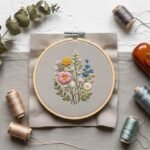
15. Hand-Embroidered Hoop Art

Embroidery hoops add subtle pattern and cozy detail to gallery walls. Use simple satin and backstitches for a textured finish.
Materials
- Wooden embroidery hoop, 6–8 inches
- Linen or cotton fabric
- Embroidery floss (varied neutrals)
- Embroidery needles
- Water-soluble marker
- Embroidery kit starter set
Instructions
- Stretch fabric taut in hoop and sketch simple botanical shape.
- Stitch outlines with backstitch; fill leaves with satin stitch.
- Knot ends on the back; trim fabric leaving 1 inch excess.
- Press lightly with a warm iron.
- Trim backing and glue down for a clean edge.
How to Display or Gift It
- Group hoops in varying sizes for a textured gallery.
- Add a small loop of twine for hanging.
- Gift with a tiny needle case and floss sample.
16. Mini Woven Wall Rug with Fringe

A mini wall rug adds pattern and plush texture to small wall areas. Use a mix of wool and cotton for soft contrast.
Materials
- Small loom (frame loom)
- Wool yarn, cotton yarn, textured chenille
- Wooden dowel, 12 inches
- Tapestry needle
- Scissors
- Frame loom kit
Instructions
- Warp your loom with cotton yarn spacing 1/4–1/2 inch.
- Weave rows using different yarn textures and widths.
- Add rya knots for bulk or looped pile.
- Finish by tying warp ends and trimming fringe to even length (3–5 inches).
- Mount on dowel and hang.
How to Display or Gift It
- Hang over a bed or in a small hallway.
- Combine with macramé pieces for wall layering.
- Wrap in tissue and a cardboard sleeve for gifting.
- Store flat or rolled with acid-free tissue to protect fibers.
17. Pebble Mosaic Tray

Create a tactile tray with natural pebbles and grout for a calming, spa-like surface. It’s sturdy and works well as a jewelry or candle tray.
Materials
- Wooden tray (shallow)
- Small polished pebbles, 1–2 lbs
- Sanded grout (small tub)
- Silicone spatula or grout float
- Sealant for grout
- Pebble mix bag
Instructions
- Arrange pebbles in tray to preview pattern.
- Mix grout to toothpaste consistency.
- Press grout into gaps, wiping excess with a damp sponge.
- Let grout dry 24 hours.
- Seal grout surface and cure per product instructions (24–48 hours).
How to Display or Gift It
- Use near the bathroom sink or on a dresser.
- Pair with neutral candles or a small succulent.
- Wrap in bubble with tissue for gifting.
- Keep away from constant water exposure to maintain grout.
18. Embellished Rattan Lampshade

Add macramé trim and beads to a simple rattan shade for extra handmade interest. The woven texture casts beautiful shadows.
Materials
- Rattan lampshade, medium
- Macramé cord, 20 feet
- Wooden beads, 20
- Hot glue gun
- Scissors
- Rattan lampshade
Instructions
- Measure shade circumference and cut macramé fringe strips.
- Knot fringe along the bottom edge using lark’s head knots.
- Add wooden beads intermittently.
- Reinforce with small dabs of hot glue for long-term wear.
- Let glue set 15 minutes before turning lamp on.
How to Display or Gift It
- Use in a reading nook for cozy ambiance.
- Pair lamp with a woven basket and layered throw.
- Wrap base and shade separately for safe gifting.
- Store in a tall craft box to avoid crushing fringe.
19. Upcycled Sweater Pouf

Upcycle a worn sweater into a soft floor pouf—great for casual seating and boho texture. Use dense stuffing or a thrifted inner cushion.
Materials
- Large wool sweater or knit blanket
- Inner pouf filler (polyfill or old pillows), enough to fill a 20-inch pouf
- Heavy-duty needle and upholstery thread
- Leather strap for handle (optional)
- Scissors
- Polyfill bag
Instructions
- Cut sweater to create two large panels; stitch sides to form a bag with one open end.
- Turn right-side out and stuff firmly.
- Hand-stitch opening closed with ladder stitch.
- Add leather handle with rivets or heavy stitching.
- Fluff for 24 hours to settle.
How to Display or Gift It
- Use near a low coffee table or as footrest.
- For gifting, present in a cloth tote with care instructions.
- Store deflated in a vacuum seal bag when not in use.
20. Resin-Coated Leaf Tray

Encapsulate pressed leaves in clear resin to preserve botanicals with a glass-like finish. Perfect for seasonal displays and small jewelry catchalls.
Materials
- Small wooden tray
- Pressed leaves (flat, fully dried)
- Two-part epoxy resin kit (clear), enough for 1 tray
- Mixing cups and stir sticks
- Gloves and respirator mask
- Epoxy resin kit
Instructions
- Seal any porous wood with a thin coat of resin or primer; let cure 2 hours.
- Lay pressed leaves in desired arrangement.
- Mix resin per kit directions; stir slowly to reduce bubbles.
- Pour thin layer (1/8 inch) over leaves; pop bubbles with a heat gun quickly (5 seconds bursts).
- Let cure 24–48 hours for tack-free, 72 hours for full cure.
- Sand edges lightly if needed and buff.
How to Display or Gift It
- Use as a perfume tray or jewelry rest.
- Wrap in tissue and place in a small kraft box for gifting.
- Avoid placing hot items directly on resin.
- Store flat to prevent dust settling on surface.
21. Felted Wool Wall Strips

Felted wool strips create a very soft, modern-boho look. The tactile layers feel cozy and refine a wall without overwhelming it.
Materials
- Wool felt strips (various widths), total ~5 yards
- Wooden dowel, 18 inches
- Hot glue gun or needle and thread
- Scissors
- Measuring tape
- Wool felt bundle
Instructions
- Cut strips in varied lengths (10–20 inches).
- Layer and attach strips to the dowel with hot glue or whip stitch.
- Stagger lengths for visual interest.
- Trim bottoms for desired silhouette.
- Hang with a concealed twine loop.
How to Display or Gift It
- Group with small framed prints for a textured gallery.
- Wrap in tissue and a kraft tube for gifting.
- Store rolls flat to prevent creases.
22. Hemp Photo Frames with Bead Trim

Wrap plain frames in hemp and accent with wood bead trim for a rustic-boho touch. They make lovely, personalized gifts.
Materials
- Wooden photo frame, 5×7 inches
- Hemp cord, 20 feet
- Wooden beads, small bag
- Hot glue gun
- Small picture-hanging hardware
- Hemp twine spool
Instructions
- Clean frame surface.
- Apply a thin line of glue and press hemp cord, wrapping tightly.
- When reaching corners, cut cord at angle and continue.
- Add bead trim along inner or outer edge with glue.
- Let glue set 15 minutes before inserting photo.
How to Display or Gift It
- Use on open shelves with small dried stems tucked behind.
- Pair several frames in a staggered layout.
- Gift with a printed photo and kraft wrapping.
- Store flat in a shallow box with tissue layers.
You made it through 22 dreamy projects that mix natural fibers, warm pigments, and textural details. From quick jute wraps to slow-build woven rugs, there's something here for a short afternoon session or a weekend craft binge. Pin the projects you want to try, share this with a friend who loves cozy corners, and pick one piece to get started with this weekend.
Trust me, a quality hot glue gun with temperature control changed how every single one of these turned out — fewer strings, neater joins, happier fingers. Which project will you pin first?