You love a space that feels thoughtful and calm, but you don’t want to break the bank. These 23 trendy projects prove you can create aesthetic room decor DIY on a budget that looks expensive and cost almost nothing. Each idea uses simple supplies, basic tools, and small techniques that give high-end finishes—think soft neutrals, warm textures, and crisp painted edges.
I start many of these with my Cricut Joy for tiny vinyl labels, though a precision craft knife works fine for simple shapes. Grab a budget hot glue gun and a flat foam brush and you’ll be set for the majority of projects. Throughout you’ll find step-by-step instructions, exact measurements, drying times, and helpful product links so you can shop quickly and confidently.
Ready to pin a few and craft this weekend? These projects suit beginners and seasoned makers alike, with styles ranging from cottagecore and boho to japandi and neutral modern. Let’s make your room feel pulled together—without a heavy price tag.
- Painted Wood Tray with Marble Effect
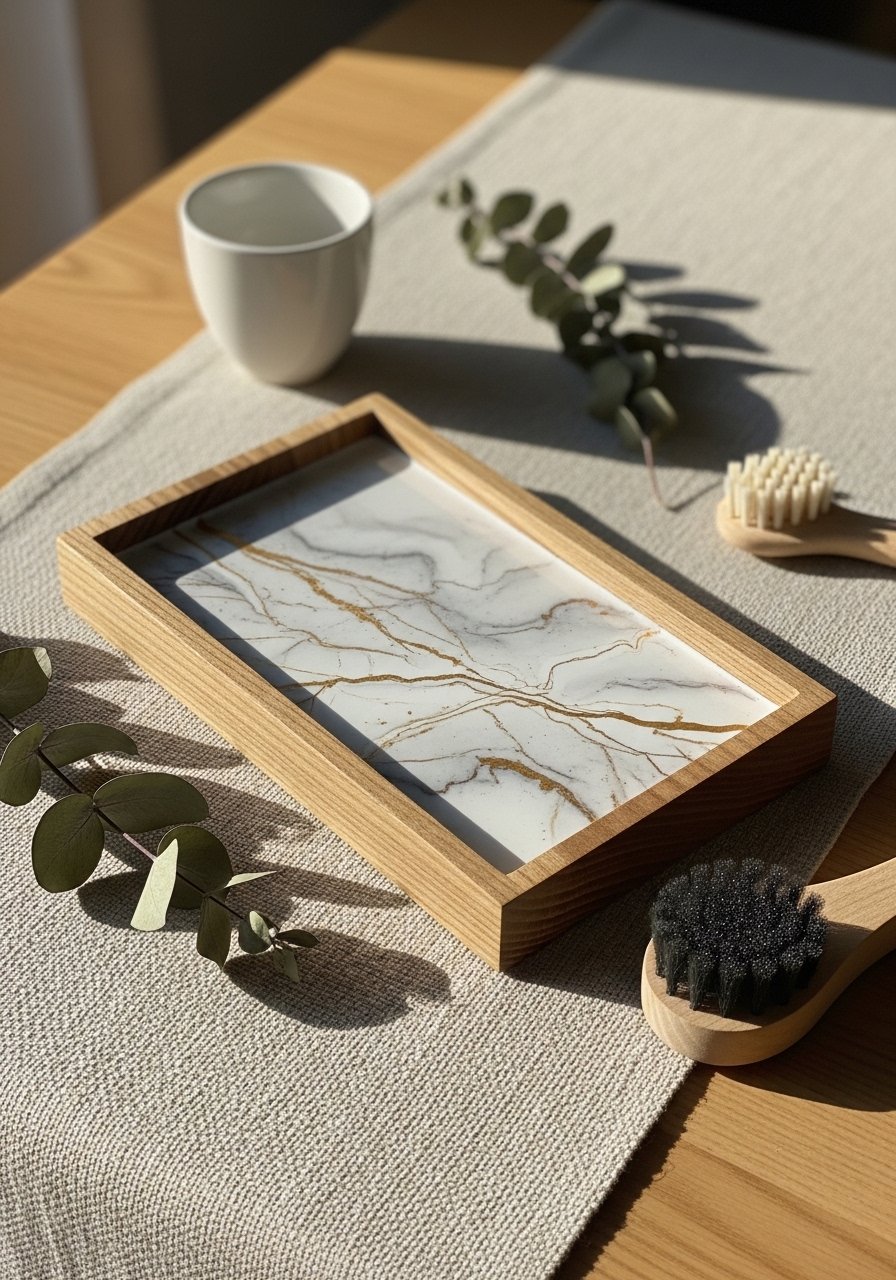
This painted wood tray feels luxe thanks to a faux marble pour and subtle gold veins. It looks like a boutique piece but costs less than a store tray. The texture is glossy and smooth when cured. Beginners will like the simple pour method; you’ll enjoy how the pattern mingles like real stone.
Materials
- 1 unfinished pine tray, 10" x 6" (sand smooth)
- 4 oz white acrylic paint (satin)
- 2 oz light gray acrylic paint
- 1 oz gold acrylic paint or gold leaf pen
- 30 ml gloss pouring medium
- 60 ml water for thinning
- 1 small disposable cup for mixing
- 1 foam brush (1 inch)
- 1 heat gun (optional for popping bubbles)
- Painter's tape, small strip
Instructions
- Sand the tray lightly with 120-grit sandpaper and wipe dust off.
- Tape the underside edges to protect them from paint.
- Mix 4 oz white acrylic with 30 ml pouring medium in a cup. Add 10–15 ml water until it flows like warm honey.
- In separate small cups, mix 2 oz gray paint with a little pouring medium and water; leave one cup with gold pigment slightly thicker.
- Pour the white mixture into a clean tray, then drop gray and gold in thin streams across the surface.
- Tilt the tray gently to let colors swirl. Use a heat gun for 5–10 seconds at 6 inches to remove bubbles.
- Let sit flat for 24 hours to cure. Apply a second coat of gloss sealer if not fully clear after 24 hours; final hardness in 72 hours.
How to Display or Gift It
- Style the tray on a nightstand with a candle and a small vase.
- Wrap in kraft paper and tuck a dried sprig for gifting.
- Store unused trays flat in a stackable craft organizer until cured.
- For an easy shop link, I reach for a sturdy foam brush when applying even coats.
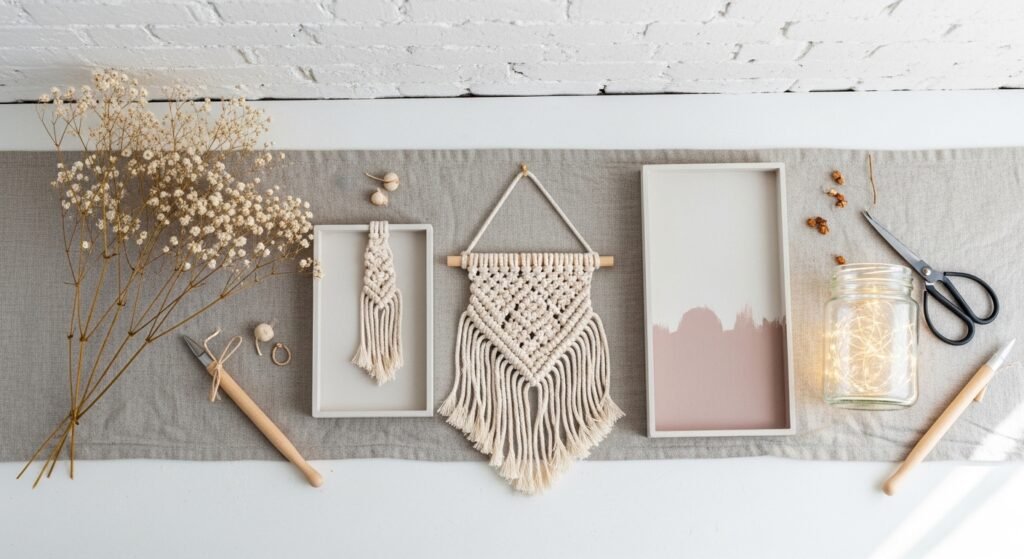
- Boho Macramé Mini Wall Hanging (5mm Cord)

Tiny macramé pieces add texture without dominating a room. This mini wall hanging uses 5mm cord and simple square knots for a relaxed boho look. The fringe feels soft under your fingertips and the raw cotton color complements cottagecore and neutral palettes. Great for beginners and quick to gift.
Materials
- 3mm or 5mm single-strand macramé cord, 10 yards
- 1 wooden dowel, 10" long
- 1 pair sharp fabric scissors
- 1 comb for fringe (metal or wide-tooth)
- 2 wooden beads (optional)
- 1 small tape measure
- 1 Lark's head knot reference printout (or phone tutorial saved)
Instructions
- Cut 6 cords at 60" each (for 10" dowel). Fold each cord in half.
- Attach each folded cord to the dowel using Lark’s head knots until dowel is evenly covered.
- Create two rows of square knots across the middle, leaving top and bottom sections plain for fringe.
- Add wooden beads threaded on center cords before tying the last knot.
- Trim fringe evenly to desired length (about 8–10").
- Comb fringe gently and hang; no drying time required.
How to Display or Gift It
- Hang in a cluster with tiny framed prints.
- Tie a short twine bow at the dowel ends for a finishing touch.
- Gift in a kraft box with tissue paper and a sprig of dried lavender.
- A small wooden dowel pack works well for multiples.
- DIY Japandi Minimalist Floating Shelf (Painted)
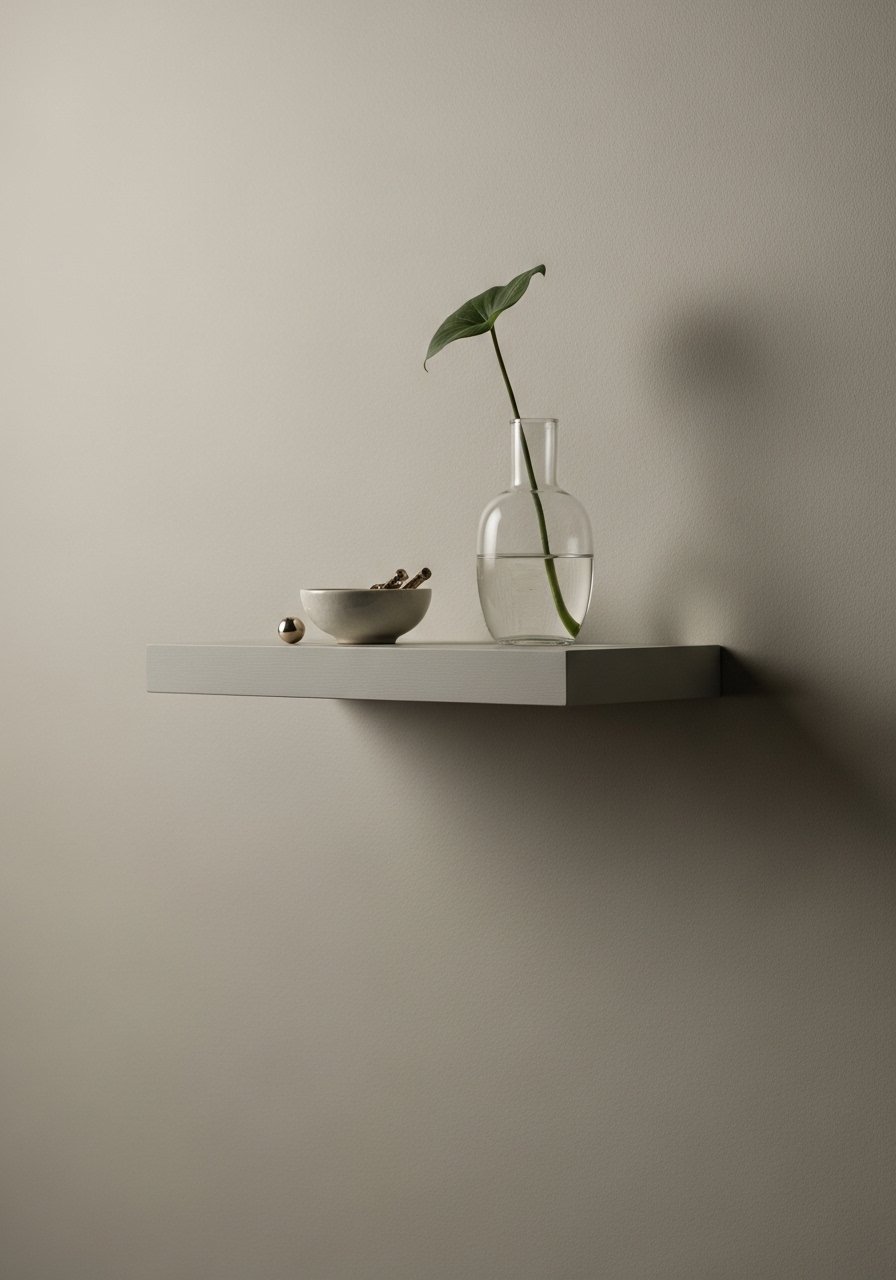
This slim floating shelf borrows from japandi simplicity—natural wood paired with matte paint. It looks high-design and costs under $5 in materials when you repurpose scrap wood. The shelf’s clean lines suit Scandinavian, japandi, or modern minimalist rooms.
Materials
- 1 pine board 12" x 4" x 3/4"
- 2 L-brackets (hidden mount style)
- 1/4 cup matte chalk paint (neutral color)
- 1 foam brush (1/2"–1")
- Sandpaper 120 and 220 grit
- 2 wood screws (1")
- Wood filler (small amount)
- Level and pencil
Instructions
- Sand the board with 120-grit then finish with 220-grit for smoothness.
- Fill any knots with a small amount of wood filler and let dry 30 minutes, then sand smooth.
- Paint two coats of chalk paint with a foam brush. Wait 30 minutes between coats; cure 24 hours to handle.
- Mount hidden L-brackets to the wall using screws and a level.
- Slide the painted board onto brackets until snug. No extra finishing required.
How to Display or Gift It
- Place a tiny ceramic bud vase and a linen-bound book.
- Put multiple shelves staggered for a gallery effect.
- Wrap for gifting in kraft with twine if giving to a new homeowner.
- I keep a compact level in my tool drawer for perfect alignment.
- Faux Concrete Plant Pot with Gold Rim
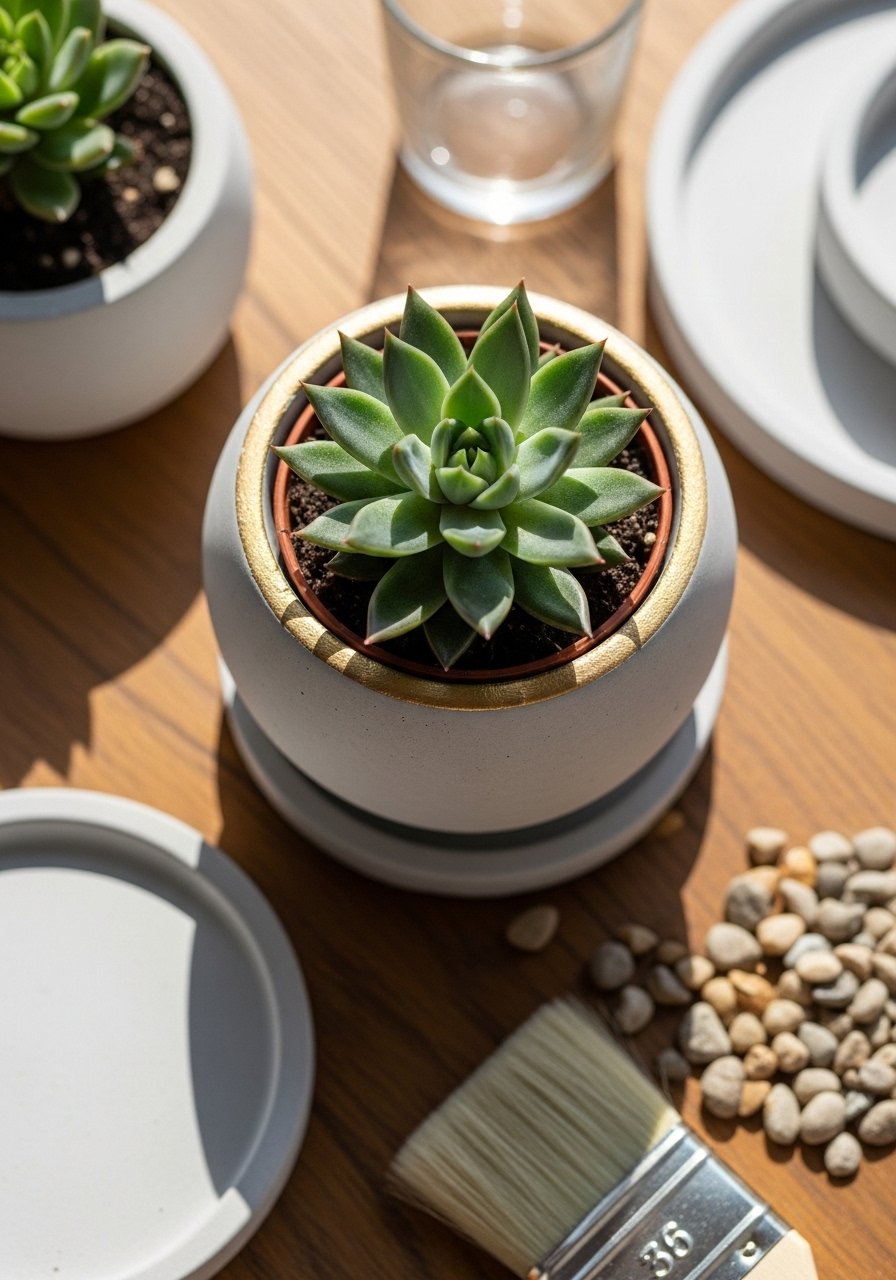
Make a faux concrete pot that looks like a designer piece. The texture is slightly gritty like cement, and a gold rim adds a luxe touch. This project works well with thrifted pots and is fast to do.
Materials
- 1 terracotta pot, 4" diameter
- 2 tbsp acrylic grout or concrete-texture paint
- 2 tbsp gray acrylic paint
- 1 tsp white acrylic paint
- 1 small flat foam brush
- 1 thin detail brush for gold rim
- 1 gold paint pen or metallic acrylic
- Fine sandpaper (240 grit)
- Clear acrylic sealer, matte
Instructions
- Wipe the pot clean. Lightly sand if glazed.
- Mix gray paint with grout for texture (approx 2:1 paint:grout).
- Apply a thin coat with a foam brush. Let dry 1–2 hours.
- Add a second coat for uniform texture; touch dry in 2 hours, cure 24 hours.
- Sand very lightly for a softer concrete look.
- Paint a 1/8" gold rim using a metallic pen or brush. Seal with two thin coats of matte sealer; dry 1 hour between coats.
How to Display or Gift It
- Group three sizes on a windowsill with pebbles.
- Gift with a small succulent tucked inside, wrapped with kraft paper.
- Store extras in stackable mason jars or craft bins.
- For small detail work I use a reliable metallic paint pen.
- Upcycled Sweater Cozy for Vases (Cottagecore)
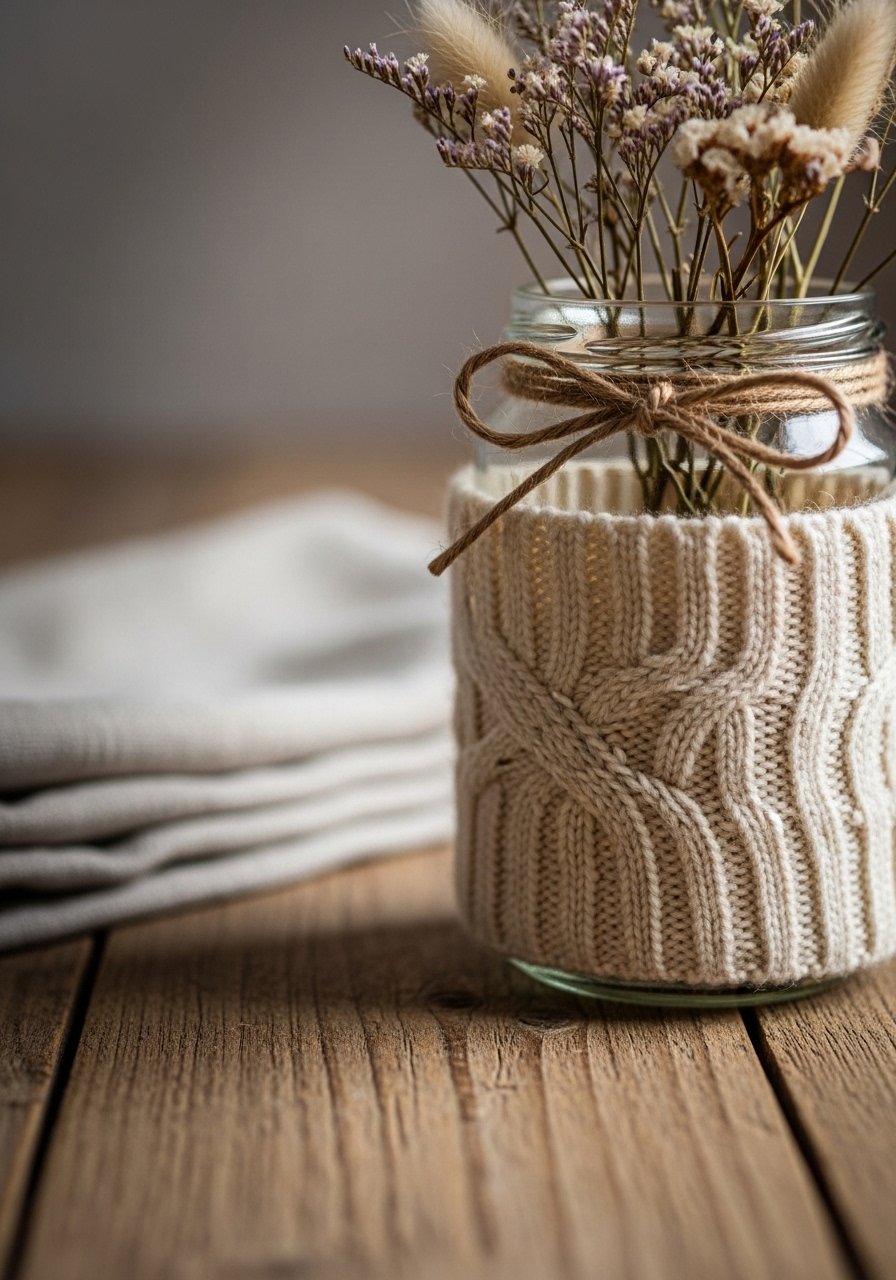
Turn thrifted sweaters into cozy vase covers that feel cottagecore and luxe. The knit texture adds warmth and hides a jar’s imperfections. This is perfect for seasonal arrangements or table decor.
Materials
- 1 thrifted sweater sleeve (or knit fabric, 8" wide)
- 1 mason jar 16 oz
- 1 sharp fabric scissors
- 1 ruler or measuring tape
- 1 spool of natural jute twine, 5 yards
- 1 hot glue gun and glue sticks
- Dried flowers or fresh sprigs
Instructions
- Cut the sleeve to fit around the jar with 1/2" overlap.
- Hem one edge with a quick hot glue seam or run a straight stitch if you have a machine.
- Slip the knit over the jar and trim top/bottom for a neat fit.
- Tie a twine bow around the neck; secure with a small dab of hot glue if needed.
- Add dried flowers and you're done—no drying time required.
How to Display or Gift It
- Cluster several wrapped jars as a centerpiece.
- Pop a battery tea light inside for soft glow (make sure fabric is away from flame).
- Gift wrapped in tissue with a handwritten tag.
- My go-to hot glue gun keeps seams tidy.
- Minimalist Painted Canvas Art (Japandi Palette)
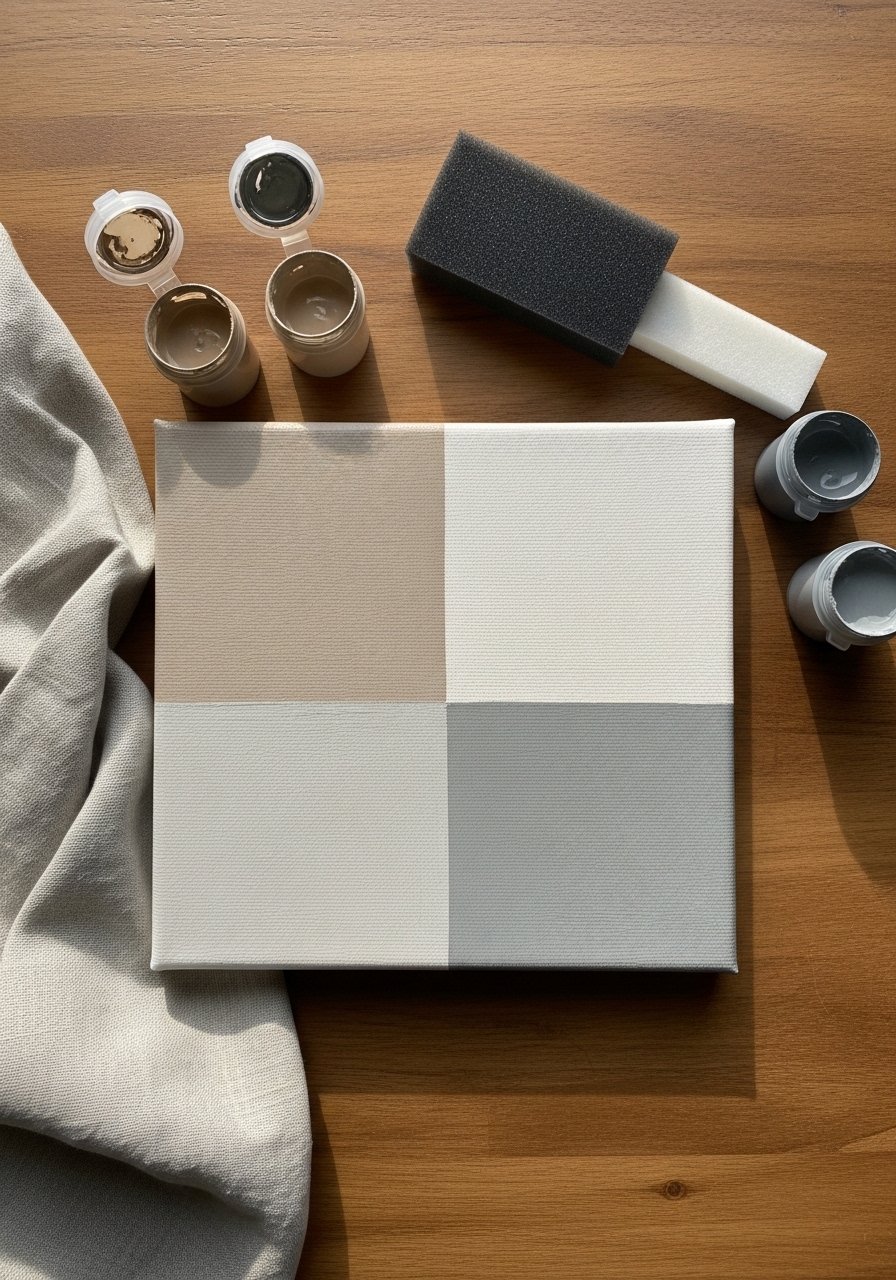
This minimalist canvas uses two color blocks for a calm, gallery-ready piece. It’s quick, inexpensive, and looks professionally framed when mounted on a floating frame. Works for apartment walls and bedside corners.
Materials
- 1 8" x 8" canvas panel
- 2 acrylic paints in neutral tones (1 oz each)
- 1 foam brush (1/2")
- Painter’s tape, 1/2" width
- 1 small mixing dish
- Sandpaper 220 grit
- Matte acrylic varnish, 2 oz
Instructions
- Lightly sand the canvas edges for texture.
- Tape a diagonal or straight block line with painter’s tape.
- Paint the larger block with the first neutral tone; let dry 30 minutes.
- Remove tape, re-tape to protect edge, and paint the second color. Dry 30 minutes.
- Apply a thin coat of matte varnish; dry 1 hour. Fully cure 24 hours.
How to Display or Gift It
- Display on a small wooden easel or hang in a grid.
- Pair with linen textiles and light wood frames.
- Wrap in tissue and tuck in a kraft box for gifting.
- I use a compact canvas panel pack when making multiple pieces.
- Command Center Memo Board with Fabric Cover
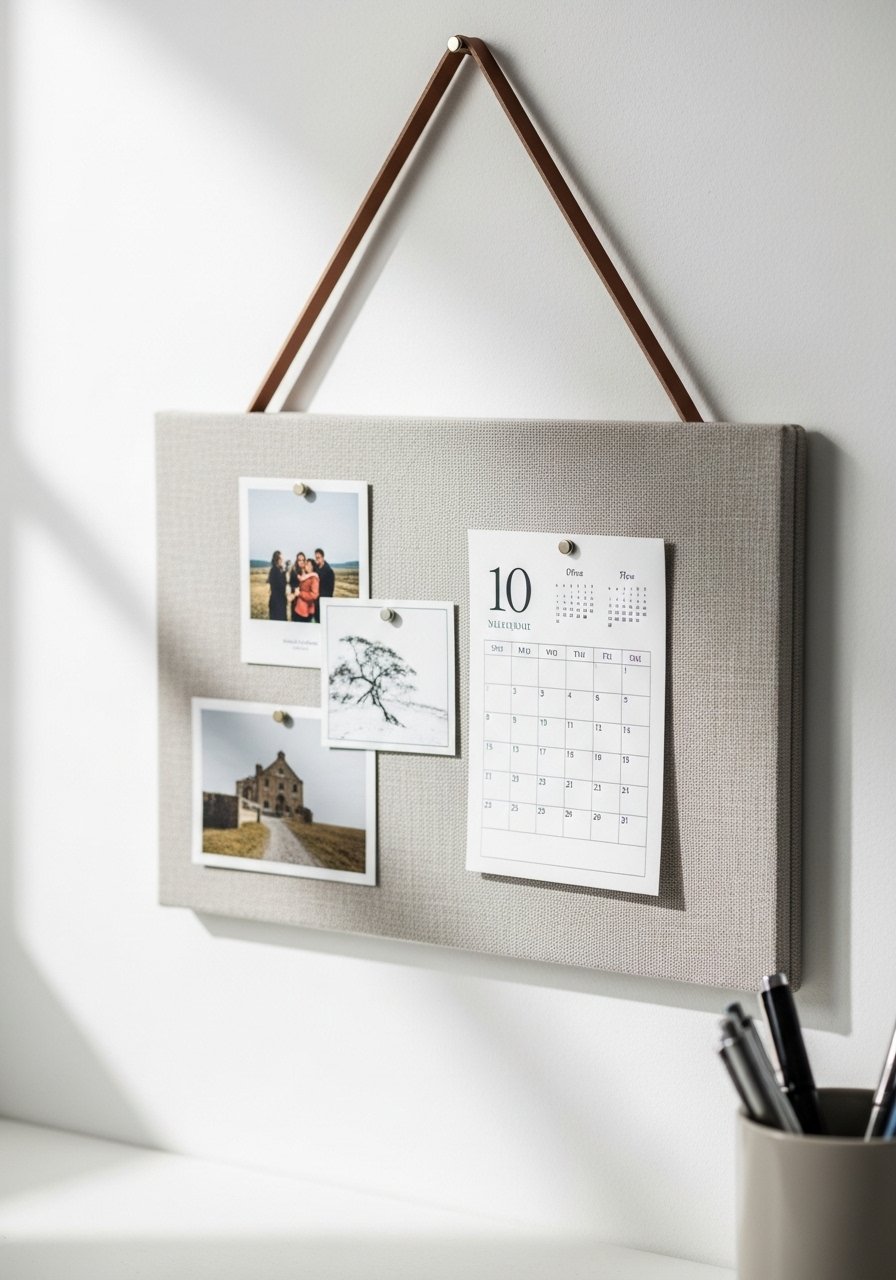
Create an organized focal point with a fabric-covered memo board. This project uses thrifted fabric and a simple frame. It looks tailored and is functional for inspiration notes, photos, or a to-do list.
Materials
- 1 thrifted frame 11" x 14"
- 1 piece foam core, cut to frame size
- 1/2 yard linen or cotton fabric
- 1 staple gun with staples
- 1 roll washi tape (10mm)
- 2 small leather strips for hanging (optional)
- Push pins, set of 10
- Ruler and craft knife
Instructions
- Remove glass from the frame and set aside.
- Cut foam core to fit frame opening precisely.
- Wrap fabric around foam core and staple on the back in even intervals.
- Reinsert into frame without glass. Use washi tape to anchor lightweight notes.
- Attach leather strips to the frame back for hanging if desired.
How to Display or Gift It
- Hang above a small desk or beside a door.
- Pair with a cork sticker strip for extra functionality.
- Gift with a set of decorative push pins in a small box.
- I like a slim staple gun for tidy upholstery-style fastening.
- DIY Terrazzo Coasters (Resin + Chips)

Terrazzo is back—these coasters use scrap ceramic chips and a clear resin for a high-end look. They’re durable and make wonderful gifts. The resin sets hard and glossy after curing, making them feel designer-made.
Materials
- 1 round silicone coaster mold
- 50 g clear epoxy resin kit (2:1 mix)
- 10–20 g ceramic or marble chips (1–5 mm)
- Mixing cups and stir sticks
- Disposable gloves
- Fine sandpaper (400 grit)
- Isopropyl alcohol for surface wipe
- Small blow torch or heat gun for bubble removal
Instructions
- Clean the mold with alcohol and let dry.
- Arrange chips in mold lightly; keep uniform spacing.
- Mix resin per manufacturer instructions (usually 2:1 or 1:1) and stir slowly for 3 minutes.
- Pour a thin layer into each mold, tapping molds to settle chips.
- Use a heat gun for 5–10 seconds to pop bubbles.
- Cure 24 hours to handle; full hardness in 72 hours. Demold and sand edges if needed.
How to Display or Gift It
- Wrap coasters in tissue and tie with twine for gifting.
- Use a small wooden coaster holder for countertop display.
- Store extras flat until fully cured in a lidded box.
- For mixing, I prefer a quality epoxy resin kit.
- Minimal LED Column Light (IKEA Hack)
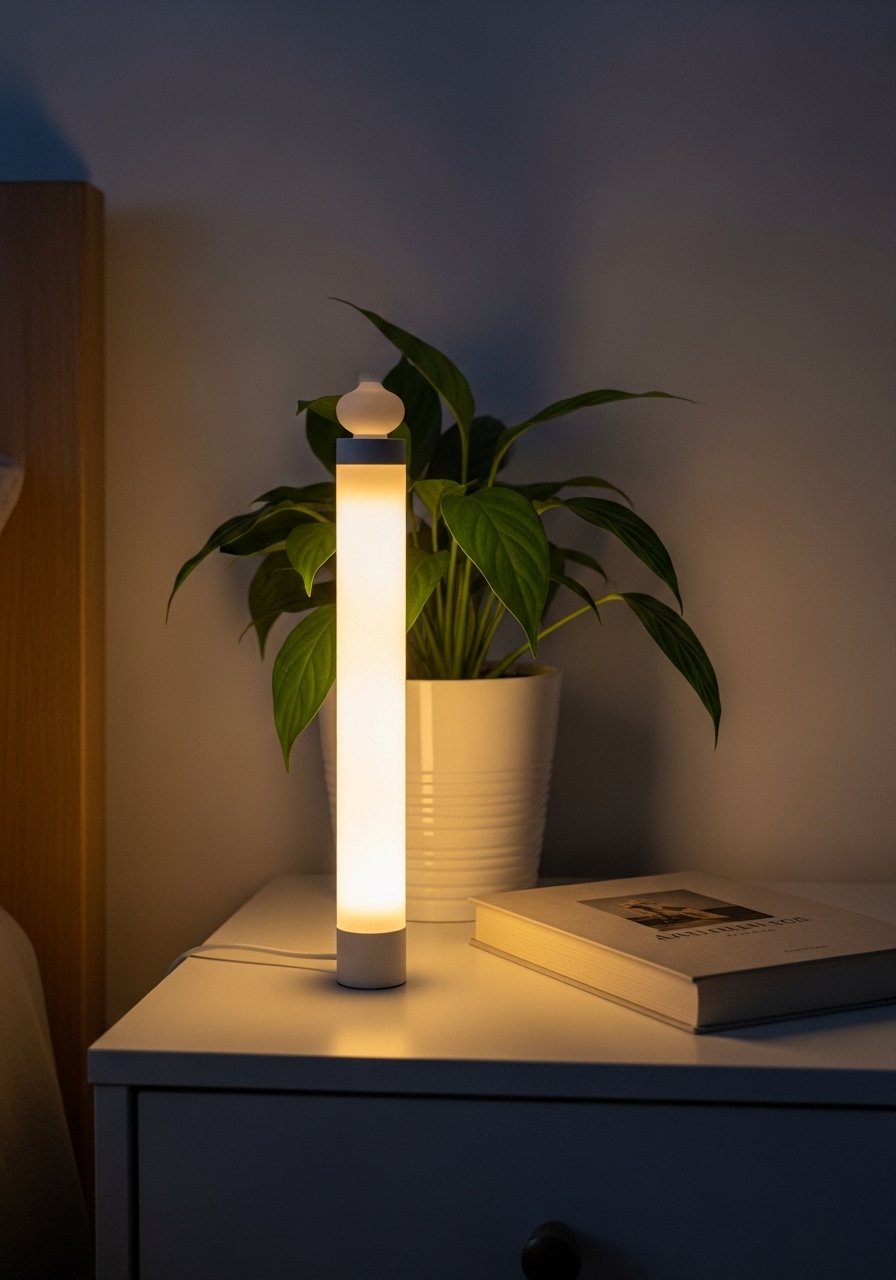
This LED column is chic and soft, perfect for mood lighting. Using a thrifted lamp base and a frosted plastic diffuser gives a costly vibe without the price. It casts warm, even light that flatters wood and linen textures.
Materials
- 1 thrifted lamp base or table lamp
- 1 frosted plastic vase or cylinder, 8" tall
- 1 LED strip light or battery-operated LED puck (warm, 3000K)
- Glue gun or silicone adhesive
- Sandpaper 120 grit (for base prep)
- Decorative stone pebbles, small handful
- Cord cover if needed
Instructions
- Remove lamp shade and clean the base.
- Fit the frosted cylinder over the base; sand inner lip lightly if needed for snug fit.
- Place LED inside the cylinder, secure with silicone and add pebbles for stability.
- Test the light; adjust LED position for even glow.
- Let adhesive set 24 hours before moving.
How to Display or Gift It
- Use beside a reading chair for soft ambient light.
- Wrap in tissue with a ribbon for housewarming gifts.
- Keep spare LEDs in a small craft organizer for quick swaps.
- I look for warm LEDs in a trusted LED strip set.
- Pressed Flower Glass Frame (Botanical)
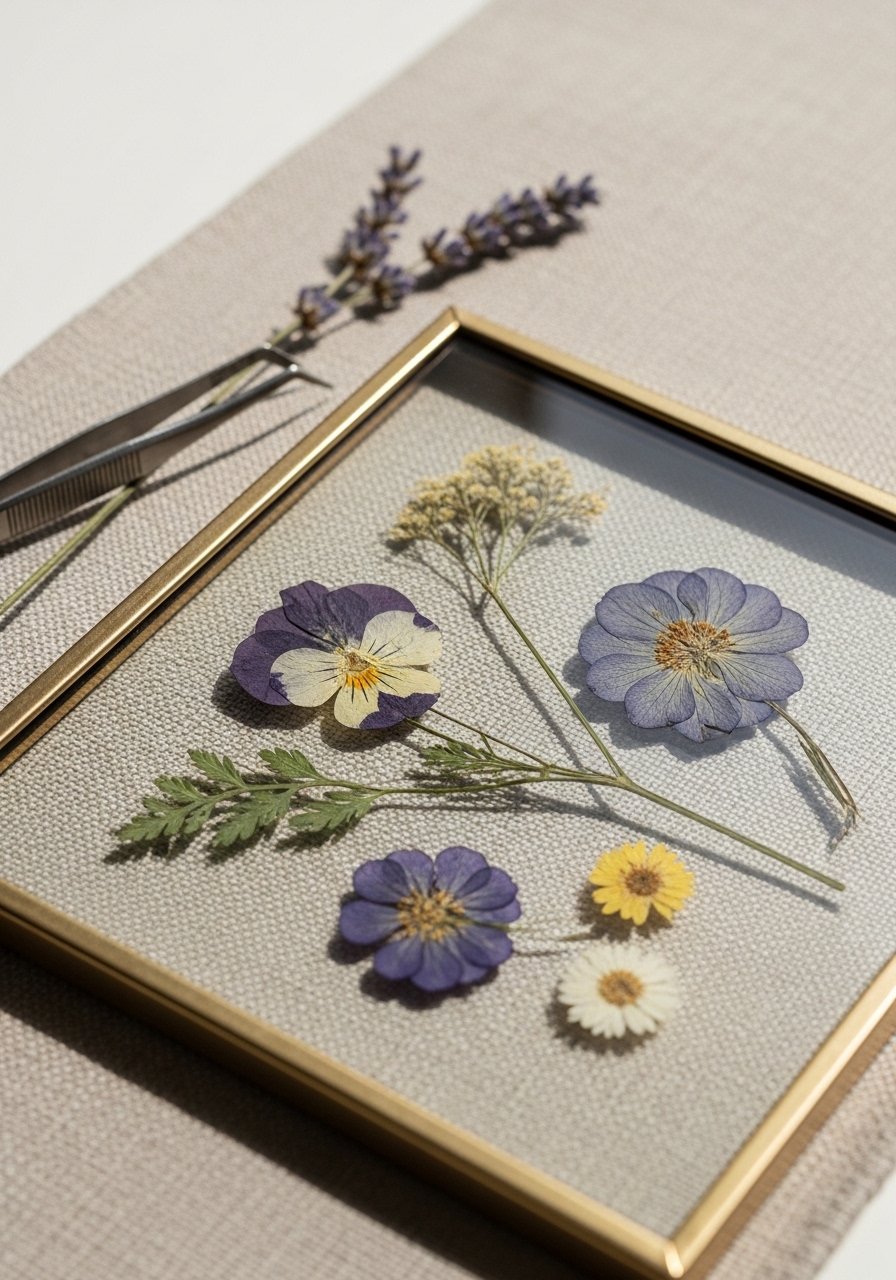
Pressed flowers add a delicate, cottagecore touch to your walls. This double-glass floating frame looks like a gallery piece and preserves little bouquets beautifully. It’s a great weekend project and makes heartfelt gifts.
Materials
- 2 glass front frames (for floating look) 5" x 7"
- Pressed flowers, 6–10 pieces (real pressed)
- Tweezers
- Acid-free paper for pressing (if pressing fresh)
- Craft glue, small tube (optional)
- Soft cloth for cleaning glass
- Small binder clips for pressing
Instructions
- Press flowers for 1–2 weeks between acid-free paper and heavy books or a flower press.
- Clean glass surfaces thoroughly with a soft cloth.
- Arrange pressed flowers between two panes of glass using tweezers.
- Seal frame edges and hang using the frame hardware.
- Avoid direct sunlight to prevent fading.
How to Display or Gift It
- Hang in small clusters or lean on a shelf.
- Gift in a flat mailer with a care note about avoiding direct sun.
- Store spare pressed blooms in labeled envelopes in a craft organizer.
- I use a small tweezers set for placement.
- Boho Tassel Curtain Tie Backs

Create soft tassel tie backs that look custom and make curtains feel intentional. They’re lightweight and add a cozy boho or cottagecore touch. Quick to make, they’re perfect if you want custom color without cost.
Materials
- Yarn, worsted weight, 50 g (per tassel)
- 2 wooden beads, 12 mm
- 1 piece cotton rope, 20"
- Scissors
- Ruler
- Hot glue (optional)
Instructions
- Wrap yarn around a 3" board or your hand 40 times.
- Tie off the top with a 6" piece of cotton rope.
- Fold yarn bundle and tie another piece tightly near top to form head.
- Thread wooden beads onto the hanging rope and secure with a knot.
- Trim the bottom evenly and comb lightly for fluff.
How to Display or Gift It
- Use on light linen curtains for a relaxed living room.
- Make a set of two and gift for a housewarming.
- Store spare tassels in a small craft drawer to keep them dust-free.
- A wooden bead pack is handy for multiple sets.
- Rustique Painted Mason Jar Lamps
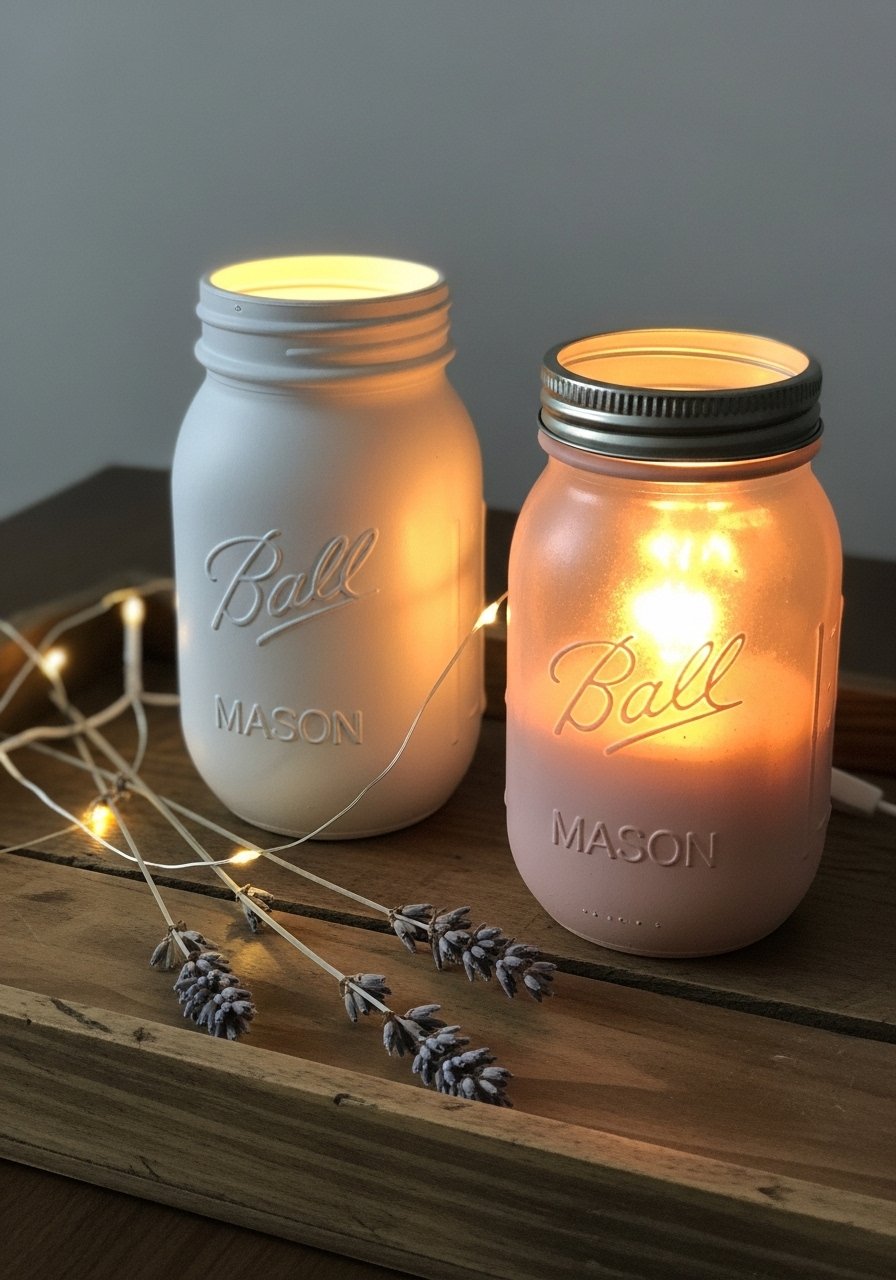
Mason jars become instant mood lamps with a painted matte finish. They diffuse light beautifully and create an intimate corner glow. They’re especially charming for boho or farmhouse bedrooms.
Materials
- 2 mason jars (16 oz)
- 1/4 cup chalk paint (two colors if desired)
- 2 battery-operated warm LED puck lights or string lights
- Foam brush
- Sandpaper 220 grit
- Twine for embellishment
Instructions
- Clean jars thoroughly and sand any labels.
- Paint inside or outside of jar with chalk paint for a soft matte finish; 2 coats, 30 minutes drying between coats.
- Insert LED puck or string lights and test for even glow.
- Tie twine around the neck for a rustic touch.
How to Display or Gift It
- Use on bedside tables for soft reading light.
- Gift in a set with a small pack of matches and a note.
- Store in a cool box when not in use so paint doesn’t scratch.
- A compact puck light pack is great for this.
- Stamped Clay Necklace Dish (Minimal)
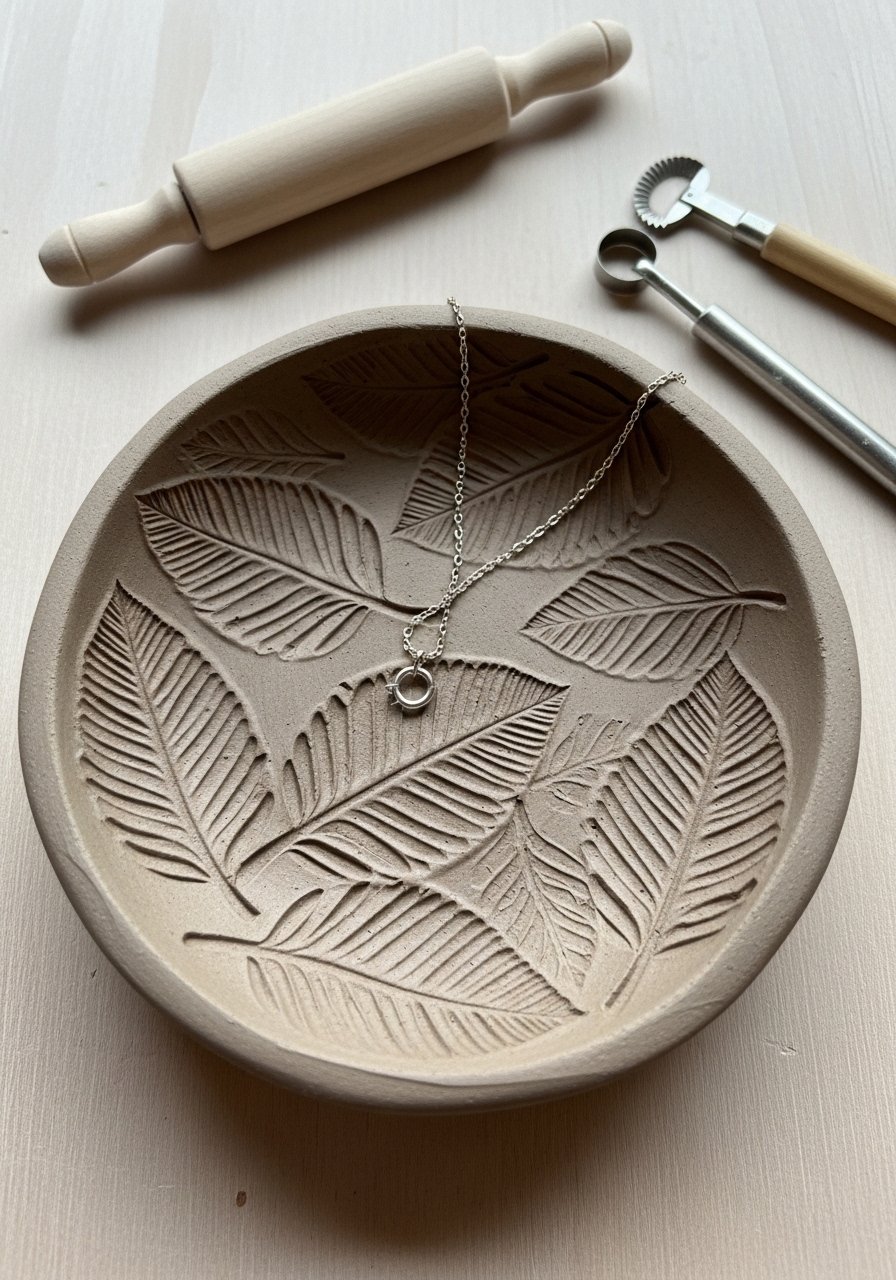
Create a tiny trinket dish from air-dry clay with stamped patterns. It’s a simple project that yields a boutique-looking accessory for jewelry or keys. The matte finish is soft to the touch.
Materials
- 200 g air-dry clay
- 1 rolling pin or sturdy bottle
- Leaf or lace stamp
- 1 round cookie cutter 3"
- Sandpaper 400 grit
- Acrylic paint (optional for edge)
- Clear matte sealer
Instructions
- Roll clay to 1/4" thickness.
- Press stamp into clay gently, then cut a circle with cookie cutter.
- Smooth edges with a damp fingertip and let air-dry 24–48 hours (depends on thickness).
- Sand surface lightly if rough. Paint or leave natural; seal with matte sealer. Cure 24 hours.
How to Display or Gift It
- Keep by the bedroom lamp for nightly jewelry.
- Tuck with a small gift card for bridesmaid favors.
- Store extra dishes flat in a lined box until dried.
- Use a fine sandpaper set for finishing.
- Scandi Yarn Wall Grid (Minimal Texture)
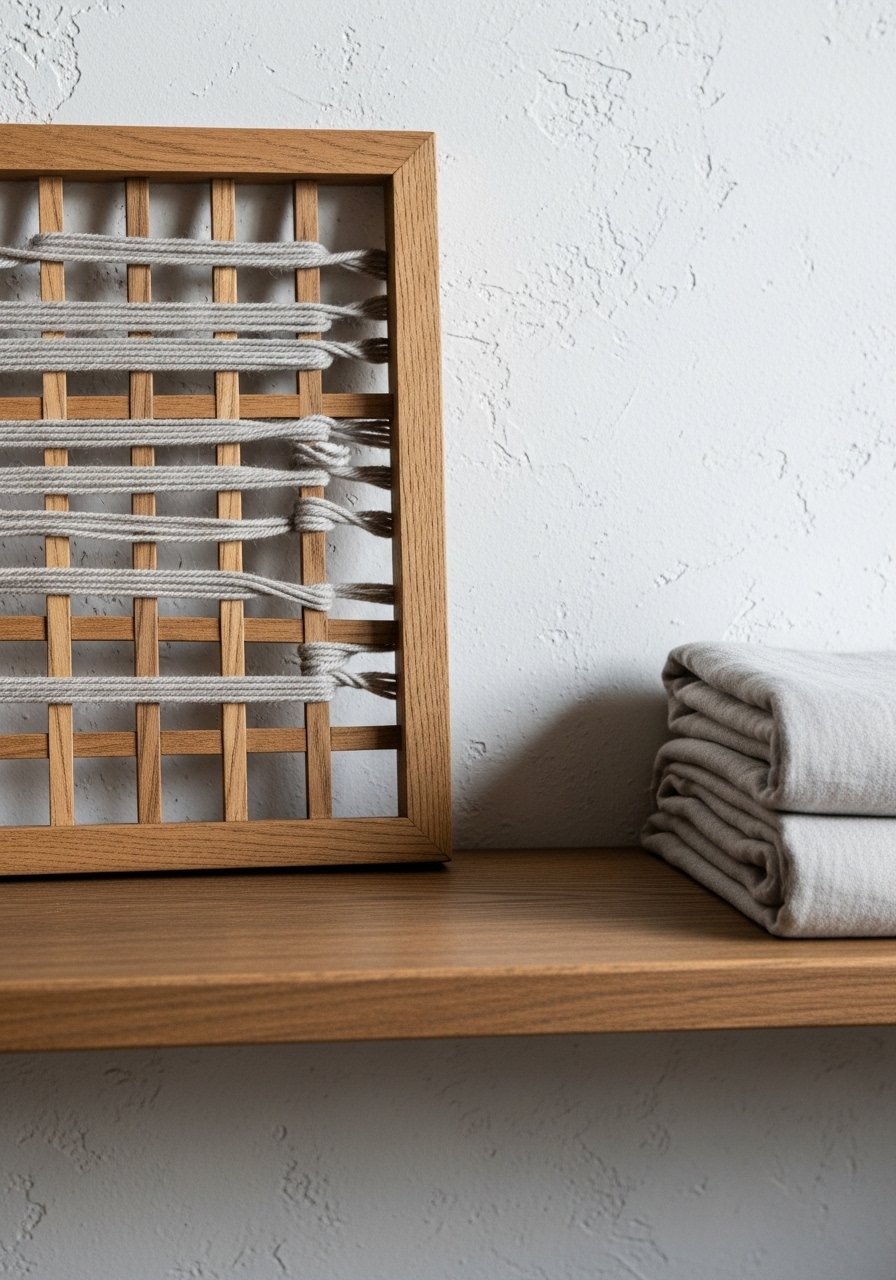
This yarn-wrapped wall grid is a subtle way to add texture and geometry. It pairs well with neutral, japandi, and modern aesthetics. You’ll love the tactile contrast against smooth walls.
Materials
- 1 wooden grid frame 12" x 12"
- 1 skein neutral yarn (50 g)
- Scissors
- Small nails or glue for securing yarn
- Ruler
- Painter’s tape
Instructions
- Measure and mark parallel lines across the grid where yarn will wrap.
- Secure yarn ends on the back with small nails or glue.
- Wrap yarn evenly across each marked line, keeping tension consistent.
- Trim and tuck ends neatly on the back.
- Hang or lean on a shelf.
How to Display or Gift It
- Hang above a low console with small ceramics.
- Bundle several colors for seasonal swaps.
- Store wrapped frames flat in a craft shelf between uses.
- I use painter’s tape to mark wrapping lines for even spacing.
- Cottagecore Dried Herb Bundle Wreath
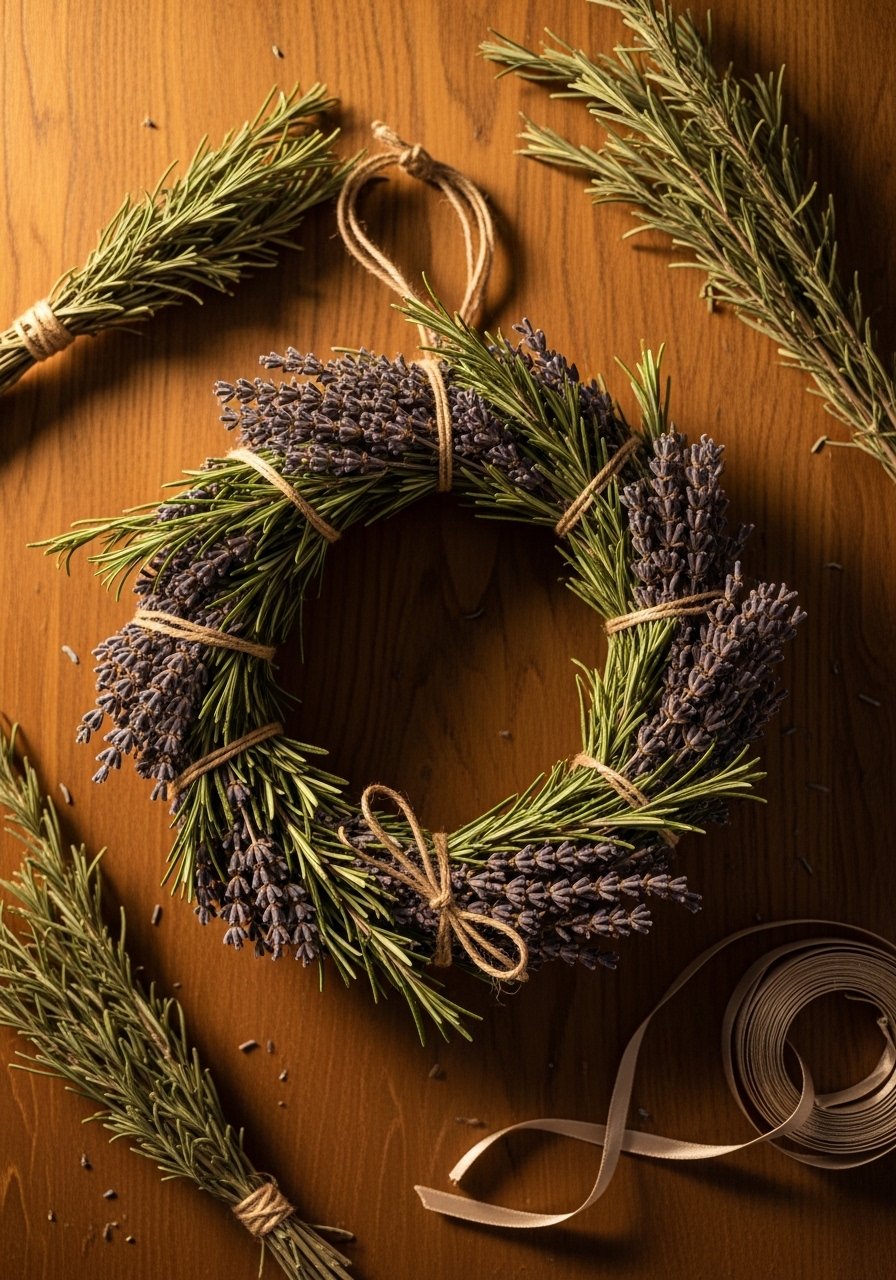
A tiny herb bundle wreath smells subtle and looks like something from a market stall. It’s easy, quick to make, and low cost if you dry your herbs at home. Great for kitchen doors or as a gift topper.
Materials
- Assorted herbs (rosemary, lavender), 20–30 stems dried
- 1 grapevine ring 6"
- Natural twine, 10 feet
- Scissors
- Wire (thin) for secure tying
- Hot glue (optional)
Instructions
- Dry herbs for 7–10 days in a cool, dark place.
- Arrange small bundles and tie tightly with twine.
- Secure bundles to grapevine ring with wire and hide wire ends with twine.
- Trim for a neat silhouette. No drying after assembly required.
How to Display or Gift It
- Hang on kitchen cabinets or a pantry door.
- Attach to a gift box for a fragrant detail.
- Keep spare herbs in a labeled mason jar for future wreaths.
- A small grapevine wreath pack is handy for batch making.
- Paper Flower Garland (Budget Boho)
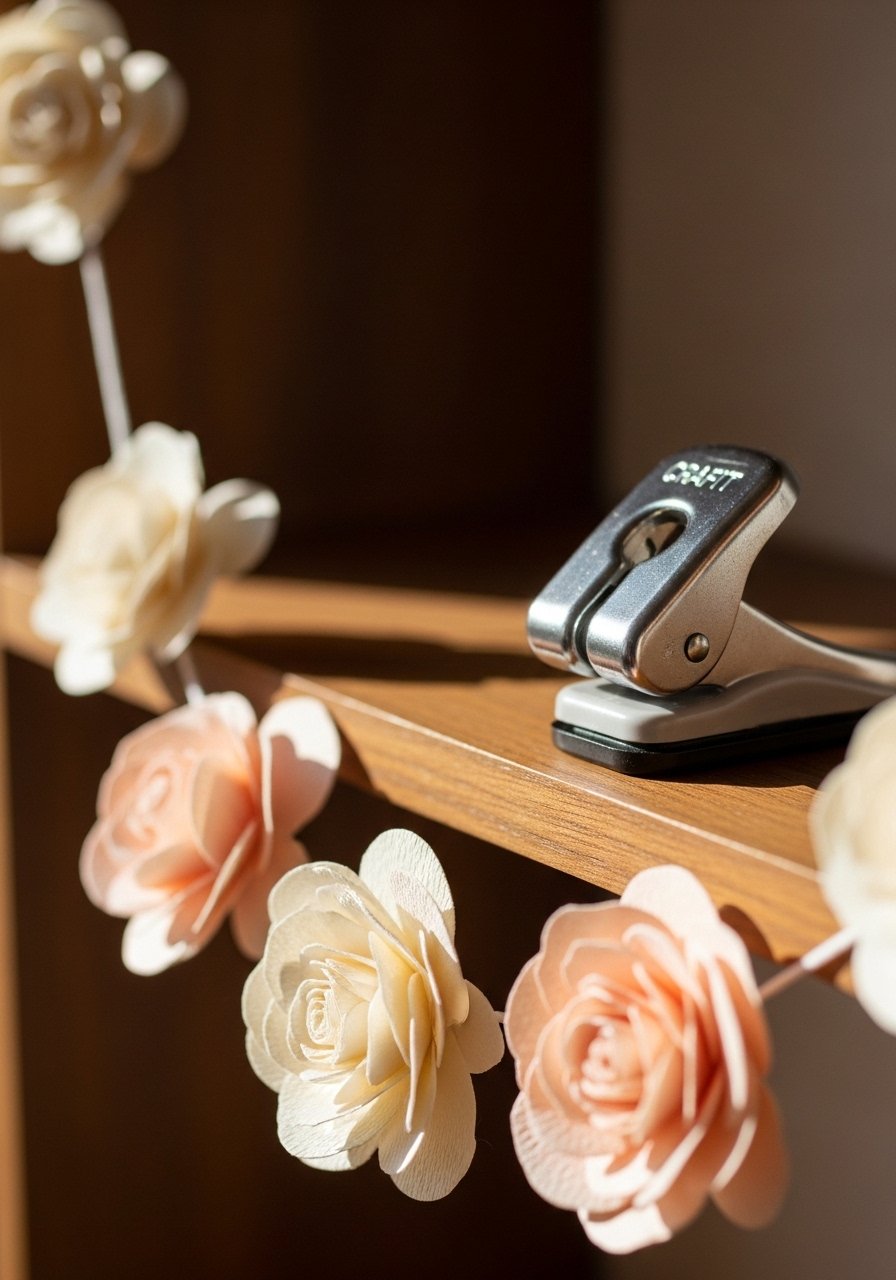
Paper flowers add a soft boho flourish to shelves or wall corners. This garland uses inexpensive craft paper and expands to longer lengths without big cost. The paper petals feel crisp and light.
Materials
- 8–10 sheets craft paper (8.5" x 11")
- 1 needle and strong thread (or thin twine)
- 1 circle punch or scallop punch
- Glue stick
- Scissors
- Ruler
Instructions
- Punch 30–40 circles from craft paper.
- Layer three circles and stitch through the center, then scrunch layers to form a petal.
- Repeat until desired length—aim for 6 ft for mantel use.
- Knot ends and trim excess thread.
How to Display or Gift It
- Drape across a headboard or shelf.
- Roll and tuck into a flat box for gifting.
- Store flat in a shallow craft organizer to avoid creases.
- A circle punch set speeds up assembly.
- Minimal Clay Wall Sculpture (Neutral)
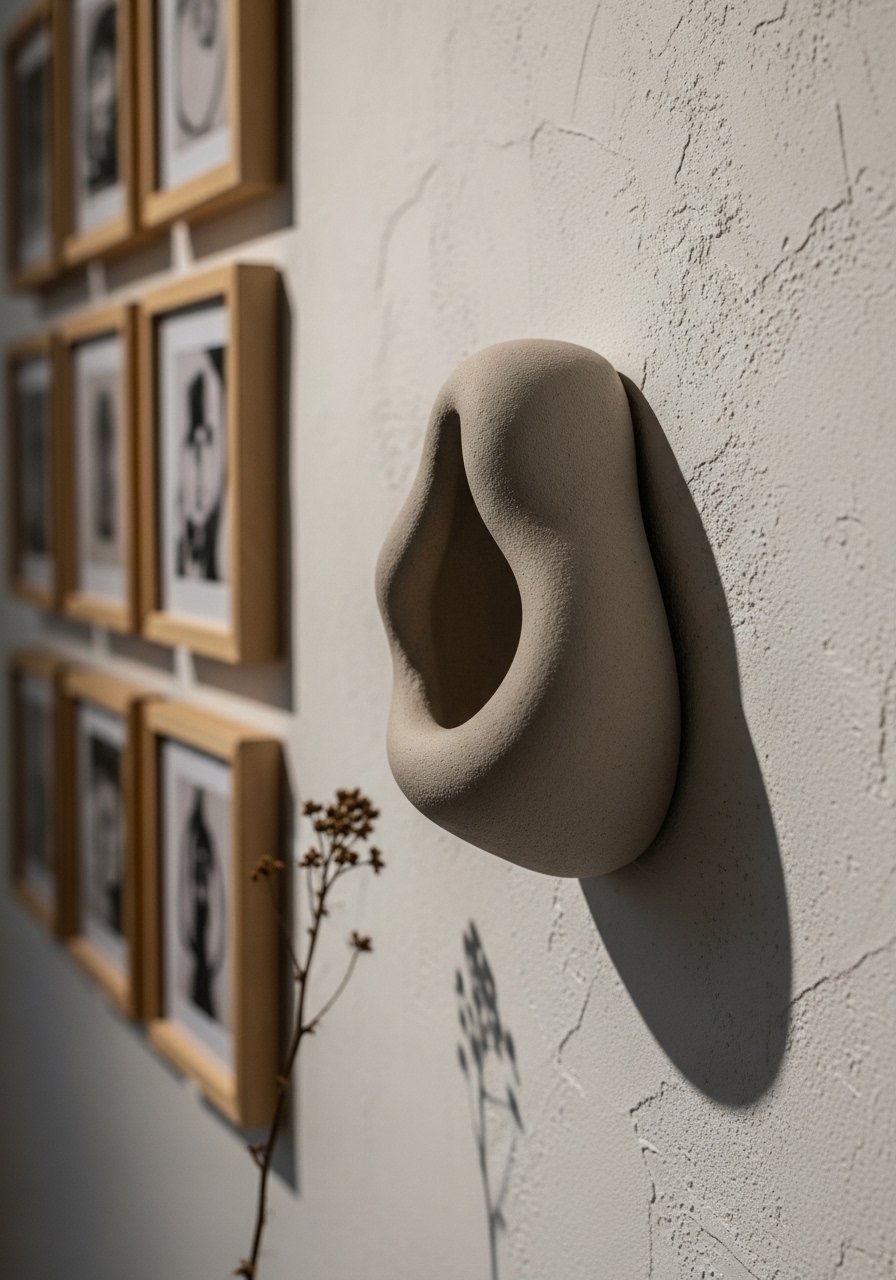
This low-relief clay sculpture adds organic shape to a wall. It’s a tactile piece that feels curated and pairs with minimalist decor. Air-dry clay keeps this project budget-friendly.
Materials
- 150 g air-dry clay
- Palette knife or clay tool
- Sandpaper 400 grit
- Mounting tape or small framed hook
- Acrylic matte paint (optional)
- Clear matte sealer
Instructions
- Shape clay into an abstract form about 6" across and 1/4" thick.
- Smooth edges with a damp sponge and let dry 24–48 hours.
- Sand gently if needed and paint a thin neutral wash if desired.
- Seal with matte sealer and mount using heavy-duty tape or hook.
How to Display or Gift It
- Group several small sculptures on a pillar shelf.
- Gift framed in a shallow shadow box.
- Store flat until fully cured to avoid warping.
- A small clay tool set helps refine shapes.
- Marbled Notebook Covers (Vinyl or Paper)
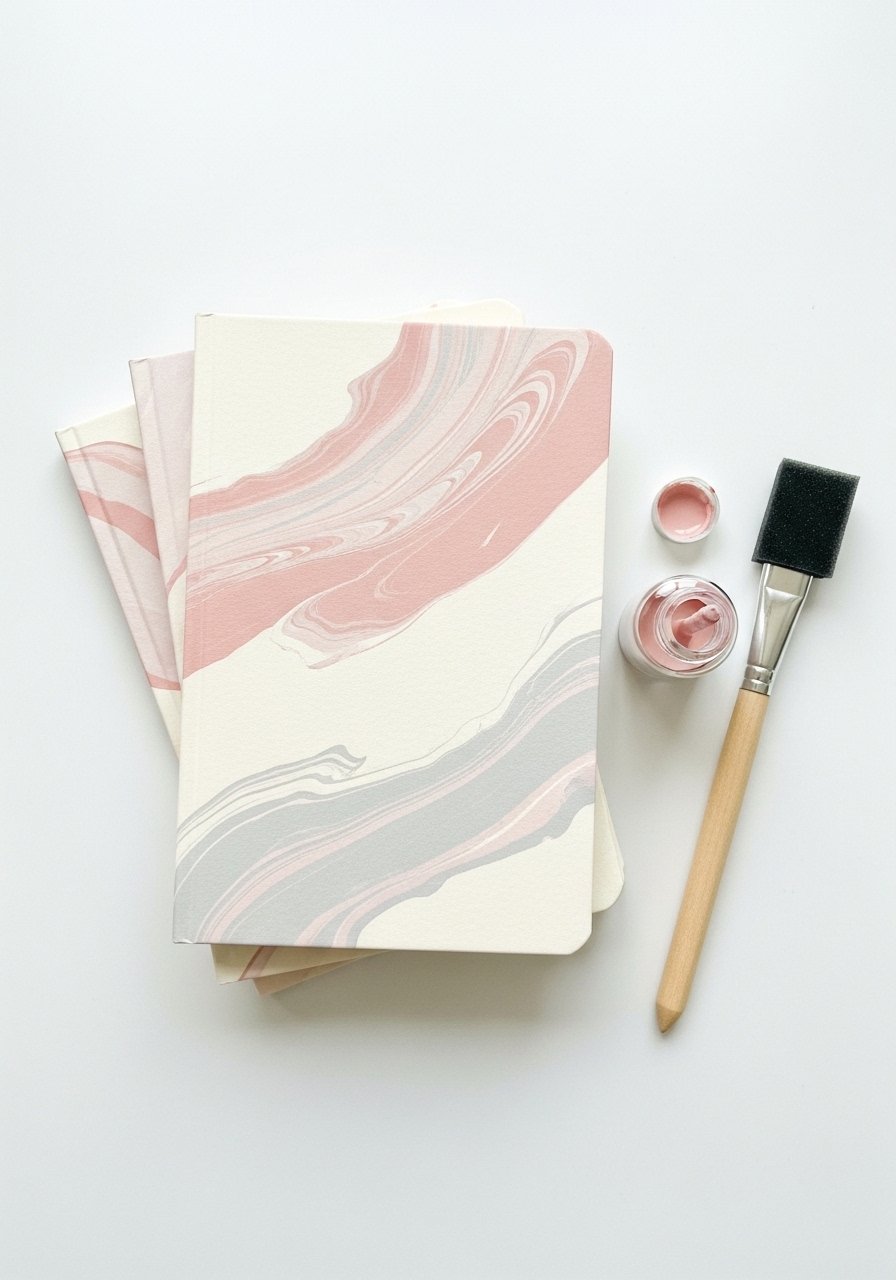
Personalize plain notebooks with a marbled cover using shaving cream or liquid inks. They look boutique and are an easy weekend craft. These are great as teacher gifts or for your own desk.
Materials
- 3 plain notebooks A5 size
- Shaving cream (non-gel), 1 cup
- Acrylic ink or fluid paint 5–10 ml each of two colors
- Scraper (old credit card)
- Paper towels
- Plastic baking tray
Instructions
- Spray shaving cream into tray and smooth.
- Add drops of acrylic ink and swirl gently with a stick.
- Press notebook cover onto surface, lift, and scrape off shaving cream.
- Rinse gently and dry flat overnight. Seal with matte spray if desired.
How to Display or Gift It
- Tie a set with twine and add a thank-you note.
- Keep on a bedside stack for guest use.
- Store covered notebooks in a dry drawer until giving.
- A compact acrylic ink set gives vivid marbled effects.
- Ribbon-Wrapped Photo Frame (Soft Edges)
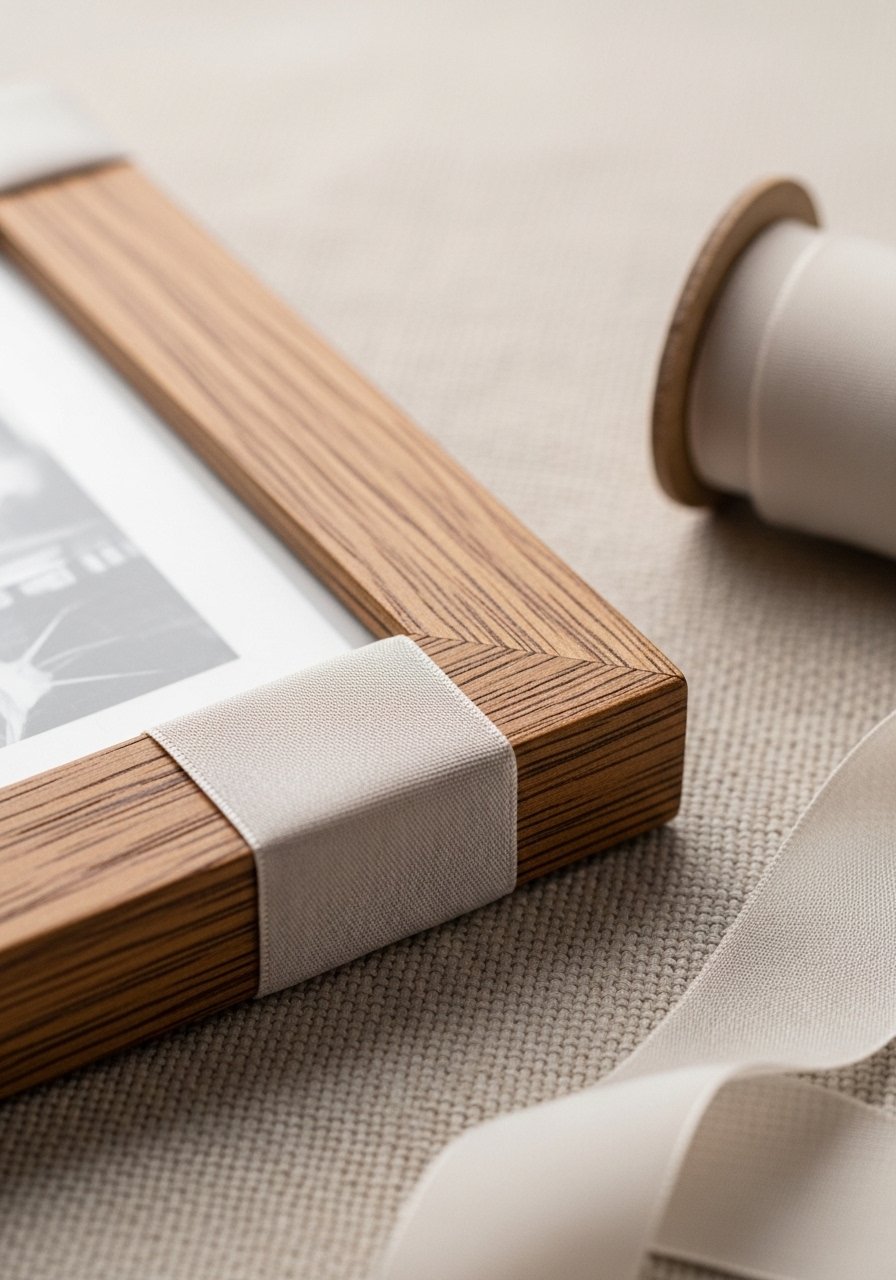
Give a thrifted frame a soft, tailored edge by wrapping it with silk or grosgrain ribbon. The finish reads boutique and is gentle in appearance—perfect for bedside tables.
Materials
- 1 wooden frame (4" x 6")
- 1 yard silk ribbon or grosgrain ribbon
- Hot glue gun
- Scissors
- Small ruler
Instructions
- Clean and sand frame edges lightly.
- Start at a corner, glue ribbon end on the back, and wrap snugly around until covered.
- Tuck and glue the final edge neatly on the back.
- Add a small bow or knot at the corner if desired.
How to Display or Gift It
- Use with small black-and-white photos for a timeless look.
- Pair with a frame stand for shelf display.
- Wrap extras in tissue for later use.
- I reach for a precise ribbon spool when selecting textures.
- Painted Terra Cotta Tile Wall Accent
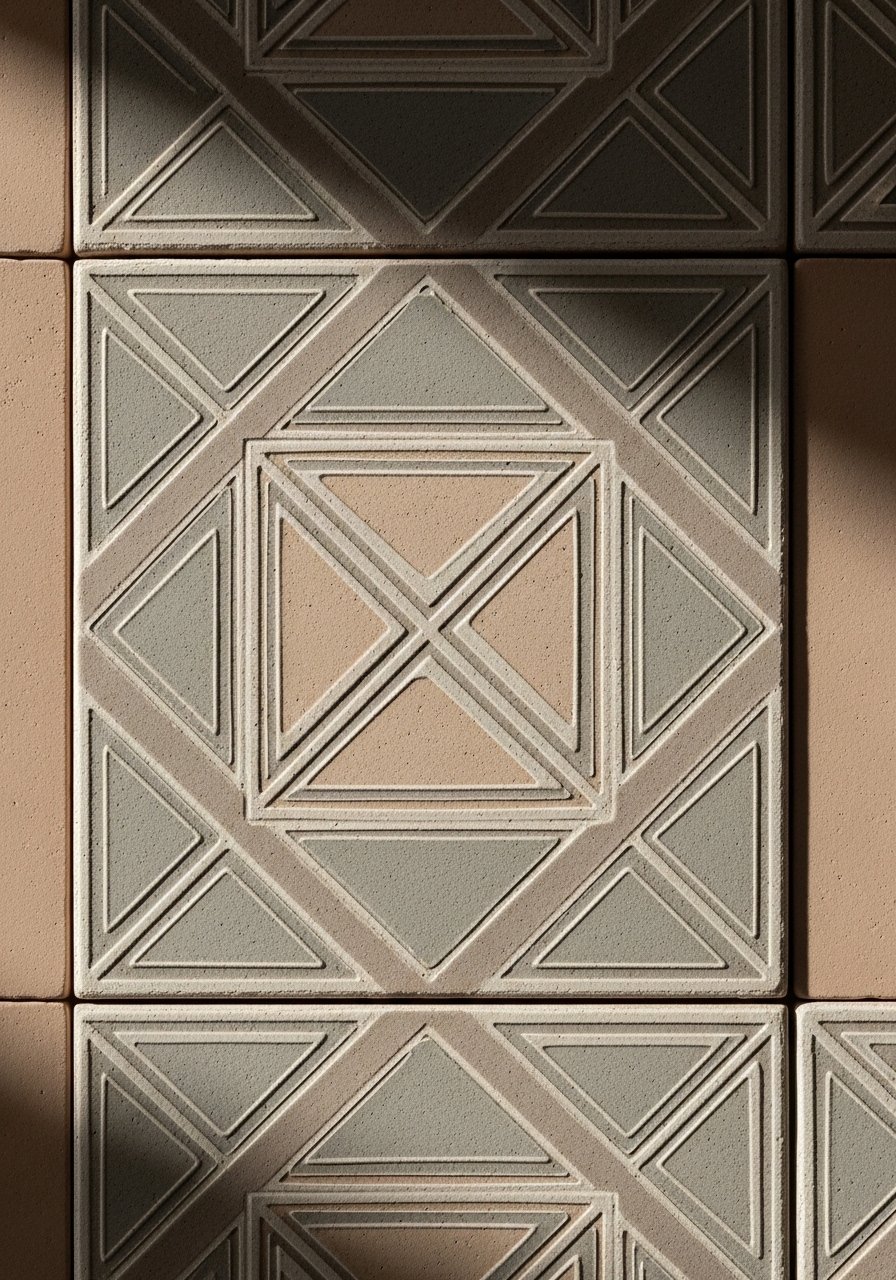
Make a small tile accent using single terracotta tiles and geometric paint. Group several for a statement or use one as a focal piece. The matte paint finish looks contemporary and crafted.
Materials
- 1–6 terracotta tiles 4" x 4"
- Acrylic paint in two neutrals, 1 oz each
- Painter’s tape
- Foam brush
- Clear matte sealer
- Adhesive squares for wall mounting
Instructions
- Clean tile, sand lightly, and tape off geometric sections.
- Paint first color and let dry 30 minutes; remove tape and re-tape for second color.
- Apply two thin coats total. Dry 1 hour after final coat.
- Seal with matte sealer and mount with adhesive squares.
How to Display or Gift It
- Create a small grid of tiles for a backsplash accent.
- Gift as a tiny wall art piece in a padded box.
- Store extra tiles flat in a shallow box to prevent chipping.
- A small pack of adhesive mounting squares works well for temporary displays.
- Hand-Painted Linen Pillow Cover (Neutral Motif)
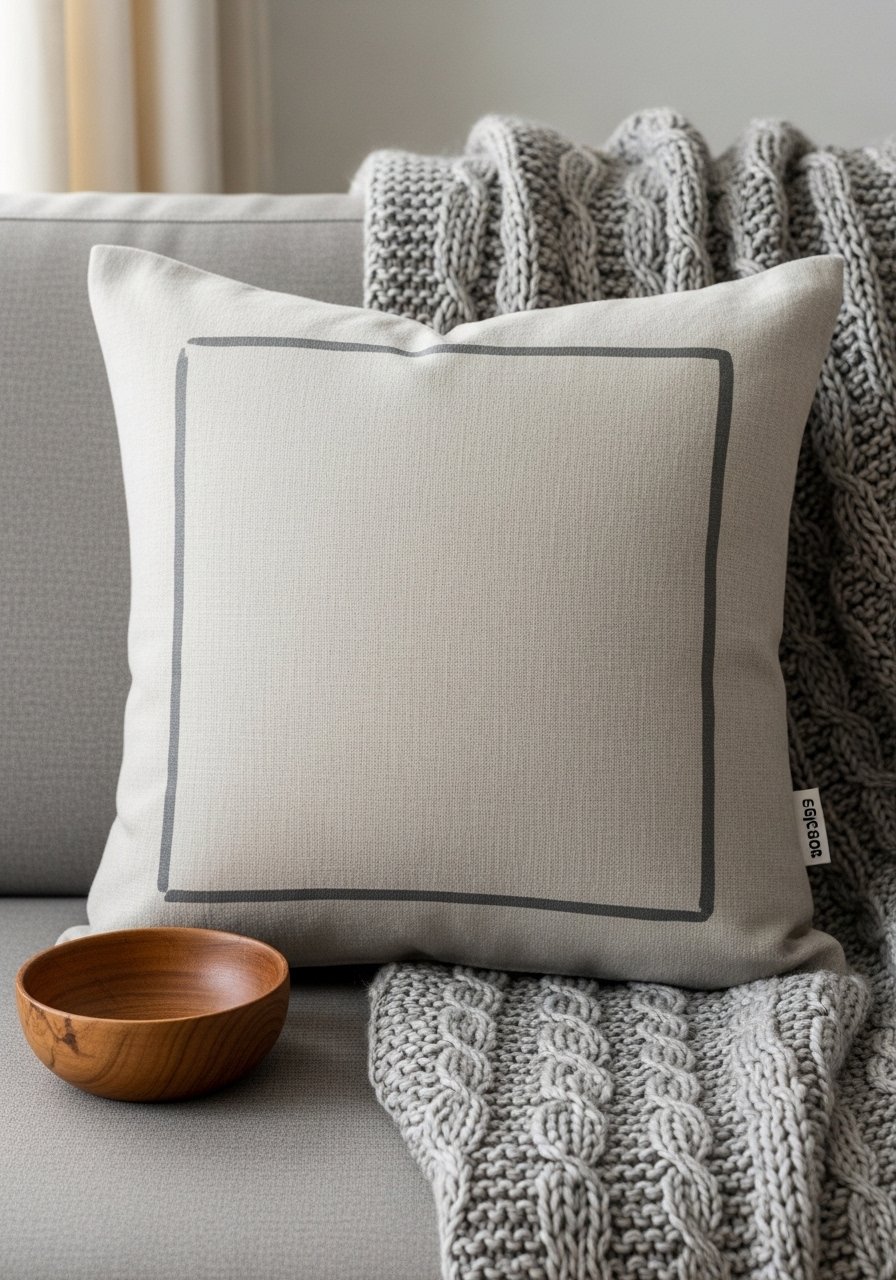
A hand-painted linen pillow cover adds a designer touch without the cost. Use fabric paint or transfer a simple motif with a pencil and freehand paint. The linen texture feels breezy and expensive.
Materials
- 1 linen pillow cover 18" x 18"
- Fabric paint, 1 oz
- Small round brush
- Painter’s tape for clean lines
- Cardboard insert to prevent bleed-through
- Iron for heat-setting (if required by paint)
Instructions
- Insert cardboard to protect back of cover.
- Lightly sketch motif or use tape for straight lines.
- Paint with thin coats; dry 30 minutes between passes.
- Heat-set per paint instructions (usually 3 minutes with iron on low).
- Washable after heat-setting; wait 24 hours before first wash.
How to Display or Gift It
- Style with a textured throw for depth.
- Make multiples as seasonal swaps.
- Gift with a small care tag and laundering tips.
- A slim fabric paint set offers color options.
- Minimal Driftwood Photo Hanger (Beachy Neutral)
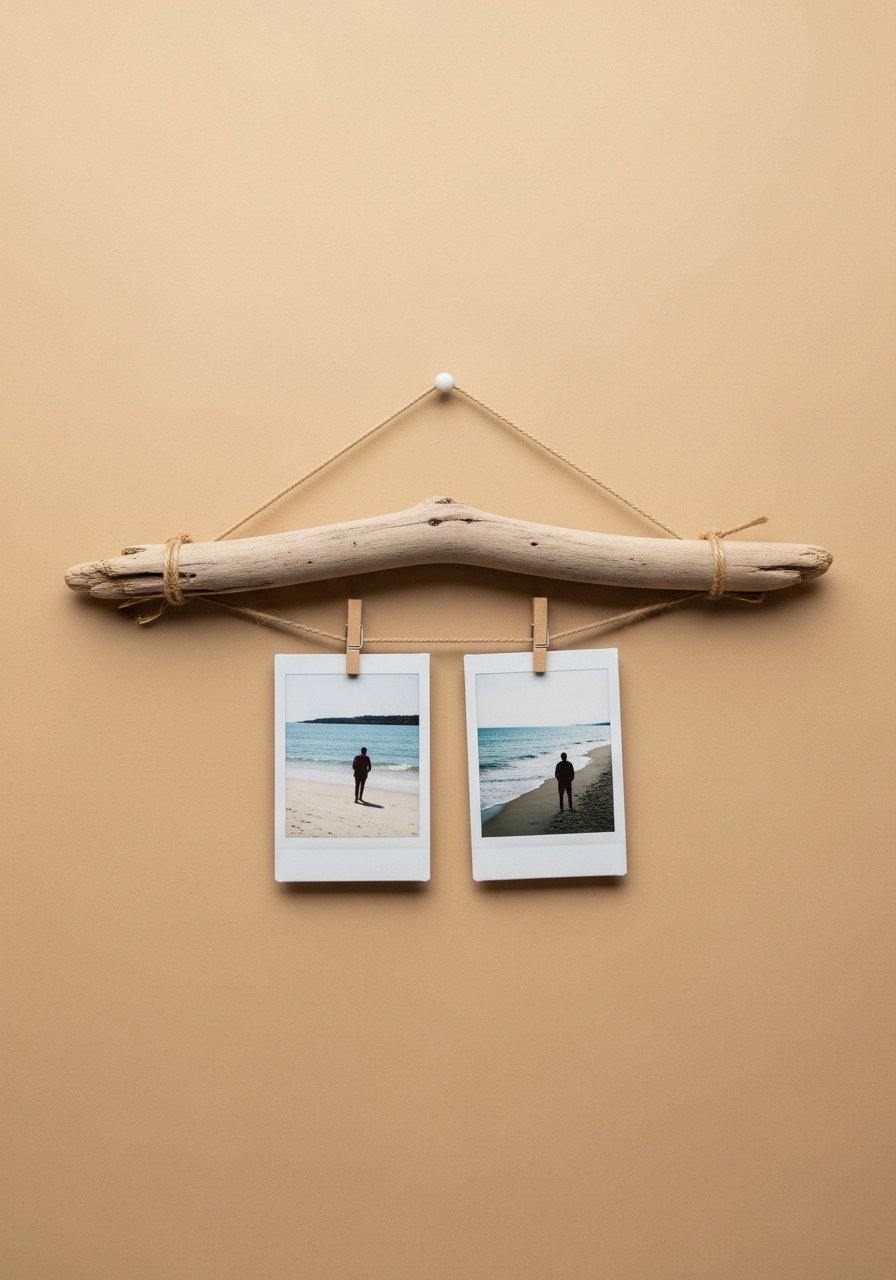
This driftwood photo hanger captures a relaxed coastal vibe. It’s light, textural, and a great way to display small photos or cards. The natural wood pairs beautifully with linen and soft greens.
Materials
- 1 piece driftwood or reclaimed stick 10"
- Twine, 2 yards
- 3 mini wooden clothespins
- Scissors
- Hook for wall hanging
Instructions
- Tie twine securely around each end of driftwood with a knot.
- Attach photos with mini clothespins spaced evenly.
- Hang from a single nail or hook—no drying time required.
How to Display or Gift It
- Hang above a desk or in a bathroom for lightweight art.
- Bundle with a set of Polaroids for gifting.
- Store in a dry place to prevent moisture damage.
- A set of mini clothespins is perfect for display.
- Stenciled Drawer Knobs for Instant Furniture Refresh
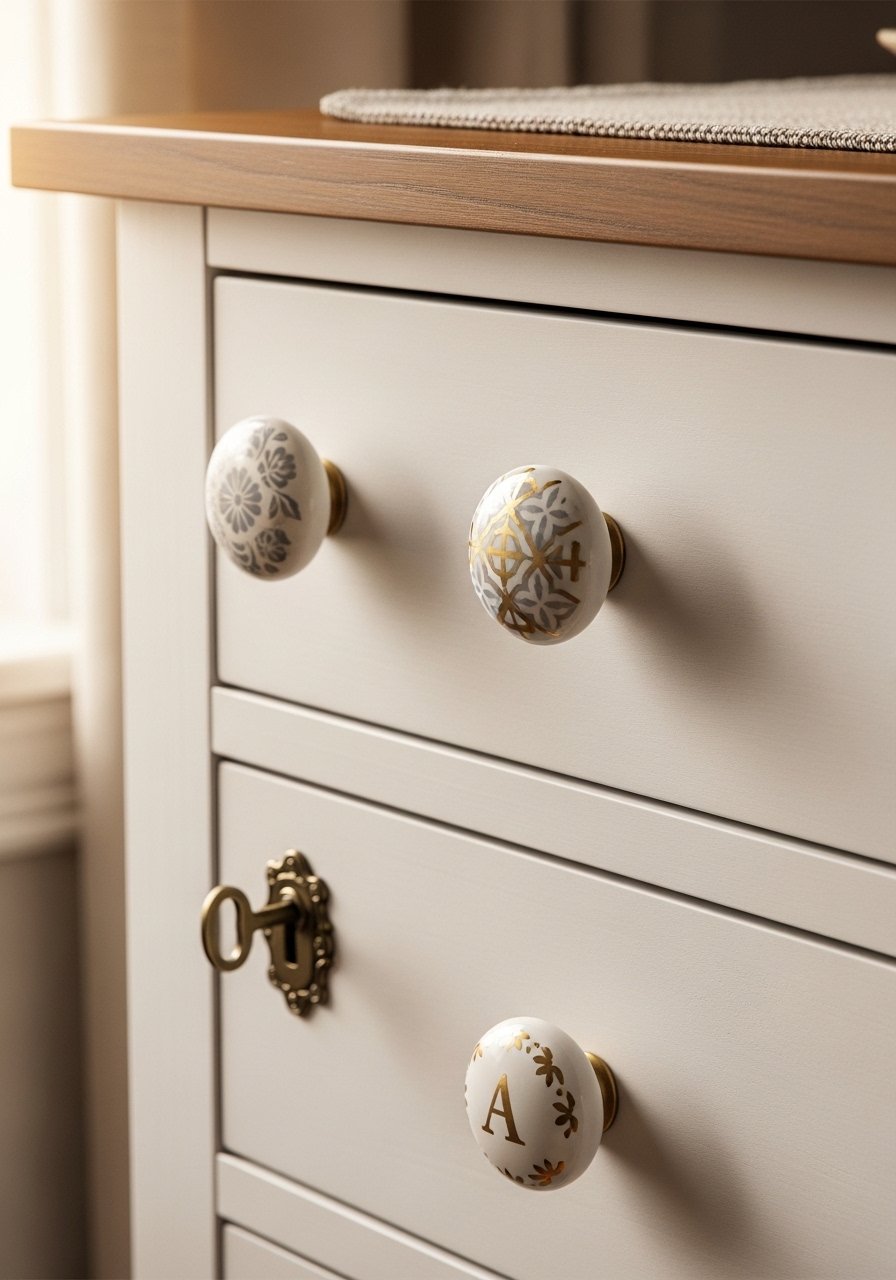
Swap cheap knobs for stenciled ones to give furniture a custom feel. This small change makes a big difference and costs only a few dollars per knob. The finish feels layered and thoughtful.
Materials
- 4 plain wooden knobs (1"–1.5")
- Acrylic paint in base color and accent color
- Small stencil (dot or geometric)
- Fine detail brush
- Sandpaper 220 grit
- Clear matte sealer
- Screwdriver to install
Instructions
- Sand knobs lightly and wipe clean.
- Paint a base color and allow 30 minutes drying.
- Position stencil and dab accent color with a small brush.
- Apply a thin coat of matte sealer after 1 hour drying.
- Install knobs and tighten screws.
How to Display or Gift It
- Swap knobs across a dresser or nightstand for a coordinated look.
- Package a set of four knobs in tissue for a small DIY gift.
- Store unused knobs in a small craft bin.
- For precision stenciling, I use a small stencil pack.
These 23 projects show how accessible aesthetic room decor DIY on a budget can be. You can curate a warm, layered space without big spending—you just need small tools, a little patience, and an eye for texture. Try one project this weekend, then pin the rest for later.
Trust me, picking up a quality hot glue gun with temperature control changed how every single one of these projects turned out — no more stringy mess, no more burns. Which project will you make first? Share a photo with a friend, or pin this list so it’s ready when inspiration strikes.


