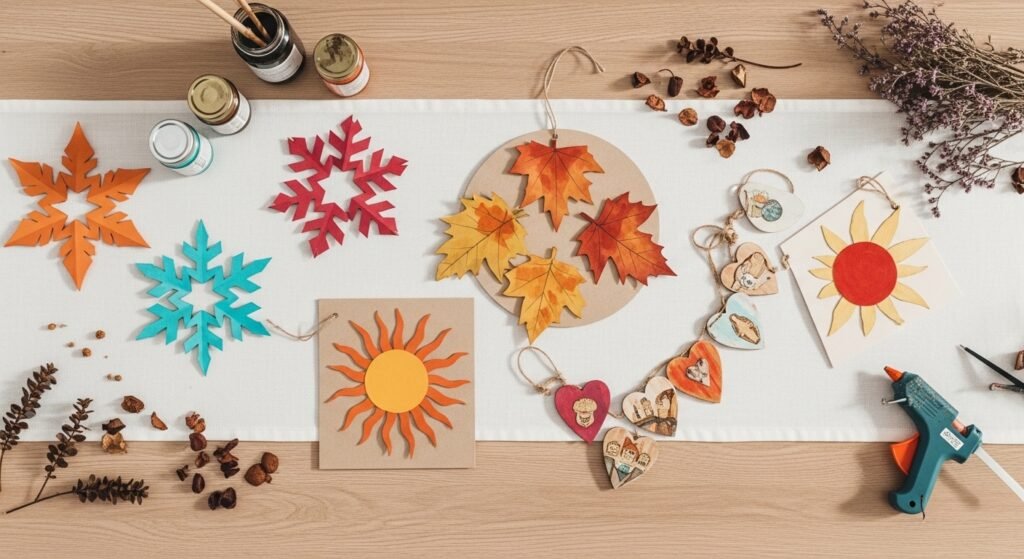
Seasonal crafts are the best way to keep kids busy, celebrate the changing year, and make keepsakes that actually last. Whether you’ve got a rainy afternoon, a holiday weekend, or a classroom craft day, these seasonal craft ideas for kids are designed to be simple, safe, and delightfully messy in the best way. You’ll find projects that use paper, paint, natural elements, fiber, and a few kid-friendly tools so everyone gets a win.
I reach for my Cricut Joy cutting machine for fast, crisp shapes, but a pair of child-safe scissors works great too. Grab a low-temp hot glue gun for quick assembly when adults are nearby. This list covers 24 seasonal craft ideas for kids—one for every mood and season—each with full materials, step-by-step instructions, drying times, and display or gifting tips. Ready to make something sweet (and sticky)? Let’s get crafting.
- Autumn Leaf Suncatchers
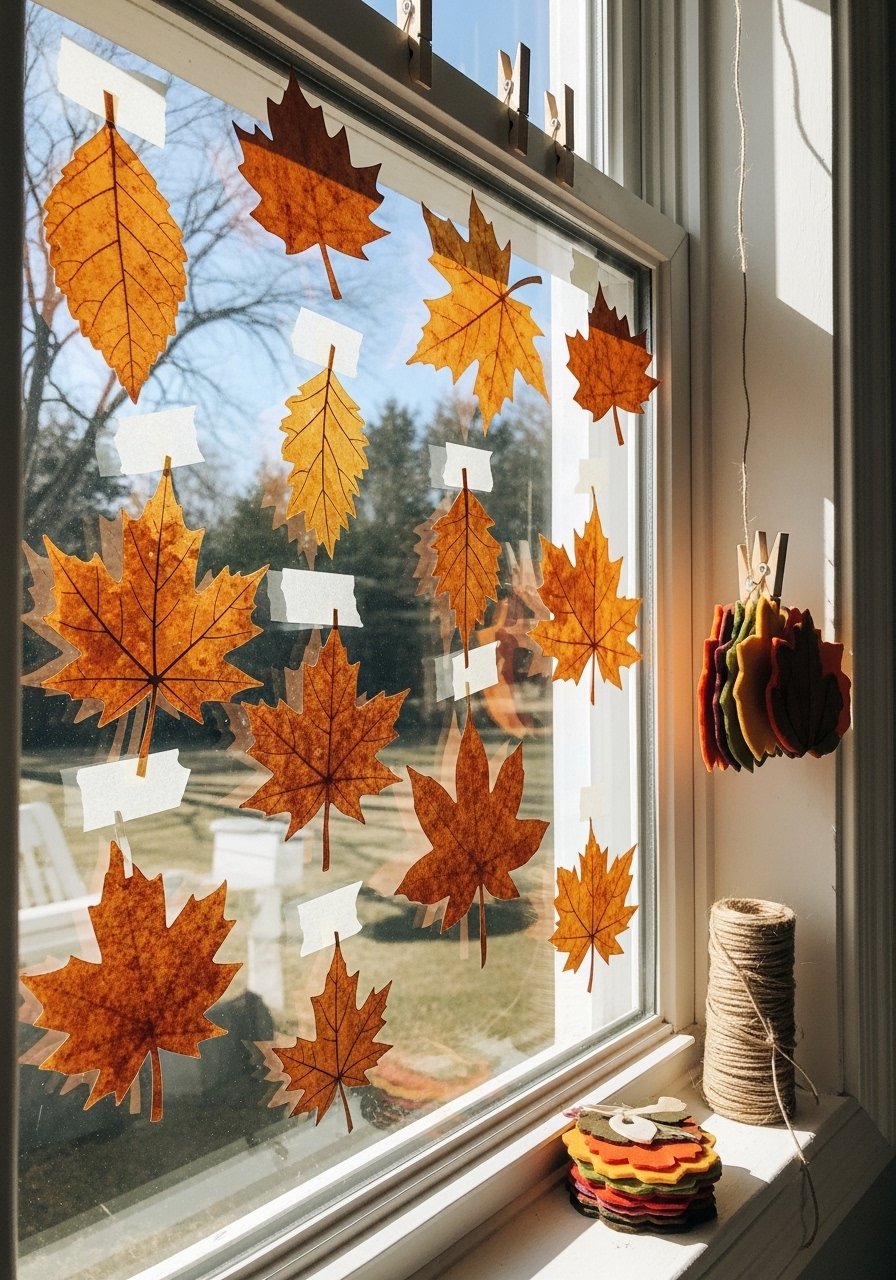
These suncatchers use real leaves pressed between clear film for a stained-glass feel kids love. They sparkle in direct sun and bring autumn color indoors. This is great for preschoolers with supervision and older kids who enjoy arranging colors. Leaves feel papery and translucent when finished.
Materials
- 6–8 real leaves, pressed flat (assorted sizes)
- 1 sheet clear contact paper (12 x 24 inches)
- Cardstock backing, 8.5 x 11 inches (1 sheet)
- Scissors (kid-safe)
- Hole punch
- 1 yard natural twine
- Washi tape, assorted (for decorative edges)
- Felt-tip pens or metallic paint pen (optional for accents)
Instructions
- Press freshly collected leaves between heavy books for 48 hours to fully flatten.
- Cut a piece of clear contact paper about 10 x 12 inches and peel the backing.
- Lay leaves on the sticky side, spacing them pleasingly.
- Trim another piece of contact paper to match and press over the leaves, smoothing with a brayer roller or a clean ruler to remove air bubbles.
- Trim edges to a nice shape and adhere cardstock to the back for support.
- Punch a hole near the top and thread twine for hanging.
- Add washi tape or draw metallic accents; ink dries instantly.
How to Display or Gift It
Hang in a sunny window or cluster several on a curtain rod for a seasonal mobile. To gift, tuck a suncatcher into a cellophane sleeve and tie with twine. Store flat in a document folder if making ahead. For classroom displays, use small binder clips on a dowel. A set of small Mason jars looks lovely for holding spare supplies next to the finished display.
- Pinecone Bird Feeders

This messy, outdoor-friendly craft is perfect for fall and winter. Kids spread seed mixture on sticky pinecones, then hang them outside to welcome feathered friends. The texture is tactile—sticky, seedy, and satisfying to press.
Materials
- 6 small-to-medium pinecones, cleaned
- 1 cup natural peanut butter (or sunflower butter for allergies)
- 2–3 cups birdseed
- 1/2 cup cornmeal (optional binder)
- 1 yard jute twine, pre-cut into 12-inch lengths
- Disposable spatula or popsicle sticks
- Paper plates for rolling
- Gloves or craft apron (optional)
Instructions
- Tie a 12-inch jute loop at the top of each pinecone.
- Spread peanut butter firmly onto the pinecone scales using a spatula.
- Pour birdseed onto a paper plate. Roll the sticky pinecone in seed until well-covered.
- Shake off excess seed and set on wax paper to firm up for 30 minutes.
- For longer-lasting feeders, refrigerate for 1 hour before hanging outdoors.
- Hang from tree branches at a safe height and monitor for local wildlife.
How to Display or Gift It
Hang several feeders on different tree limbs to create a bird station. Package three in a small basket with instructions for a nature-lover gift. Store extras in an airtight container in the fridge for up to 48 hours before use.
- Seasonal Craft Ideas for Kids: Salt Dough Ornaments
Salt dough is forgiving and fun. Kids can shape, stamp, and bake ornaments for any season—pumpkins for fall, snowflakes for winter. The texture is smooth when painted and slightly weighty when cured. This is beginner-friendly and great for small groups.
Materials
- 2 cups all-purpose flour
- 1 cup fine salt
- 1 cup warm water
- Rolling pin
- Seasonal cookie cutters (various shapes)
- Drinking straw (for holes)
- Acrylic paint set (child-safe)
- Clear acrylic sealer spray (matte)
- Ribbon or baker’s twine, 12-inch pieces (6)
Instructions
- Mix flour and salt in a bowl. Slowly add water and stir to form a stiff dough.
- Knead on a floured surface for 3–4 minutes until smooth.
- Roll dough to 1/4 inch thickness. Cut shapes with cookie cutters.
- Use a straw to make a hole for hanging.
- Bake at 200°F (93°C) for 2–3 hours or until fully hard (thicker pieces may need longer). Cool completely.
- Paint with acrylics. Let paint dry 30 minutes between coats.
- Seal with a thin coat of acrylic sealer and let cure 24 hours before hanging.
How to Display or Gift It
Thread ribbon and hang on a small tree, gift package, or use as napkin tags. Store extras flat in a craft box. For gift sets, tuck ornaments into kraft boxes with tissue paper.
- Winter Snowflake Window Garland
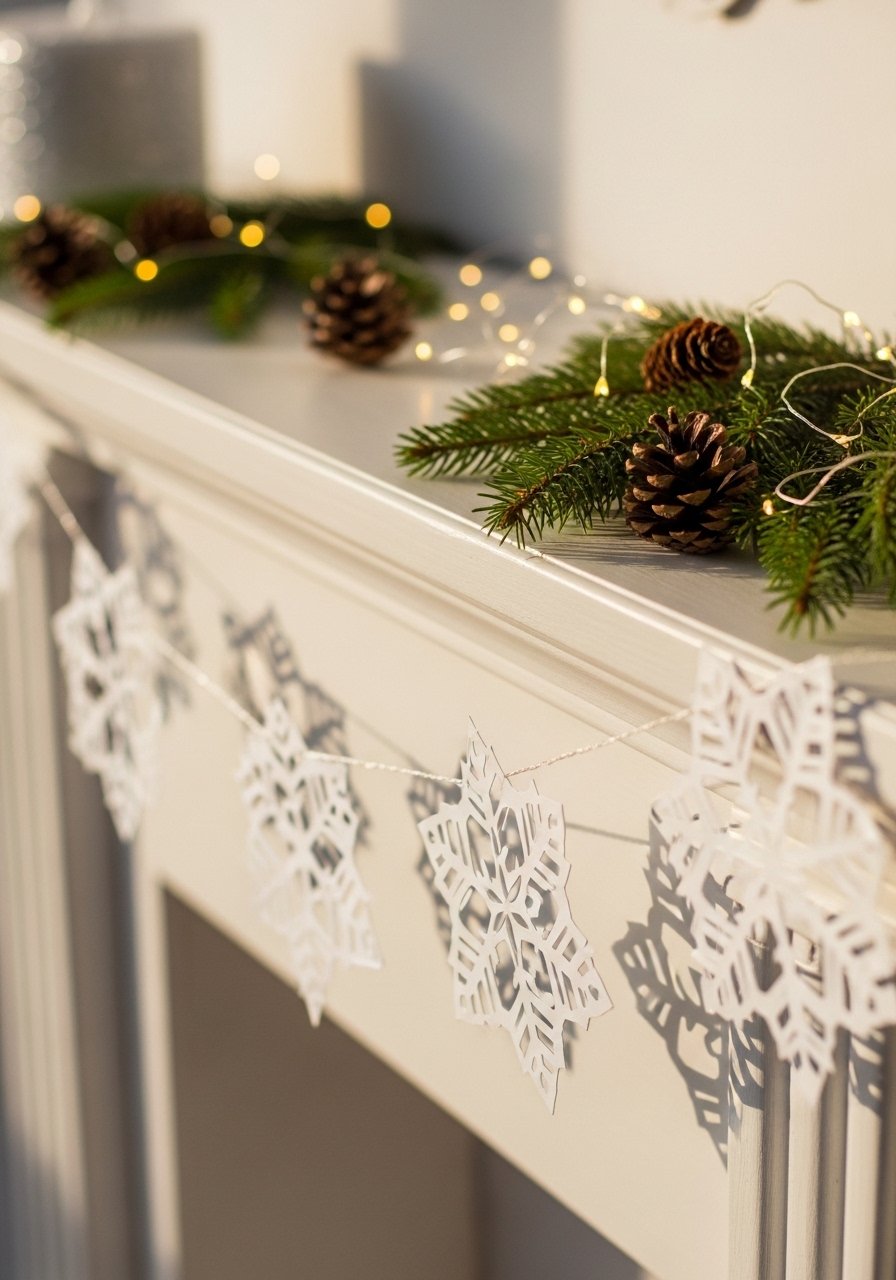
Paper snowflakes are classic and adaptable. This garland uses folded snowflake chains for a delicate, cottagecore winter look. The finished garland feels light and lacy, fluttering with air movement.
Materials
- 6 sheets white copy paper (8.5 x 11)
- Paper doilies (optional)
- Scissors
- String or thin ribbon, 6 feet
- Hole punch
- Glitter glue (optional)
- Mini clothespins (optional for display)
Instructions
- Fold each paper into a triangle and cut fringe shapes to create snowflake patterns.
- Open carefully to reveal snowflakes.
- For chain snowflakes: fold accordion style and glue edges to form loops, joining to make a chain length.
- Let any glue or glitter glue dry 30 minutes.
- Attach snowflakes to ribbon using a dot of glue or mini clothespins every 6–8 inches.
- Trim ribbon ends and secure for hanging.
How to Display or Gift It
Drape across a mantel, stair banister, or classroom bulletin board. Pack garlands flat in a long kraft tube for gifting. Store in a large envelope to prevent creases.
- Spring Seed Bombs
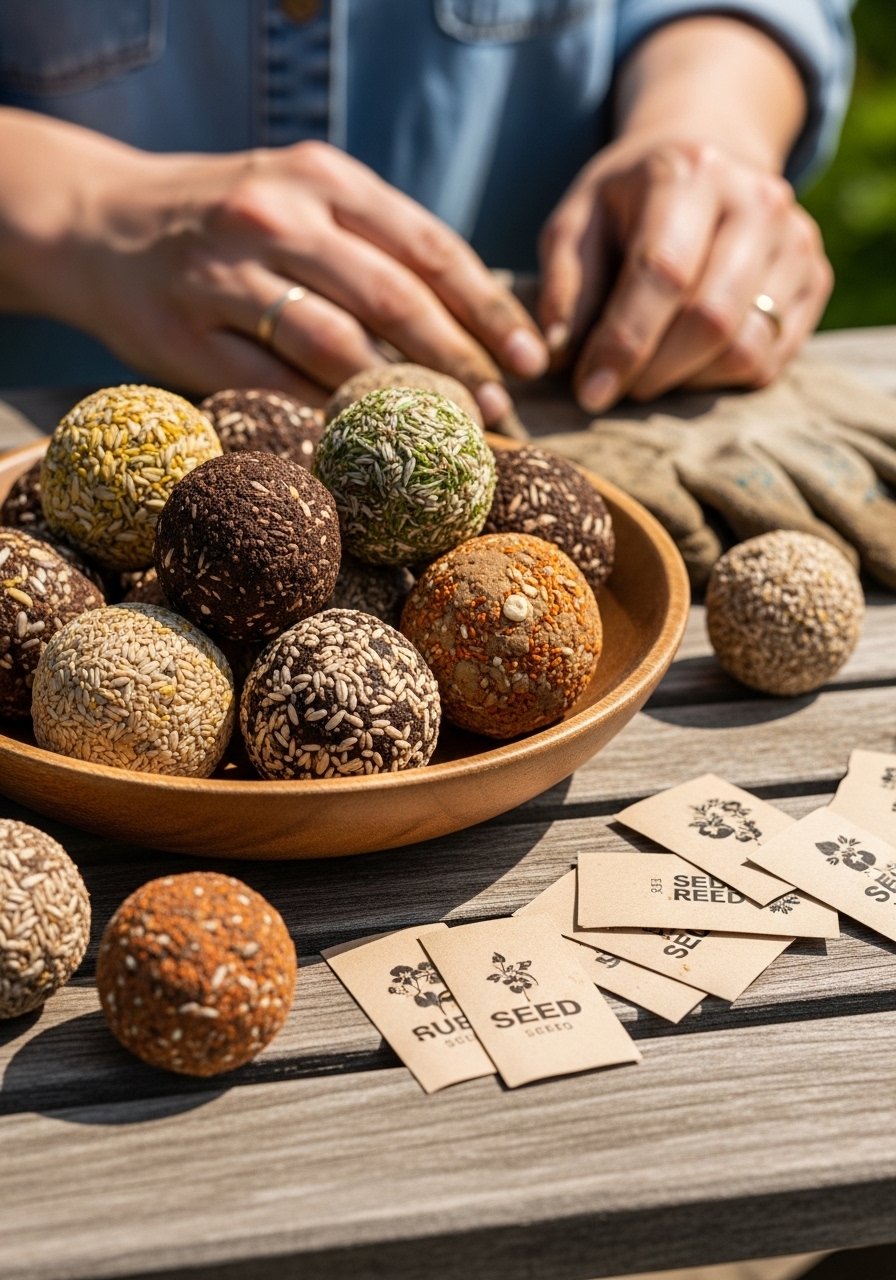
Seed bombs are playful and promote pollinators. Kids mix clay, compost, and native wildflower seeds into small balls to toss in bare patches. They feel sandy and crumbly before drying, then firm.
Materials
- 1 cup clay powder
- 1 cup compost or screened potting soil
- 1/4 cup wildflower seed mix (native to your area)
- Water (a few tablespoons)
- Gloves (optional)
- Tray for drying
- Small labels or craft paper
Instructions
- Mix clay and compost in a bowl.
- Stir in seeds gently so they’re evenly distributed.
- Add water slowly, a teaspoon at a time, until mixture holds together when squeezed.
- Roll into 1-inch balls.
- Dry on a tray in a sunny spot for 48–72 hours until hard.
- Store in a dry container until ready to toss into soil or gift.
How to Display or Gift It
Bundle several seed bombs in a small kraft box with planting instructions. Use a label that lists the bloom time and tips for local planting. Store in a cool, dry place until spring.
- Easter Egg Marble Painting
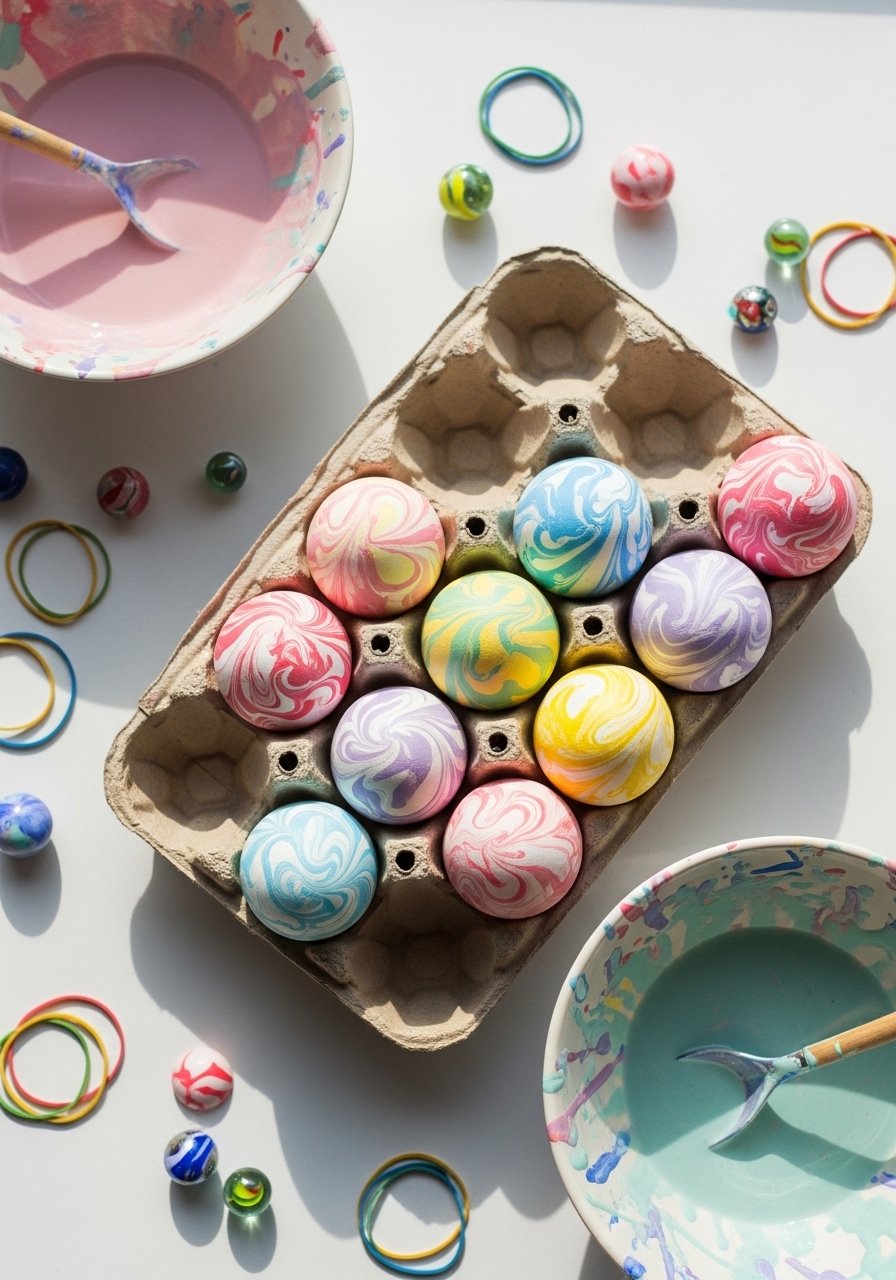
This marble technique creates swirling, marbled eggs using washable paint and marbles in a box. Kids love the messy rolling motion and vibrant results. Finished eggs are glossy if sealed.
Materials
- 12 plastic or wooden eggs
- Washable acrylic paints, small pots
- 1 shallow cardboard box per child
- Marbles (3–5 per box)
- Paper towels
- Clear craft sealer spray (optional)
- Rubber bands or stickers (for masking)
Instructions
- Place an egg in the box with a few marbles and spoonfuls of paint.
- Close and tilt the box, rolling the marbles to spread paint over the egg.
- Open periodically to check coverage and add colors.
- Let eggs dry on a rack for 30–60 minutes between layers.
- Add a second rolling coat if desired. Final dry time 1–2 hours.
- Seal lightly with spray sealer if using wooden eggs; cure 24 hours.
How to Display or Gift It
Arrange in a decorated egg carton or nest in a reclaimed wooden crate. Tie several together with ribbon for a centerpiece. Store painted plastic eggs in a divided craft organizer.
- Summer Tie-Dye Tote Bags

A wearable craft perfect for summer. Kids learn folding techniques to make spirals, stripes, and bullseyes. Fabric feels soft and vibrant after washing.
Materials
- 2 cotton canvas tote bags, child size
- Fiber-reactive dye kit (multi-color)
- Squeeze bottles (included with kits)
- Rubber bands
- Plastic table cover
- Gloves and aprons
- Plastic zip-top bags for setting
Instructions
- Pre-wash totes without fabric softener.
- Fold and bind with rubber bands to create desired pattern (spiral, accordion).
- Mix dyes per kit instructions.
- Apply dye to sections using squeeze bottles.
- Place dyed bag in a zip-top bag and let set 6–8 hours (overnight for richer color).
- Rinse under cold water until water runs clear, then wash separately and dry.
How to Display or Gift It
Use as a beach tote, library bag, or teacher gift. Fold neatly and place in a gift box with a matching ribbon. Store extra dye kits and bags in a craft organizer.
- Felt Flower Headbands
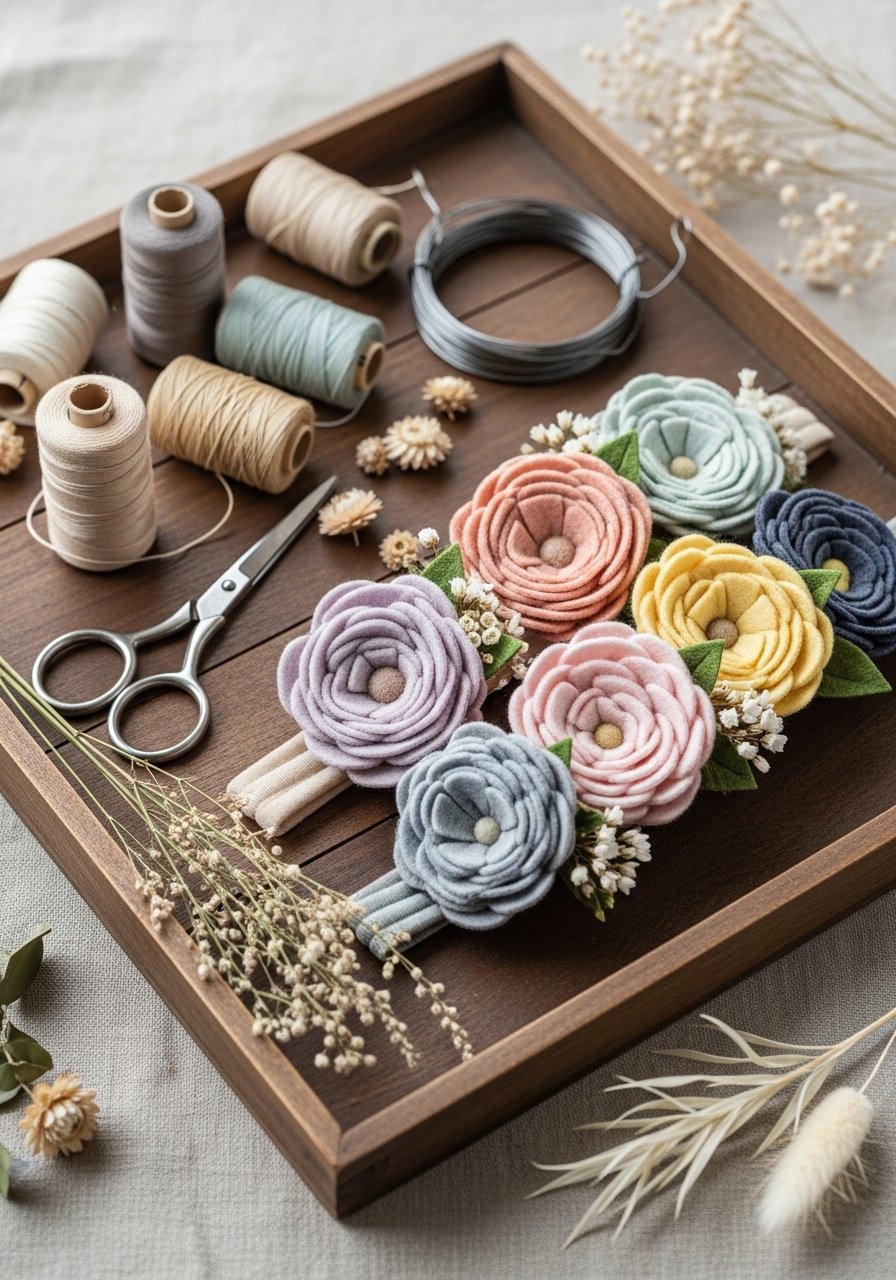
Soft felt flowers make whimsical headbands for spring and summer. The finished flowers are plush and light, comfortable on a kid’s head.
Materials
- Assorted felt sheets (5 x 7 inches, 6 colors)
- 1 package floral wire (thin)
- Hot glue gun (low-temp recommended)
- Scissors
- Embroidery thread, matching colors
- Headband bases, child size (plastic)
- Small wooden beads (optional)
Instructions
- Cut 3–5 petal shapes per flower from felt (about 2–3 inches each).
- Layer petals and stitch or glue the centers together.
- Wrap floral wire with thread to create stems if desired.
- Attach flowers to headband bases with hot glue; let set 10 minutes.
- Add beads or leaves for detail.
- Trim any loose threads and test for secure attachment.
How to Display or Gift It
Place headbands on a small wooden easel for store-style display or wrap in tissue in a kraft box. Store extras in a drawer organizer to keep petals flat.
- Paper Plate Pumpkins
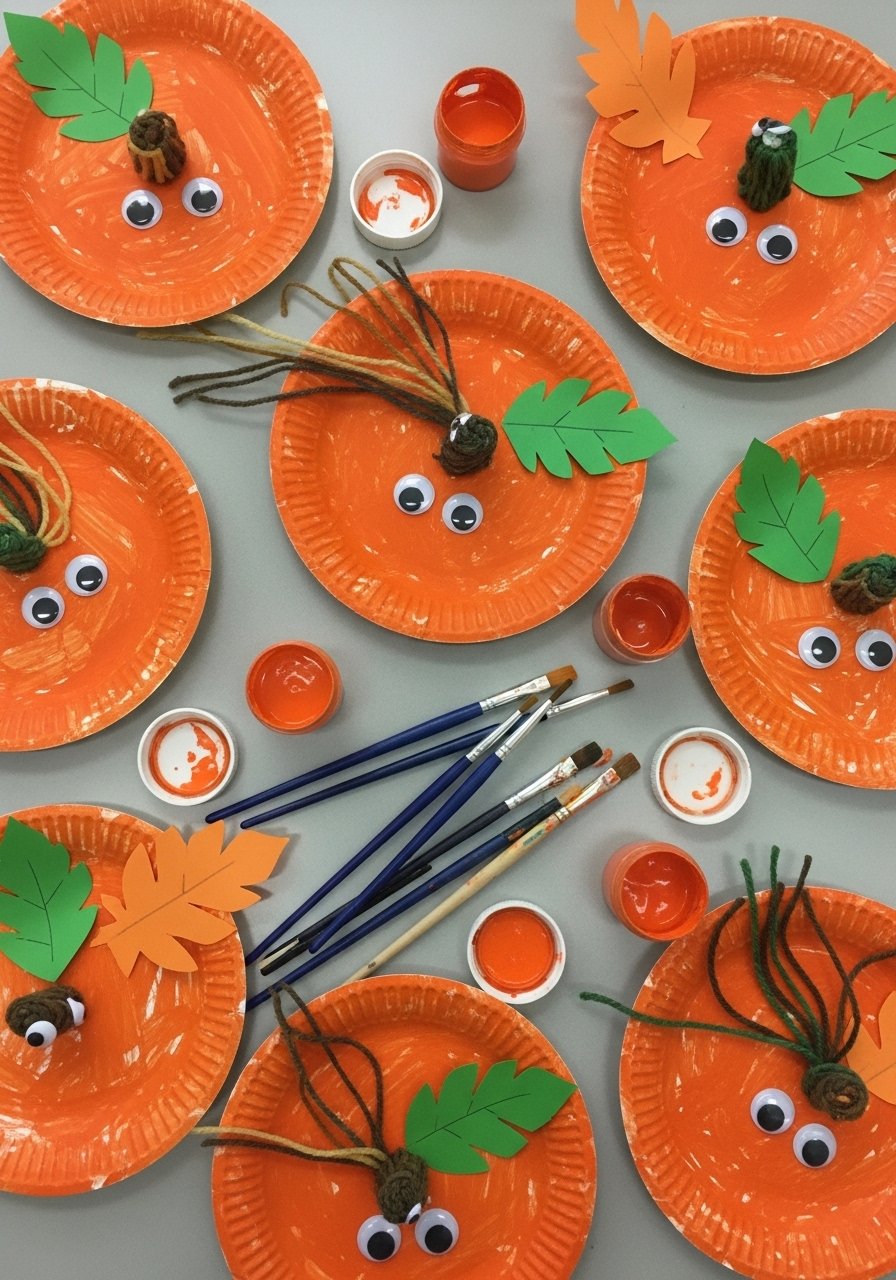
This simple fall craft turns paper plates into adorable pumpkins with texture from yarn and paint. Kids can experiment with brush strokes and layering.
Materials
- Paper plates (6)
- Acrylic paint in orange, green, brown
- Yarn, orange or brown
- Glue stick and craft glue
- Googly eyes (optional)
- Leaf hole punch
- Scissors
Instructions
- Paint paper plates orange. Let dry 20–30 minutes.
- Crumple and glue yarn into a stem at the top center.
- Punch leaves from green cardstock and glue next to stem.
- Add facial features or patterns with paint or markers. Dry 15 minutes.
- Reinforce edges with glue if plates are flimsy.
- Cut a small slit to hang as a decoration if desired.
How to Display or Gift It
String several pumpkins into a garland or use on a classroom bulletin board. Pack flat in a large envelope for gifting.
- Leaf Printing on Tea Towels
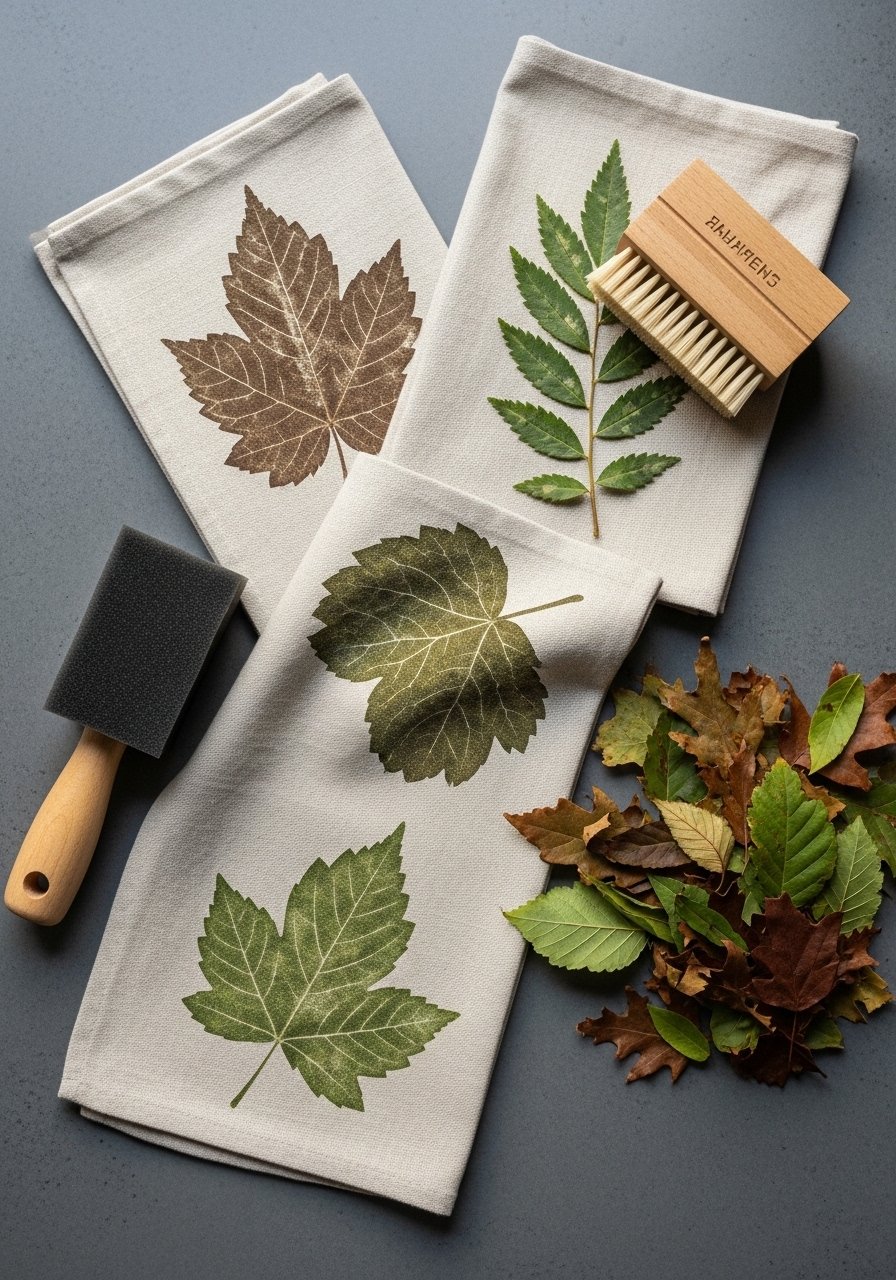
Leaf prints on fabric capture natural vein patterns in rustic farmhouse or japandi styles. The textured print feels slightly raised after paint and soft with washing.
Materials
- Plain cotton tea towels, pre-washed (18 x 28 inches)
- Fabric paint (leaf green, brown)
- Real leaves (various sizes)
- Foam brush
- Cardboard insert (to place inside towel)
- Rolling pin or brayer
- Paper towels
Instructions
- Place cardboard inside towel to prevent bleed-through.
- Brush paint onto leaf underside with a foam brush.
- Press painted leaf, paint-side down, onto towel and rub with a brayer or rolling pin for 15–30 seconds.
- Peel leaf carefully to reveal the print.
- Heat-set paint per manufacturer's instructions (usually iron on reverse for 3–5 minutes).
- Let cure 24 hours before washing on gentle cycle.
How to Display or Gift It
Fold and tie with twine for a kitchen gift. Display in a stack with a small wooden spatula. Store in a linen drawer.
- Puffy Paint Snowmen (Indoor Winter Craft)
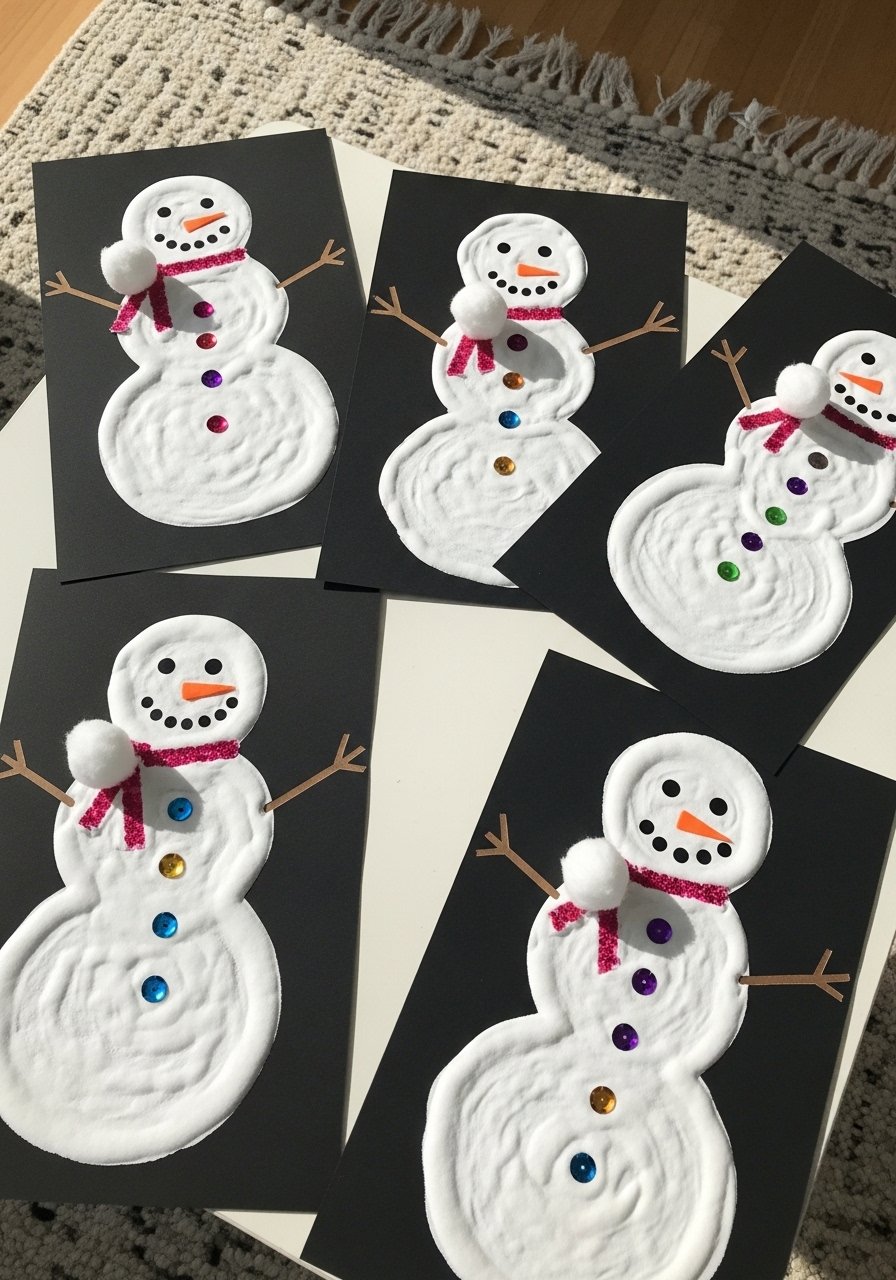
Puffy paint adds dimension to winter art. Kids squeeze and shape the paint to create raised snowmen—fun sensory output that dries to a pillowy texture.
Materials
- 1 cup shaving cream
- 1/2 cup white glue
- Acrylic paint (black, orange)
- Black cardstock, 8.5 x 11
- Sequins or small buttons
- Toothpicks or craft sticks
- Small funnel or squeeze bottle (optional)
Instructions
- Mix shaving cream and white glue until fluffy.
- Add a spoonful to a palette and tint with a drop of acrylic paint if desired.
- Squeeze onto cardstock in three stacked circles for a snowman.
- Use toothpicks to add eyes, mouth, and carrot nose from orange paint.
- Press sequins for buttons while puffy paint is wet.
- Let dry 24–36 hours to be fully firm and non-tacky.
How to Display or Gift It
Frame finished artwork in a cheap frame or clip to a mini easel. Make sets for seasonal cards. Store flat until paint fully cures.
- Seasonal Craft Ideas for Kids: Pine Needle Weaving Wall Pocket
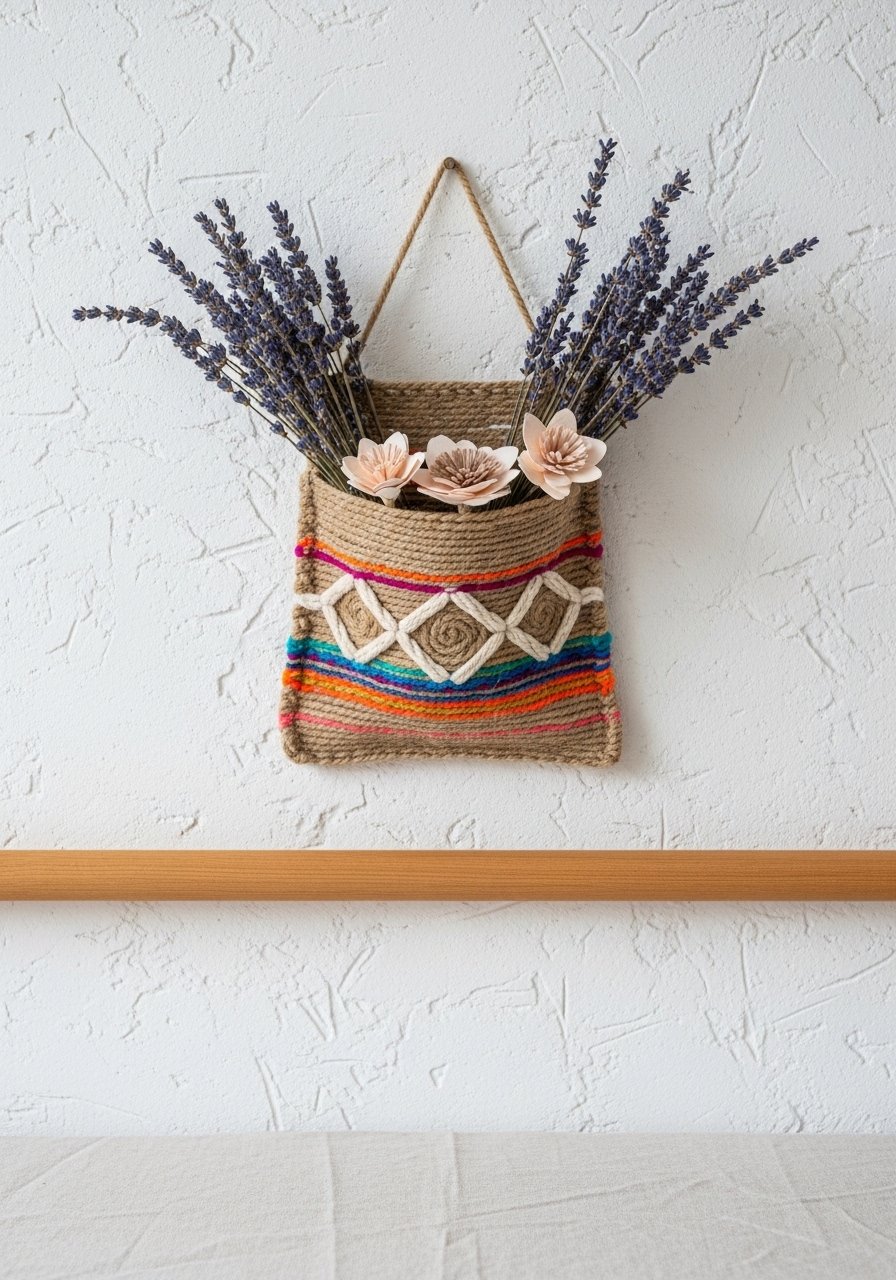
A simple weaving project that uses chunky yarn and a cardboard loom to make a tiny wall pocket for seasonal botanicals. The texture is cozy and boho-cottage at once. Older kids enjoy the repetitive rhythm.
Materials
- Chunky yarn (50 yards)
- Cardboard loom (hand-cut, 6 x 8 inches)
- Darning needle
- Scissors
- Wooden dowel, 8 inches
- Glue (craft glue)
- Dried botanicals (lavender, wheat)
Instructions
- Cut cardboard loom with evenly spaced slits at top and bottom.
- Warp loom with yarn wrapping from top to bottom.
- Weave using an over-under pattern with a second yarn color until desired height (4–5 inches).
- Create a pocket by folding the woven piece and glue or stitch sides.
- Attach to a wooden dowel and add a hanging loop.
- Tuck dried botanicals into the pocket. Let glue set 1 hour.
How to Display or Gift It
Hang on a bedroom wall or above a desk. Fill with seasonal sprigs or small notes. Store in a flat box to prevent yarn stretch.
- Halloween Monster Puppets
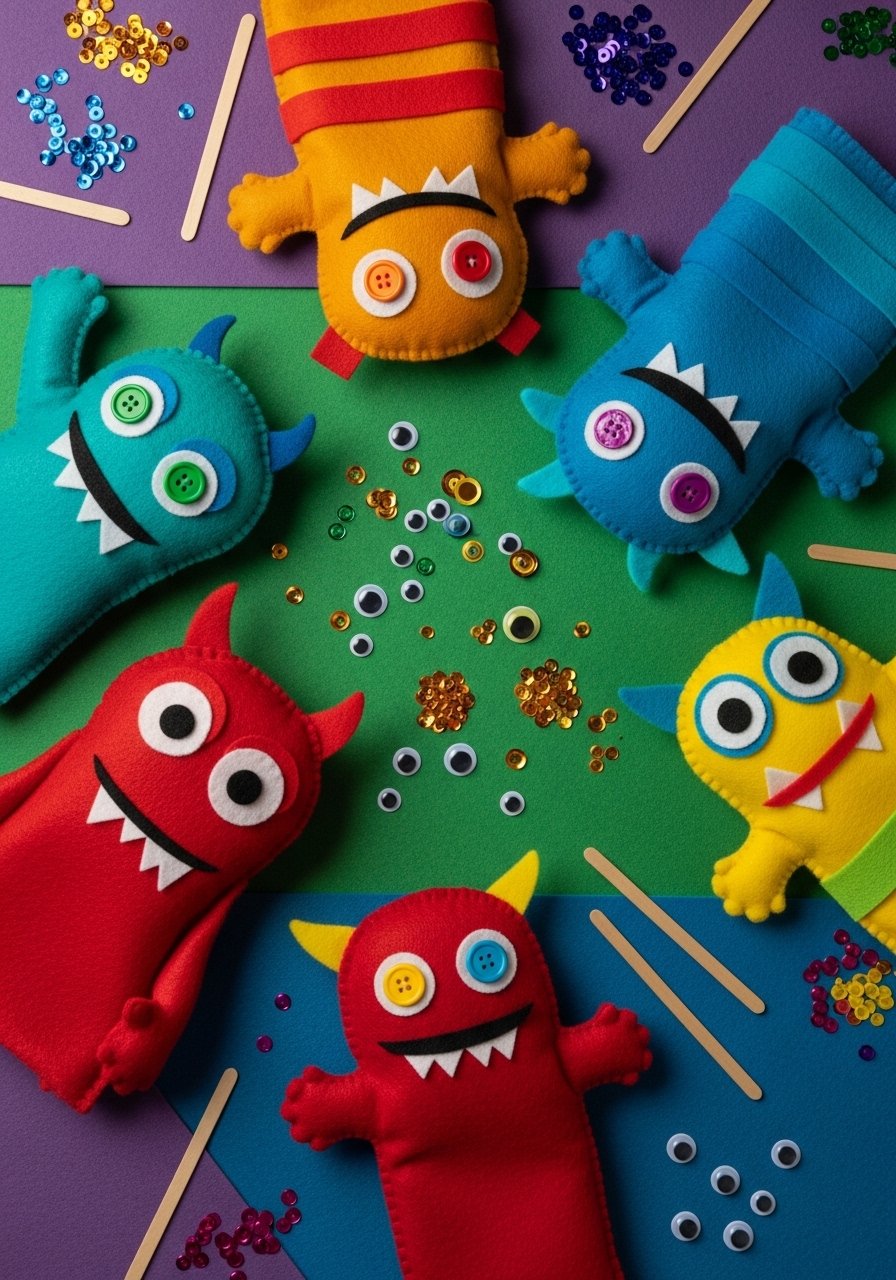
Puppet-making sparks imaginative play. These stick puppets are soft and customizable—kids add eyes, teeth, and spots. Finished puppets are lightweight and great for storytelling.
Materials
- Felt sheets, assorted colors
- Popsicle sticks, 12
- Googly eyes (various sizes)
- Fabric glue
- Scissors
- Black marker pen
- Small pom-poms or sequins for embellishment
Instructions
- Cut basic monster shapes from felt (about 4–5 inches tall).
- Glue felt to popsicle sticks, leaving enough stick to hold.
- Add googly eyes and fabric glue teeth.
- Draw mouths or patterns with a marker.
- Let glue dry 30 minutes until firmly attached.
- Test puppet stability before play.
How to Display or Gift It
Use a shoebox puppet theater for showtime or package sets in clear bags. Store finished puppets upright in a craft caddy.
- Spring Flower Pressed Paper Card
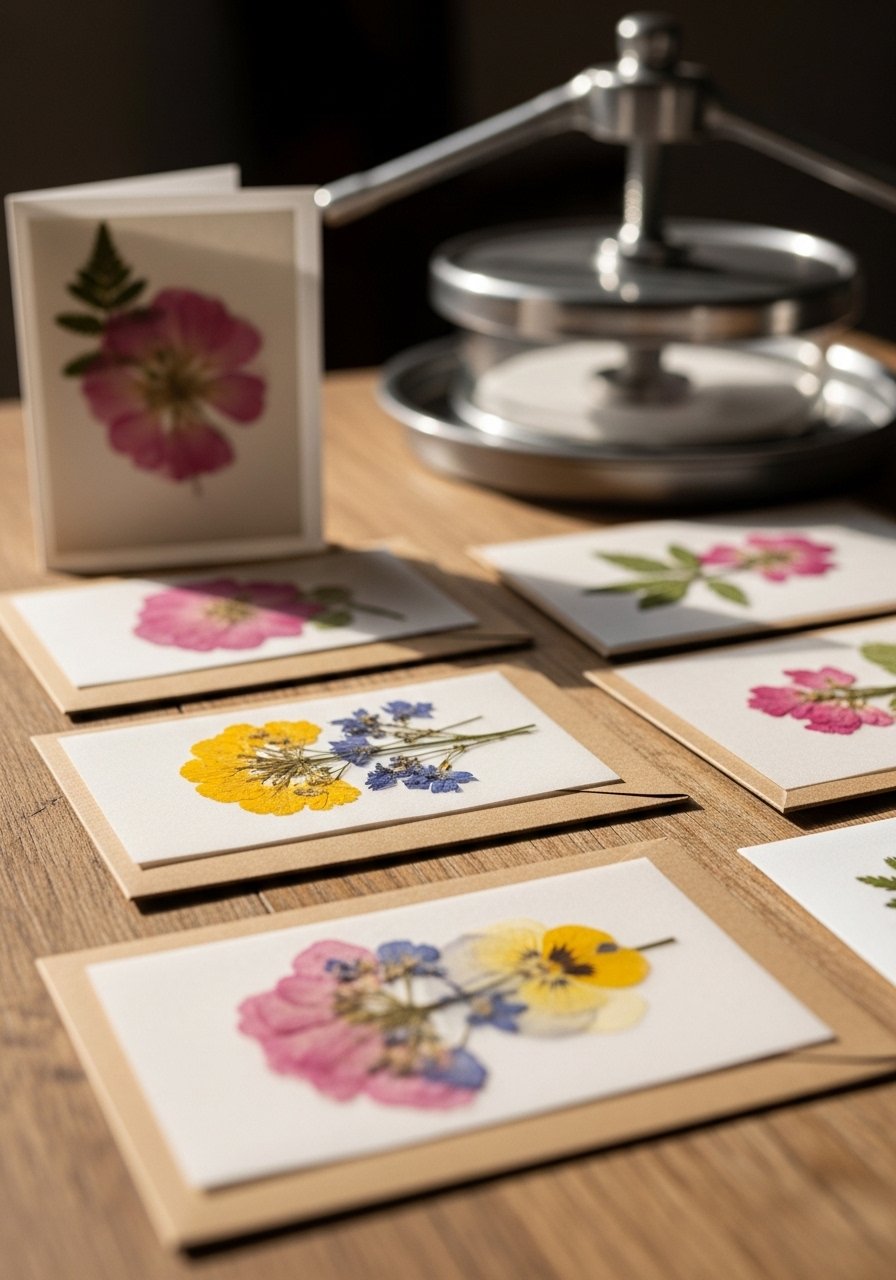
Pressed-flower cards preserve tiny blooms for keepsake stationery. Kids arrange blossoms into simple designs; the final card feels delicate and botanical.
Materials
- Pressed flowers (variety)
- Vellum sheets
- Kraft card blanks, A6 (6)
- Paper glue or glue dots
- Tweezers
- Bone folder (optional)
Instructions
- Place pressed flowers on the card in your chosen arrangement.
- Use glue dots or tiny glue drops to secure petals.
- Cover with a vellum sheet and fold or secure edges.
- Use a bone folder to crease neatly.
- Let adhesive set 30 minutes before stacking.
- Slip into a clear sleeve for mailing.
How to Display or Gift It
Pair cards with a small envelope and a pressed extra bloom tucked inside. Store in a flat tray to avoid crushing flowers.
- Fourth of July Fireworks Pinwheels
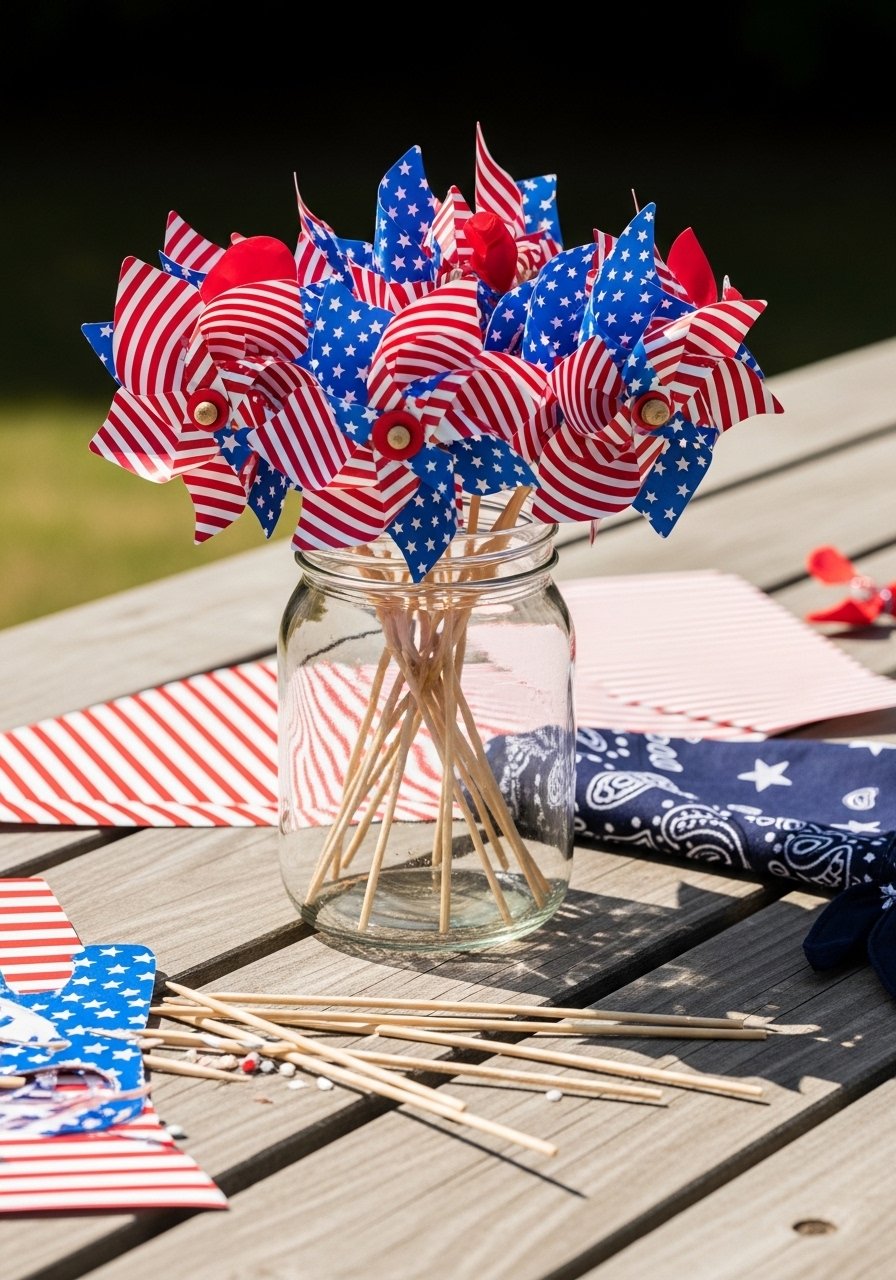
Pinwheels are kinetic and festive. Using patriotic paper makes them perfect for summer celebrations. The finished pinwheel spins lively in a breeze.
Materials
- Decorative paper (double-sided, 6 x 6)
- Push pins or brads
- Bamboo skewers, 6
- Small wooden beads
- Scissors
- Ruler
- Glue
Instructions
- Cut paper into 6 x 6 inch squares.
- Fold corners to the center, leaving the center unpunched.
- Secure with a brad through a bead and into a bamboo skewer.
- Adjust tightness so pinwheel spins freely.
- Test and trim edges if too heavy.
- Let glue set 10 minutes if using adhesive.
How to Display or Gift It
Plant several pinwheels in a jar for a table centerpiece. For gifting, bundle three and tie with ribbon into a kraft tube.
- Rock Painting Garden Markers
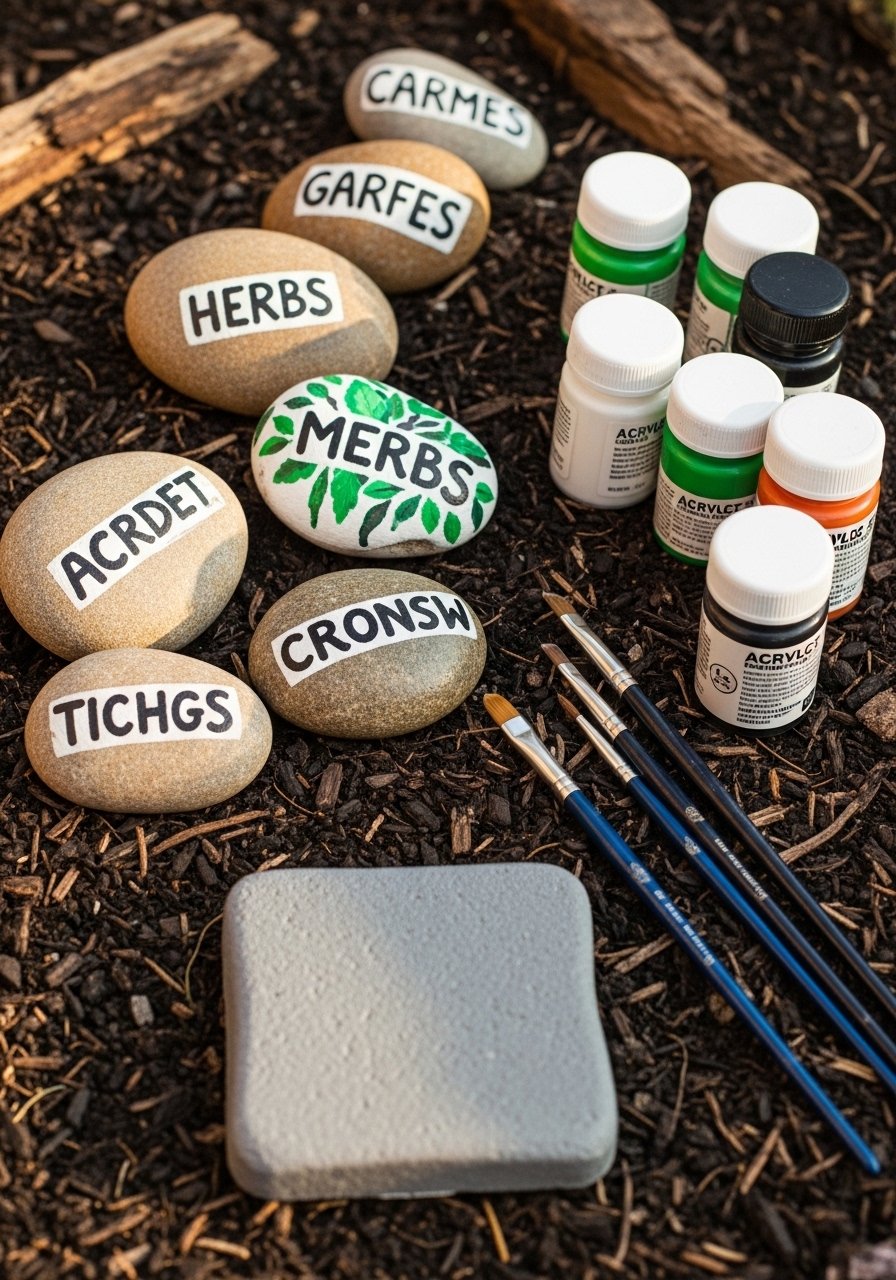
Rock painting is perfect for older kids with careful hand control. Use acrylic paint and paint pens to make durable garden markers. They feel smooth and sturdy.
Materials
- Smooth river rocks, pet-friendly washed (12)
- Acrylic paint set
- Paint pens for detail (black, white)
- Clear outdoor sealer spray
- Fine brushes
- Paper towels
Instructions
- Clean rocks and let dry.
- Paint a base color if desired; dry 15–20 minutes.
- Use paint pens to write herb or vegetable names.
- Add small decorative motifs.
- Seal with outdoor sealer; cure 24 hours before placing outside.
- Test waterproofing by sprinkling water—no smearing.
How to Display or Gift It
Place markers in your garden or tuck into a potted herb for a housewarming gift. Store extra rocks in a small crate.
- Beach Memory Shadow Boxes
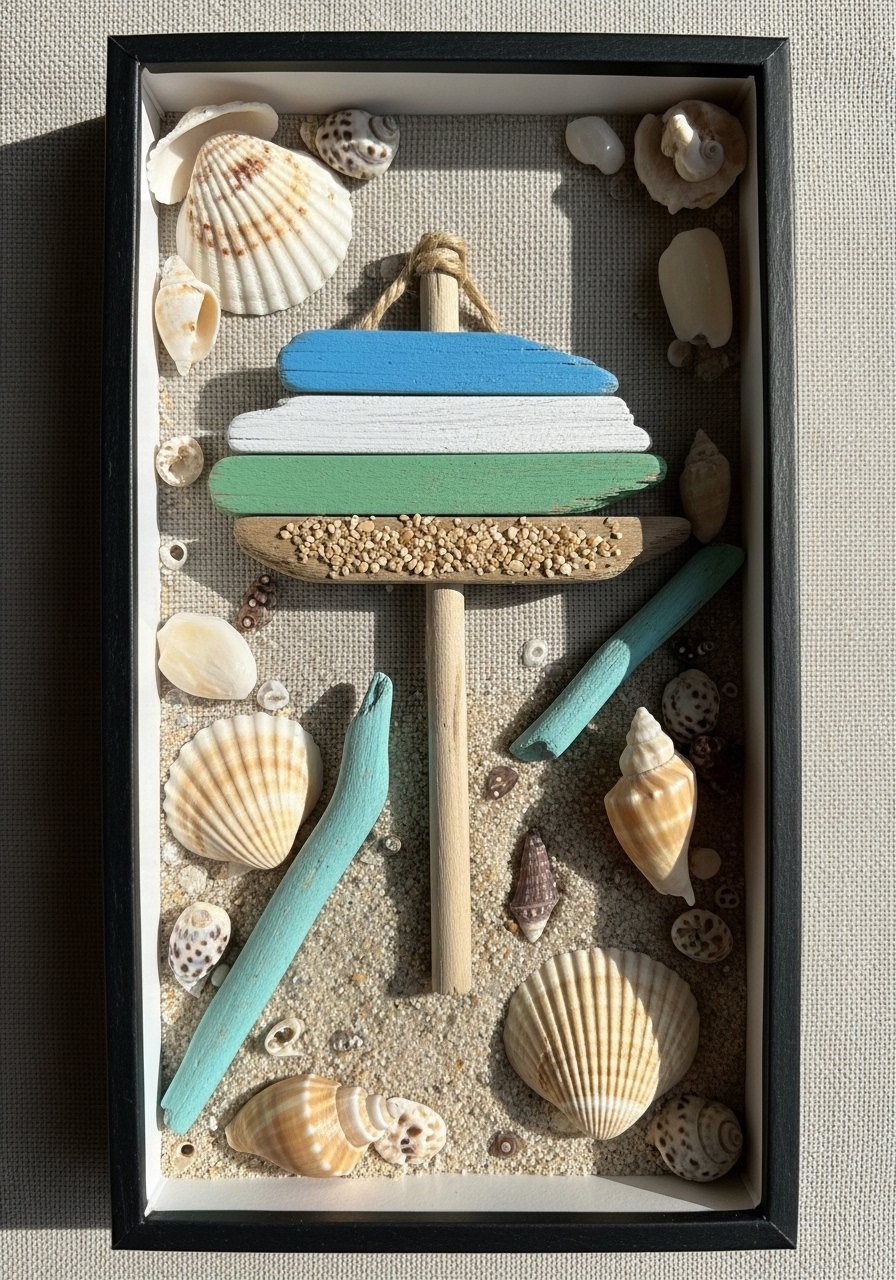
Shadow boxes let kids preserve vacation finds. The finished box has a tactile sand base and layered treasures—perfect for memory craft.
Materials
- Small shadow box (5 x 7)
- Fine beach sand, 1/4 cup
- Collected shells and small driftwood
- Hot glue gun
- Tweezers
- Glue dots
- Small label stickers
Instructions
- Glue a thin line of glue to the base and sprinkle sand, pressing lightly.
- Arrange shells and driftwood, gluing each piece securely.
- Add a tiny label with date and location.
- Let glue cure 1 hour before closing the box.
- Clean glass with a microfiber cloth.
- Secure backing and hang or stand.
How to Display or Gift It
Display on a shelf or nightstand. Pack in tissue and a small kraft box for gifting. Store unused shadow boxes flat.
- DIY Nature Crowns
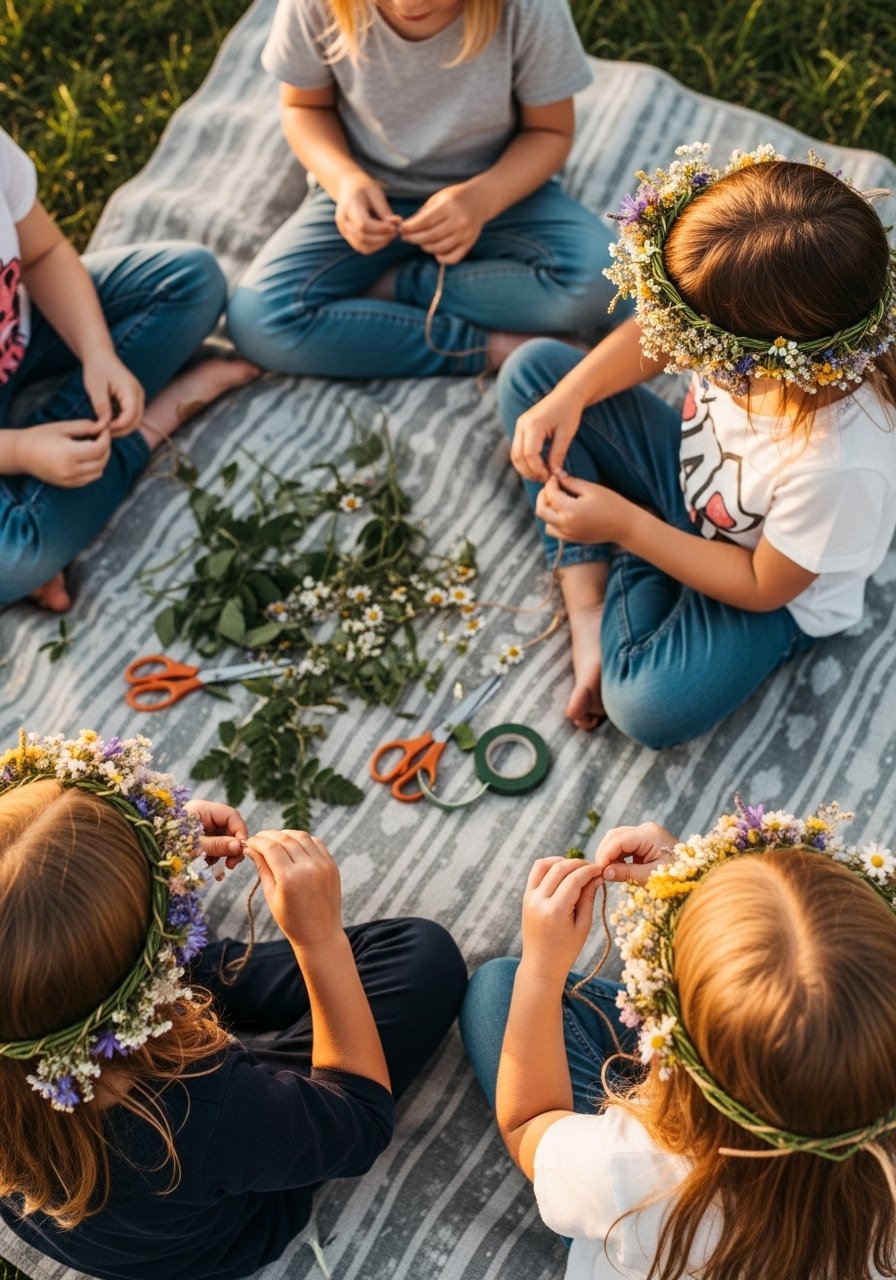
Nature crowns are a spring/summer favorite for play and photos. They feel fresh and fragrant and are best used the same day. Young kids enjoy collecting materials.
Materials
- Flexible floral wire
- Floral tape
- Fresh small flowers and greenery
- Scissors
- Ribbon, optional for tying
- Small pliers (for cutting wire)
Instructions
- Measure wire around child’s head leaving 2 inches overlap.
- Twist ends to form a base and wrap with floral tape.
- Attach small flower sprigs by wrapping stems and tape tightly.
- Build layer by layer until crown looks full.
- Tie ribbon at back for added security.
- Wear immediately; crowns last 1–2 days when refrigerated.
How to Display or Gift It
Use as a photo prop or party favor. Store leftover flowers in a small vase to reuse.
- Dinosaur Footprint Plaster Casts
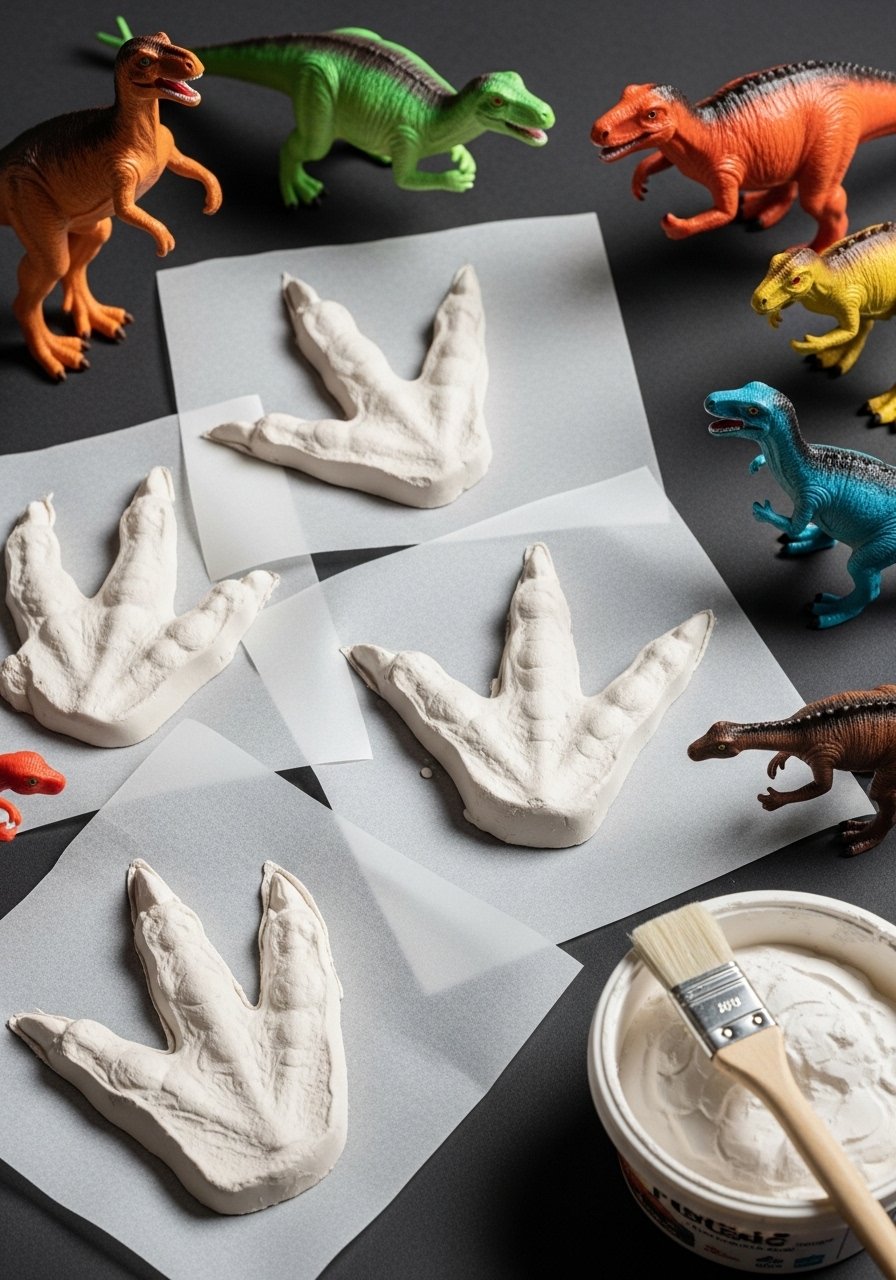
Kids press toy dinosaur feet into plaster to make fossil-like casts. The finish feels hard and stone-like when cured, a great tactile reward.
Materials
- Plaster of Paris (1–2 lb)
- Disposable cups
- Toy dinosaur with distinct foot
- Mixing stick
- Wax paper
- Acrylic paints for coloring
- Gloves
Instructions
- Mix plaster per package (usually 2 parts plaster:1 part water) until smooth.
- Pour into disposable cup to 1/2 inch depth.
- Press toy foot firmly but carefully.
- Let set 30–45 minutes to harden enough to remove.
- Remove cast and let cure fully 24 hours.
- Paint and seal if desired; paint dries 30 minutes.
How to Display or Gift It
Label with a hand-drawn “fossil” tag and display on a small stand or shelf. Pack in shredded tissue for gifting.
- Seasonal Craft Ideas for Kids: Mini Macramé Plant Hangers
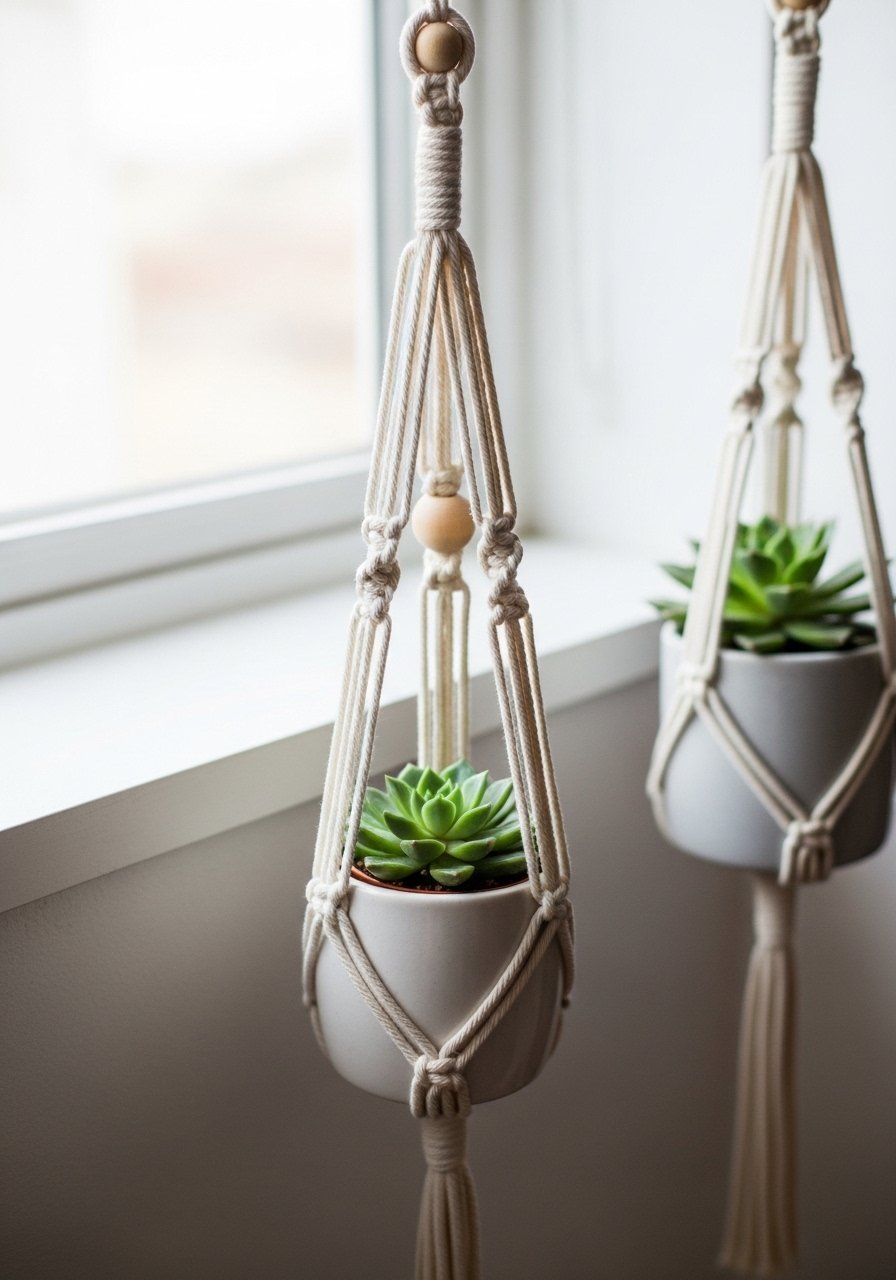
A scaled-down macramé hanger uses simple knots for a modern boho look. It’s great for older kids learning knot patterns. Finished hangers feel tactile and sculptural.
Materials
- 3mm cotton macramé cord, 20 yards total (cut into four 60-inch strands)
- Small ceramic pots (3–4 inches)
- Wooden ring or metal O-ring
- Wooden beads (optional)
- Scissors
- Tape measure
Instructions
- Fold cords through ring to create eight working strands.
- Tie a gathering knot about 2 inches below the ring.
- Make square knots in sets of four, repeating for 4–5 inches.
- Create a final gathering knot 2 inches above the pot rim.
- Trim ends to desired length and comb for a tassel look.
- Test with a small pot; cords should sit snugly. Adjust knot tightness if slipping.
How to Display or Gift It
Hang by a sunny window or give as a teacher or housewarming gift with a small succulent. Store cord in a labeled basket for future projects.
- Valentine's Heart Stamp Linocut (Beginner)
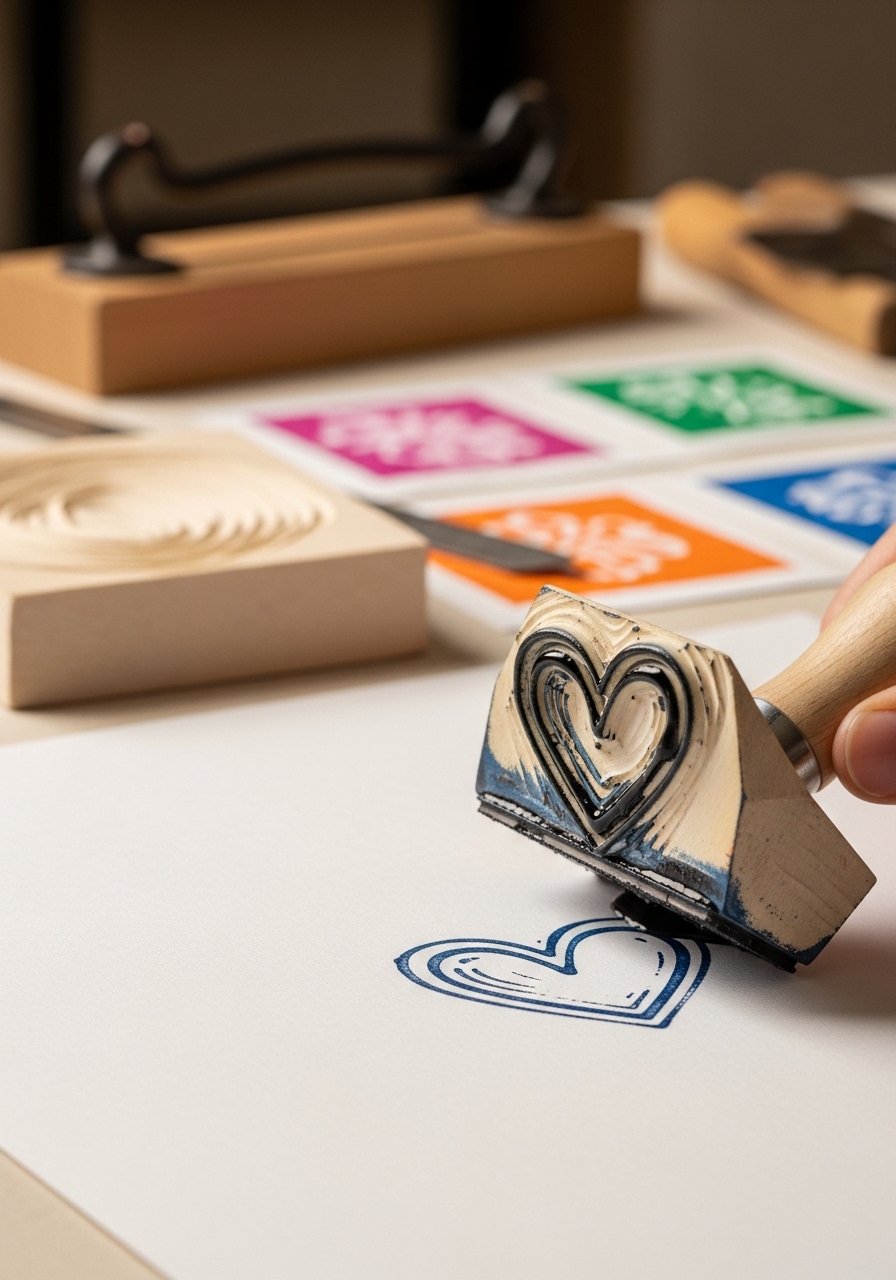
Introduce kids to printmaking with pre-cut soft linoleum or foam carving blocks. The carved stamp creates repeated hearts for cards or wrapping paper. Prints have tactile ink edges and rich color.
Materials
- Soft carving block or craft foam sheets
- Carving tools (safety) or child-safe alternatives
- Water-based block printing ink (red, pink)
- Ink roller (brayer)
- Bristol cardstock
- Pencil and tracing paper
- Cutting mat
Instructions
- Sketch heart design on tracing paper and transfer to block.
- Carefully carve away negative space (adult supervision).
- Roll a thin layer of ink on the brayer and apply evenly to stamp.
- Press stamp firmly onto cardstock for a clean print.
- Let ink dry 30–60 minutes depending on thickness.
- Clean tools and store stamp in a cool place.
How to Display or Gift It
Make sets of cards for Valentine’s or gift wrap. Store stamps in a drawer with paper separators.
- Suncatcher Bead Wind Chimes

Beaded wind chimes mix color and sound. String translucent beads and charms to catch light—perfect for porch or garden. They tinkle gently in breeze.
Materials
- Translucent acrylic or glass beads (100)
- Fishing line (clear, 20 lb, 20 ft)
- Small metal bells or charms
- Wooden branch or driftwood
- Scissors
- Needle for threading (optional)
Instructions
- Cut multiple lengths of fishing line (12–18 inches).
- Thread beads and a bell or charm at the bottom.
- Tie securely and attach to driftwood at spaced intervals.
- Use a center hanging line and balance the piece.
- Trim ends and knot firmly. Let sit 10 minutes to test balance.
- Hang where it will catch sunlight and a breeze.
How to Display or Gift It
Hang on a porch or in a sunroom. Wrap in tissue and place in a recycled box for gifting.
- DIY Stamped Clay Jewelry for Kids
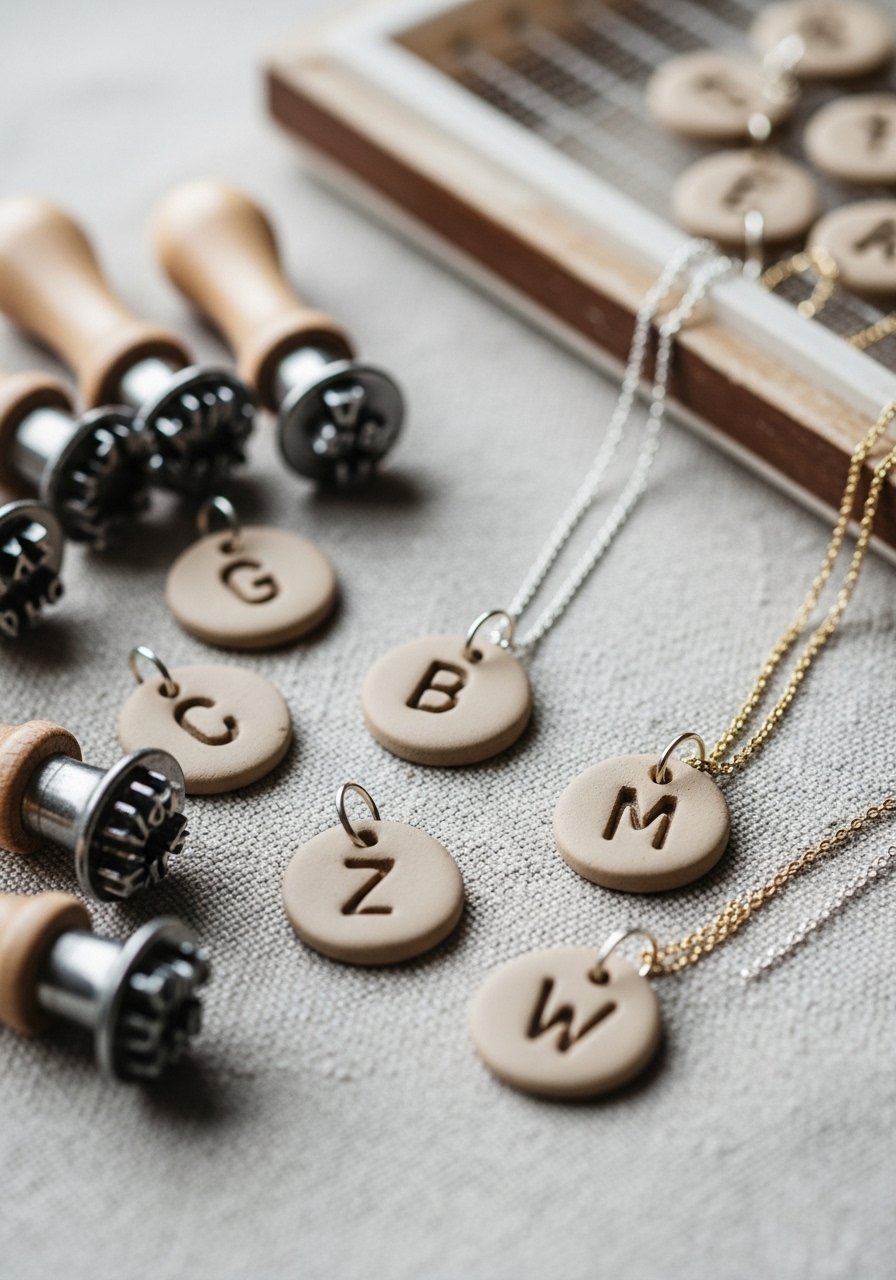
Air-dry clay and alphabet stamps make personalized charms and necklaces. Pieces feel lightweight and can be painted for color.
Materials
- Air-dry polymer clay (8 oz)
- Alphabet and small shape stamps
- Straw (for holes)
- Fine sandpaper
- Acrylic paint and small brush
- Necklace chains or cords
- Clear sealer
Instructions
- Roll clay to 1/8 inch thickness.
- Stamp letters and shapes gently.
- Use straw to make a hole for necklace cord.
- Let air-dry 24–48 hours until fully hardened.
- Sand edges gently and paint; let paint dry 30 minutes between coats.
- Seal with clear coat and string onto chains.
How to Display or Gift It
Place in a small jewelry box and tuck gift into a kraft bag. Store unfinished clay in an airtight bag to keep workable.
- Holiday Light-Up Reindeer Jars
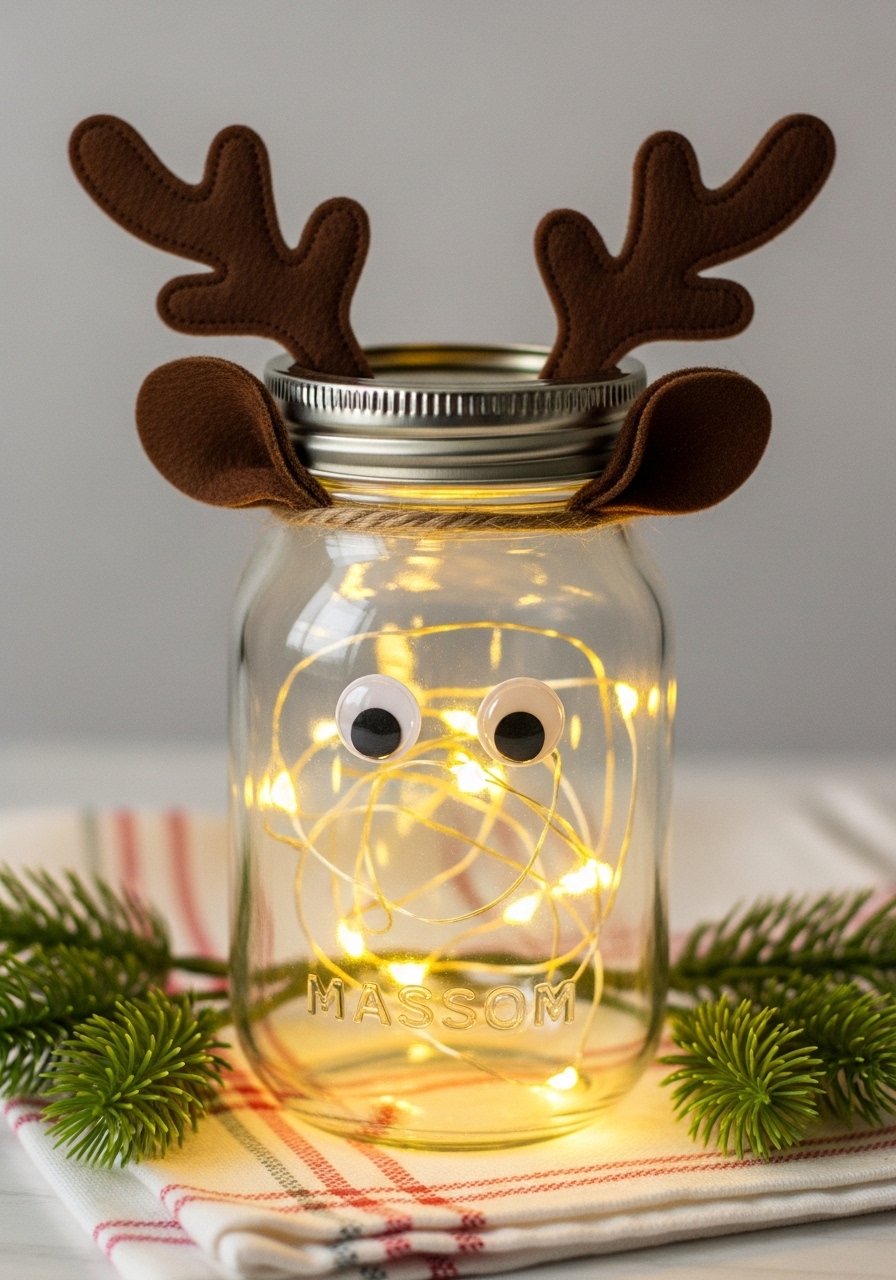
Kid-friendly glow jars use battery LED lights for safe illumination. They create a cozy holiday feel and double as nightlights. The finished jar is warm and festive.
Materials
- Small mason jars (4)
- Battery-operated LED fairy lights (4 sets)
- Felt (brown, black)
- Hot glue gun
- Googly eyes
- Ribbon
- Scissors
Instructions
- Insert LED lights into jar and fluff so bulbs are evenly spaced.
- Cut felt antlers and a nose shape.
- Glue antlers and googly eyes to jar top or lid.
- Attach nose with a dab of glue.
- Tie a ribbon around the neck for decoration.
- Test lights; batteries typically last 48+ hours depending on set.
How to Display or Gift It
Place on a mantel or bedside table. Wrap in cellophane with a bow for a crafty holiday present. Store extra batteries in a labeled drawer.
Thanks for crafting through this seasonal lineup—24 hands-on projects that cover every mood, holiday, and weather day. You’ve got paper, paint, clay, fiber, and nature-based ideas here, so there’s something for every kid and every skill level. Pin this list for rainy-day rescue, gift-giving inspiration, or classroom planning. Which project are you trying first—something messy like salt dough ornaments or something delicate like pressed-flower cards?
If you want one tool to make many of these easier, a quality low-temp hot glue gun will speed construction without the stringy mess. Share this with a friend who loves simple, seasonal fun and tag me in your photos—I can’t wait to see what you and the kids make!


