Rainy afternoons can feel long when kids say "I'm bored" for the third time. Luckily, you can turn gray skies into a craft party with sweet, simple projects that keep little hands busy and imaginations busy—without needing a ton of messy prep. These 23 trendy, indoor-friendly craft ideas for kids rainy day are designed to be doable, playful, and visually pretty enough to pin to your favorite boards.
You’ll find projects that riff on cottagecore, boho, and playful modern styles—everything from paper marbling to mini macramé keychains. I mention helpful tools where they actually make a difference (I run precise cuts with my Cricut Explore cutting machine for complicated shapes, but a craft knife works), and I suggest reliable supplies like a low-temp hot glue gun when quick adhesion matters.
Grab a smock, set a tray for supplies, and pick a project—these craft ideas for kids rainy day will keep the mood bright and the living room relatively clean.
- Paper Umbrella Puppets

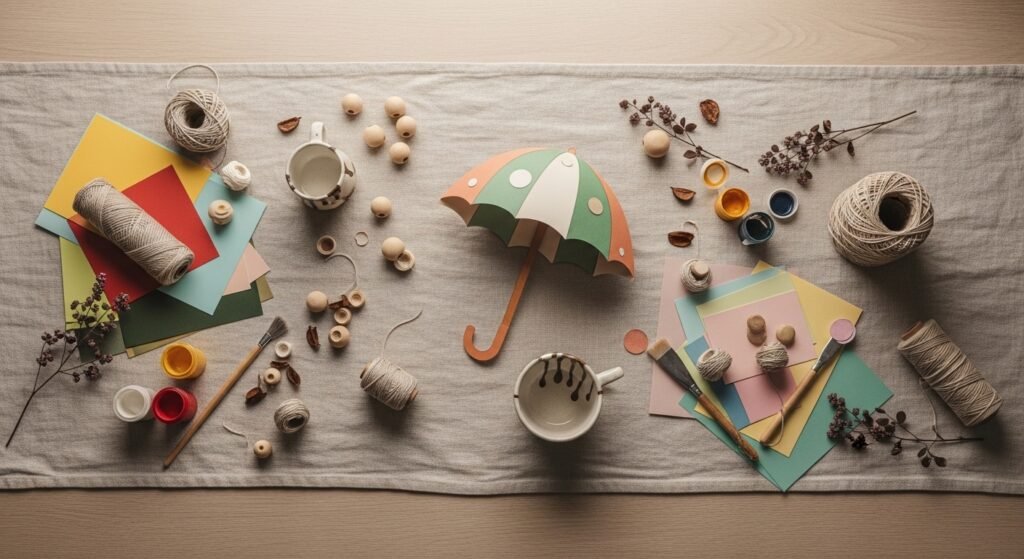
Paper umbrella puppets are tiny theater essentials—bright, lightweight, and perfect for puppet shows on a rainy afternoon. The finished puppets look glossy and cheerful with rounded handles and patterned canopies. Beginner kids love folding and gluing; older kids enjoy designing patterns. The paper feels smooth, and the wooden stick gives a satisfying weight in little hands. I score folds cleanly with a bone folder for crisp umbrellas.
Materials
- 12 sheets 8.5" x 11" colored cardstock (assorted)
- 12 wooden skewers, 7" length
- 6 sheets patterned scrapbook paper (6" x 6")
- 1 roll washi tape 12 mm
- 1/4 cup white craft glue (PVA)
- 1 foam brush for glue application
- 1 bone folder
- Scissors, ruler, and a pencil
Instructions
- Cut cardstock into semicircles: fold each 8.5"x11" in half widthwise, draw a 5" radius semicircle, and cut for 1 canopy (prep: 10 minutes).
- Score the semicircle into 6 equal sections using the ruler and bone folder to create fold lines.
- Accordion-fold along the score lines to create umbrella pleats.
- Glue a 6" strip of patterned paper along the straight edge inside the canopy for contrast. Press with the foam brush to remove bubbles.
- Attach a wooden skewer to the center back using a line of white craft glue and reinforce with a 1" washi tape wrap (allow 20 minutes drying).
- Add a small paper handle by folding a 1" x 3" strip into a loop and hot-gluing or gluing it to the skewer end.
- Add a lightweight embellishment (pom-pom, sticker) to each top. Let dry until firm to the touch (30 minutes).
How to Display or Gift It
- Stage a puppet show on a low cardboard box stage and add a paper curtain for dramatic effect.
- Wrap a set of 4 in kraft tissue and tie with twine for a rainy-day party favor.
- Store finished puppets vertically in a tall mason jar or a craft organizer tray like this craft organizer tray for reuse.
- Salt-Dough Rain Charms
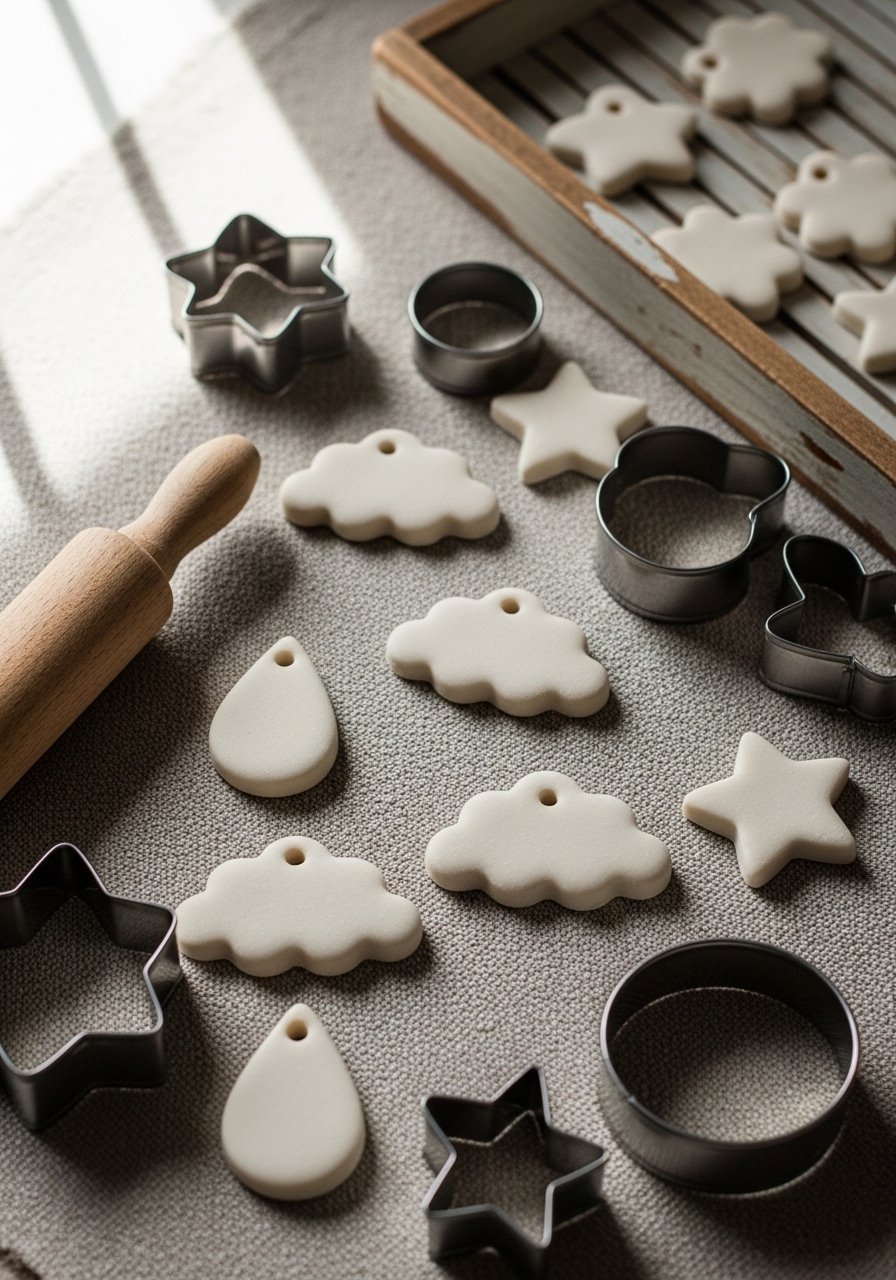
Salt-dough charms make keepsakes kids can paint and glue onto backpacks or strings. They dry matte and sand to a smooth finish. The dough is tactile and forgiving, so kids can press in textures. I like using a silicone rolling pin for even thickness—less sticking, less mess.
Materials
- 2 cups all-purpose flour
- 1 cup fine salt
- 3/4 cup warm water (add more if needed)
- Assorted small cookie cutters (clouds, raindrops)
- Acrylic paint set (12 colors)
- 1 small flat foam brush
- Sandpaper 120-grit
- Clear varnish (matte Mod Podge) for sealing
Instructions
- Combine flour and salt in a bowl. Gradually add warm water and mix until a soft dough forms (prep: 10 minutes).
- Knead 3–4 minutes until smooth. Rest for 10 minutes.
- Roll dough to 1/4" thickness on a lightly floured surface. Cut shapes with cookie cutters.
- Use a straw to punch a hole for hanging. Transfer shapes to a parchment-lined baking sheet.
- Bake at 200°F (95°C) for 2–3 hours or until fully hard; flip halfway for even drying. Let cool completely.
- Sand edges smooth, paint with acrylics, and seal with 2 thin coats of matte Mod Podge, drying 20 minutes between coats.
- Thread twine or ribbon through holes and knot.
How to Display or Gift It
- Tie charms to pencil pouches or zipper pulls as tactile gifts.
- Package sets in small kraft boxes with shredded paper and a handwritten tag.
- Store extras flat in a shallow craft storage box to avoid breakage.
- DIY Rain Stick (Recycled Tube)
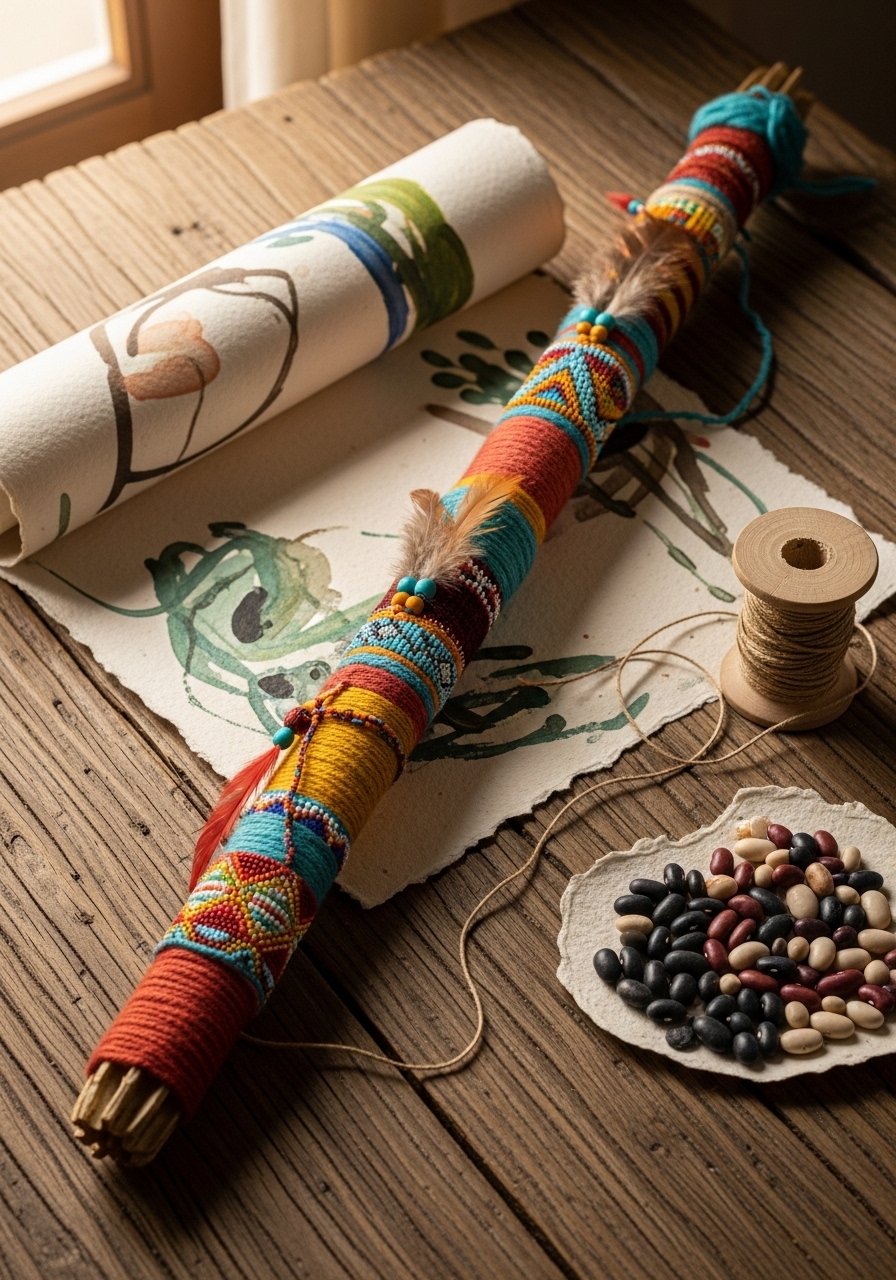
A rain stick is a calming instrument—kids love the sound of beans trickling and the slow motion. Decorated with colorful masking tape and washi, it becomes a decorative shelf piece too. Using a paper towel tube or mailing tube keeps it lightweight and safe for small hands.
Materials
- 1 mailing tube or sturdy cardboard tube, 24" long
- 1/2 cup dry rice or small beans
- 10 wooden dowels, 1/8" diameter, cut into 1" lengths
- Masking tape or craft tape
- Acrylic paints or paint pens
- 1 hot glue gun (low-temp) and glue sticks
- Decorative washi tape rolls
- Parchment paper and scissors
Instructions
- Seal one end of the tube with a round of cardboard and secure with hot glue.
- Drop in a layer of wooden dowel bits to create internal obstacles for sound.
- Add 1/4 cup rice/beans, then more dowel bits, repeating until tube is about 3/4 full.
- Seal other end and reinforce both ends with masking tape.
- Paint or decorate the tube with paint pens and washi tape. Let paint dry 30 minutes.
- Test sound. If too quiet, add more rice; if too loud, add more dowels.
- Finish by wrapping ends with twine and a glue dot for a tidy look.
How to Display or Gift It
- Pair with a small music booklet for a homemade rhythm set.
- Display upright on a shelf with a tiny easel or lean against books in a kid’s room.
- Wrap in tissue and tuck into a cylinder gift tube for mailing.
- Puffy Paint Cloud Art

Puffy paint gives tactile, fluffy clouds that kids want to touch. The paint puffs up after microwaving briefly for that raised, whipped look. Use dark backgrounds for dramatic contrast—the texture really pops.
Materials
- 1/2 cup white school glue
- 1/2 cup shaving cream (not gel)
- 1 tsp baking soda
- Food coloring or liquid watercolor (optional for accents)
- Assorted cardstock (navy or dark colors)
- Popsicle sticks for mixing
- Foam brushes to apply
- Microwave-safe bowl and paper towels
Instructions
- In a microwave-safe bowl, combine glue, shaving cream, and baking soda. Stir gently until fluffed.
- Add a drop of food coloring to tint the mixture, stirring briefly.
- Spoon puffy paint onto cardstock in cloud shapes and smooth with a popsicle stick.
- Microwave the paper (on a microwave-safe plate) for 12–18 seconds at 50% power to set the puff—watch closely.
- Let cool 5 minutes before handling. The surface will be dry to the touch but slightly squishy inside; it firms within 24 hours.
- Add painted rain lines with a thin paintbrush once the clouds are stable.
- Create a gallery of three cards in different sizes for variety.
How to Display or Gift It
- Frame pieces in inexpensive frames or mount in a shadowbox for depth.
- Send as tactile greeting cards tied with baker’s twine.
- Store flat in a wide craft organizer until fully cured.
- Button Rain Collage
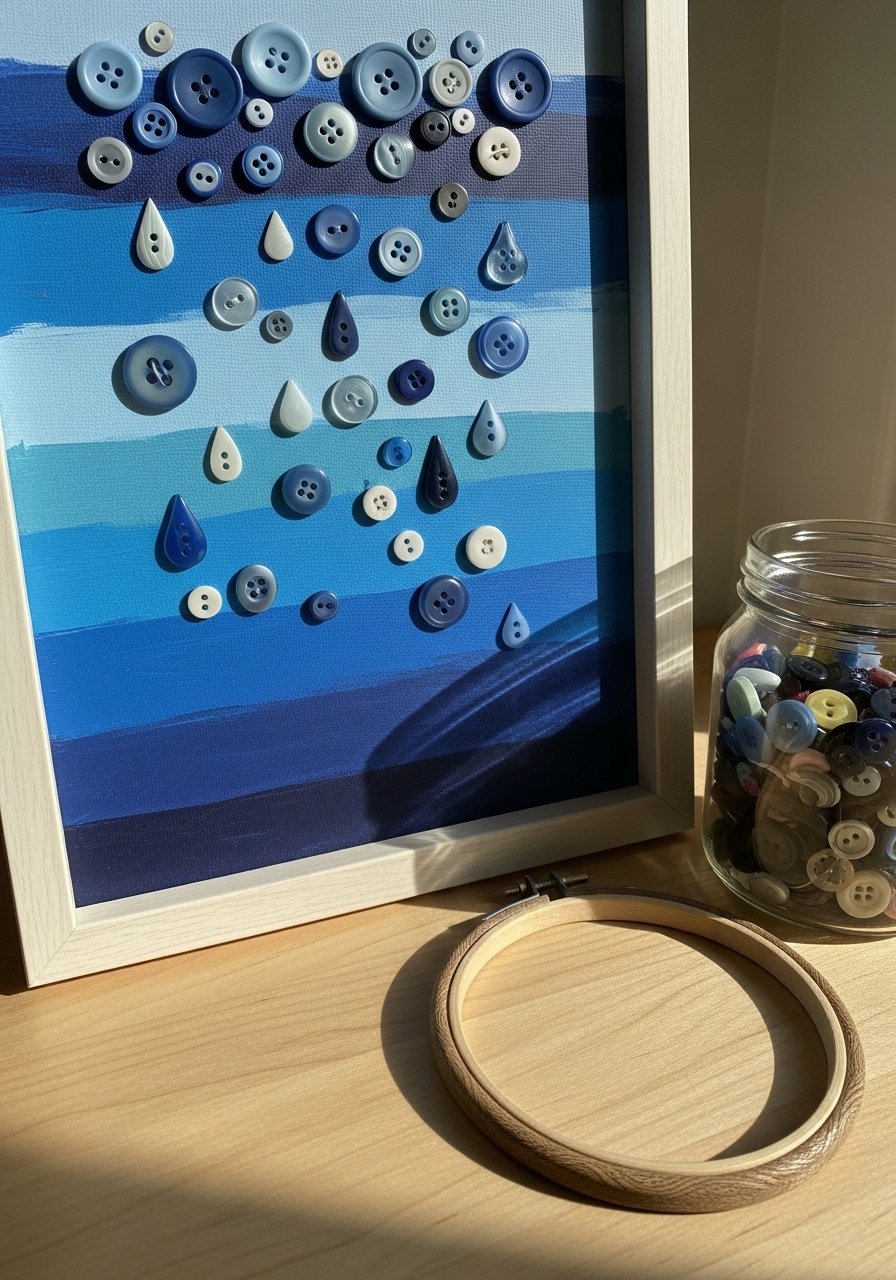
Button collages give a sweet, dimensional rainy scene. Sewing buttons onto heavyweight paper or thin canvas helps them stay in place. The collage has a cheerful tactile texture that kids love to arrange.
Materials
- 1 8" x 10" heavyweight mixed-media paper or thin canvas
- 50–100 assorted blue buttons (various sizes)
- Embroidery thread, needle
- Acrylic paint for background (2 colors)
- Paintbrush, pencil, and ruler
- Mod Podge (matte) to seal edges
- Small wooden frame (optional)
Instructions
- Paint the background in blended blues and let dry 30 minutes.
- Sketch light rain lines with a pencil for button placement.
- Thread a needle with double thread and knot the end. Start from the back of the paper/canvas and stitch buttons in place, following the sketched lines.
- Space buttons to create depth—larger at the bottom, smaller near the top.
- Once all buttons are sewn, apply a thin coat of matte Mod Podge around edges to secure stray threads.
- Let everything dry 20 minutes before framing.
- Trim any excess thread on the back and add a hanging loop.
How to Display or Gift It
- Hang in a bathroom or playroom for a weather-themed vignette.
- Mount inside an embroidery hoop for instant wall art.
- Wrap in tissue and place in a shallow gift box for a handmade keepsake.
- DIY Mini Terrariums (No Soil)
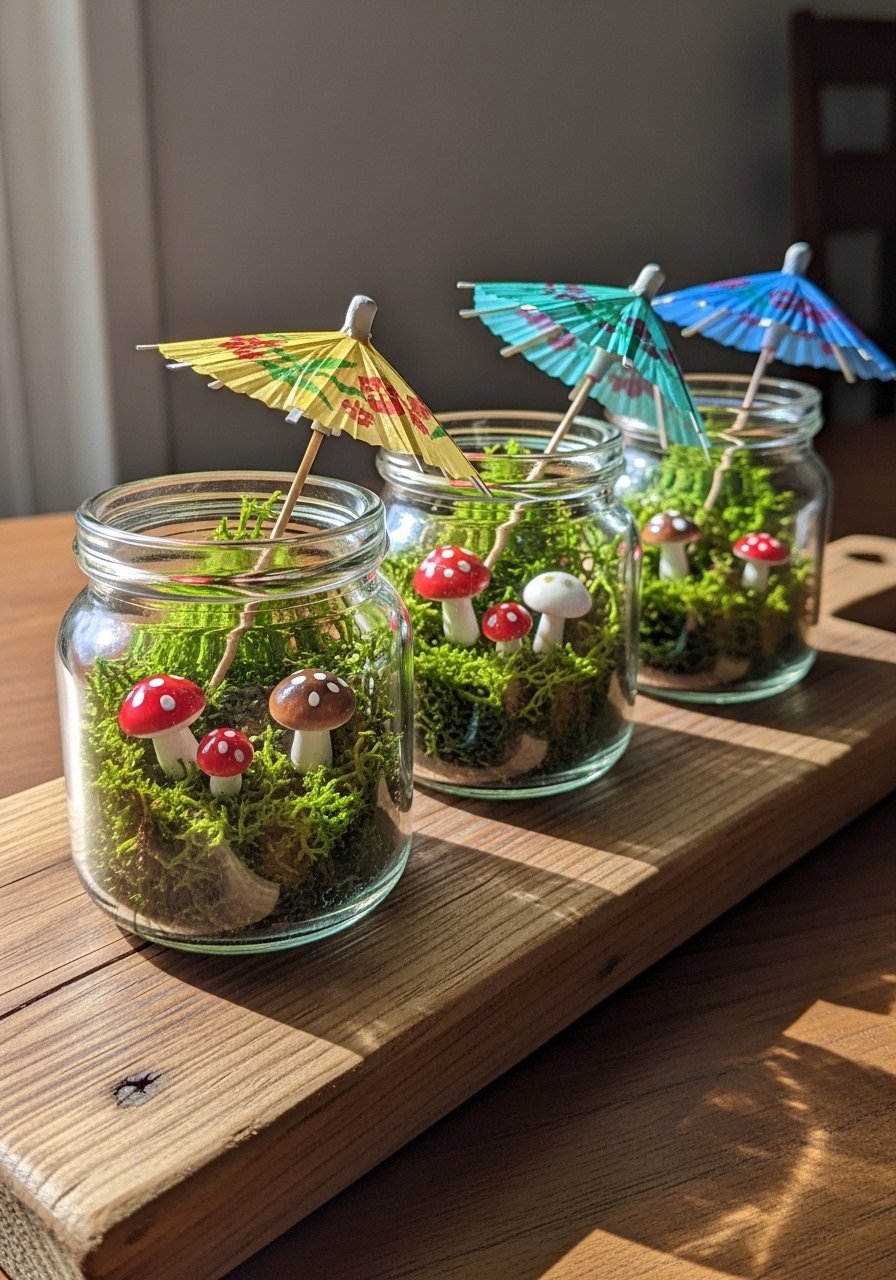
Mini terrariums built with faux moss and tiny finds are perfect for rainy day storytelling. They’re mess-free and child-safe since they use silk moss and small figurines. Kids get to layer textures and create tiny scenes.
Materials
- 3 small glass jars with lids (4–6 oz)
- 1 cup preserved or faux moss
- 3–6 miniature figures (animals, mushrooms)
- Craft glue or hot glue (low-temp)
- Tweezers for placement
- Mini paintbrush for glue application
- Small pebbles 1/4 cup for base
Instructions
- Clean jars and dry thoroughly.
- Add a thin layer of pebbles (about 1/4") to each jar for texture.
- Press in a layer of faux moss to cover the pebbles.
- Arrange mini figures using tweezers; glue in place with a dab of craft glue.
- Replace lids. If gifting, glue lid shut or add a ribbon.
- No drying time required unless using hot glue—cool 2 minutes to set.
- Create a tiny story card to tuck under the lid for imaginative play.
How to Display or Gift It
- Group on a windowsill for a tiny indoor garden.
- Package in a small kraft box with tissue paper for a whimsical gift.
- Store in a shallow organizer between uses to avoid crushed moss—this craft organizer tray works well.
- Rainbow Scratch Art

Scratch art feels like magic—kids reveal bright colors by scratching away a black surface. It’s forgiving and gives crisp, vivid lines. I prefer wooden styluses for control; they feel nice in small hands.
Materials
- 6 sheets 8.5" x 11" heavy cardstock
- Assorted oil pastels (12 colors)
- Black tempera paint mixed with 1 tsp dish soap (for adhesion)
- Foam brush to apply paint
- Wooden stylus tools or a blunt toothpick
- Newspaper to protect work surface
- Spray fixative (optional)
Instructions
- Color the entire cardstock with thick layers of oil pastel. Cover all white areas.
- Apply a thin 2 coats of black paint mixture, letting 15 minutes dry between coats.
- Once paint is fully dry, scratch designs with a wooden stylus to reveal colors underneath.
- If paint cracks, smooth with a foam brush and a light recoat—dry 15 minutes.
- Optionally spray with fixative to prevent smudging (follow spray directions).
- Clean stylus occasionally to prevent color transfer.
How to Display or Gift It
- Frame favorites in small frames for a bright gallery wall.
- Punch a hole and tie with ribbon to make colorful gift tags.
- Store flat in a portfolio folder to protect the painted surface.
- Foil Stamped Raindrop Mobiles
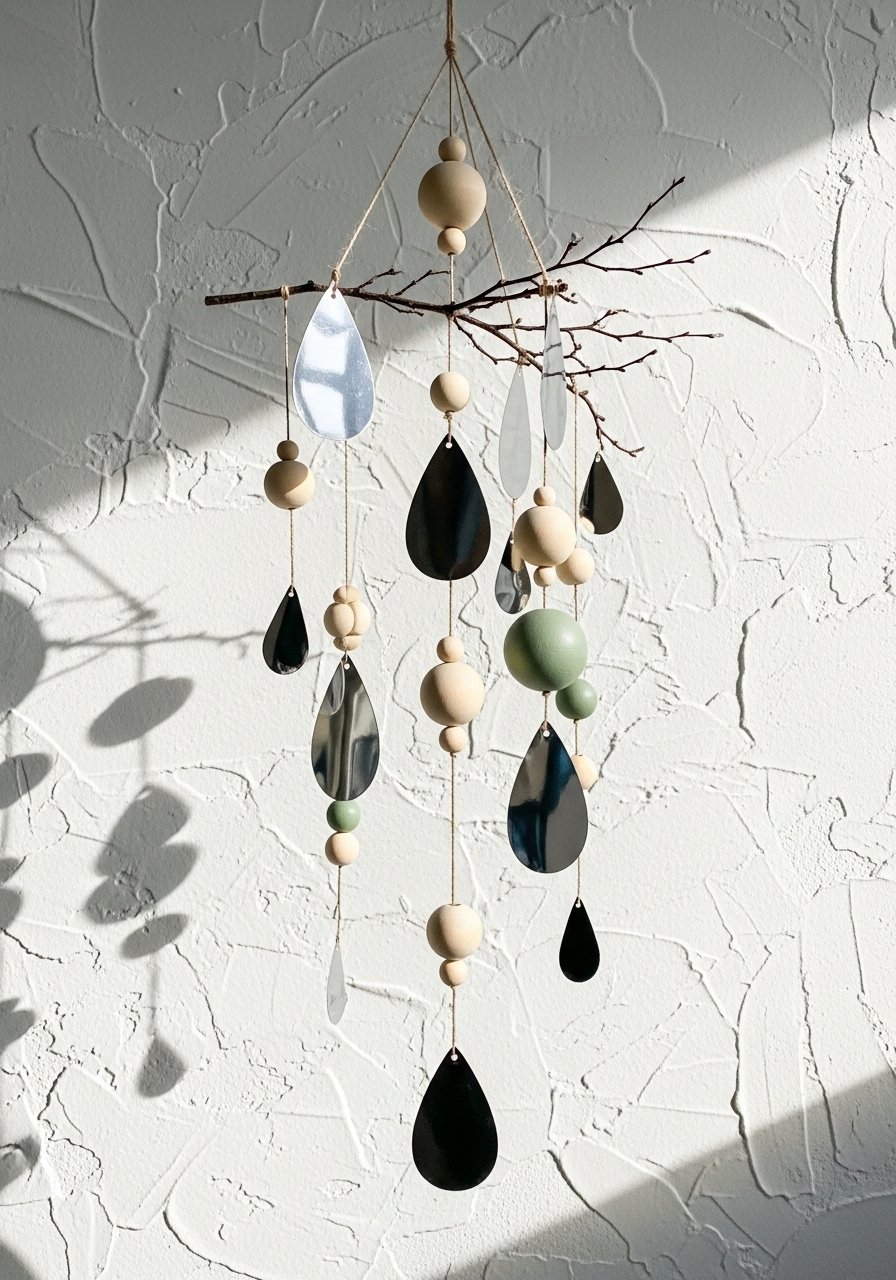
Foil stamping gives a luxe shimmer kids adore. Lightweight cardstock raindrops with metallic foil reflect light beautifully when hung. Using peel-and-stick foil sheets is a kid-friendly way to get that sheen.
Materials
- 1 small natural branch or wooden dowel, 12"
- 20 raindrop shapes cut from heavy cardstock (2" tall)
- 1 roll adhesive foil sheets (silver)
- Natural twine, 1 yard
- Wooden beads, 10 medium
- Hole punch and scissors
- Craft glue or glue stick
Instructions
- Cut raindrop shapes from cardstock and punch a small hole at the top.
- Press adhesive foil onto cardstock and rub firmly with a brayer roller for good transfer.
- Peel backing to reveal metallic sheen. Trim edges.
- Thread twine through drops and add wooden beads between drops for spacing.
- Tie strands to a branch or dowel and balance for even hanging.
- Hang near a window where light catches the foil.
- No significant drying time; allow adhesive to set 10 minutes before display.
How to Display or Gift It
- Hang in a nursery or cozy corner to catch window light.
- Wrap individual raindrops in tissue and put several in a small gift bag.
- Store unused foil sheets in a flat organizer to prevent creasing.
- Felted Rain Boots (Finger-Felted)

Finger-felting wool gives a squishy, cozy feel perfect for small decor boots. This project is a gentle introduction to felting—kids can shape wool into tiny booties and add stitched accents. Use felting needles only with adult supervision.
Materials
- 50 g wool roving (assorted colors)
- 1 set felting needles (assorted gauges)
- Foam felting pad
- Embroidery floss for accents
- Small sewing needle
- Scissors
- Mini stuffing of polyester fiberfill for shape
Instructions
- Pull a small amount of roving and wrap it into a rough boot shape.
- Place on the foam pad and carefully jab with the felting needle to compact fibers. Work slowly and keep fingers clear of the needle.
- Shape heel and toe by adding small roving pieces and felting into place.
- When firm, add a cuff and felt down for definition.
- Stitch decorative lines or dots with embroidery floss.
- Insert a small ball of fiberfill if you want a fuller shape.
- Felt until surface is uniformly compacted—about 20–30 minutes per boot for beginners.
How to Display or Gift It
- Use as a shelf accent or hang as a keychain with a small jump ring.
- Pair with a tiny note card and gift in a small kraft box.
- Store in a drawer or fabric pouch to keep dust off.
- Paper Plate Rain Garden (Collage + Texture)

Paper plate rain gardens are an easy mixed-media collage that combine paint, tissue, and small embellishments. The dish shape reads as a small landscape, and layering textures makes each piece tactile and unique.
Materials
- 6 paper plates (9" diameter)
- Acrylic paints (blues, greens)
- Tissue paper in assorted colors, 10 sheets
- Glue stick and white craft glue
- Assorted pom-poms and sequins, approx 30
- Scissors and paintbrushes
- Small paper cups for mixing paint
Instructions
- Paint the base of each plate with a gradient sky or pond color; dry 20 minutes.
- Tear tissue paper into small pieces. Crumple slightly for texture.
- Apply glue and layer tissue pieces for plants and flowers.
- Add pom-poms and sequins as flower centers—use glue dots for quick adhesion.
- Outline elements with a thin brush and darker paint for depth.
- Let all glue dry 30 minutes before handling.
- Trim any overhang and add a simple hanging hole if you want wall displays.
How to Display or Gift It
- Arrange plates on a wall in a cluster to create a kid’s gallery.
- String plates along a ribbon for a cheerful banner.
- Pack plates flat separated by tissue paper in a shallow box for gifting.
- Puffy-Cloud Bath Bombs (Kid-Friendly)
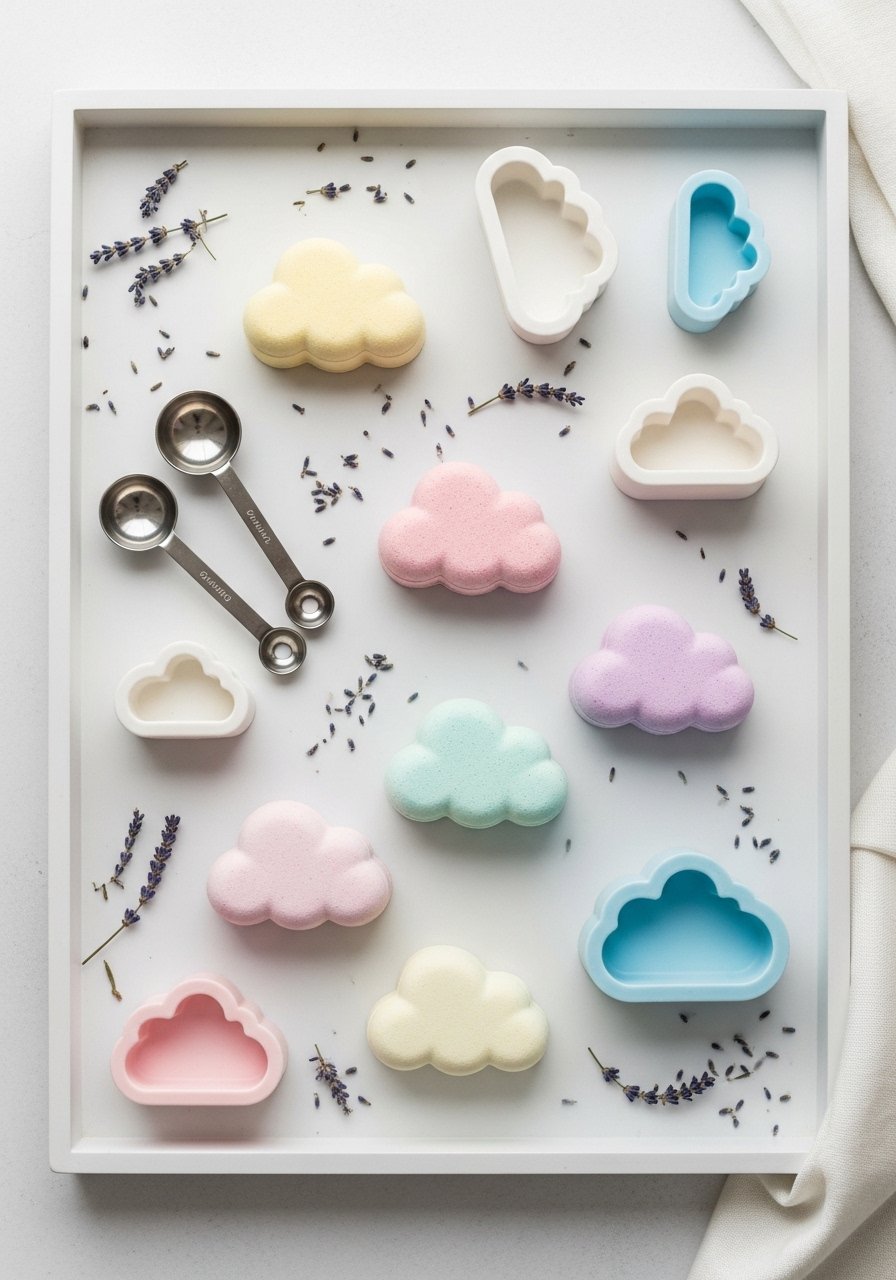
A fizzy bath bomb project makes an end-of-day treat. These kid-friendly bombs use baking soda and citric acid and can be molded into cloud shapes with silicone molds. Let kids decorate with dried flowers before they set.
Materials
- 1 cup baking soda
- 1/2 cup citric acid
- 1/2 cup cornstarch
- 2 tbsp coconut oil, melted
- 1 tsp water and 5 drops essential oil (optional)
- Silicone cloud molds (small)
- Dried lavender or flower petals, 1 tbsp
- Mixing bowl, spoon, and measuring cups
Instructions
- Combine dry ingredients in a bowl and whisk to remove clumps.
- Slowly add melted coconut oil and essential oil, mixing with a fork. Mist with tiny amounts of water if needed—avoid fizzing by keeping moisture minimal.
- Press mixture firmly into silicone cloud molds.
- Sprinkle dried flowers on top and press lightly.
- Let molds sit undisturbed for 24 hours to harden fully.
- Gently unmold clouds and wrap in wax paper if gifting.
- Store in airtight container in a cool, dry place.
How to Display or Gift It
- Package two in a small tin with a note about bath time.
- Store in a craft organizer or small jar to avoid humidity.
- Include a small wooden scoop for a boutique feel.
- Washable Window Stickers (Gel Clings)

Gel clings turn your window into an interactive weather scene. They’re reusable and easy to press on and peel off. Kids can mix colors and create patterns that look luminous against daylight.
Materials
- 1 bottle liquid gelatin or craft gel medium, 8 oz
- Food coloring or liquid watercolors
- Small silicone molds (raindrops, clouds)
- Parchment paper and pipette or squeeze bottle
- Scissors, ruler
- Small jar for storing extra gel
Instructions
- Mix craft gel medium with food coloring to desired tint.
- Pipe into molds using a pipette. Fill to the top and smooth.
- Let dry 12–24 hours until firm but slightly tacky.
- Gently unmold and press onto a clean window; cling will adhere.
- To remove, peel slowly and store on parchment paper.
- Keep unused gel in an airtight jar for touch-ups.
How to Display or Gift It
- Create a themed set for a rainy-season activity kit in a small box.
- Stick on classroom windows for temporary decor.
- Store on parchment in a shallow box to prevent sticking.
- Cardboard City with Rainy Scene
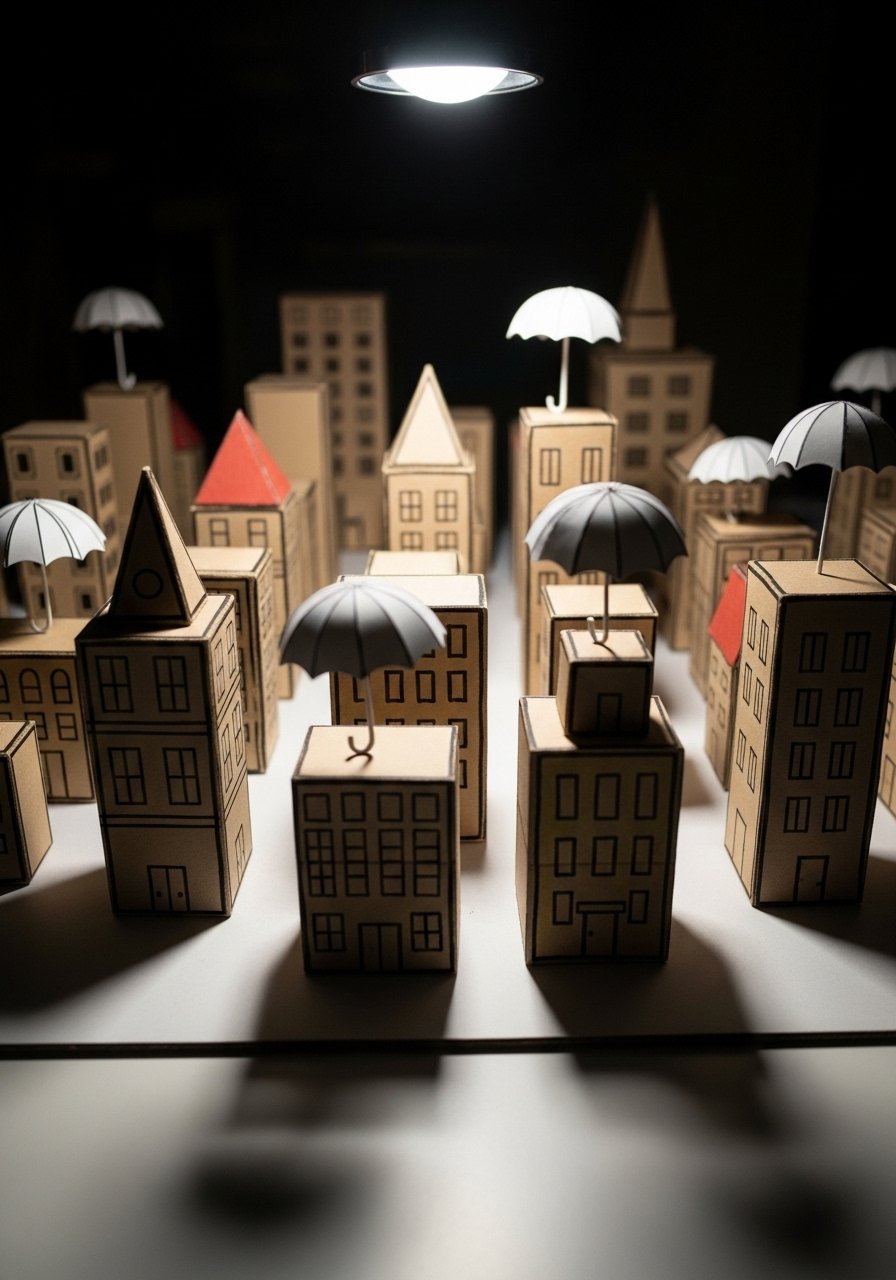
Cardboard cities encourage imaginative play—kids design buildings, add painted puddles, and use small toys for scale. Using a craft knife and cutting mat (adult-supervised) helps achieve clean edges.
Materials
- 1 large cardboard box flattened (e.g., shipping box)
- Acrylic paint (white, gray, colorful accents)
- Craft knife and self-healing cutting mat
- Ruler, pencil
- Painter’s tape
- Small toy figures and cars
- Glue gun or craft glue
Instructions
- Sketch building outlines on cardboard and cut out façades with an adult-supervised craft knife.
- Paint façades in blocks of color; dry 20 minutes between coats.
- Use painter’s tape to mask windows and doors for crisp lines.
- Assemble buildings by gluing tabs into boxes. Reinforce with tape.
- Create puddles with blue paint and gloss Mod Podge for shine—dry 30 minutes.
- Add toy figures and umbrellas to populate the streets.
- Let everything cure 1 hour before heavy play.
How to Display or Gift It
- Use the city as an ongoing play mat—store flat in a large portfolio.
- Gift as a personalized playset in a shallow box with a note.
- Display on a play-table with small lamps for night scenes.
- Marbled Soap Bars (Cold Process Lite)
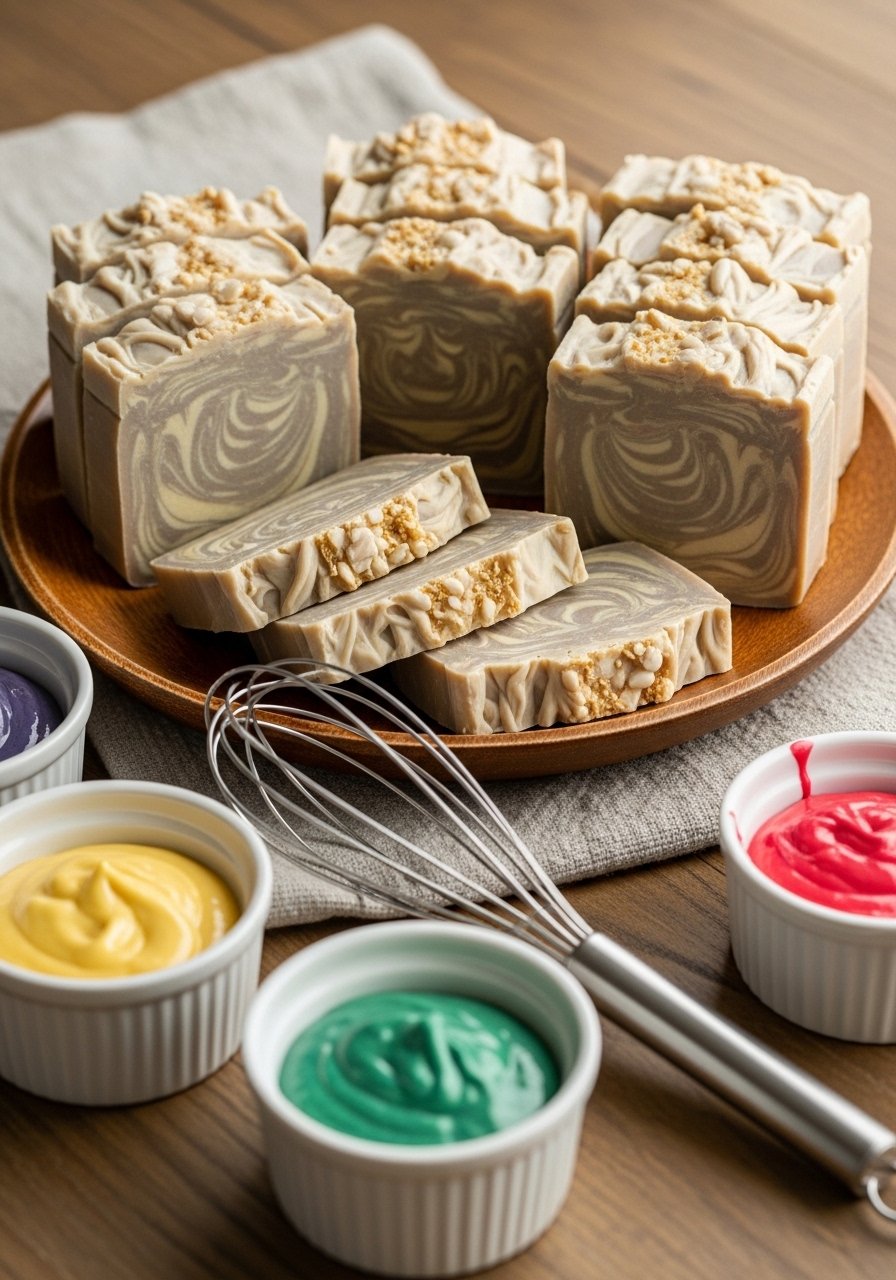
Marbled soap is a bit advanced but kid-friendly if you use a melt-and-pour base. Kids can swirl color into clear base to create pretty raindrop swirls. The bars smell lovely and make great gifts.
Materials
- 2 lb melt-and-pour soap base
- 3 soap-safe colorants (blue, white, pearlescent)
- Soap molds (6 bar mold)
- Heatproof measuring cup and microwave
- Disposable gloves, skewer for swirling
- Essential oils (optional), 1 tsp
- Soap cutter for neat bars
Instructions
- Melt soap base in microwave in 30-second bursts, stirring between.
- Divide into three bowls and tint each with soap colorant.
- Spoon layered colors into the mold and swirl with a skewer for marbled effects.
- Let set 2–4 hours until firm.
- Unmold and slice if using a block mold. Cure isn't necessary with melt-and-pour, but let rest overnight.
- Wrap bars in waxed paper or small boxes.
How to Display or Gift It
- Tie a set of two bars with twine and a sprig of dried lavender.
- Store in a soap box or shallow drawer away from humidity.
- Label with scent notes for gifting.
- Simple Macramé Keychains (Kids Version)
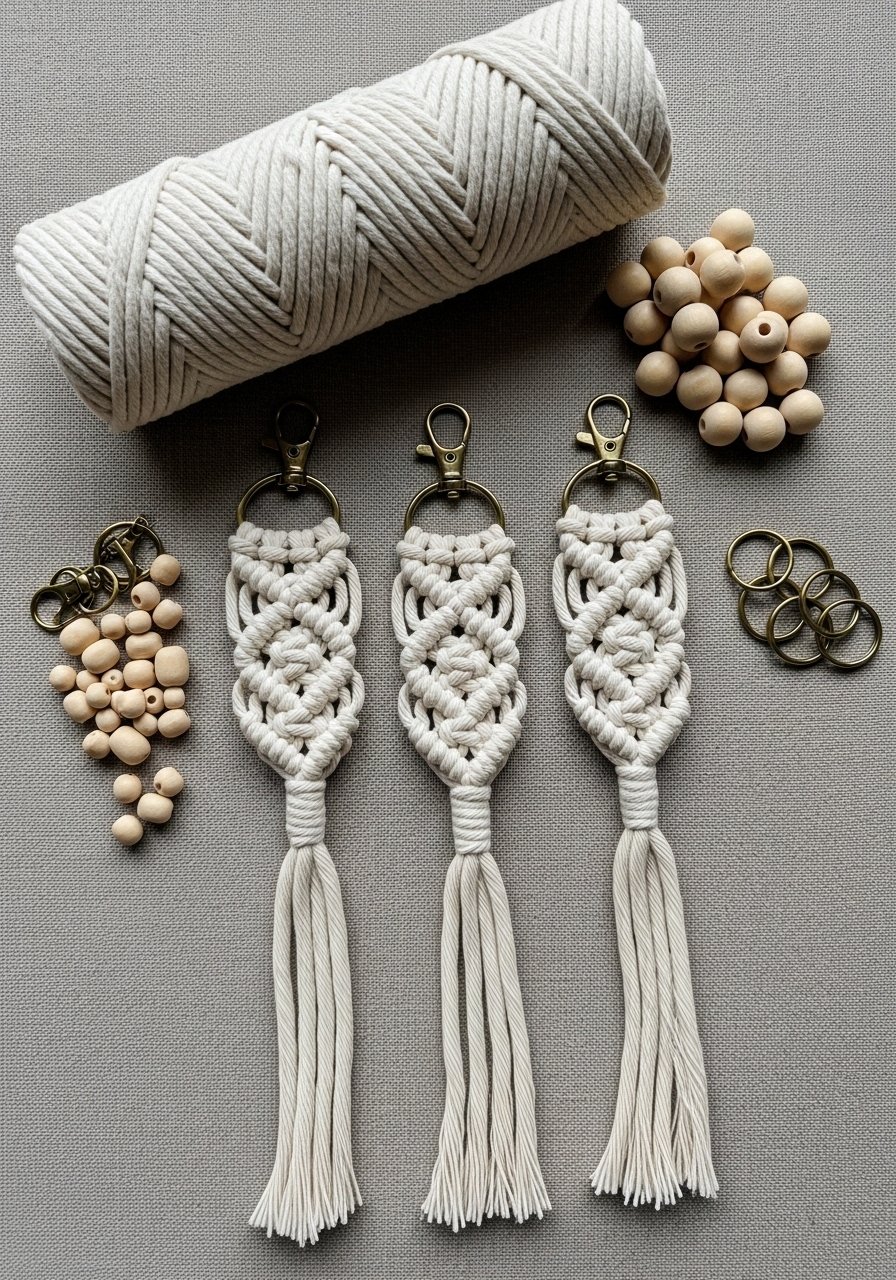
Mini macramé keychains introduce knotting basics using thin cord. They’re quick to make and look nicely textured. Use 3mm single-strand macramé cord for manageable thickness and wooden beads to anchor knots.
Materials
- 3mm single-strand macramé cord, 10 yards
- 5 wooden beads (8 mm)
- 3 metal key rings
- Scissors and a small lighter (to slightly seal ends—adult use)
- Comb to fray ends
- Tape to hold cords while working
Instructions
- Cut cords into 3 pieces x 30 cm for each keychain.
- Fold cords around the key ring and secure with a simple lark’s head knot.
- Tie square knots about 2" down and slide on wooden beads.
- Finish with a tight half-hitch and trim ends to desired length.
- Lightly singe the cut ends with a lighter to prevent fraying (adult step).
- Comb out the fringe for a boho look.
- Repeat for more keychains—15–20 minutes per pair.
How to Display or Gift It
- Attach to a small card and present as a set.
- Store finished keychains on a small hook rack near the door.
- Use a small craft organizer drawer for cords and beads.
- DIY Thunder Drum (Paper Plate)
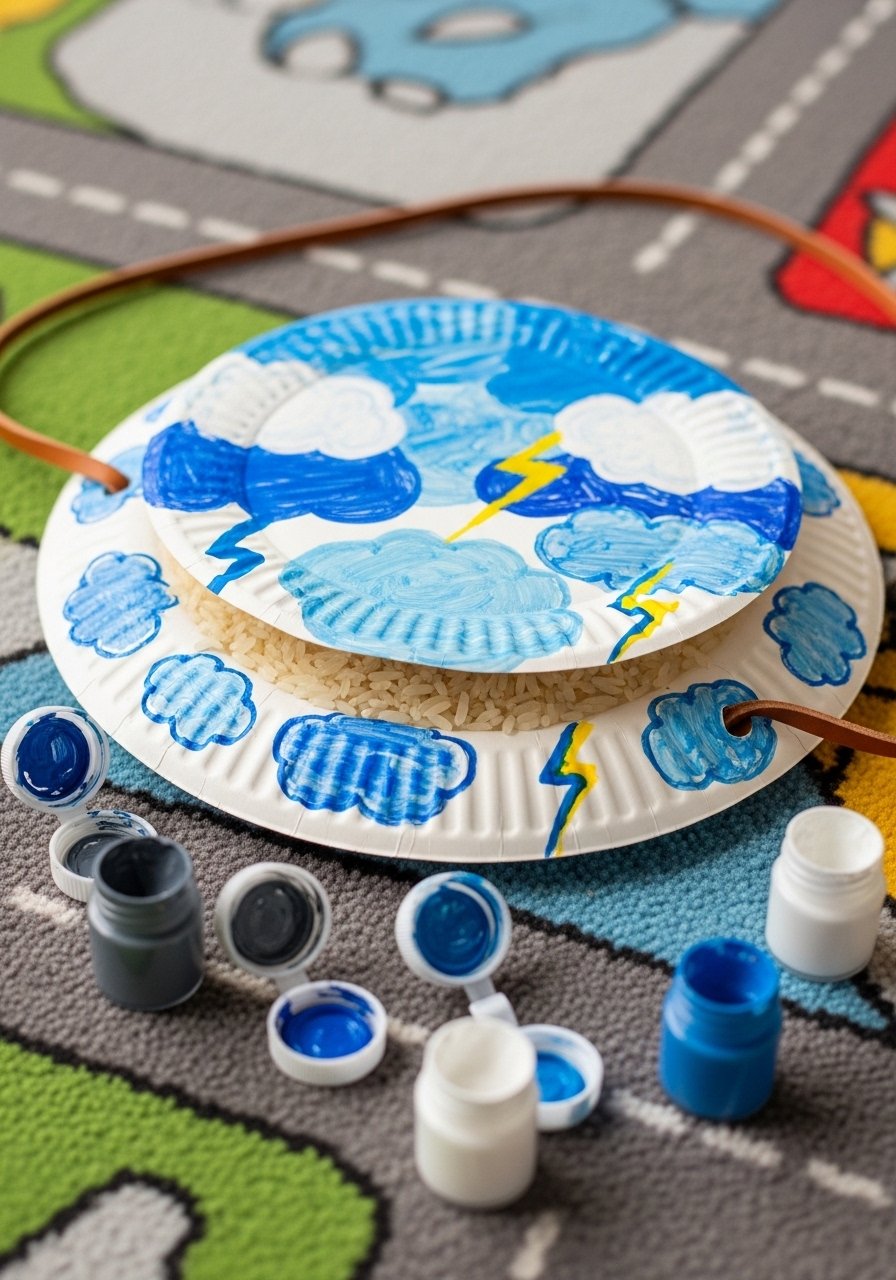
A thunder drum is a fun sound-maker for dramatic play. Using sturdy paper plates and rice produces a gentle rumble. Kids can paint stormy scenes on both sides for drama.
Materials
- 2 sturdy paper plates per drum
- 1/3 cup rice
- Stapler and tape
- Acrylic paint and brushes
- Ribbon or leather strip for a handle
- Hot glue gun (low-temp) for reinforcement
Instructions
- Paint the plates with stormy sky designs and let dry 20 minutes.
- Place rice between the two plates and staple around the edge to seal.
- Reinforce the seam with tape and a bead of hot glue for durability.
- Attach a ribbon handle across the back with hot glue.
- Shake gently to test volume—add more rice for louder rumble.
- Let glue cool 5 minutes before play.
- Store flat to protect the painted surface.
How to Display or Gift It
- Use as a prop for a rainy-day puppet show.
- Package with other music-making crafts as a kit.
- Store in a basket with other small instruments.
- Rainy Day Story Stones
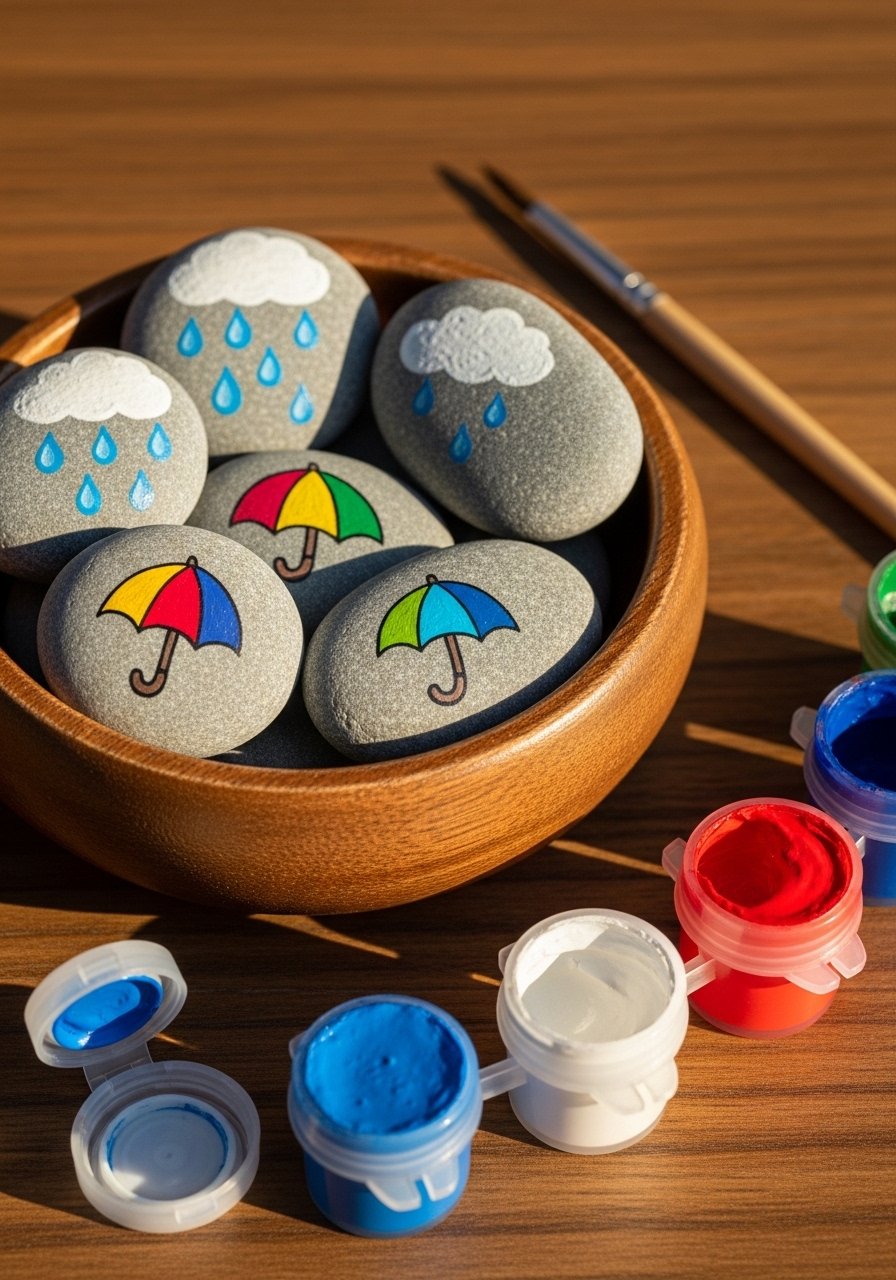
Story stones are tactile prompts for storytelling. Smooth pebbles painted with icons allow kids to create weather-based tales. The paint holds well on primed rocks and becomes a durable play set.
Materials
- 12–20 smooth flat pebbles (2–3" diameter)
- Acrylic paint pens or small brushes with acrylics
- Pencil for sketching
- Matte sealer spray or Mod Podge
- Small wooden bowl for storage
- Paper towel and water cup for cleaning brushes
Instructions
- Wash stones and let dry; prime with a thin coat of white paint if needed.
- Sketch simple weather icons lightly with pencil.
- Paint icons with acrylics or paint pens; let dry 15 minutes between layers.
- Apply 1 coat of matte sealer to protect paint and let dry 10 minutes.
- Use stones to prompt a short story—pick three and weave a tale.
- Store in a wooden bowl when not in use.
How to Display or Gift It
- Wrap a set in a small muslin bag with storytelling prompts.
- Keep in a basket in the play area for quick creative prompts.
- Pair with a small notebook to write stories inspired by the stones.
- Bubble-Painted Rainbows
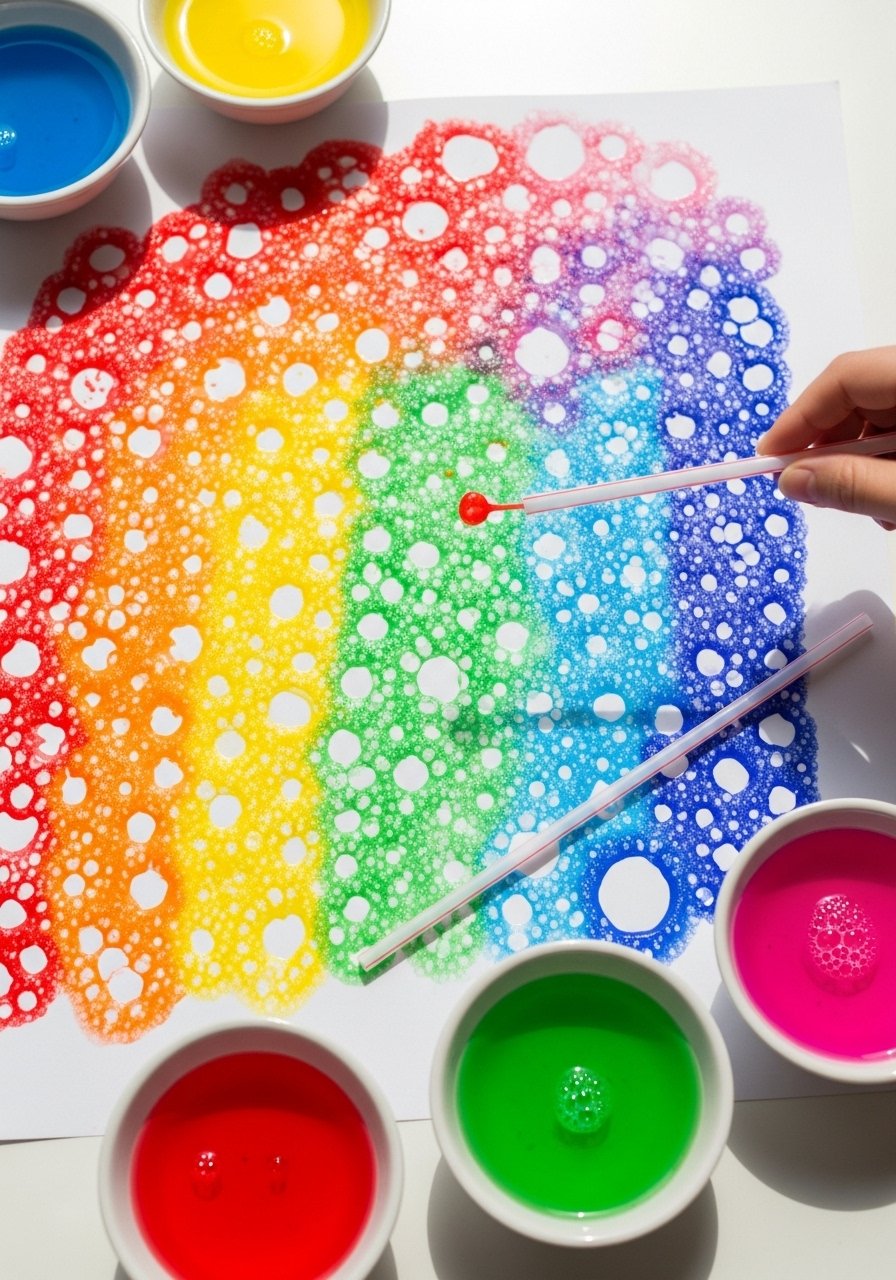
Bubble painting creates dreamy, textured rainbows. It's delightfully messy in a controlled way and yields soft, organic prints. Use washable paint and a tray for easy cleanup.
Materials
- 1/2 cup liquid dish soap
- 1/4 cup water per color
- 2 tbsp acrylic paint per color
- Small bowls for mixing
- Straws
- Large sheet watercolor paper
- Apron and newspaper for protection
Instructions
- Mix dish soap, water, and acrylic paint in bowls—the color becomes visible in bubbles.
- Blow through a straw into the bowl to create a bubble layer.
- Gently press paper onto bubbles to capture the print, rotating for rainbow bands.
- Repeat with other colors, allowing 10 minutes drying between layers.
- Let final artwork dry 30 minutes flat.
- Trim edges and display.
How to Display or Gift It
- Frame a single sheet for a pop of color in a kid’s room.
- Make sets of notecards from trimmed pieces for gifting.
- Store flat in a portfolio until mounting.
- Rainy Day Suncatchers (Tissue + Glue)
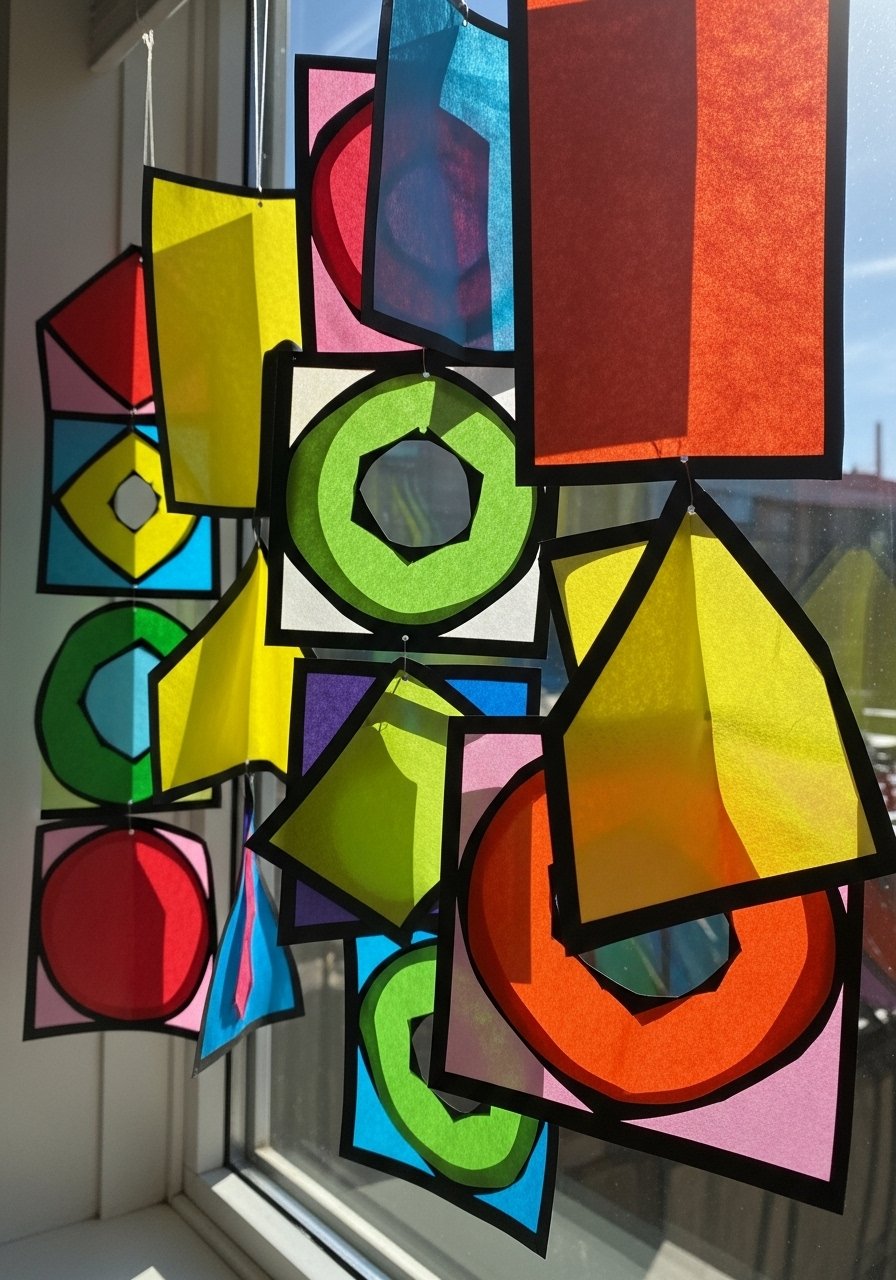
Tissue suncatchers are luminous and easy. The translucent layers look like stained glass when the sun hits them. Kids can cut shapes and glue them within a blackout frame for crisp silhouettes.
Materials
- Black cardstock, 8.5" x 11"
- Assorted tissue paper sheets (10 colors)
- White craft glue, thinned with water (1:1)
- Foam brush
- Scissors and craft punches
- Clear suction cups or string for hanging
Instructions
- Cut black cardstock into frames and cut out a central shape.
- Tear tissue paper into small pieces and apply a thin glue wash to the center with a foam brush.
- Layer tissue pieces until the center is covered.
- Let glue dry 20 minutes and trim edges.
- Hang in a sunny window with suction or string.
- Replace tissue if faded after a season.
How to Display or Gift It
- Mix sizes and hang as a colorful window cluster.
- Gift as a sun-themed craft set in a flat box.
- Store flat in a folder to protect delicate tissue.
- Storybook Rainy Day Puppets (Socks)
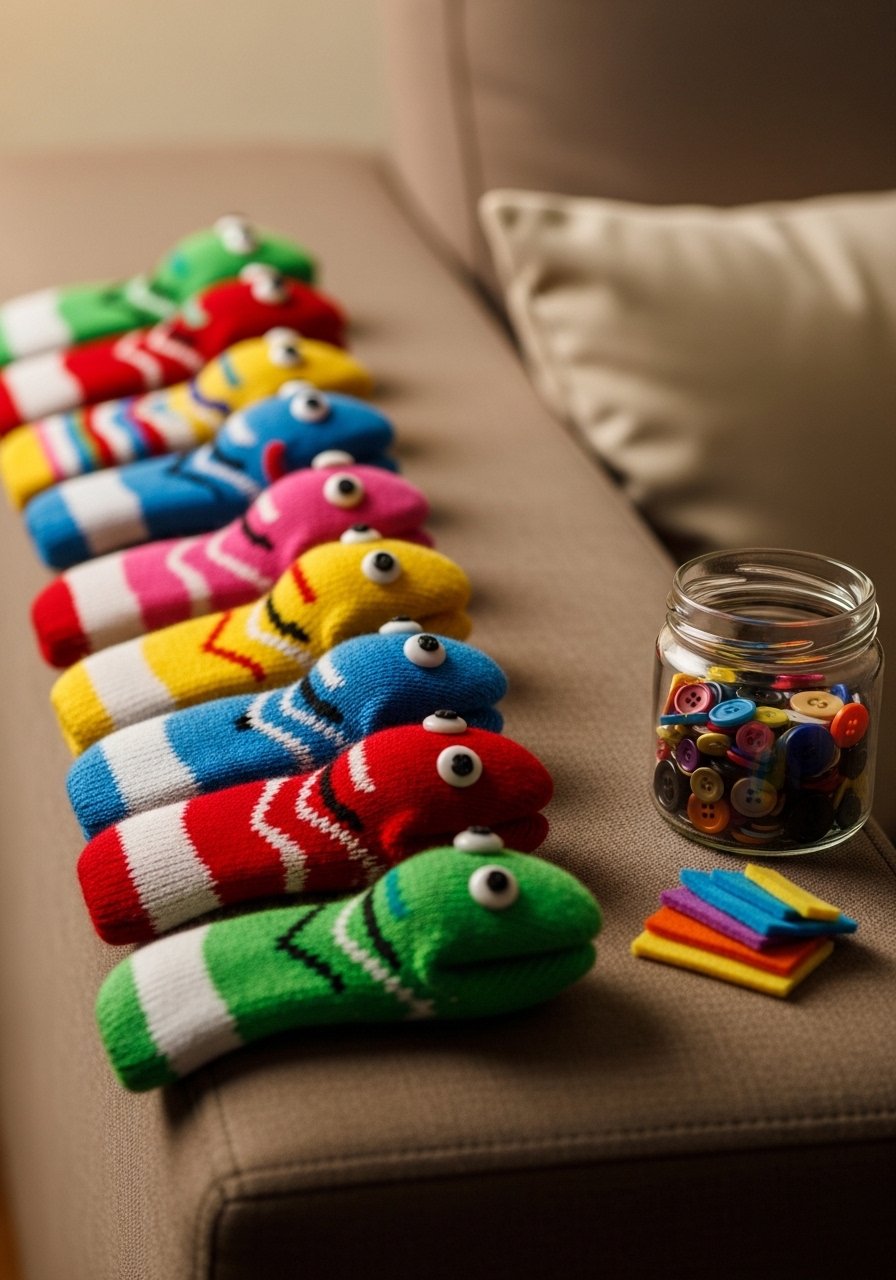
Sock puppets are classic and endlessly customizable. Felt pieces glued or sewn on create expressive faces. They’re great for collaborative storytelling and puppet theater.
Materials
- 4 clean socks (cotton)
- Felt sheets assorted colors
- Hot glue gun (low-temp) or fabric glue
- Buttons for eyes (or felt eyes for safety)
- Embroidery floss for mouth detailing
- Scissors, needle (optional)
Instructions
- Fit the sock over your hand to plan face placement.
- Cut felt shapes for eyes, tongue, and hair.
- Glue or sew pieces to the sock. Use felt eyes if safety is a concern with younger kids.
- Add button details if appropriate, securing well with glue.
- Embroider simple mouths with floss for expression.
- Let glue cool 5 minutes before play.
- Create small props, like paper umbrellas, to enhance storytelling.
How to Display or Gift It
- Store puppets on a low shelf near a homemade puppet stage.
- Gift as a set tied with ribbon and a mini script for a show.
- Keep a labeled bin for puppet accessories.
- Rainy Day Mosaic Coasters (Paper + Glue)
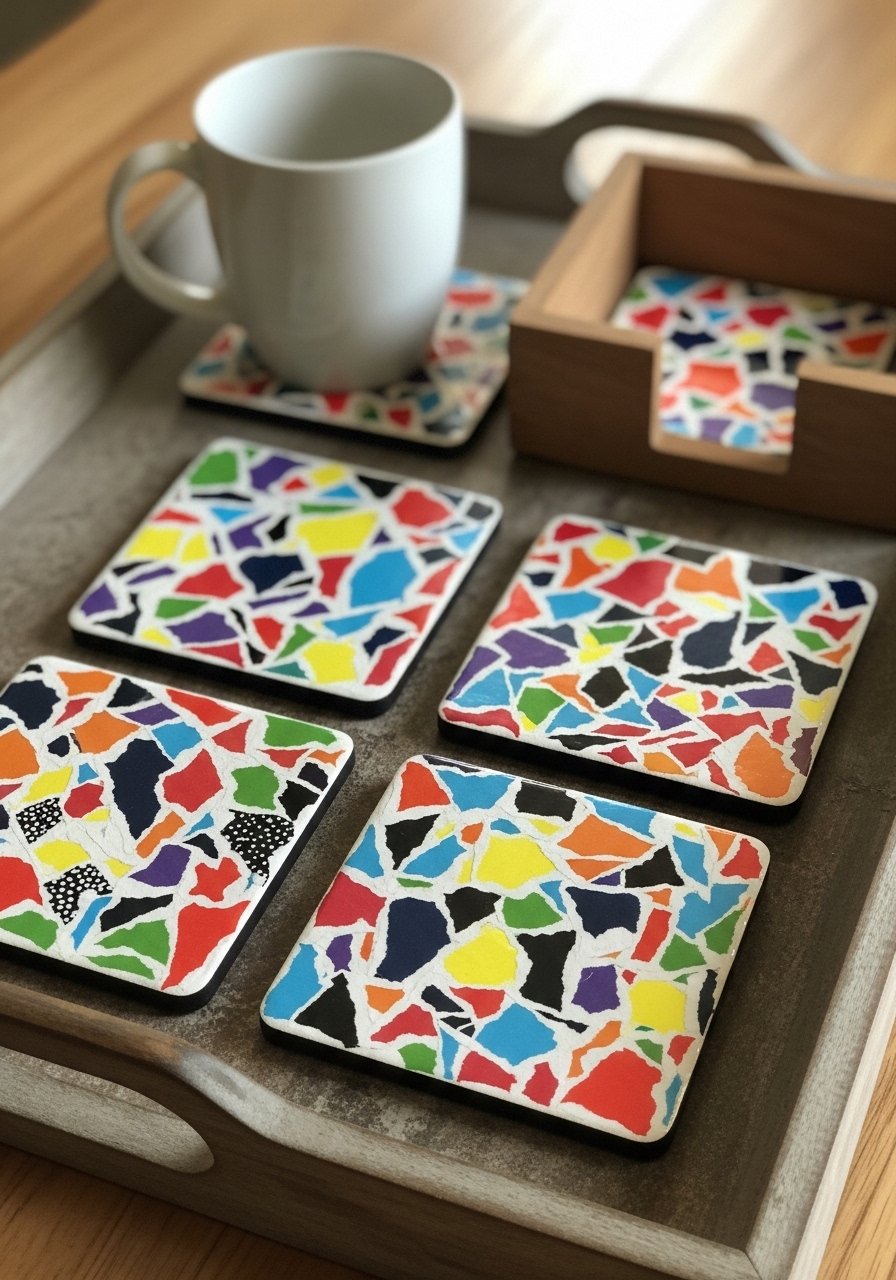
Paper mosaic coasters are a lightweight, easy introduction to mosaic techniques. Kids tear paper into tiny pieces and glue them into patterns. Finish with two coats of gloss Mod Podge for spill protection.
Materials
- 4 square cork coasters (4" x 4")
- Assorted colored paper scraps (magazines, scrapbook)
- White craft glue
- Foam brush
- Gloss Mod Podge (2 coats)
- Scissors and a tray to catch scraps
Instructions
- Tear paper into small pieces and arrange into a design on a coaster without glue first.
- Apply a thin coat of glue on the coaster and press pieces down.
- Cover the whole surface then brush another thin glue coat on top.
- Let dry 20 minutes, then apply 2 coats of gloss Mod Podge, drying 15 minutes between coats.
- Edge sand lightly if paper overhangs.
- Let cure 24 hours before using with liquids.
- Repeat for each coaster.
How to Display or Gift It
- Stack coasters with a ribbon for a usable handmade gift.
- Store coasters flat in a small coaster holder.
- Pair with a matching mug for a rainy-day tea gift.
- Origami Rainy Day Bookmarks
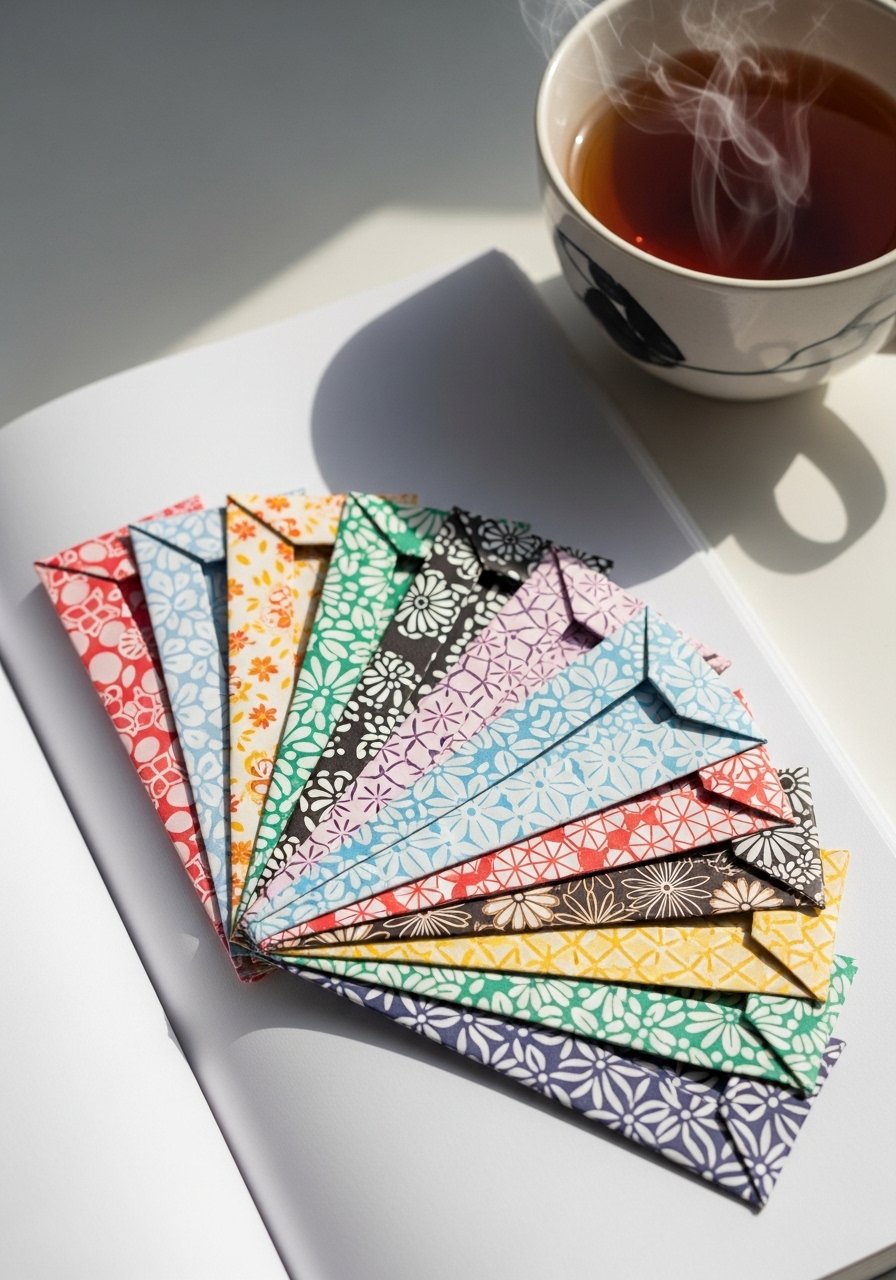
Origami bookmarks are fast, functional, and satisfyingly geometric. Using patterned paper makes them look designer. They’re great for encouraging reading on a rainy afternoon.
Materials
- 24 sheets origami paper (6" x 6")
- Markers or gel pens for faces/accents
- Washi tape for reinforcement (optional)
- Bone folder for crisp folds
- Scissors (for trimming)
- Small envelope for gifting sets
Instructions
- Fold a classic corner bookmark: fold paper in half diagonally, fold corners to center, tuck flap to form pocket.
- Decorate with markers or add washi tape accents.
- Use a bone folder to crisp edges for a neat finish.
- Make sets of 4 in matching color schemes.
- No drying time—instant use.
- Store in a small envelope to keep corners crisp.
How to Display or Gift It
- Bundle four in a kraft envelope with a handwritten note.
- Attach to a new paperback book for a thoughtful gift.
- Keep a small jar on your desk for easy access.
- Raindrop String Art (Kid Version)
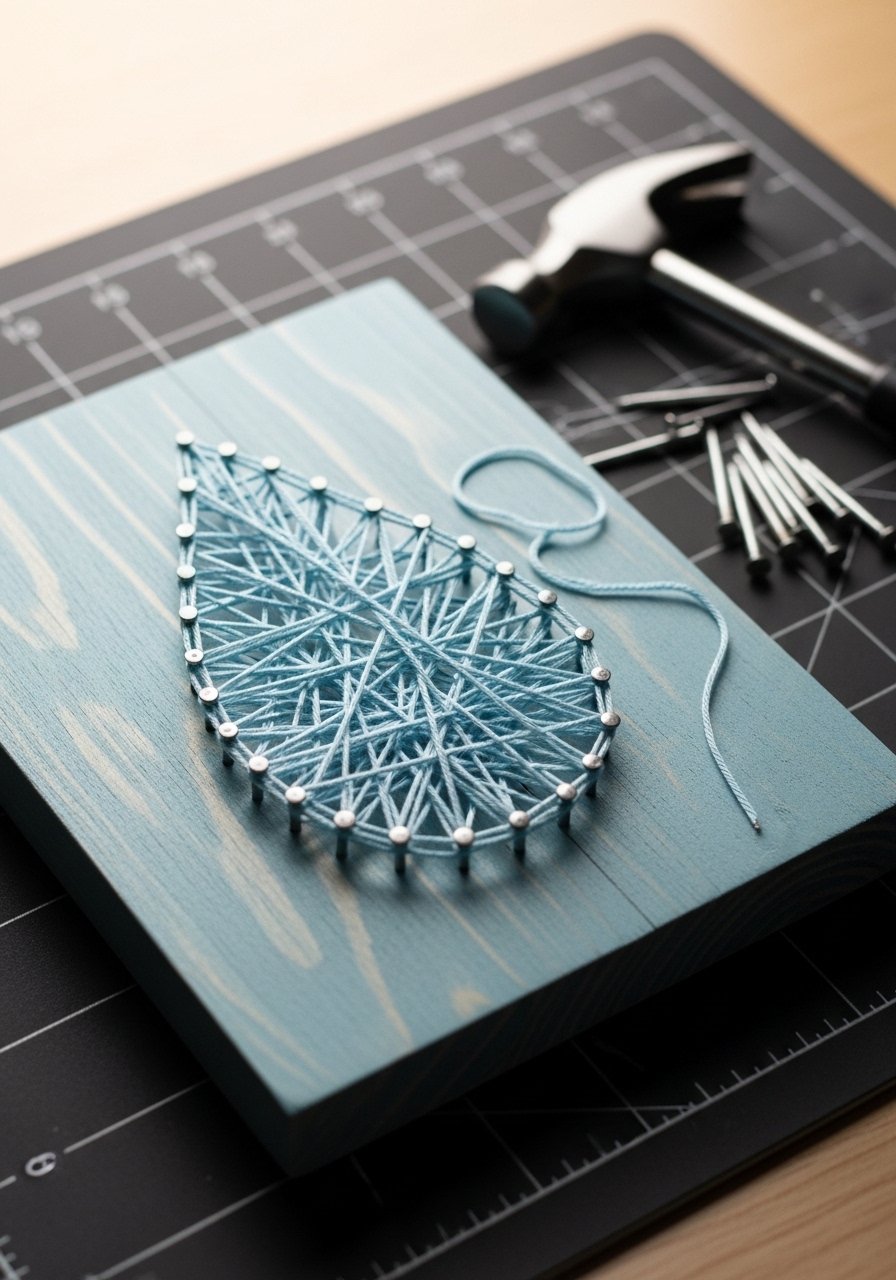
String art gives kids a controlled form of hammering and threading. Using a lightweight foam board and blunt nails keeps it safe. The result is a modern, geometric raindrop that looks great on a shelf.
Materials
- 1 wooden plaque or foam board, 6" x 6"
- Small nails (20) or pushpins (adult hammering)
- Embroidery floss in 3 shades of blue
- Pencil and ruler
- Small hammer (adult)
- Tape to hold floss ends
Instructions
- Draw a raindrop outline and mark points along the edge every 1/2".
- With adult help, tap nails into marked points so heads are flush—do not fully sink.
- Tie floss to one nail and weave across to other nails in a star pattern.
- Change colors to create an ombre effect.
- Tie off ends and tuck under nearby stitches; secure with a dab of glue if needed.
- Trim excess floss for a tidy back.
- Display once all glue is dry 10 minutes.
How to Display or Gift It
- Stand on a small wooden easel or hang with a ribbon.
- Pair with other minimalist craft pieces for gallery grouping.
- Store extra floss and nails in a small craft organizer for future projects.
Rainy days don’t have to be dull—these 23 craft ideas for kids rainy day cover quick wins, tactile projects, and keepsakes that children actually enjoy making. Try one project alone or mix a few into a mini craft festival on the living room floor. Save or pin this list for the next rainy afternoon, and share your favorite finished pieces with friends.
If you want one tool that helps across almost every project, consider a reliable low-temp hot glue gun. It cuts dry time on many crafts and tames small messes when used carefully.
Which project will you try first this rainy week?


