You love a room that feels thoughtfully styled, even when square footage is limited. These 21 projects are perfect if you're hunting for aesthetic room decor DIY for small spaces that add personality without crowding the floor. Each idea is compact, budget-friendly, and tuned for modern trends like boho, cottagecore, japandi, and minimalist farmhouse.
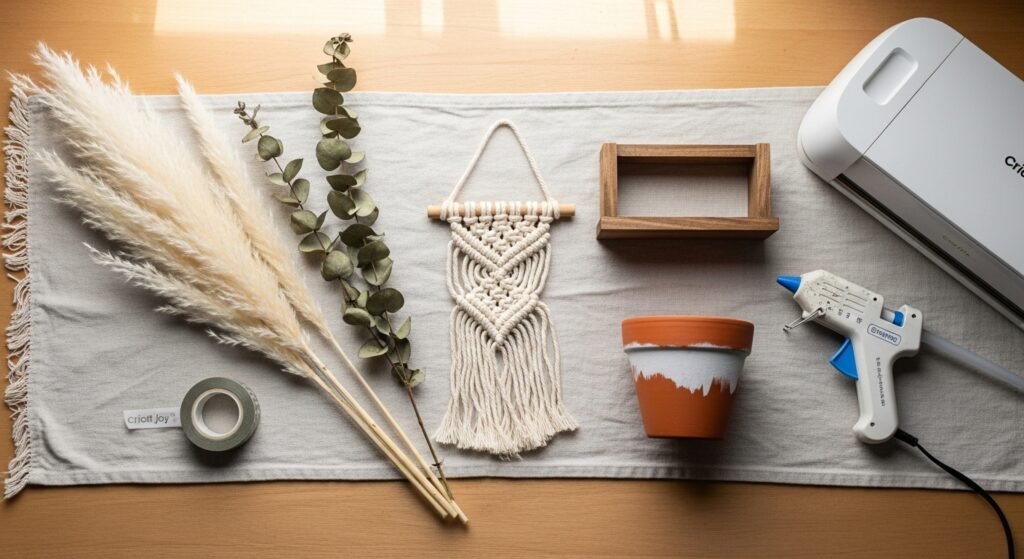
You'll find projects that use simple tools like a hot glue gun and a precision craft knife, plus a few ones where a Cricut or small cutting machine speeds things up. I run vinyl through my Cricut Joy cutting machine for stickers and tiny labels, and a temperature-control hot glue gun keeps edges neat on fabric projects. Each project includes exact materials, times, and tips so you can finish without fuss.
These projects focus on aesthetic room decor DIY for small spaces—wall, corner, and shelf-friendly designs that create impact in tiny apartments, dorm rooms, or cozy spare rooms. Pin your favorites, gather a few supplies, and let’s make every single corner count.
- Mini Macramé Shelf Hammock
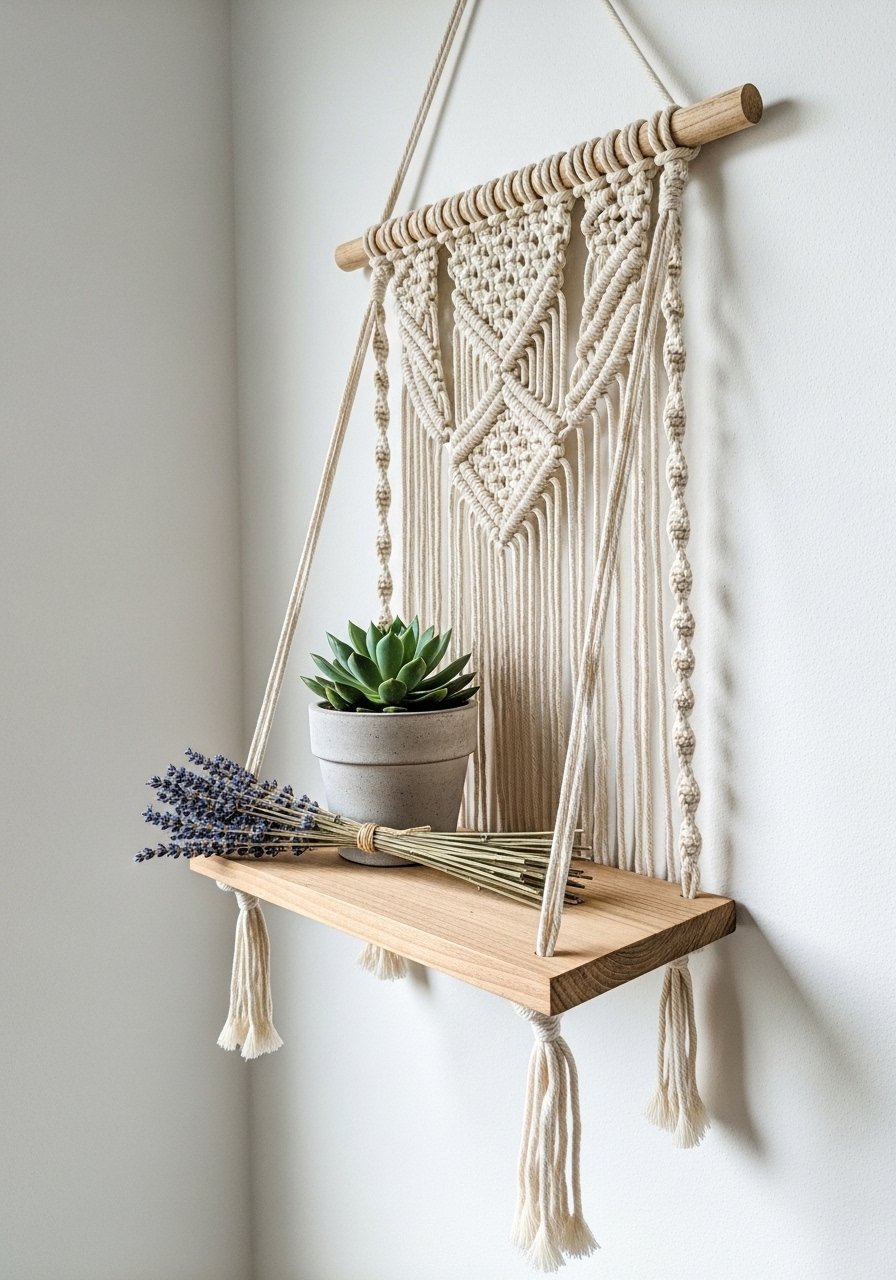
This mini macramé shelf hammock adds texture without taking floor space. It feels soft and boho, with a slight japandi restraint thanks to the simple wooden shelf. Great for plants, ceramics, or a tiny stack of books. If you're new to knots, a small wooden dowel makes anchoring easier.
Materials
- 3mm single-strand macramé cord, 10 yards (cut into four 2.5 yd lengths)
- Small wooden shelf blank (6" x 4"), sanded smooth
- Wooden dowel or branch, 12" long
- Scissors
- Tape measure
- Pencil
- Hot glue sticks, 6–10
- Small wall anchor and screw (for drywall)
Instructions
- Cut four 2.5 yd cords; fold each in half to create eight working strands.
- Attach each looped cord to the dowel using lark's head knots. Space evenly across the 12" dowel.
- Pair strands and tie square knots 6" down from the dowel to form pockets for the shelf.
- Repeat a second row of square knots 3" below the first for stability.
- Measure and tie a gathering knot at the center about 1" below the lower row.
- Slide the wooden shelf onto the knots. Use small dabs of hot glue under the shelf edges to hold it in place.
- Trim cord tails to 1–2" and use a lighter quickly at tips to prevent fraying (for synthetic cord only).
- Hang dowel on a drywall anchor rated for 10+ lbs and test with weight.
How to Display or Gift It
- Hang above a nightstand for a bedside plant or candle (battery-powered candles only).
- Add a small dried-sprig bundle tied with twine for a cottagecore finish.
- Wrap in tissue and tuck into a kraft box for a charming handmade gift.
- Store extra cord in a divided craft organizer like the small craft organizer trays.
- Washi Tape Accent Wall Strips
This one is fast, removable, and perfect for renters. Washi tape gives crisp color without commitment. You’ll get that minimal boho stripe look in under an hour, and the strips are easy to tweak if you change your color story.
Materials
- Assorted washi tape rolls (3 colors), 10mm–15mm width
- Painter's tape (for layout)
- Ruler or level (24")
- Pencil
- Scissors
- Cleaning cloth and mild rubbing alcohol
- Small wooden shelf or picture ledge (optional)
Instructions
- Clean the wall with rubbing alcohol and let it dry 10 minutes.
- Measure the area; mark top and bottom guide dots every 12" with pencil.
- Use a level to draw faint vertical guide lines (erase later).
- Apply painter's tape to protect edges if you want crisp borders.
- Place washi tape from top to bottom along guides, smoothing with a brayer or finger to avoid bubbles.
- Overlap tape slightly at joins. Trim ends with a precision craft knife for clean corners.
- Remove painter's tape immediately for best lines.
- Smooth again and press edges firmly—washi lasts months but is removable.
How to Display or Gift It
- Pair with a small floating ledge and a succulents trio.
- For gifting, roll coordinating washi with a ribbon and include a little instruction card.
- Store leftover rolls in a clear mason jar for visibility; try mason jars.
- Tiny Gallery Ledge with Mini Prints

A narrow gallery ledge creates instant personality without nail-heavy installations. Perfect for rotation: small prints, postcards, or pressed botanicals. Use a craft knife for matting or a Cricut for perfectly sized vinyl labels.
Materials
- Narrow wooden ledge, 24" long x 2" deep
- Three mini frames (4"x6")
- Picture-hanging screws (2) and anchors
- Sandpaper (120 grit)
- Stain or chalk paint, 1 oz sample
- Foam brush
- Level
- Small adhesive felt pads
Instructions
- Sand the ledge lightly and apply one thin coat of stain or chalk paint. Dry 30–60 minutes.
- Mark wall for studs or use anchors; mount ledge level with screws.
- Insert mini prints into frames. Use a self-healing cutting mat and precision craft knife to trim mats to 4"x6" if needed.
- Arrange frames on ledge leaving small gaps; use felt pads to keep frames from sliding.
- Refresh paint with a second thin coat if coverage isn't opaque; allow 24 hours full cure before heavy use.
How to Display or Gift It
- Rotate prints seasonally or theme-by-theme (travel, botanical, type).
- Display with a tiny ceramic bud vase tucked behind a frame.
- For gifting, mount a print and wrap the ledge with kraft paper and twine.
- Upcycled Sweater Throw Pillow
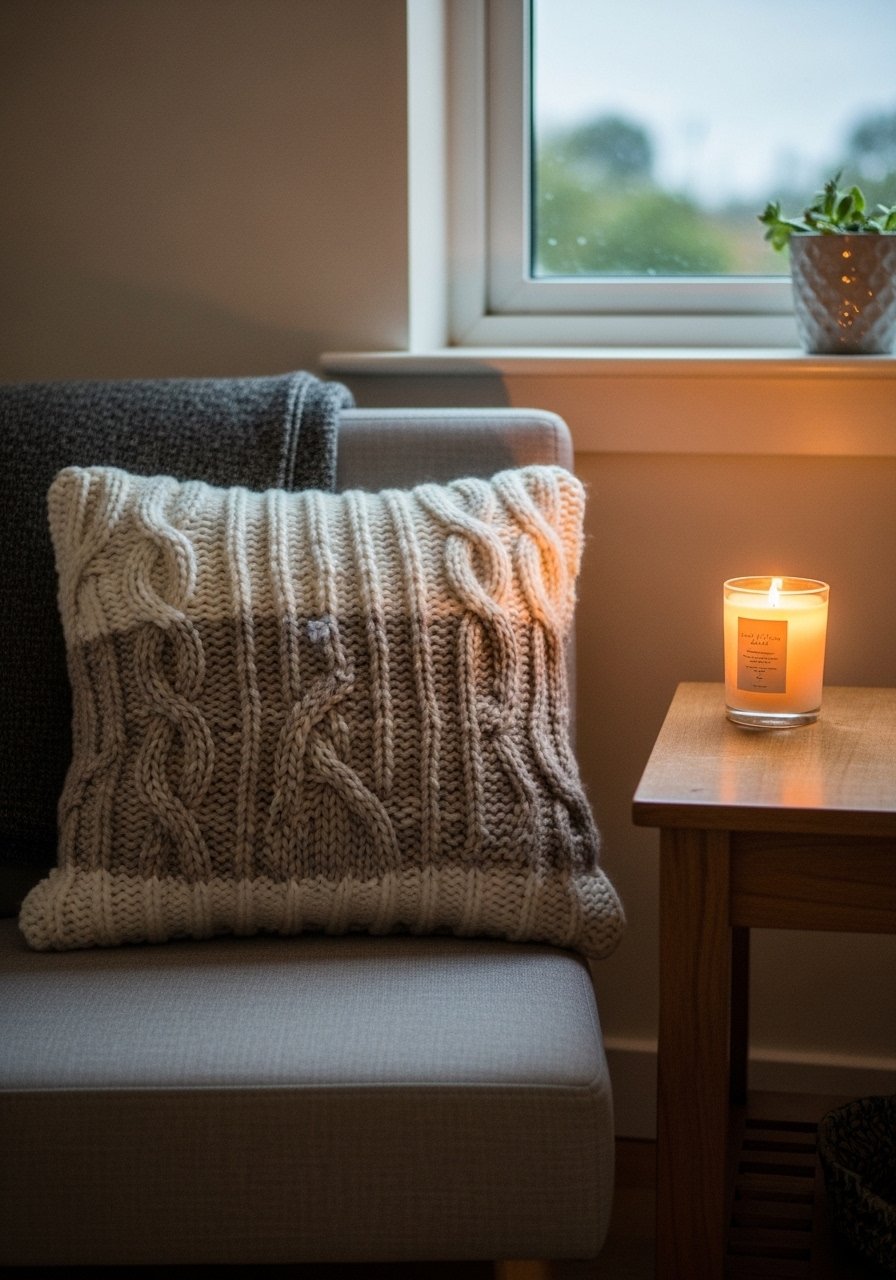
Turn an old knit into a tactile pillow with minimal sewing. The chunky texture feels warm and fits snug in small reading nooks. A sewing needle helps, but a glue alternative works for zero-sew versions.
Materials
- Unwanted wool or acrylic sweater (adult size)
- Pillow insert, 12"x16" or 16"x16"
- Sharp fabric scissors
- Hand-sewing needle and thread (or fabric glue)
- Pins
- Seam ripper (if removing seams)
Instructions
- Cut sweater across body to create a rectangle slightly larger than your insert—+1" seam allowance.
- Pin right sides together and sew three sides with ¼" seam. If zero-sew, use fabric glue in a thin bead, clamping for 30 minutes and letting cure 24 hours.
- Turn right-side out and insert the pillow.
- Hand-sew the final seam closed with small ladder stitches and knot securely.
- Steam lightly to settle fibers (avoid wool that will felt).
How to Display or Gift It
- Use as a lumbar pillow on a small sofa or chair.
- Pair with a neutral throw and a wooden tray for a cozy corner vignette.
- Package in a kraft box and tuck a sachet of dried lavender inside for gifting.
- Mini Terracotta Painting: Ombre Plant Pots
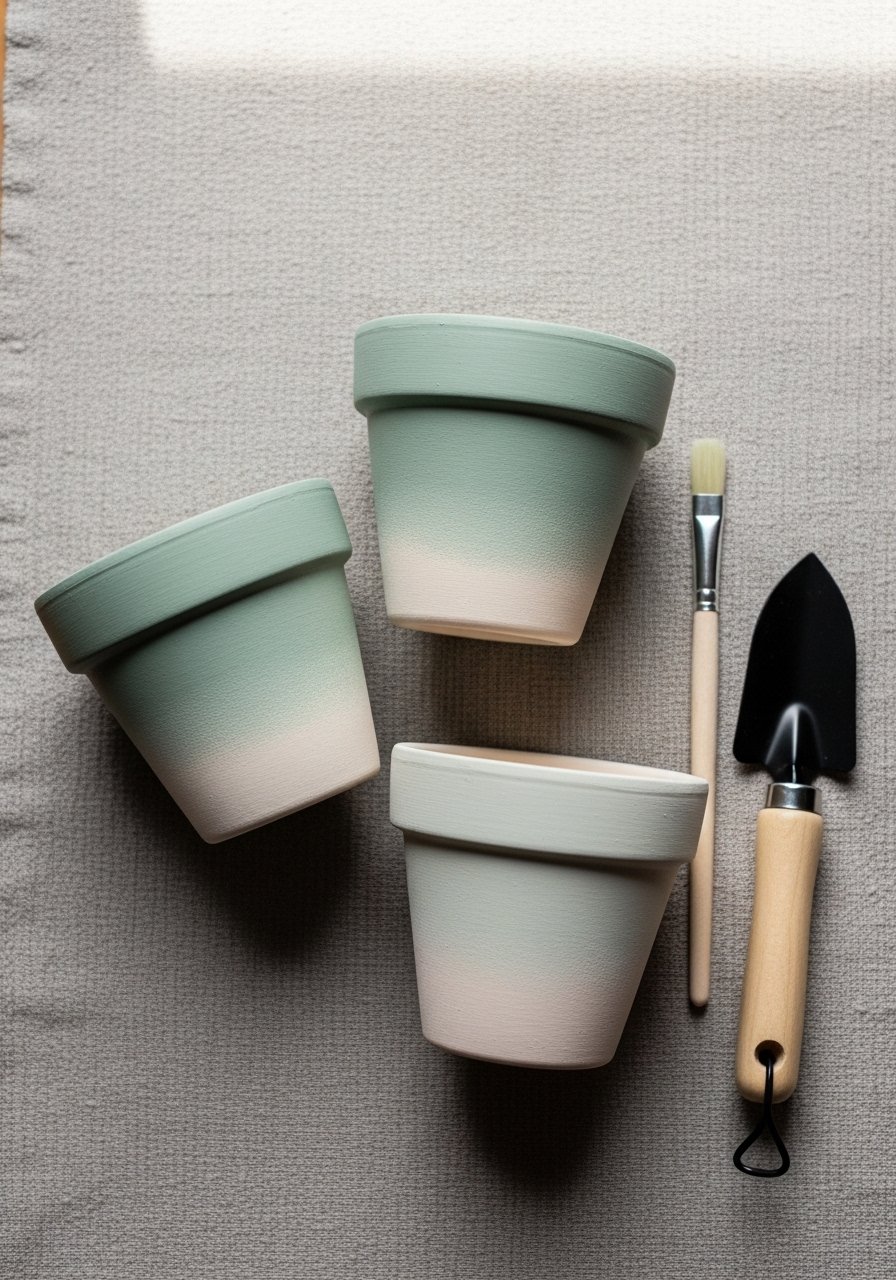
Small painted pots bring color and texture to narrow windowsills. Ombre is forgiving; you can blend with a damp brush for a soft finish. Acrylic craft paints dry fast, so you'll have plants potted same day.
Materials
- Terracotta pots, 3.5" diameter x 3
- Acrylic craft paint set (earth tones)
- Flat foam brush, 1"
- Small round detail brush
- Painter's tape (optional)
- Clear matte sealer (spray or brush-on)
- Potting soil and small succulent or cactus
Instructions
- Clean pots and let air dry 10 minutes.
- Paint base coat in the lightest color; let dry 20–30 minutes.
- Use a foam brush to apply a mid-tone 60% up the pot, blending with the lighter coat while still wet.
- Add the darkest tone near the rim and blend down slightly. Acrylic should be touch dry in 30 minutes; allow 24 hours for full cure.
- Seal with one thin coat of clear matte sealer; dry 1–2 hours between coats.
- Add drainage pebbles, potting soil, and plant.
How to Display or Gift It
- Group on a narrow windowsill or stack on a tiny tiered tray.
- Pair with a small wooden plant riser for height contrast.
- For gifting, nest pots inside a bakery box with tissue and a care note.
- Mini Resin Tray for Trinkets
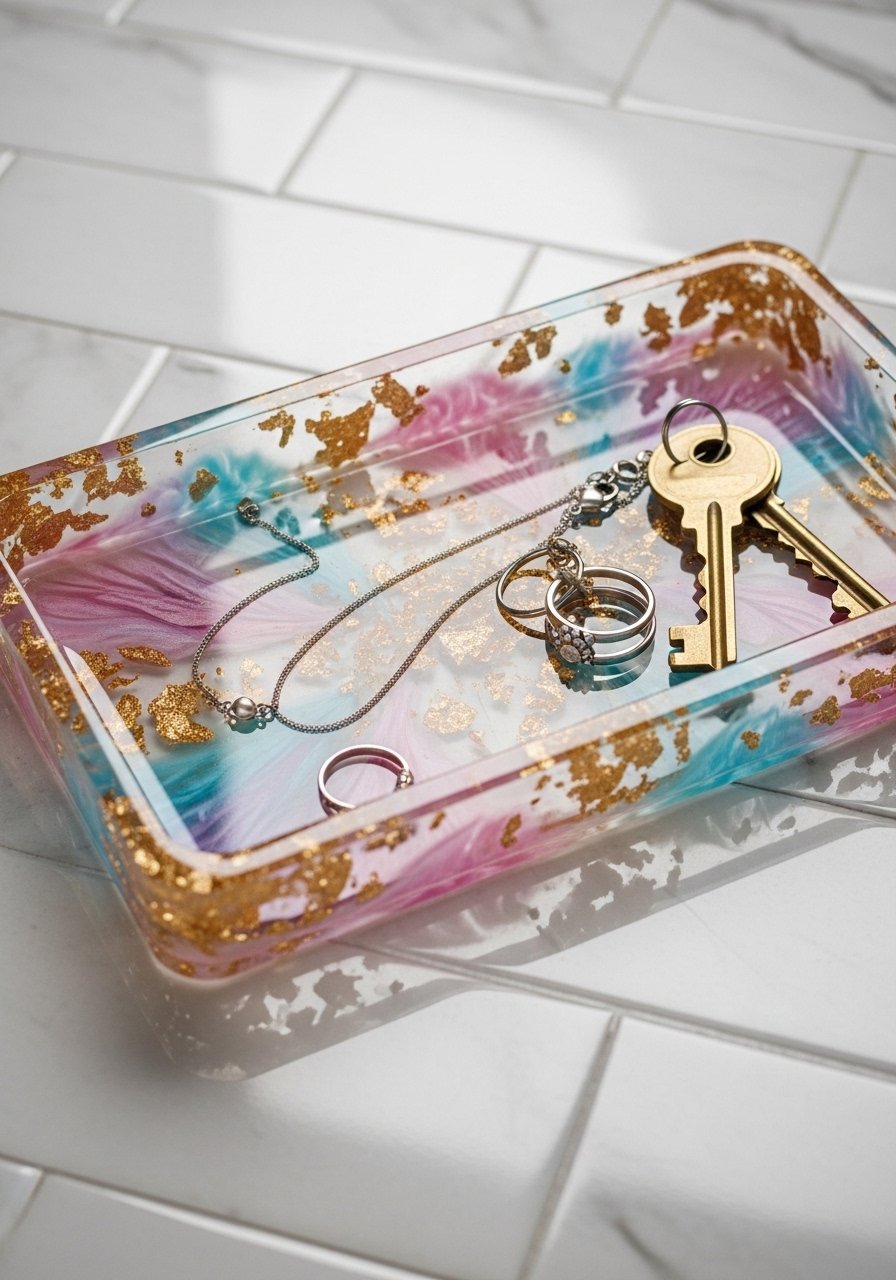
Epoxy resin yields glossy, small trays that catch jewelry and keys. Use petite molds for easy mixing and minimal waste. Measure resin carefully and allow full cure for best results.
Materials
- Epoxy resin kit, small (2 oz resin + 2 oz hardener)
- Silicone tray mold, 4" x 6"
- Mixing cups and wooden stir sticks
- Pigment powders or alcohol inks
- Gold leaf flakes (optional)
- Nitrile gloves
- Heat gun (optional) to pop bubbles
Instructions
- Mix resin and hardener 1:1 by volume—2 oz each—stir for 3 minutes scraping sides.
- Pour a thin base layer (approx 2 mm) into mold and let rest 5–10 minutes.
- Add pigments or inks and a second pour. Use wooden stick to create swirls.
- Sprinkle gold leaf; remove bubbles with a heat gun held 6–8” away for 5–10 seconds.
- Cover to protect from dust and cure undisturbed 24–48 hours (full hardness in 72 hours).
- Demold and sand edges with fine grit sandpaper if needed.
How to Display or Gift It
- Place on a narrow dresser or entry ledge for small items like rings and keys.
- Wrap in tissue with a ribbon for a thoughtful, handmade present.
- Store trays flat in a stackable craft organizer to avoid warping.
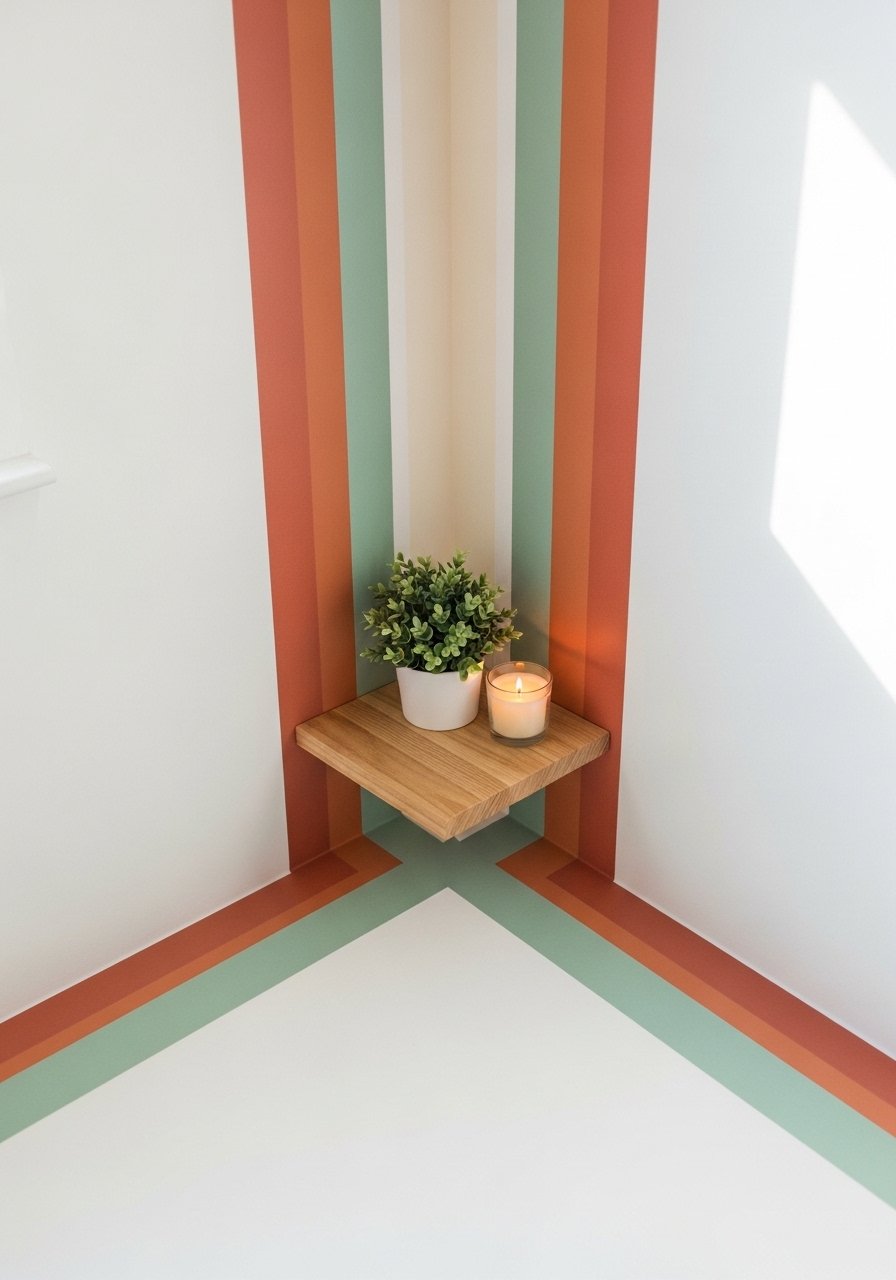
- Floating Corner Plant Shelf (aesthetic room decor DIY for small spaces)
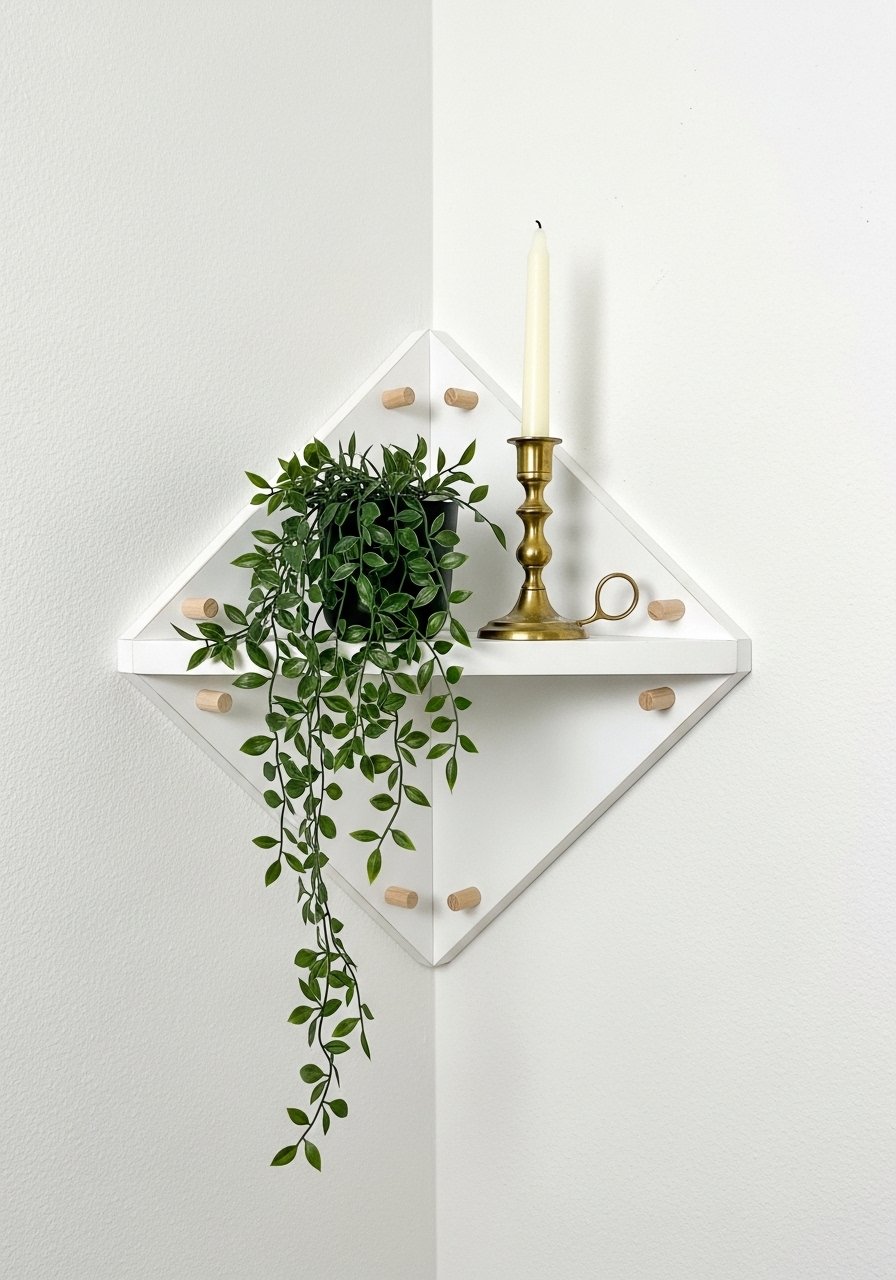
This triangular floating shelf fits awkward corners to bring greenery up and out of the way. It fits small plants and decor without making the room feel cluttered. A drill and corner bracket make the install secure.
Materials
- Pine triangle shelf, 10" sides
- Corner mounting bracket set (2)
- Small drill and 1/8" drill bit
- Wall anchors for drywall rated 15+ lbs
- Sandpaper and wax finish (1 oz)
- Felt pads
- Small potted trailing plant (4" pot)
Instructions
- Sand and wax the shelf; let wax cure 30 minutes.
- Mark bracket positions on wall; pre-drill with 1/8" bit and insert anchors.
- Screw bracket to wall, then slide shelf onto bracket.
- Test weight with a small book before adding plants.
- Attach felt pads under the shelf to prevent scuffing.
How to Display or Gift It
- Style with a trailing plant and a tiny ceramic bud vase.
- For gifting, include a small care card and wrap the shelf in kraft paper.
- Use a small wooden easel to display if gifting; check small wooden easels.
- Vintage Lace Lamp Shade Makeover
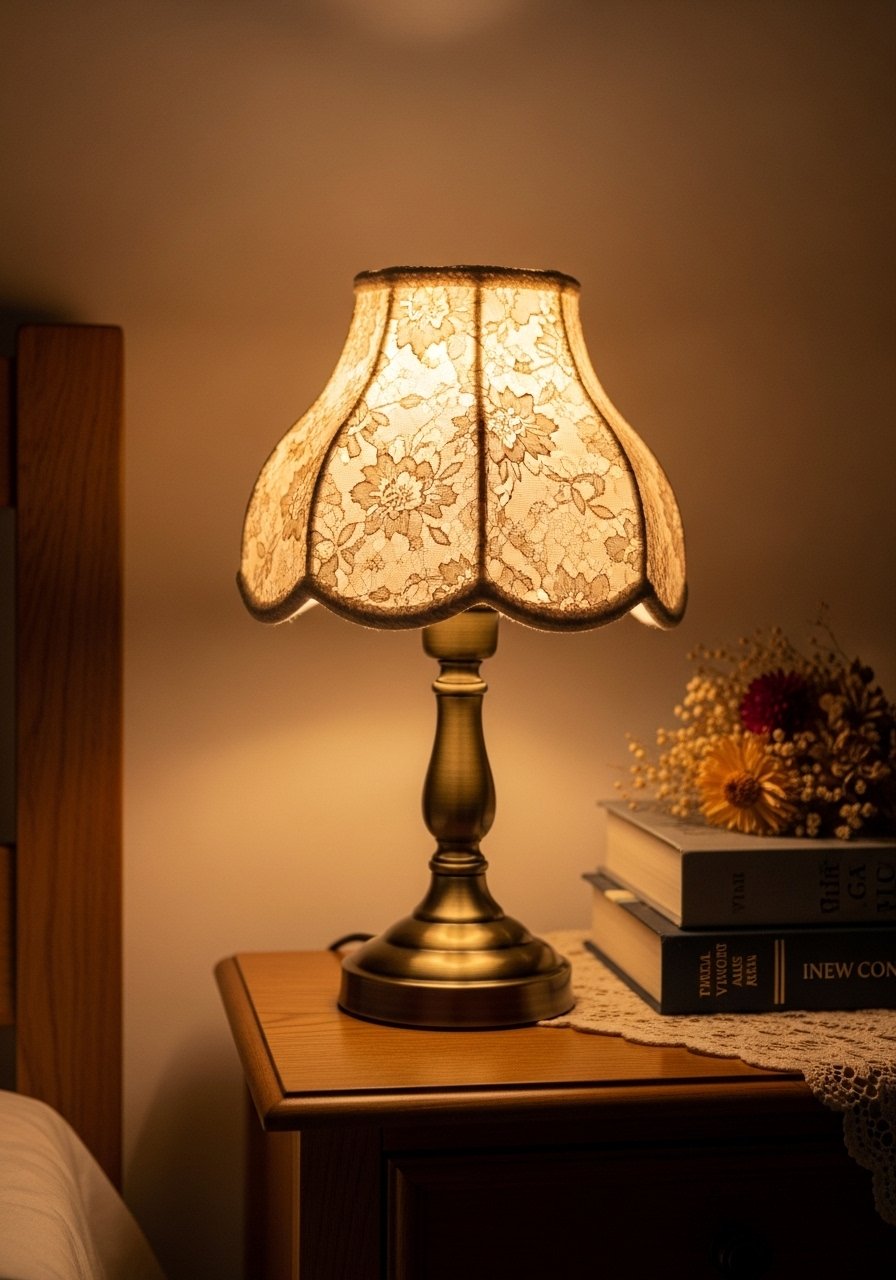
Transform a dated shade with lace overlay for a soft, cottagecore glow. This adds texture and diffuses light beautifully. A spray adhesive keeps the lace flat and neat.
Materials
- Small lamp shade (drum or empire), 6"-8" diameter
- Lace fabric, 12" x 12"
- Spray adhesive (fabric-safe)
- Scissors
- Trim or ribbon ½" for finishing edge
- Needle and thread for small tacks (optional)
Instructions
- Measure the shade and cut a lace rectangle allowing 1" overlap on ends.
- Spray a thin, even coat of adhesive on the outer shade surface.
- Wrap lace smoothly, pressing out wrinkles. Trim overlap so edges meet neatly.
- Glue or hand-stitch the seam for extra security.
- Attach ribbon trim to top or bottom edge with hot glue for a finished look.
- Let adhesive cure 24 hours before using lamp.
How to Display or Gift It
- Pair with a warm LED bulb for soft ambient light.
- Wrap the lamp base in a scarf and tuck the shade into a kraft box for gifting.
- Store spare trims and lace in a fabric organizer box.
- Cork Tile Accent for Tiny Nooks
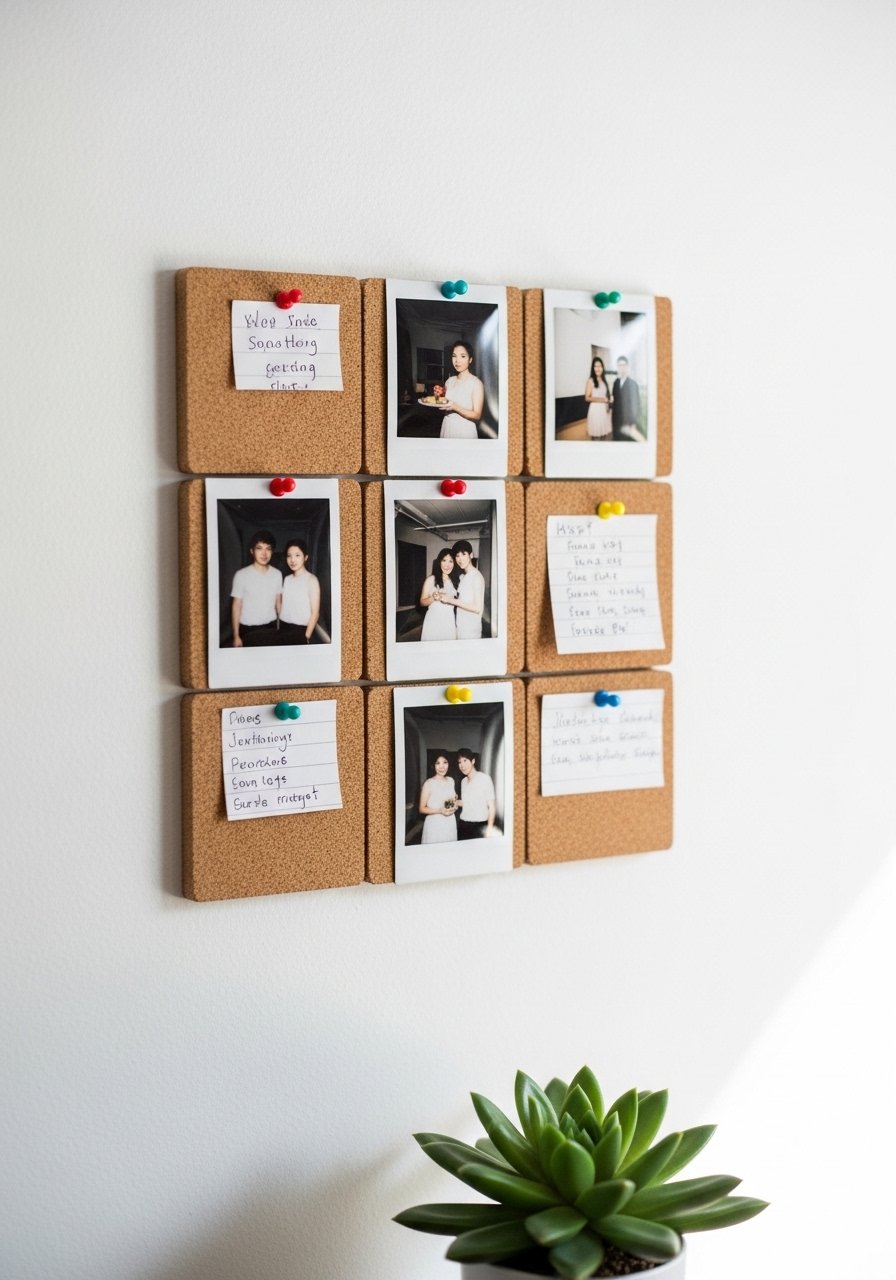
Cork tiles let you create a pin-worthy corner that’s both functional and warm. Use a glue suitable for cork and test adhesion on your wall surface first.
Materials
- Cork tiles, 3" x 3" or 6" x 6" (9 tiles)
- Mounting adhesive for cork
- Level and ruler
- Pencil
- Small push pins or brass tacks
Instructions
- Lay out tile pattern on the floor to settle spacing.
- Mark wall grid with faint pencil.
- Apply mounting adhesive per manufacturer's instructions to back of tile.
- Press tile to wall for 30 seconds; hold each edge for firm contact.
- Repeat until grid is complete. Let adhesive set 24 hours before pinning.
- Pin mementos and tiny prints to personalize.
How to Display or Gift It
- Use as a backdrop for a charging station or key drop.
- Gift as a mounted board with a starter kit of pins and mini prints.
- Store spare tiles flat in a craft organizer.
- Tiny Textile Wall Pocket Organizer
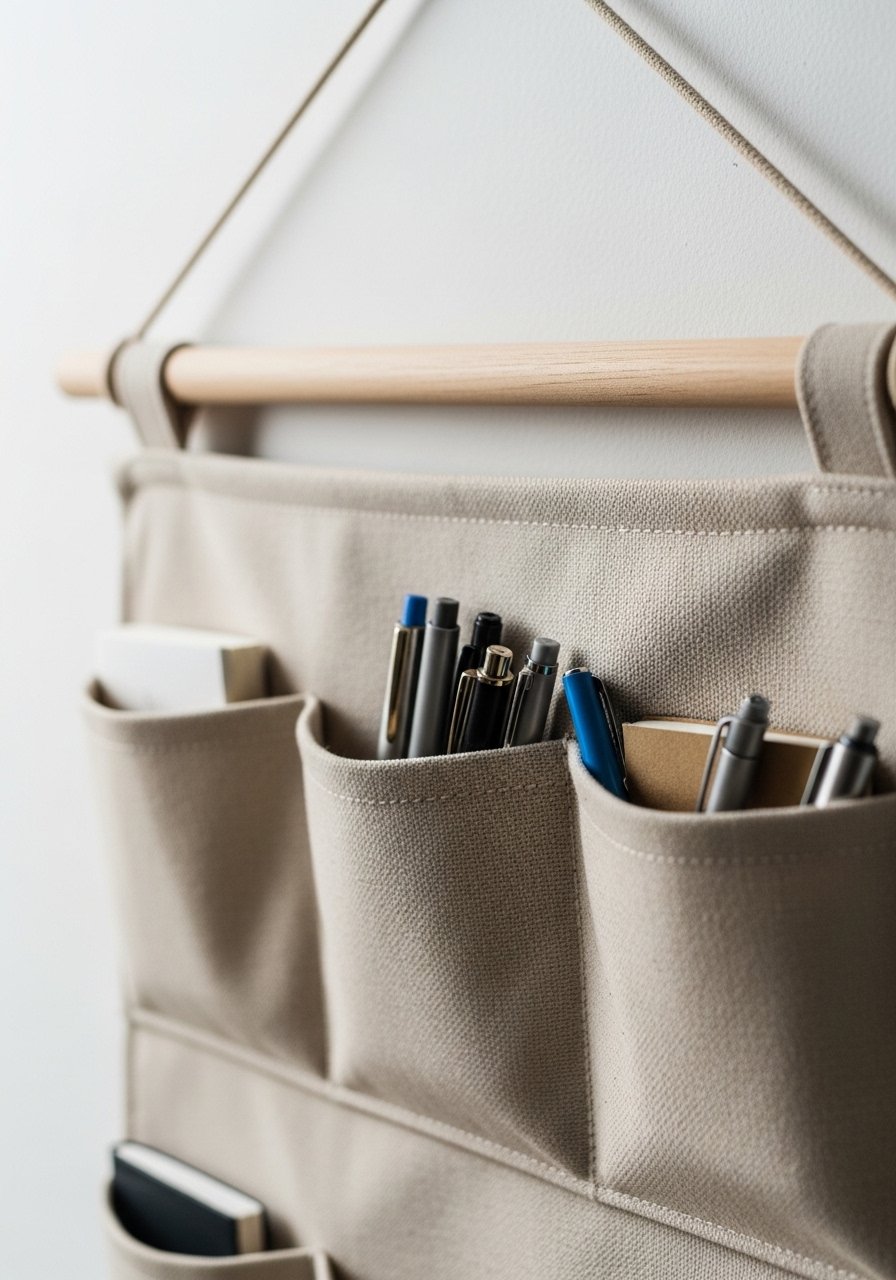
This canvas pocket organizer keeps small essentials off surfaces and adds soft texture. It's functional for mail, glasses, or seedlings.
Materials
- Canvas fabric piece, 12" x 18"
- Fusible interfacing, 12" x 18"
- Wooden dowel, 12"
- Cotton thread and needle or sewing machine
- Scissors and ruler
- Iron
- Small leather strap for hanging (optional)
Instructions
- Fuse interfacing to canvas per package directions.
- Fold canvas to create three pockets: bottom fold at 6", then fold down another 6".
- Sew vertical seams every 4" to form pocket divisions.
- Hem the top and insert a dowel. Attach leather strap or fabric loop for hanging.
- Press for crisp edges.
How to Display or Gift It
- Hang above a desk or near an entryway to hold keys and mail.
- For gifting, fill pockets with stationery and wrap in kraft paper.
- Store extra interfacing and fabric in a flat fabric organizer.
- Decorative Peg Rail for Jewelry & Masks
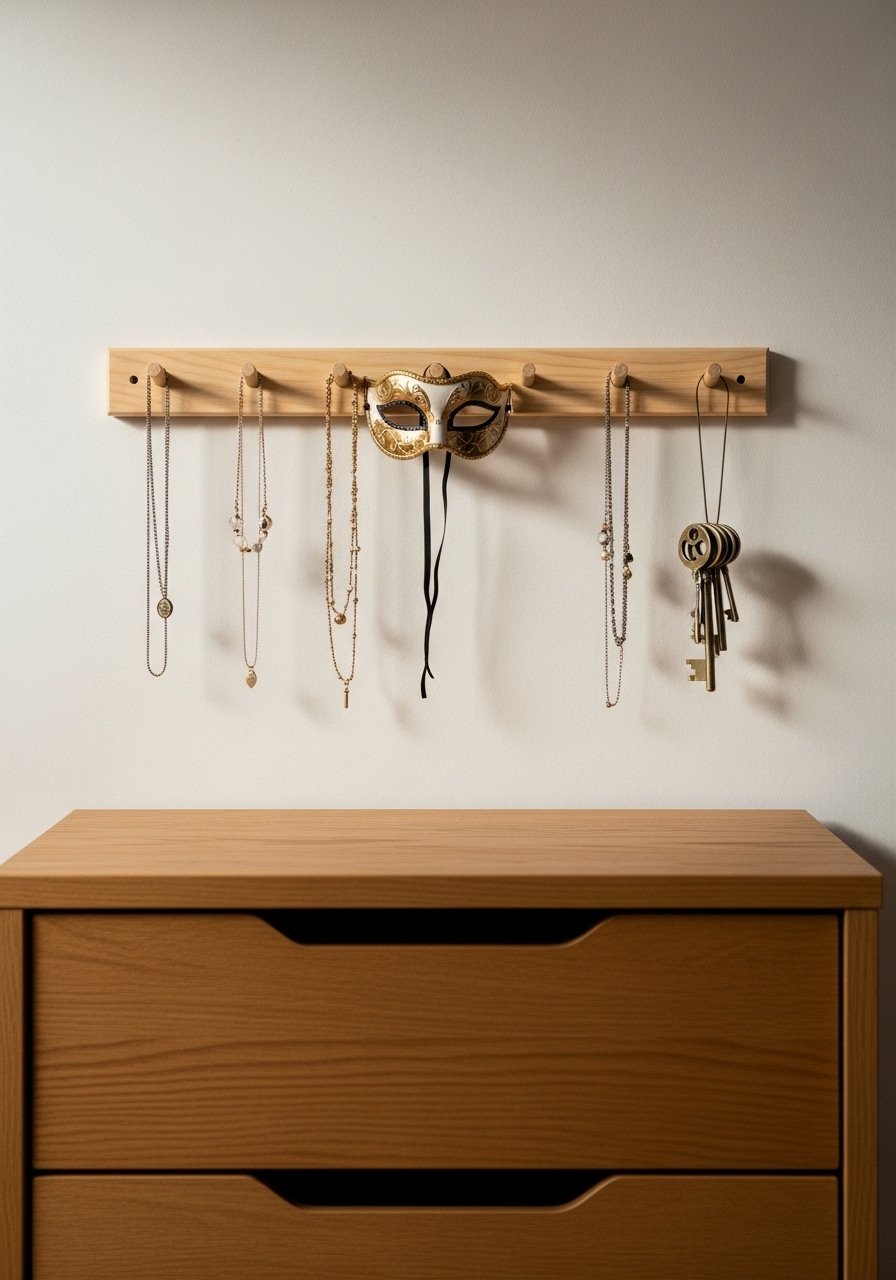
A peg rail keeps jewelry and daily essentials organized without using drawer space. A small dowel and wall screws make this quick.
Materials
- Wooden board, 18" x 3" x 1"
- Five wooden pegs/dowels (3/8" x 1.5")
- Drill with 3/8" bit
- Wood glue
- Sandpaper and stain (1 oz)
- Wall anchors and screws
Instructions
- Sand and finish the board; let finish cure 2 hours.
- Measure and mark peg positions spaced 3" apart.
- Drill holes 3/4" deep for pegs.
- Insert pegs with wood glue and clamp for 30 minutes.
- Mount board to wall with screws and anchors.
How to Display or Gift It
- Style above a dressing table or near the door for masks and keys.
- Use small hook hangers for additional items.
- Package with a set of wooden pegs as a gift.
- Tiny Tapestry: Hoop Weaving
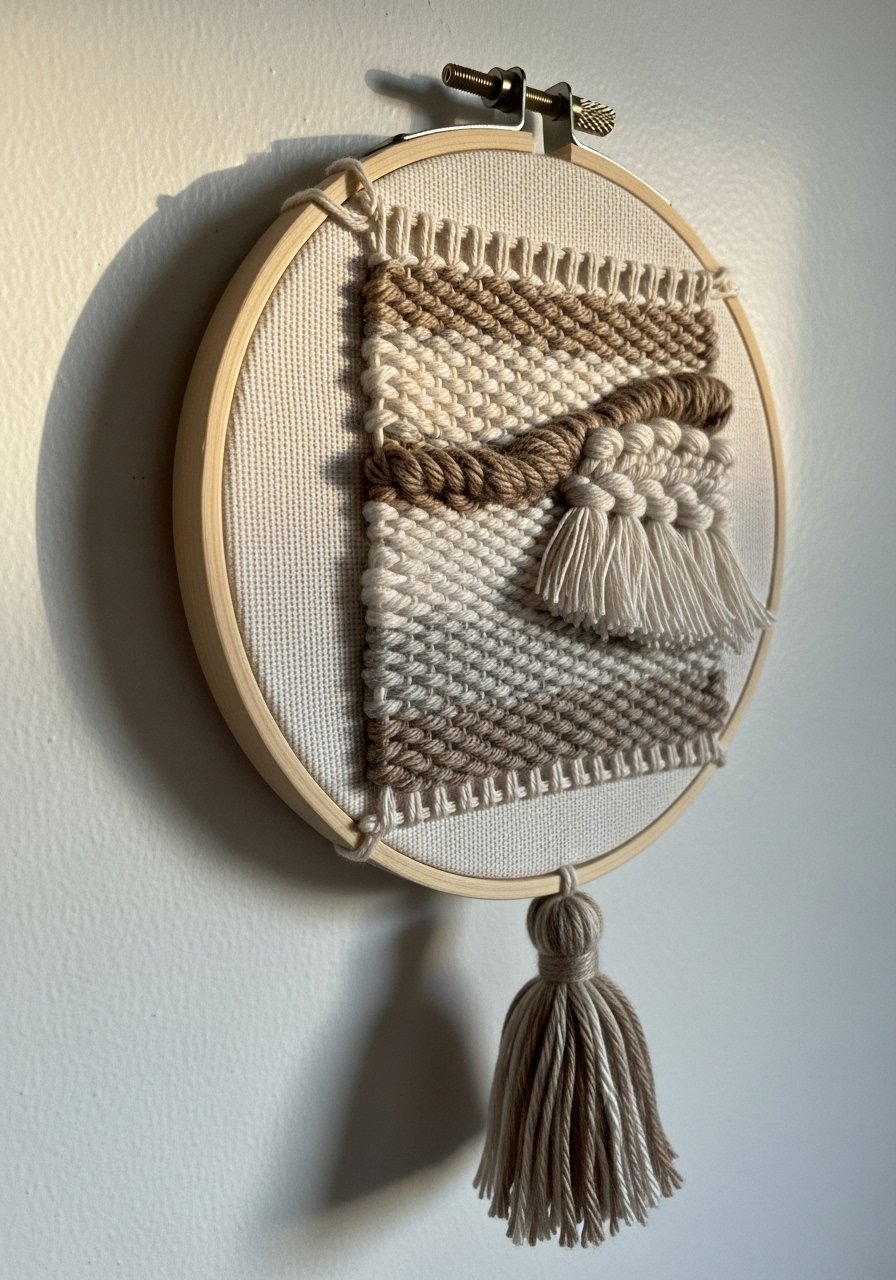
Hoop weaving is compact and highly customizable. In small spaces, a cluster of hoops feels curated and textured.
Materials
- Embroidery hoop, 6"
- Weaving yarns (wool roving, cotton, chenille)
- Tapestry needle
- Scissors
- Comb or fork for beating weft
Instructions
- Stretch warp threads across the hoop vertically and knot at top and bottom.
- Start weaving with the tapestry needle; alternate rows and colors.
- Add rya knots for fringe and tassels at the bottom.
- Beat the weft gently with a comb as you go to keep fabric tight.
- Tie off warp threads at the back and trim excess.
How to Display or Gift It
- Hang a trio of different sizes in a staggered cluster.
- Slip into a padded envelope with care instructions for gifting.
- Store yarn scraps in a divided craft tray.
- Geometric Washable Chalkboard Decal
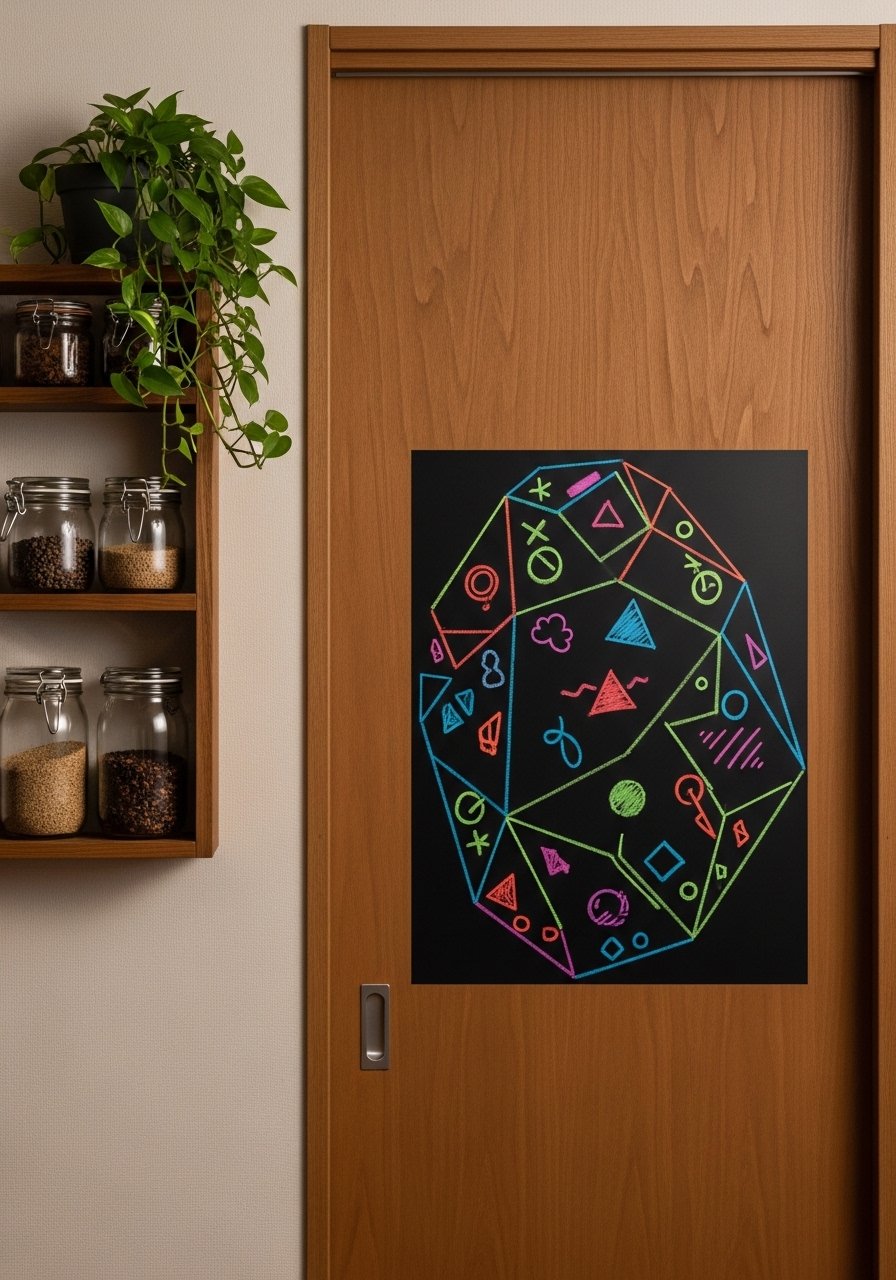
Make messages and lists stylish with a geometric chalk decal. It's removable and perfect for tiny kitchens or dorm doors.
Materials
- Chalkboard peel-and-stick decal (cut to 12" x 12")
- Chalk markers
- Precision scissors
- Ruler
- Cleaning cloth
Instructions
- Measure and cut decal to fit area.
- Peel backing and apply from one edge, smoothing as you go.
- Let set 24 hours before heavy use.
- Use chalk markers for bold lines; clean with a damp cloth.
How to Display or Gift It
- Stick near an entry for quick notes.
- Bundle a decal with chalk markers for gifting.
- Store extra decals flat in a portfolio folder.
- Miniature Photo Ledge (aesthetic room decor DIY for small spaces)
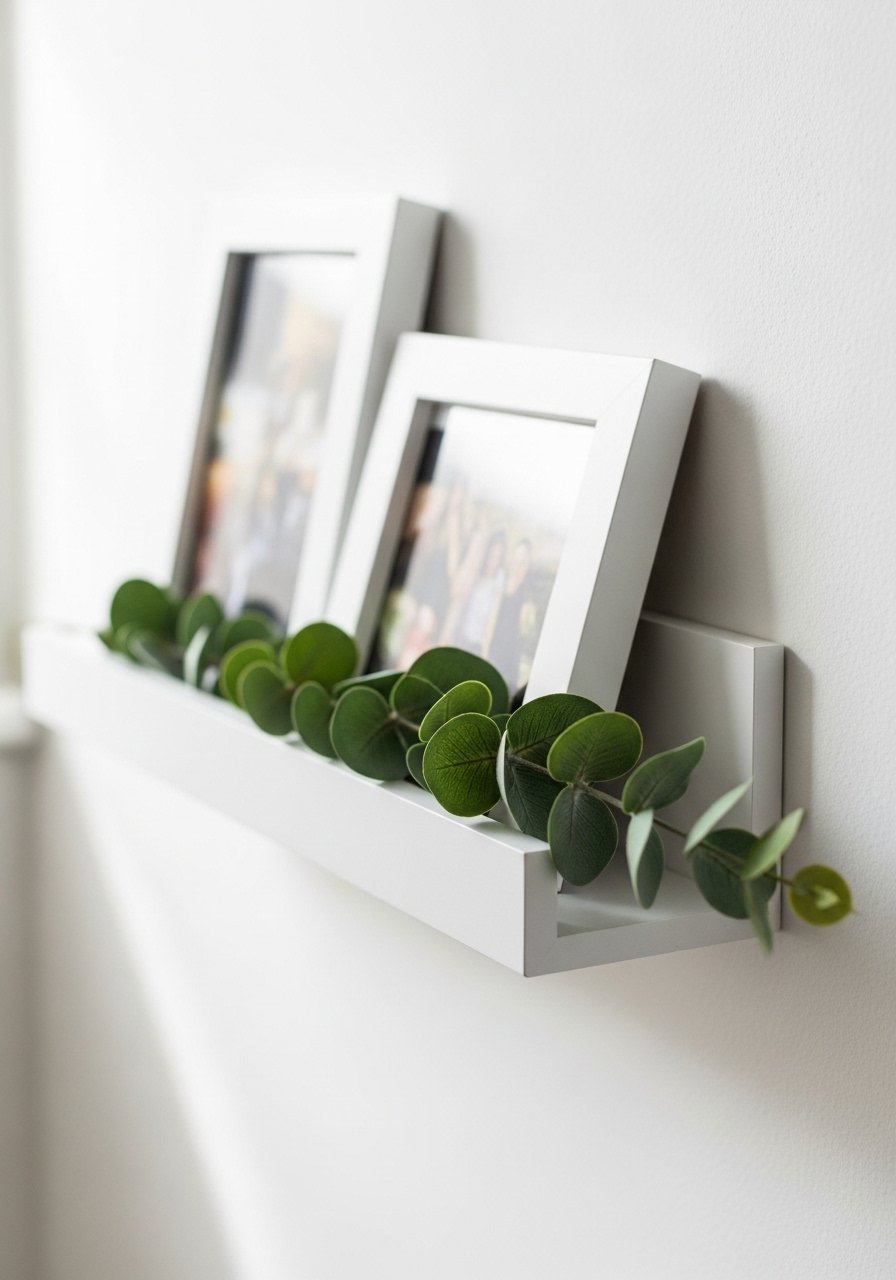
A small photo ledge showcases memories without big wall commitment. It's ideal for narrow walls between doors or above light switches.
Materials
- Mini photo ledge 12" x 1.5"
- Two small frames 3" x 3"
- Wood glue and small finishing nails
- Sandpaper and paint or stain (1 oz)
- Mounting hardware (screws, anchors)
Instructions
- Sand and finish the ledge; allow to dry 30–60 minutes.
- Attach frame stops with glue and small nails.
- Mount ledge with anchors, checking level.
- Swap photos seasonally for a fresh look.
How to Display or Gift It
- Use in hallways or behind doors.
- Gift with pre-loaded frames and a care note.
- Store ledges in a flat crate until ready to hang.
- Petal Paper Wall Garland
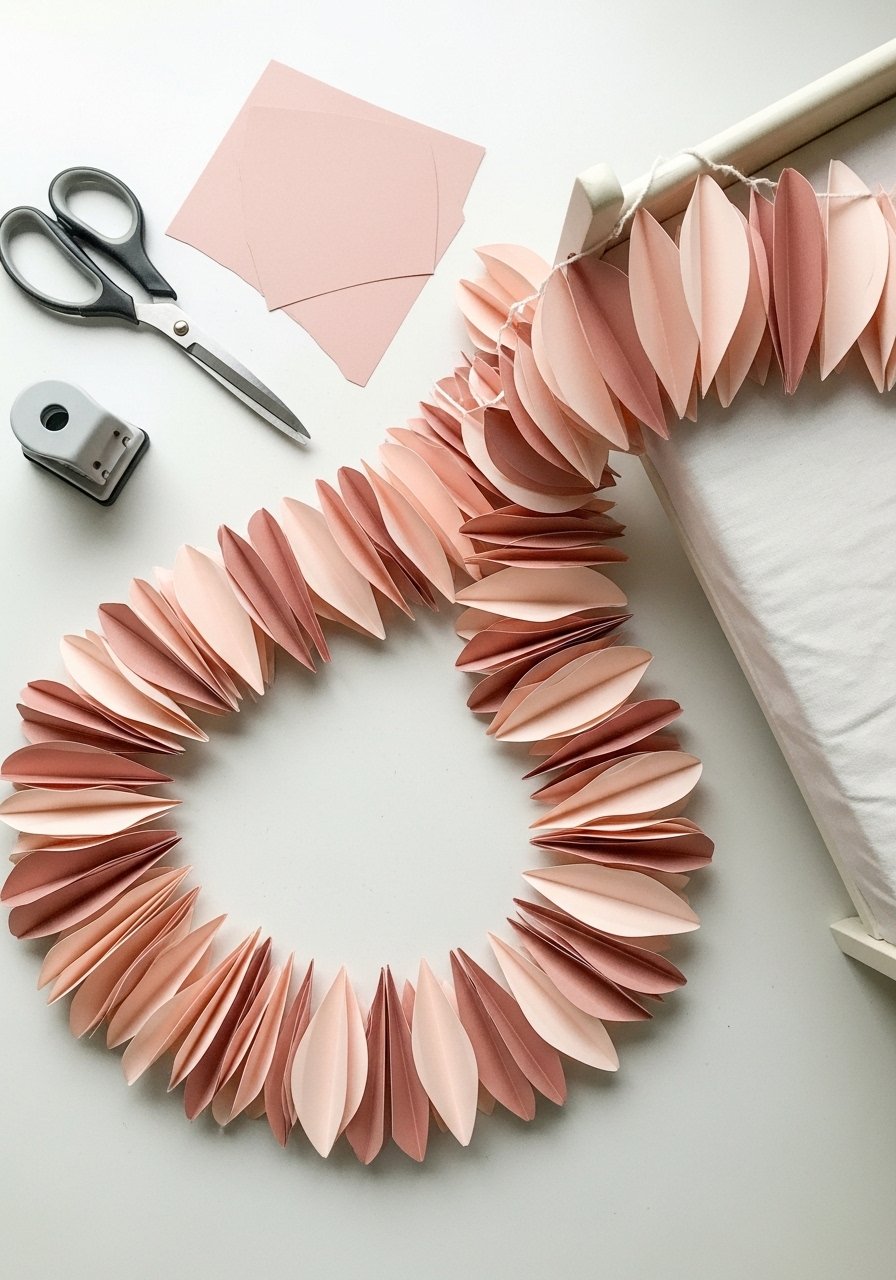
Paper garlands are light, inexpensive, and make corners feel whimsical. Use heavyweight paper for durability and fold techniques for dimension.
Materials
- Heavyweight cardstock, assorted colors
- Hole punch or circle punch set
- Baker’s twine, 10 ft
- Scissors
- Glue stick or fabric glue
- Pencil and ruler
Instructions
- Cut cardstock into petal shapes using a punch or template.
- Fold petals slightly to add dimension.
- Punch a small hole at petal base and string onto twine.
- Tie knots between petals for spacing.
- Hang and adjust spacing as needed.
How to Display or Gift It
- Drape across a tiny canopy bed or mirror frame.
- Roll garland and tuck into a clear box for gifting.
- Store paper flat in a plastic file to avoid creases.
- Painted Door Trim Accent
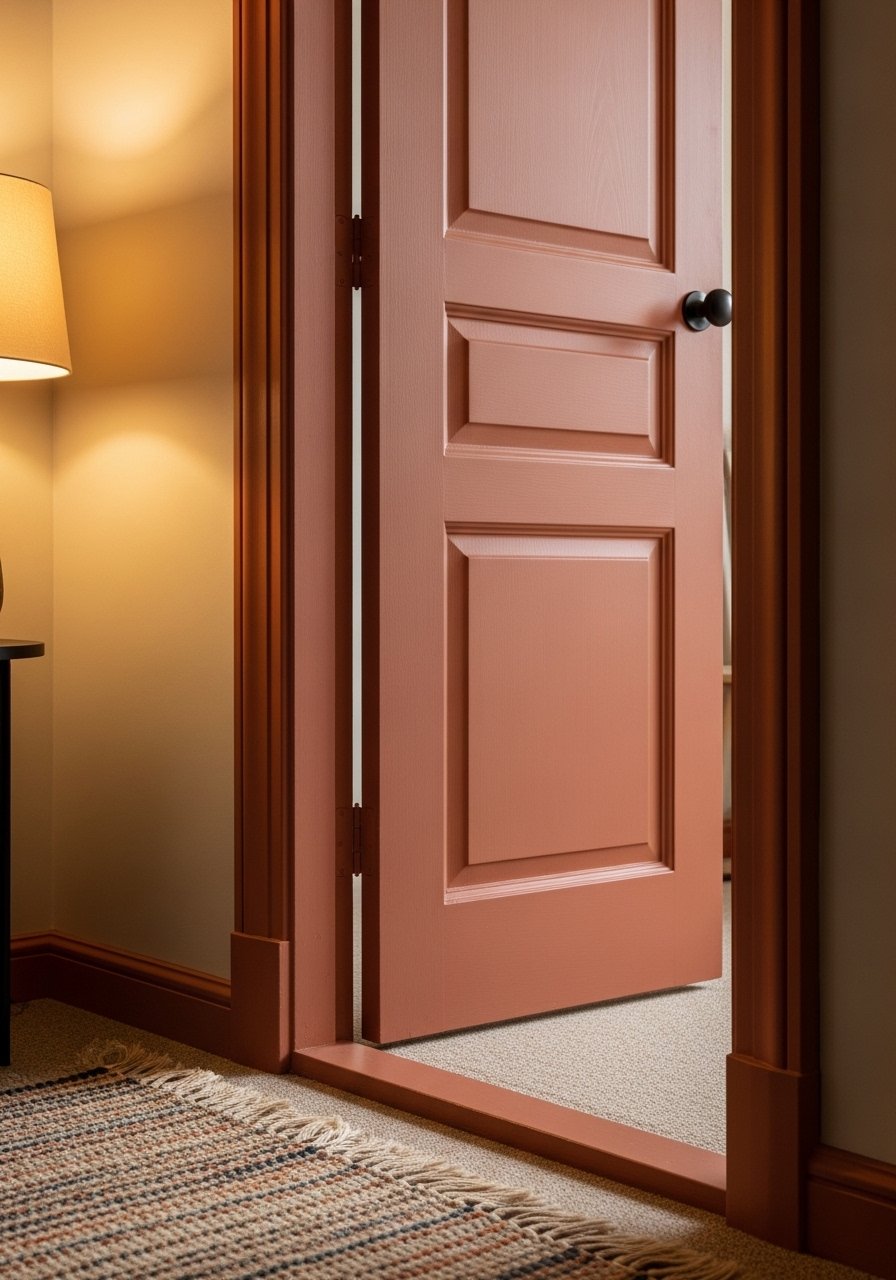
A painted trim acts like a frame for a door or closet without altering structure. It's a high-impact look for small rooms.
Materials
- Painter’s tape
- Sample-sized chalk or acrylic paint, 2 oz
- Small angled brush 1"
- Sandpaper (fine)
- Drop cloth
Instructions
- Clean and sand trim lightly.
- Apply painter’s tape to protect wall and door surfaces.
- Paint two thin coats, allowing 30 minutes between coats.
- Remove tape while paint is tacky for crisp lines.
- Allow 24 hours for full cure.
How to Display or Gift It
- Paint matching skirting board for cohesion.
- Pair with a small hook in the same color for keys.
- Keep a small spare sample pot for touch-ups.
- Tiny Jewelry Holder Tree
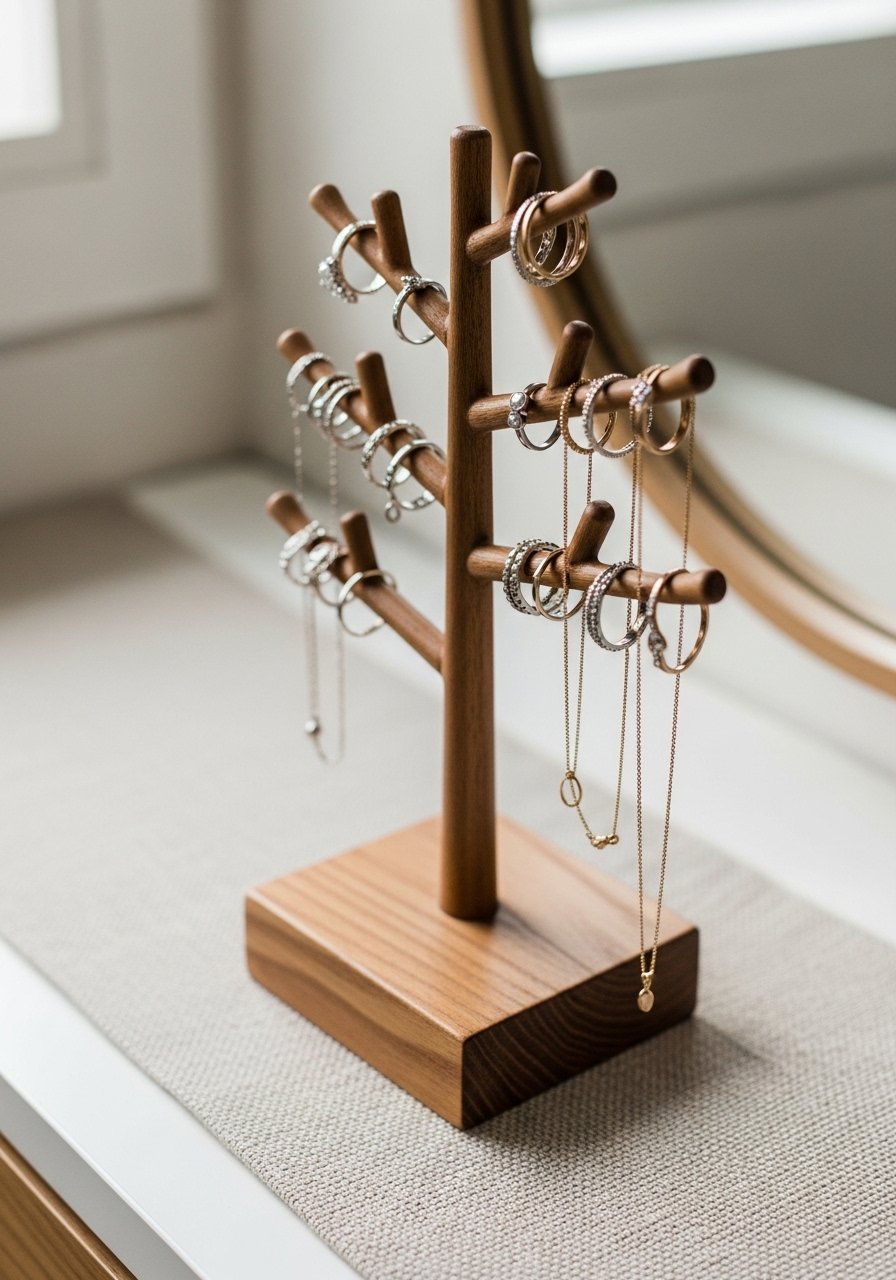
This little tree keeps delicate jewelry organized and looks sculptural on a dresser. Drill carefully to avoid splitting thin dowels.
Materials
- Solid wood base disk, 3" diameter
- Wooden dowels, assorted diameters (5–10)
- Drill with appropriate bits
- Wood glue
- Sandpaper and finish (wax or oil)
- Small saw
Instructions
- Layout dowel arrangement on the base and mark hole positions.
- Drill holes slightly smaller than dowel thickness.
- Insert dowels with wood glue and clamp until set (30 minutes).
- Sand and apply finish; let dry 2 hours before use.
How to Display or Gift It
- Place on a mirrored tray or narrow shelf.
- Gift with a small polishing cloth tucked under the base.
- Store extra dowels in a small tin.
- Tiny Mirror with Jute Fringe
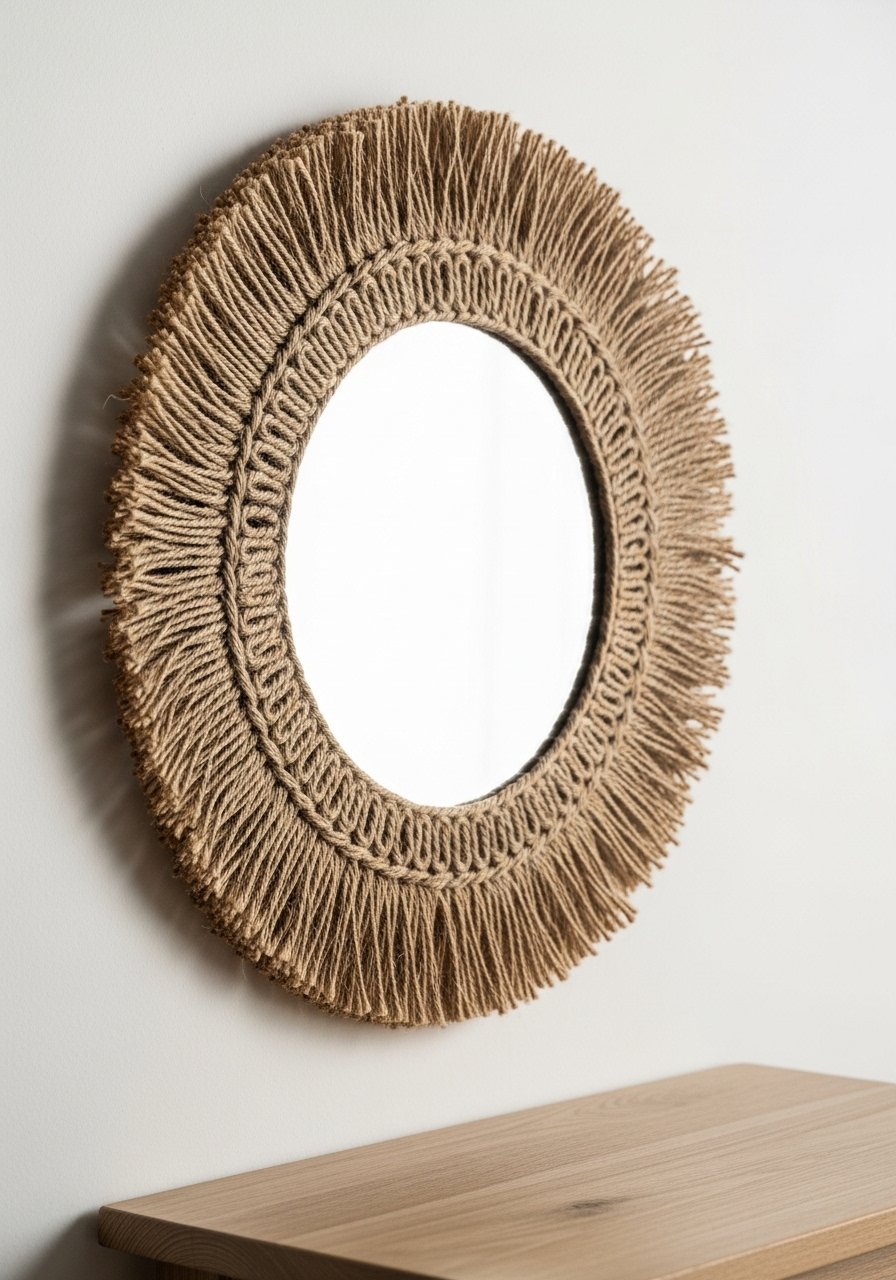
A fringed mirror adds texture and reflects light to make small rooms feel larger. Jute is forgiving and gives a farmhouse-boho twist.
Materials
- Round mirror, 8" diameter
- Jute twine, 10 yds
- Hot glue gun and sticks
- Scissors
- Cardboard ring template (mirror diameter + 1")
Instructions
- Cut cardboard ring to match mirror circumference plus fringe allowance.
- Wrap jute around cardboard to create fringe layers; hot-glue in place.
- Attach jute-wrapped ring to mirror back using hot glue, aligning edge flush.
- Add hanging hardware and test weight on wall anchor.
How to Display or Gift It
- Hang above a tiny console to visually enlarge the space.
- Gift wrapped with a care note for jute maintenance.
- Store flat in a padded portfolio to avoid crushing fringe.
- Mini Pegboard Organizer
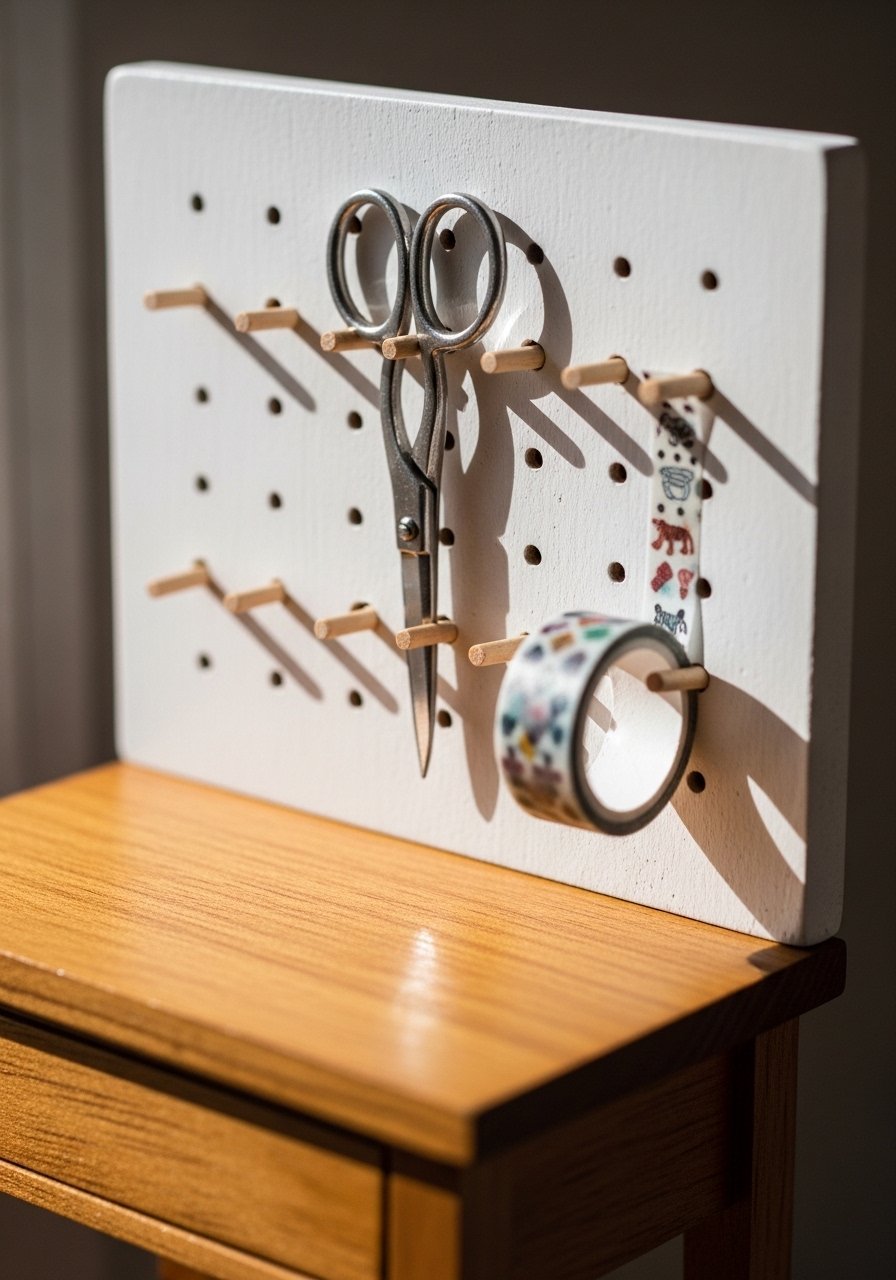
Pegboards scale down nicely for small desks or craft corners. Use small pegs and accessories to keep everything neat and visible.
Materials
- Mini pegboard, 12" x 12"
- Small wooden pegs
- Spray paint or paint can (sample size)
- Small baskets or cups for pegs
- Wall anchors and screws
Instructions
- Paint pegboard and pegs; allow to dry 30–60 minutes.
- Insert pegs and hang baskets or cups for tools.
- Mount to wall with anchors.
- Rearrange as your storage needs change.
How to Display or Gift It
- Use above a narrow desk to free desktop space.
- Package with pegboard accessories for gifting.
- Store extra pegs in a small craft organizer tray.
- Tiny Corner Mirror Mosaic
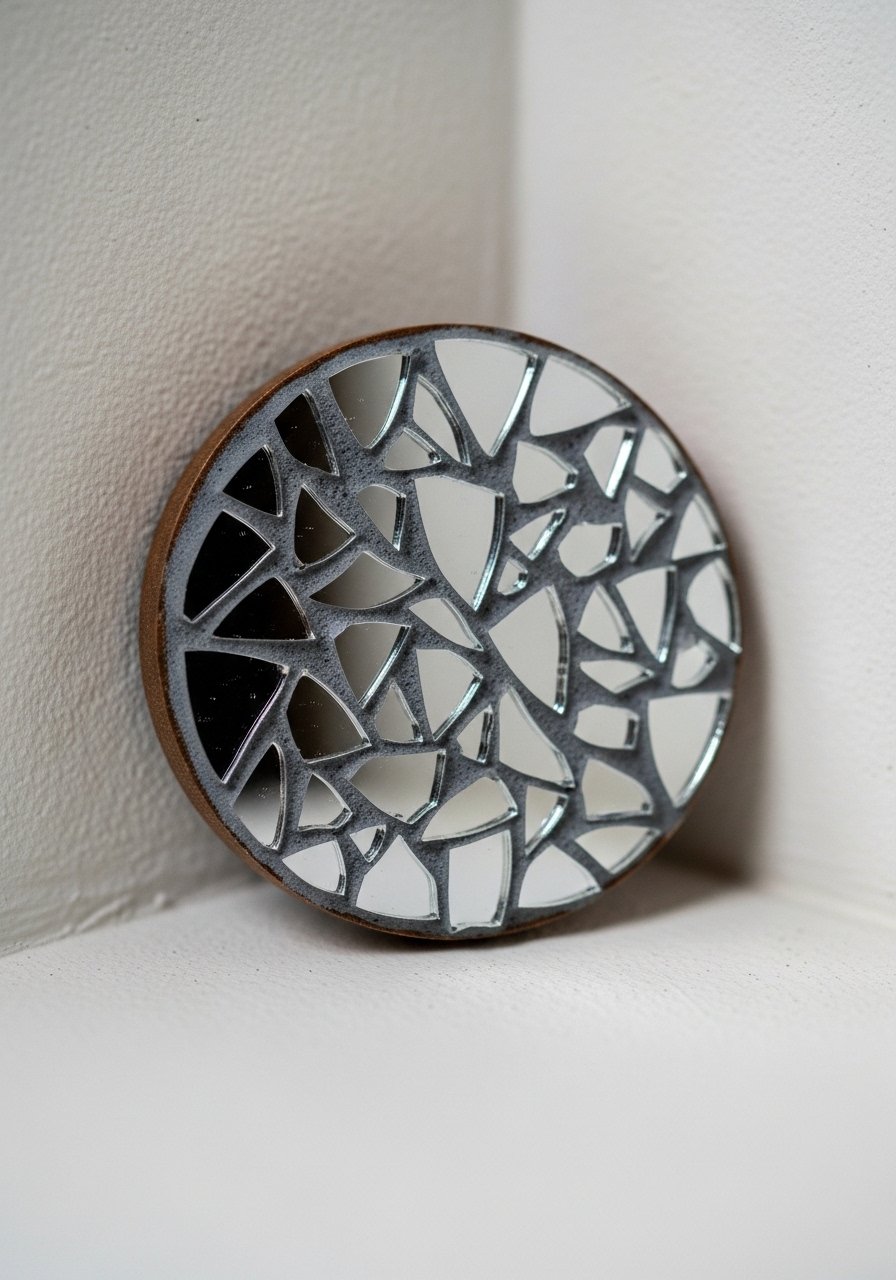
A mosaic mirror catches light and becomes a focal point in a compact space. Work on a small backing to keep it manageable.
Materials
- Small wooden backing, 6" x 6"
- Mirror tiles or recycled mirror pieces
- Thinset adhesive or E6000
- Grout (unsanded), ½ cup
- Sponge and water
- Safety glasses and gloves
Instructions
- Arrange mirror pieces on backing before gluing.
- Glue each piece with a small dot of adhesive and press into place.
- Once set 24 hours, apply grout to fill gaps; wipe excess with a damp sponge.
- Let grout dry 24 hours and polish mirror surfaces.
How to Display or Gift It
- Hang near a light source to amplify brightness.
- Gift with a small polishing cloth and hanging hook.
- Store extra tiles in a labeled box.
- Magnetic Mini Planters for Fridge or Locker
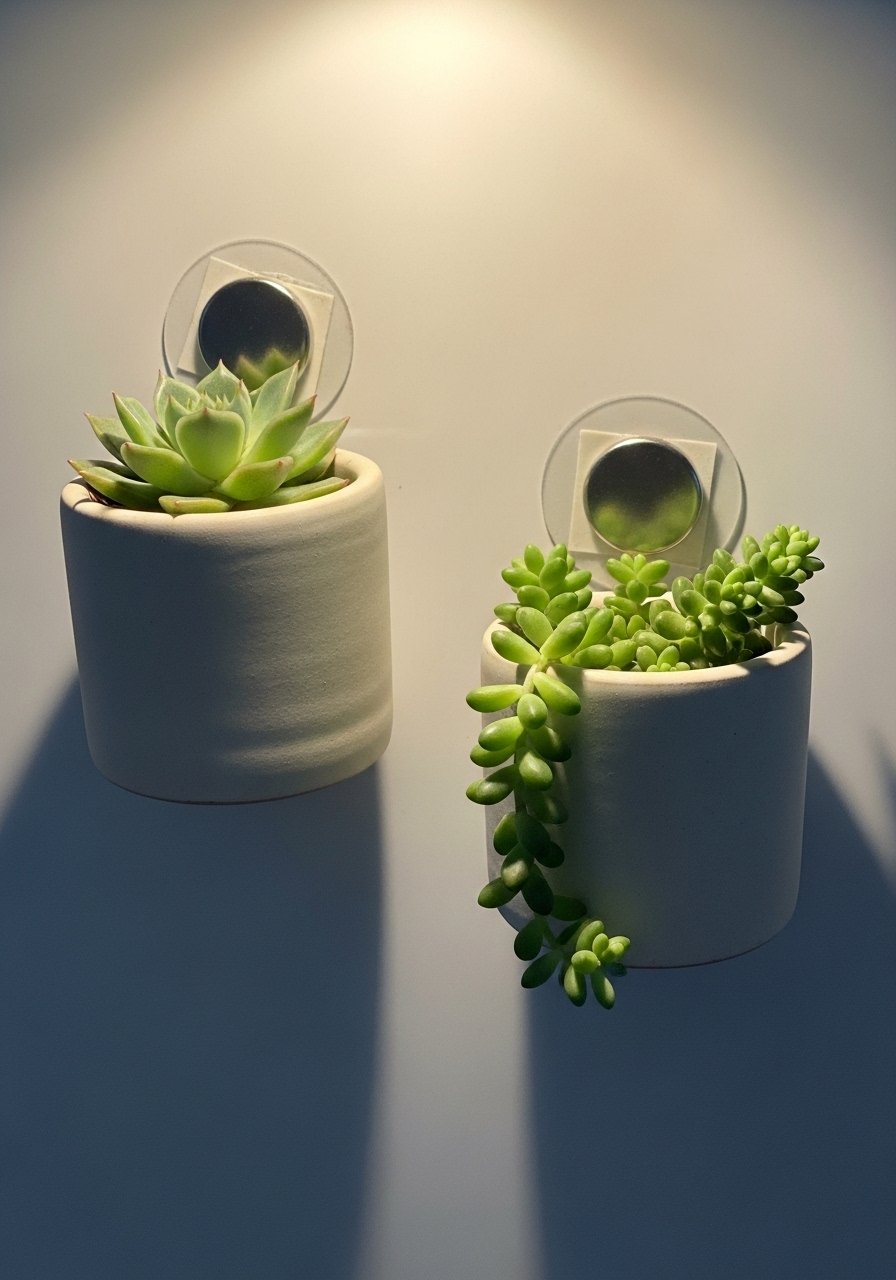
Magnetic planters bring greenery to metal surfaces without taking precious counter space. Choose small succulents that need little water.
Materials
- Tiny ceramic pots (2" diameter) x2
- Strong disc magnets (1/2" x 1/8")
- E6000 or epoxy glue
- Small succulents and soil
- Hot glue gun (optional)
- Small drill bit for pot drainage (optional)
Instructions
- If pot has no drainage, add small layer of pebbles before soil.
- Glue magnet to back of pot with E6000; let cure 24 hours.
- Pot succulents with minimal soil and press into place.
- Attach to metal surface. Water sparingly—succulents need weeks between waterings.
How to Display or Gift It
- Place on a mini fridge, locker, or metal bookshelf.
- Gift as a pair with a care card and a mini watering syringe.
- Store spare magnets and small pots in divided organizer.
Thank you for crafting through these 21 compact projects—each one designed to make a small space feel intentional and personal. Try a few that match your aesthetic (boho macramé, cottagecore lace, japandi wood tones), then pin the post so you can circle back when a new corner needs love. Which project will you try first? Share a photo with a friend, or make one as a tiny, thoughtful gift.
Trust me, picking up a quality temperature-control hot glue gun changed how my projects finished — less stringing, neater edges, less fuss. Happy crafting, and don’t forget to save this pin for later inspiration.


