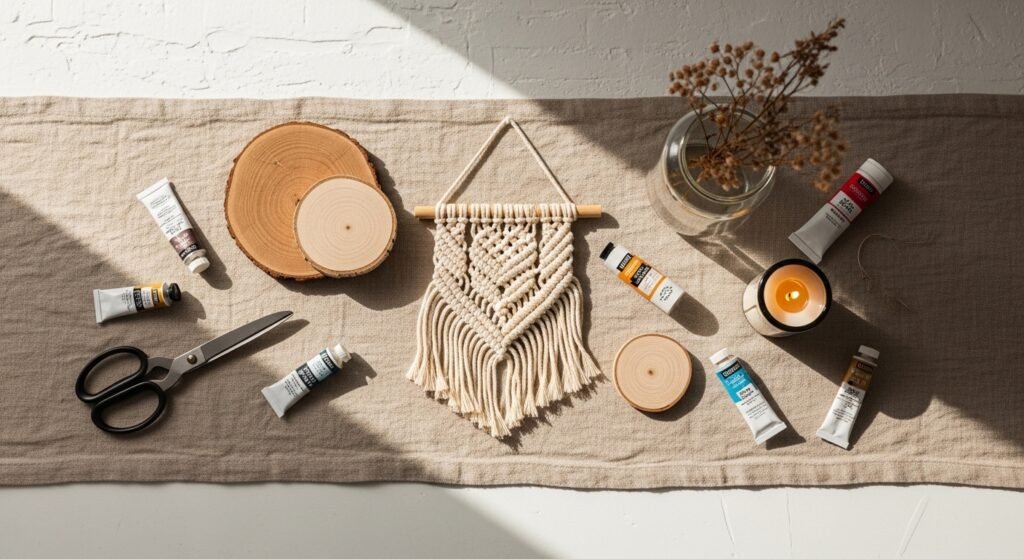
You know that itch to refresh your space without buying a new sofa? These 27 easy aesthetic room decor DIY ideas are designed for exactly that—simple supplies, zero artistic skills, and big visual payoff. Each project finishes with a polished, gallery-ready look that suits cottagecore, boho, japandi, and modern farmhouse corners. You'll find projects that use paint, paper, fiber, resin, and a few wood blanks—nothing intimidating.
I reach for my Cricut Joy cutting machine for small vinyl accents, but a craft knife and a ruler work just fine. Grab a hot glue gun and a stack of spare wood rounds, and you’re already set for most of these projects. Read on for step-by-step instructions, exact material quantities, drying times, and styling tips to make each piece feel intentional. Happy crafting—you’ll be pinning your own projects in no time.
- Driftwood & Dried Flower Hanging
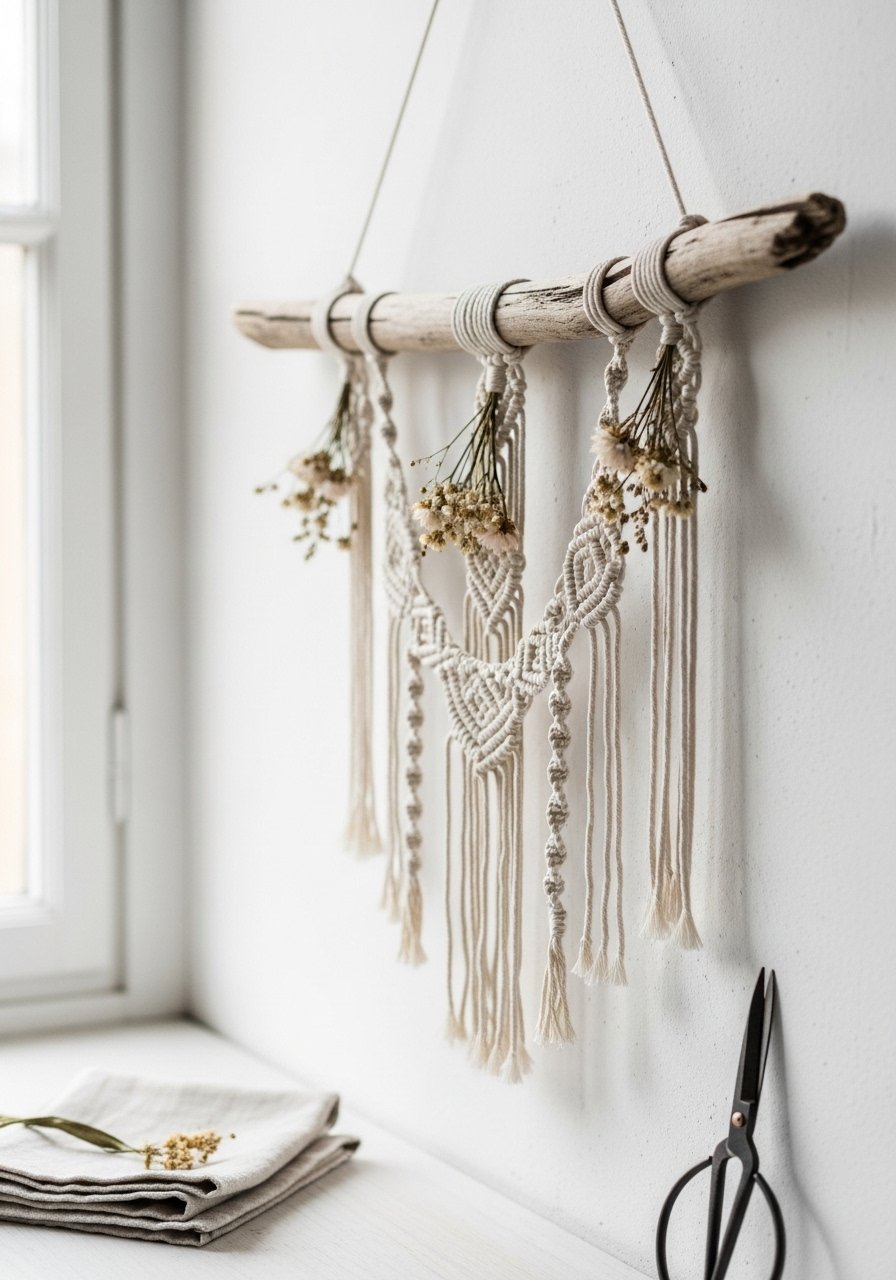
This airy driftwood hanging blends natural texture with simple florals. It looks like a boutique find but takes about 20 minutes. Perfect for boho corners or above a bedside table. Beginners and teens will love the tactile tying and soft movement. The piece feels beachy and matte, with twig bark and papery dried petals that add a gentle scent memory.
Materials
- 1 small driftwood stick (8–12 inches)
- 5 yards 3mm macramé cord (single-strand)
- 3–5 stems dried flowers (bunny tail, lavender, statice)
- 12 6mm wooden beads (optional)
- 1 pair sharp craft scissors
- 1 small spool thin jute twine
- 1 hot glue stick
Instructions
- Trim driftwood to desired length (8–12"). Sand any sharp ends lightly.
- Cut 3 pieces of macramé cord (60 inches each) for hanging loops.
- Fold each cord in half and loop over the driftwood using a lark’s head knot.
- Tie smaller lengths of cord (12–18") to hang beads and flowers. Thread beads then knot below.
- Attach dried flower stems with a dab of hot glue and wrap thin jute twine around stems for security.
- Trim excess cord for a neat fringe or leave long for a boho look.
- Hang on a small nail; no heavy anchors needed.
How to Display or Gift It
- Hang above a small shelf or gallery wall. Pair with rattan frames for a cohesive boho vignette.
- Add a spritz of essential oil to the dried flowers to refresh scent.
- Wrap in tissue paper and place in a kraft box for a heartfelt, ready-to-mail gift.
- Store flattened in a shallow box to avoid crushing the flowers.
- Minimal Geometric Canvas (easy aesthetic room decor DIY)
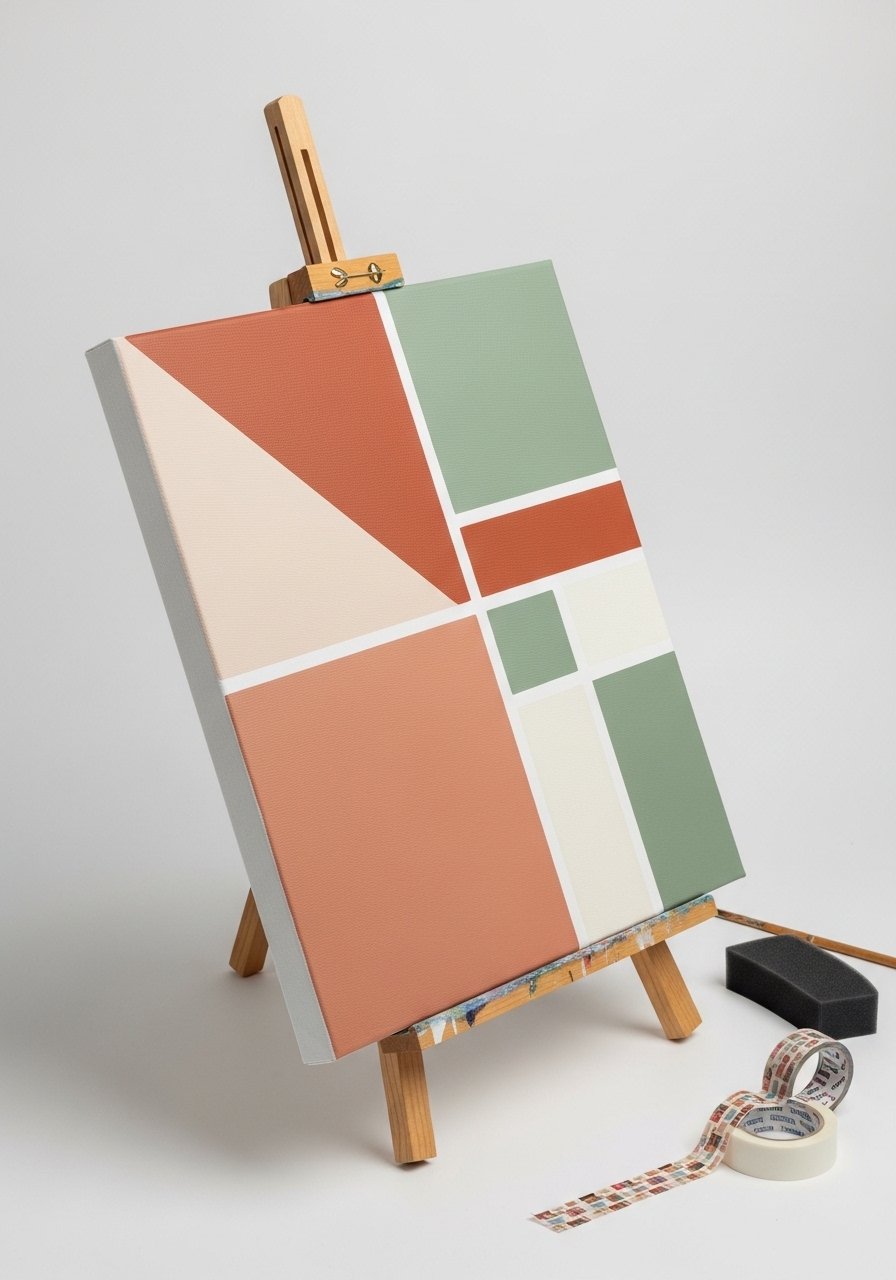
Clean lines and muted color blocks give this geometric canvas its modern cozy vibe. It's a great entry into painting—no freehand drawing required. Painter’s tape makes crisp edges, and a foam brush keeps layers even. Works well for living rooms, entryways, or a bedside stack.
Materials
- 1 8×10 stretched canvas
- 3 acrylic craft paint colors (2 oz each)
- 1 roll painter's tape (1/2" width)
- 1 flat foam brush (1")
- 1 small palette or paper plate
- 1 damp cloth for edges
- 1 small wooden easel for display
Instructions
- Clean canvas surface; apply one thin base coat if needed and let dry 30 minutes.
- Plan geometric blocks with pencil; press painter’s tape firmly where you want lines.
- Paint first color with foam brush in a single even coat. Dry 30 minutes.
- Remove tape gently when paint is dry to the touch for crisp lines.
- Repeat with remaining colors, allowing 20–30 minutes between coats.
- After final coat, let cure 24 hours before moving.
- Optional: seal with a thin coat of Mod Podge matte applied with a foam brush.
How to Display or Gift It
- Group several canvases with varied palettes for a mini gallery.
- Place on a small wooden easel on a bookshelf.
- Wrap in tissue and use a kraft ribbon for gifting.
- Store flat in a painting folder if making multiple pieces.
- Button-Cluster Photo Frame

A playful way to personalize a frame with texture and color. This project is tactile, forgiving, and ideal for using up craft buttons. Kids and beginners will enjoy the quick, satisfying glue-up.
Materials
- 1 5×7 wooden photo frame (unfinished)
- 30–40 assorted buttons (6–20mm)
- 1 hot glue gun + 4 glue sticks
- 1 small jar craft paint (optional)
- 1 foam paintbrush
- 1 sandpaper (220 grit)
- 1 felt backing sheet (optional)
Instructions
- Sand frame edges; wipe with a cloth.
- Paint frame if desired; let dry 30 minutes.
- Plan button cluster on corner before gluing.
- Heat hot glue gun; apply glue to back of each button and press in place. Hold 5–7 seconds.
- Fill gaps with smaller buttons or paint dots.
- Let glue set for 15 minutes before handling.
- Reinstall photo and secure felt backing.
How to Display or Gift It
- Display on a shelf mixed with small plants and candles.
- Gift with a photo already inserted.
- Store spare buttons and frames in a stackable craft organizer.
- Try a monochrome palette for a more minimalist look.
- Cork & Leather Key Hook Board
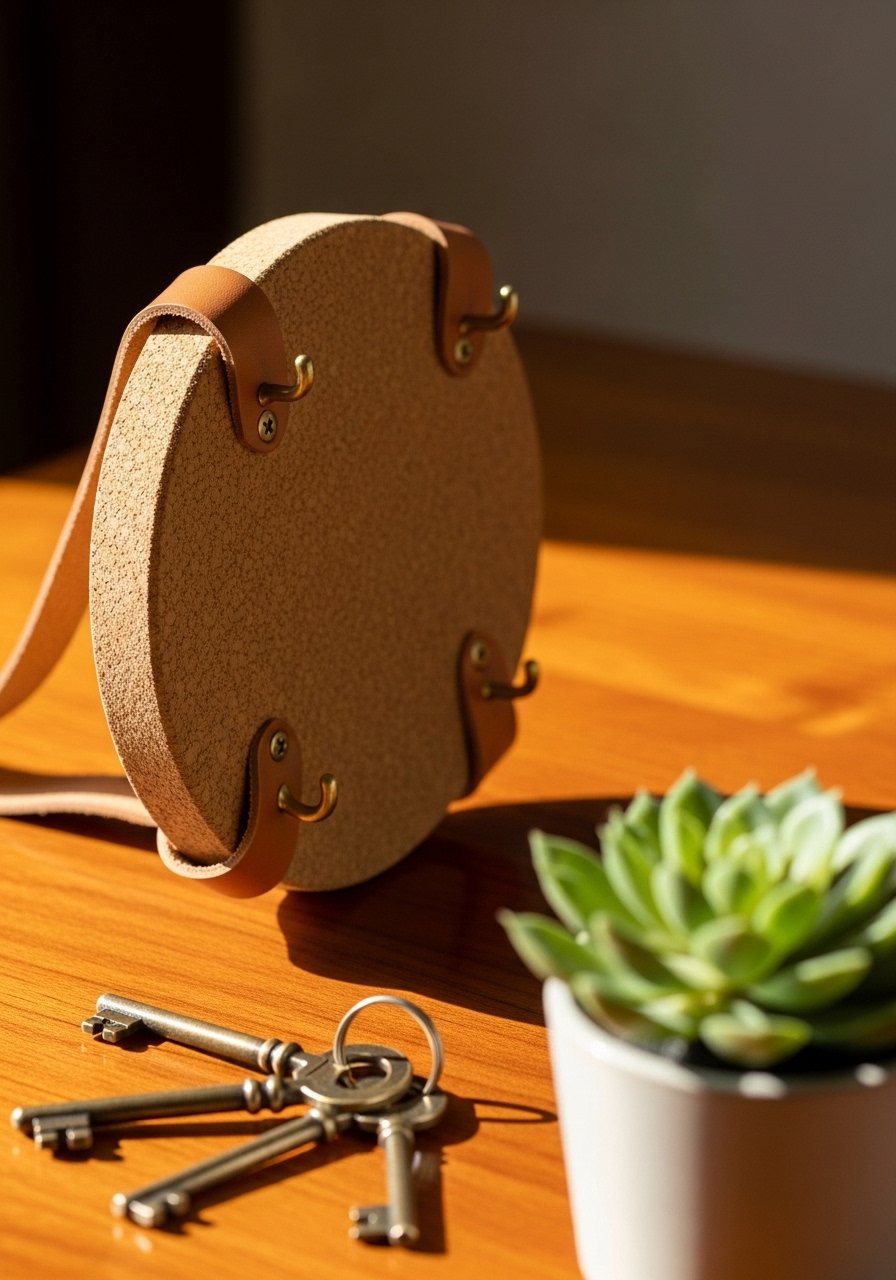
This small hook board uses cork rounds and leather straps for a soft, modern entryway piece. It's tactile and durable, great for renters since cork is lightweight. The leather strap adds a modern japandi touch.
Materials
- 1 6-inch cork round (or two 4" rounds)
- 2 leather straps (1" x 6")
- 3 brass hooks
- 6 small wood screws and anchors (if mounting on drywall)
- 1 metal ruler
- 1 drill with small bit
- 1 pencil
Instructions
- Mark screw positions on cork; pre-drill small guide holes.
- Attach brass hooks using screws; tighten until snug.
- Align leather straps at top and secure with small screws or brass tacks.
- Mount to wall using anchors if needed. Weight limit about 3 lbs per hook.
- Wipe with a damp cloth to clean cork dust.
How to Display or Gift It
- Mount near entry or on the side of a desk.
- Pair with a small tray for loose change.
- Wrap in kraft paper and twine for a housewarming gift.
- Store spare hardware in a small compartment craft organizer.
- Painted Wood Rounds Wall Cluster

Wood rounds gain a fresh Scandinavian vibe when painted in muted tones with a foil accent. It’s a great way to create a gallery feel without frames. No artistic skill required—just steady brush strokes and painter’s tape for shapes.
Materials
- 6 wood rounds (2", 3", 4", 6")
- 3 acrylic paint colors (2 oz each)
- 1 small gold leaf pen or metallic paint
- 1 foam brush set
- 1 painter's tape
- 12 double-sided adhesive discs (for wall mounting)
- 1 sandpaper (120 grit)
Instructions
- Sand each wood round smooth; wipe off dust.
- Tape off sections if creating blocks, or paint freehand with foam brushes.
- Apply one coat; let dry 30 minutes.
- Add second coat for full coverage; dry 30 minutes.
- Add metallic accents with gold leaf pen; let cure 20 minutes.
- Attach adhesive discs per manufacturer directions and press to wall.
- Hang in a clustered arrangement; step back to adjust spacing.
How to Display or Gift It
- Arrange over a desk or bed in an organic cluster.
- Attach command strips for renter-friendly display.
- Package a set in tissue and kraft box for gifting.
- Extra rounds store flat in a shallow box.
- Mini Macramé Plant Hanger
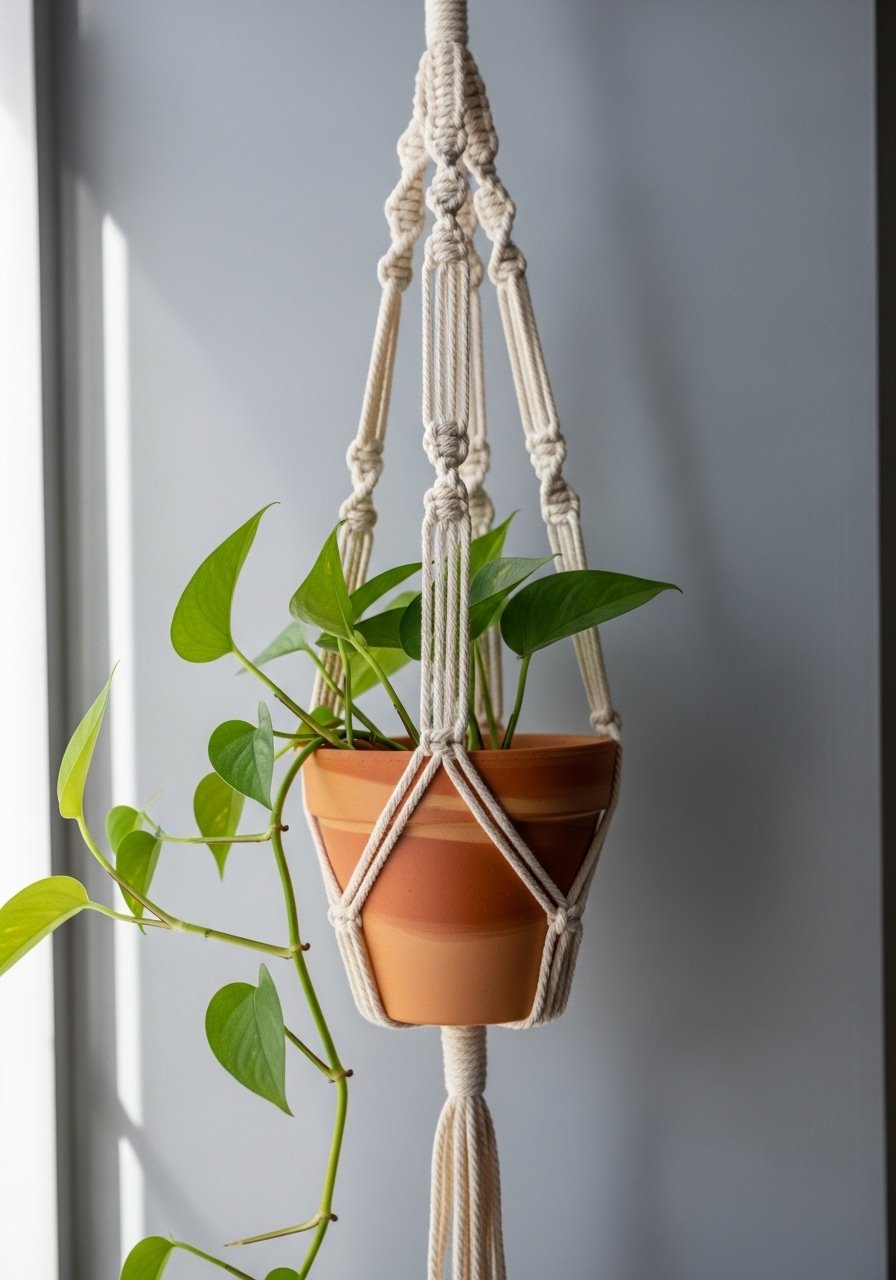
This petite plant hanger is an intro to macramé with just a few square knots. It gives instant vertical interest and suits succulents, small pothos, or string-of-pearls. Works for beginners and people short on space.
Materials
- 30 feet 3mm macramé cord (single-strand)
- 1 small terracotta pot (3")
- 1 wooden ring (1.5")
- 1 ruler
- 1 scissors
- 1 small plant (succulent or trailing)
Instructions
- Cut 4 cords at 7 feet each. Fold through wooden ring and knot.
- Create a gathering knot to anchor cords; space out evenly.
- Make square knots in pairs for 4–5 rows until desired length.
- Form a cradle by gathering cords and tying a strong overhand knot 6 inches above base.
- Trim tassel to neat length.
- Pot plant and place in hanger; adjust knot spacing if needed.
How to Display or Gift It
- Hang near a bright window for trailing plants.
- Gift with a small potted succulent in a kraft box.
- Store cord rolled on a spool to keep it tangle-free.
- Use a small wooden dowel to create a multi-hanger display.
- DIY Linen & Felt Pillow Cover
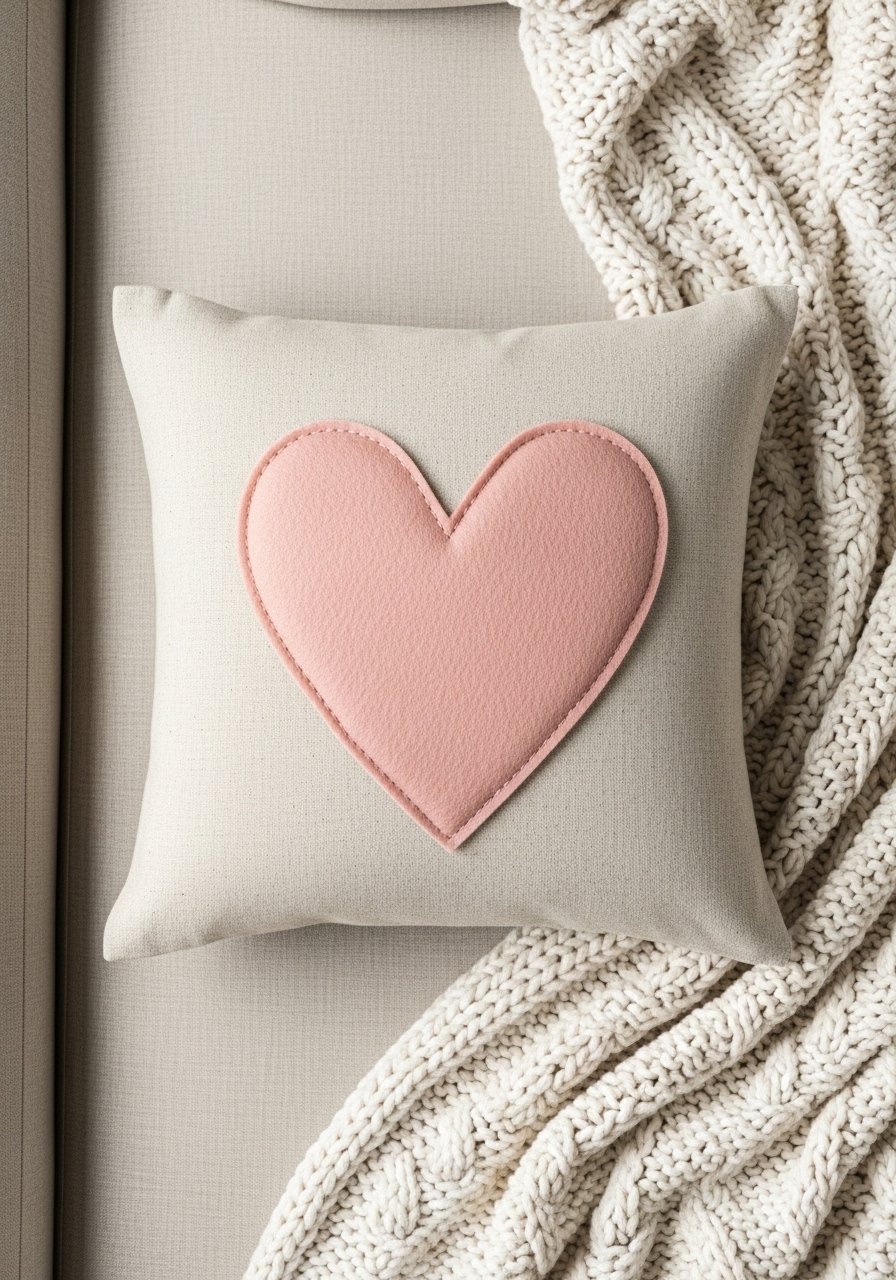
A linen pillow with a soft felt appliqué adds handcrafted comfort. No sewing machine? Use fabric glue or a simple whip stitch. This project is forgiving—felt hides small mistakes and feels cozy.
Materials
- 1 16×16 linen pillow cover (store-bought or sewn)
- 1 felt sheet (9" x 12")
- 1 fabric glue (1 oz)
- 1 embroidery needle and thread (for optional stitching)
- 1 pencil
- 1 scissors
- 1 pillow insert (16×16)
Instructions
- Cut felt applique shape slightly smaller than cover (e.g., 10" heart).
- Position on pillow cover and secure temporarily with pins.
- Apply small dots of fabric glue and press felt for 2 minutes.
- For extra hold, stitch around edge with a whip stitch; knot ends.
- Let glue cure 24 hours before washing.
- Insert pillow and fluff.
How to Display or Gift It
- Pair with a knit throw for table or bed styling.
- Wrap pillow in tissue and tuck into a gift box for housewarmings.
- Store spare covers flat in a breathable fabric organizer.
- Make multiples in a color story for coordinated bedding.
- Cozy Neutral Tassel Garland (easy aesthetic room decor DIY)
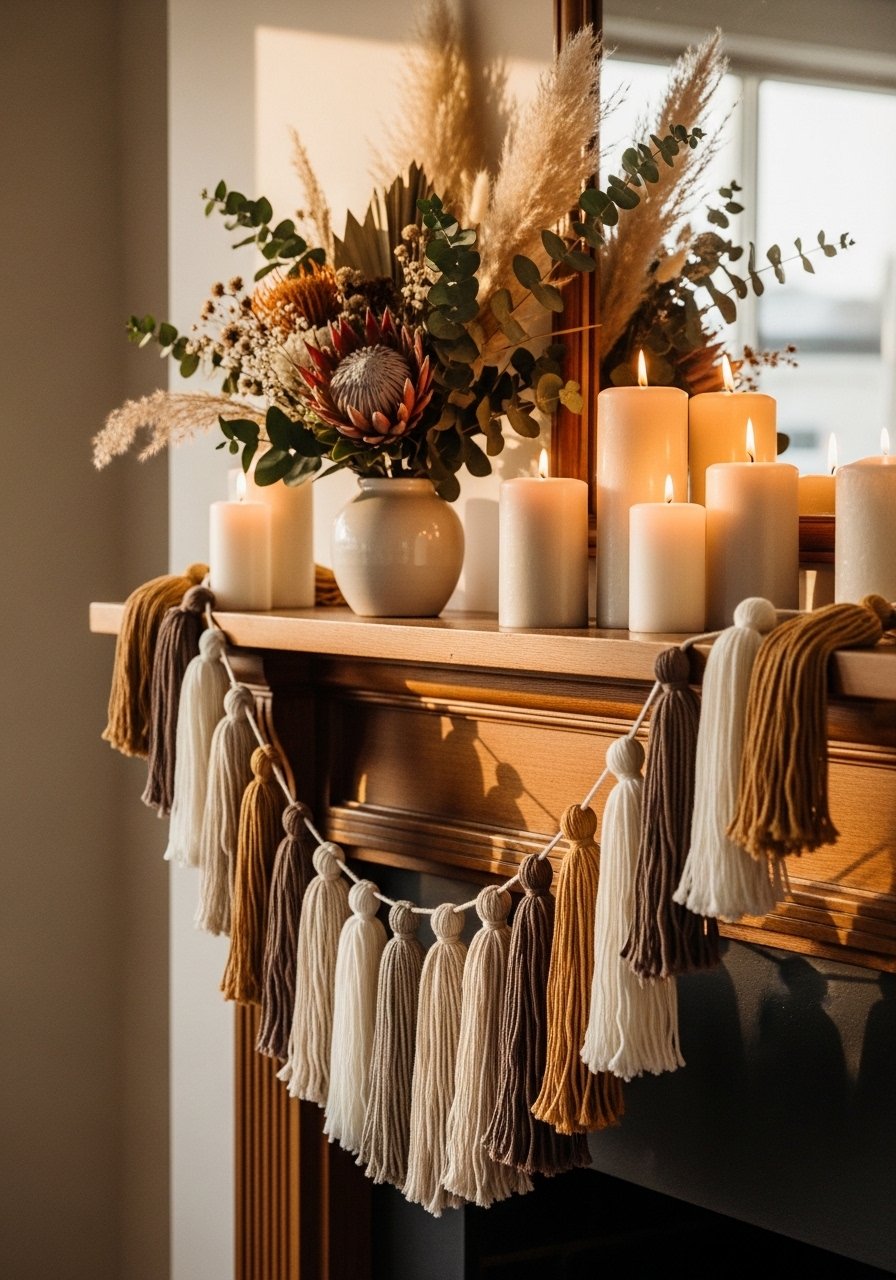
Tassel garlands add warm texture and movement to mantles and shelves. They’re quick, repetitive, and relaxing—great for making while watching a show. Use a yarn-winder tool or just a cardboard template.
Materials
- 1 skein cotton yarn (100g)
- 1 cotton cord (3 yards)
- 10–12 tassels (~4" long each)
- 1 pair scissors
- 1 small comb (for fluffing tassels)
- 1 measuring tape
Instructions
- Wind yarn around a 4" cardboard template 40 times for each tassel.
- Slide loops off and tie a 6" piece of yarn around the top, leaving a loop to hang.
- Cut the bottom loops and trim for even length.
- Attach tassels to cotton cord spaced 4–6" apart using overhand knots.
- Fluff by combing tassel ends gently; trim as needed.
- Hang and adjust spacing.
How to Display or Gift It
- Drape across a mirror, shelf, or headboard.
- Gift in a kraft tube for shipping.
- Store rolled in a zip bag to prevent tangling.
- Make in seasonal yarn colors for holidays.
- Pressed Flower Resin Coasters
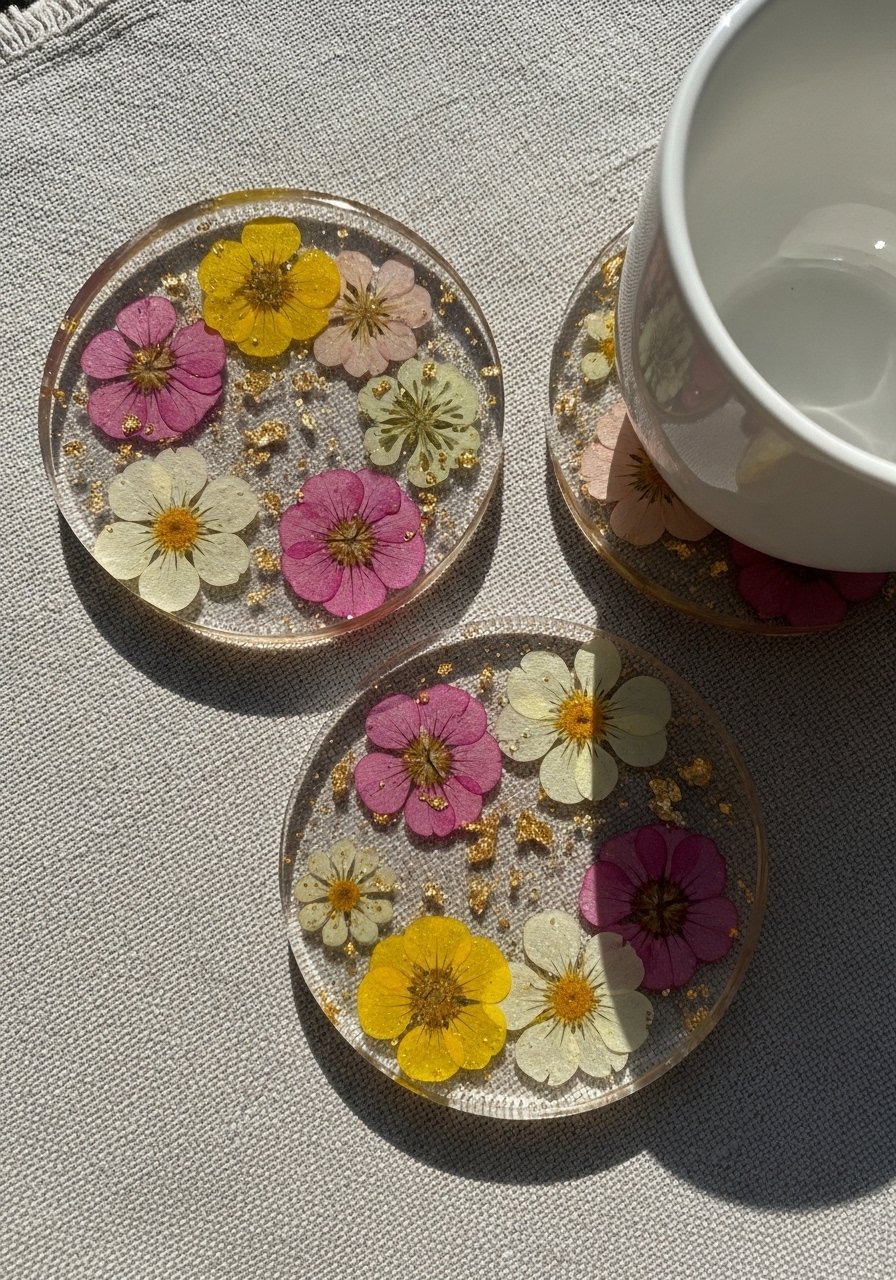
Clear resin coasters capture pressed flowers for a delicate, glass-like finish. Use small silicone molds and a reliable epoxy resin kit for bubble-free results. These are popular as gifts and last for years when cured properly.
Materials
- 4 round silicone coaster molds (4" diameter)
- 1 epoxy resin kit (16 oz total)
- 8–12 pressed flowers (flat, fully dried)
- 1 mixing cups and stir sticks
- 1 small torch or heat gun
- 1 nitrile gloves
- 1 gold foil flakes (optional)
Instructions
- Ensure flowers are fully pressed and dry (48 hours).
- Mix resin and hardener per kit ratios—usually 1:1 by volume. Stir for 3 minutes.
- Pour a thin base layer (about 1/8"), let set 15–20 minutes to reach tacky state.
- Place pressed flowers gently, then pour remaining resin to top.
- Use a small torch/heat gun briefly to remove bubbles—hold 6–10" away, pass quickly.
- Let cure 24–48 hours until firm; full cure 72 hours.
- Demold and sand edges lightly if needed.
How to Display or Gift It
- Bundle coasters with a ribbon and small card.
- Store flat until fully cured to avoid imprinting.
- Use a small wooden coaster holder for shelf display.
- Avoid dishwasher; wipe with soft cloth.
- DIY Minimal Wall Shelf from Dowel & Leather
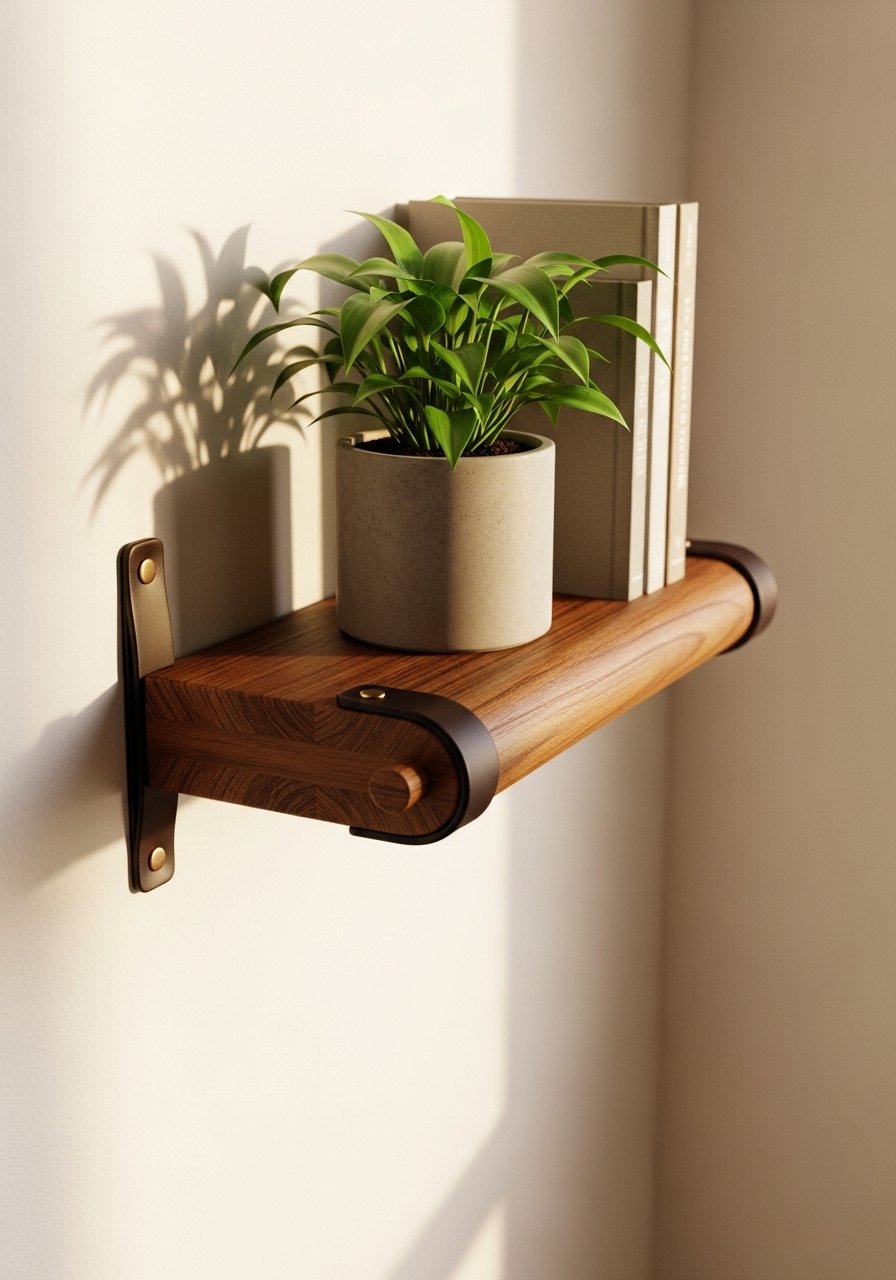
A slim shelf built from a dowel and leather straps is subtle and modern. It’s strong enough for plants or frames and fits small walls. Use a metal ruler and drill for accurate holes.
Materials
- 1 wooden dowel (1" x 24")
- 2 leather straps (1.5" x 8")
- 4 brass screws and anchors
- 1 drill and 5/32" drill bit
- 1 wood stain (1 oz) and cloth
- 1 sandpaper (120 grit)
- 1 tape measure
Instructions
- Sand dowel and apply a thin coat of stain; wipe after 2 minutes, dry 1 hour.
- Mark strap positions about 1" from ends; drill pilot holes in wall.
- Screw leather straps to wall anchors, leaving top loop to insert dowel.
- Slide dowel through loops; check level.
- Tighten screws so dowel sits snug and supports about 10 lbs.
- Style with lightweight decor.
How to Display or Gift It
- Use to display small frames, succulents, or candles.
- Wrap in kraft paper with a twine bow for gifting.
- Store spare hardware in a craft organizer.
- Make multiples for a staggered bookshelf look.
- Washi-Tape Wall Art

Washi tape makes perfectly straight, removable art—ideal for renters. You get crisp designs with almost zero cleanup. This is fast and flexible; change the pattern seasonally.
Materials
- 1 12×12 mat board or canvas
- 6–8 rolls of washi tape (varied widths)
- 1 metal ruler
- 1 precision craft knife
- 1 small cutting mat
- 1 frame (optional)
Instructions
- Plan layout and apply washi tape strips firmly to the board.
- Use metal ruler and craft knife to trim edges cleanly.
- Layer tapes for subtle texture or keep single layers for minimalism.
- Frame or hang unframed using double-sided tape.
- Replace pieces as colors change.
How to Display or Gift It
- Lean framed piece on a shelf for quick styling.
- Gift unframed in a protective sleeve for easy mailing.
- Store extra washi rolls in a clear organizer for easy access.
- Make matching sets for a cohesive wall.
- Hand-Painted Ceramic Vases (No Wheel)
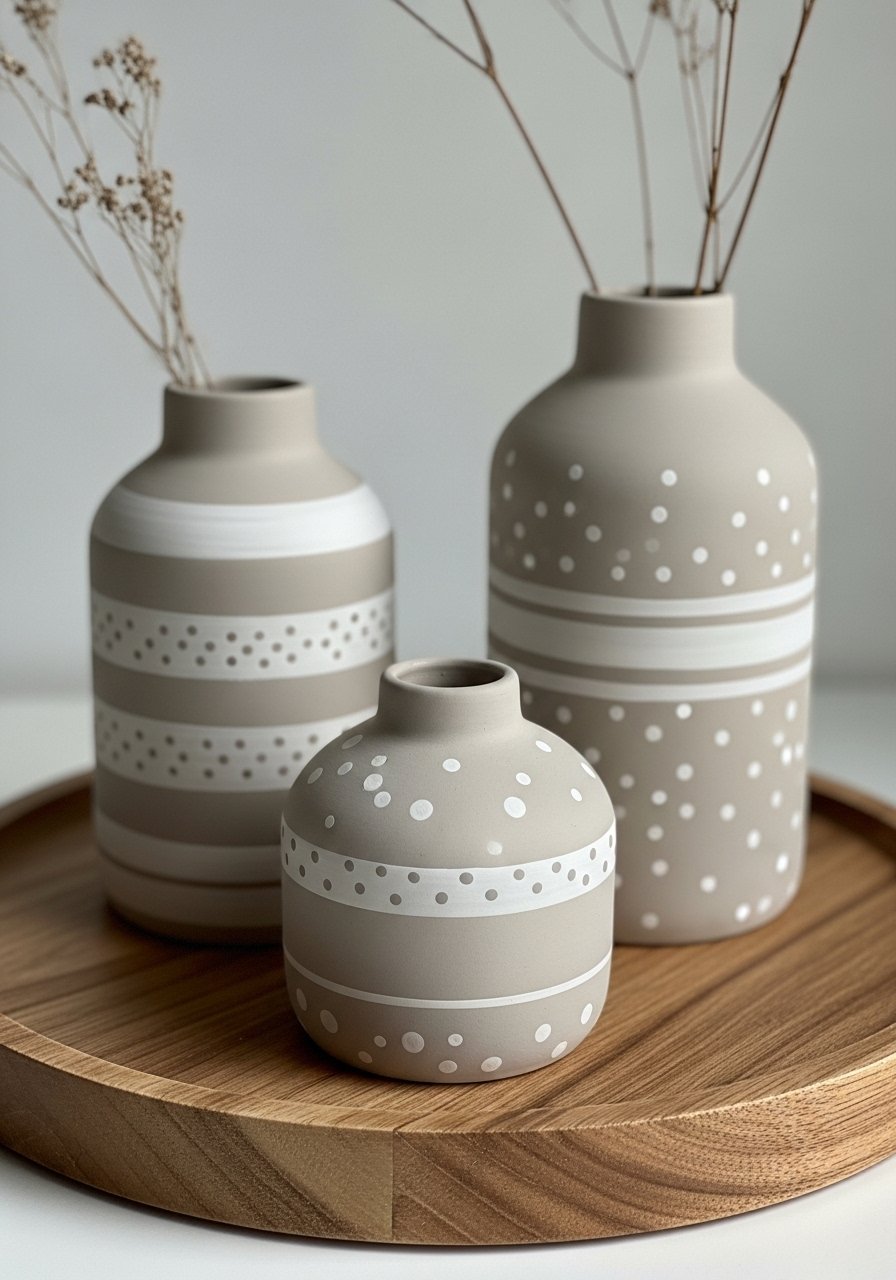
Transform thrifted vases with chalk paint and a detail brush. No pottery skills needed—just steady hands for simple patterns. Chalk paint gives a soft, matte finish and adheres to glazed ceramics.
Materials
- 3 thrifted ceramic vases (varied sizes)
- 2 chalk paint colors (2 oz each)
- 1 detail brush set
- 1 foam brush for base coats
- 1 sandpaper (220 grit)
- 1 clear matte sealer (spray or brush-on)
Instructions
- Clean vases thoroughly; sand glossy spots lightly.
- Apply a single thin coat of chalk paint with foam brush; dry 30 minutes.
- Apply a second coat if needed; dry 30 minutes.
- Add stripes or dots with detail brush; let dry 20 minutes.
- Seal with clear matte sealer; cure 24 hours before use with water.
- Use plastic liner for fresh flowers or dry stems for longer life.
How to Display or Gift It
- Cluster vases on a tray with dried stems.
- Wrap in kraft tissue and place in a sturdy box for gifting.
- Store spare paints and brushes in a small craft caddy.
- Mix painted and raw ceramics for textural interest.
- Rustic Chalkboard Sign

A rustic chalkboard sign adds friendly messaging to entryways or kitchens. Use a pre-made wood chalkboard and a chalk pen for neat lettering. It’s erasable and reusable—great for menus or quotes.
Materials
- 1 small wood chalkboard sign (8×12")
- 1 white chalk pen
- 1 sanding block
- 1 jute twine (2 feet)
- 1 small hook for hanging
- 1 damp cloth for erasing
Instructions
- Sand wood edges lightly for a rustic look.
- Thread jute twine through pre-drilled holes and knot.
- Write message with chalk pen; let set 1 minute.
- Wipe mistakes with a damp cloth and reletter.
- Hang and update message as desired.
How to Display or Gift It
- Hang in a kitchen for week’s menu or in a nursery for notes.
- Pair with a small box of chalk pens in a gift bundle.
- Store with other seasonal signs in a shallow bin.
- Use mini wooden easels to display on counters.
- Layered Paper Wall Fan
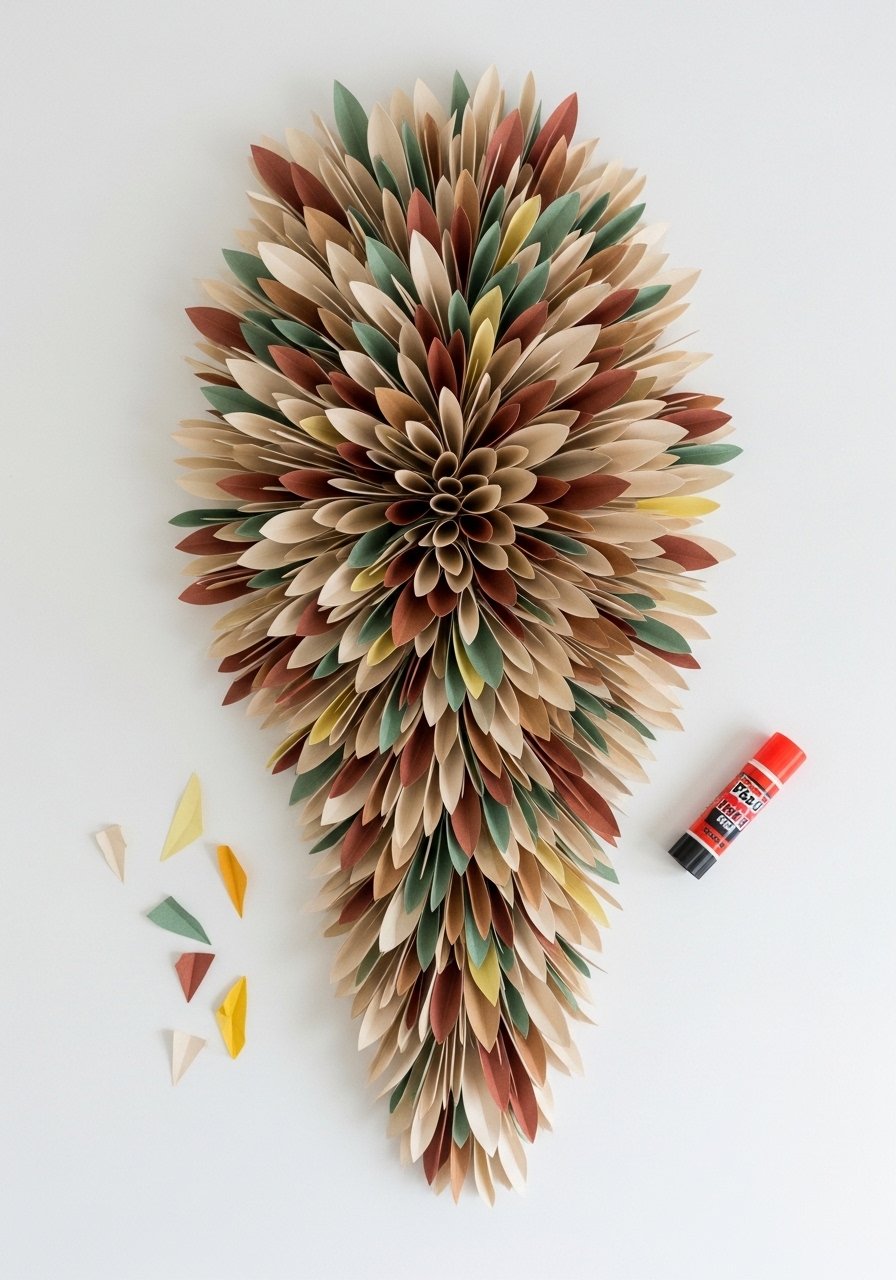
Paper fans are lightweight, sculptural wall accents that feel elegant without fuss. They’re budget-friendly and make an instant focal point. Good for seasonal displays.
Materials
- 4 sheets heavyweight craft paper (12×12")
- 1 glue stick
- 1 bone folder or ruler for creasing
- 1 scissors
- 1 double-sided mounting tape
- 1 pencil
Instructions
- Fold each paper into an accordion of 1/2" folds.
- Fold in half to form a fan; glue inner edges to secure.
- Layer fans in descending sizes and glue into a cohesive cluster.
- Mount to wall with double-sided tape; press firmly for 30 seconds.
- Replace if sun fades colors.
How to Display or Gift It
- Create a trio for over a side table.
- Ship flat with tissue paper in a mailing envelope.
- Store between chipboard sheets to keep folds crisp.
- Try metallic paper for holiday decor.
- Driftwood Mirror Frame (easy aesthetic room decor DIY)

A driftwood mirror brings coastal texture to any wall. Glue small pieces around a round mirror for a tactile, handcrafted frame. It’s forgiving—irregular pieces add character rather than detract.
Materials
- 1 small round mirror (8")
- 20–30 small driftwood pieces (1–3")
- 1 hot glue gun + 6 glue sticks
- 1 craft knife
- 1 hanging wire or D-ring hardware
- 1 sandpaper (optional)
Instructions
- Clean mirror edge; plan wood layout around circumference.
- Heat glue gun and attach driftwood pieces, holding each 5–7 seconds.
- Fill gaps with smaller twigs or shells; glue in place.
- Attach D-ring hardware to back per weight instructions.
- Let glue cure 30 minutes before hanging.
How to Display or Gift It
- Hang over a console or bathroom vanity.
- Gift wrapped in kraft paper with a note about care.
- Store extra driftwood in a small box for future repairs.
- For heavier mirrors, use wall anchors rated for the weight.
- Easy Felt Wall Hanging
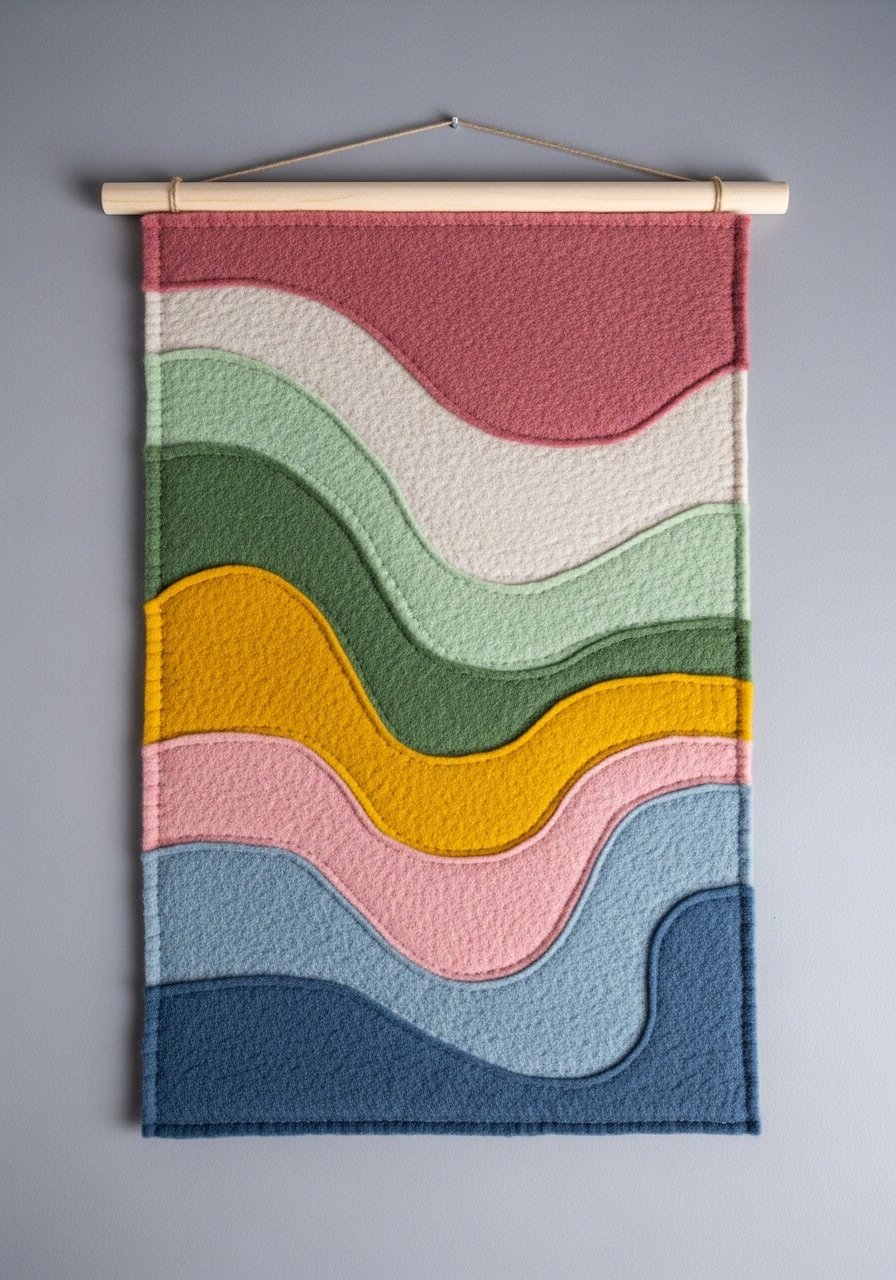
Felt wall hangings are soft, noise-dampening, and beginner-friendly. Cut simple shapes and layer for depth—no sewing required if you use fabric glue. Great for nurseries or cozy corners.
Materials
- 1 12×18 wool-blend felt sheet (background)
- 4–6 smaller felt shapes (varied colors)
- 1 wooden dowel (12")
- 1 fabric glue (1 oz)
- 1 scissors
- 1 thin jute cord (for hanging)
Instructions
- Cut background felt to size and arrange shapes on top.
- Use fabric glue to adhere shapes; press 30 seconds.
- Glue top edge to dowel if needed and wrap jute cord for hanger loops.
- Let glue cure 24 hours before handling.
- Trim stray threads.
How to Display or Gift It
- Hang above a crib or reading nook.
- Pack flat in tissue and a shallow box for gifting.
- Store spare felt in a breathable organizer.
- Make themed sets for seasonal decor.
- Painted Terracotta Succulent Tray
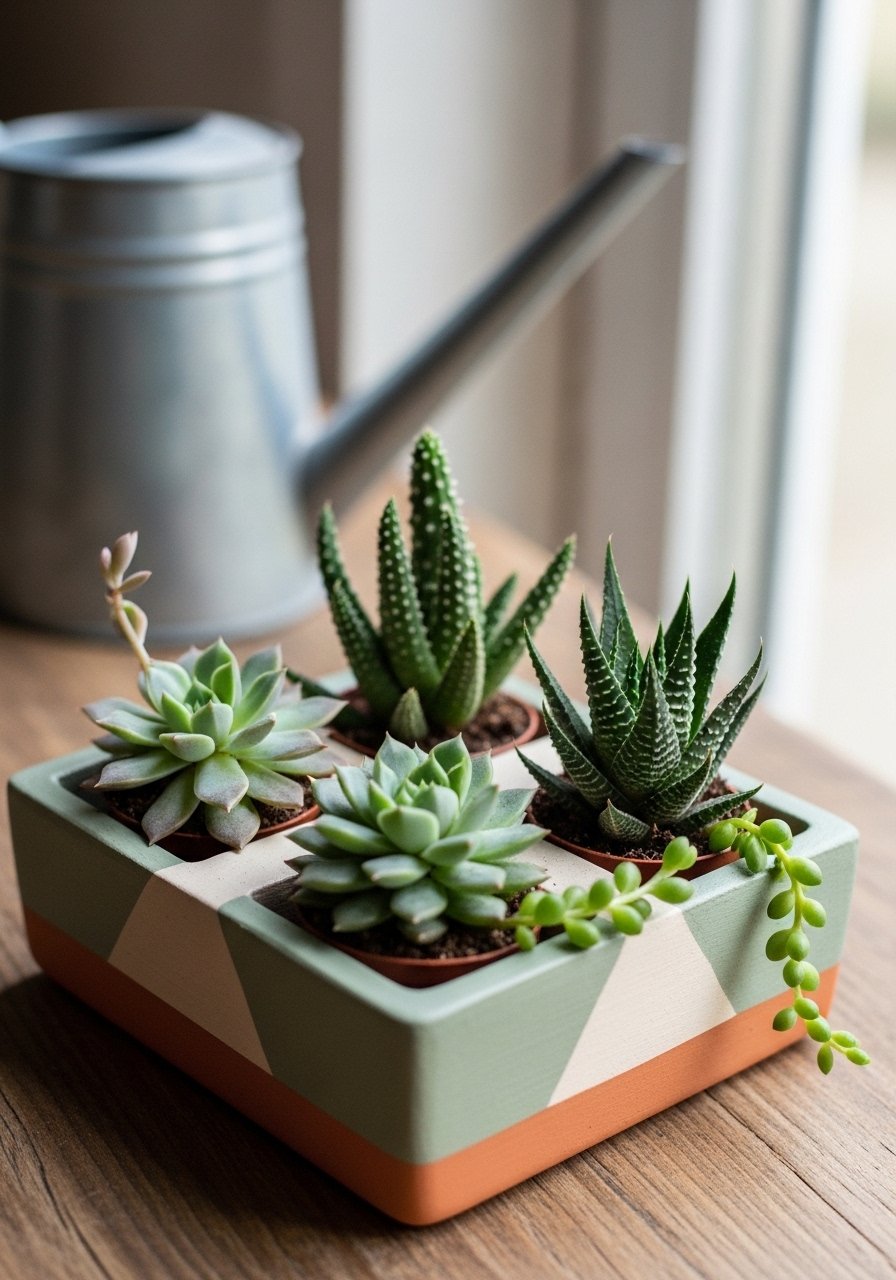
Painted terracotta trays are practical and stylish for mini-succulent arrangements. Chalk paint adheres well; seal to protect from water. Ideal for window sills and desk accents.
Materials
- 1 terracotta tray (6" x 4")
- 2 chalk paint colors (1 oz each)
- 3 2" succulents in nursery pots
- 1 foam brush
- 1 clear matte sealer
- 1 small saucer for watering
Instructions
- Paint tray base color with foam brush; dry 30 minutes.
- Add geometric accents with a second color; dry 20 minutes.
- Seal with matte sealer; cure 24 hours.
- Place succulents in nursery pots on tray; water sparingly.
- Wipe spills immediately to protect paint.
How to Display or Gift It
- Place on a sunny windowsill or desk.
- Gift with care instructions for succulents.
- Pack in a box with newspaper for shipping.
- Store spare pots in a divided organizer.
- Tiny Embroidery Hoop Wall Art

Small hoops are quick stitches with big charm. Use simple running stitch or backstitch for a minimalist design. Great for practicing needlework and making coordinated sets.
Materials
- 1 4" embroidery hoop
- 1 piece natural muslin (6×6")
- 1 embroidery floss (6 strands, 8 ft)
- 1 embroidery needle
- 1 pencil for tracing
- 1 small pair scissors
Instructions
- Tighten muslin in hoop; trim excess.
- Lightly sketch design; thread needle with 2 strands for delicate lines.
- Stitch simple design using backstitch; knot and hide ends.
- Trim fabric at back and secure with glue or fold neatly.
- Hang with a small loop of floss.
How to Display or Gift It
- Cluster three hoops for a gallery.
- Gift in a small box with an extra skein of floss.
- Store finished hoops flat to avoid warping.
- Make seasonal motifs for rotating decor.
- Mason Jar Vanity Organizer
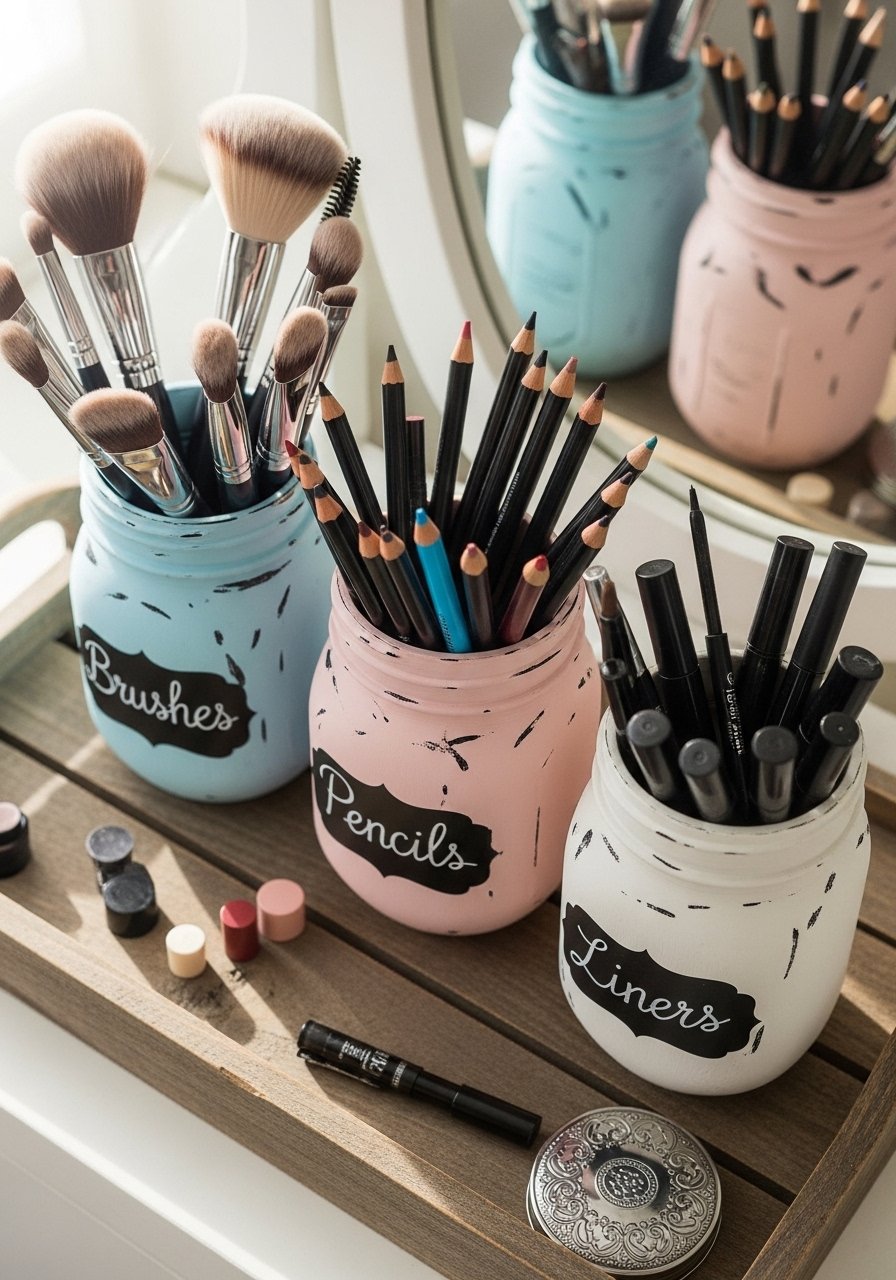
Mason jars repurposed into vanity organizers are practical and pretty. Paint and label them for a coordinated look. Works well for desk supplies too.
Materials
- 3 mason jars (8 oz)
- 1 acrylic paint (matte) — 1 oz
- 1 chalk pen
- 1 foam brush
- 1 wooden tray (optional)
- 1 sandpaper (220 grit)
Instructions
- Clean jars and sand any labels off.
- Paint jars with foam brush; dry 30 minutes and add second coat if needed.
- Label with chalk pen once paint is fully dry (24 hours if using opaque paint).
- Place on tray and arrange items.
- Wipe interiors before storing makeup brushes.
How to Display or Gift It
- Group on a vanity with a small mirror.
- Add filler like glass beads for pencils.
- Gift with brushes tucked in and wrapped in cellophane.
- Store spare jars nested together.
- Rope-Wrapped Vase
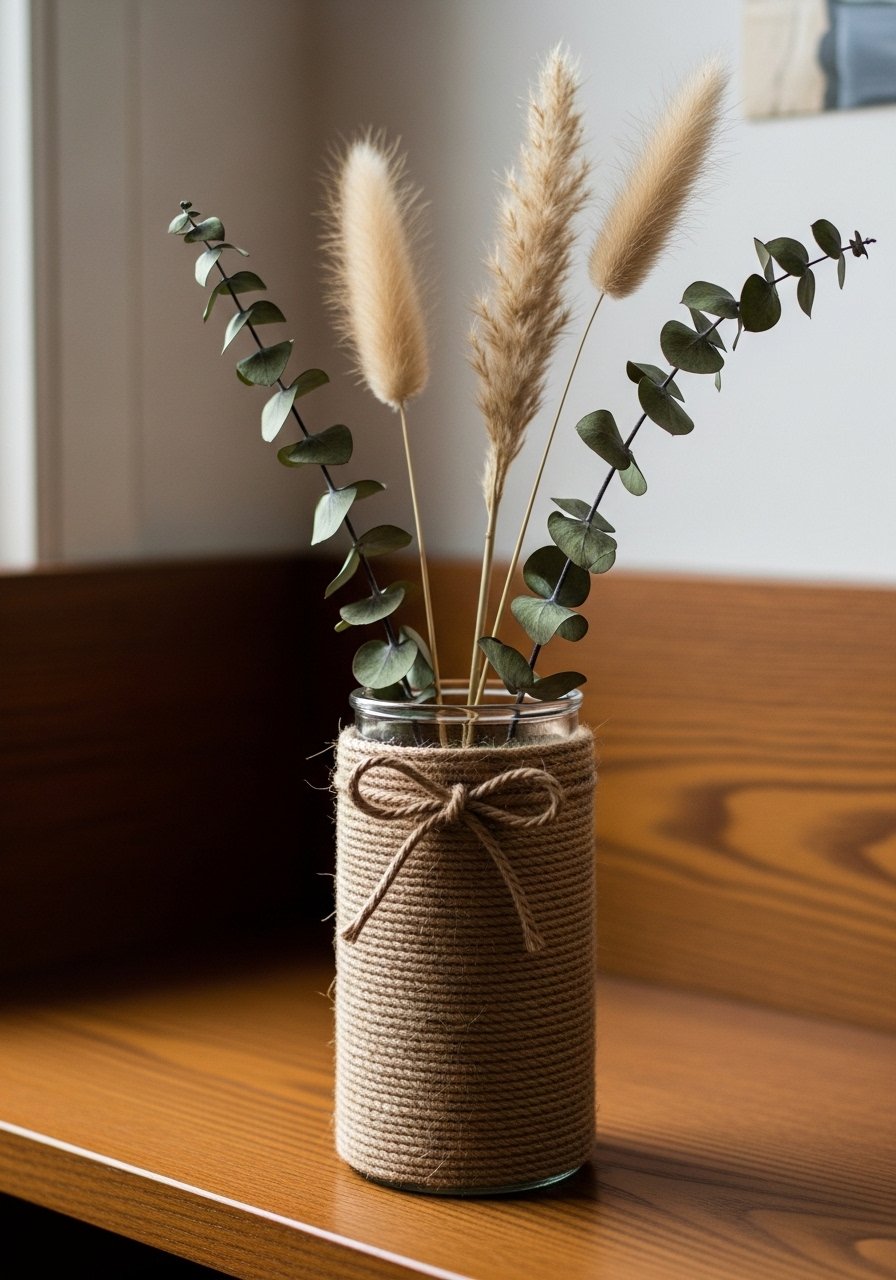
Wrapping a glass vase in jute rope makes a plain vessel feel organic and neutral. It’s forgiving and hides imperfections, giving a coastal-farmhouse touch.
Materials
- 1 glass vase (6" tall)
- 20 feet natural jute rope
- 1 hot glue gun + 4 glue sticks
- 1 scissors
- 1 small dried stems bouquet
Instructions
- Secure rope end at vase base with a dot of hot glue.
- Wrap rope tightly, adding glue every 2–3 inches.
- Finish with a secure knot and trim neatly.
- Add a small rope bow with glue for detail.
- Display with dried stems; avoid water contact.
How to Display or Gift It
- Group with other wrapped vessels for a vignette.
- Gift with dried stems and care note.
- Store spare rope neatly coiled.
- Keep out of reach of pets (jute can shed).
- Minimal Acrylic Paint Pour Trinket Dish
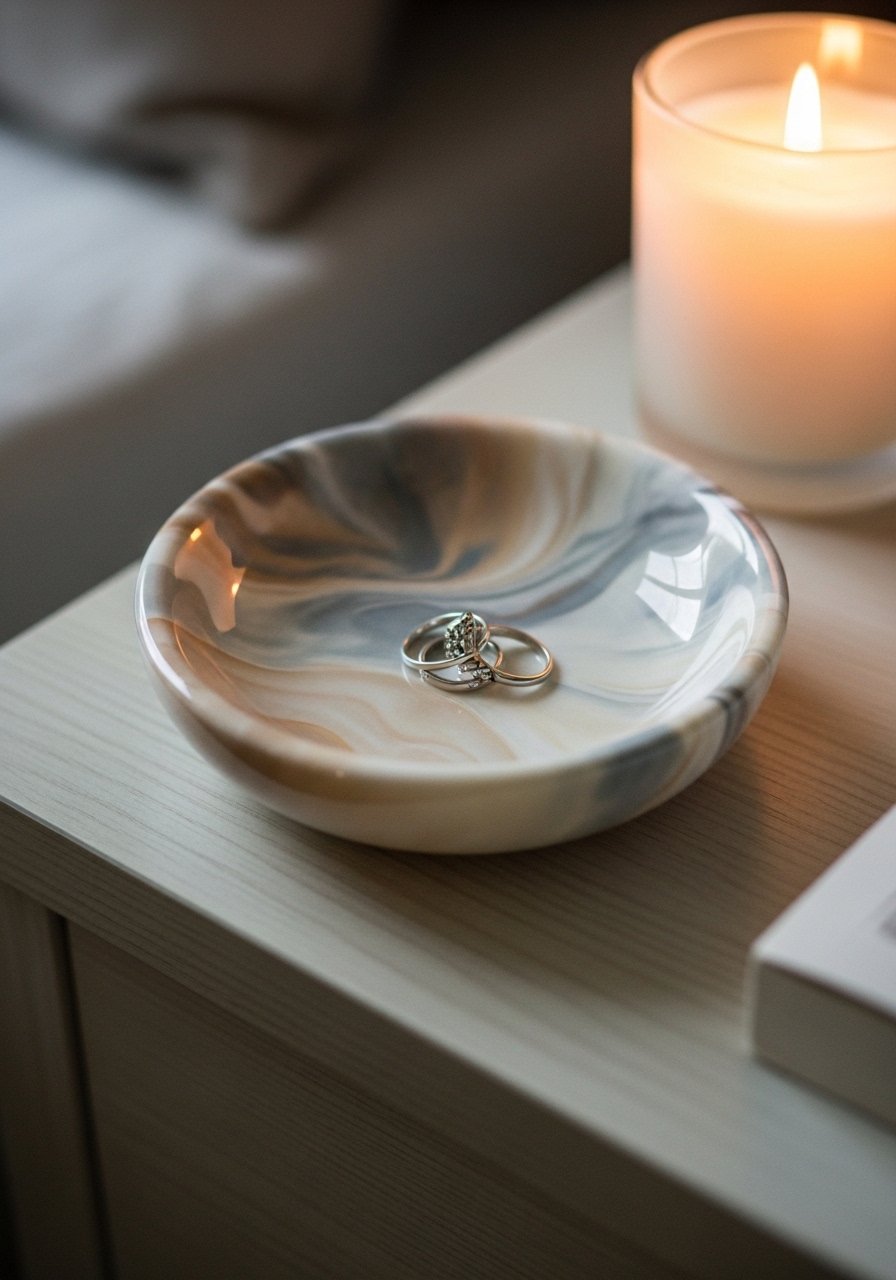
Acrylic pour creates marbled dishes with a high-end look. Use silicone molds and a pouring medium for smooth, glossy results. Great for jewelry or keys.
Materials
- 2 small silicone trinket dish molds
- 3 acrylic paints (fluid) — 1 oz each
- 1 pouring medium (4 oz)
- 1 mixing cups and stir sticks
- 1 nitrile gloves
- 1 torch or heat gun (optional)
Instructions
- Mix each paint with pouring medium (2:1 medium to paint) in separate cups.
- Layer paints into a pouring cup and pour into mold with gentle movement.
- Tilt mold to spread; pop bubbles with torch briefly.
- Let cure 24–48 hours; demold when firm.
- Seal with clear gloss sealer if desired; cure 24 hours.
How to Display or Gift It
- Use on a nightstand for rings or a desk for paperclips.
- Wrap in tissue and a small box for gifting.
- Store flat until fully cured.
- Avoid placing near heat or direct sunlight.
- Simple Book Page Wall Fan
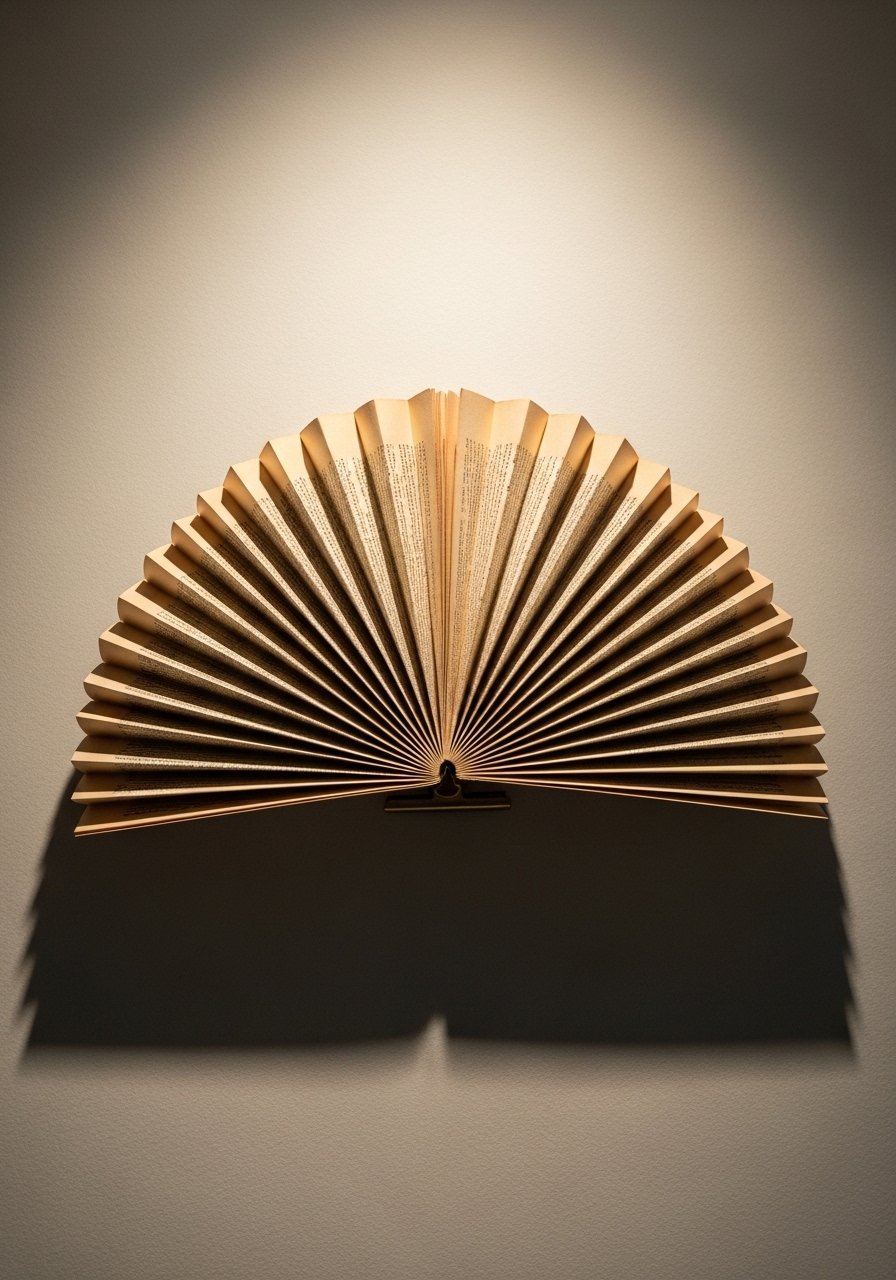
Recycling old book pages into wall fans gives a literary cottagecore feel. It's lightweight, inexpensive, and quick—ideal for book nooks.
Materials
- 6–8 vintage book pages (8.5×11)
- 1 glue stick
- 1 bone folder or ruler
- 1 pencil
- 1 double-sided tape for mounting
- 1 scissors
Instructions
- Fold each page into accordion folds of 1/2".
- Glue ends to form fans in varying sizes.
- Layer fans and glue together to form a cluster.
- Mount with double-sided tape; press firmly.
- Replace if pages fade over time.
How to Display or Gift It
- Group above a reading chair.
- Gift with a vintage bookmark.
- Store flat between chipboard for multiple fans.
- Combine with pressed flowers for texture.
- DIY Pebble Tray Centerpiece
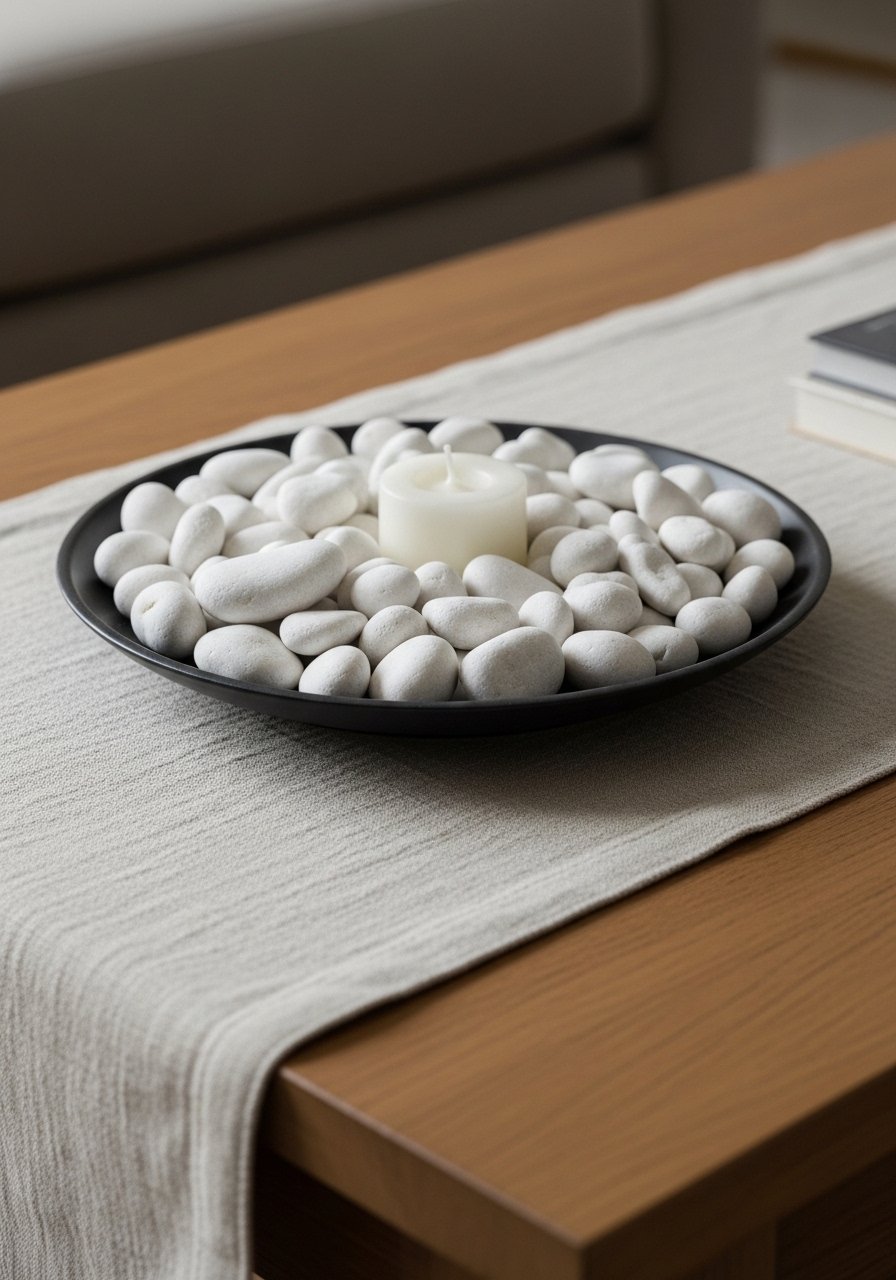
A pebble tray is a simple, serene centerpiece that brings tactile calm. Use smooth river pebbles for a spa-like look; pair with a small candle or air plant.
Materials
- 1 shallow wooden tray (8"x6")
- 1 lb smooth river pebbles
- 1 small pillar candle or air plant
- 1 small scoop or spoon
- 1 damp cloth for cleaning
Instructions
- Fill tray with pebbles to desired depth.
- Nestle candle or air plant in center.
- Wipe tray edges to remove grit.
- For candles, never leave unattended.
How to Display or Gift It
- Use on a coffee table with a stack of books.
- Wrap tray in cellophane and tie with jute for gifting.
- Store pebbles in a jar when not in use.
- Refresh pebbles seasonally with different accent colors.
- Paper Fringe Lampshade Makeover
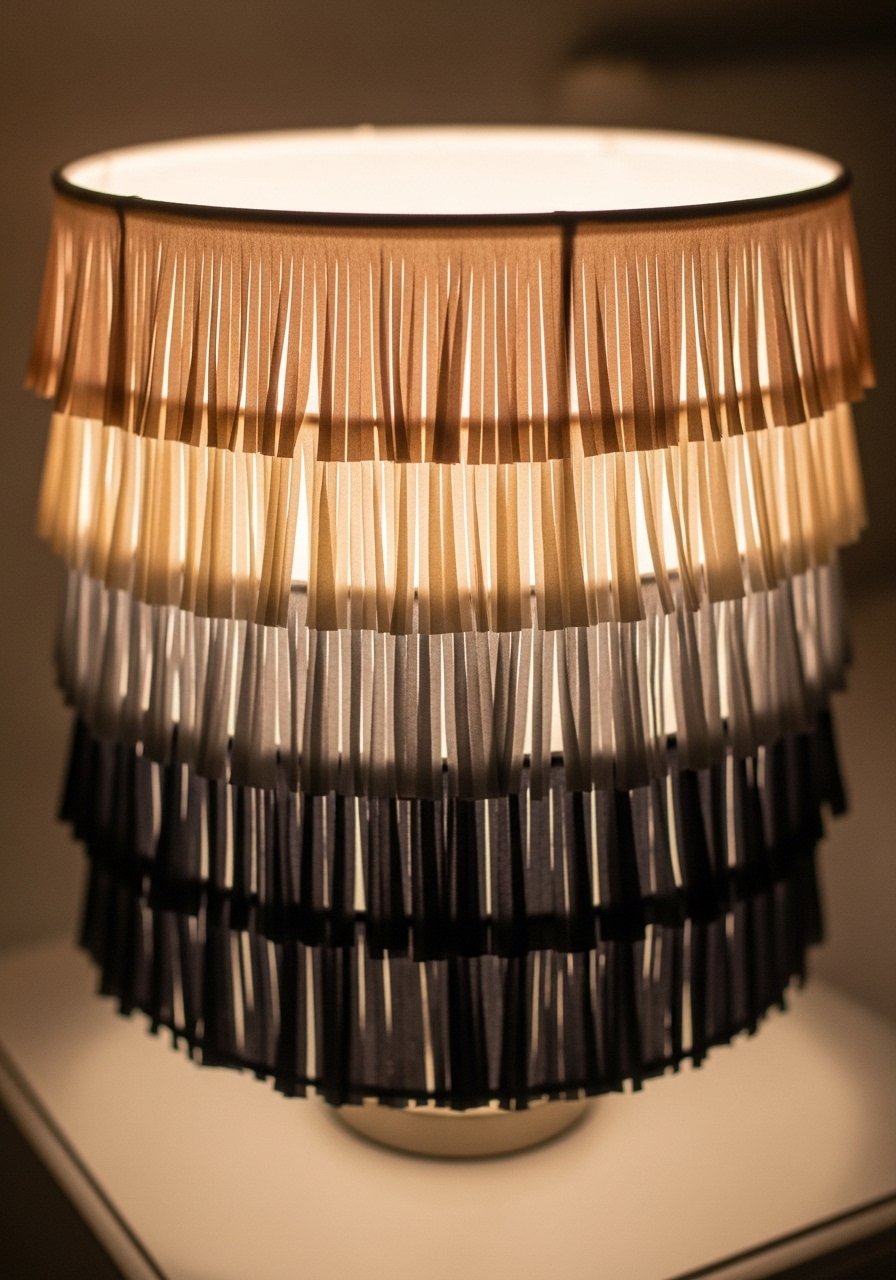
Covering a lampshade in paper fringe adds soft texture and warmth to lighting. It’s lightweight and swap-friendly for seasonal refreshes.
Materials
- 1 drum lampshade (10" diameter)
- 3 sheets crepe paper or tissue paper (varied colors)
- 1 glue gun or craft glue
- 1 scallop-edge scissors
- 1 ruler
Instructions
- Cut paper into strips 1" wide x 12" long; fringe each strip halfway down.
- Starting at the bottom, glue fringe strips around the shade, overlapping slightly.
- Continue layering upward until shade is covered.
- Trim top edge for a neat finish.
- Test shade on lamp to ensure heat safety (use LED bulbs).
How to Display or Gift It
- Use over a bedside table lamp for soft ambient light.
- Gift as a lampshade swap for a friend’s lamp.
- Store flat if removing fringe for reuse.
- Use LED bulbs only to avoid heat damage.
- Simple Painted Clipboards for Wall Organization

Painted clipboards are both decorative and functional. They’re perfect for recipes, to-do lists, or rotating art. Painter’s tape ensures clean blocks.
Materials
- 3 wooden clipboards (standard size)
- 2 acrylic paint colors (1 oz each)
- 1 foam brush
- 1 painter’s tape
- 1 sandpaper (120 grit)
- 1 small mounting hook per clipboard
Instructions
- Sand clipboards lightly and wipe clean.
- Tape off sections for color blocks.
- Paint with foam brush; dry 30 minutes and add second coat.
- Remove tape carefully for crisp lines.
- Hang with mounting hooks; clip in notes or prints.
How to Display or Gift It
- Use in kitchens, home offices, or craft rooms.
- Gift with a small notepad and pen.
- Store spare clipboards stacked flat.
- Make matching sets for coordinated office decor.
- Embellished Candle Jars
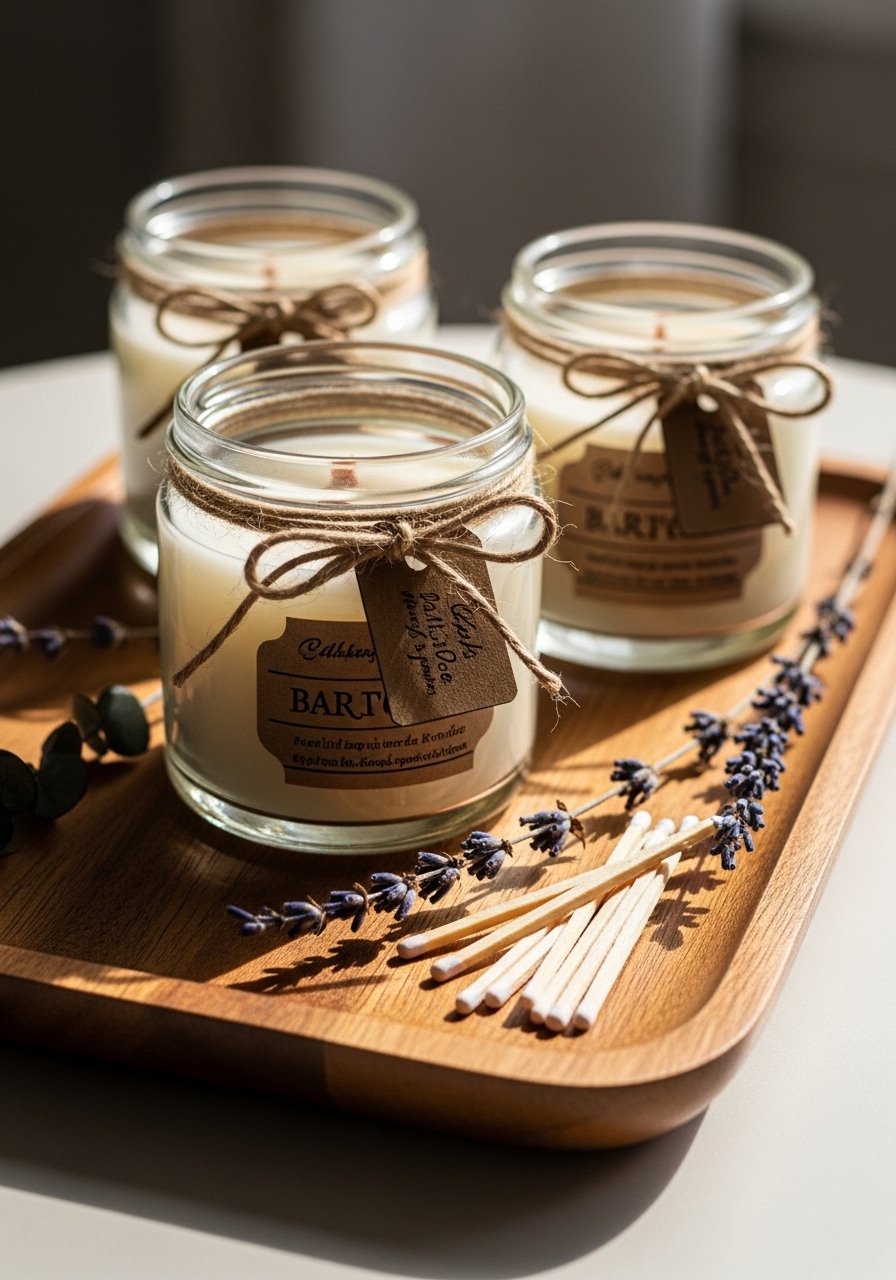
Refinish store candles by adding twine, labels, or pressed flowers under a decoupage layer. It’s a quick upgrade and makes candles gift-ready.
Materials
- 3 small glass candle jars
- 1 roll jute twine
- 1 brown kraft labels
- 1 small glue dots pack
- 1 scissors
- 1 dried sprig for each jar
Instructions
- Wrap jute twine around jar neck and secure with a glue dot.
- Attach kraft label and write message.
- Tuck dried sprig under twine.
- For decoupage, use a thin coat of Mod Podge and press flower flat; dry 24 hours.
- Always trim wick to 1/4" before lighting.
How to Display or Gift It
- Group on a tray or shelf for cozy styling.
- Gift boxed with a matchstick bundle.
- Store extras upright in a cool, dry place.
- Avoid leaving candles unattended.
- Vintage-Look Photo Clipboard Collage
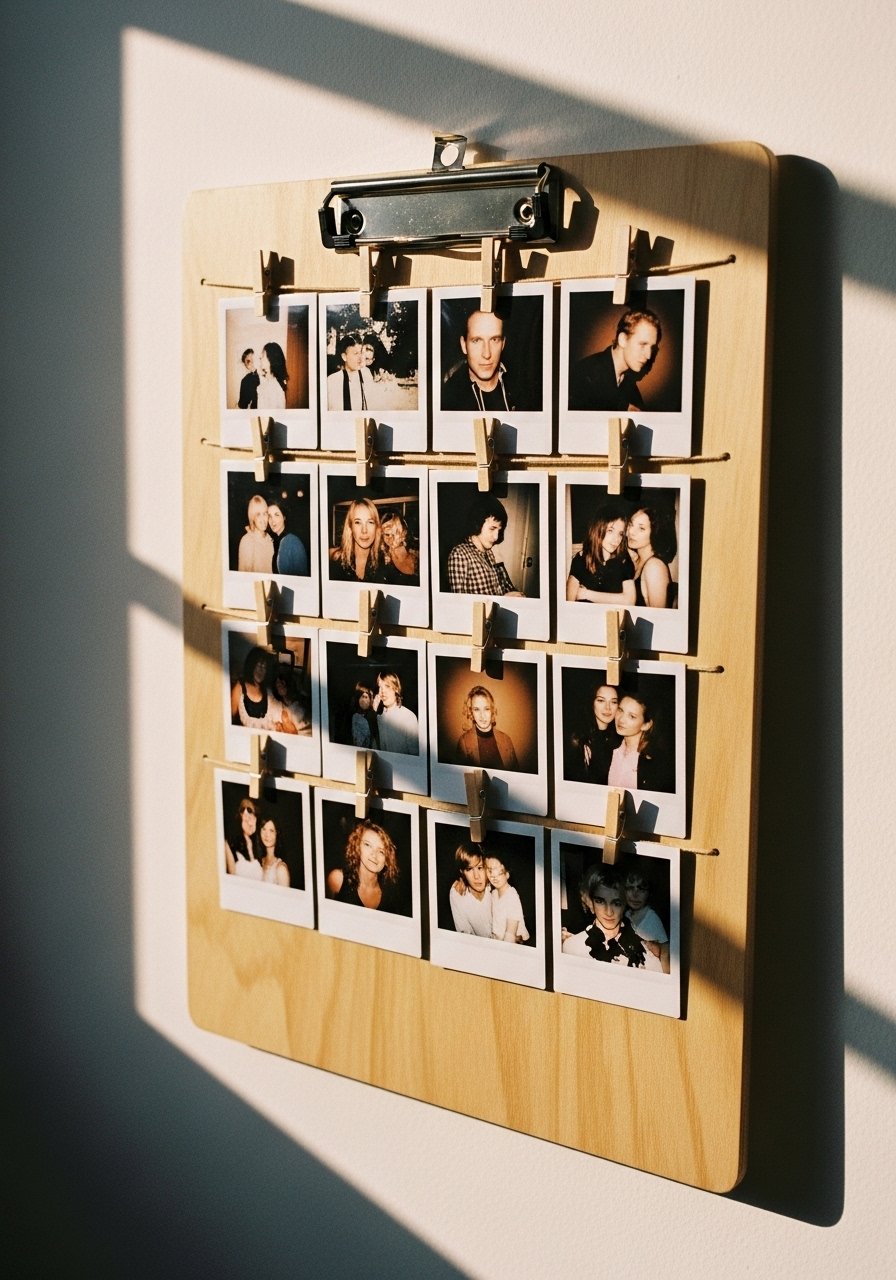
Create a nostalgic collage using printed photos and mini clothespins on a clipboard. It’s an easy rotating display for memories and art school prints.
Materials
- 1 wooden clipboard
- 12–15 3×4 printed photos or art prints
- 12 mini clothespins
- 1 small ruler
- 1 pencil
- 1 double-sided tape
Instructions
- Arrange photos on clipboard to find a pleasing layout.
- Clip photos using mini clothespins; secure overlapping edges with double-sided tape if needed.
- Hang clipboard and swap photos whenever you like.
- Store spare prints in a photo sleeve.
How to Display or Gift It
- Feature on a gallery wall or by a reading nook.
- Gift with a set of printed photos in a kraft envelope.
- Store spare clothespins in a small jar for easy access.
- Rotate prints seasonally for fresh displays.
You made it through 27 approachable, budget-friendly projects that together cover paint, fiber, paper, wood, resin, and found materials. There’s something here for small spaces, renter-friendly walls, and last-minute gifts—plus clear measurements, dry times, and practical tips so you won’t waste supplies. Pin this list so you can come back when you spot a blank wall, a thrifted vase, or a gift moment. Which project will you try first? Share a photo with a friend or make one as a surprise gift.
Trust me, picking up a quality hot glue gun with temperature control changed how every single one of these projects turned out — less stringing, faster bonds, and fewer burns. Happy crafting!


