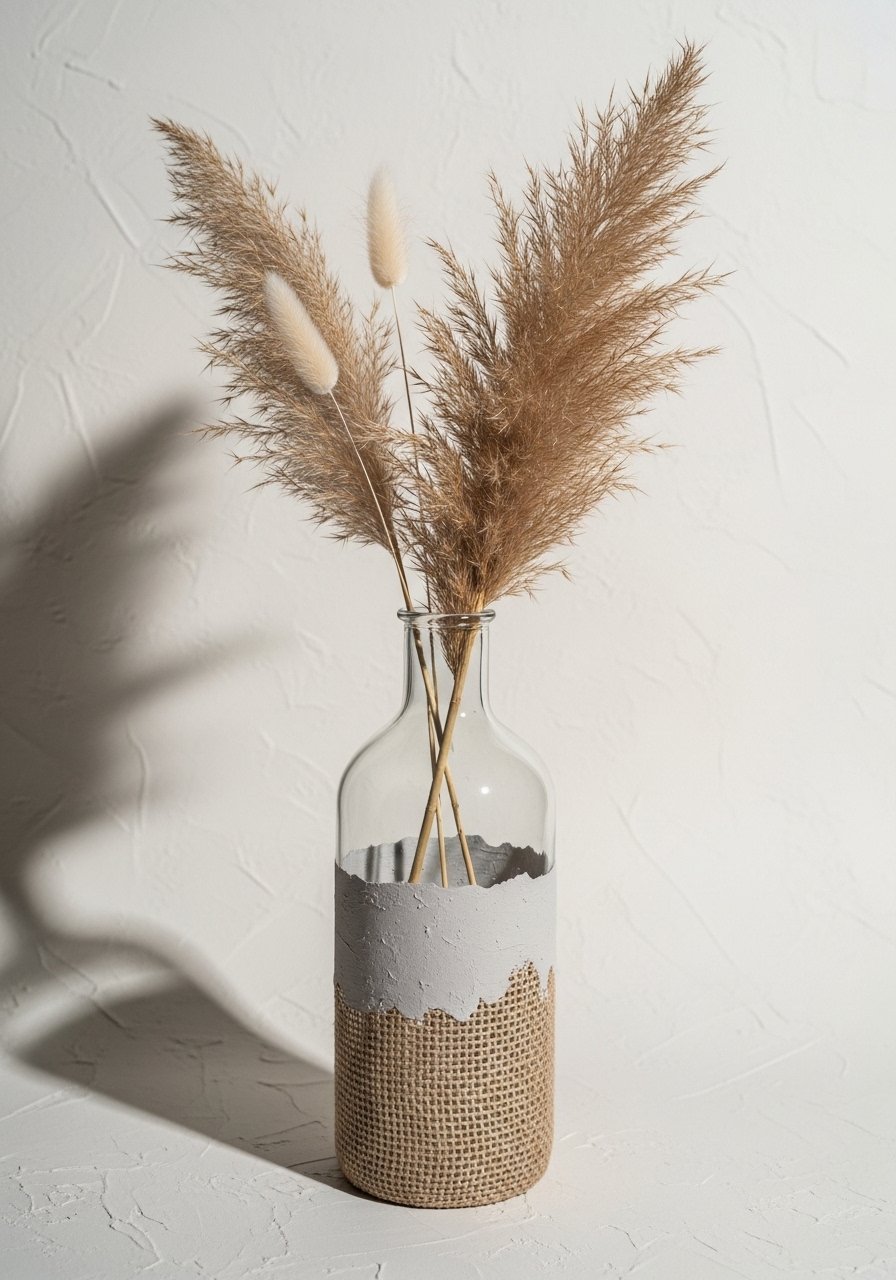
You’ve probably scrolled past a dreamy shelf photo and thought, “I could make that.” These 26 bold boho vase decorating ideas are built for makers who want earthy texture, simple steps, and results that look magazine-ready. Whether you love raw clay, frayed fiber, or glazed finishes, you’ll find projects that use affordable supplies and everyday tools.
I start most finishes with a thin foam brush and my go-to acrylic craft paint set for color blocking. For adhesive work, a low-temp hot glue gun keeps things fast without warping delicate glass or ceramic.
Each project below includes an exact materials list, step-by-step instructions with dry times, and styling tips so you can decorate vases for gifts, shelves, or a cozy corner. Pick one, set up a small workspace, and let tactile textures do the rest.
- Sun-Baked Clay Paint Wash Vase

This simple wash gives any glass vase a soft, earthy base that feels hand-applied. The finish is matte, slightly streaky, and tactile when sealed. Beginners love how forgiving the wash is—brush marks add character. Use a flat foam brush for even coverage and to avoid brush hairs.
Materials
- Clear glass vase (16 oz)
- Acrylic craft paint in raw sienna, burnt umber, and titanium white — 3 small tubes
- Matte Mod Podge — 4 fl oz
- Water — ¼ cup
- Flat foam brush — 1 (1")
- Fine-grit sandpaper — 120 grit
- Microfiber cloth — 1
- Painter’s tape — 1 roll
Instructions
- Wash and dry the vase; remove labels and any adhesive residue with warm soapy water. Let dry fully (10–15 minutes).
- Lightly sand the vase where you’ll apply paint to help adhesion; wipe with a microfiber cloth.
- Mix 1 tbsp raw sienna, 1 tsp burnt umber, 1 tsp white, and 2 tbsp water in a disposable cup to a thin, milky consistency.
- Dip the foam brush and apply a thin, uneven coat from bottom up in vertical strokes. Leave gaps for a textured look.
- Let the first coat dry 30 minutes. Apply a second sparse coat if desired for depth; dry 30 minutes.
- Seal with a thin coat of Matte Mod Podge, applied with a clean foam brush. Dry 1 hour. Cure fully 24 hours before adding water or flowers.
- Check for tackiness; a fully cured surface will be firm and not sticky.
How to Display or Gift It
Display on an entry console with dried grasses. Tie a small twine bow around the neck. Store extras flat in a craft organizer box until the sealer cures. For gifting, wrap in kraft tissue and tuck in a kraft gift box.
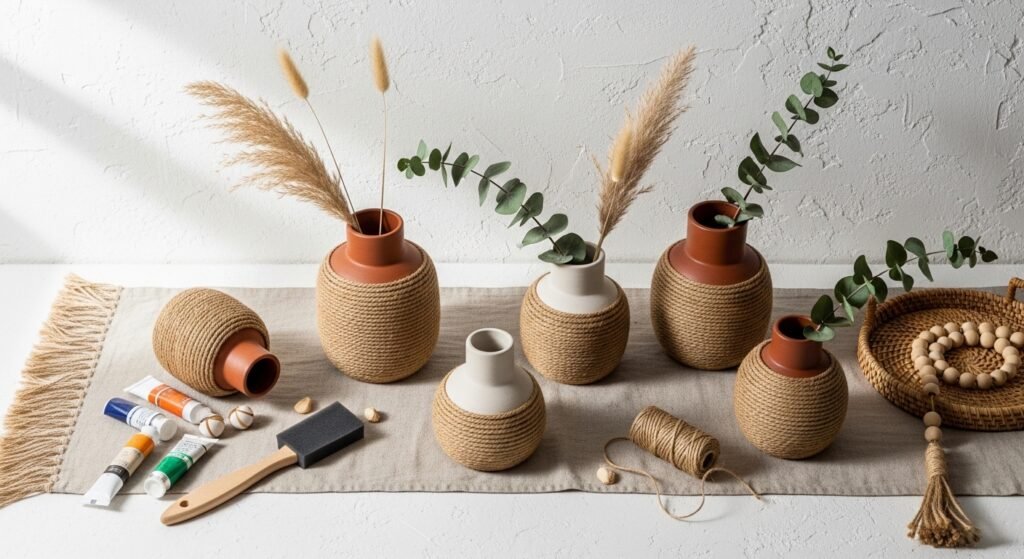
- Jute-Wrapped Coastal Clay Vase
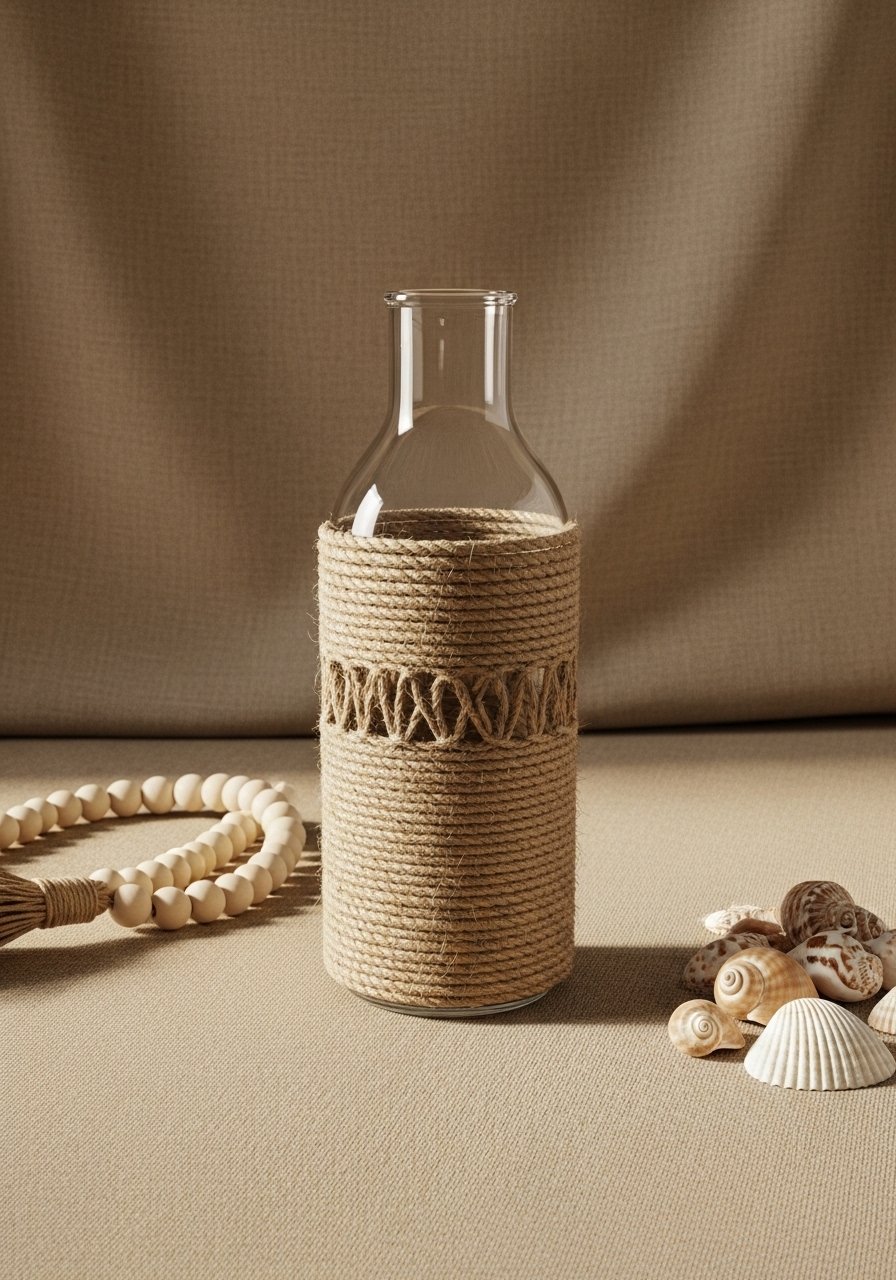
This project adds an organic fiber base that looks like a thrifted coastal find. The jute creates a warm, tactile band you can mix with paint or leave natural. A hot glue gun makes the wrap quick and secure without messy knots showing.
Materials
- Glass or ceramic vase, 8–10" tall
- 3mm jute cord, 30 feet
- Hot glue gun (low-temp) and glue sticks — 1 gun, 6 sticks
- Scissors
- Clear craft sealer spray — matte, 6 oz
- Small wooden beads — 12
- Twine (for finishing knot) — 3 feet
- Craft needle (for threading beads) — 1
Instructions
- Clean the vase and wipe dry. Test-fit the jute by wrapping loosely and note where you want the start/end.
- Plug in the hot glue gun to warm. Apply a thin line of glue at the vase neck and press the jute cord into place. Hold 5 seconds.
- Continue wrapping, applying thin glue lines every 3–4" to keep the wrap even. Keep tension firm but not stretched.
- When you reach the lower edge of your design, trim cord and secure with a small dab of glue. Press a wooden bead over the end for a finished look.
- Allow glue to cure 10 minutes. Spray a light coat of clear craft sealer from 8–10" away to reduce fraying. Dry 30 minutes, cure 24 hours.
How to Display or Gift It
Nest it on a stack of driftwood books for a coastal vignette. For gifting, tuck a printed care note and a bundle of dried eucalyptus inside the vase. Store wrapped vases in a padded craft organizer.
- Boho Vase Decorating Ideas — Linen-Wrapped Neutral Vase
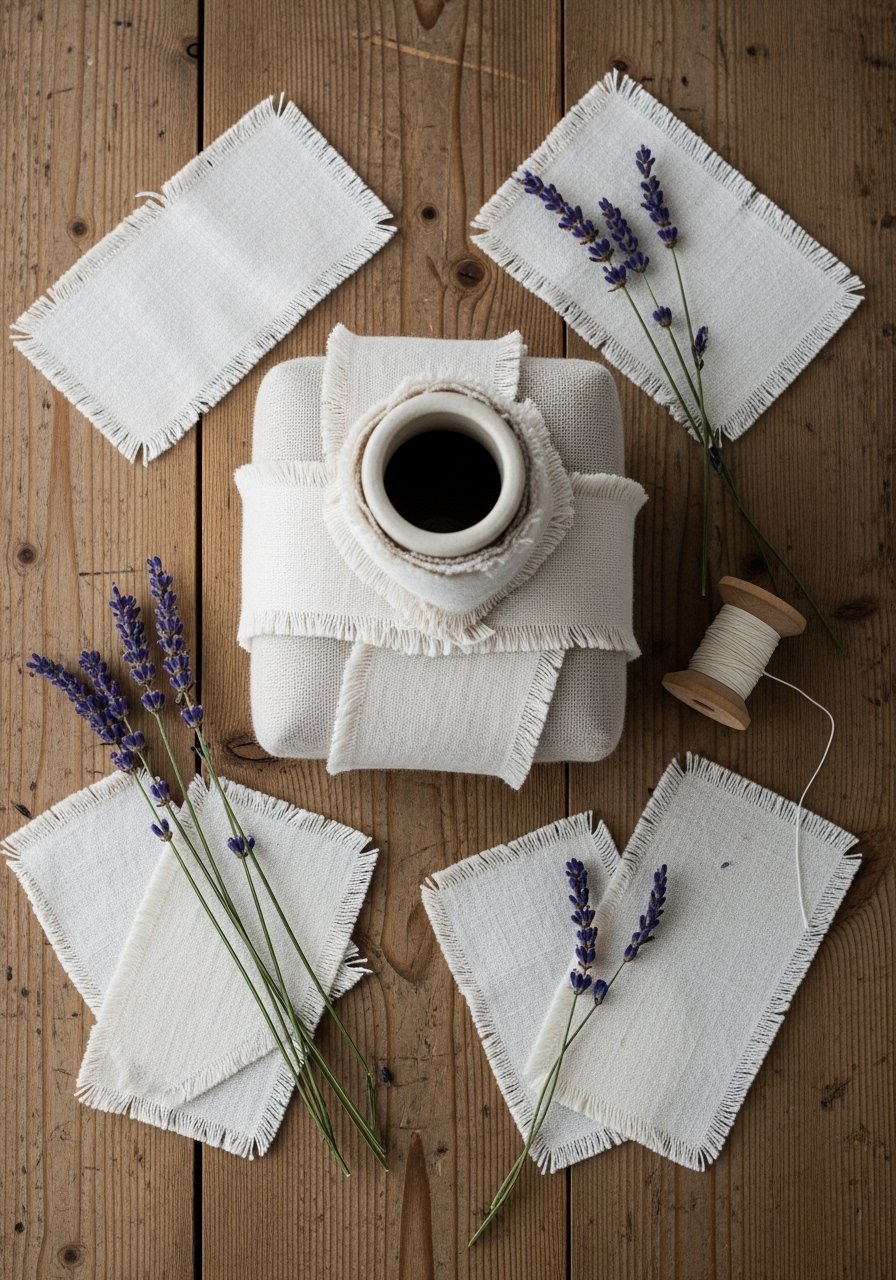
The linen strip adds cottagecore texture and a soft neutral tone. This is perfect when you want a textile look without full macramé. Use fabric glue for clean adhesion. A sewing machine option is mentioned for durability.
Materials
- Small ceramic vase, 6" tall
- Linen fabric scraps — 6" x 24"
- Fabric glue (clear-drying) — 2 oz
- Scissors
- Pins (to hold while drying) — 6
- Rotary cutter or fabric scissors
- Optional: sewing machine for a stitched edge
- Needle and thread — for hand-sewing 12"
Instructions
- Cut the linen to a 6" x 24" strip (adjust for vase circumference).
- Apply a thin line of fabric glue along one long edge. Wrap the linen around the vase, overlapping the glued edge to secure. Pin edges while glue sets.
- Smooth wrinkles and trim excess at the bottom for a neat finish.
- Let glue dry 1–2 hours; fully cure 24 hours before handling.
- For extra security, stitch a hidden seam with needle and thread or a quick line on a sewing machine.
How to Display or Gift It
Fill with fresh herbs or dried lavender for a kitchen mantle. Wrap in tissue and place in a kraft gift box for a simple, thoughtful gift.
- Textured Chalk Paint Drip Vase
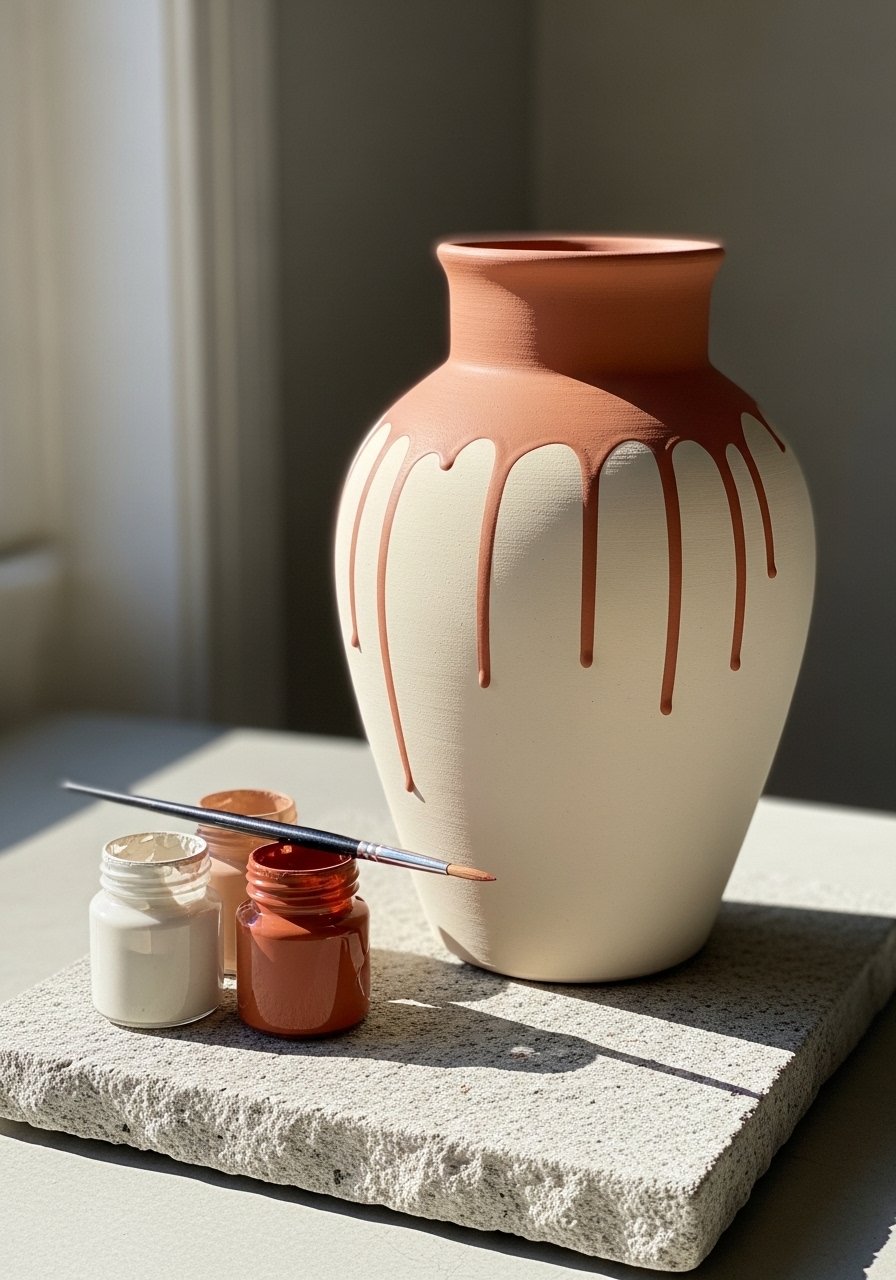
Chalk paint gives a soft, velvety finish with depth when you layer drips. The controlled drips create an artisanal look. A brayer roller helps press paint into texture for consistent coverage.
Materials
- Ceramic or glass vase, 10–12" tall
- Chalk paint (2 colors: cream and terracotta) — 2 x 2 oz jars
- Small paintbrush (round) — 1
- Brayer roller — 1 (2")
- Paper towel
- Water container
- Matte clear wax or sealer — 4 oz
Instructions
- Clean the vase. If glass, sand lightly for adhesion.
- Apply a base coat of cream chalk paint with the roller; let dry 30 minutes.
- Thin terracotta chalk paint with 1 tsp water to encourage drips.
- Use the round brush to place droplets near the rim; tilt vase slightly to guide drips down. Work in sections.
- Let dry 45 minutes. If tacky, leave 1–2 hours.
- Apply a thin coat of matte wax or sealer with a lint-free cloth. Cure 24 hours.
How to Display or Gift It
Pair with a small wooden tray and neutral candles. For gifting, include care notes and avoid water for display for 48 hours.
- Pebble Mosaic Earth Vase
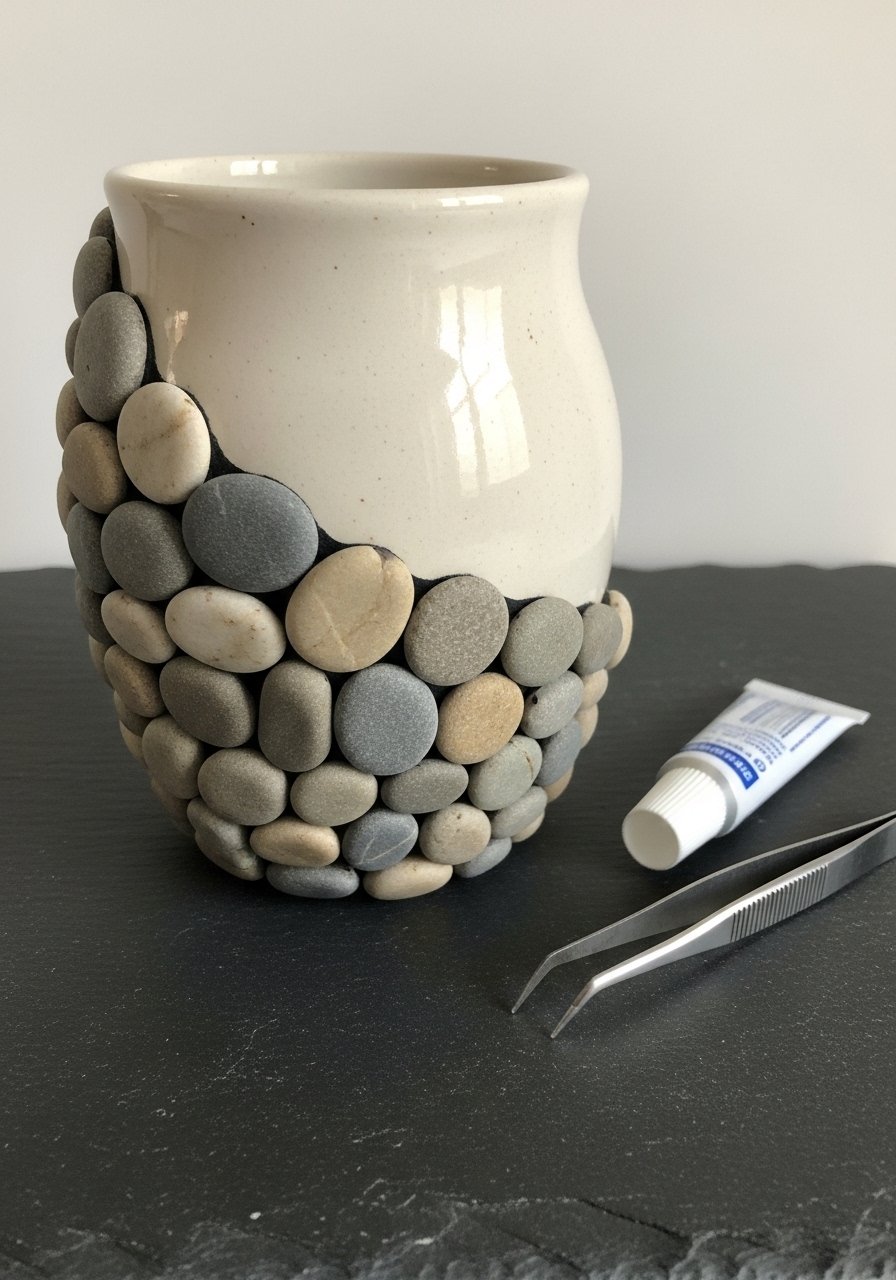
Tiny pebbles add natural texture and weight without bulk. Tweezers help place stones precisely. An outdoor-rated epoxy provides a durable hold and water resistance for cut stems.
Materials
- Short glass vase (6–8")
- Flat decorative pebbles, 100–150 pieces (8–12 mm)
- Clear epoxy adhesive (outdoor-rated) — 1 oz
- Tweezers — 1 pair
- Disposable mixing stick and cup
- Isopropyl alcohol wipes
- Rubber gloves
Instructions
- Clean and dry the vase; wipe with alcohol.
- Plan your mosaic layout by arranging pebbles on a paper template.
- Mix 0.5 oz epoxy per manufacturer directions (usually 1:1). Work in 10-minute windows.
- Apply a small dab of epoxy with a wooden stick; press a pebble into place using tweezers.
- Work in 2–3" sections. Allow epoxy to begin to set 10–15 minutes then continue.
- Full cure 24–48 hours before adding water. Ensure no tackiness remains.
How to Display or Gift It
Place on a textured linen runner; surround with tiny succulents. Ship in a cushioned box with bubble wrap if gifting. Store unused pebbles in a craft organizer tray.
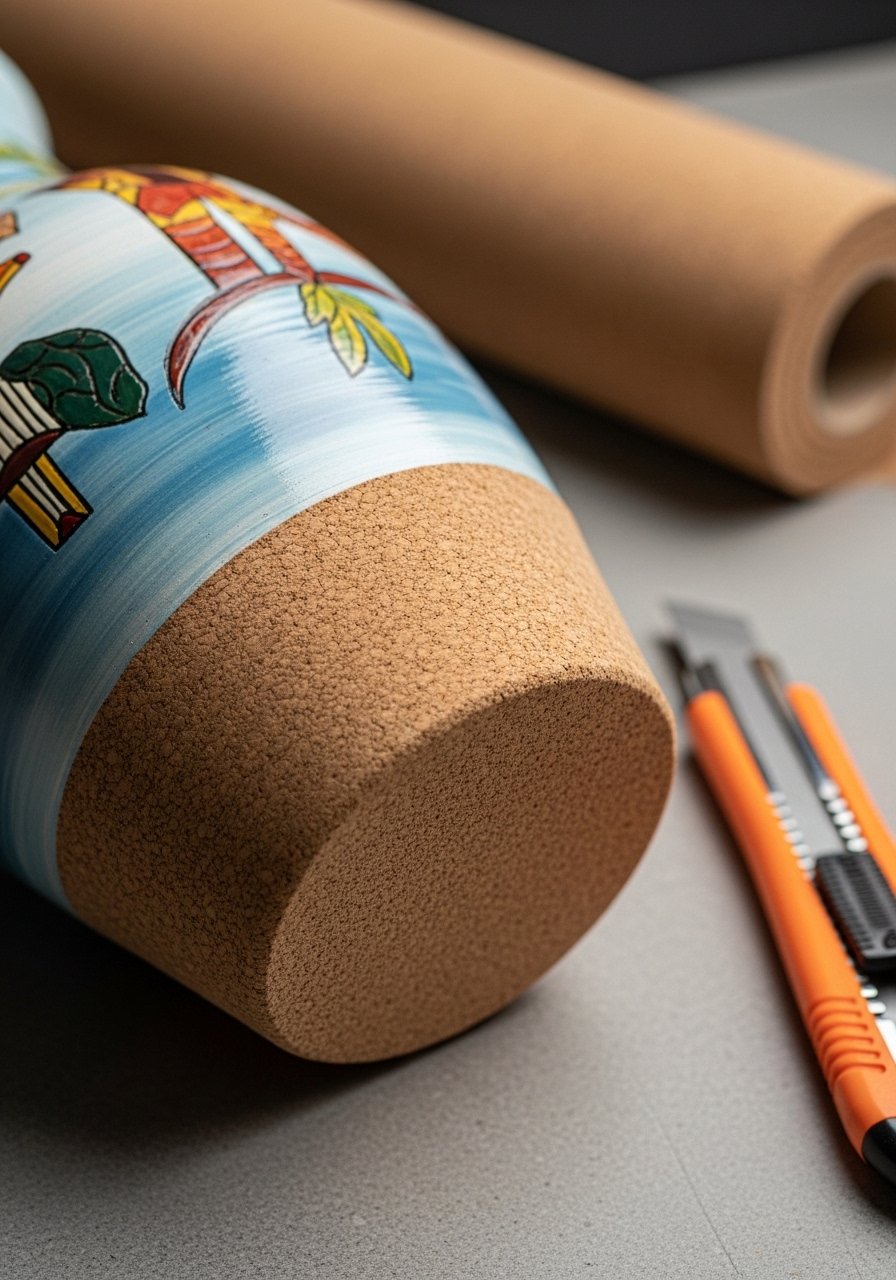
- Matte Clay Spray Over Organic Mesh
Using a sculptable mesh under a sprayable clay imparts subtle ridges and structure. A heat gun can speed drying between thin coats but use low heat. The finish is sculptural without heavy weight.
Materials
- Glass cylinder vase, 12" tall
- Sculpting mesh or jute net — 12" x 18"
- Sprayable air-dry clay or texture spray — 8 oz
- Low-temp heat gun — 1
- Fine sandpaper — 220 grit
- Disposable gloves
- Painter’s tape
Instructions
- Wrap the mesh around the vase and secure with painter’s tape in inconspicuous areas.
- Shake the sprayable clay and apply a thin first coat, holding nozzle 10–12" away. Keep coats thin to avoid sagging.
- Let coat dry 30 minutes. Use a heat gun at low for 5–10 seconds if you need to accelerate.
- Apply a second light coat for opacity; dry 1 hour.
- Once fully dry, remove tape and gently sand any sharp ridges with 220 grit.
- Optionally seal with matte spray sealant. Cure 24 hours.
How to Display or Gift It
Pair with rattan trays and neutral books. For storage, keep mesh and spray in a craft toolbox protected from moisture.
- Boho Vase Decorating Ideas — Macramé Fringe Wrap

Fringe softens a vase and creates movement when paired with pampas or tall stems. This beginner-friendly macramé uses simple knots. A macramé cord spool in 3mm gives a delicate fringe.
Materials
- Vase, 8–10" tall
- 3mm macramé cord, 50 feet
- Wooden bead large hole — 1
- Scissors
- Measuring tape
- Small comb (to fray fringe)
- Hot glue gun — 1
Instructions
- Cut 10 cords at 30" each. Fold in half and create lark’s head knots around the vase neck until covered.
- Tie a simple square knot row 1" below the neck to secure.
- Thread a wooden bead onto the center cords and knot beneath it.
- Trim fringe to desired length and comb gently to fray.
- Secure the starting tail under a knot with a dab of hot glue. Let set 10 minutes.
How to Display or Gift It
Display with tall dried stems or reed diffusers. Store extra cord on a spool in a craft organizer. For gifting, slide vase into a kraft gift box and include a small care card.
- Sgraffito Clay Paint Vase (Etched Texture)
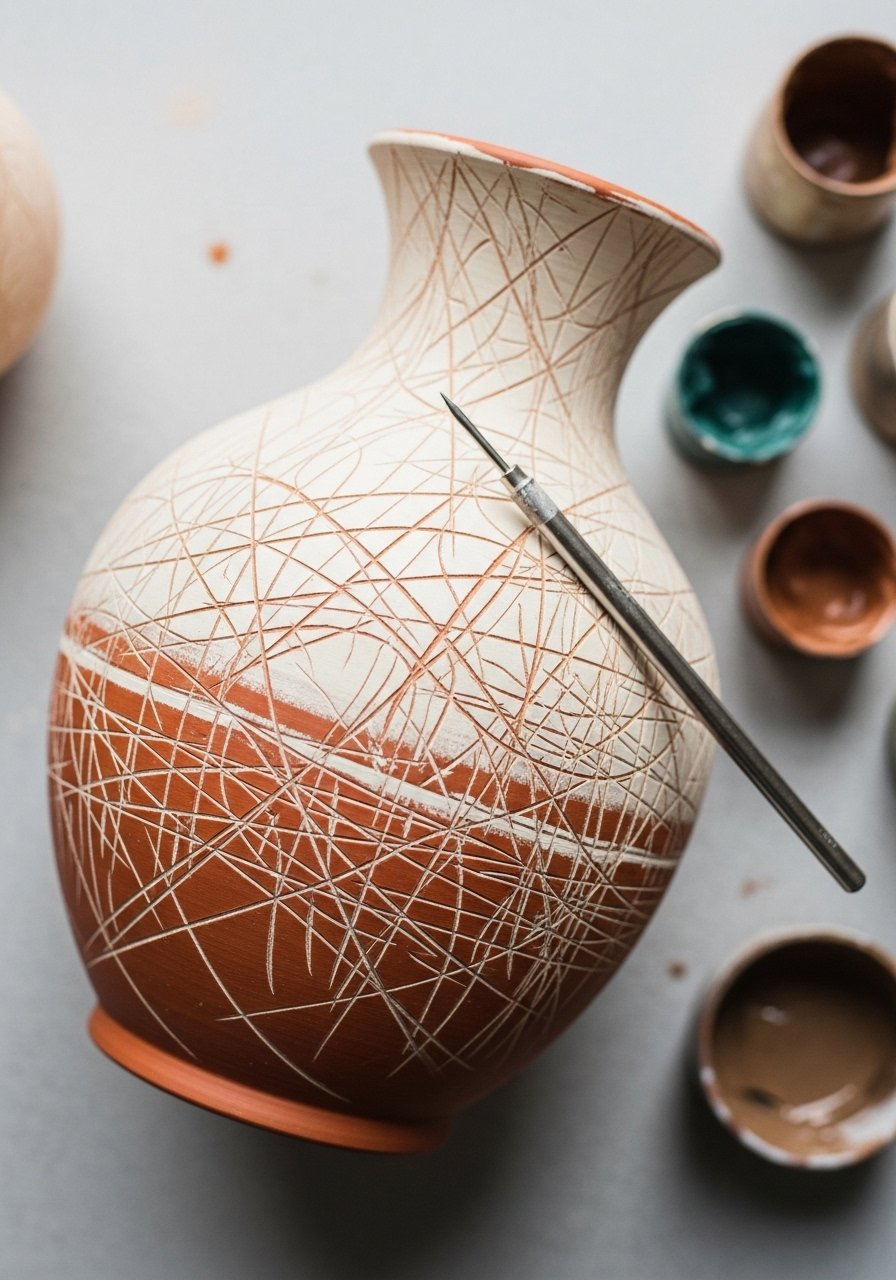
Sgraffito means scratching through a top layer to reveal color beneath. This produces a hand-etched look that’s earthy and artistic. A fine stylus or nail works for incising patterns.
Materials
- Ceramic vase, unglazed or primed glass
- Acrylic paint base coat (terracotta) — 2 oz
- Acrylic topcoat (cream) — 2 oz
- Stylus or toothpick for etching — 1
- Foam brush — 1
- Sandpaper — 120 grit
- Clear matte sealer — 2 oz
Instructions
- Sand vase lightly if glossy. Apply terracotta base coat; dry 30 minutes.
- Once base is dry, paint over with cream topcoat; dry 30 minutes.
- Using a stylus, scratch through the cream to reveal terracotta in desired patterns. Work steadily; practice on paper first.
- Wipe away dust and seal with clear matte sealer. Dry 1 hour, cure 24 hours.
How to Display or Gift It
Pair with linen textiles and burnished brass candlesticks. For gifting, tuck dried stems inside and wrap with a simple twine bow.
- Raffia Tassel Accent Vase
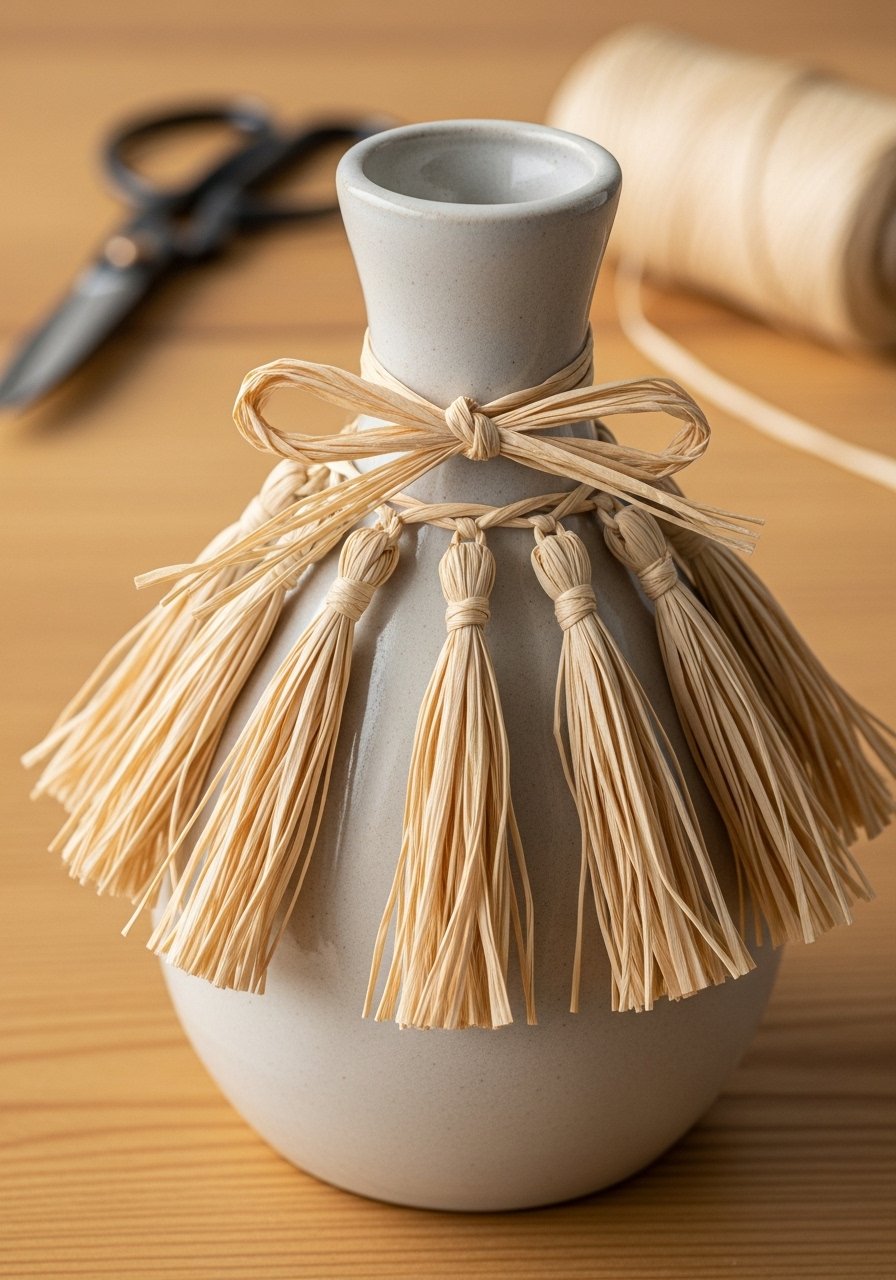
Tassels give a playful, tactile rim that’s easy to customize. Raffia is lightweight and adds a natural fiber look without bulk. Tying multiple tassels creates a balanced fringe.
Materials
- Vase, 6–8" tall
- Natural raffia — 30 feet
- Scissors
- Hot glue gun — 1
- Wooden ring or small hoop — 1
- Small ribbon for hiding knots — 1 foot
Instructions
- Cut raffia into 12 pieces of 12" each. Fold in half and thread through wooden ring, securing with knot.
- Space rings around the neck and secure with hot glue on the inside lip of the vase. Hold 5–10 seconds.
- Trim tassels to uniform length. Optionally wrap a ribbon around the base of tassels to conceal knots.
- Let glue cure 10 minutes before adding décor.
How to Display or Gift It
Group several tasselled vases on a low coffee table tray. For gifting, nest the vase in tissue paper and include instructions to remove tassels before washing.
- Layered Earth-Tone Paint Banding

Painted bands are modern and graphic while still feeling warm with earthy colors. Painter’s tape keeps lines neat; a bone folder or burnisher helps seal tape edges for crisp lines.
Materials
- Tall vase, 10–12"
- Painter’s tape — 1 roll
- Acrylic craft paints: ochre, olive green, cream — 3 x 1 oz
- Flat foam brush — 1
- Bone folder or burnishing tool — 1
- Paper towel
- Clear matte sealer — 2 oz
Instructions
- Clean vase and mark band locations with a faint pencil line.
- Apply painter’s tape along pencil lines, burnish edges with a bone folder.
- Paint each band with thin layers; dry 20–30 minutes between coats. Two coats usually give full coverage.
- Remove tape once paint is dry to the touch (about 30 minutes) to prevent peeling.
- Seal with a matte sealer; cure 24 hours.
How to Display or Gift It
Use as a pedestal for a single bloom or a handful of dried stems. For storage, nest in padded compartments of a craft organizer tray.
- Rustic Burlap Sleeve with Bead Closure
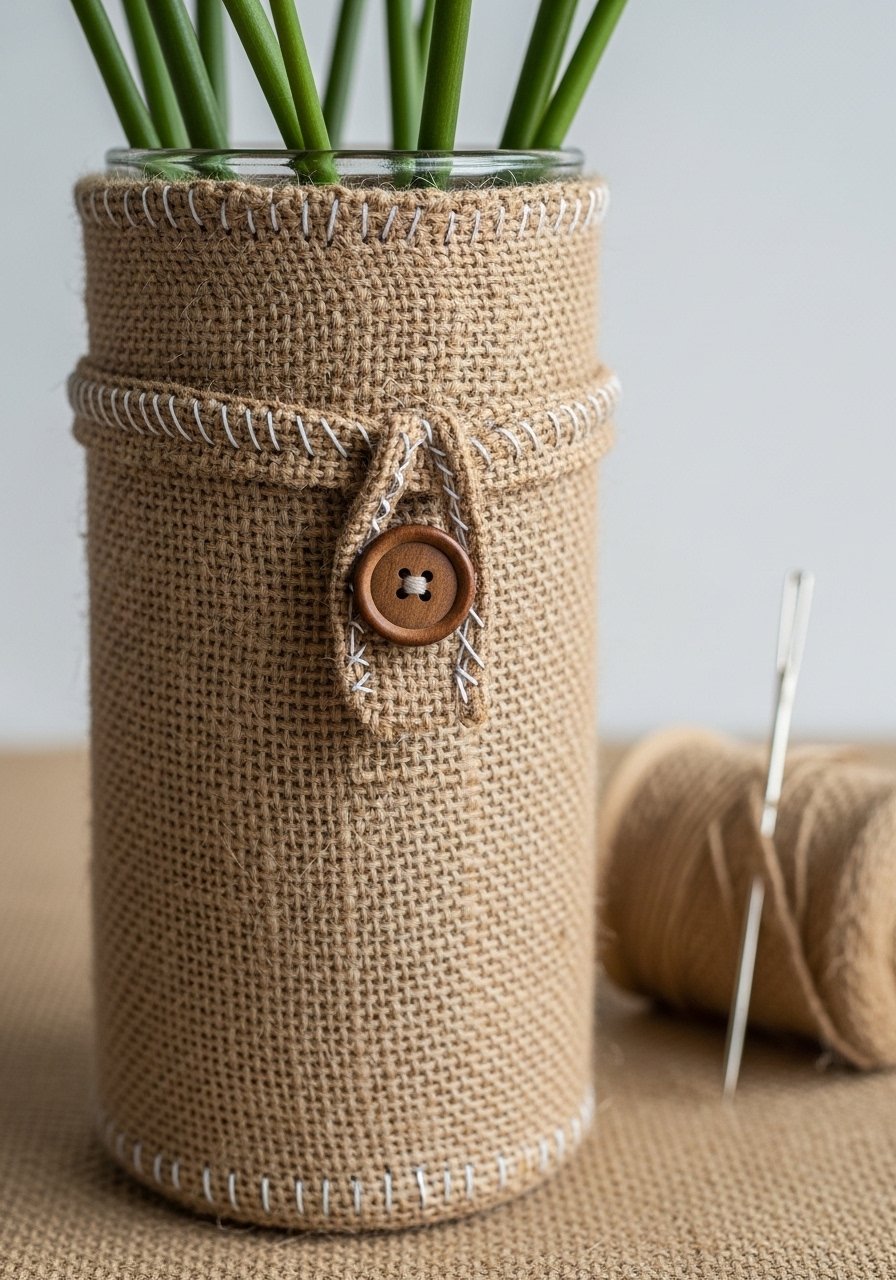
A stitched burlap sleeve gives farmhouse-meets-boho charm. The sleeve is removable, so the vase can be washed or switched seasonally. A button closure adds a handmade touch.
Materials
- Vase, 8–10"
- Burlap fabric — 8" x circumference
- Needle and heavy thread or sewing machine
- Wooden button — 1 (1")
- Measuring tape
- Sewing pins
- Hot glue (optional)
Instructions
- Measure vase circumference and cut burlap 1" longer for seam and 2" taller for overlap.
- Fold edges and stitch a neat hem. Sew a loop on one short end and attach wooden button to the other.
- Slide sleeve over vase and button closed at desired height.
- Optionally secure bottom with a small dab of hot glue for stability.
How to Display or Gift It
Layer on a tray with candles and ceramic bowls. Store sleeves flat until ready to use in a fabric organizer.
- Burnt Umber Wash with Gold Leaf
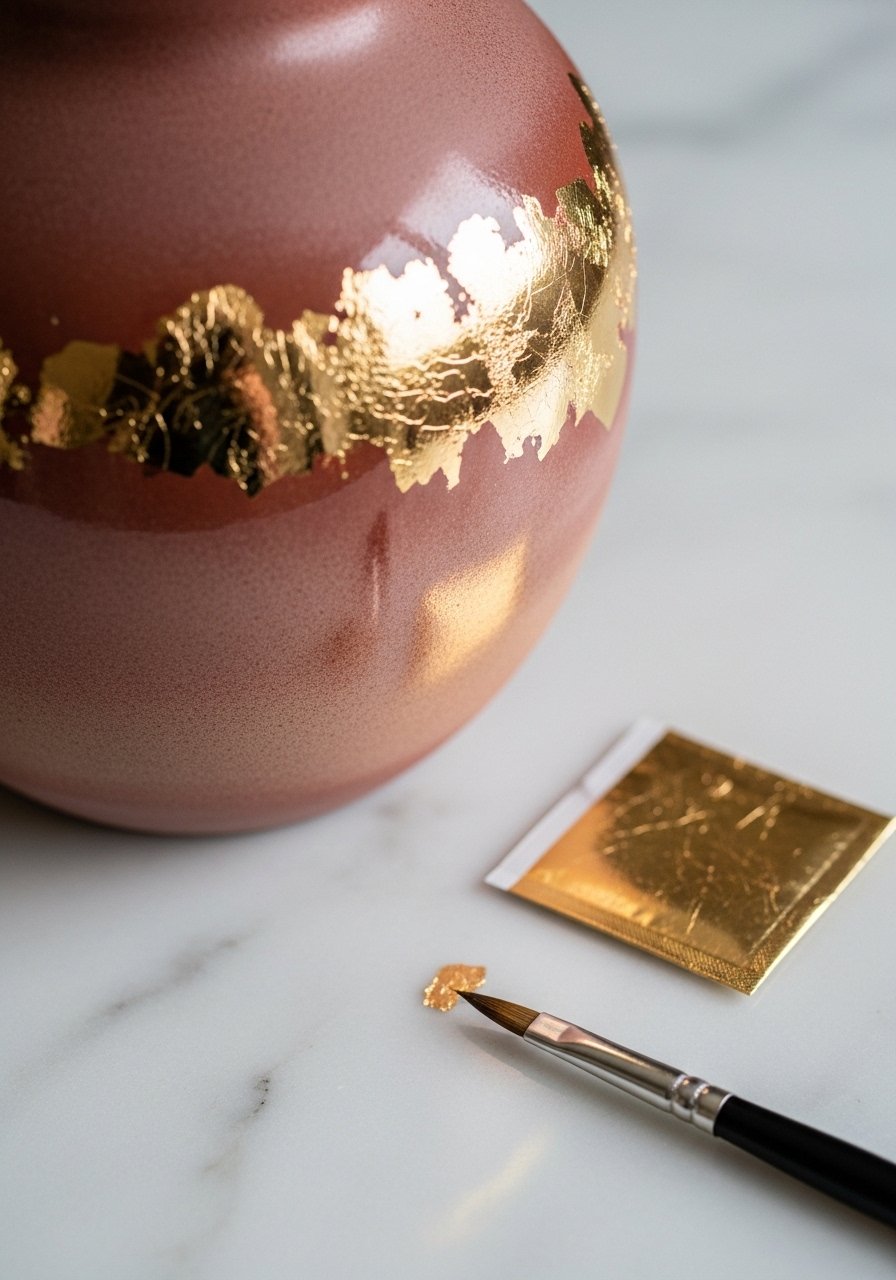
Gold leaf adds luxe contrast to raw earthy washes. Use size adhesive for leaf application and a soft brush to burnish. Work in a calm, draft-free area to prevent leaf tearing.
Materials
- Vase, 8–12"
- Acrylic wash in burnt umber — 2 oz
- Gold leaf sheets (1 pack)
- Gold leaf size (adhesive) — 0.5 oz
- Soft brush for burnishing — 1
- Cotton gloves (optional)
- Small bowl of distilled water (for cleanup)
Instructions
- Apply the burnt umber wash; dry 30 minutes.
- Brush a thin line of gold leaf size where you want the leaf to adhere. Wait until tacky (per product directions, usually 10–20 minutes).
- Lay gold leaf sheet over adhesive; gently press with soft brush. Remove excess with a dry brush.
- Seal gold leaf with a thin coat of clear sealer; dry 1 hour and cure 24 hours.
How to Display or Gift It
Set on a mirrored tray to reflect the gold. For gifting, pad the box carefully; gold leaf is delicate.
- Woven Raffia Basket-Skirted Vase
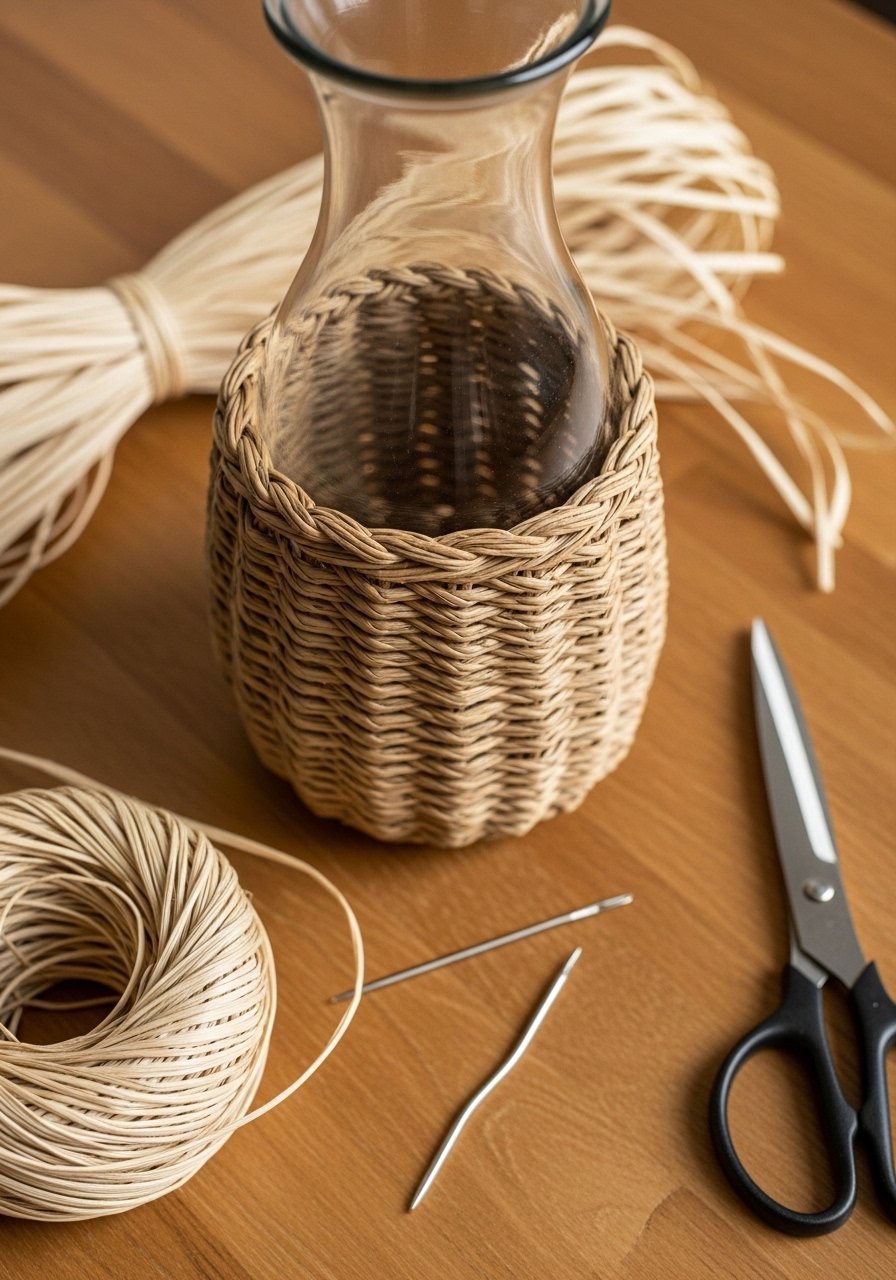
A woven skirt gives that handmade market feel and conceals less-pretty vase stems. A simple spiral weave works fast and creates an earthy silhouette.
Materials
- Vase, 8–10"
- Raffia for weaving — 50 feet
- Round willow or rattan base ring — 1 (4" diameter)
- Weaving needle — 1
- Scissors
- Clothespins to hold weaves
Instructions
- Secure raffia to the base ring. Work in a spiral, looping raffia around the ring and pulling snugly.
- Build up rows until the skirt reaches the desired height.
- Tuck and secure ends under the last row. Use clothespins while setting.
- Let the skirt rest 1 hour to set shape.
How to Display or Gift It
Set with wild grasses or peonies. For gifting, include a care card: keep dry to preserve raffia.
- Tie-Dye Bleach-Resist Ceramic Vase
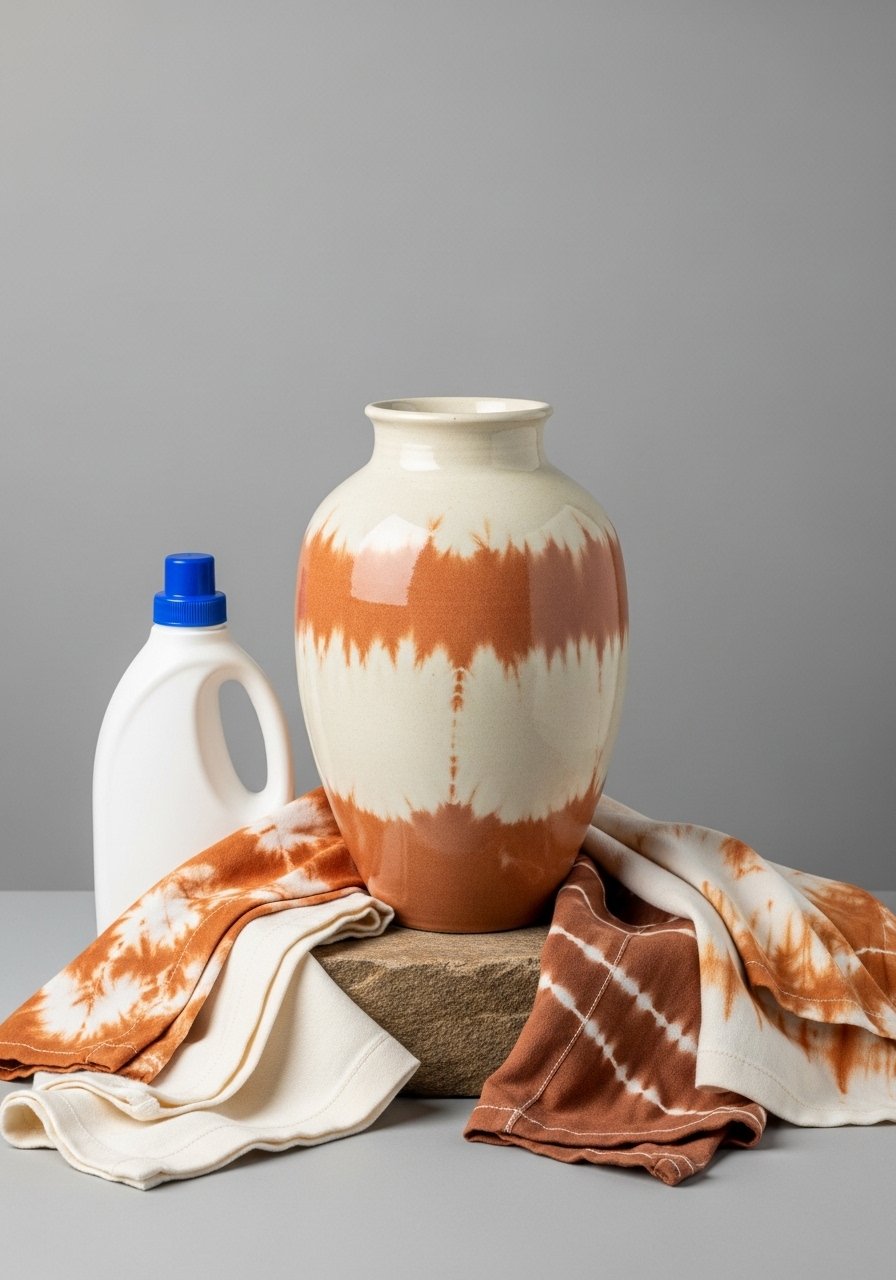
A gentle bleach-resist gives muted boho patterns on raw ceramics. It’s best on unglazed or matte surfaces. Work in a ventilated area and neutralize with baking soda after bleaching.
Materials
- Unglazed ceramic vase
- Household bleach — ¼ cup
- Small spray bottle or brush
- Baking soda — 2 tbsp
- Water — 1 cup
- Rubber gloves
- Mask
- Soft cloth for blotting
Instructions
- Mix 1 part bleach to 3 parts water in a spray bottle. Test on a scrap.
- Apply bleach in target areas using spray or brush. Watch color change — usually within 2–10 minutes.
- Once desired contrast is reached, neutralize with baking soda solution (1 tbsp baking soda to 1 cup water); rinse thoroughly.
- Let dry 1–2 hours. Seal with a matte sealer if needed.
How to Display or Gift It
Perfect with boho bedding or woven throws. For gifting, include a small packet of dried flowers and a care note.
- Boho Vase Decorating Ideas — Carved Faux Terracotta with Sgraffito

This layered technique mimics carved terracotta using air-dry modeling paste and sgraffito. It gives a substantial, natural look while remaining lightweight.
Materials
- Glass or ceramic vase
- Air-dry modeling paste — 4 oz
- Palette knife — 1
- Acrylic base paint (terracotta) — 2 oz
- Acrylic topcoat (light sand) — 2 oz
- Stylus or carving tool — 1
- Sandpaper — 220 grit
Instructions
- Apply a thin layer of terracotta paint; dry 30 minutes.
- Spread modeling paste with a palette knife to create an uneven, carved surface. Let dry overnight (8–12 hours).
- Paint a light topcoat over dried paste.
- Use a stylus to etch patterns, revealing terracotta below.
- Sand edges lightly and seal. Cure 24 hours.
How to Display or Gift It
Works well on an outdoor patio table (sheltered). For gifting, wrap in kraft tissue and place in a cushioned box.
- Knotted Leather Strap Accent Vase
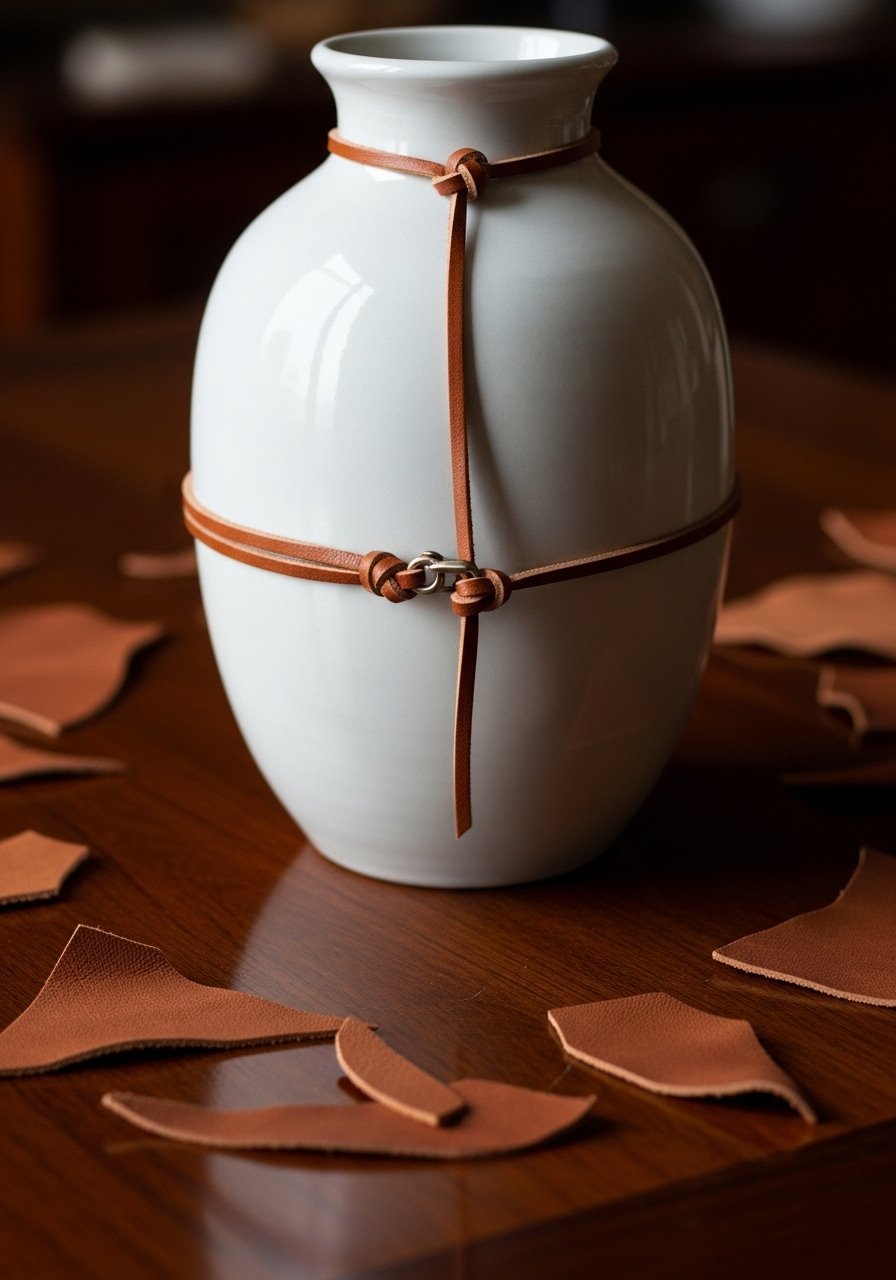
Leather adds unexpected warmth and a tactile contrast to ceramics. Knotted sections create an artisanal accent you can swap seasonally.
Materials
- Vase, 8–10"
- Vegetable-tanned leather strap — 36" x ¼"
- Small metal clasp or rivet — 1
- Leather hole punch — 1
- Scissors
- Clear leather finish — 1 oz
Instructions
- Measure strap length to wrap twice and allow for knots. Cut to 36".
- Tie simple overhand knots spaced evenly and fit around vase.
- Secure ends with a metal clasp or small rivet.
- Apply thin leather finish to protect; dry 30 minutes.
How to Display or Gift It
Place beside reclaimed wood frames and brass accents. Store extra straps in a small craft organizer drawer.
- Pebbled Resin Inlay Vase Band
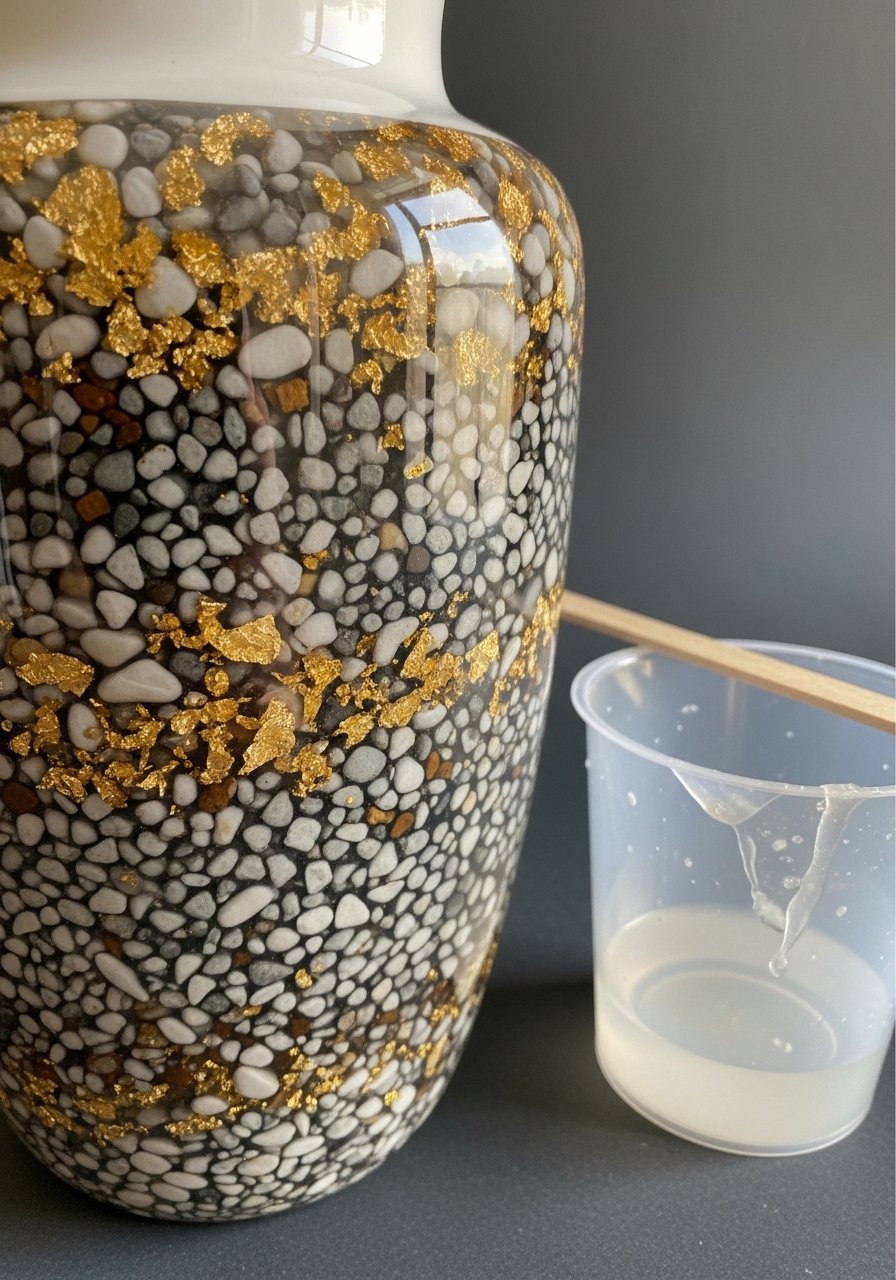
A resin band provides depth and a gloss contrast to matte textures. Use a slow-cure epoxy for bubble-free results. Work quickly in small batches.
Materials
- Vase, 8–12"
- Clear epoxy resin kit (slow cure) — 2 oz
- Small pebbles or crushed shells — 1/4 cup
- Disposable mixing cups and stir sticks
- Painter’s tape to mask band area
- Gloves and nitrile masks
Instructions
- Mask the band area with painter’s tape.
- Mix 0.5–1 oz epoxy per directions. Stir slowly to minimize bubbles.
- Fold in pebbles and pour into masked band. Use a toothpick to settle pieces.
- Let cure 24–48 hours fully before removing tape.
How to Display or Gift It
Place under a small lamp to show the glossy inlay. Ship carefully with foam padding if gifting.
- Wool Roving Felted Sleeve Vase
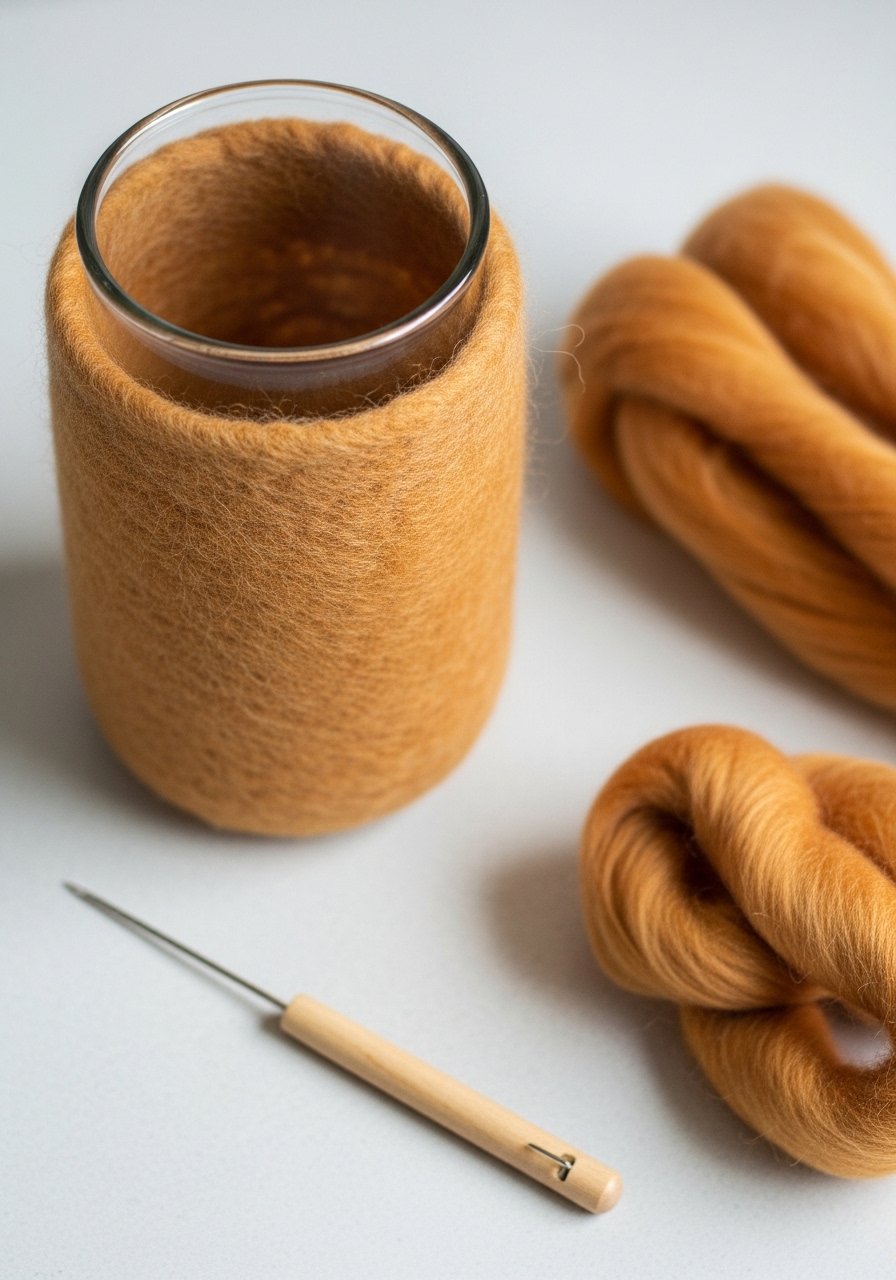
A felted sleeve adds cozy texture and insulates glass. Needle felting creates firm fabric that hugs the vase. This is a tactile project great for colder months.
Materials
- Vase, 8"
- Wool roving (wool felt color) — 4 oz
- Felting needles — 1 set
- Foam felting pad — 1
- Scissors
Instructions
- Lay out wool roving to match vase circumference; wrap around vase.
- Using felting needles and a foam pad, poke wool repeatedly to compact fibers. Work slowly—needle causes small pricks if mishandled.
- Continue felting until sleeve is dense and elastic.
- Trim excess and slide sleeve onto vase. Keep sleeve dry to avoid felting changes.
How to Display or Gift It
Pair with knit throws and warm-toned candles. Store wool in sealed craft bins to keep it lint-free.
- Painted Tribal Stripe Vase with Masking

Tribal stripes feel bold but remain earthy in neutral palettes. Small details demand a steady hand; use thin painter’s tape and a small detail brush.
Materials
- Vase, 7–9"
- Painter’s tape (thin) — 1 roll
- Acrylic paints: black, ivory — 2 x 1 oz
- Fine detail paintbrush — 1
- Ruler and pencil
- Clear matte sealer — 2 oz
Instructions
- Mark stripes lightly in pencil. Apply painter’s tape along marks and burnish edges.
- Paint stripes with thin coats; dry 20 minutes between coats.
- Remove tape carefully. Fill small chevron accents with a fine detail brush.
- Seal with matte sealer; cure 24 hours.
How to Display or Gift It
Use in an entry vignette with woven baskets. For gifting, add a handwritten note about the pattern inspiration.
- Dried Flower Resin Topper Vase
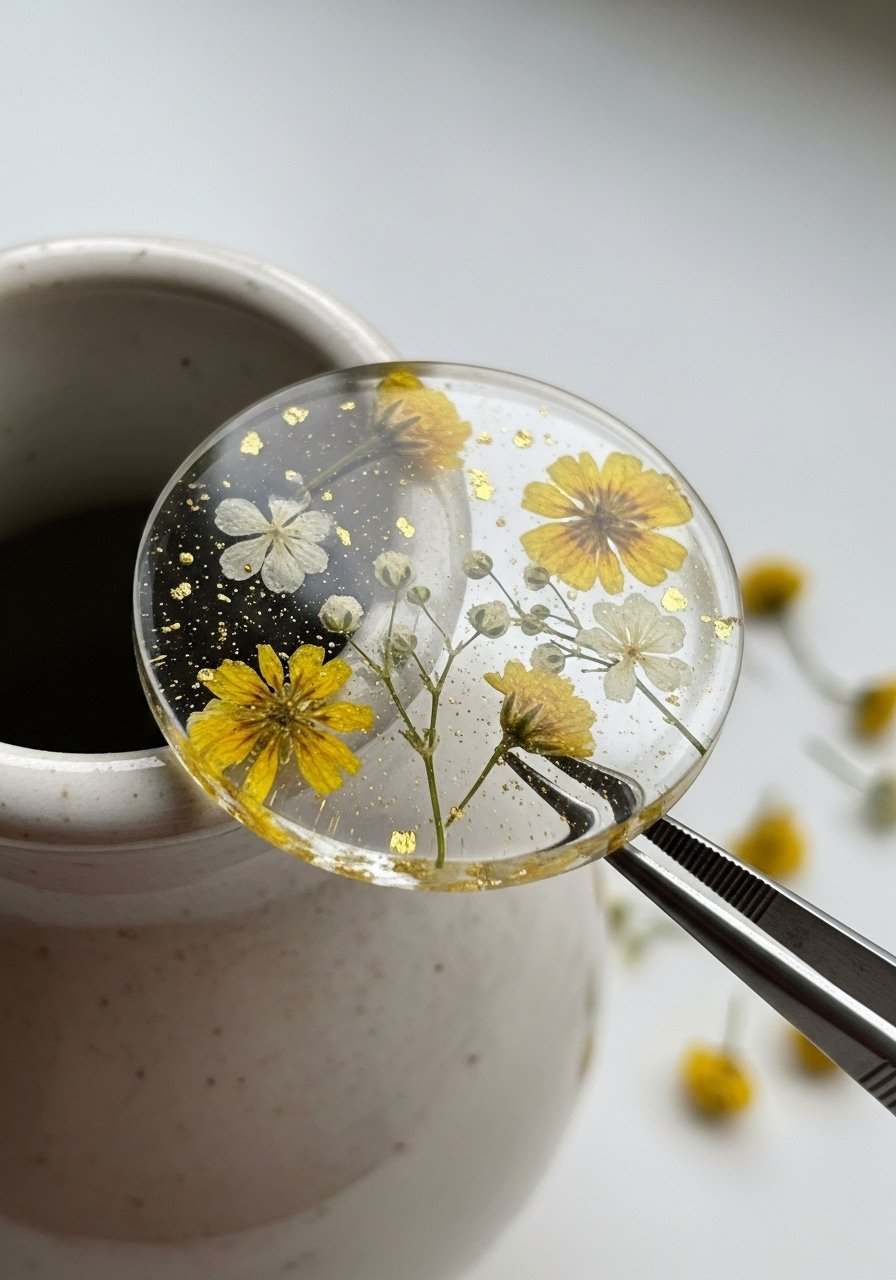
Embedding dried flowers in resin creates an heirloom topper that looks boutique. Keep flowers fully dried to avoid discoloration and bubbles.
Materials
- Vase, any size
- Clear epoxy resin (slow-cure) — 2 oz
- Small dried flowers or petals — 0.5 oz
- Disposable mixing cups and stir sticks
- Painter’s tape and a small mold (if making a removable topper)
- Gloves and mask
Instructions
- If making a removable topper, use a small silicone mold sized for your vase rim.
- Arrange dried flowers in the mold. Mix epoxy per directions and pour slowly.
- Use a toothpick to pop bubbles. Let cure 24–48 hours.
- Demold carefully and place topper on vase. For permanent bond, use a small dab of epoxy to attach and cure 24–48 hours.
How to Display or Gift It
Perfect as a gift for anniversaries or birthdays—include a small care card. Store toppers flat in a cushioned box until use.
- Painted Cork Base Eco Vase
A cork base gives warmth and protects surfaces. Cork is easy to glue and trims neatly. This is great for heavy vases that need a non-slip bottom.
Materials
- Vase, 8–12"
- Cork sheet — 6" x circumference
- Craft knife or rotary cutter
- Strong craft adhesive (E6000) — 1 oz
- Ruler and pencil
- Sandpaper — 120 grit
Instructions
- Measure vase circumference and cut cork sheet accordingly.
- Sand inside edge of cork slightly for better adhesion.
- Apply a thin line of E6000 and press cork to base. Hold or clamp for 10 minutes.
- Let adhesive cure 24 hours before use.
How to Display or Gift It
Use on wood surfaces to prevent scratches. For gifting, include a small cork coaster.
- Painted Dip-Dye Ombre Vase

Ombre dip-dye feels relaxed and handcrafted. Diluted paint helps blend colors smoothly. Rotate the vase slowly for even transition.
Materials
- Vase, 10–12"
- Acrylic paints in 3 shades of the same color family — 3 x 1 oz
- Large round foam brush — 1
- Disposable cup of water for diluting
- Paper towels
- Clear matte sealer — 2 oz
Instructions
- Mix three paint shades (dark, medium, light). Thin each with 1 tsp water for gradual blends.
- Starting at the base, paint the darkest shade up to 1/3 height; dry 20 minutes.
- Overlap with the medium shade, blending with the foam brush as you go.
- Finish with the light shade at the neck. Allow 30 minutes between coats.
- Seal with matte sealer; cure 24 hours.
How to Display or Gift It
Group vases with complementary ombre shades. For gifting, wrap in tissue and tuck a single dried stem inside.
- Embossed Paper Mache Covering
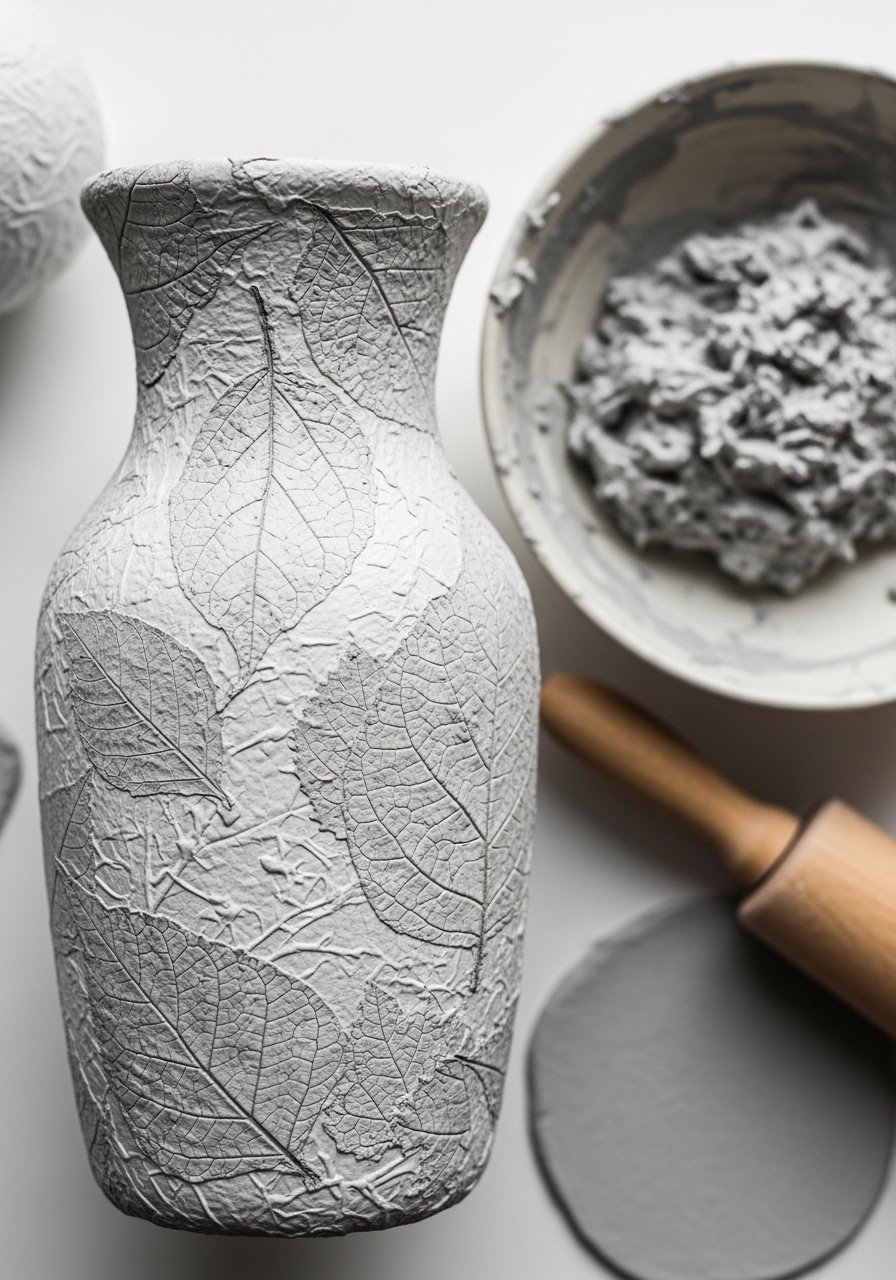
Paper mache with pressed patterns produces a soft, tactile finish that’s lightweight. Press leaves or lace into wet pulp for imprinting. Seal well for water resistance.
Materials
- Vase, 8–10"
- Paper mache pulp or paper strips and paste — enough for 2 layers
- Pressing materials (leaves, lace)
- Small rolling pin
- Sandpaper — 220 grit
- Matte sealer — 4 oz
Instructions
- Apply a thin first layer of paper mache pulp to the vase. Smooth with a rolling pin.
- Press leaves or lace into the wet surface to create texture.
- Add a second thin layer to lock impressions. Let dry 24 hours.
- Sand lightly and seal with multiple thin coats of matte sealer; dry 1 hour between coats.
How to Display or Gift It
Place in a boho vignette with woven textures. For gifting, avoid filling with water; include a small glass insert for fresh flowers.
- Woven Leather and Beaded Collar
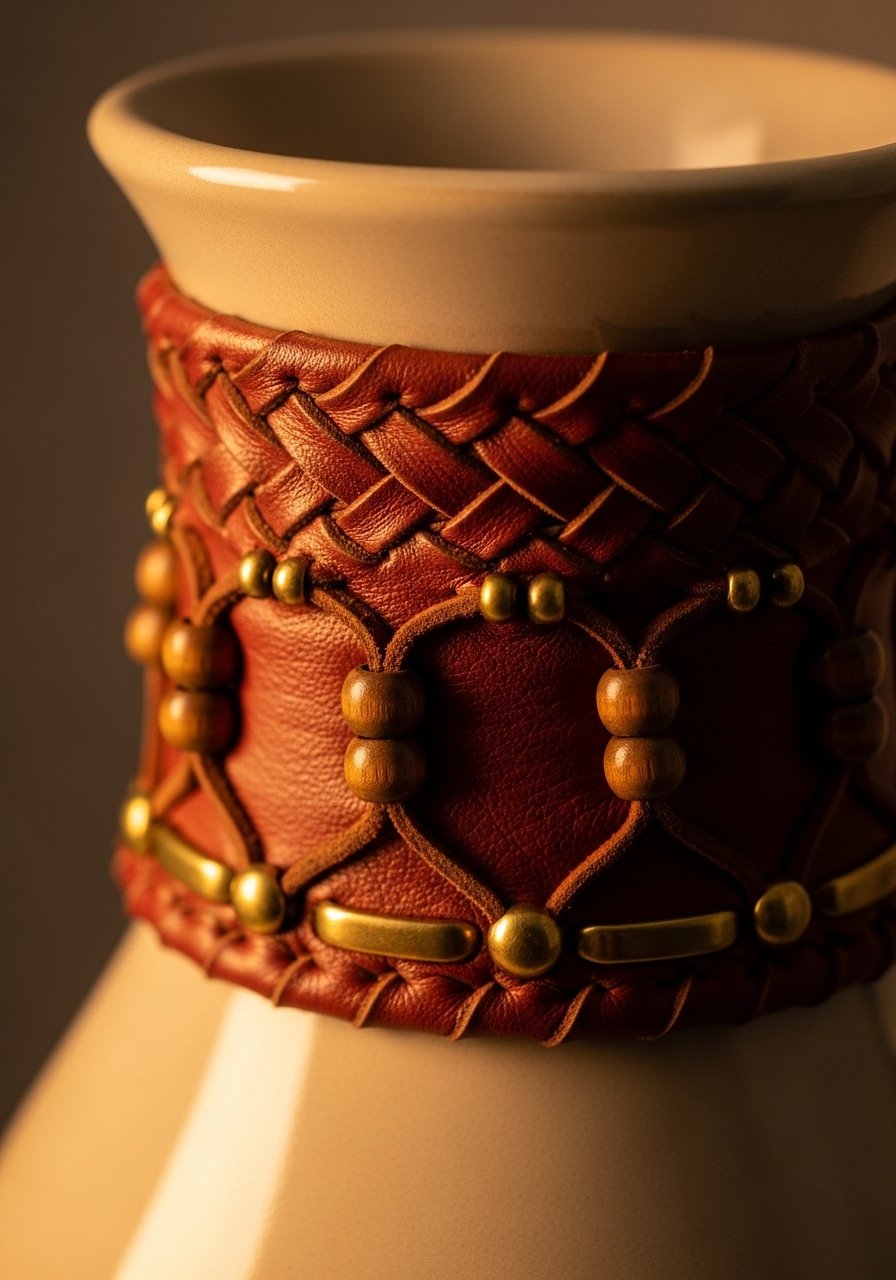
A beaded collar at the neck creates a focal point and frames stems. Mix leather strips and beads for an eclectic, global look.
Materials
- Vase, any height
- Thin leather strips — 3 x 18"
- Wooden beads (large-hole) — 20
- Small brass accents — 6
- Strong thread or thin wire
- Scissors
- Hot glue
Instructions
- Braid three leather strips and thread beads intermittently.
- Form a collar that fits snugly at the vase neck; finish ends with a dab of glue or a small knot.
- Add brass accents for visual interest.
- Allow glue to cure 30 minutes before placing flowers.
How to Display or Gift It
Style with eclectic ceramics and travel-inspired trinkets. Store collars flat in a jewelry organizer.
- Painted Monochrome Clay Relief
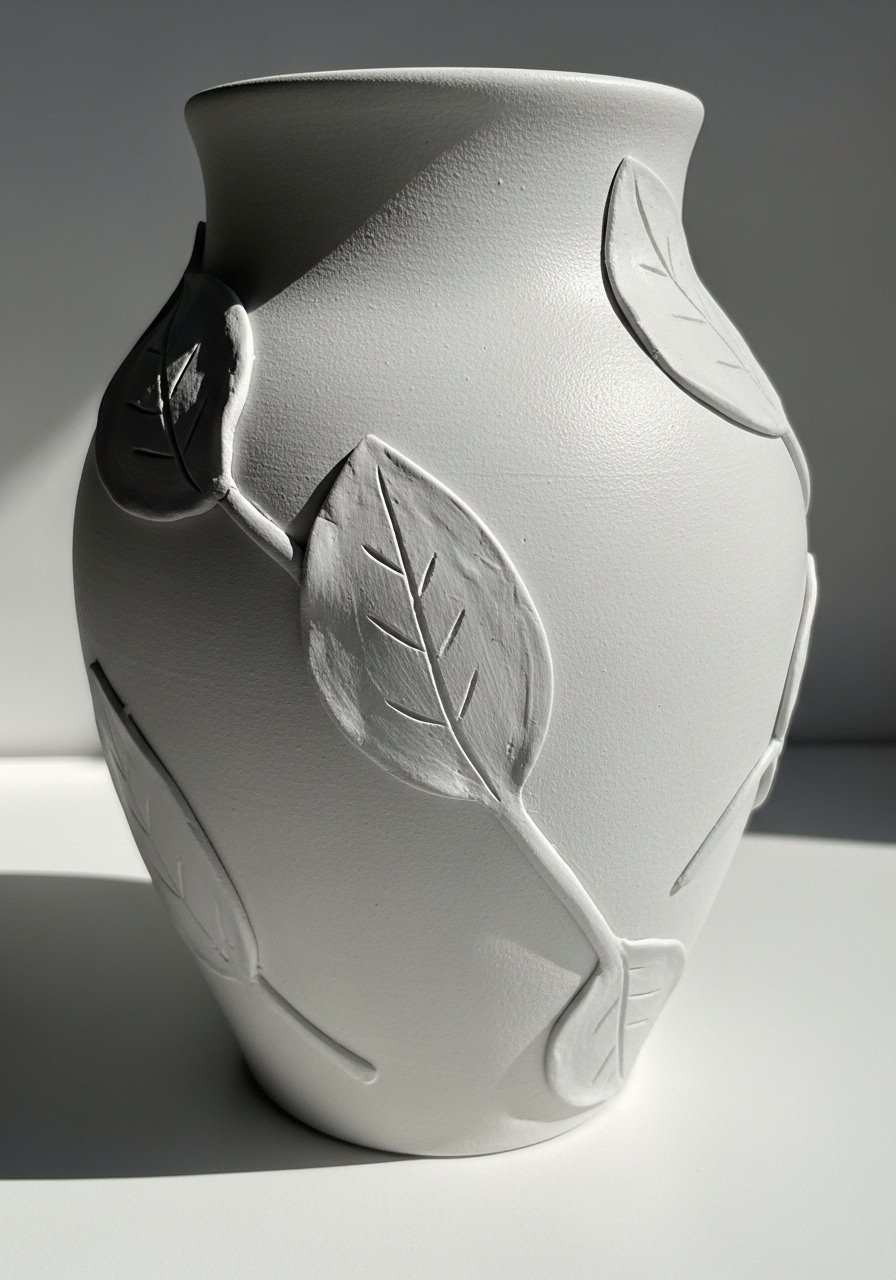
Clay appliqués add dimension and can be painted for a chic monochrome look. Air-dry clay is light and adheres well with craft glue or thin epoxy.
Materials
- Vase, 7–10"
- Air-dry clay — 2 oz
- Small sculpting tools or toothpicks
- Craft glue or epoxy — 0.5 oz
- Matching acrylic paint — 1 oz
- Foam brush — 1
- Sandpaper — 220 grit
Instructions
- Roll small clay shapes and press them lightly onto vase to mark placement. Remove and let shapes dry overnight (8–12 hours).
- Glue dried shapes to vase with craft glue; hold until set.
- Sand any rough edges and paint the entire vase in a single color for a monochrome finish.
- Seal with matte sealer; cure 24 hours.
How to Display or Gift It
Perfect as a centerpiece for a neutral table. For gifting, add care instructions: clean with a dry cloth only.
- Mixed-Media Earth Tone Collage Vase
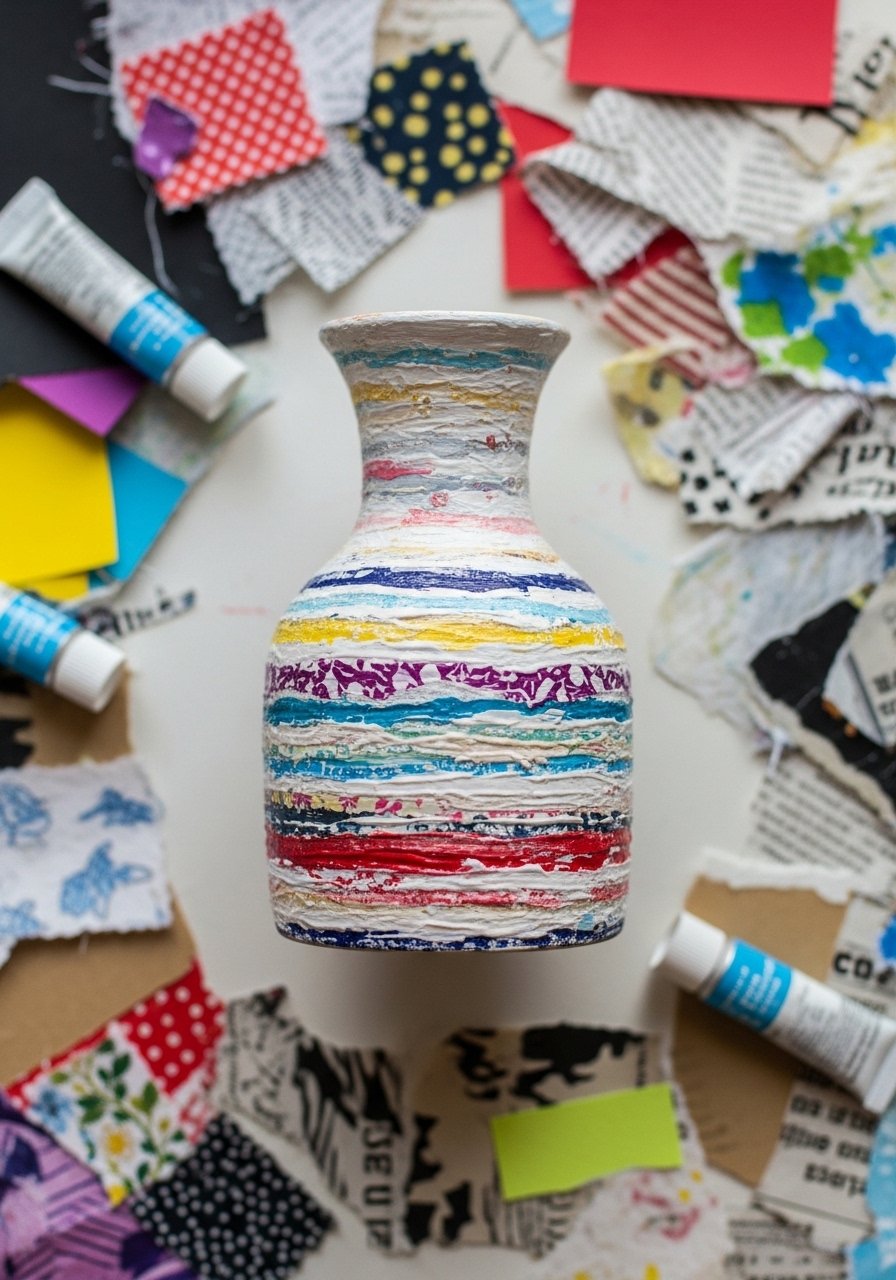
This collage approach mixes fabric, paper, and paint for a boho patchwork. Use Mod Podge for layering and to add durability. This is an excellent way to use scraps.
Materials
- Vase, 6–8"
- Fabric scraps (linen, cotton) — assorted, about 6 pieces
- Decorative paper (scrapbook paper) — 4 sheets
- Matte Mod Podge — 4 oz
- Foam brush — 1
- Scissors
- Sandpaper — 120 grit
Instructions
- Lightly sand vase for adhesion.
- Cut fabric and paper into desired shapes.
- Apply a thin coat of Mod Podge where the first piece will sit; press fabric/paper and brush over top with another thin coat.
- Overlap pieces and repeat until covered. Smooth bubbles as you go.
- Let dry 1 hour, then apply 1–2 additional top coats for durability. Cure 24 hours.
How to Display or Gift It
Place on a gallery shelf with framed prints. Store extra scraps in a divided craft organizer.
You made it to the end—what a collection. From woven collars to resin toppers, these 26 boho vase decorating ideas give you tactile, earthy finishes that suit cottagecore, japandi, and modern farmhouse shelves. Try one technique or mix and match: a painted wash under a macramé fringe or a cork base with a gold-leaf rim will feel curated and personal.
Save or pin this list so you can come back when you find a vase at a thrift store or spot the perfect dried stem. Which texture are you trying first—soft fiber, rough clay, or glossy resin? Share your photos with friends and pass along a project you love.
Trust me, picking up a quality hot glue gun with temperature control changed how every single one of these projects turned out — less string, neater bonds, and faster finishes.


