
You probably have a plain glass vase tucked away that’s waiting for a little personality. Whether you’re freshening a side table or making a batch of gifts, these glass vase decorating ideas give you elegant, creative results you can finish in an afternoon. I’ll walk you through 30 approachable projects—everything from simple painted stripes to resin-encased botanicals—so you can pick one that matches your decor style, from cottagecore to Japandi to boho.
I usually start small: grab a set of acrylic craft paints and a pack of foam brushes for crisp coverage. If you want perfectly cut vinyl shapes, my go-to is a Cricut machine for clean edges and fast prep. Try the Cricut Joy cutting machine if you plan to make lots of stickers or labels quickly. Also keep a reliable hot glue gun nearby for trims and quick fixes.
Ready to try a few? Each project below includes a photo prompt, materials with exact quantities, step-by-step instructions with drying times, and ideas for displaying or gifting. Happy crafting!
- Minimalist Matte Painted Vase (glass vase decorating ideas)
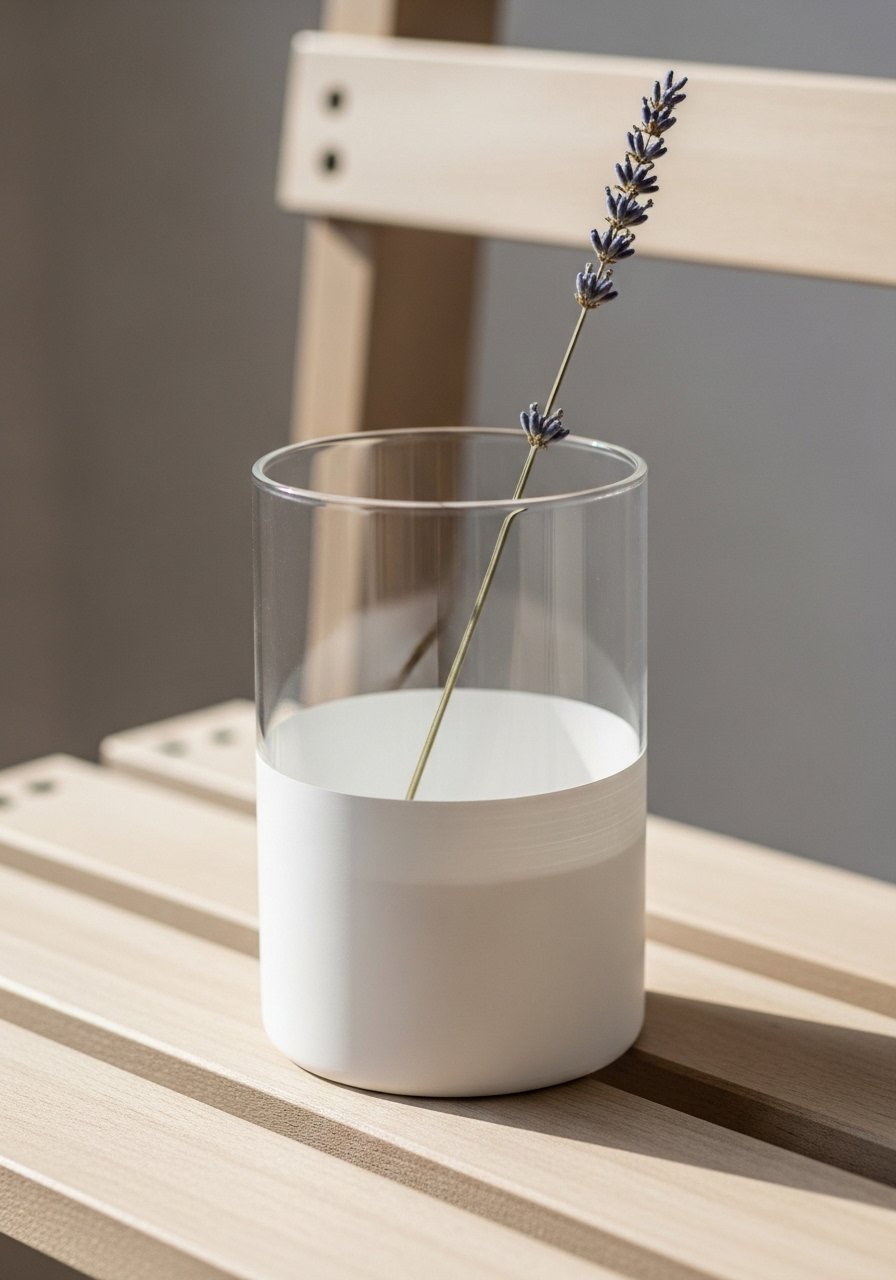
This minimalist matte-dipped vase gives a clean, modern look. The finish is soft to the touch and pairs beautifully with dried stems. Beginners love this because the technique is forgiving; you can sand for a smooth edge if you make a slip-up. Use a foam brush to keep brushstrokes invisible.
Materials
- 1 clear glass vase (10–12" tall)
- Chalk-style craft paint, matte white, 120 ml
- Flat foam brush, 1" wide
- Painter’s tape, 3/4"
- Sandpaper, 220 grit (for minor edge smoothing)
- Clear matte sealer spray, 200 ml
- Ruler and pencil for marking
Instructions
- Clean the vase with rubbing alcohol; remove any labels.
- Measure and mark the dip line with a pencil; wrap painter’s tape straight around.
- Sand the area lightly where tape will sit so paint adheres.
- Apply one thin coat of chalk-style paint with the foam brush; wait 30 minutes.
- Apply a second thin coat; wait 1 hour until firm to the touch.
- Remove tape carefully. If the edge is uneven, sand lightly and touch up.
- Finish with two light coats of clear matte sealer, 15-minute interval between coats; cure 24 hours.
How to Display or Gift It
- Pair with dried lavender or bleached pampas for a neutral mantel.
- Wrap the base in kraft tissue and tie with jute for gifting.
- Store extra foam brushes flat in a small craft organizer so bristles don’t bend.
- Make a set in complementary colors and display grouped on a coffee table.
- Painter’s Tape Stripes (glass vase decorating ideas)
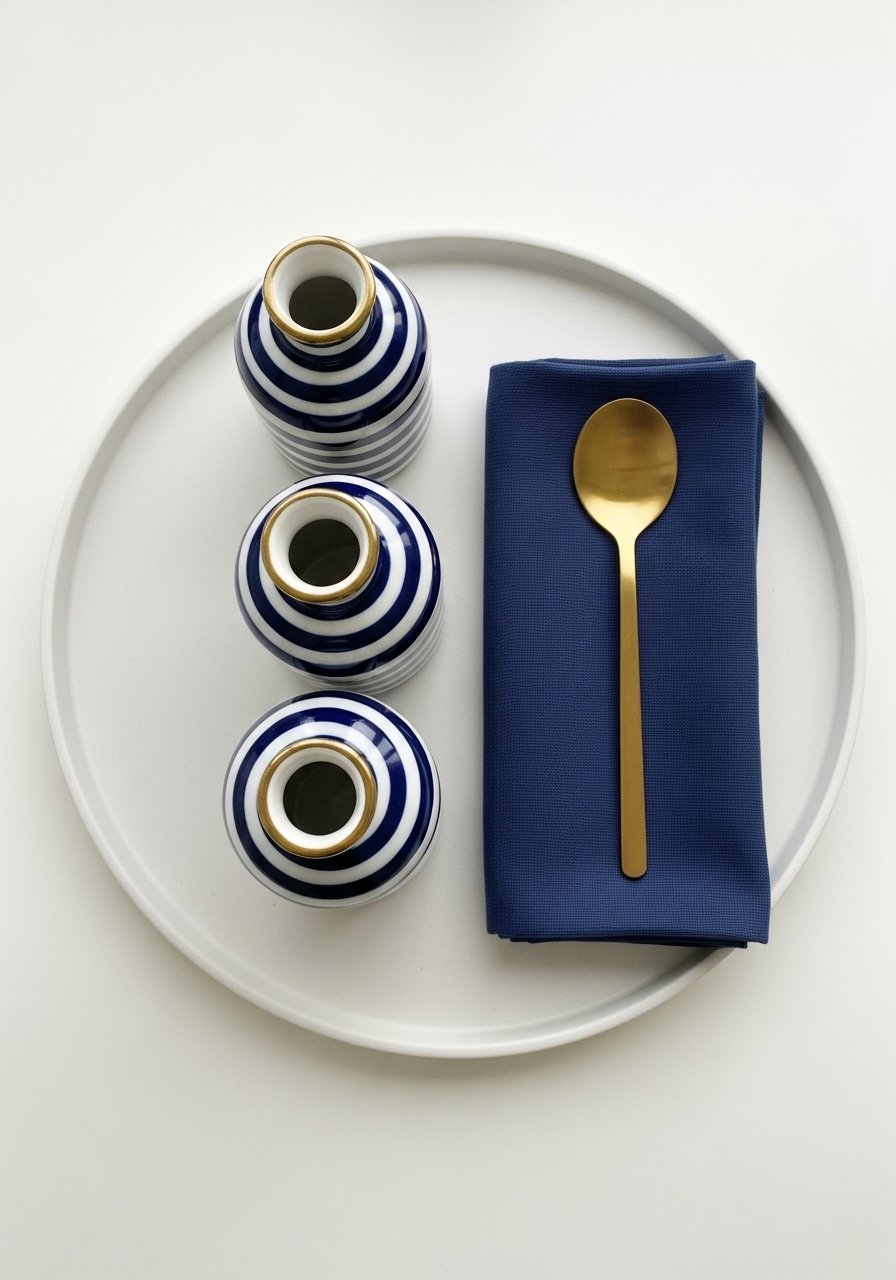
Crisp stripes are a timeless way to add graphic interest. Painter’s tape keeps lines clean, and metallic paint on a stripe adds a luxe touch. Great for gift sets that feel custom-made.
Materials
- 3 small glass bud vases (4–6" tall)
- Painter’s tape, 1/4" and 1/2" widths
- Acrylic craft paint set (navy + metallic gold), 20 ml each
- Small angled artist brush, size 2
- Clear gloss Mod Podge, 120 ml
- Disposable palette and paper towels
Instructions
- Clean vases; dry thoroughly.
- Decide stripe spacing and apply painter’s tape. Press edges firmly.
- Paint stripes with thin coats; wait 20 minutes between coats. Apply two coats for opacity.
- Remove tape gently when paint is tacky but not fully dry to avoid peeling.
- Touch up clean lines with a fine brush.
- Seal with one coat of gloss Mod Podge; let cure 24 hours.
How to Display or Gift It
- Group three matching striped vases on a bar cart with clippings.
- Pack in a narrow kraft box with shredded tissue for gifting.
- Store extra glassware in soft craft storage bins to avoid chips.
- Gold Leaf Accent Vase

Gold leaf creates an organic, luxe pattern that plays well with warm interiors. Use adhesive size for the best adhesion and a soft brush to lay flakes.
Materials
- 1 glass vase (8–10" tall)
- Gold leaf sheets, 25 sheets (loose leaf)
- Gold leaf adhesive size, 30 ml
- Soft gilding brush
- Cotton gloves (to handle leaf)
- Clear gloss sealer spray, 200 ml
- Small jar for mixing
Instructions
- Clean and dry the vase; wear cotton gloves.
- Apply adhesive size where you want gold. Wait until tacky (about 10–15 minutes).
- Gently lay gold leaf onto tacky areas with the gilding brush.
- Press down and smooth; remove excess flakes with a soft brush.
- Seal with two light coats of gloss sealer; allow 24 hours curing.
- Remove any stray gold with a soft cloth.
How to Display or Gift It
- Place on a side table with warm candles to reflect the gold.
- Wrap base with a linen ribbon when gifting.
- Keep small leftover sheets in a flat craft storage box to avoid creasing.
- Twine-Wrapped Rustic Vase
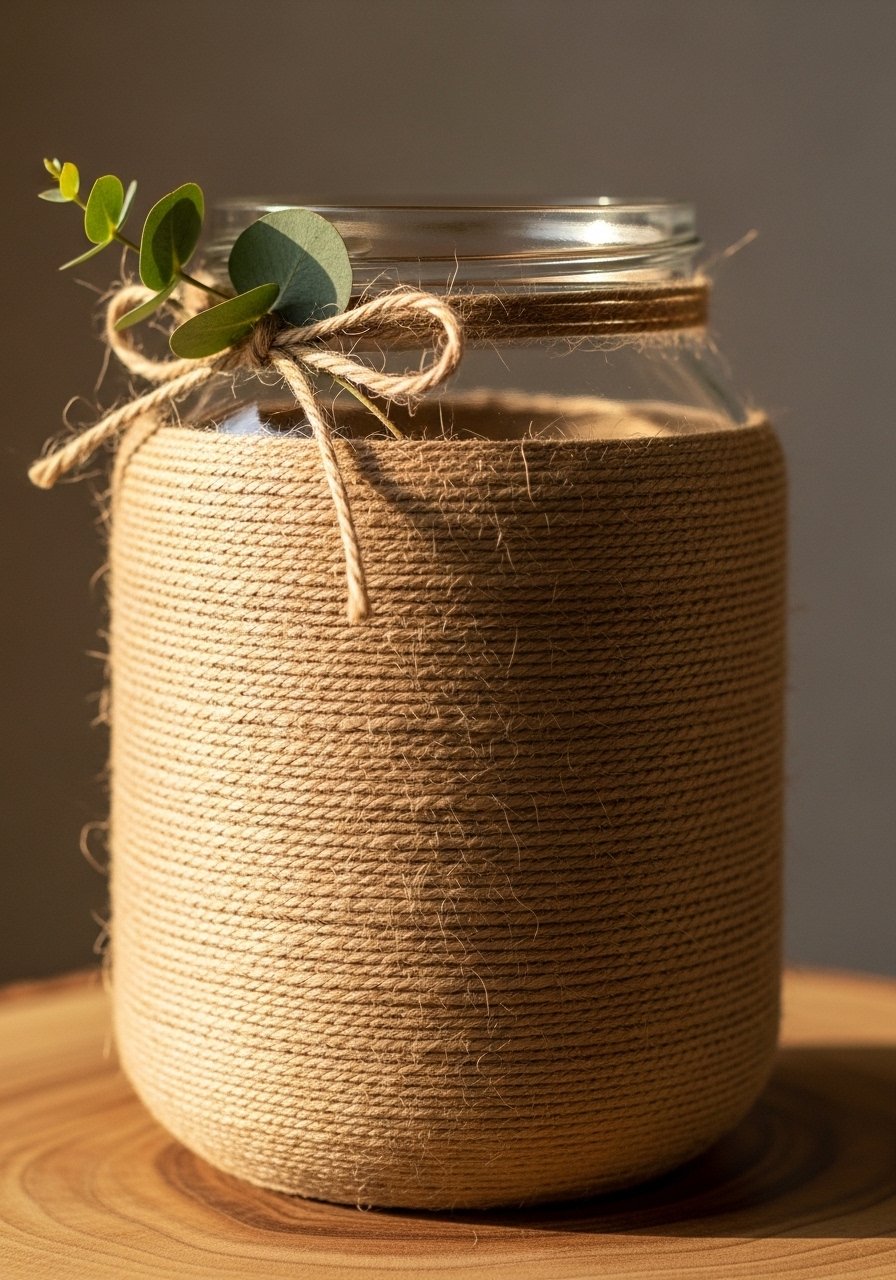
Natural twine gives glass a cozy, farmhouse look and hides seam imperfections. Hot glue makes it fast. This is a great kid-friendly craft (with adult glue supervision).
Materials
- 1 clear jar or vase (6–10")
- Natural jute twine, 50 feet (3mm)
- Low-temp hot glue gun + glue sticks, 6 sticks
- Scissors
- Small sprig of dried eucalyptus for finishing
Instructions
- Clean the vase. Plug in the low-temp hot glue gun.
- Start at the base: apply a dot of glue and press twine into it.
- Wrap tightly, adding small glue dots every 2–3 inches.
- Continue to the neck; cut and glue the end securely.
- Optional: tie a small sprig with leftover twine at the neck.
- Check for loose strands and trim.
How to Display or Gift It
- Use as a kitchen utensil holder or mantle vase.
- For gifting, tuck a small dried bouquet inside and wrap in kraft paper.
- Store wrapped vases vertically in a cool, dry place to prevent glue softening.
- Decoupage Napkin Vase (glass vase decorating ideas)
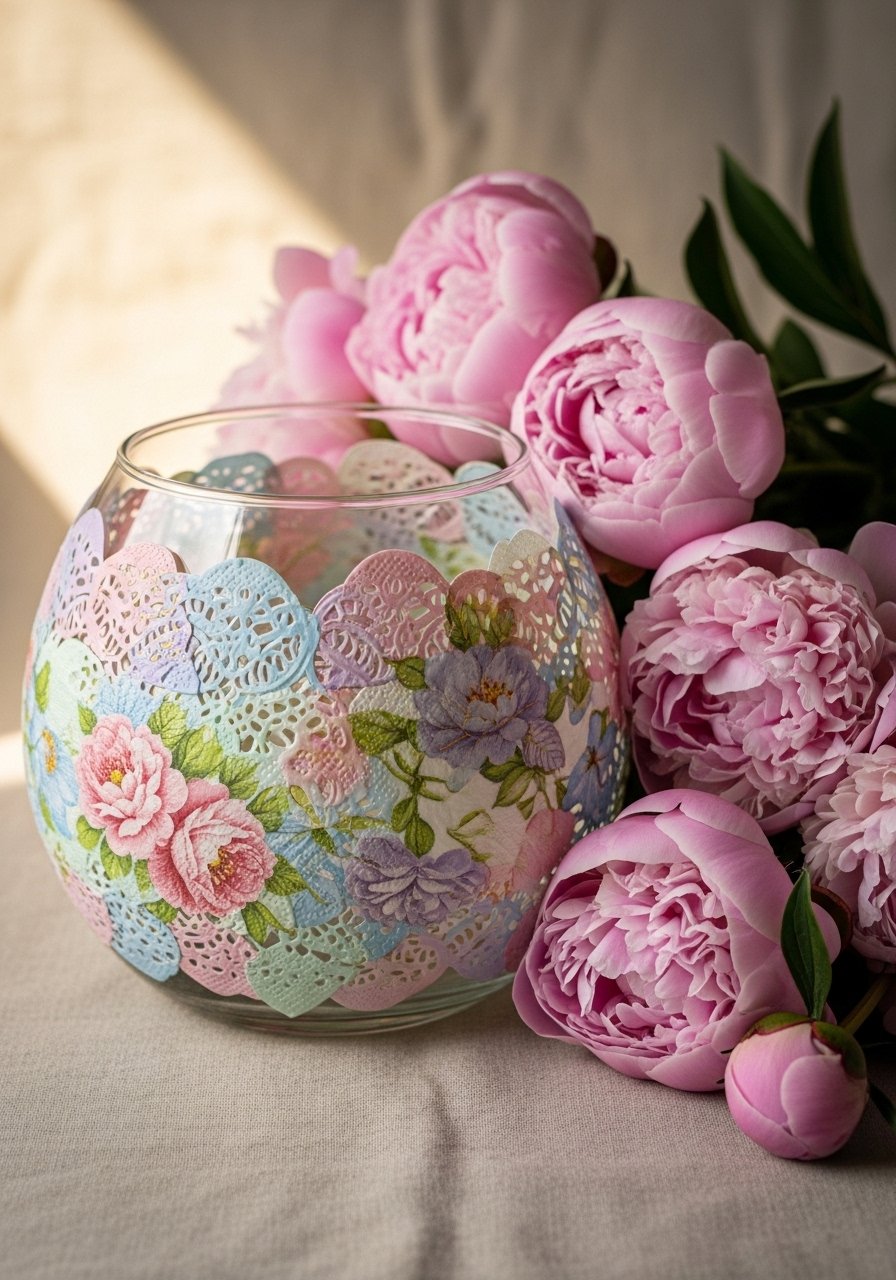
Decoupage with printed napkins creates a delicate, vintage look. Mod Podge is the easiest adhesive for neat, translucent coverage. This technique works on curved surfaces if you smooth carefully with a brayer.
Materials
- 1 glass vase (6–8" tall)
- Decorative paper napkins, 2–3 layers of chosen pattern
- Mod Podge (matte), 120 ml
- Soft foam brush and small brayer roller
- Scissors and tweezers for detail
- Clear acrylic sealer, 200 ml
Instructions
- Separate napkin layers; keep only the printed top layer.
- Clean vase. Cut napkin to approximate size.
- Apply a thin coat of Mod Podge with foam brush.
- Lay napkin gently, smoothing from center outward with brayer.
- Apply another thin coat of Mod Podge over napkin; wait 30 minutes.
- Repeat one more protective coat; let cure 24 hours.
- Spray with acrylic sealer for durability.
How to Display or Gift It
- Fill with fresh garden blooms for a cottagecore centerpiece.
- Wrap in tissue and put in a shallow gift box for safe shipping.
- Store extra napkins in a flat folder to keep them crisp.
- Ocean Shell Mosaic Vase
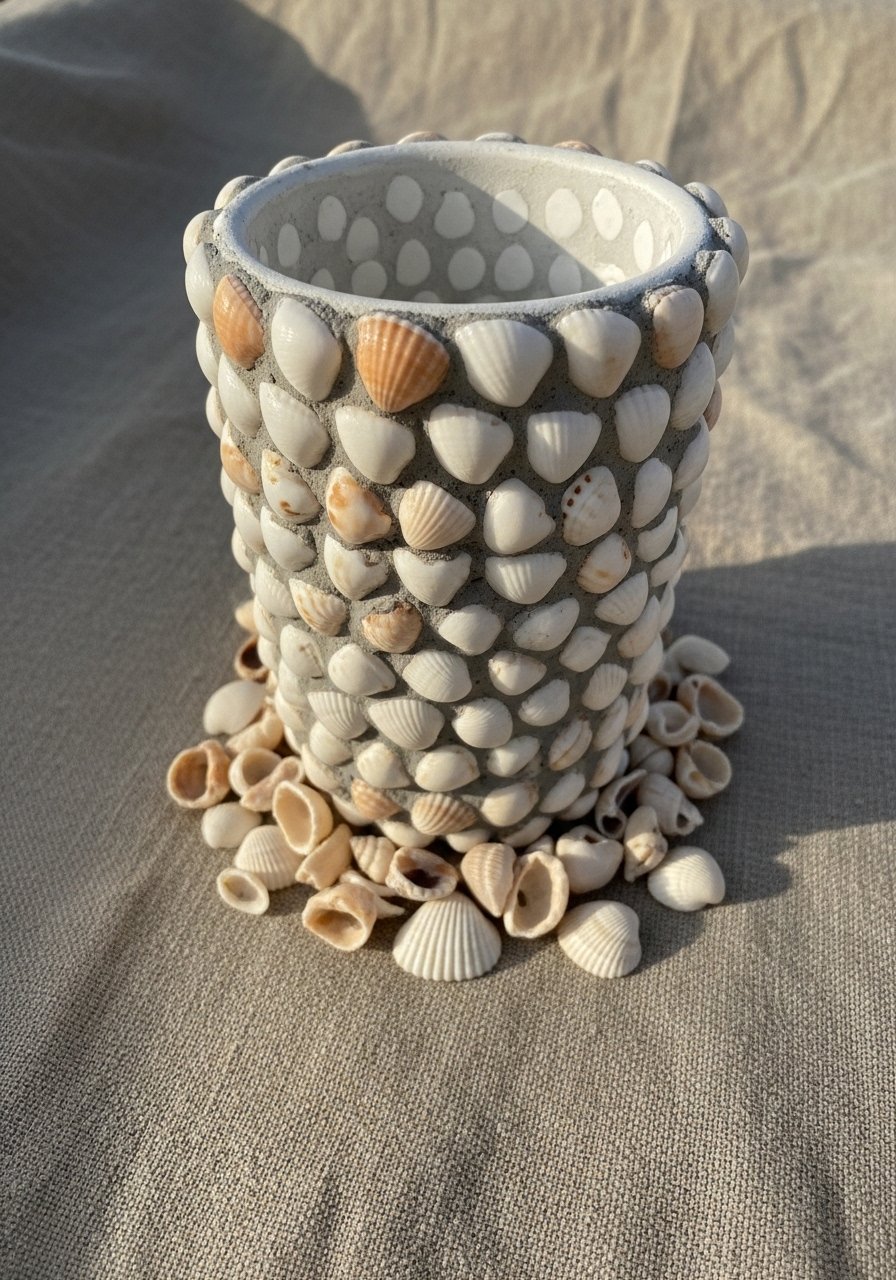
Mosaic shell work adds coastal texture. Use waterproof craft glue and grout for a finished look that holds up in humid spaces.
Materials
- 1 wide-mouth glass vase (5–8")
- Small shell pieces, approx. 1 cup (broken shells work)
- Waterproof craft adhesive (E6000 recommended), 30 ml
- Grout, 100 g
- Small grout float or popsicle stick
- Soft cloth for cleanup
Instructions
- Clean vase. Plan shell placement by dry-fitting pieces.
- Adhere shells one by one with small dots of E6000; let set 1–2 hours.
- Mix grout per package; apply into gaps with a float or craft stick.
- Wipe excess grout carefully with damp cloth; allow 24 hours to cure.
- Rinse and buff any haze with a soft cloth.
How to Display or Gift It
- Perfect for beach houses or seaside-themed showers.
- Add a small tag with shell origin as a personal touch when gifting.
- Store in a padded box to protect grout and shells.
- Ombre Spray Paint Vase
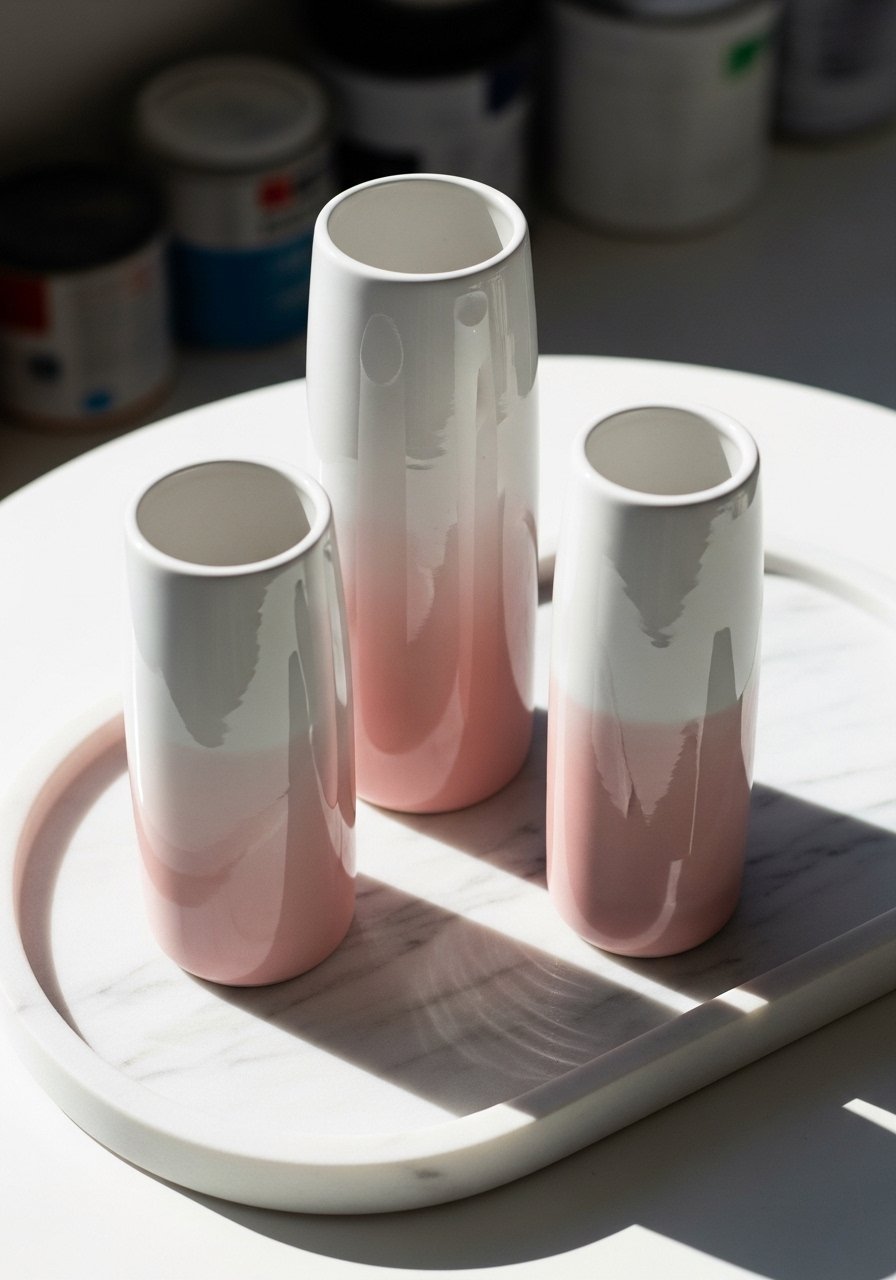
Ombre with spray paint gives a smooth gradient without brushstrokes. Use light misting passes and test on scrap glass first.
Materials
- 3 glass vases (varying sizes)
- Spray paint set (blush, pink, white) 150 ml each
- Painter’s tape and newspaper for staging
- Nitrile gloves and dust mask
- Turntable or lazy Susan for even spraying
Instructions
- Clean vases and stage outdoors or in a ventilated area.
- Secure vase on a rotating turntable. Start with white base coat; apply 2 light coats, 10 minutes apart.
- Spray blush lightly at the base while rotating; make overlapping passes.
- Build color gradually; let dry 15–20 minutes between passes.
- Blend with white spray near the top for the gradient.
- Seal with clear spray sealer and cure 24 hours.
How to Display or Gift It
- Group varying sizes on a console table for soft color.
- Package in a box with shredded kraft and a silica gel pack for shipping.
- Store unused spray cans upright in a ventilated closet.
- Etched Glass Monogram Vase
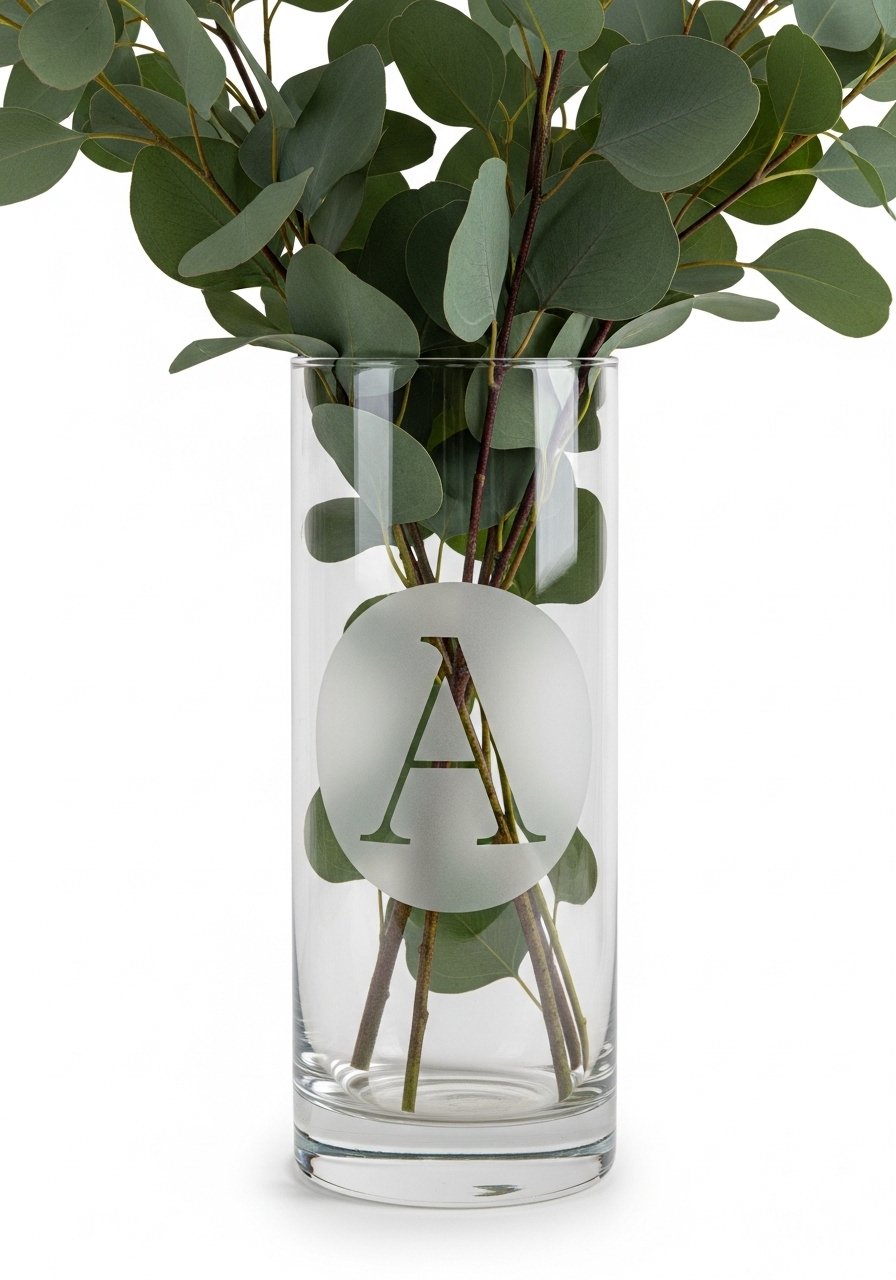
Glass etching cream creates a frosted, permanent finish—great for monograms and geometric patterns. Use adhesive vinyl for crisp stencils.
Materials
- 1 clear vase (8–10")
- Glass etching cream, 50 ml
- Adhesive vinyl stencil (cut with craft knife or Cricut)
- Small flat brush for applying cream
- Rubber gloves and safety goggles
- Ruler and masking tape
Instructions
- Clean vase; apply stencil smoothly with no bubbles.
- Put on gloves and goggles. Apply a thick layer of etching cream over stencil.
- Leave cream for 5–10 minutes per product instructions.
- Rinse under running water until cream is removed. Remove stencil.
- Dry and buff with a microfiber cloth.
How to Display or Gift It
- Fill with single long-stem rose for an elegant gift.
- Wrap in tissue paper and place in a narrow box.
- Store completed etched pieces separately so they don’t scratch.
- Pressed Flower Resin Accent (glass vase decorating ideas)

Encasing pressed flowers in resin makes an eye-catching accent band. Use a small epoxy resin kit and work in thin layers for bubble-free results.
Materials
- 1 glass vase (6–8")
- Epoxy resin kit (A+B), 60 ml total
- Pressed flowers (assorted), 10–15 small pieces
- Disposable mixing cups and stir sticks
- Small foam brush and a heat gun (or torch) to remove bubbles
- Nitrile gloves and ventilation
Instructions
- Clean vase and plan flower placement. Mask off area for resin band.
- Mix epoxy per kit directions (usually 2:1 or 1:1) precisely.
- Pour a thin base layer into the masked band; wait 30–45 minutes to tack.
- Arrange pressed flowers on tacky layer with tweezers.
- Pour a final thin layer to cover flowers; pop bubbles with a heat gun quickly.
- Let cure 24–48 hours depending on resin; full cure often 72 hours.
How to Display or Gift It
- Display with simple stems so the resin band is visible.
- Package in a cushioned box with curing instructions for buyer.
- Store leftover resin in sealed containers per manufacturer guidelines.
- Painted Dipped Rim (two-tone)

A painted rim is subtle but stylish—perfect for wine-bottle vases. Quick, kid-friendly, and easy to reproduce as a set.
Materials
- 1 recycled glass bottle/vase (10–12")
- Acrylic craft paint, forest green, 30 ml
- Foam brush, 1/2"
- Painter’s tape (optional)
- Clear gloss sealer, 100 ml
Instructions
- Clean and remove labels from bottle.
- Decide rim height; tape if you want a crisp line.
- Hold bottle horizontally and dip or brush paint onto rim. Apply two thin coats, 20 minutes apart.
- Remove tape if used while paint is tacky.
- Seal with a gloss sealer once dry; cure 24 hours.
How to Display or Gift It
- Group in a wine rack or on an entry console.
- Add a small dried herb bundle tied at the neck for gifting.
- Keep extras upright in a storage bin to protect painted rims.
- Chalkboard Label Vase
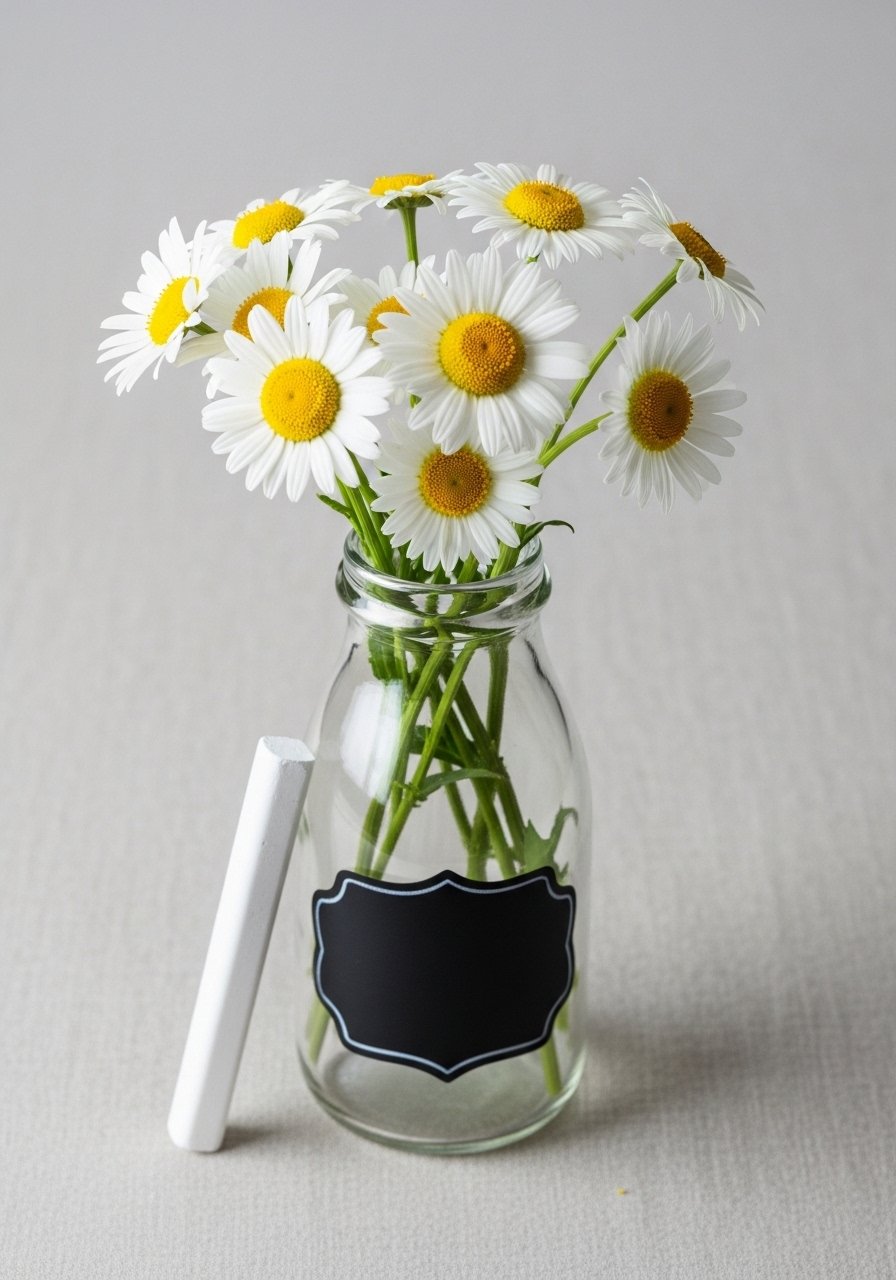
Chalkboard paint lets you label or leave notes on the vase—handy for events, gift personalization, or seasonal messages.
Materials
- 1 small bottle or vase (6")
- Chalkboard paint, 50 ml
- Small flat brush
- Chalk and eraser cloth
- Painter’s tape for edges
- Clear backing coat (optional), vintage matte sealer 100 ml
Instructions
- Clean vase. Tape off label area.
- Apply two thin coats of chalkboard paint, 30 minutes apart.
- Remove tape and cure 24 hours.
- Season label by rubbing a piece of chalk over the surface and wiping off.
- Write message; wipe clean with a damp cloth.
How to Display or Gift It
- Use at parties with guest names or table numbers.
- Gift with a small chalk set tied on the neck.
- Store in a craft organizer to keep labels dust-free.
- Marble Nail Polish Effect
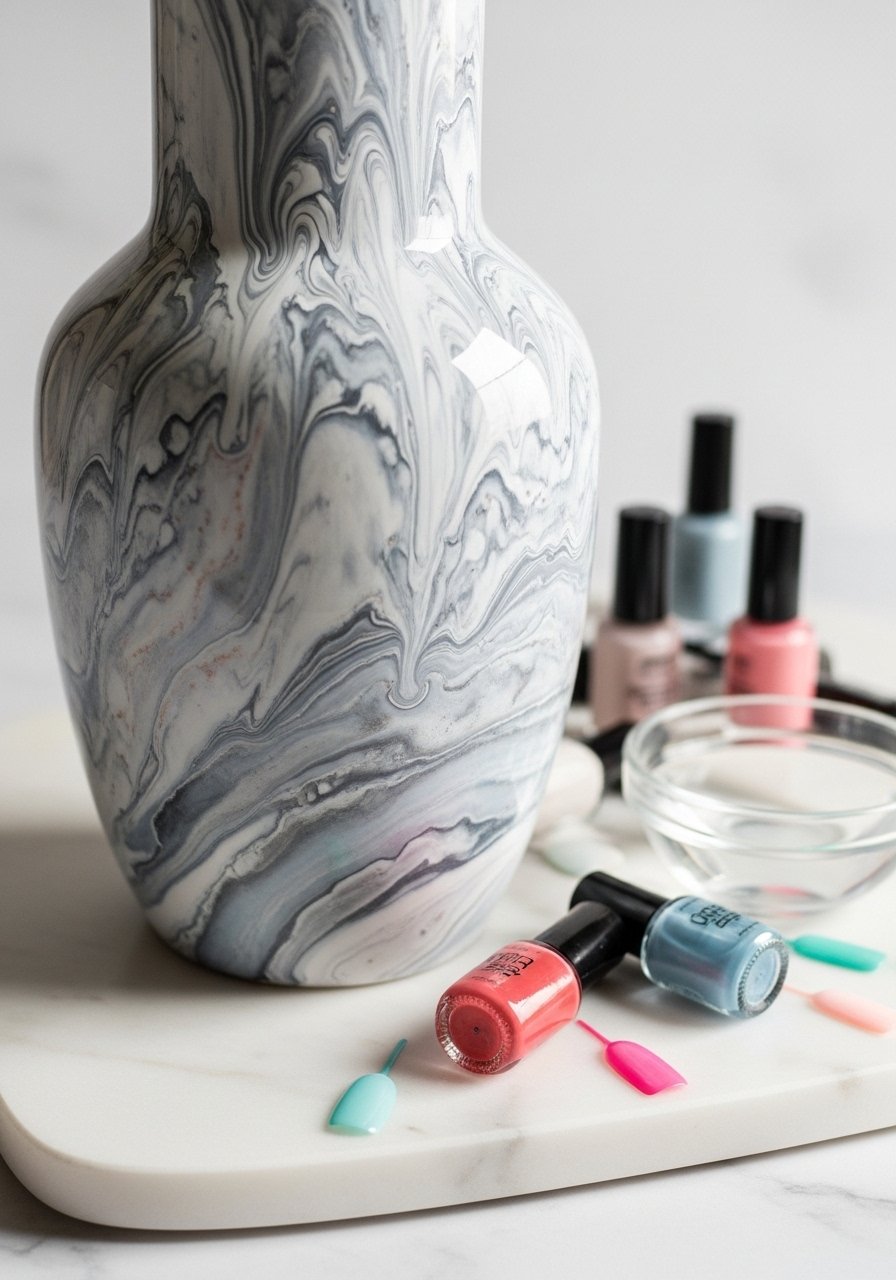
Water marbling with nail polish yields a glossy, marble look and works great on small vases. It’s quick but messy—work over newspaper.
Materials
- 1 small glass vase (5–7")
- Nail polish bottles in white, gray, black (small sizes)
- Disposable plastic cup of room-temp water
- Toothpick for swirling
- Gloves and paper towels
- Clear topcoat spray, 100 ml
Instructions
- Clean vase and fill a disposable cup with water.
- Drip polish into water to create concentric rings.
- Use a toothpick to create a marbled pattern.
- Dip vase section into water where pattern is floating. Remove and let dry 15–20 minutes.
- Repeat for additional sections if desired.
- Seal with clear topcoat and allow 24 hours to cure.
How to Display or Gift It
- Place on a bathroom counter for makeup brushes or toothbrushes.
- Wrap in bubble wrap and a shallow box for shipping.
- Keep leftover polish in a small sealed bag to reuse later.
- Rustic Lace-Dipped Vase
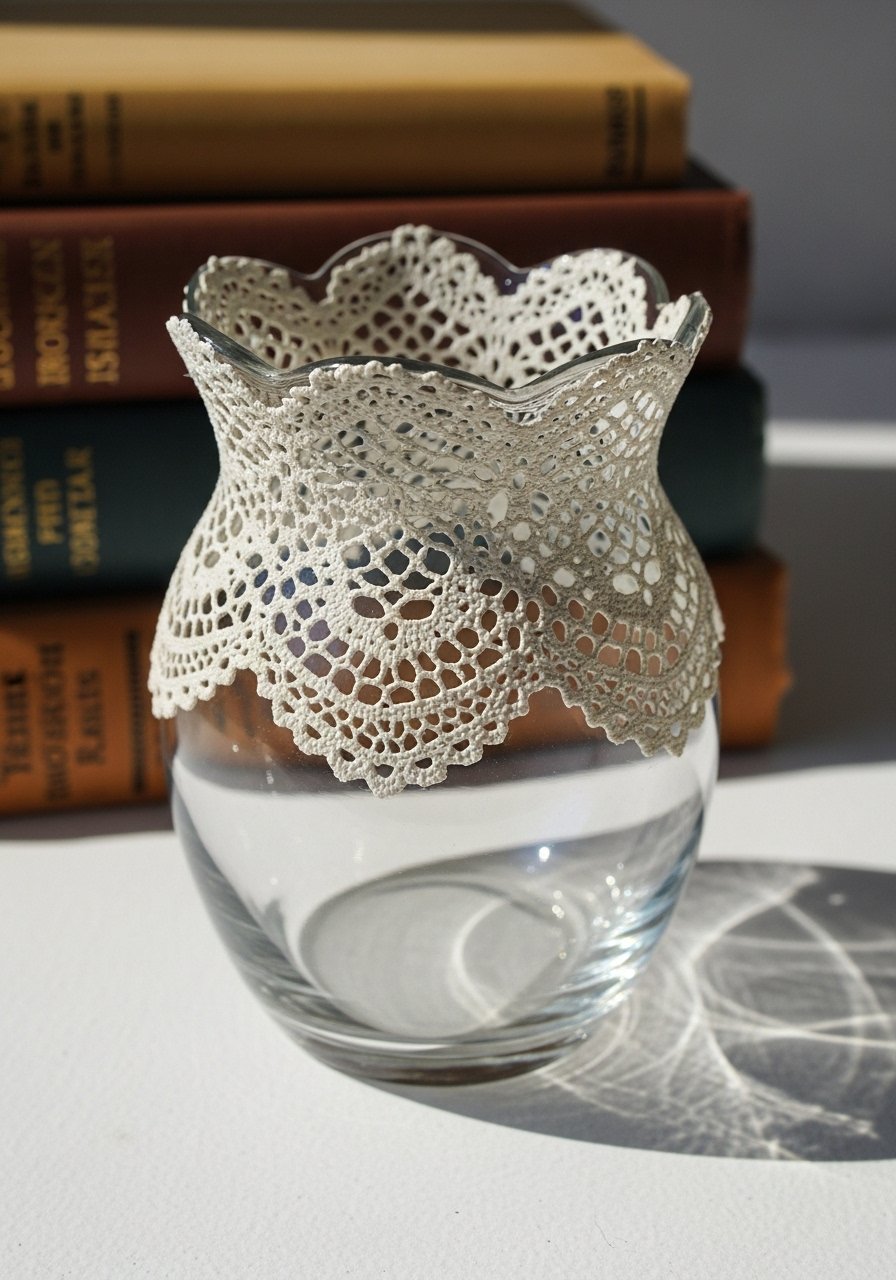
Lace-dipping leaves an embossed fabric texture on the glass—romantic and cottagecore-friendly. Mod Podge works well as the adhesive base.
Materials
- 1 glass vase (6")
- Lace trim or doily piece, 10" length
- Mod Podge (matte), 120 ml
- Soft foam brush
- Scissors
Instructions
- Clean vase; cut lace to fit area.
- Brush Mod Podge onto vase area; press lace gently into place.
- Smooth with fingers and apply another coat of Mod Podge on top.
- Let dry 1 hour, then apply a second protective coat.
- Allow to cure 24 hours.
How to Display or Gift It
- Fill with delicate blooms like baby’s breath.
- Gift tucked inside a tissue-lined hat box for a vintage feel.
- Store lace separately to avoid snagging.
- Beaded Garland Wrap
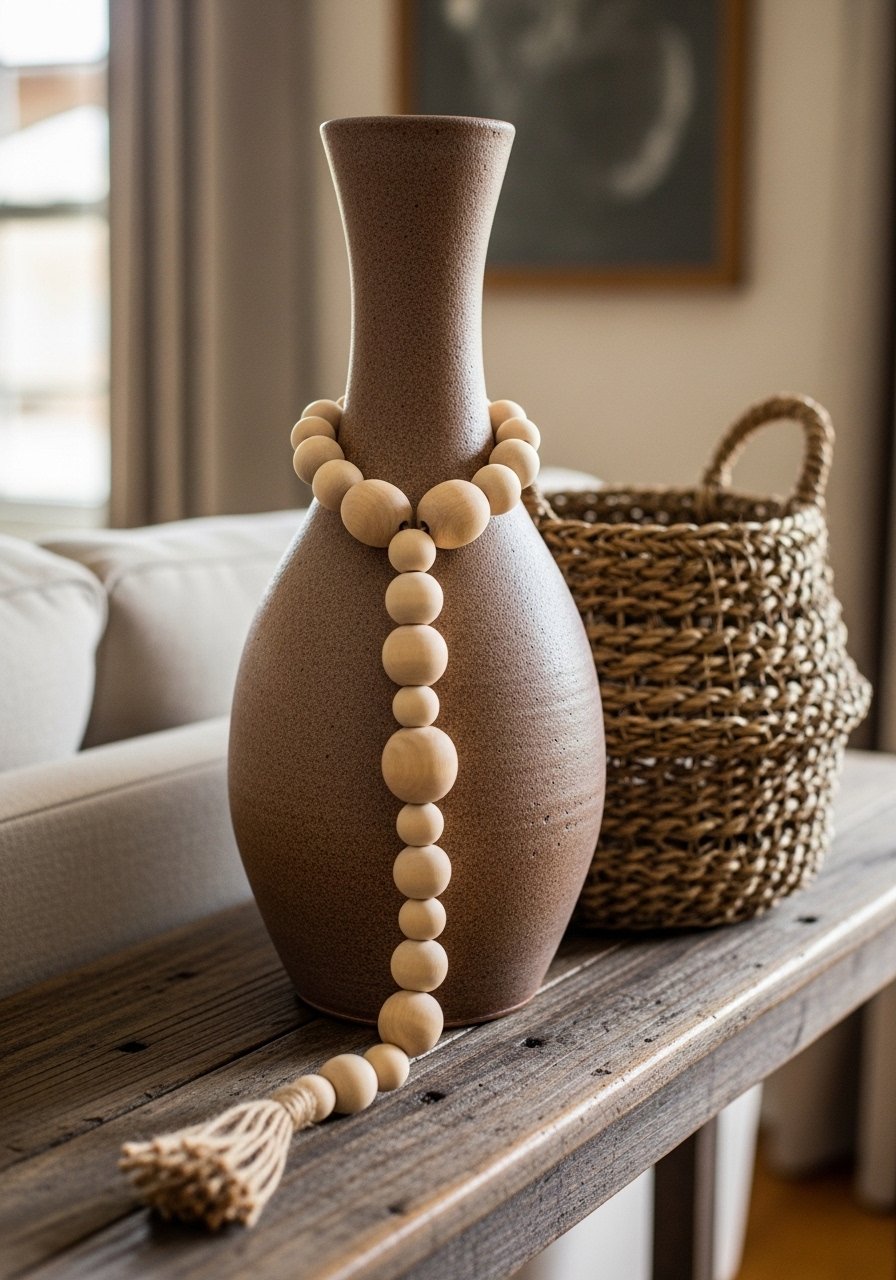
A bead garland wrapped around the neck softens the glass and adds tactile interest. Make the garland with wooden beads on cotton cord.
Materials
- 1 tall glass vase (10–12")
- Wooden beads, 20 beads (12 mm)
- Cotton cord, 2 m (3mm)
- Scissors and tape to secure ends
- Hot glue (optional) for securing knot
Instructions
- Thread beads onto cord, tie a secure knot and trim ends.
- Wrap garland around the vase neck and adjust loops.
- Secure knot with a dab of hot glue if needed.
- Fluff and style beads for even spacing.
How to Display or Gift It
- Swap the garland seasonally with painted beads.
- Place on a shelf with a matching wooden tray.
- Keep spare beads in a small craft organizer for future repairs.
- Fabric-Wrapped Boho Vase

Wrapping in fabric adds color and softness. Use flexible cotton fabric and secure with hot glue or a stitched seam.
Materials
- 1 cylinder vase (8–10")
- Lightweight cotton fabric strip, 60 cm x 20 cm
- E6000 or hot glue, 20 ml
- Leather cord for tie, 30 cm
- Scissors and ruler
Instructions
- Measure and cut fabric to wrap vase with 1 cm overlap.
- Apply a thin line of glue along the overlap; press fabric tight.
- Tuck ends at the seam and secure.
- Tie a leather cord around the neck for finishing.
- Let adhesive set per product instructions (E6000 cures 24–72 hours).
How to Display or Gift It
- Use with wildflowers in a boho living room.
- Wrap in tissue paper and slide into a kraft box for gifting.
- Store leftover fabric in a labeled drawer.
- Metallic Rub N Buff Ombre
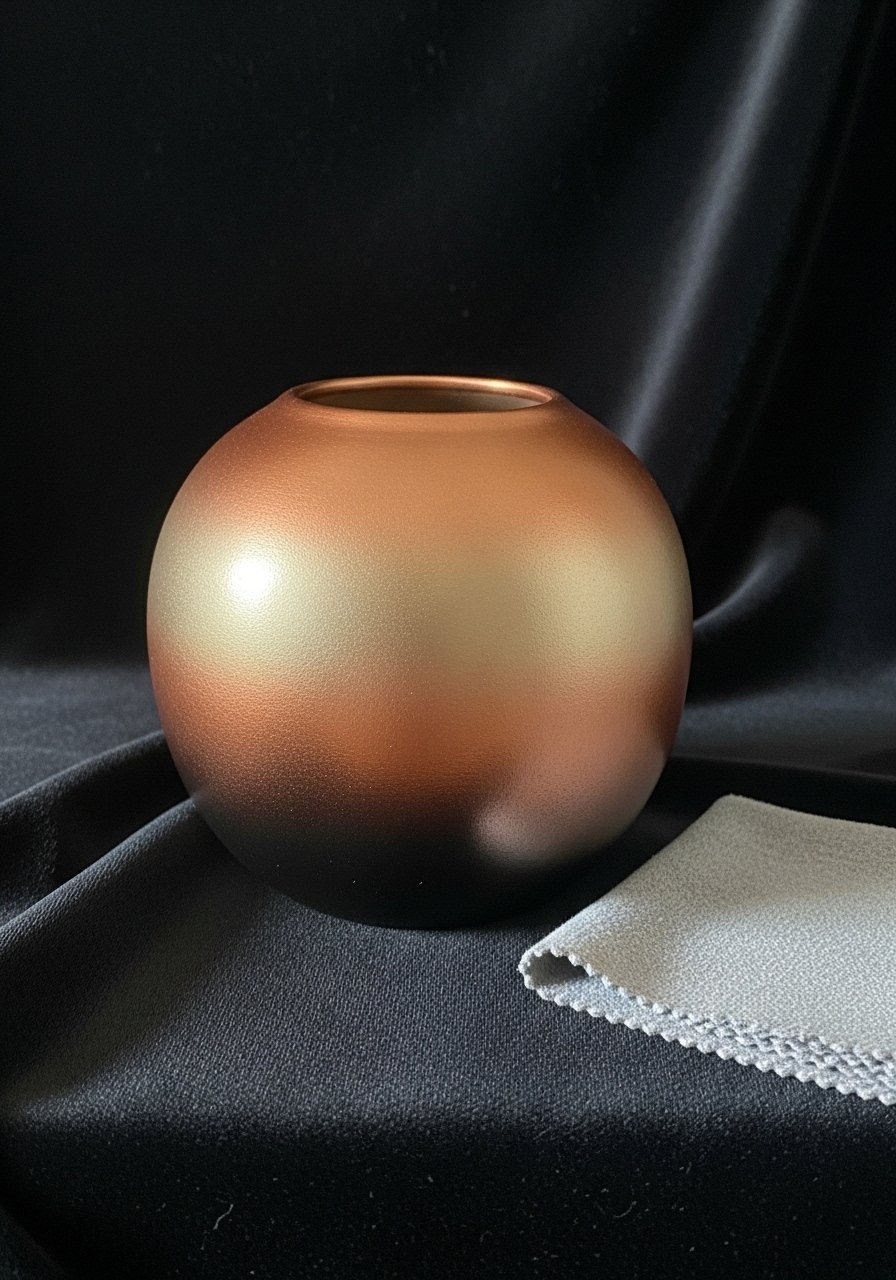
Rub 'n Buff gilding wax gives a warm metallic finish with a soft patina. It’s ideal for small accents and touch-up blending.
Materials
- 1 short glass vase (5–7")
- Metallic gilding wax (copper + gold), tubes 10 g each
- Soft cotton cloth for buffing
- Small artist brush for detailed application
- Gloves
Instructions
- Clean and dry vase. Apply copper at base with finger or brush.
- Blend gold toward the middle for an ombre effect.
- Buff gently with a soft cloth until lustrous.
- Seal lightly with clear spray if desired; cure 24 hours.
How to Display or Gift It
- Place with candlelight to highlight metallic sheen.
- Wrap in soft tissue and tuck in a box with a polishing cloth for gifting.
- Store gilding wax in a cool drawer.
- Pebble-Filled Transparent Layering
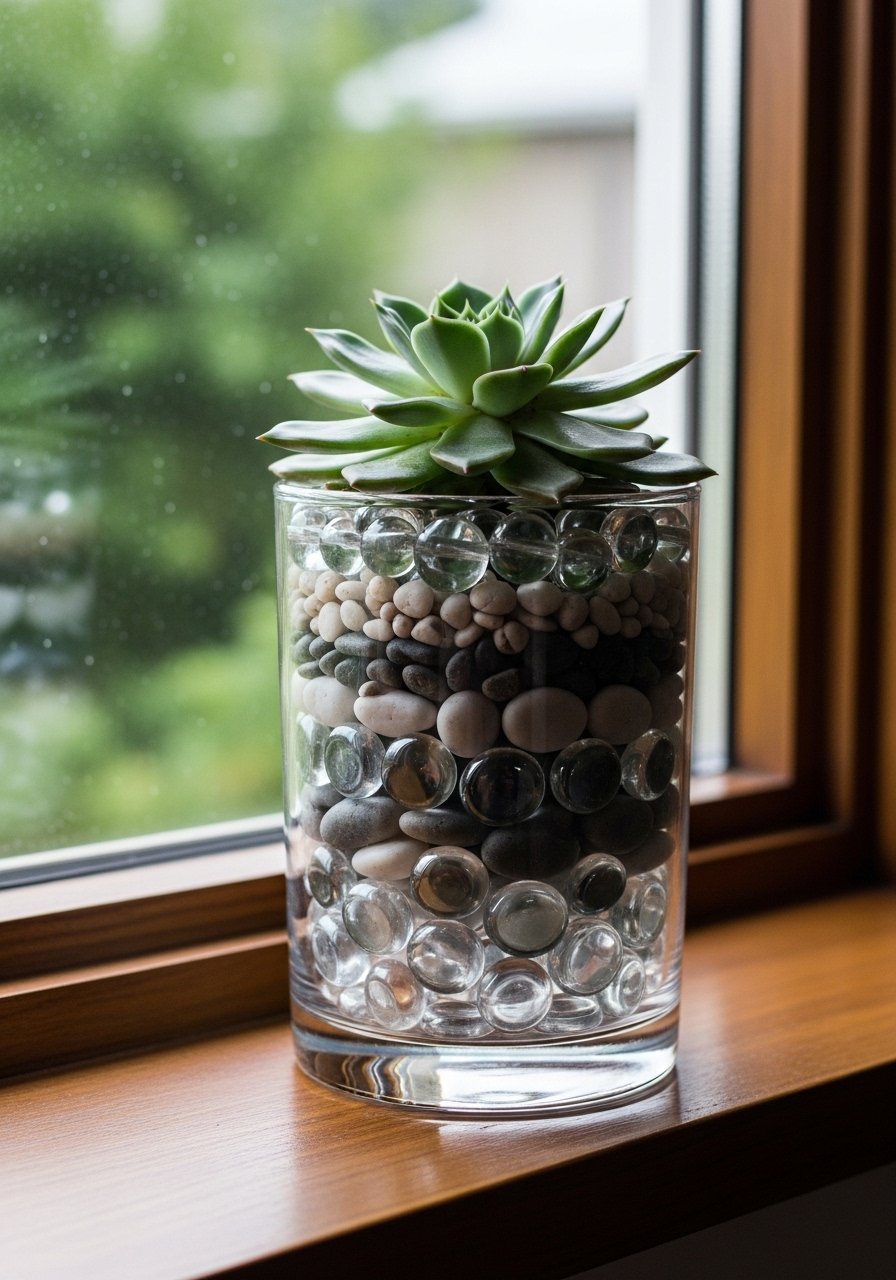
Filling a vase with pebbles and beads creates an interior texture that glows when backlit. Great for air plants or succulents.
Materials
- 1 tall clear vase (12")
- Small river pebbles, 2 cups
- Clear glass beads (various sizes), 1 cup
- Activated charcoal, 2 tbsp (if planting)
- Small succulents or air plant
Instructions
- Clean vase. Layer pebbles and glass beads in alternating bands.
- For succulents, add a thin layer of activated charcoal to prevent odor.
- Plant or nest an air plant on top.
- Water sparingly if using succulents.
How to Display or Gift It
- Display on a sunny sill or desk for low-maintenance greenery.
- Present as a small terrarium gift in a sturdy box.
- Store extra pebbles in a mason jar.
- Painted Stencil Motif
Using stencils lets you repeat motifs with precision. Adhesive stencils or a Cricut-cut vinyl make crisp shapes.
Materials
- 1 glass vase (8")
- Adhesive stencil or vinyl-cut stencil
- Acrylic craft paint (sage green), 20 ml
- Small foam pouncer brush
- Painter’s tape and paper plate for paint
Instructions
- Clean vase; apply stencil and press edges tight.
- Pounce paint lightly with foam brush to avoid bleed.
- Remove stencil while paint is slightly tacky for crisp edges.
- Apply a clear sealer after 24 hours.
How to Display or Gift It
- Match stencil color to throw pillows for cohesive decor.
- Bundle with a set of stencils as a gift.
- Store leftover stencils flat.
- Cork Studded Base Vase
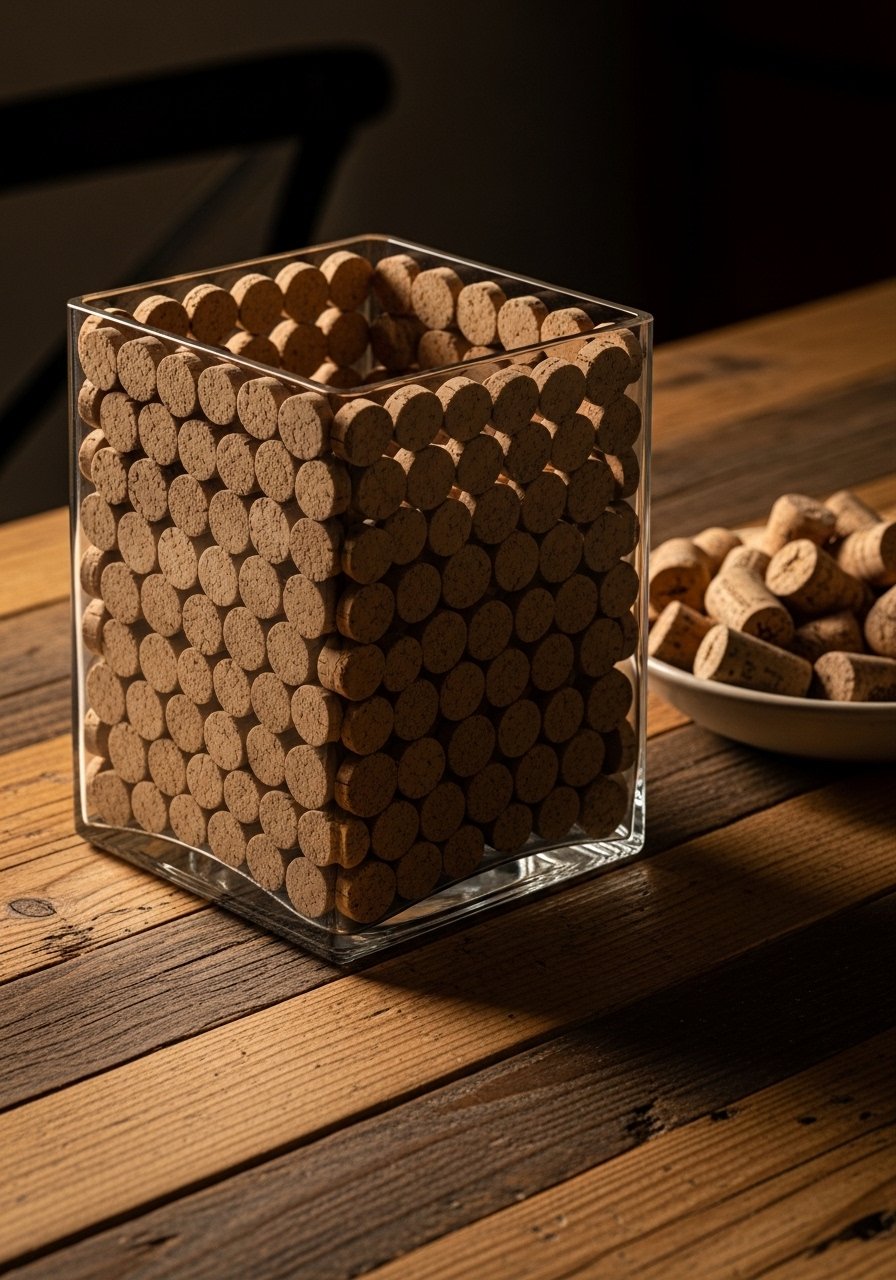
Sliced wine corks glued to the base make a recycled, textured base and protect surfaces from scratching.
Materials
- 1 square glass vase (6–8")
- Wine corks, 12 corks sliced into discs
- Craft knife and cutting board
- E6000 adhesive, 30 ml
- Sandpaper for smoothing edges
Instructions
- Slice corks into 3–4 mm discs. Sand if needed.
- Glue discs to base in a tight pattern; let set 1–2 hours.
- Fill any gaps with small cork bits and press to fit.
- Let adhesive cure 24 hours before use.
How to Display or Gift It
- Use as a rustic kitchen centerpiece.
- Pair with a small cork trivet when gifting.
- Store cork discs in a zip bag for future repairs.
- Lace and Paint Resist (shabby chic)
Use lace as a resist to reveal the glass beneath after painting. This gives a soft, ethereal pattern.
Materials
- 1 glass vase (7")
- Lace fabric piece, 10 cm x 20 cm
- Fabric stiffener or Mod Podge, 60 ml
- Chalk paint (blush), 60 ml
- Soft brush for painting and smoothing
Instructions
- Clean vase. Stiffen lace with fabric stiffener and adhere where desired.
- Paint over the vase with chalk paint; apply two thin coats, 30 minutes apart.
- When paint is tacky, gently peel lace to reveal pattern.
- Touch up with a fine brush if needed.
- Seal with matte sealer; cure 24 hours.
How to Display or Gift It
- Perfect for bridal or baby shower decor.
- Wrap in tissue and place in a cute box for gifting.
- Store delicate lace pieces flat.
- Macramé Vase Hanger
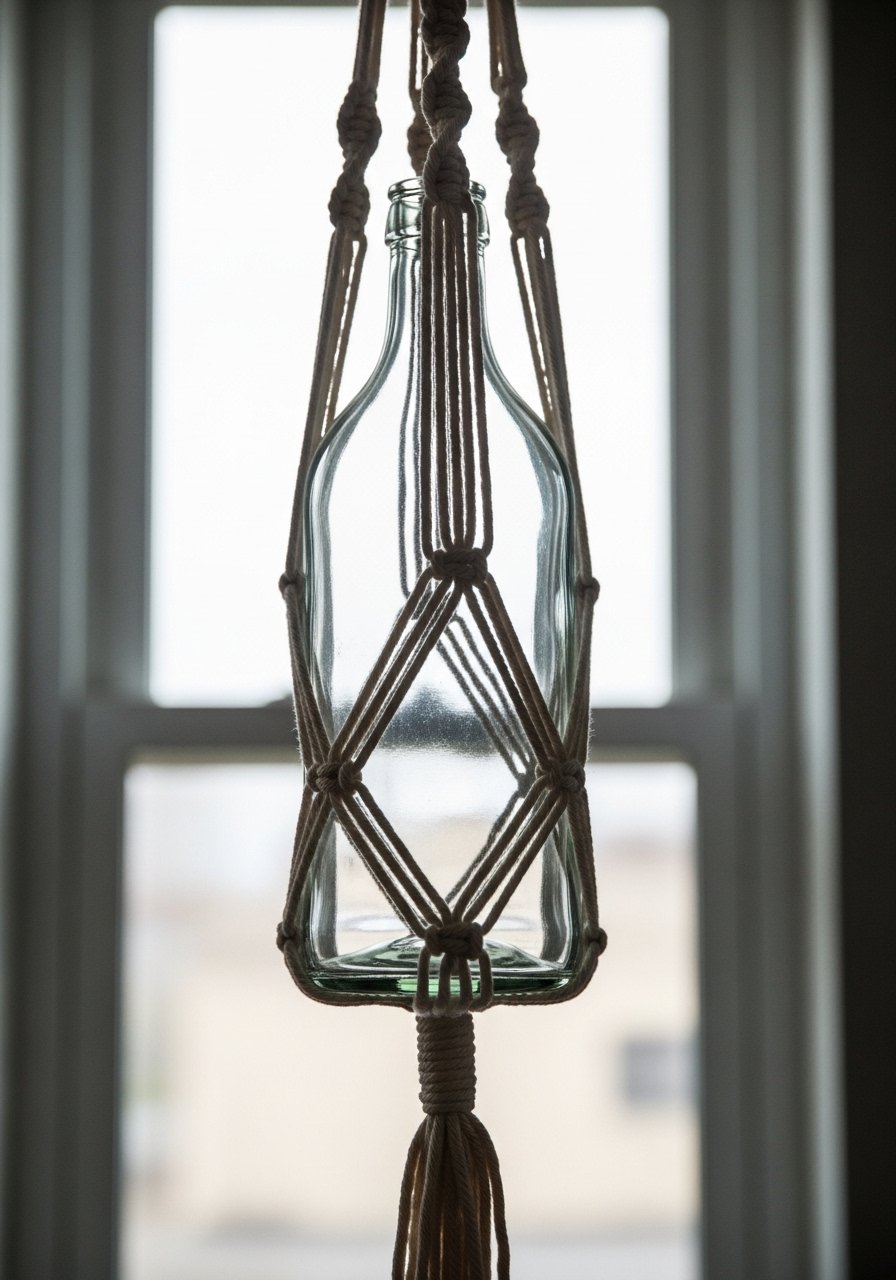
A macramé hanger turns any vase into hanging decor. Use 3mm cotton cord for a delicate look and wooden beads for accents.
Materials
- 1 narrow-neck tall vase (8–10")
- Macramé cord, 3mm single-strand, 10 m
- Wooden beads, 5 pieces (8–12 mm)
- Scissors and a tape measure
Instructions
- Cut cords: four lengths of 2.5 m each.
- Tie a central gathering knot and spread cords for square knots.
- Create alternating square knots for a 10 cm section.
- Add wooden beads and finish with half-hitch knots to form a cradle.
- Place vase in hanger and adjust knots for balance.
How to Display or Gift It
- Hang in a sunny corner with trailing plants.
- Gift with a small care card for the plant variety.
- Store cord and spare beads in a craft drawer.
- Washed-Out Watercolor Wash
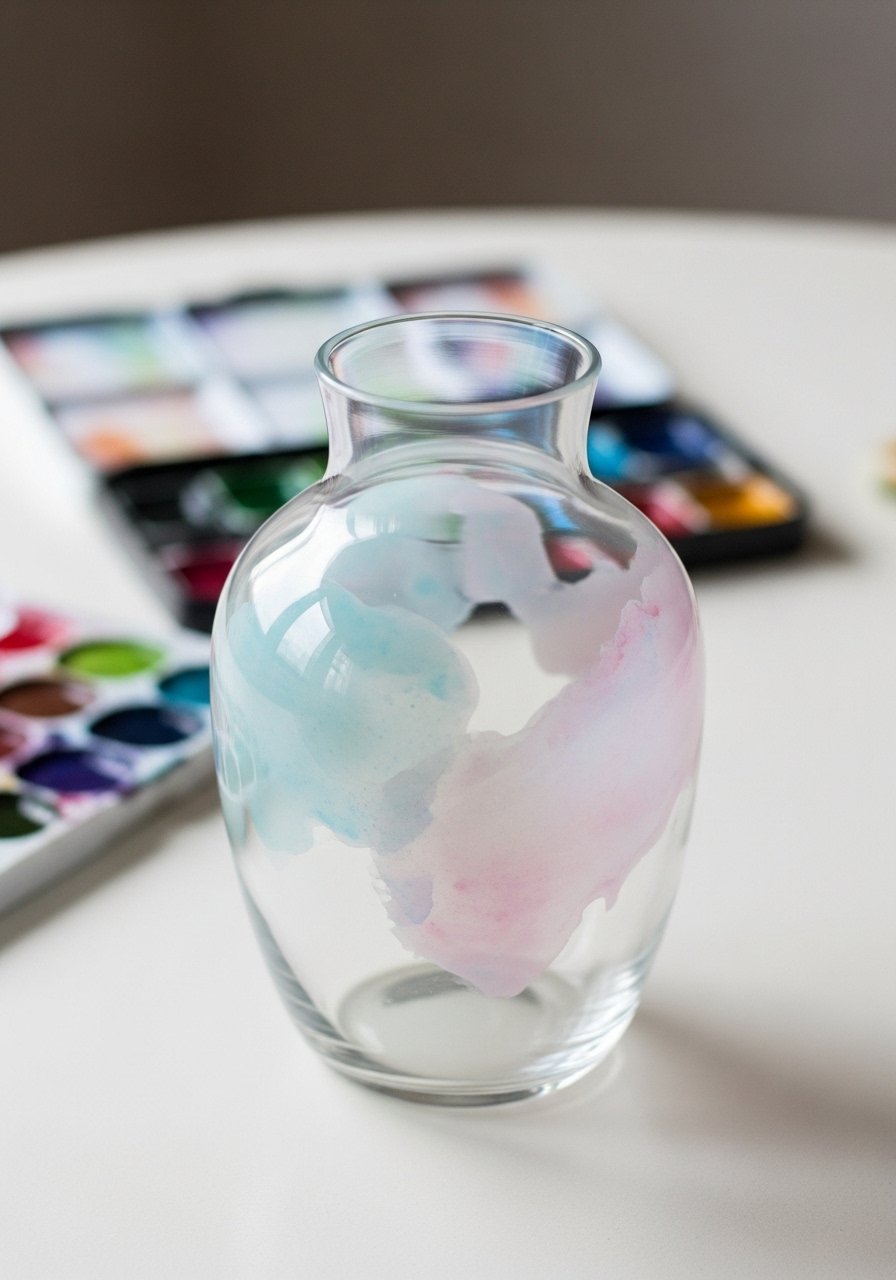
Diluted acrylics create soft watercolor effects on glass. Work in thin washes and let each layer dry to build depth.
Materials
- 1 bell-shaped vase (8")
- Acrylic paints (pastels), 10 ml each
- Small water dish and brush (round size 6)
- Paper towels and palette
- Clear gloss sealer, 100 ml
Instructions
- Clean vase. Mix paint with water to a translucent wash.
- Paint in gentle strokes, letting colors blend on the glass.
- Allow 15–20 minutes to dry between layers.
- Build color in 2–3 layers for depth.
- Seal with a gloss coat; cure 24 hours.
How to Display or Gift It
- Pair with white peonies for a dreamy table centerpiece.
- Wrap in soft tissue and protective paper for gifting.
- Store paints in labeled jars for repeats.
- Geometric Metallic Tape Inlay
Metallic tape delivers clean shapes and instant modernity. Use a craft knife and ruler for precision.
Materials
- 1 glass vase (8–10")
- Metallic tape rolls (gold/rose gold), 1 roll each
- Matte black spray paint, 150 ml
- Craft knife and self-healing cutting mat
- Ruler and fine-tip marker
Instructions
- Clean vase and spray paint with matte black base; let dry 30 minutes.
- Cut metallic tape shapes on a mat using a ruler.
- Apply tape carefully and press edges.
- Seal the tape edges with a thin line of clear sealer if desired.
How to Display or Gift It
- Use in a modern office or gallery shelf.
- Gift with a note about care: wipe gently with a damp cloth.
- Store extra tape rolls in a drawer.
- Pearl-Encrusted Glam Vase
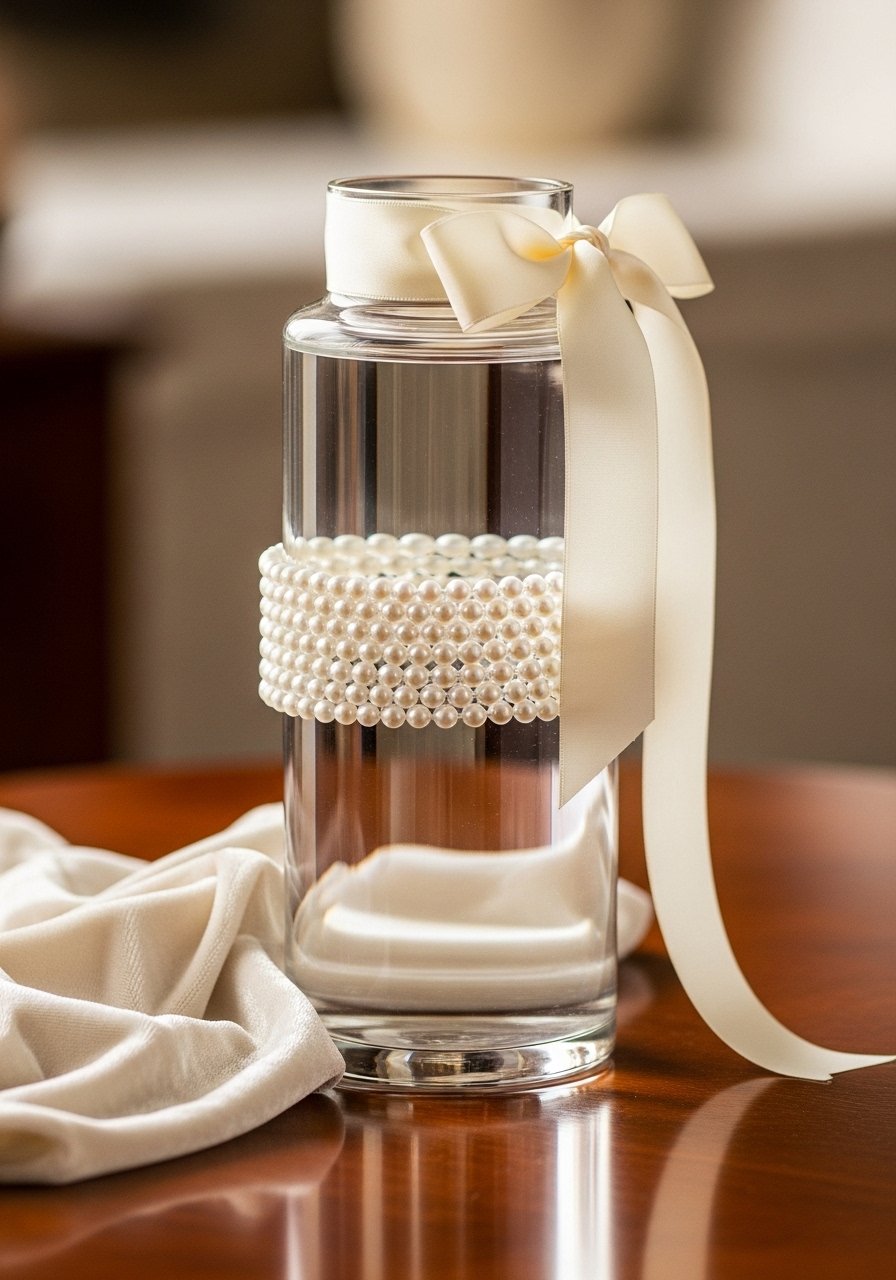
Pearls lend a classic, bridal-friendly look. Use flat-back pearls and E6000 glue for a secure hold.
Materials
- 1 clear vase (10")
- Flat-back pearl embellishments, 50 pieces (6–8 mm)
- E6000 adhesive, 30 ml
- Tweezers and soft cloth
Instructions
- Plan pearl placement by laying out a band.
- Apply small dots of E6000 and set pearls with tweezers.
- Let adhesive cure 24–48 hours for full strength.
- Clean any excess glue carefully.
How to Display or Gift It
- Ideal for wedding centerpieces or bride gifts.
- Package with soft tissue and a silk ribbon.
- Keep spare pearls in a small compartment container.
- Stamped Clay Accent Base
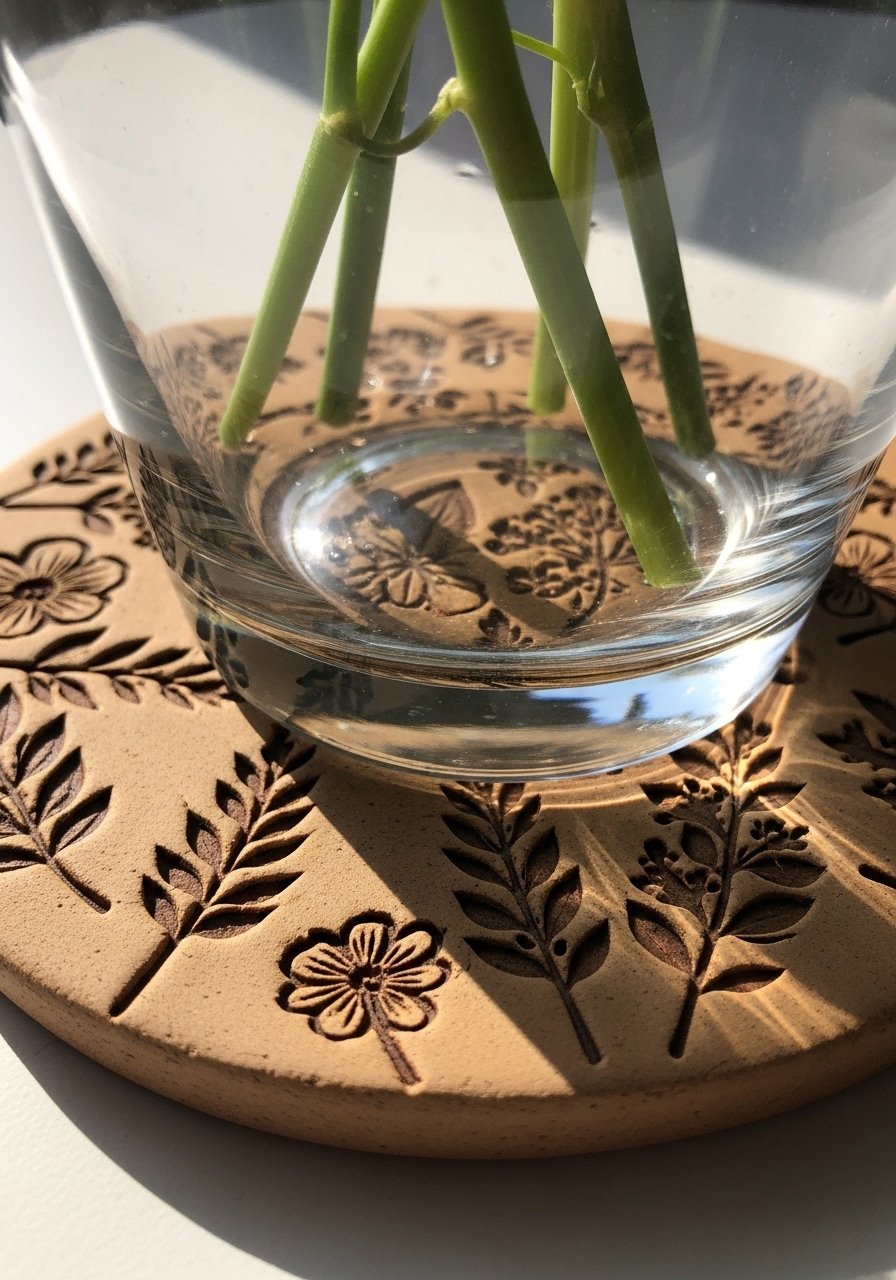
Air-dry clay can be pressed and wrapped around the base for a tactile accent. Stamp patterns for extra charm.
Materials
- 1 round-bottom vase (7")
- Air-dry clay, 150 g
- Small rolling pin and botanical stamps
- Craft knife and water for smoothing
- Clear matte sealer, 100 ml
Instructions
- Roll clay into a thin sheet and stamp desired pattern.
- Cut a ring to wrap the base of the vase.
- Smooth edges with a damp finger and press gently onto base.
- Let dry 24–48 hours (air-dry times vary by thickness).
- Seal with matte sealer to protect surface.
How to Display or Gift It
- Use as a decorative base for a seasonal arrangement.
- Wrap in kraft paper and gift with care instructions.
- Store leftover clay in an airtight container to prevent drying.
- Frosted Spray Gradient
Frosted spray gives a soft, diffused look that complements modern and Japandi interiors. Layering creates a soft gradient.
Materials
- 1 tall glass vase (12")
- Frosted glass spray paint, 200 ml
- Painter’s tape and newspaper for masking
- Gloves and dust mask
Instructions
- Clean vase. Mask top and bottom if needed.
- Spray from a distance in light passes to build a gradient. Wait 10–15 minutes between passes.
- Add more passes for denser frost.
- Let cure 24 hours before handling.
How to Display or Gift It
- Use with soft cotton stems for a calming vignette.
- Gift in a box with silica gel if shipping.
- Store unused spray upright in a cool space.
- Seashell Rim with Beach Sand
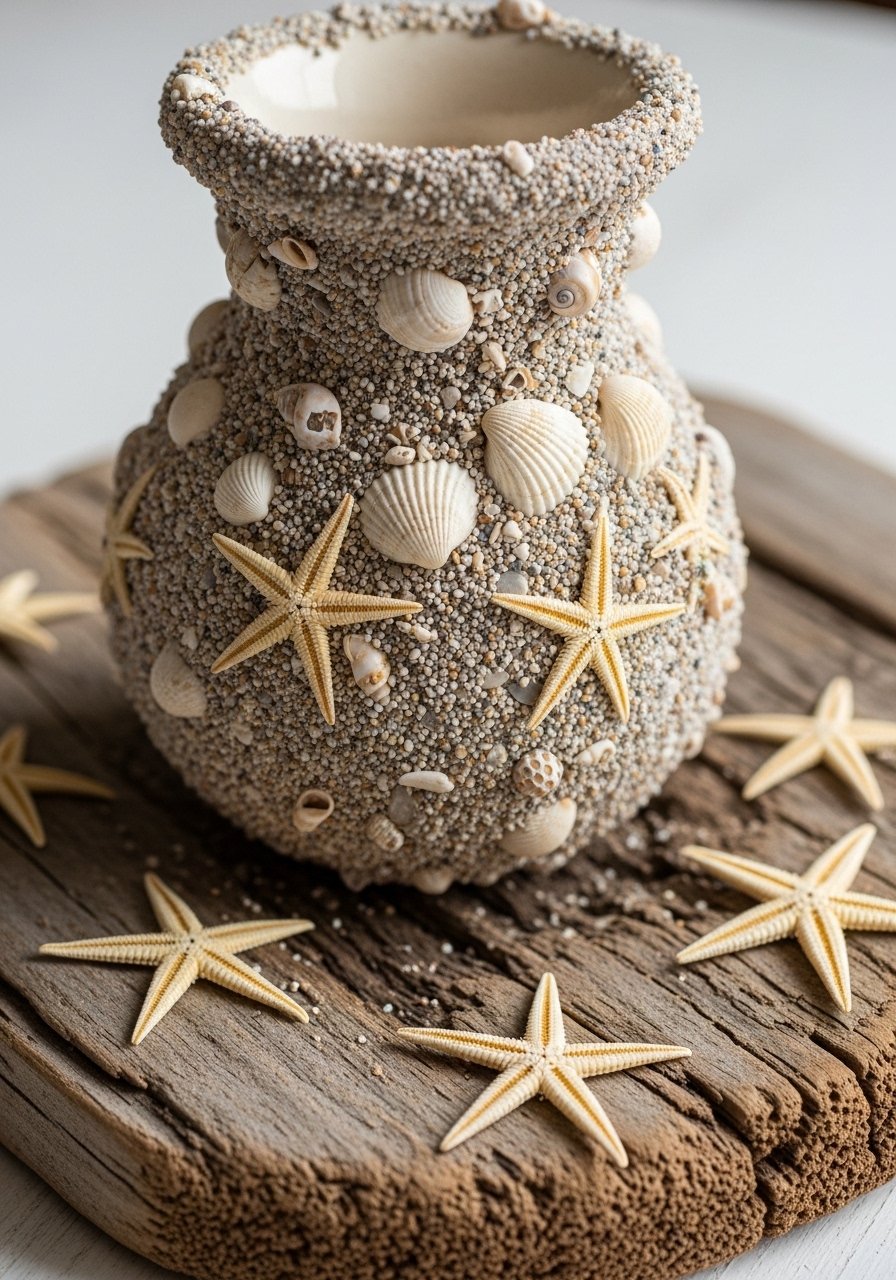
Sanded rims bring the beach inside. Use a mix of fine sand and craft glue for an authentic texture.
Materials
- 1 short vase (6")
- Fine craft sand, 1/2 cup
- Mini shells, 1/4 cup
- Clear craft glue or Mod Podge, 60 ml
- Small foam brush
Instructions
- Apply glue around the rim. Sprinkle sand and press shells into place.
- Let dry 1–2 hours, then shake off excess.
- Seal with a clear topcoat to prevent shedding; cure 24 hours.
How to Display or Gift It
- Pair with coordinated coastal candles.
- Gift with a note about where the sand came from (if recycled).
- Store in a dry box to avoid sand loss.
- Metallic Drip Effect
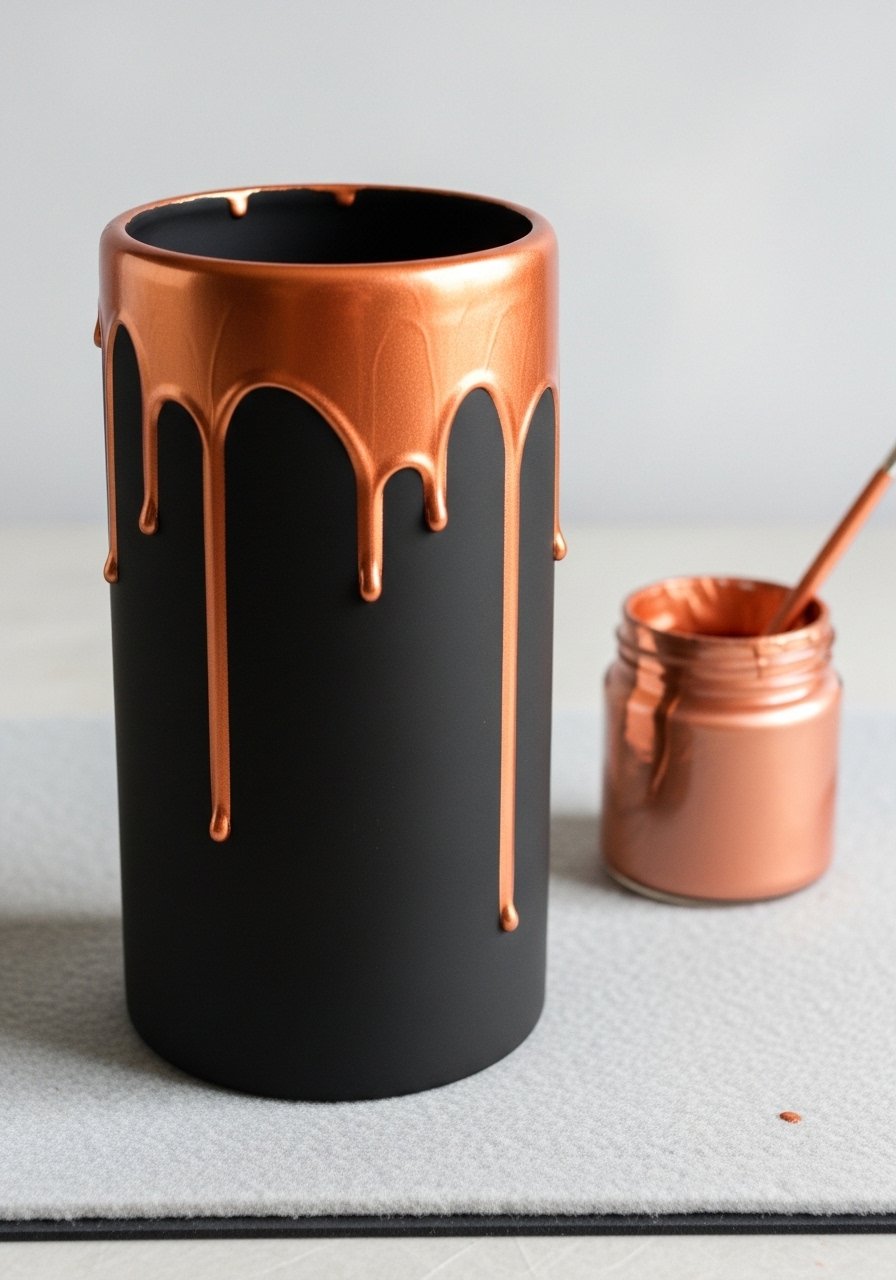
Metallic drips create a dramatic, handcrafted look. Thicker paint produces slow, elegant drips.
Materials
- 1 clear vase (9")
- Metallic acrylic paint (copper), 30 ml
- Paint medium to thin slightly, 10 ml
- Small squeeze bottle or pipette
- Protective mat
Instructions
- Mix metallic paint with a little medium for flow.
- Using a pipette, place drops along the rim and let gravity create drips.
- Rotate vase to vary drip length.
- Allow to dry 1–2 hours; apply a second coat if needed.
How to Display or Gift It
- Display with single tall stems for a sculptural look.
- Wrap in cellophane and tie with a ribbon for gifting.
- Store in a sturdy box to protect drips.
- Origami Paper Collage

Origami elements add playful color and dimension. Use lightweight paper and a clear adhesive to keep pieces secure.
Materials
- 1 medium vase (8")
- Origami paper squares, 30 pieces (5 cm x 5 cm)
- Craft glue (clear-drying), 30 ml
- Small brush and tweezers
Instructions
- Fold desired origami shapes (cranes, boats, flowers).
- Apply small dots of glue and attach shapes in a composed pattern.
- Overlap slightly and layer for depth.
- Let dry 1–2 hours; seal lightly if needed.
How to Display or Gift It
- Use as a cheerful desk accessory.
- Gift with an instruction card to fold more shapes.
- Store unused paper in a flat envelope.
- Vintage Label Transfer
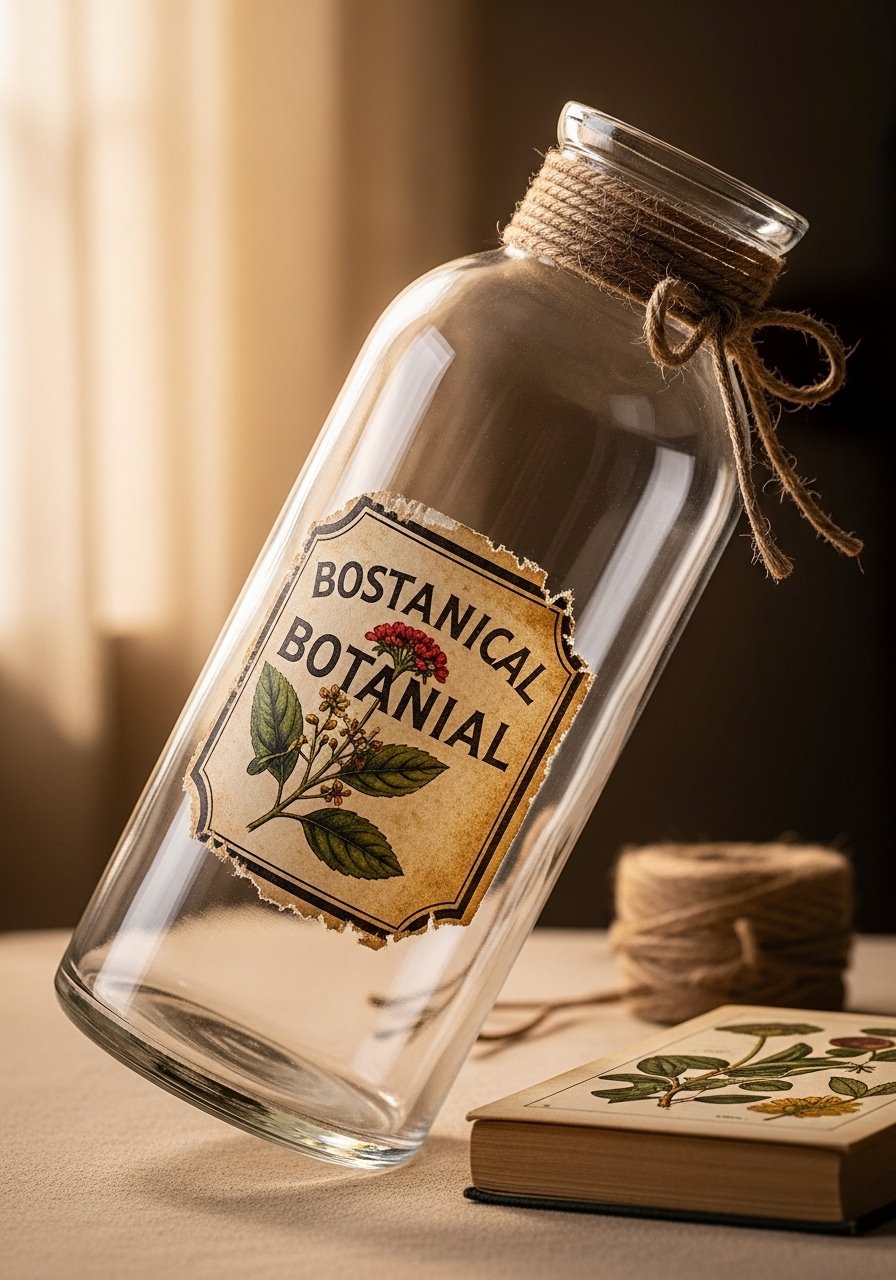
Image transfer gives a collage-style vintage look. Gel medium transfers printed images nicely.
Materials
- 1 glass jar/vase (7–9")
- Printed vintage label (inkjet print), 1
- Gel medium transfer (matte), 120 ml
- Soft cloth and water for burnishing
- Scissors and tweezers
Instructions
- Cut the printed label to size; apply gel medium to the print side.
- Press paper onto the vase and burnish flat; allow to dry overnight.
- Dampen paper and rub gently to remove fibers, revealing transferred image.
- Seal with matte spray; cure 24 hours.
How to Display or Gift It
- Perfect for apothecary-style displays or gifting with dried herbs.
- Store extra prints flat to prevent curling.
You made it to the end—what a collection! These 30 glass vase decorating ideas cover styles from Japandi minimalism to boho texture and cottagecore romance. Try one project today, or plan a batch craft day to build a matching set. Save or pin this page so you can reference measurements, drying times, and product notes later. Which design are you most tempted to try: gold leaf glam, pressed flower resin, or a cozy twine wrap? Share your finished vases with friends or gift them at the next gathering.
For a single tool that speeds up dozens of these projects, consider a good temperature-controlled hot glue gun — it changed how I finish trims, beads, and twine wraps without a stringy mess. Happy crafting!


