
You probably have at least one plain vase hiding in a cupboard. With a few budget vase decorating ideas, you can turn those plain glass or thrifted finds into pieces that look like they cost far more than they did. This collection of 24 projects focuses on inexpensive materials, easy techniques, and finishes that read boutique—think matte chalky paint, delicate gold accents, and textural wraps.
I’ll show you projects that use everyday supplies like Mod Podge and twine, plus small tools that make life easier—like a reliable hot glue gun for secure wraps and a precision craft knife for crisp vinyl edges. Every idea here has measurements, drying times, and troubleshooting tips so your finished vase looks high end and durable.
Ready to browse budget vase decorating ideas that cost almost nothing? Each project includes a short materials list, step-by-step instructions, and styling tips so you can pin, make, and gift with confidence.
- Painted Matte Ombre Vase — a top budget vase decorating ideas pick
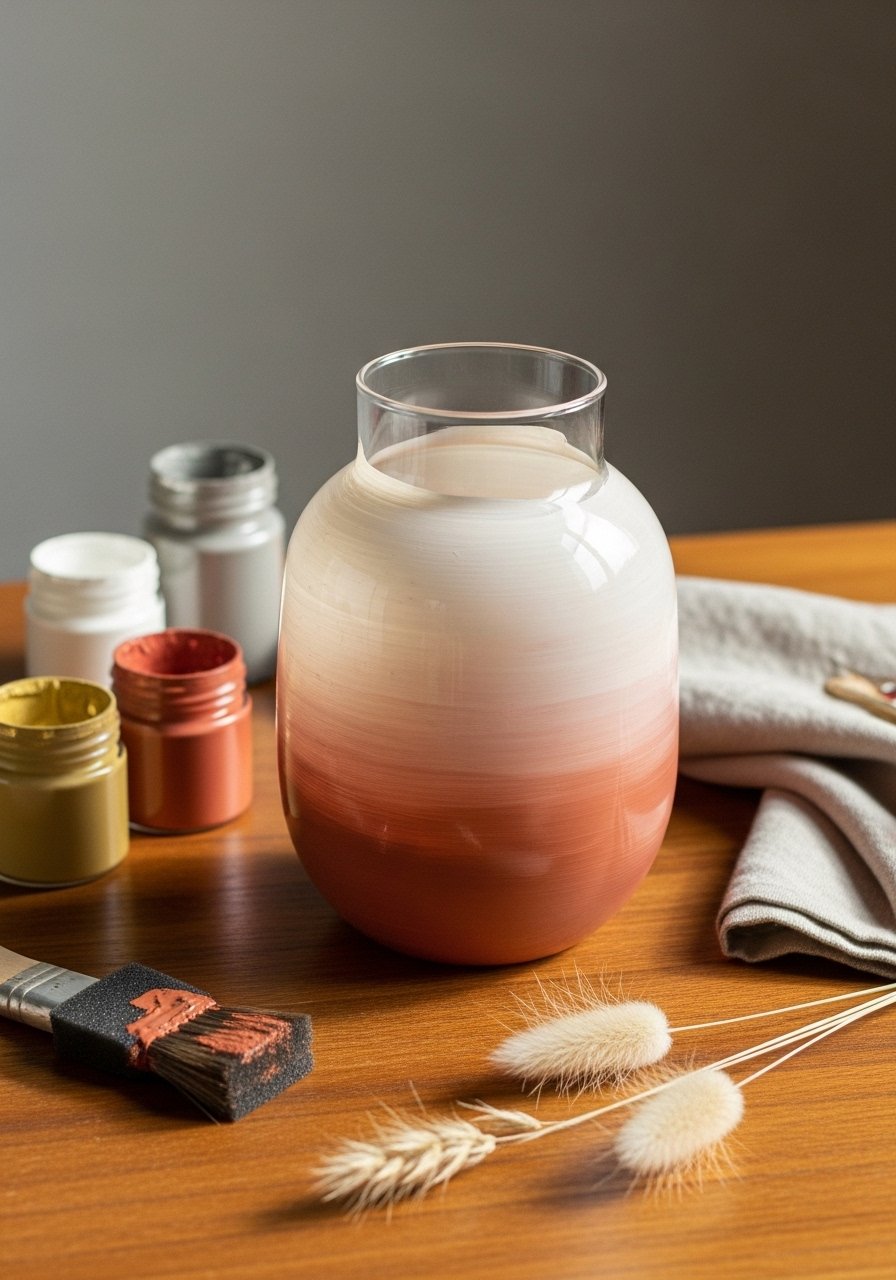
This painted matte ombre looks expensive but uses a small stash of chalk paint. The finish is velvety and soft to the touch. Beginners will love how forgiving blending is with a foam brush and light sanding. Use a flat foam brush for even coats.
Materials
- One clean glass vase (8–10" tall)
- Chalk paint (color A) — 60 ml
- Chalk paint (color B) — 60 ml
- Fine-grit sandpaper (220)
- Flat foam brush (1")
- Painter’s tape (1/2" roll)
- Disposable cup for mixing
- Drop cloth or craft mat
Instructions
- Wash and dry the vase thoroughly. Remove labels with warm soapy water.
- Tape the bottom rim if you want a bare-bottom edge. Lightly sand the vase so paint adheres.
- Paint the top third with Color A in thin even coats. Let dry 30 minutes.
- Paint the bottom third with Color B. Dry 30 minutes.
- Mix a 50/50 blend of A+B in a cup. Use the flat foam brush to blend the middle section with gentle horizontal strokes for 2–3 minutes until seamless.
- Allow to dry 1 hour, then sand lightly for a suede finish. Apply a second thin coat if coverage isn't opaque. Cure 24 hours before handling.
How to Display or Gift It
- Pair with dried pampas or bunny tail grasses for a neutral vignette.
- Wrap the base with kraft tissue and tie with twine for gifting.
- Store extra painted vases upright in a cardboard box to avoid scuffs.
- Display on a mantel with a small wooden tray to create a mini styling group.
- Jute Twine Wrapped Vase — rustic budget vase decorating ideas

The jute twine wrap gives thrifted jars a farmhouse look. It’s tactile, inexpensive, and forgiving if your rows shift by a millimeter. A low-temp hot glue gun makes this quick.
Materials
- Glass vase or jar (any size)
- 100 ft natural jute twine (3mm)
- Hot glue gun and glue sticks
- Scissors
- Painter’s tape (to mark starting line)
- Felt pad for the base
Instructions
- Clean the jar and dry. Mark your starting height with painter’s tape.
- Plug in the glue gun and work in small sections.
- Apply a thin line of hot glue and press the twine into it. Wrap tightly and press each coil against the previous one.
- Continue wrapping to the top, trimming excess twine and securing with glue.
- Tuck the end under a coil and add a dab of glue for security.
- Let the glue set 10 minutes before handling.
How to Display or Gift It
- Add a small dried sprig and tie with baker’s twine.
- Use as a utensil caddy in a rustic kitchen.
- Store extra twine in a stackable craft organizer to keep it from tangling: craft organizer.
- Gold Leaf Accent Rim Vase

A thin gold rim makes even the simplest vase look curated. Gold leaf applies quickly and gives a luxe metallic payoff for a minimal cost. I like using a small craft brush to burnish the edges.
Materials
- Glass vase
- Gold leaf sheets (imitation) — 1–2 sheets
- Adhesive size for gold leaf (quick size) — 30 ml
- Soft craft brush (size 6)
- Cotton gloves
- Clear matte sealer spray (optional)
Instructions
- Clean and dry vase. Decide rim width (5–8 mm) and mark faintly with pencil.
- Apply a thin coat of adhesive size to the rim and wait until tacky (5–10 minutes).
- Carefully lay gold leaf sheet over the tacky area. Press gently with a soft brush.
- Remove excess leaf with a clean brush.
- Seal with a light coat of clear matte spray for durability. Dry 1 hour.
How to Display or Gift It
- Use a single stem for a gallery-like look.
- Wrap in tissue and place in a small kraft box for gifting.
- For storage, keep gold leaf sheets flattened in a zipper pouch.
- Decoupage Napkin Vase — floral budget vase decorating ideas
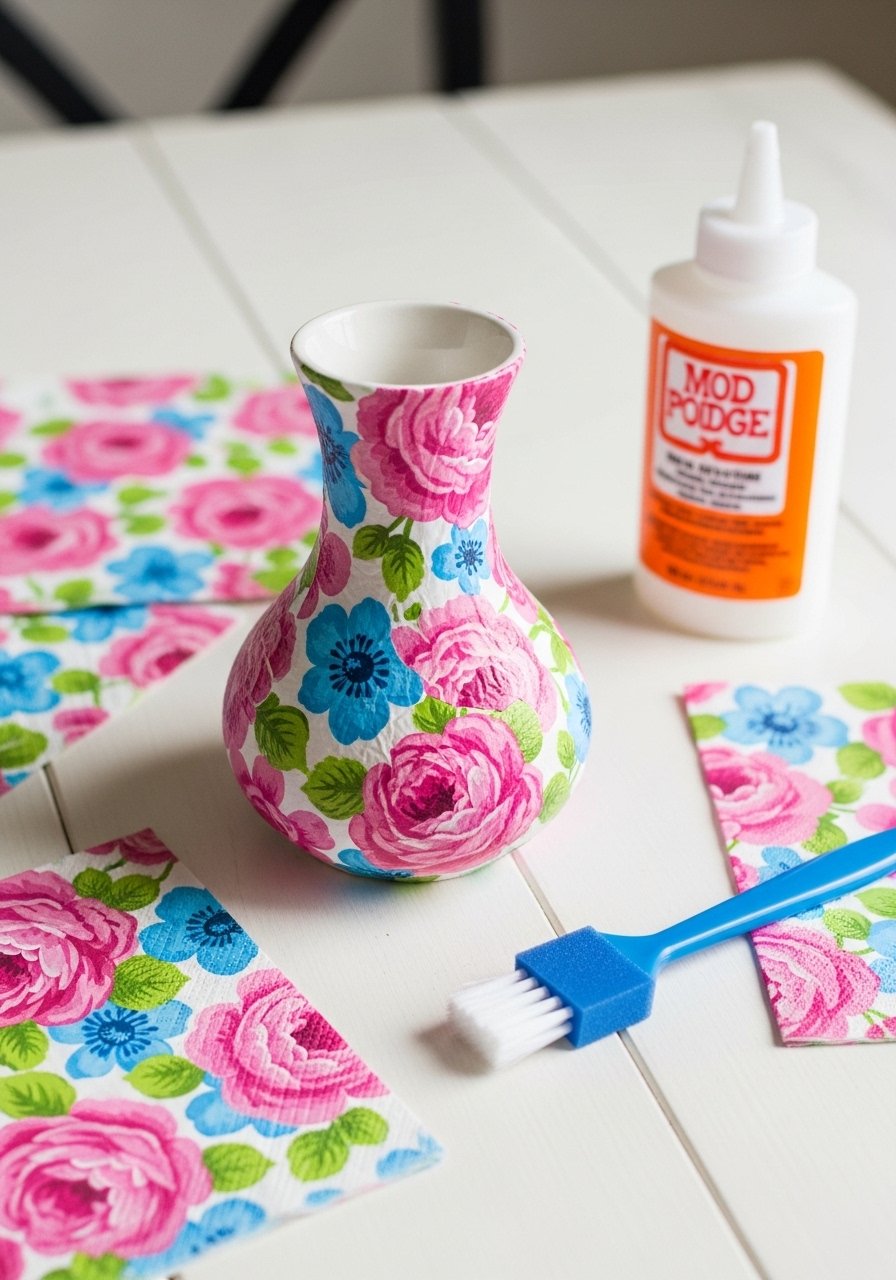
Decoupaged napkins give instant pattern without printing or vinyl cutting. It’s a great beginner-friendly option for cottagecore or shabby-chic looks. Use matte Mod Podge for a soft finish.
Materials
- Glass vase (4–8" tall)
- Decorative paper napkins or tissue (2–3)
- Mod Podge matte — 120 ml
- Foam brush (1")
- Scissors
- Small bowl of water
- Plastic card to smooth bubbles
Instructions
- Separate napkin layers; use only the printed top layer.
- Cut or tear napkin to desired shapes. Sand vase lightly to help adhesion.
- Brush a thin coat of Mod Podge where you’ll place the napkin.
- Lay napkin gently, smoothing with a plastic card from center outward.
- Brush a thin coat of Mod Podge over the napkin. Let dry 20–30 minutes.
- Add a second coat. Cure 24 hours before use.
How to Display or Gift It
- Fill with fresh or faux stems that match the napkin print.
- Wrap in clear cellophane and tie with ribbon for gifting.
- Store any leftover napkins flat in a craft drawer.
- Painted Tribal Stripe Vase — one of the best budget vase decorating ideas
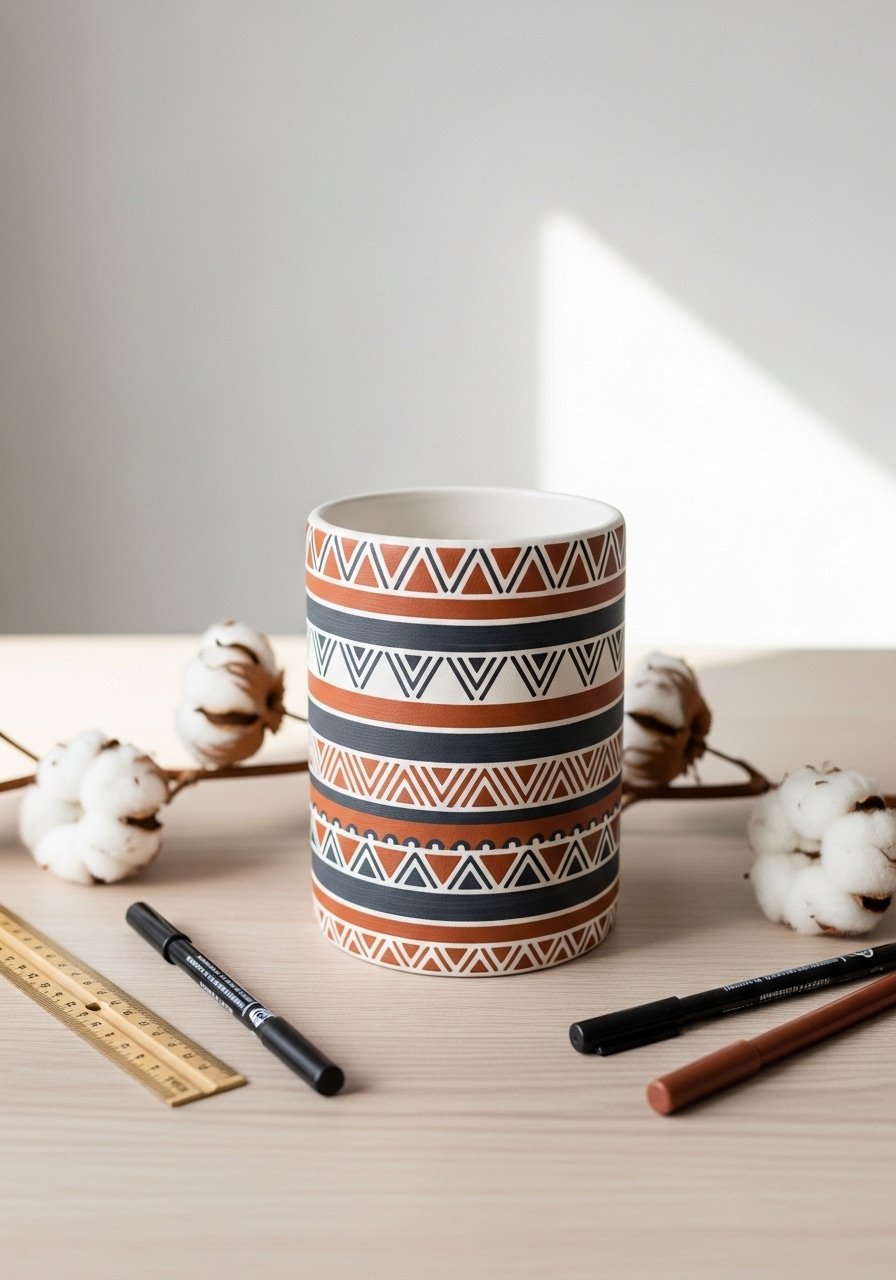
Hand-painted stripes give a boho-japandi crossover look. Use a paint pen set for crisp lines without masking. This project is great for those who love imperfect, handmade marks.
Materials
- Glass or ceramic vase (6–10")
- Acrylic craft paints (2 colors) — 30 ml each
- Paint pens (fine tip) in coordinating color
- Painter’s tape (optional for straight lines)
- Small foam brush
- Ruler and pencil
Instructions
- Clean the vase. Lightly sand ceramic if needed.
- Mark stripe positions with a pencil and ruler.
- If you want precise lines, use painter’s tape. For hand-drawn, skip tape.
- Paint stripes with foam brush or paint pen. Thin coats dry 15 minutes.
- Apply a second coat where necessary. Cure 24 hours.
- If painted on glass, finish with a clear outdoor sealer for washability.
How to Display or Gift It
- Group with small neutral ceramics for a collected shelf.
- Add a kraft tag and baker’s twine for gifting.
- Store painted pieces upright with padding between them.
- Marbled Nail Polish Vase
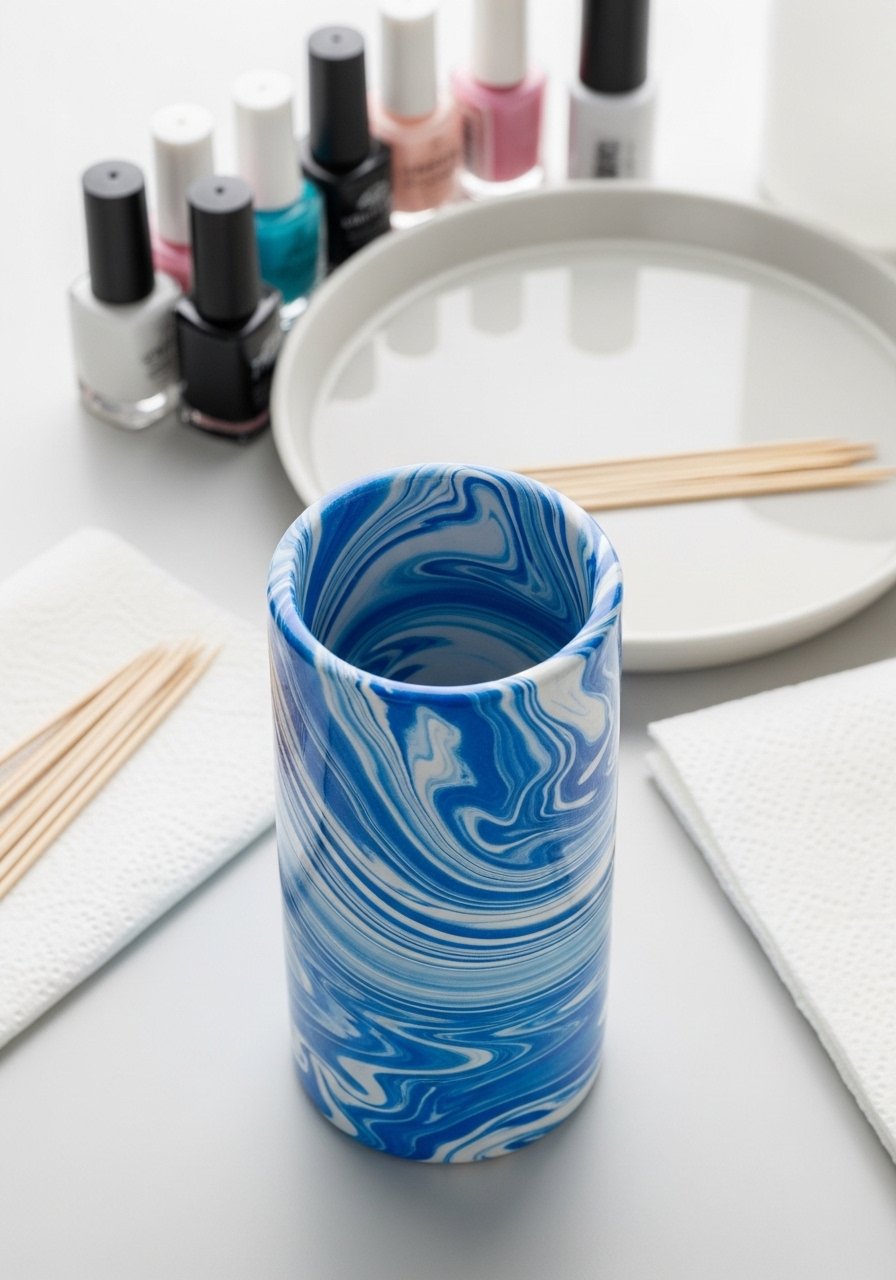
Marbling with nail polish is an easy way to get that high-end marble look on glass. Use cheap but color-rich nail polish and work in a well-ventilated area.
Materials
- Glass vase (short or mid-size)
- Nail polish in 2–3 colors (5–10 ml each)
- Disposable shallow tray or tub (large enough to dip)
- Wooden skewer or toothpick
- Disposable gloves
- Paper towels
Instructions
- Fill the tray with room-temperature water (2–3" deep).
- Drop a few drops of each polish onto the water’s surface. Use a skewer to swirl.
- Holding the vase by the rim, dip it at an angle into the design. Rotate to pick up pattern.
- Lift and let excess water drip. Dry 10 minutes then place upright.
- If coverage is light, repeat for a bolder look. Allow 24 hours to cure.
- Finish with a clear spray sealer if you expect heavy handling.
How to Display or Gift It
- Use for single-stem flowers to show off the marbling.
- Wrap in tissue and twine for a quick gift.
- Store additional nail polishes in a divided drawer to avoid spills.
- Burlap and Button Collage Vase
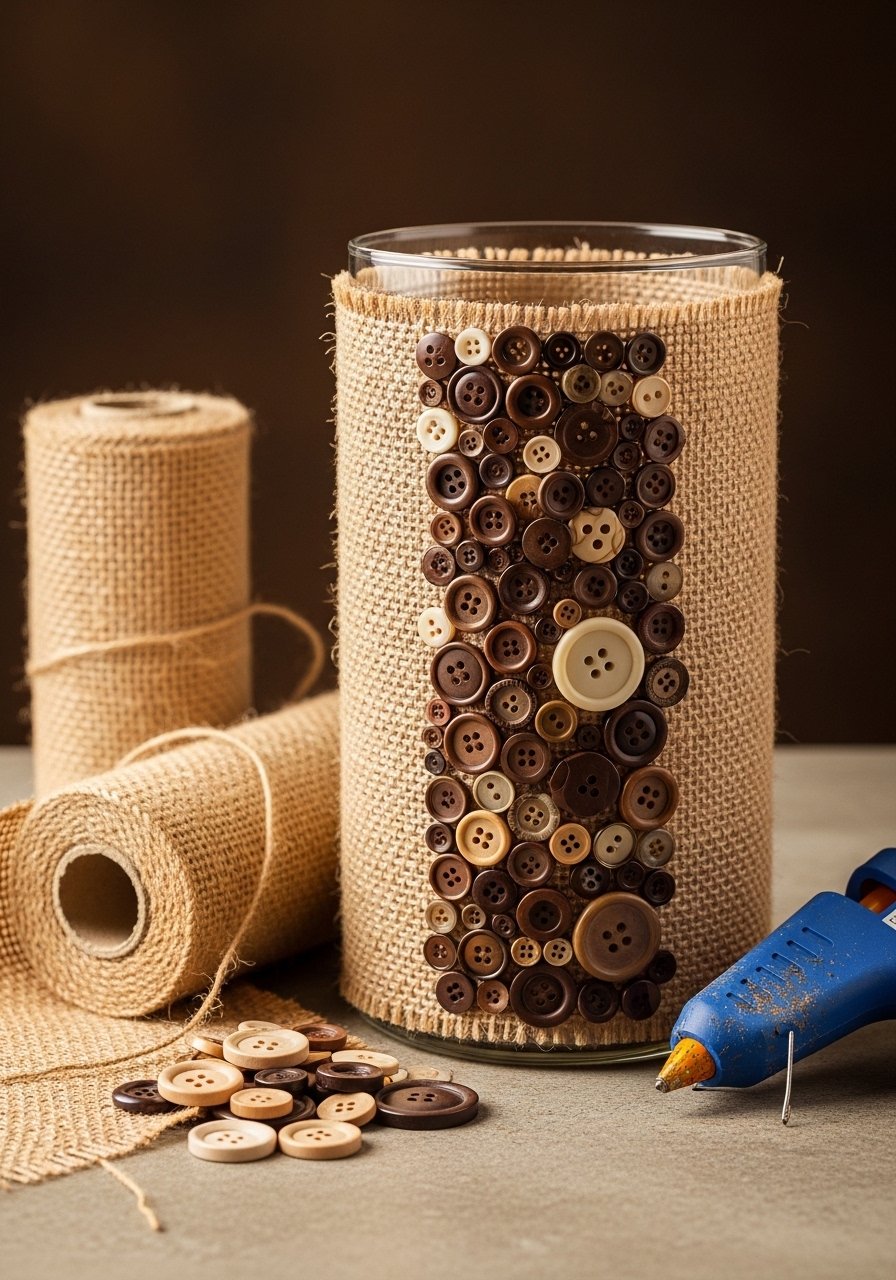
Burlap adds texture; buttons add charm. This project reads farmhouse-chic and is a great way to use craft stash buttons. A low-temp hot glue gun works well here.
Materials
- Glass or mason jar
- Burlap ribbon (2" wide) — 1–2 yards
- Assorted buttons (10–15)
- Hot glue gun and sticks
- Scissors
- Jute twine for finishing knot
Instructions
- Measure burlap around vase and cut with 1/2" overlap.
- Heat glue gun. Glue one edge and wrap tightly.
- Trim edges and glue seam.
- Arrange buttons in a column. Glue each button in place.
- Tie a twine bow around the neck for finishing.
- Let glue cool 10 minutes before filling.
How to Display or Gift It
- Fill with wildflowers or kitchen utensils.
- Tuck a small notecard under the twine for gifting.
- Store spare burlap rolled in a craft bin.
- Stenciled Monogram Vase
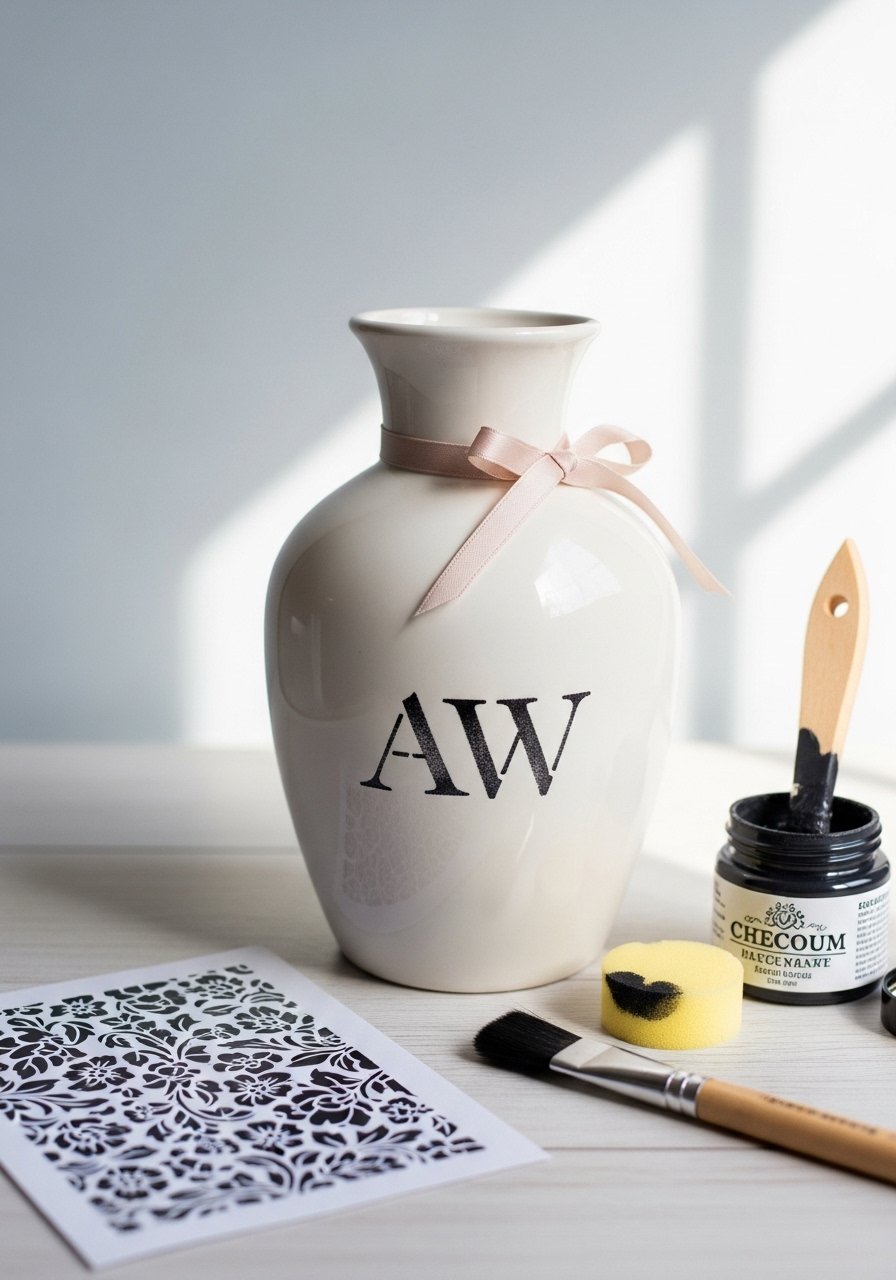
Monograms give a custom feel. Use a pre-cut stencil or a letter stencil set and a stencil sponge for crisp edges.
Materials
- Clean glass vase
- Chalk paint (white) — 60 ml
- Letter stencil set
- Stencil sponge or stippling brush
- Pencil and painter’s tape
- Fine sandpaper (220)
Instructions
- Paint vase with a base coat. Dry 30 minutes.
- Position stencil and tape lightly.
- Dab paint with stencil sponge—use a small amount of paint to avoid bleed.
- Remove stencil carefully while paint is still damp to keep edges crisp.
- Touch up with a tiny brush if needed. Cure 24 hours.
- Lightly sand for a soft, worn look if desired.
How to Display or Gift It
- Pair with a matching tray and monogrammed coasters for gift sets.
- Wrap in tissue inside a small gift box.
- Store stencils flat to keep edges clean.
- Chalkboard Paint Message Vase
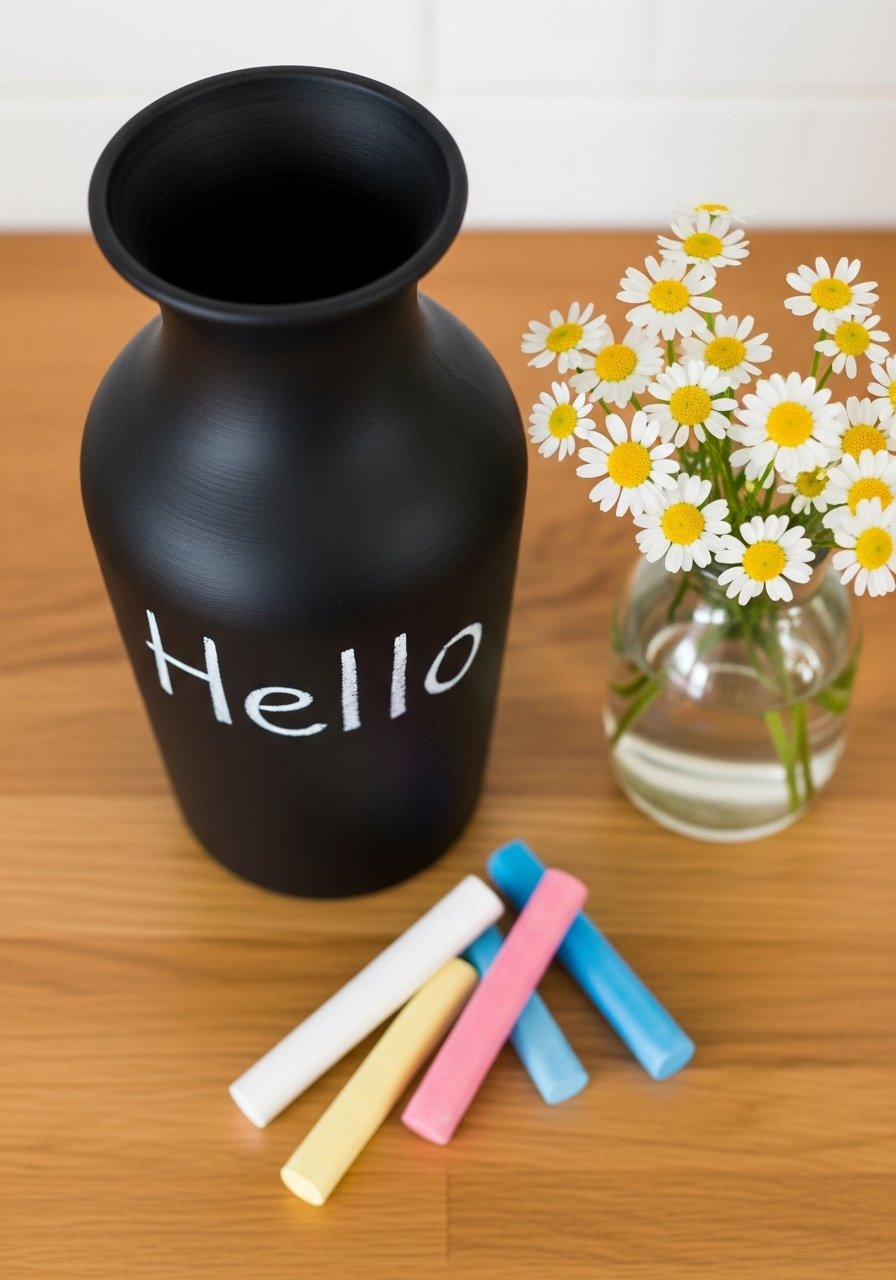
Chalkboard paint turns a vase into a changeable message piece—great for parties or seasonal notes. Use a small chalk marker set for neater writing.
Materials
- Glass or ceramic vase
- Chalkboard paint (30–60 ml)
- Foam brush (1")
- Chalk or chalk markers
- Painter’s tape (for shapes)
- Damp cloth for clean-up
Instructions
- Clean and sand the vase. Apply 1–2 thin coats of chalkboard paint. Dry 30 minutes between coats.
- Let cure 24 hours, then "season" the surface by rubbing with chalk and wiping clean.
- Write messages with chalk or chalk markers.
- For an accent, paint only a band or oval for messages.
How to Display or Gift It
- Use for table place cards or favor vases.
- Pair with a small bag of chalk tied with ribbon.
- Store wrapped in bubble wrap if shipping.
- Pumice Paint Textured Vase (faux concrete)
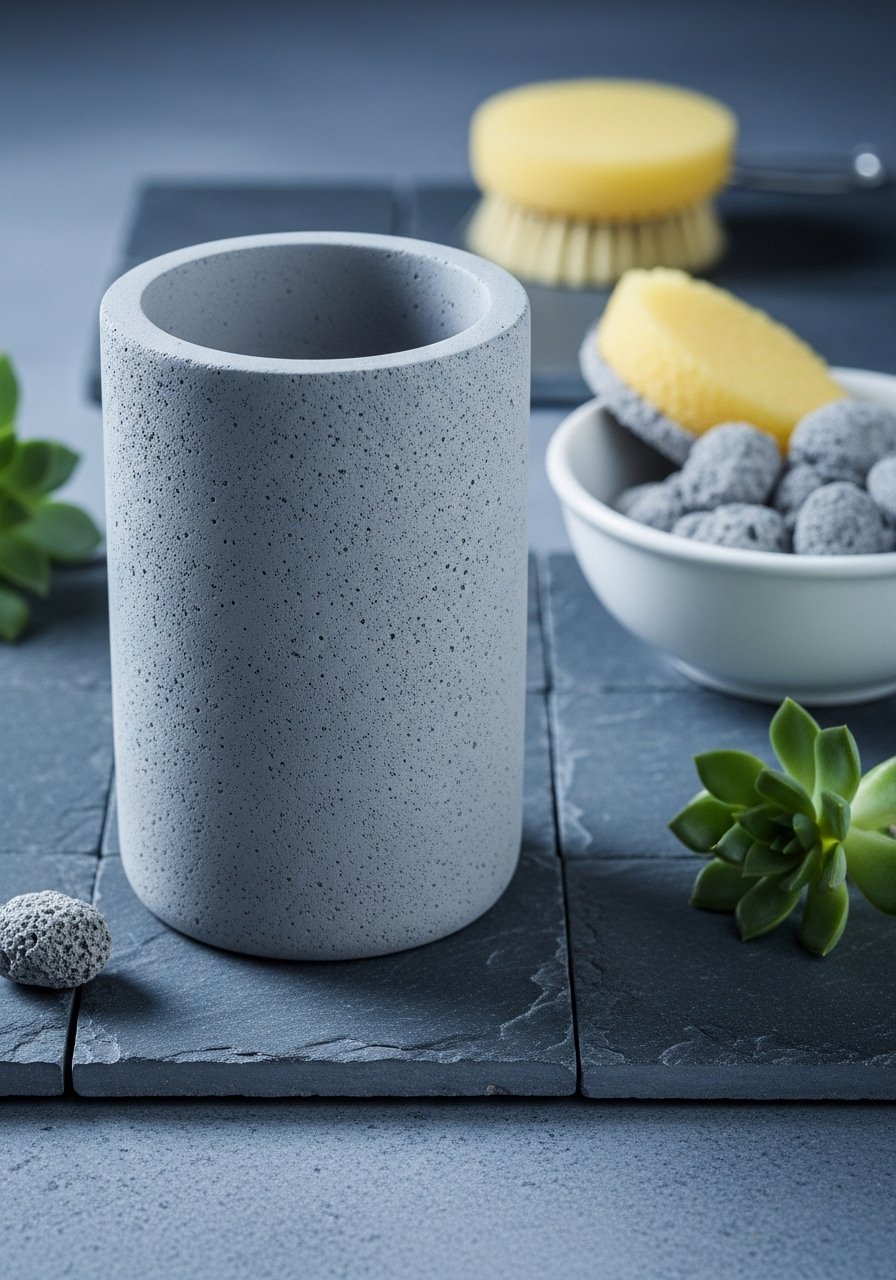
Pumice paint or a sand additive creates a modern Japandi-styled vase with earthy texture. Use a sand additive to stretch your paint and get that concrete look.
Materials
- Vase (ceramic or glass)
- Chalk paint (grey) — 120 ml
- Sand additive or pumice gel — 30 g
- Small mixing cup
- Stiff brush or mini roller
- Fine-grit sandpaper
Instructions
- Mix chalk paint with sand additive (about 2 tbsp additive per 60 ml paint).
- Apply first thin coat. Let dry 30 minutes.
- Apply second coat with stippling motions for texture.
- Let cure 24–48 hours. Sand lightly on high points for authentic wear.
- Seal with a matte sealer if desired.
How to Display or Gift It
- Pair with concrete or wood planters for a cohesive look.
- Wrap in kraft paper and secure with twine for gifting.
- Keep extra sand additive in a sealed jar.
- Leaf-Pressed Glass Vase with Mod Podge
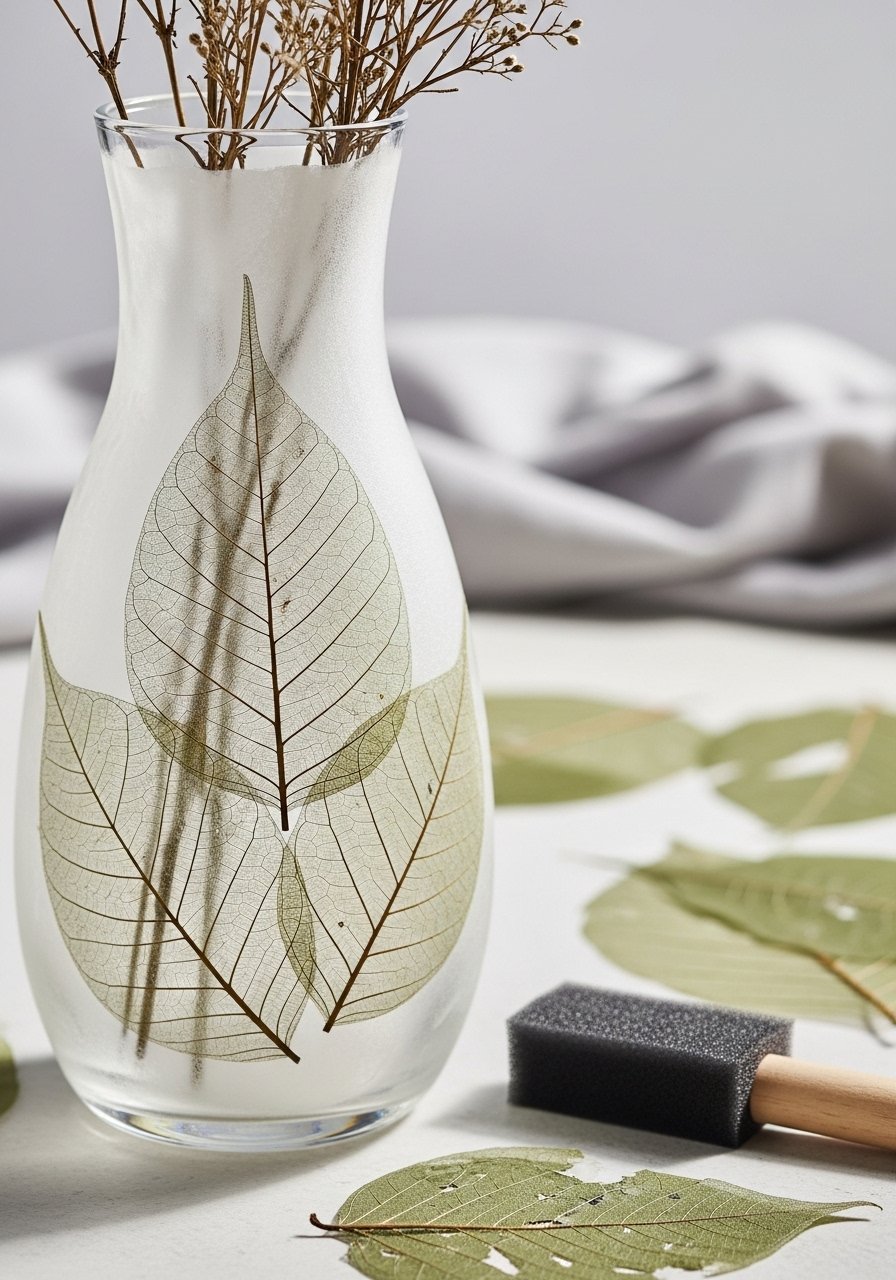
Pressed leaves locked under Mod Podge create a botanical, cottagecore effect. Press fresh leaves at least 48 hours before use for best results.
Materials
- Clear glass vase
- Pressed leaves (dried 48–72 hours)
- Mod Podge Matte — 120 ml
- Foam brush (1")
- Tweezers
- Clear craft sealer spray
Instructions
- Arrange leaves on the vase dry-run with tweezers.
- Brush a thin coat of Mod Podge where the leaf will sit.
- Place leaf carefully, press to flatten, and smooth with brush.
- Brush a sealing coat over the top. Dry 30 minutes.
- Add a second coat. Cure 24 hours.
- Finish with light spray sealer for extra protection.
How to Display or Gift It
- Use single stems so leaves remain visible.
- Gift with a note about the leaf type and where it was found.
- Store finished vases upright to avoid smudging.
- Minimalist Washi Tape Stripes — a simple budget vase decorating ideas favorite

Washi tape is the fastest way to add pattern and pops of color. It's removable, so it's perfect for renters or temporary styling. Use quality washi tape for clean removal.
Materials
- Glass vase
- Assorted washi tape rolls (3–5mm and 10mm widths)
- Ruler
- Scissors or precision craft knife
- Cutting mat (if trimming edges)
Instructions
- Clean and dry vase. Mark stripe spacing with a ruler.
- Start at the base and apply tape with slight tension.
- Trim ends with scissors or a precision craft knife.
- For extra hold, run a credit card over the tape to remove air bubbles.
- If using longer-term, add a thin coat of matte Mod Podge over tape edges. Dry 30 minutes.
How to Display or Gift It
- Change tapes seasonally for new looks.
- Use as party decor with coordinating napkins.
- Store spare washi rolls in a divider box to keep them flat.
- Cork Mosaic Vase
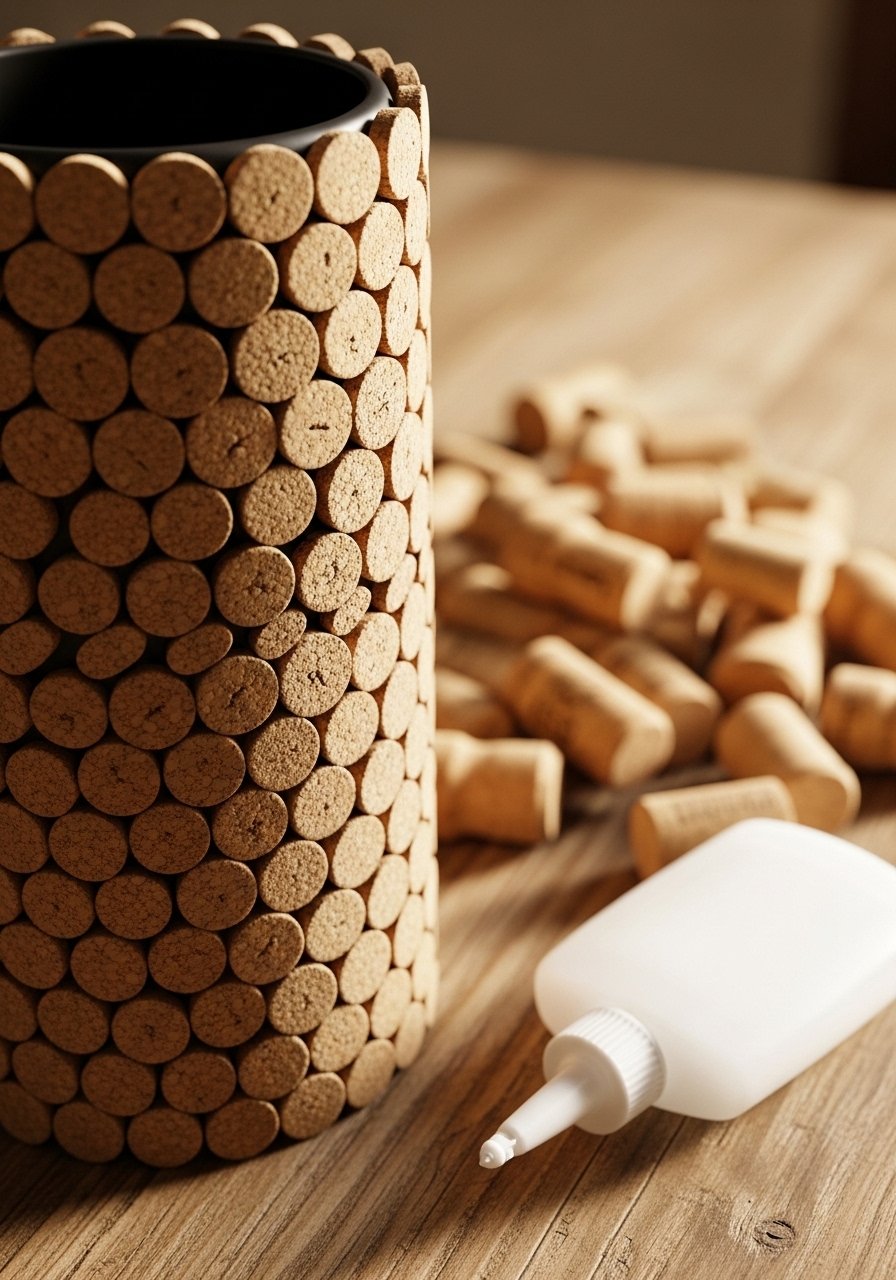
Cork mosaics are tactile and sustainable—perfect for upcycling wine corks. Slice corks into rounds and glue them in patterns for a warm, textured finish.
Materials
- Glass or ceramic vase
- Wine corks (about 20–40 depending on size)
- Sharp serrated knife or cork cutter
- E6000 or strong craft glue
- Sandpaper
- Protective gloves
Instructions
- Slice corks into 3–5 mm rounds.
- Sand the edges if rough.
- Arrange pattern on the vase dry-fit.
- Glue each cork round in place and press for 10–20 seconds.
- Let set 24 hours for full bond with E6000.
- Optionally seal with matte clear spray to protect from moisture.
How to Display or Gift It
- Use for succulents or dry stems (cork doesn't like constant water).
- Wrap in kraft paper for gifting with a rustic tag.
- Store leftover corks in a small mason jar.
- Air-Dry Clay Collar Vase
An air-dry clay collar adds sculptural interest. It molds around any vase and gives a high-end ceramic look at low cost.
Materials
- Vase (glass or thrifted)
- Air-dry clay (250 g)
- Rolling pin or dowel
- Clay carving tools or toothpick
- Sandpaper (fine)
- Non-stick mat
Instructions
- Roll clay to about 4–5 mm thickness.
- Cut a band measuring vase circumference + 1 cm by desired height.
- Score and add a slip (clay water) to seam, then wrap gently around vase. Smooth seam.
- Carve texture or keep smooth. Let air-dry 24–48 hours depending on thickness.
- Sand edges lightly and paint or leave natural.
- For durability, seal with matte craft sealer.
How to Display or Gift It
- Pair with dried stems to avoid water contact with clay.
- Wrap in bubble wrap for shipping; air-dry clay is brittle when thin.
- Store extra clay in an airtight tub.
- Painted Chalky Stone Speckle Vase
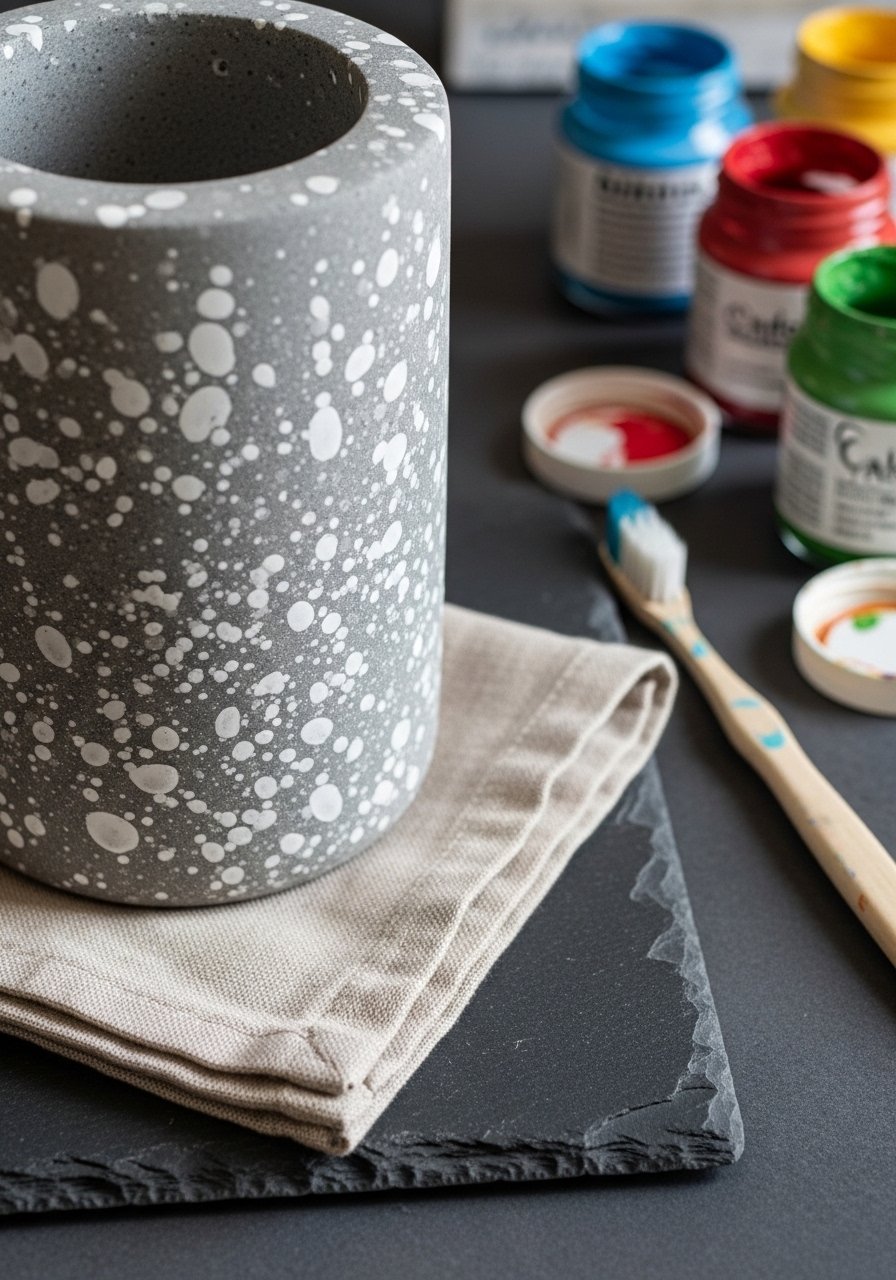
Speckled paint mimics stone and is super budget-friendly. A toothbrush or stiff brush gives a random speckle pattern that looks artisanal.
Materials
- Vase (any material)
- Acrylic paint (base grey) — 60 ml
- Acrylic paint (white) for speckles — 10 ml
- Old toothbrush or stiff bristle brush
- Small cup for splattering water
- Painter’s tape (if protecting rim)
Instructions
- Paint vase with base grey. Dry 30 minutes.
- Dip toothbrush in diluted white paint and run thumb across bristles to flick speckles.
- Work in short bursts until coverage is pleasing.
- Dry 1 hour and apply a second coat of speckles if desired.
- Cure 24 hours.
How to Display or Gift It
- Use with textured linens and stone coasters for a cohesive table.
- Gift as a pair for coffee-table styling.
- Store painted vases upright with felt pads underneath.
- Rimmed Leather Strap Accent
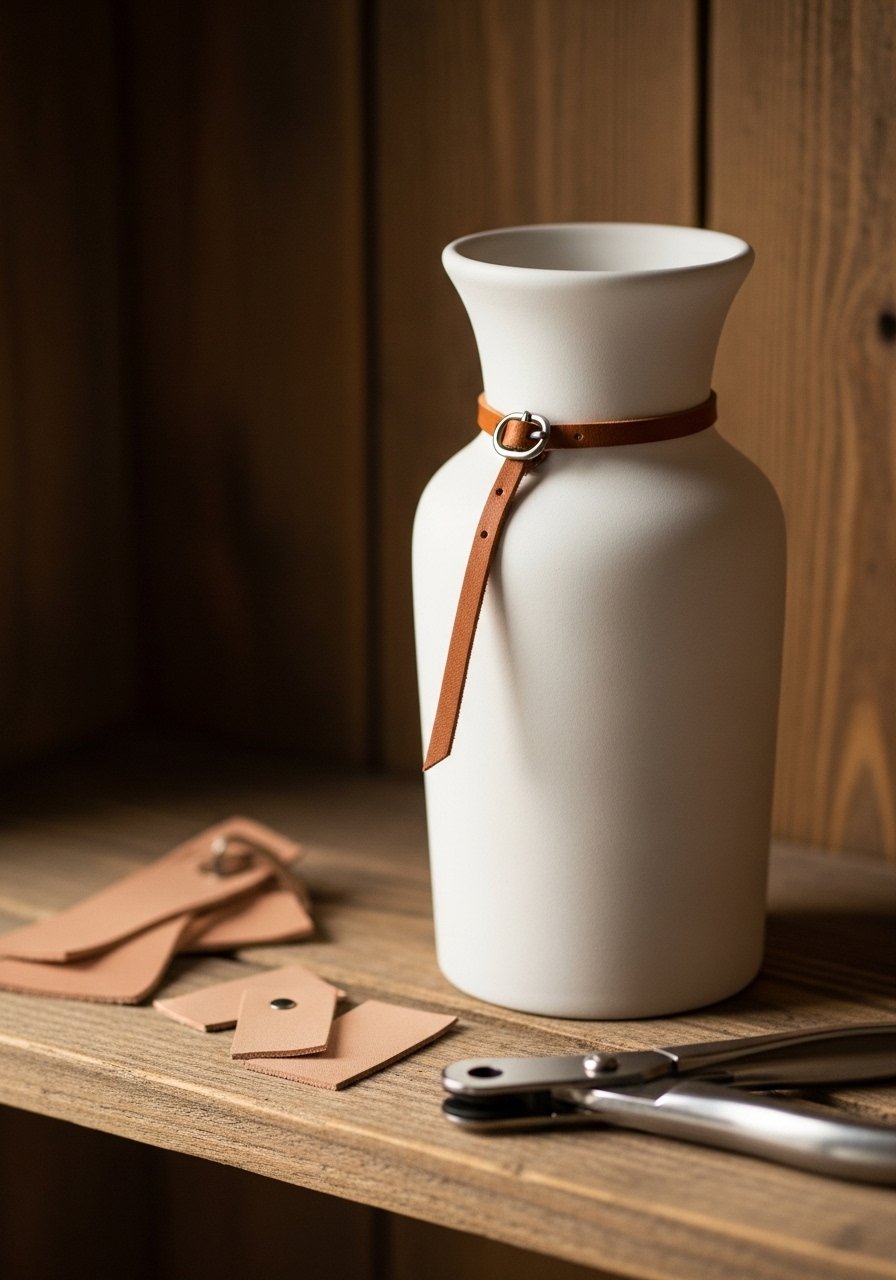
Leather adds an editorial, slightly masculine touch. A thin strap with a small buckle looks designer and costs under $5 for scrap leather.
Materials
- Vase with a narrow neck
- Leather strap (or faux leather) — 12–20"
- Small buckle or snap
- Hole punch (small)
- Scissors
- Leather glue or hot glue
Instructions
- Measure leather length for a snug fit with overlap.
- Punch holes for buckle or use snap.
- Glue the ends or fasten buckle.
- Optionally add a tiny stamped initial with a metal stamp.
- Let glue set 30 minutes.
How to Display or Gift It
- Pair with leather-trimmed notebooks for a gift set.
- Store leather scraps flat to prevent creases.
- Use for modern office vases or neutral decor.
- Shell and Sand Beach Vase
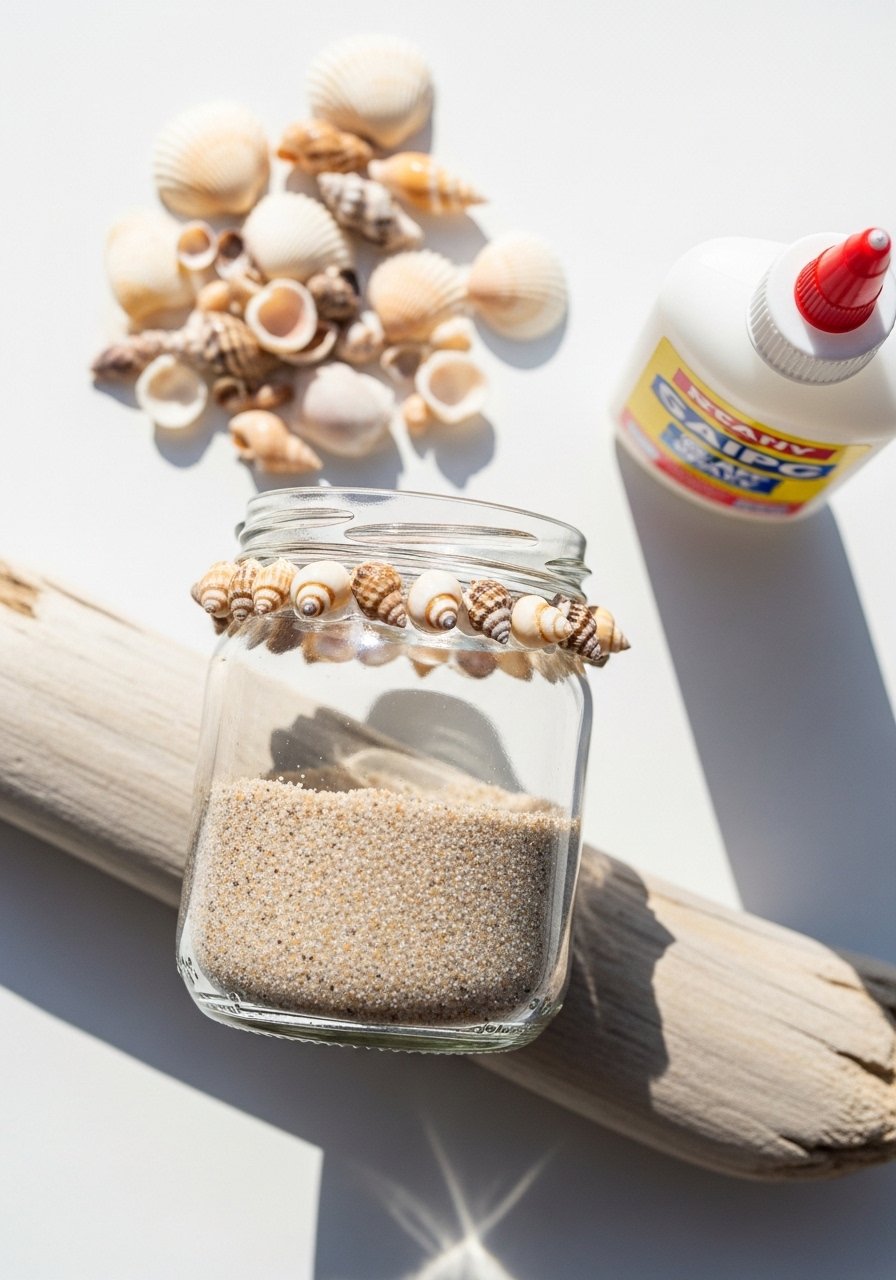
This coastal design uses collected or inexpensive craft shells for a coastal accent. Use glue that bonds to glass for longevity.
Materials
- Short glass jar
- Small craft shells (30–50)
- Fine craft sand — 2 tbsp
- Clear craft glue or E6000
- Small spoon and brush
- Sealer spray (optional)
Instructions
- Apply glue band where sand will stick. Sprinkle sand and tap off excess.
- Glue shells in place, starting with larger ones and filling with small shells.
- Let set 24 hours for E6000 or 2–4 hours for craft glue.
- Seal with clear spray if you expect moisture.
How to Display or Gift It
- Fill with faux succulents or small beach bouquets.
- Package with a small bottle of extra shells for gifting.
- Store shells in a labeled bag for future crafts.
- Thin Yarn Wrapped Color Block Vase

Yarn wrapping creates a soft color-blocked effect. Thin acrylic yarn works well and is inexpensive.
Materials
- Vase
- Thin acrylic yarn in 2–3 colors
- Hot glue gun or craft glue
- Scissors
- Painter’s tape to mark color breaks
- Needle nose pliers (to tuck ends)
Instructions
- Mark bands with painter’s tape.
- Glue the starting end to the vase inside the band.
- Wrap tightly, keeping rows flush.
- At color change, tuck the end under the next wrap and secure with glue.
- Trim excess and press ends into place. Let glue set 10 minutes.
How to Display or Gift It
- Use as a pencil or brush holder on a desk.
- Pair with a matching yarn-wrapped picture frame.
- Store leftover yarn in zip bags by color.
- Mosaic Tile Teacup Vase

Use thrifted teacups for charming mini vases covered with a mosaic of broken tiles or thrifted china. Grout fills gaps for a polished finish.
Materials
- Teacup or small vase
- Broken tiles or thrifted china shards
- Tile adhesive or strong craft glue
- Grout (small packet) — enough for one cup
- Sponge and soft cloth
- Safety gloves and goggles
Instructions
- Arrange tiles dry to plan the pattern.
- Glue tiles in place and let set 24 hours.
- Mix grout per package directions. Apply and force into joints.
- Wipe excess grout with a damp sponge. Let grout dry 24 hours.
- Buff with a soft cloth to remove haze.
How to Display or Gift It
- Use as a countertop succulent planter (with drainage considerations).
- Gift as a teacup planter with small plant included.
- Store grout and tile scraps in labeled containers.
- Ribbon Rosette Neck Vase

Tiny ribbon rosettes create a romantic, handcrafted collar. Use satin or grosgrain ribbon for crisp petals.
Materials
- Vase
- Satin ribbon (3/8" width) — 1–2 yards
- Hot glue gun
- Scissors
- Needle and thread (optional for tighter rosettes)
Instructions
- Cut ribbons into 4–6" strips.
- Roll and twist into rosettes, securing with glue or a few stitches.
- Glue rosettes around the neck in a cluster or band.
- Let glue cool 10 minutes.
How to Display or Gift It
- Use with fresh roses for weddings or bridal showers.
- Store rosettes flat in a compartmentalized box.
- Metallic Paint Drip Vase
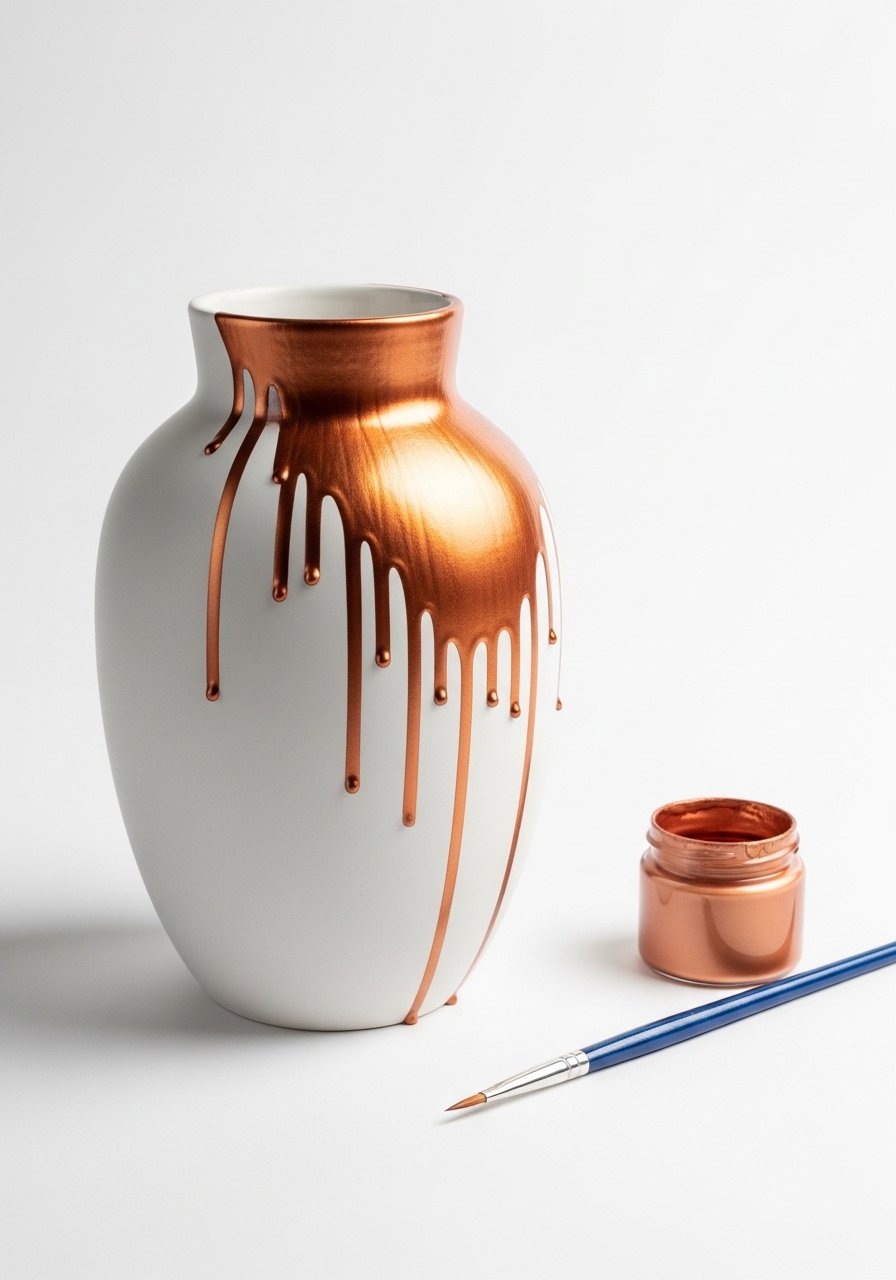
Controlled metallic drips make a minimal vase look editorial. Thin metallic acrylic gives a real-metal luster at low cost.
Materials
- Vase (matte painted base)
- Metallic acrylic paint (copper, gold, etc.) — 15 ml
- Small round brush
- Palette or disposable plate
- Painter’s tape to protect areas
Instructions
- Paint vase with a matte base coat. Dry 30 minutes.
- Dip brush in metallic paint and apply at edge, allowing gravity to form drips.
- Guide drips with a brush if needed. Dry 1 hour.
- Add a second layer for sheen if desired. Cure 24 hours.
How to Display or Gift It
- Use with a single long stem for modern styling.
- Wrap in tissue and place in a narrow box for mailing.
- Keep extra metallic paint in a tightly closed jar.
- Pressed Flower Resin Band (mini)
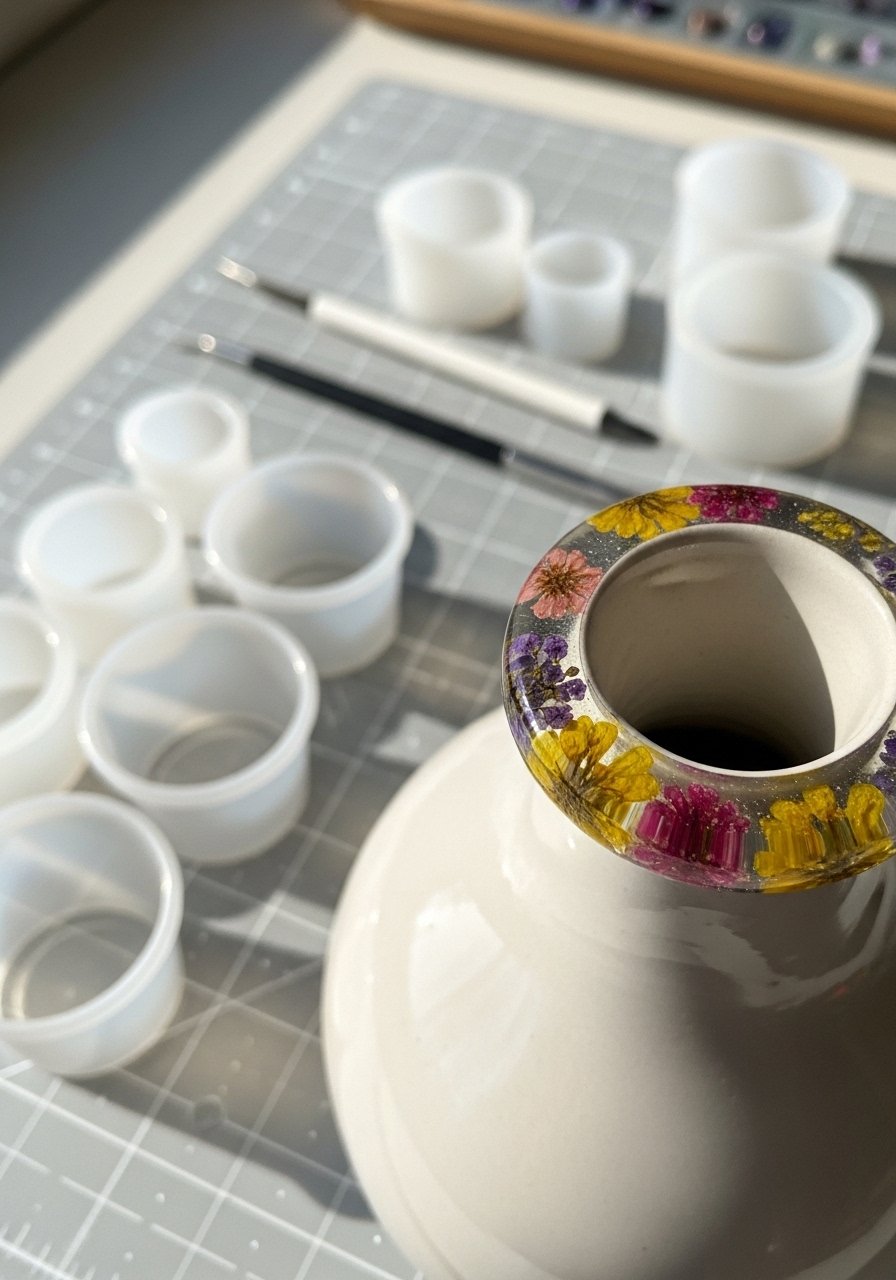
A thin resin band with tiny pressed flowers has a delicate, high-end feel. Work with small amounts of epoxy resin and a UV lamp if you prefer quick cures.
Materials
- Vase
- UV resin or 2-part epoxy (small amount ~10 ml)
- Pressed tiny flowers or petals
- Small strip mold (or wrap resin on glass)
- Toothpick and gloves
- UV lamp (if using UV resin)
Instructions
- Arrange pressed flowers in a strip mold or on a prepared surface.
- Pour a thin layer of resin to secure flowers. Cure per product: UV resin cures 2–5 minutes under lamp; 2-part epoxy may take 24 hours.
- If using 2-part epoxy without a mold, tape a strip of acetone-proof paper and pour; remove after cure.
- Sand any sharp edges and glue band to vase with craft glue.
- Let adhesive set 24 hours.
How to Display or Gift It
- Use for small bud vases to keep resin band proportionate.
- Gift with a small note about resin care (avoid heat).
- Store UV resin in an opaque container away from sunlight.
- Fabric-Wrapped Vase with Piping Trim
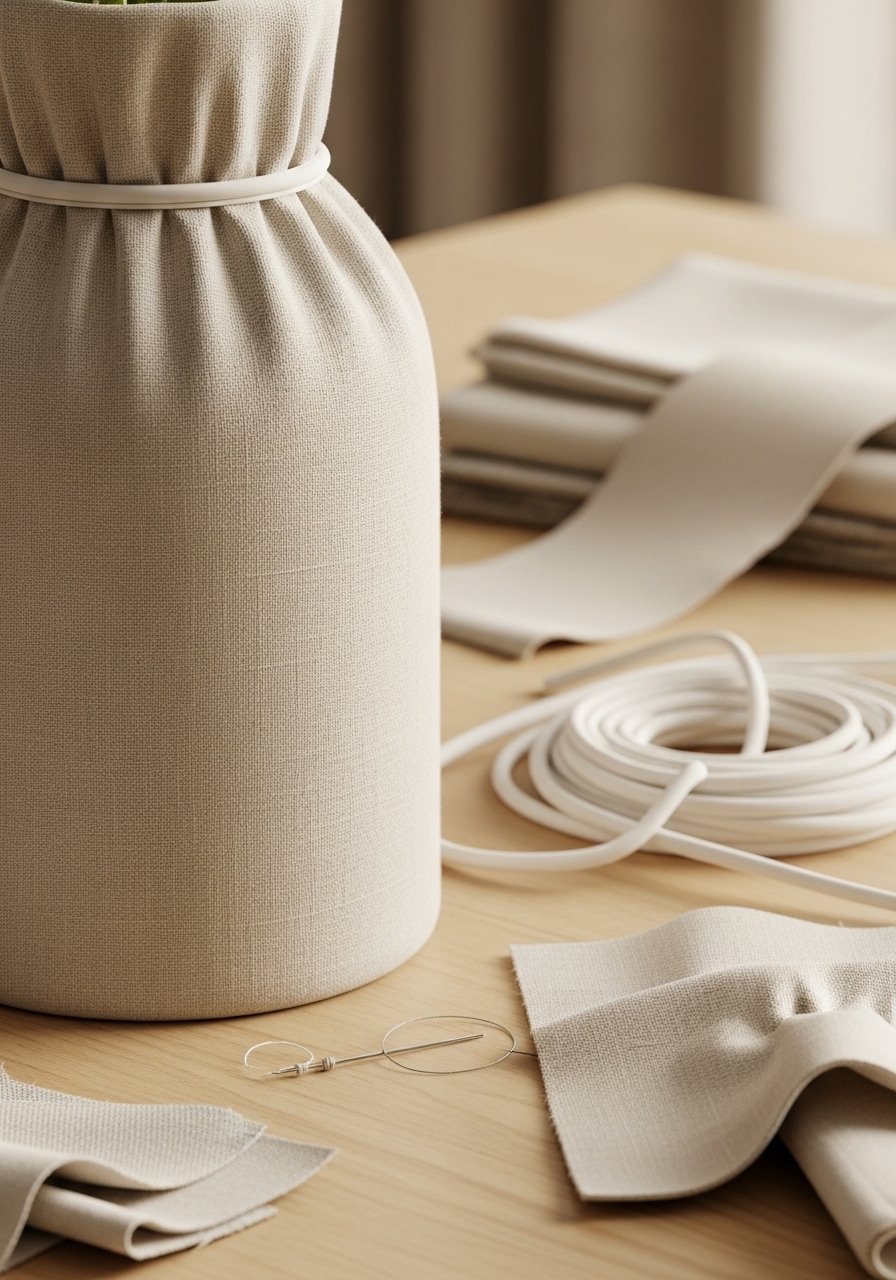
Fabric wrapping feels soft and tailored. Piping trim adds a sewn, boutique finish without stitching all the way around.
Materials
- Vase
- Linen or cotton fabric — 20 x 10 cm
- Piping cord (small) — 20–30 cm
- Hot glue or fabric glue
- Scissors and ruler
- Needle and thread (optional)
Instructions
- Cut fabric to wrap circumference plus 1 cm seam.
- Glue one edge and wrap fabric snugly.
- Tuck and glue the top and bottom edges.
- Glue piping trim around the neck for detail.
- Let glue set 30 minutes.
How to Display or Gift It
- Pair with matching linen napkins for a dinner party gift.
- Store fabric scraps in a labeled bin for future small projects.
- Frosted Spray Paint Dip — minimal budget vase decorating ideas
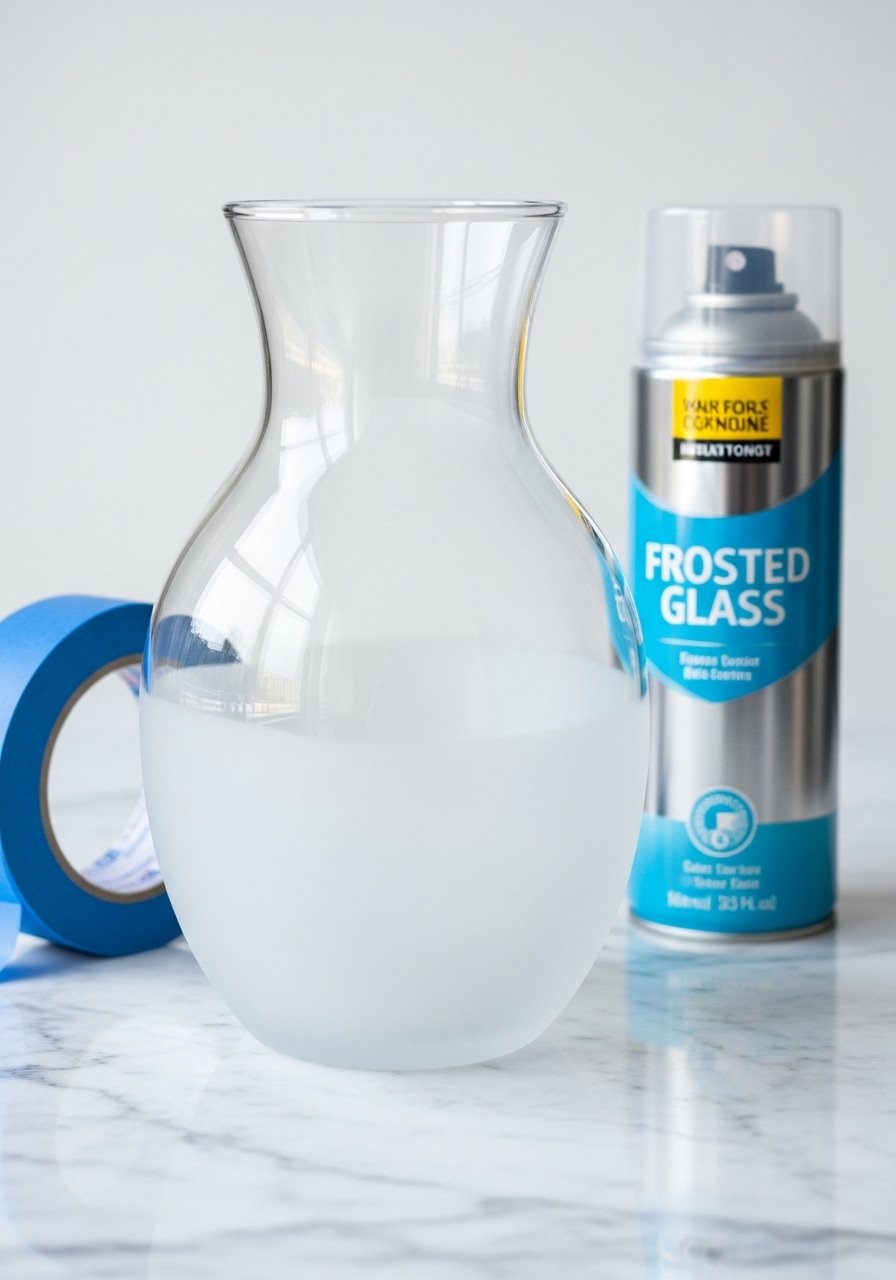
A frosted dip is simple and elegant. Frosted glass spray adds privacy and a delicate glow, perfect for candlelight vases.
Materials
- Glass vase
- Frosted glass spray paint — one 3–4 oz can
- Painter’s tape
- Newspaper or drop cloth
- Gloves and mask
Instructions
- Tape off the area you want clear.
- Work in a well-ventilated area. Spray 10–20 cm away in light even passes.
- Apply 2–3 thin coats, drying 10 minutes between coats.
- Let cure 24 hours before handling.
- Remove tape and clean edges gently with a craft knife if needed.
How to Display or Gift It
- Use with battery-operated candles for a soft glow.
- Wrap base with tissue and tie with ribbon for gifting.
- Store spare spray cans upright in a ventilated cabinet.
You made it to the end—and now you’ve got 24 practical, wallet-friendly ways to make simple vases look high end. From twine wraps and napkin decoupage to resin bands and gold leaf accents, there’s a technique here for every style—boho, cottagecore, japandi, farmhouse, and modern minimal. Try one tonight with supplies you already have, or pick a few as quick weekend projects.
Pin this list so you can come back when you’re ready to make. Which budget vase decorating ideas are you trying first—jute-wrapped rustic or marbled polish glam? Share a photo with a friend or gift a finished piece; these small handmade vases feel boutique when presented with simple kraft packaging. Trust me, upgrading your glue gun to a temperature-controlled hot glue gun will speed up wrapping and reduce those stringy glue woes across many of these projects.


