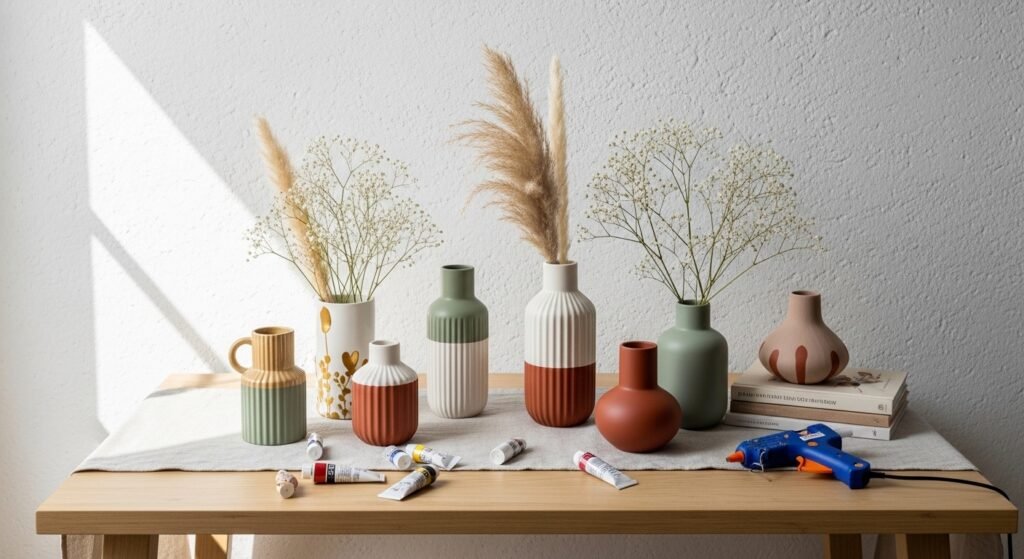
If you love adding small, personal touches around the house, these 29 vase decorating ideas for home decor are made for you. Imagine turning plain glass, thrift-store finds, or simple ceramic vases into pieces that match cottagecore pillows, clean japandi shelves, or full-on boho displays. You’ll find everything from quick paint techniques to a weekend resin project—techniques that fit any skill level and most budgets.
I use a reliable hot glue gun for fast embellishments and my Cricut Joy when I want crisp vinyl shapes—both save time and give cleaner results than cutting by hand. Grab your favorite acrylic paint set and a few brushes, and you’re already halfway there. These vase decorating ideas for home decor include full materials lists, step-by-step instructions with drying times, display tips, and links to products that genuinely help the process. Pin the projects you love and try one this weekend.
- Ombre Painted Glass Vase
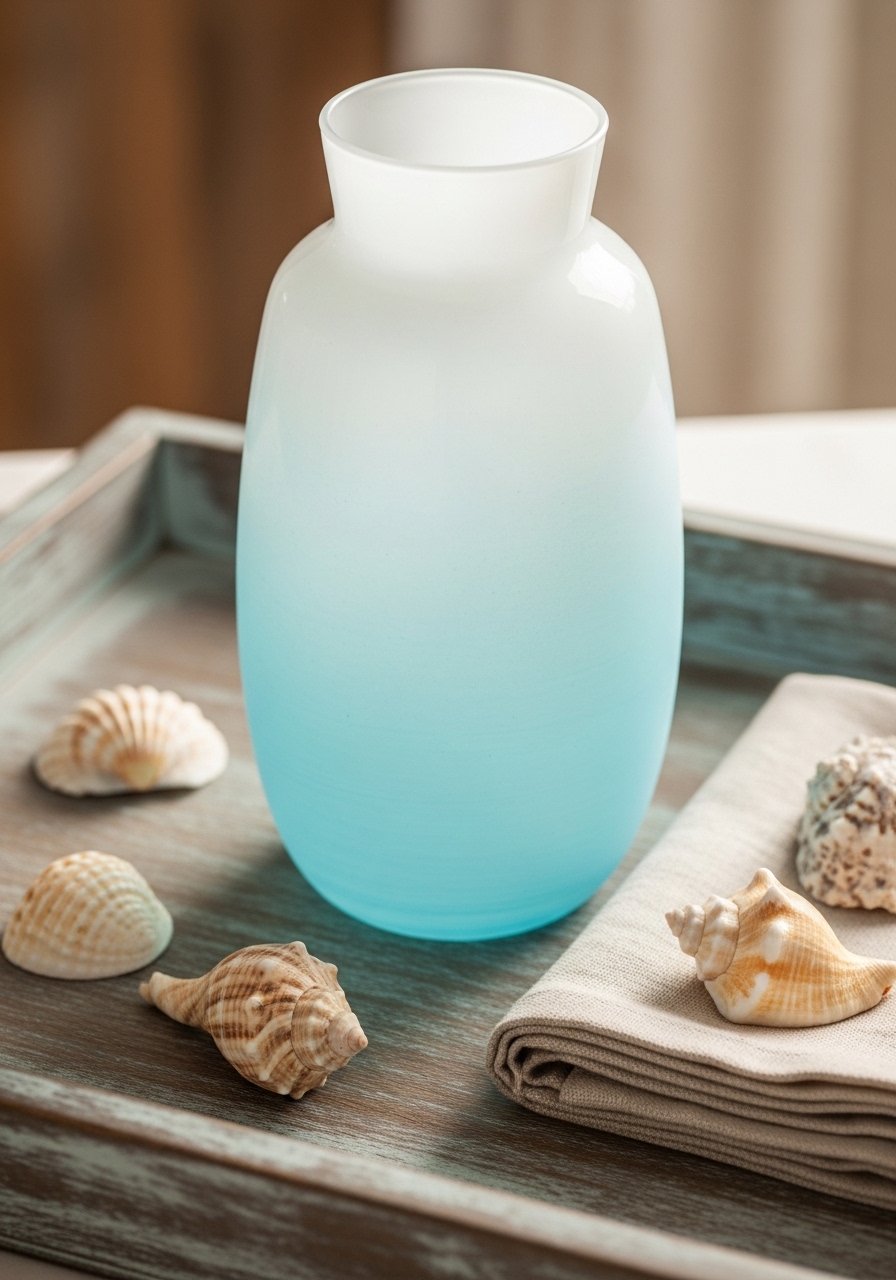
A soft ombre is one of those vase decorating ideas for home decor that reads high-end but takes under an hour. The paint fades look like a coastal store-bought piece—smooth, slightly textured, and matte. Beginners will appreciate the forgiving blending step, and the finished vase feels cool and tactile to the touch. I use a flat foam brush for the initial color and a dry brush to feather the blend.
Materials
- Tall clear glass vase, cleaned and dry
- Acrylic craft paint in two shades plus white (2 oz each)
- Flat foam brush, 1 inch
- Small dry brush, 1/2 inch
- Painter's tape, 1-inch
- Paper towels
- Matte sealer spray, 1 light coat
Instructions
- Wash and dry the vase—remove labels with warm soapy water and a bit of rubbing alcohol.
- Tape off the rim if you want a clean top edge.
- Paint the darkest color at the bottom with the foam brush—one thin coat.
- While still tacky, paint the middle color overlapping the first by 1–2 inches.
- Use a small dry brush to feather the join upward in light strokes until blended.
- Allow 24 hours to cure to the touch, then spray one light coat of matte sealer. Full cure 72 hours.
How to Display or Gift It
Set this vase on a mantel with relaxed linen napkins and sand-toned candles. Add dried linen-colored stems for a coastal look. Wrap in kraft paper and tie with twine for a quick gift—store wrapped in a padded craft organizer drawer if shipping.
- Mod Podge Napkin-Decoupage Vase

Napkin decoupage creates a delicate pattern that clings to curves beautifully. This vase decorating idea for home decor feels vintage-cottagecore and is forgiving if you overlap layers. Use a foam brush to smooth bubbles. I reach for matte Mod Podge for that soft, slightly satiny finish that still reads hand-made.
Materials
- Glass or ceramic vase, any size
- Decorative paper napkin (1–2 ply patterned), cut to pieces
- Mod Podge (matte), 4 oz
- Flat foam brush
- Soft brayer or credit card for smoothing
- Scissors
- Fine grit sandpaper (optional)
- Clear acrylic sealer, spray
Instructions
- Test-fit napkin pieces against the vase, trimming as needed.
- Remove top ply of napkin pattern; discard the white layers.
- Brush a thin coat of Mod Podge over the area to be covered.
- Lay napkin piece gently, smooth with a brayer or card to remove bubbles.
- Brush another thin coat of Mod Podge over the top; let dry 15–20 minutes between coats. Apply 2 coats total.
- After 24 hours, add a light spray of clear acrylic sealer and cure 48 hours.
How to Display or Gift It
Pair with fresh-cut garden flowers or eucalyptus sprigs. For gifting, place the vase in a kraft box with tissue and a small care note. Store flat in a craft drawer between projects.
- Twine-Wrapped Rustic Vase
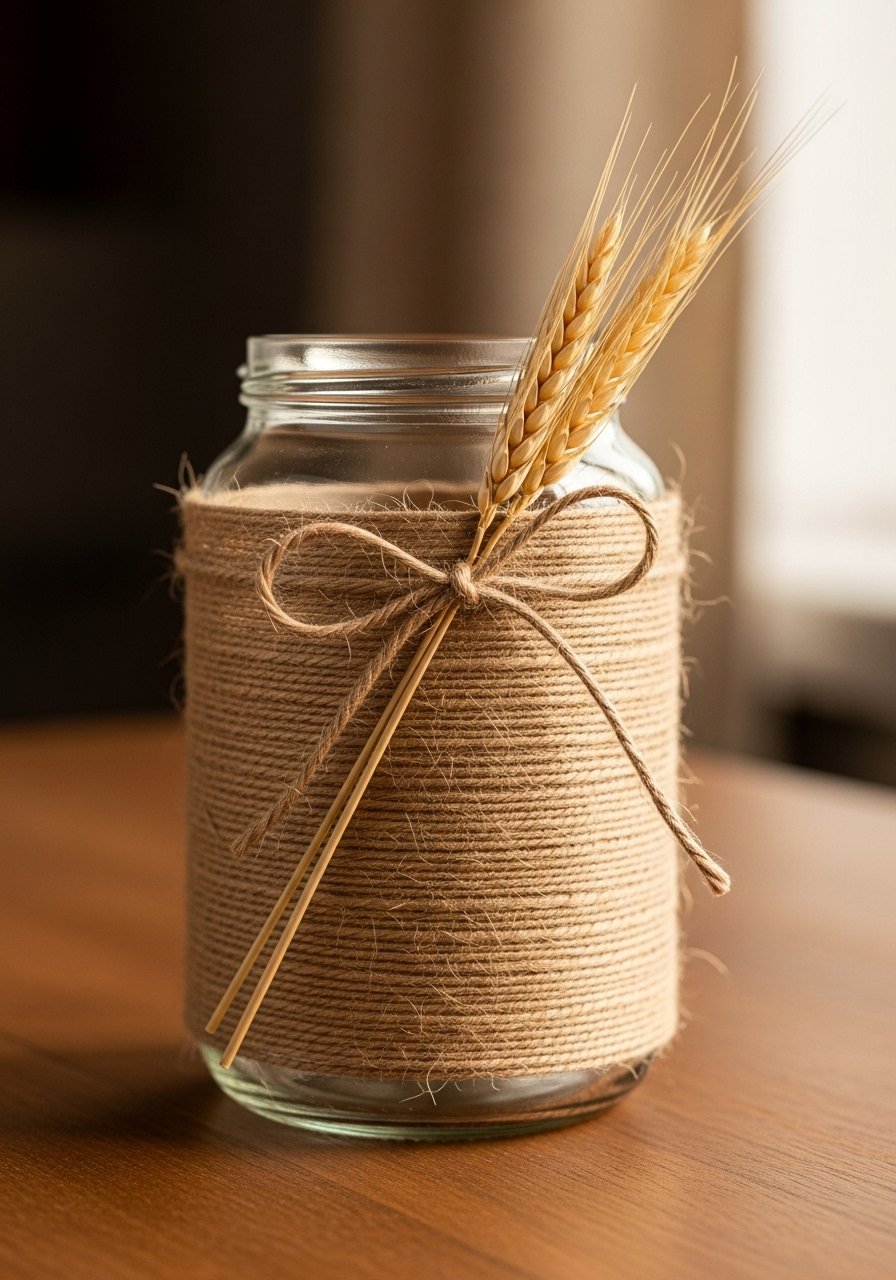
Twine wrapping gives instant farmhouse charm—warm, tactile, and budget-friendly. It’s sturdy in hand and great for concealing unsightly labels on thrifted jars. A low-temperature hot glue gun keeps the wrap neat without melting the twine. This project’s texture is pleasantly rustic and kid-friendly with adult supervision for the glue.
Materials
- Mason jar or glass vase
- 3mm natural jute twine, 20–40 yards depending on size
- Low-temp hot glue gun and glue sticks
- Scissors
- Ruler
- Optional: small wooden bead for accent
Instructions
- Heat your low-temp glue gun and trim the jar lip if desired.
- Apply a dab of glue at the base; press the twine start down and wrap tightly.
- Continue wrapping, adding a dab every 2–3 inches to secure.
- For clean lines, keep tension even—finish at top with glue and tuck the end.
- Add a twine bow or wooden bead threaded onto twine with a drop of glue.
- Let glue fully cool 10 minutes before handling.
How to Display or Gift It
This vase pairs well with dried stems and sits nicely on a reclaimed-wood shelf. Wrap in tissue and pop in a kraft gift bag for a hostess present. Store extra twine in a craft organizer bin to avoid tangles.
- Macramé Net Vase Hanger

A macramé net turns a plain vase into a boho hanging planter. The knot texture is tactile and adds vertical interest to a room. This pattern uses 3mm macramé cord and simple square knots—a great beginner project if you know a few basic knots. I use a wooden ring for a polished hanger finish.
Materials
- Round glass vase or jar
- 3mm single-strand macramé cord, 20 yards
- Wooden hanging ring, 2-inch
- Measuring tape
- Scissors
- Comb or brush for finishing fringe
Instructions
- Cut 8 lengths of cord at 3 yards each. Fold in half and loop through the wooden ring.
- Form pairs and tie square knots about 4 inches down to create a node.
- Repeat pattern until the net reaches the jar base; fit the jar to test spacing.
- Gather the cords and tie a final gathering knot under the jar base to secure.
- Trim fringe evenly and comb for a soft finish.
- Hang and adjust knot spacing for a snug fit.
How to Display or Gift It
Hang near a sunny window with faux stems or air plants. Pack flat for gifting in a long kraft box. Store extra cord on a spool in a craft drawer.
- Mosaic Tile Accent Vase
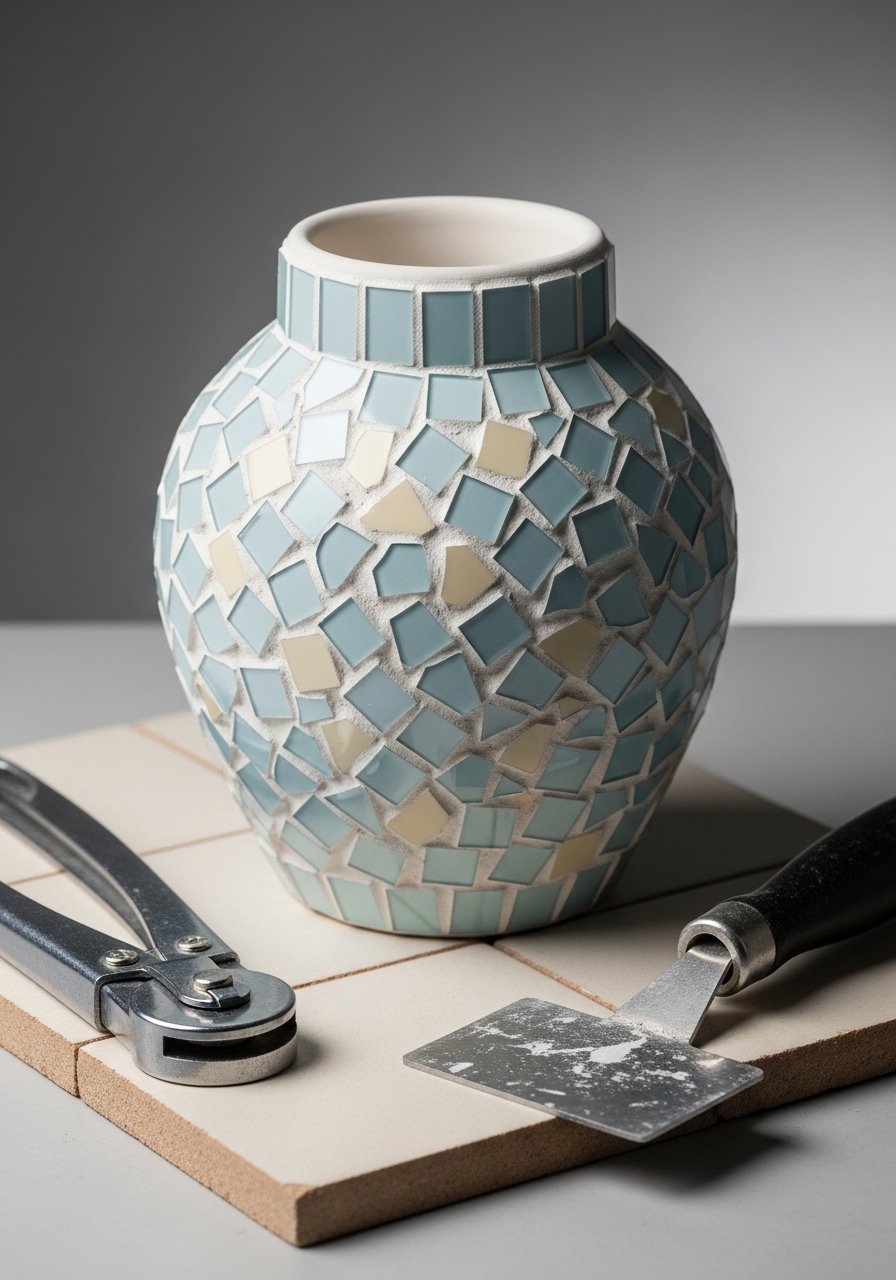
Small glass or ceramic vases are perfect for a mosaic makeover—broken tile or thrifted china pieces make unique patterns. Use a grout float for smooth finishes and let grout cure fully for a durable surface. This project yields glossy, weighty texture and matches Mediterranean or eclectic decor.
Materials
- Small ceramic or glass vase
- Broken tiles, mosaic sheets, or broken china pieces
- Tile nippers or glass cutter
- White grout, 1 cup mixed
- Small spatula or grout float
- Sponge and water
- Mesh tray or towel
Instructions
- Plan your tile layout by dry-fitting pieces around the vase.
- Use tile nippers to shape pieces as needed—wear safety goggles.
- Adhere tiles with a thin line of E6000 or tile adhesive; let set 24 hours.
- Mix grout to a thick toothpaste consistency; spread into gaps with spatula.
- Wipe excess grout with a damp sponge; let grout set 20–30 minutes, then clean.
- Cure grout 48–72 hours before use; buff with a soft cloth.
How to Display or Gift It
Place on a sunny windowsill or pair with hand-thrown pottery. Wrap in bubble wrap and tuck into a shallow gift box for safe transport. Store tile offcuts in a small organizer bin.
- Gold Leaf Trimmed Vase
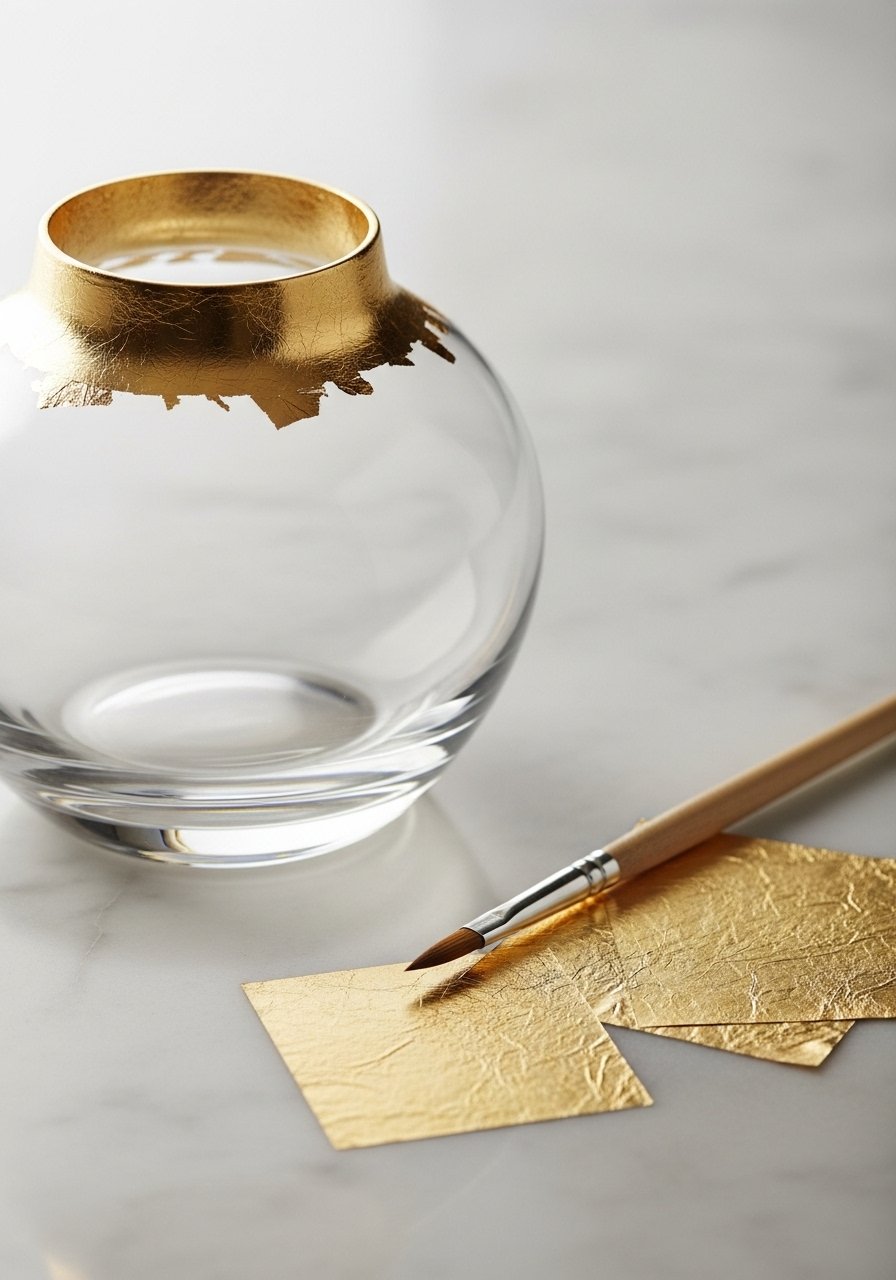
Gold leaf adds luxe shimmer without weight. Use gilding adhesive (size) for good adhesion and a soft brush to burnish. This finish feels smooth and metallic in the hand—great for holiday styling or adding glam to minimal rooms.
Materials
- Glass vase
- Gold leaf sheets (imitation), 1 pack
- Gilding adhesive (size), 1 oz
- Soft flat brush
- Soft burnishing brush or cotton
- Clear acrylic sealer spray
Instructions
- Clean the vase and mark the gilding area with painter’s tape.
- Apply a thin coat of gilding adhesive and let it become tacky (10–15 minutes).
- Lay gold leaf gently and press with a soft brush.
- Remove excess leaf with a soft brush and burnish for smoothness.
- Spray one light coat of clear sealer; cure 24 hours.
How to Display or Gift It
Use as a single sculptural piece with a dried single stem. Slip into a tall gift box lined with tissue for a luxe present. Keep extra leaf sheets flat in a craft organizer.
- Marbleized Alcohol Ink Vase

Alcohol ink creates marbled swirls with depth and translucence—perfect for small vases and bud jars. The finish dries fast and looks glassy on ceramic. Use gloves and work on a nonabsorbent surface.
Materials
- Ceramic or glass vase, unglazed or primed
- Alcohol ink set (3–6 colors)
- Rubbing alcohol (91%) in a dropper bottle
- Lint-free gloves
- Foam applicator or brush
- Acrylic gloss sealer, spray or brush-on
Instructions
- Wipe vase with alcohol to remove dust.
- Drop small amounts of ink onto the vase and add a few drops of rubbing alcohol to spread.
- Tilt and rotate vase to move pigments; use a brush to guide swirls.
- Let inks dry 10–15 minutes between layers if adding depth.
- Once satisfied, allow 1 hour to fully dry, then seal with two light coats of gloss sealer. Cure 24 hours.
How to Display or Gift It
Group several marbled vases for a collected look on a coffee table. Wrap in bubble wrap and place in a tall box if shipping. Keep leftover inks in a labeled organizer.
- Chalk Paint Farmhouse Finish
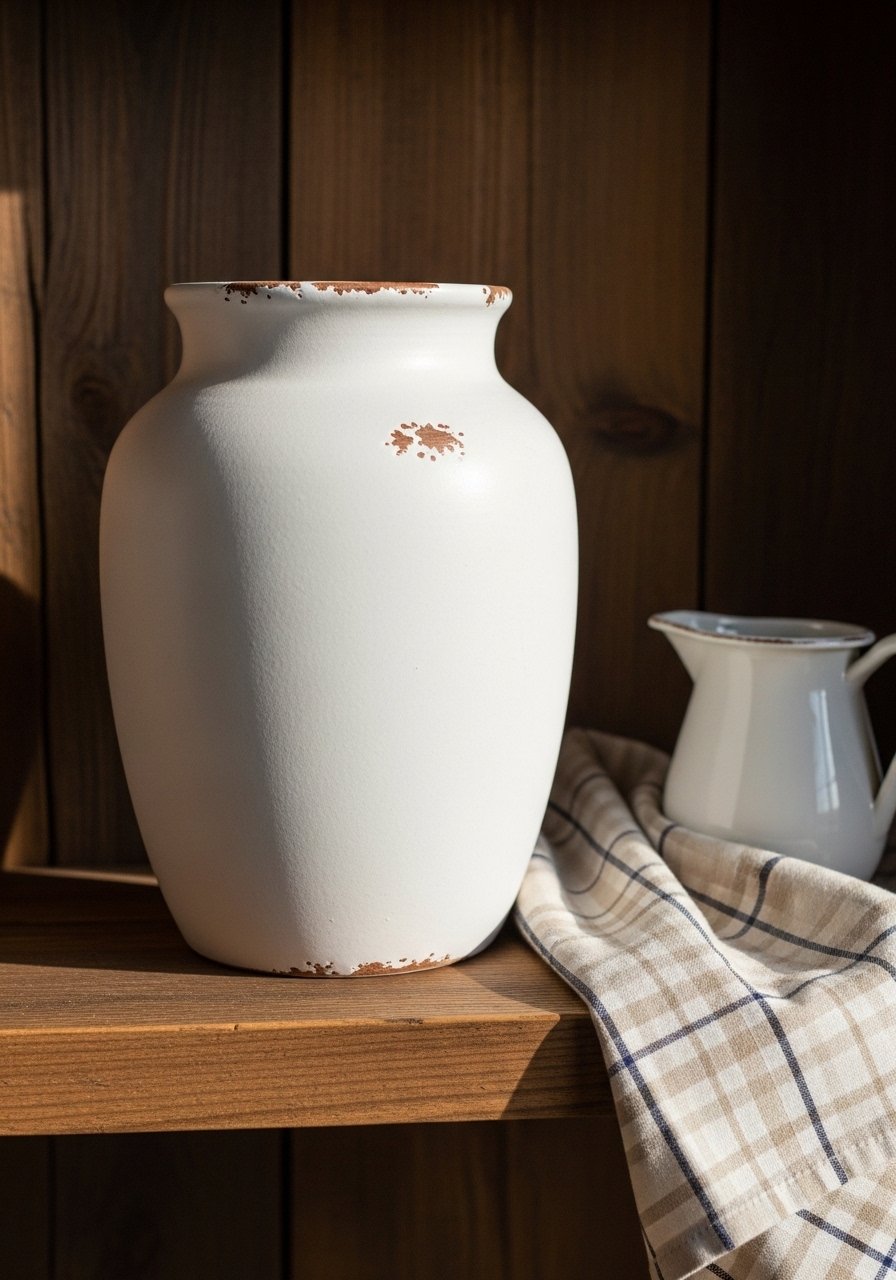
Chalk paint gives a soft, velvety matte finish that sands beautifully for a distressed farmhouse look. It’s forgiving and requires minimal prep. Sand lightly for areas that should look naturally worn.
Materials
- Ceramic vase
- Chalk paint, 2 oz
- Foam brush
- 220-grit sandpaper
- Clear wax, soft cloth for buffing
- Small sanding block
Instructions
- Wipe the vase clean—no primer needed for most chalk paints.
- Apply one thin coat with a foam brush; let dry 30–45 minutes.
- Apply a second coat for full coverage; dry 1 hour.
- Sand edges and raised areas lightly to distress.
- Apply a thin coat of clear wax and buff for a soft sheen. Cure 24 hours.
How to Display or Gift It
Group with woven baskets and wooden picture frames. Store finished pieces upright in a stackable craft organizer while wax cures.
- Speckled Ceramic Look (Splatter Technique)
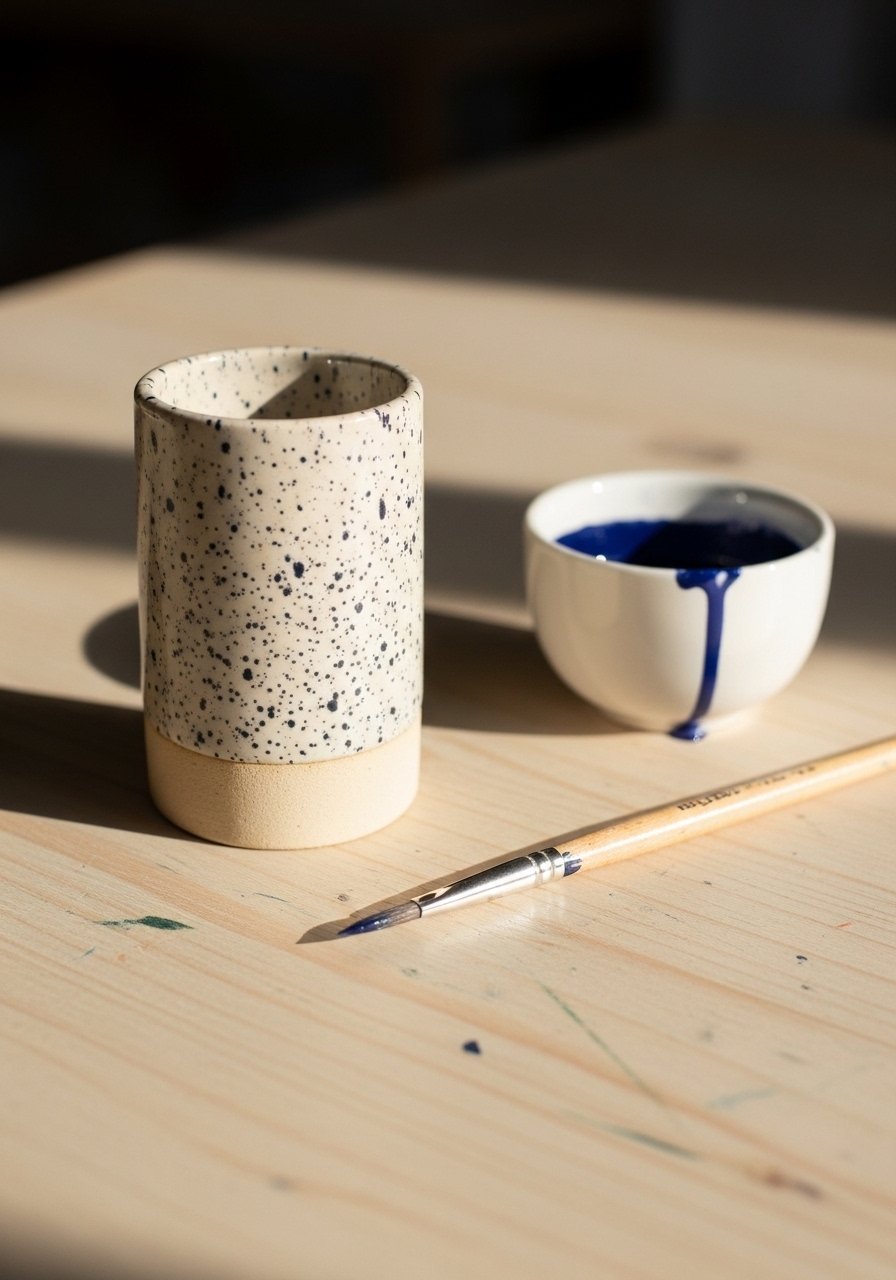
The speckled finish mimics pottery glaze and adds organic texture. It’s quick and great for hiding minor paint imperfections. Thin down paint and use a toothbrush for fine splatters, keeping hands and surfaces protected.
Materials
- Glass or ceramic vase
- Acrylic paint (mixed to thin consistency), 1 oz
- Old toothbrush or stiff-bristled brush
- Masking paper or drop cloth
- Gloves
- Clear matte sealer
Instructions
- Paint the vase base color if needed; dry 30–60 minutes.
- Thin paint with a few drops of water to a milky consistency.
- Dip toothbrush and run thumb across bristles to splatter evenly; practice on scrap first.
- Let speckles dry 15–30 minutes; repeat for coverage.
- Seal with matte sealer; cure 24 hours.
How to Display or Gift It
Speckled vases look great on kitchen shelves or in groups on open shelving. Pack in a small gift box with paper filler for giving.
- Leather-Wrapped Accent Vase

Leather adds warm contrast and a tactile band that anchors arrangements. A leather strip stitched or glued gives a tailored, masculine feel—great for modern-rustic or mid-century rooms. Use contact cement or fabric glue for secure adhesion.
Materials
- Glass or ceramic vase
- Vegetable-tanned leather strip, 1/2–1 inch wide
- Contact cement or leather glue
- Leather needle and waxed thread (optional)
- Scissors and ruler
- Edge burnisher or bone folder
Instructions
- Measure circumference and cut leather leaving 1/2 inch overlap.
- Apply glue on underside and press onto vase, smoothing with bone folder.
- If stitching, pre-punch holes and saddle-stitch using waxed thread.
- Trim edges and burnish for a clean look.
- Let glue dry 24 hours before use.
How to Display or Gift It
Pair with sculptural dried stems. Gift in a kraft box with leather conditioner sachet. Store spare strips flat in a shallow drawer.
- Resin-Encased Dried Botanicals Vase
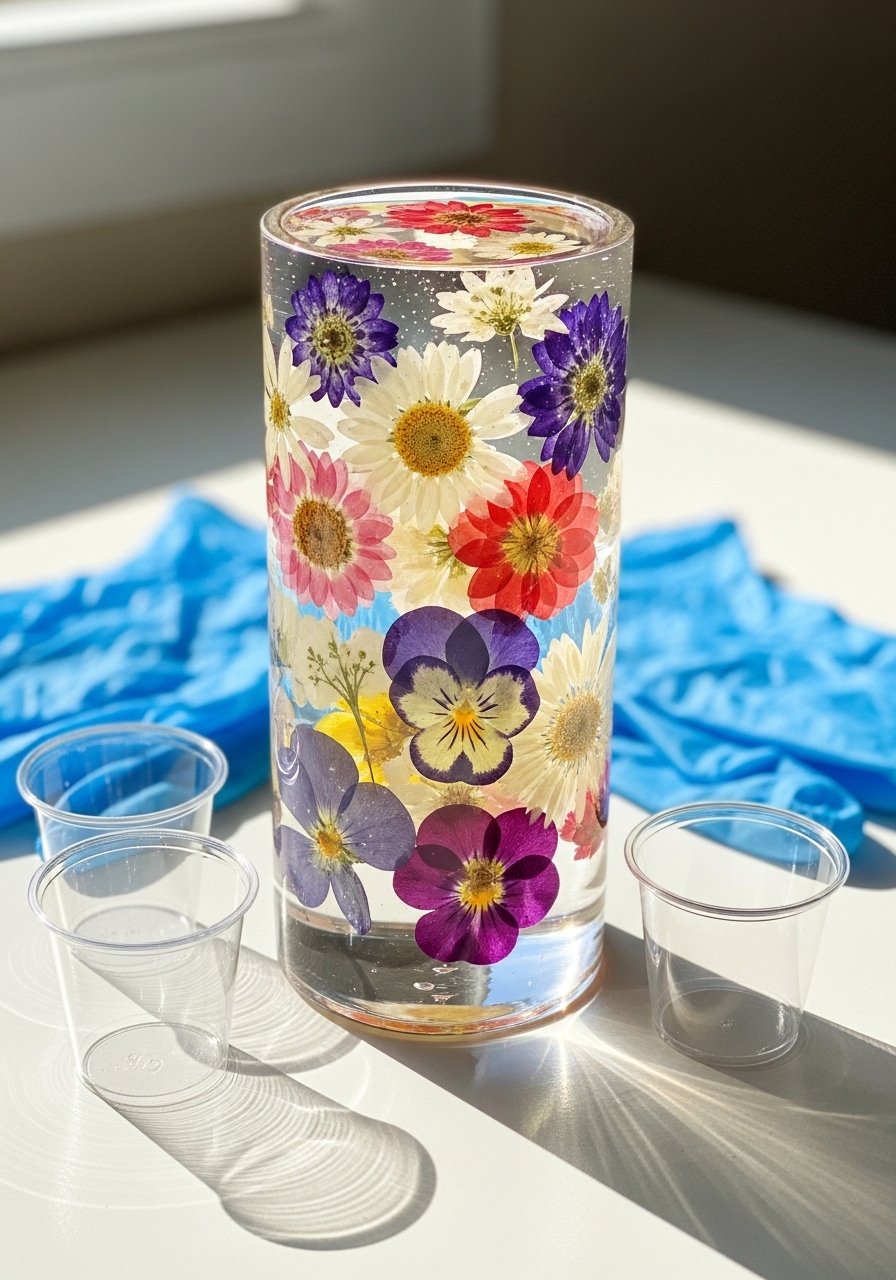
Resin gives a glassy, deep-encased look—perfect for preserving pressed flowers or fern fronds. This technique yields a smooth, jewel-like finish but requires careful mixing and dust-free curing. Use an epoxy resin kit with a 48–72 hour cure time.
Materials
- Clear vase or mold
- Epoxy resin kit, 8 oz (2-part)
- Pressed dried flowers
- Mixing cups and stir sticks
- Nitrile gloves
- Heat gun (for popping bubbles)
Instructions
- Arrange pressed botanicals in the vase or mold.
- Mix resin and hardener per kit instructions (by volume), stir for 3 minutes.
- Pour a thin layer, position flowers, then pour remaining resin slowly.
- Remove bubbles with a heat gun sweep (3–5 seconds).
- Cover to keep dust off; allow 48–72 hours cure.
- Lightly sand edges if needed and polish.
How to Display or Gift It
This piece is a delicate heirloom. Wrap in tissue and a fitted box for gifting. Store excess resin in its original container per manufacturer directions.
- Hand-Stamped Clay Accent

Adding an air-dry clay band gives a sculptural, tactile accent—think soft relief that feels handmade. The clay can be textured with stamps and painted for contrast. It’s lightweight and kid-friendly if you use non-toxic air-dry clay.
Materials
- Glass vase
- Air-dry clay, 4–6 oz
- Rolling pin or pasta machine
- Clay texture stamps
- Acrylic paint, small brush
- Craft glue (E6000)
Instructions
- Roll clay to 1/8-inch thickness and cut a strip matching the vase height.
- Stamp texture and gently wrap around vase, smoothing edges.
- Let clay dry 24–48 hours depending on thickness.
- Paint accents and seal with matte sealer once dry.
- Glue the band to the vase and allow glue to set 24 hours.
How to Display or Gift It
Pair with linen runners and woven placemats. For gifting, place in a kraft box with foam cushioning. Store unused clay in an airtight container.
- Painted Geometric Tape Lines
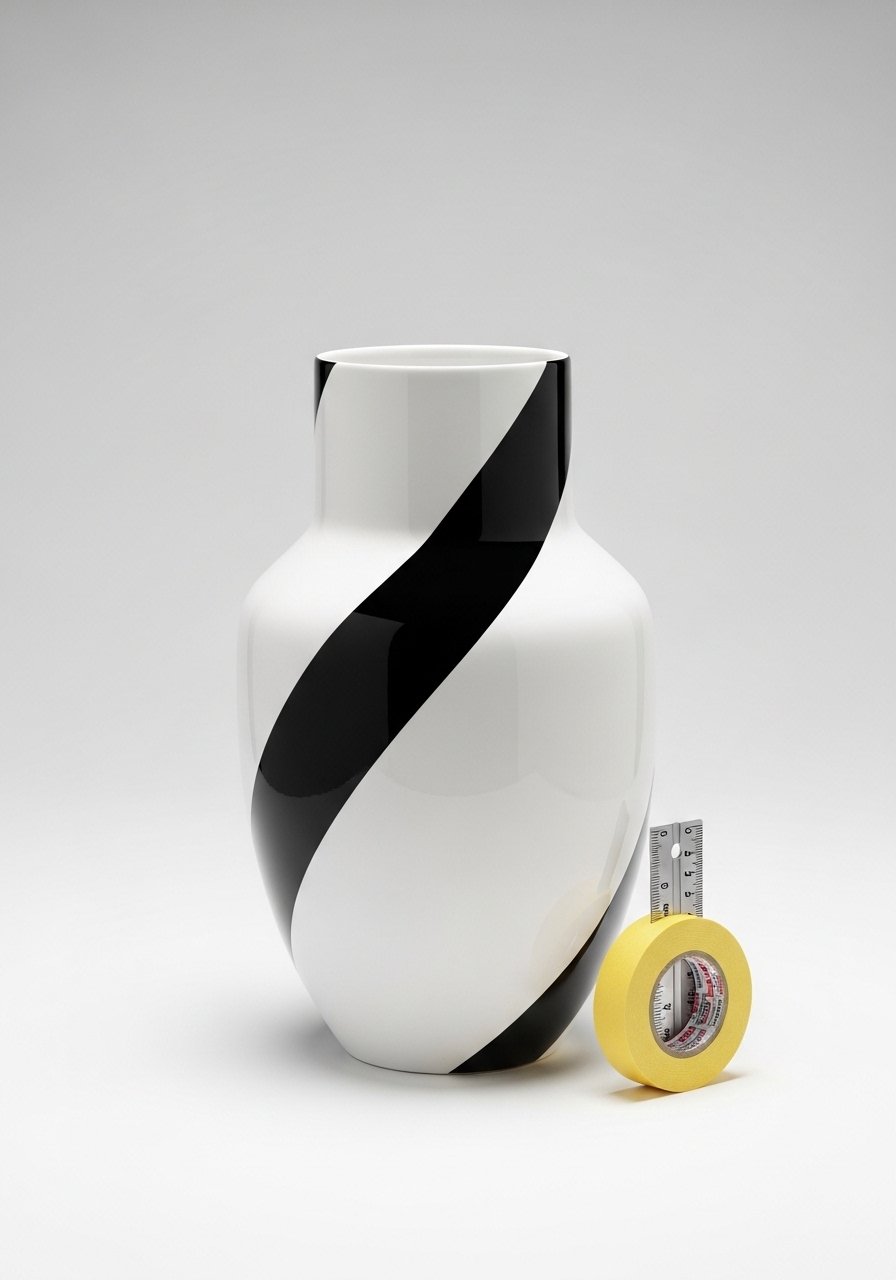
Painter’s tape gives razor-sharp stripes and geometric shapes—great when you want modern contrast. Press tape firmly to avoid paint bleed. A brayer or bone folder helps seal edges before painting.
Materials
- Vase, any color base
- Painter’s tape, 1/8–1/2 inch
- Acrylic paint, contrasting color, 1 oz
- Flat foam brush
- Bone folder or brayer
- Clear matte sealer
Instructions
- Paint the base color and let dry 1–2 hours.
- Mark tape lines and press tape edges firmly with a bone folder.
- Apply one thin coat of contrasting paint; remove tape while paint is wet for crisp edges.
- Touch up tiny bleed spots with a detail brush.
- Seal with one light coat of matte sealer; cure 24 hours.
How to Display or Gift It
Group with minimalist frames and metal accents for a modern mantel. Pack in a box with paper tape around the base to prevent movement during shipping.
- Burlap & Lace Wrapped Vase
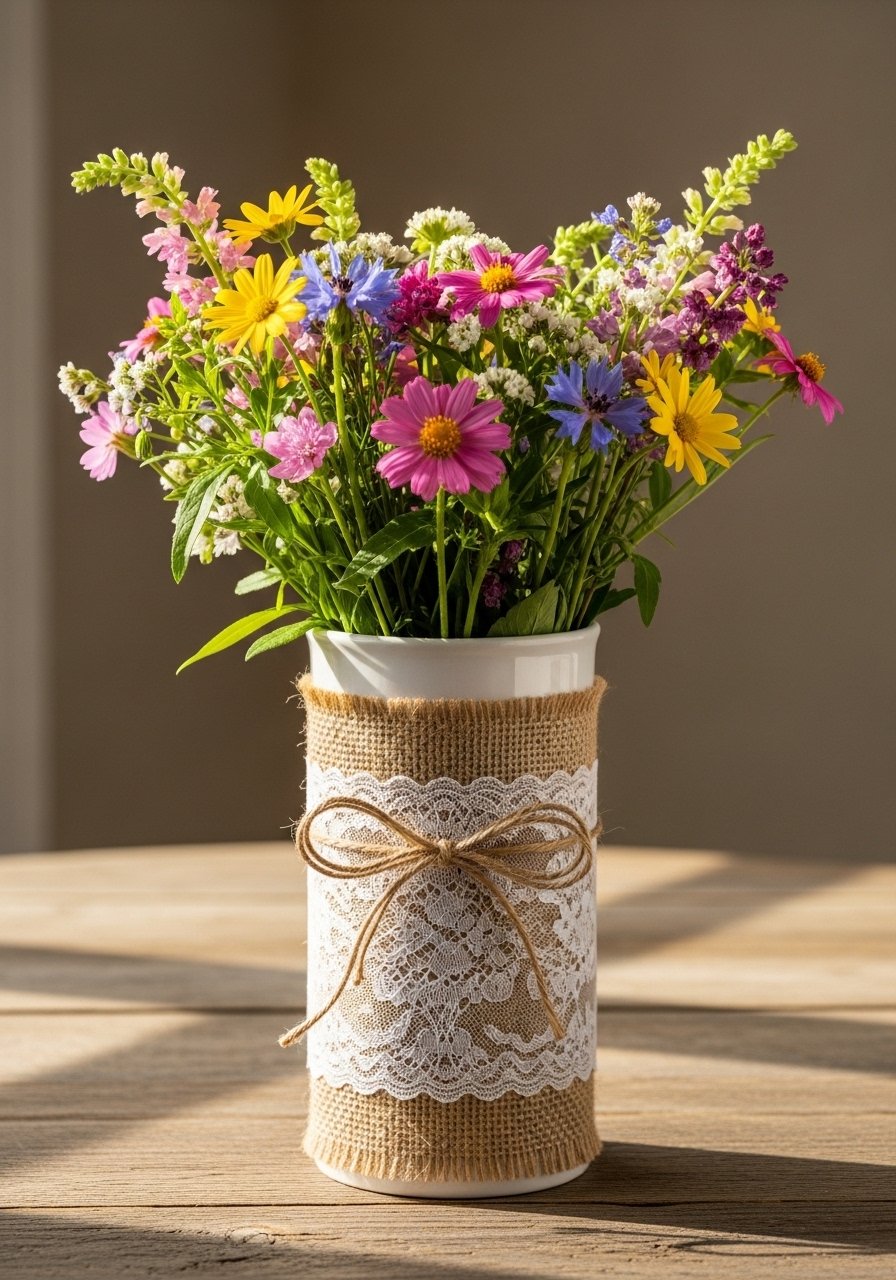
Burlap and lace combine rustic and delicate textures—ideal for weddings or country interiors. The combo feels warm and tactile and is forgiving during wrapping. Use fabric glue to avoid stitches.
Materials
- Vase
- Burlap strip, width per vase
- Lace trim, length matching burlap
- Fabric glue
- Twine
- Scissors
Instructions
- Measure and cut burlap to wrap around the vase with slight overlap.
- Glue burlap seam and press until set (10 minutes).
- Glue lace over burlap and let set 30 minutes.
- Tie twine bow around the center; secure with a dab of glue.
- Allow full cure 24 hours before adding water or stems.
How to Display or Gift It
Perfect for rustic table settings or bridesmaid gifts. Wrap in kraft paper and place in a shallow box with tissue.
- Painted Calligraphy Label Vase
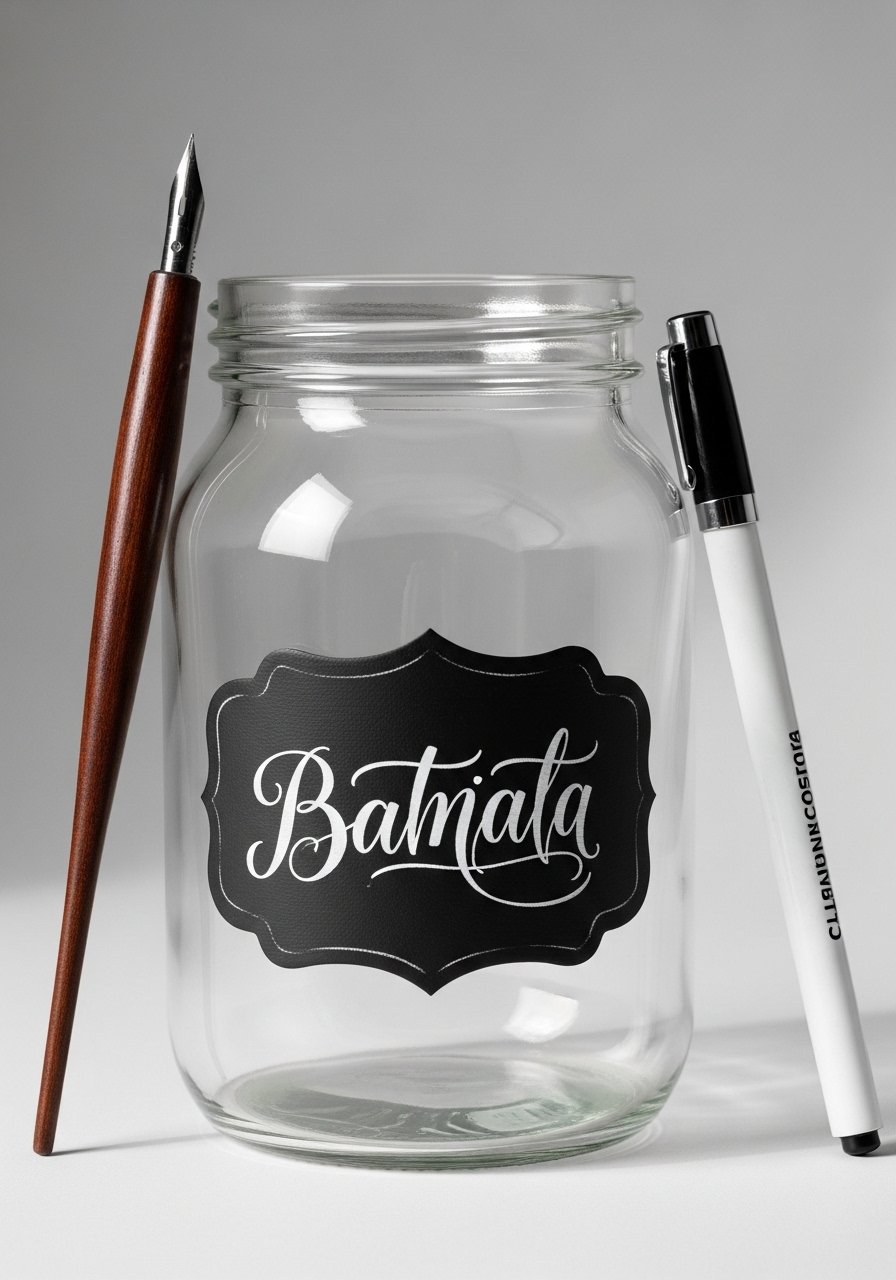
A painted label with hand-lettered text adds personalization—great for kitchen herb vases or gift tags. Use paint pens for control and seal the label for durability. This project feels intimate and special to hold.
Materials
- Glass jar
- Chalkboard paint or black acrylic, 1 oz
- Small foam brush
- White paint pen or acrylic paint and fine round brush
- Ruler and pencil
- Clear sealer
Instructions
- Paint a rectangular label area and let dry 30–45 minutes.
- Lightly pencil guidelines for lettering.
- Use a white paint pen to write botanical names or messages.
- Allow 1–2 hours for ink to dry, then seal with a light spray.
- Erase any visible pencil lines gently.
How to Display or Gift It
Pair with fresh herbs on a kitchen windowsill. For gifting, tuck a seed packet and twine around the jar.
- Cork Mosaic Vase

Cork mosaics are tactile, eco-friendly, and great for matching neutral palettes. Cork cuts cleanly with a sharp knife and glues well. This finish is warm and soft to the touch—ideal for snug, casual interiors.
Materials
- Vase
- Wine corks, 20–30 depending on size
- Sharp utility knife
- Wood glue or E6000
- Cutting board
- Fine sandpaper
Instructions
- Slice corks into 1/8–1/4-inch rounds.
- Dry-fit cork pieces around the vase, trimming as needed.
- Glue pieces individually; press firmly and wipe excess glue.
- Let glue cure 24 hours.
- Lightly sand edges if rough and seal with matte spray.
How to Display or Gift It
Works well in a cozy reading nook. Wrap in kraft paper with natural twine for gifting. Keep extra cork slices in a small jar.
- Silk Scarf Wrapped Vase
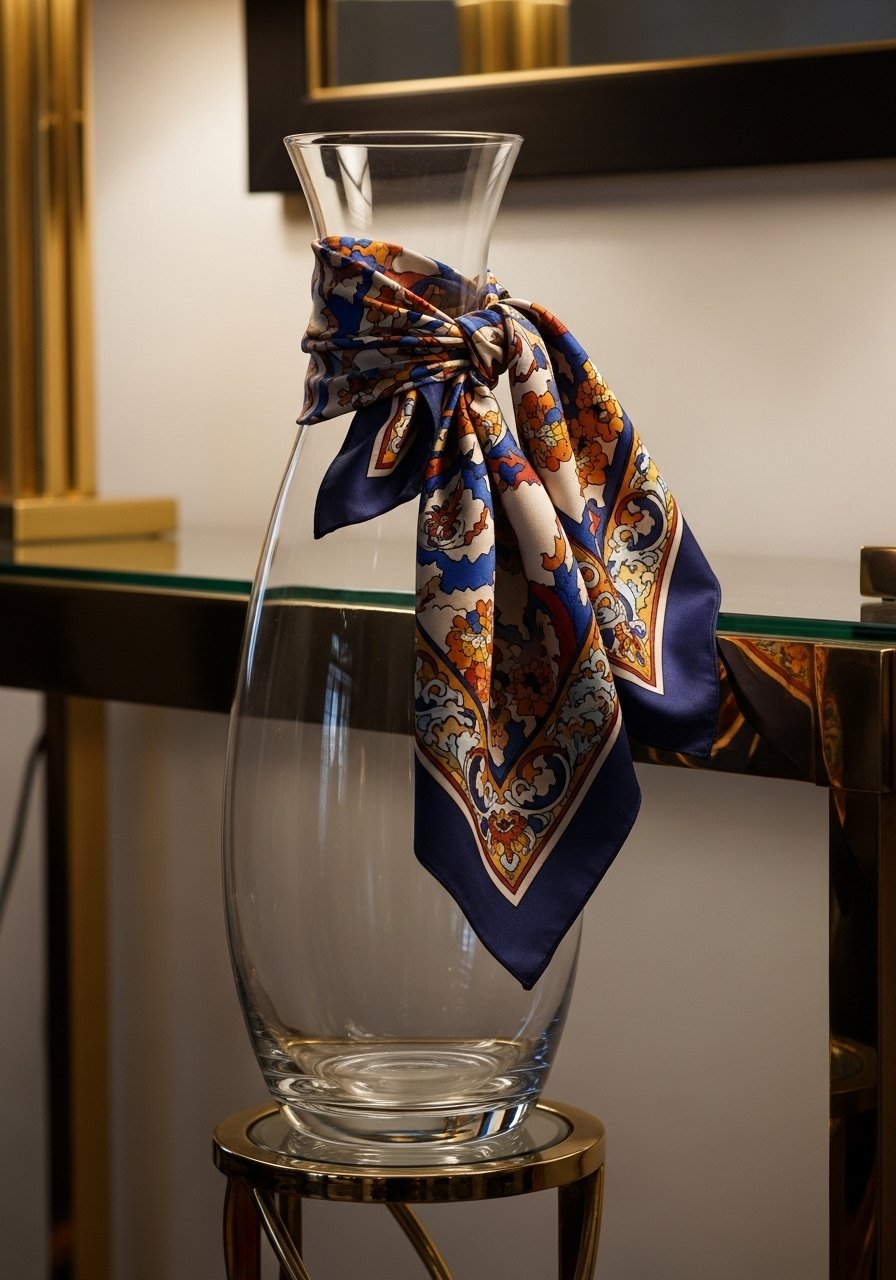
A silk scarf creates instant pattern and color and is fully removable for laundering. It’s a no-glue option that feels luxurious and changeable with seasons. The scarf’s slick texture contrasts with dried blooms.
Materials
- Vase
- Small silk scarf or bandana (20×20 inches)
- Ribbon or twine to secure
- Scissors
- Optional: clear elastic band for inside hold
Instructions
- Drape scarf around the vase and arrange pattern.
- Gather fabric at the neck and tie a loose knot or secure with ribbon.
- Tuck ends neatly or let them hang for a casual look.
- Replace scarf seasonally or wash per care label.
How to Display or Gift It
This is great for quick room refreshes. Gift the vase wrapped inside the scarf and tied like a present.
- Painted Chevron Clay Slip Technique
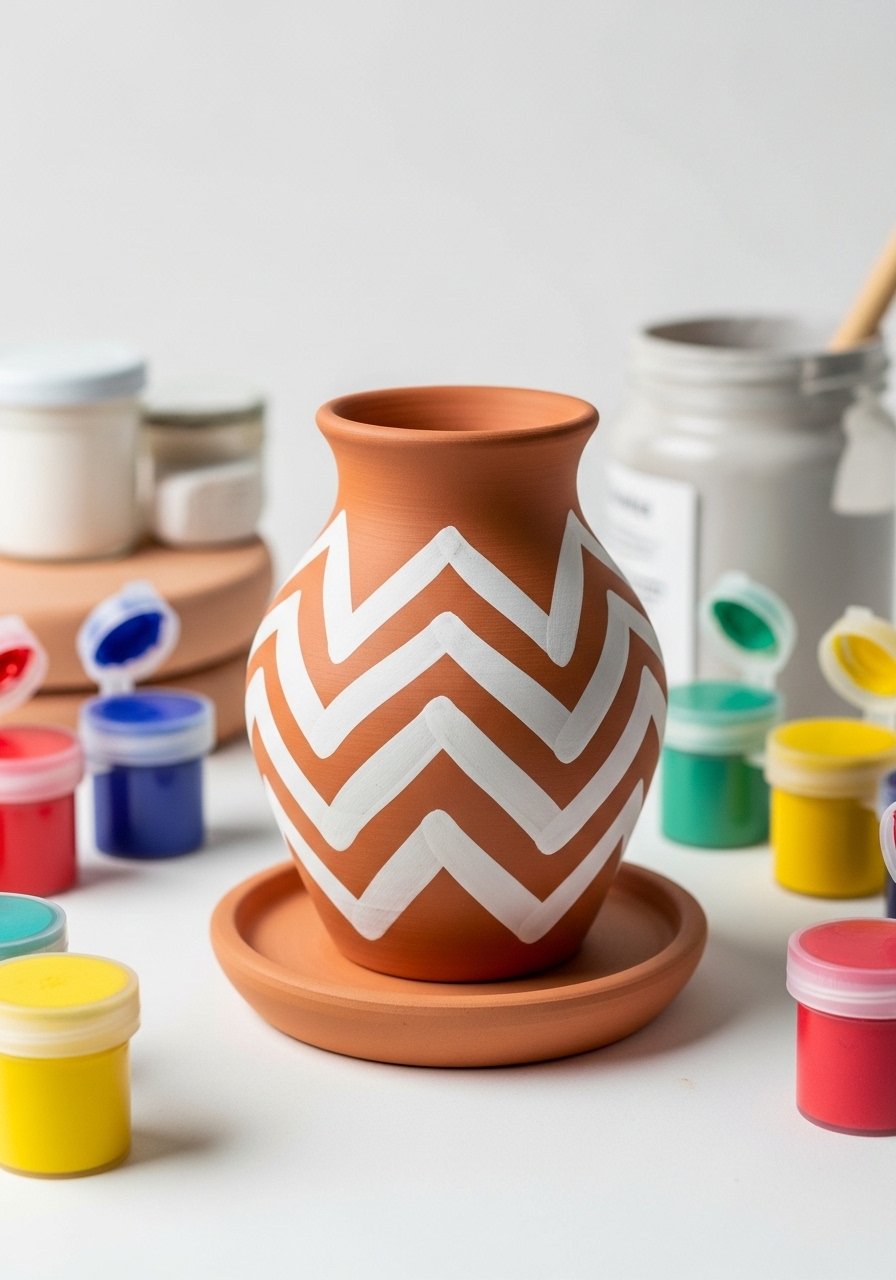
Clay slip or acrylic can create crisp chevrons with a stencil. The terracotta base peeks through for warmth. This technique gives a tactile matte finish.
Materials
- Terracotta vase
- White clay slip or acrylic paint, 2 oz
- Chevron stencil or painter's tape
- Foam stippling brush
- Sandpaper (220)
- Matte sealer
Instructions
- Sand terracotta surface lightly and wipe clean.
- Position stencil and secure with low-tack tape.
- Apply slip or paint with stippling brush in thin layers.
- Remove stencil carefully while paint is wet.
- Let dry 1–2 hours and seal with matte sealer. Full cure 24 hours.
How to Display or Gift It
Chevrons play well with geometric decor. Pack in a box with tissue for gifting and label for the recipient.
- Ribbon Fringe Accent

Ribbon fringe adds movement and softness—perfect for pastel, feminine spaces or party decor. It feels playful and tactile and is easily refreshed for events.
Materials
- Short vase
- Ribbon spools, assorted widths and textures, ~3–6 yards total
- Hot glue gun
- Scissors
- Ruler
Instructions
- Cut ribbons into equal lengths (4–6 inches) and fold in half.
- Apply small glue dots in a row and attach folded ribbons to create fringe rows.
- Layer rows working upward for fullness.
- Trim uneven ends for a neat silhouette.
- Let glue cool 10–15 minutes.
How to Display or Gift It
Use it as a party centerpiece with short floral bunches. Store ribbon scraps in a ribbon organizer spool box.
- Painted Floral Silhouette Vase (Stencil)
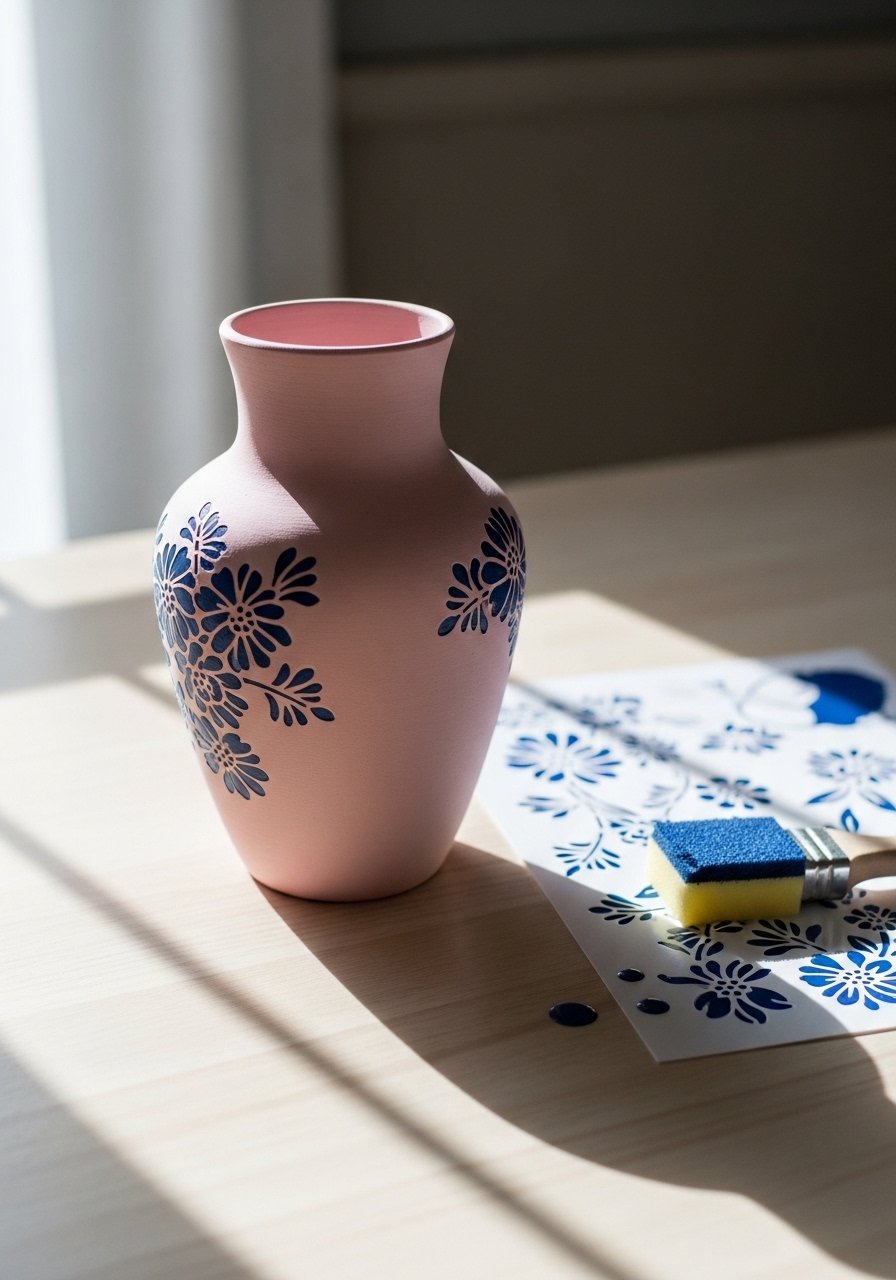
Stenciled florals create crisp repeating patterns and are great for making matching sets. Use a stencil brush and pounce lightly for even coverage.
Materials
- Vase
- Vinyl floral stencil or printable stencil sheet
- Stencil brush or sponge pouncer
- Acrylic paint, small amount
- Painter’s tape
- Sealer
Instructions
- Paint base coat and dry 1–2 hours.
- Secure stencil and dab paint with a pouncer—light pressure only.
- Remove stencil gently after each motif.
- Repeat pattern and let dry 30–60 minutes.
- Seal with a light coat; cure 24 hours.
How to Display or Gift It
Set matching stenciled vases in a line on a windowsill. Wrap individually in tissue and box for gifting.
- Etched Glass Pattern

Etching gives a permanent frosted look and feels professional. Etching cream requires gloves and careful timing but yields a soft, tactile finish. Use glass-safe stencils for crisp lines.
Materials
- Clear glass vase
- Glass etching cream
- Vinyl stencil
- Gloves and safety glasses
- Small spatula
- Warm water for rinse
Instructions
- Clean glass and apply stencil securely.
- Put on gloves and apply a thick layer of etching cream per product directions.
- Leave on for recommended time (usually 1–5 minutes).
- Rinse thoroughly and remove stencil.
- Dry and admire the frosted design.
How to Display or Gift It
Etched vases are elegant centerpieces for weddings. Wrap in tissue and place in a shallow box with padding.
- Beaded Fringe Boho Vase
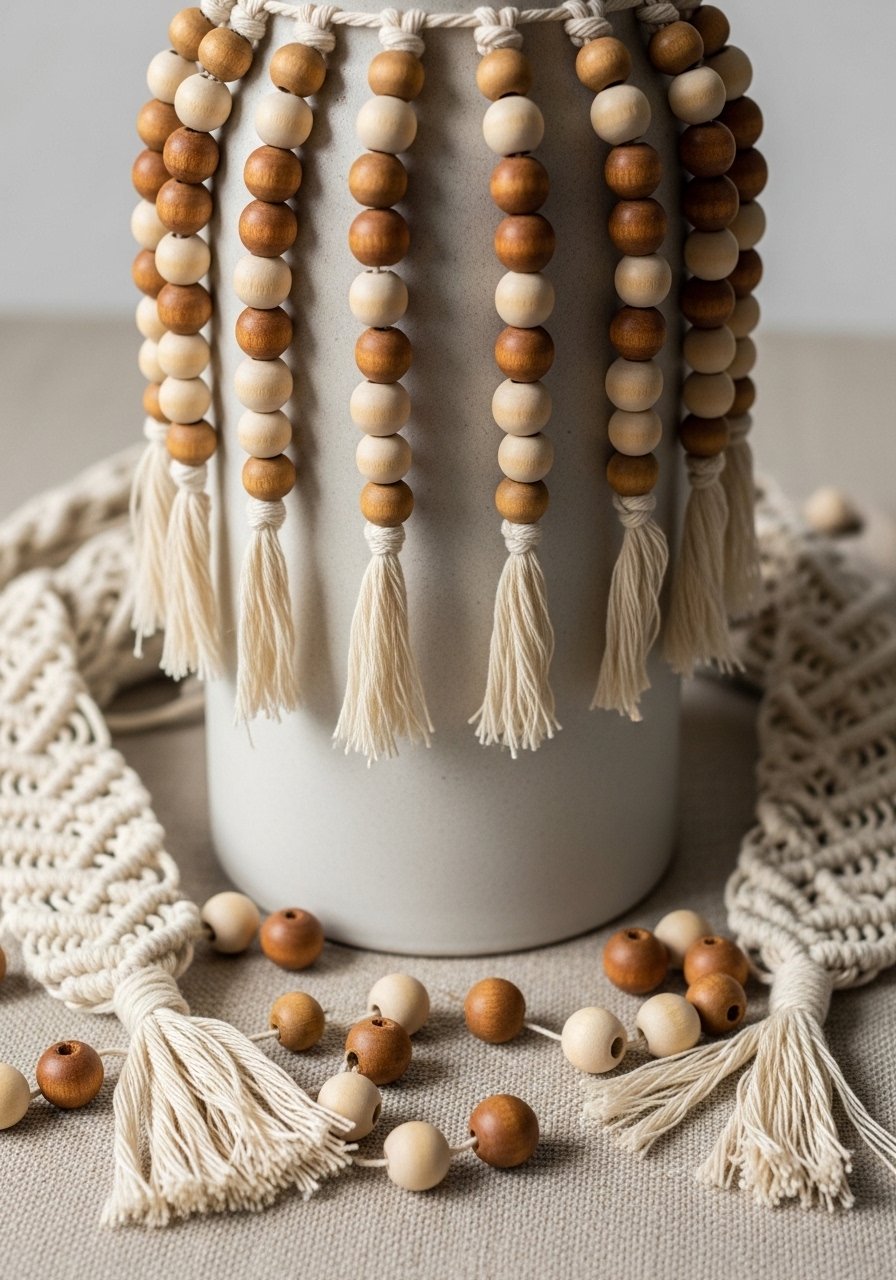
Beaded fringe adds playful texture and a boho silhouette. Wooden beads on macramé cord feel organic and move beautifully with air-currents.
Materials
- Vase
- Wooden beads, assorted sizes (20–40)
- 3mm macramé cord, 10–15 yards
- Hot glue gun
- Scissors
- Small wooden dowel (optional)
Instructions
- Cut cords to desired fringe lengths plus extra for knots.
- String beads and knot beneath each bead to lock in place.
- Gather multiple beaded strands and glue them around the vase neck or a dowel ring.
- Trim and adjust for even drape.
- Let glue set 15–30 minutes.
How to Display or Gift It
This vase sits beautifully on a low coffee table with pampas grass. Wrap in kraft paper and tie with twine for a boho-themed gift.
- Concrete-Look Faux Planter
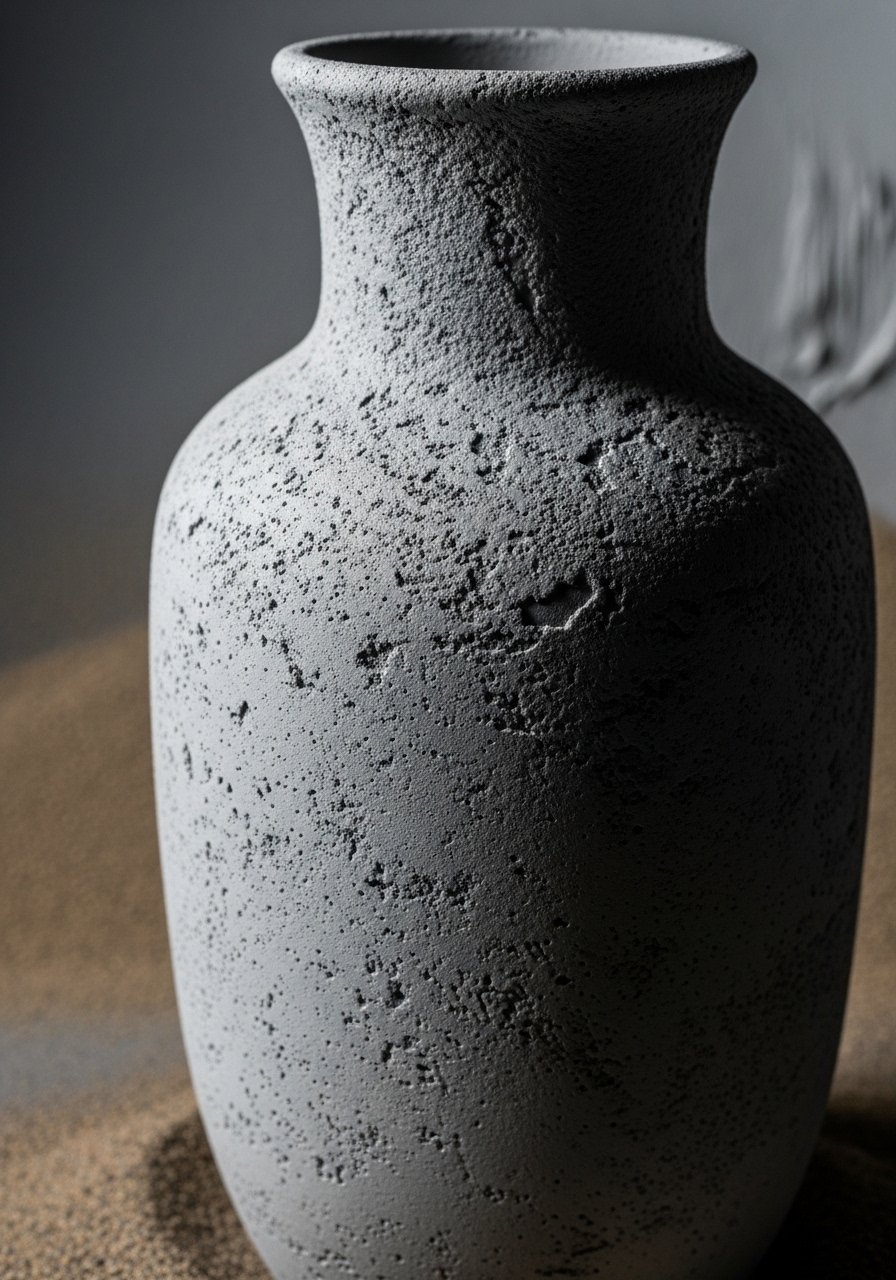
A concrete look adds an industrial edge without heavy weight. Textured paint or a concrete-effect spray makes it feel sturdy and matte. Sealing helps avoid chalky residue.
Materials
- Terracotta or lightweight vase
- Concrete-effect spray or textured paint
- Foam brushes
- 220-grit sandpaper
- Clear matte sealer
Instructions
- Sand vase lightly and wipe clean.
- Apply one coat of concrete-effect paint with a stippling motion.
- Add a second coat for texture if needed; dry 1 hour between coats.
- Sand lightly for worn edges.
- Seal with matte sealer; cure 24 hours.
How to Display or Gift It
Use in minimalist interiors or industrial rooms. Pack in a sturdy box with foam padding for shipping.
- Chalkboard Paint Message Vase

A chalkboard vase is practical and fun—you can change messages for guests or seasons. Chalk marker or real chalk can be used, and messages wipe clean.
Materials
- Small jar
- Chalkboard paint
- Small paintbrush
- Chalk or chalk marker
- Painter’s tape
- Sealer (optional for chalk marker)
Instructions
- Paint label area with chalkboard paint and let dry 30–45 minutes.
- Lightly cure by rubbing chalk across the surface and wiping.
- Write messages or names using chalk or marker.
- Seal only if using a chalk marker per manufacturer instructions.
How to Display or Gift It
Perfect for party place settings. Gift with a tiny chalk set in a kraft bag.
- Washi Tape Patterned Vase
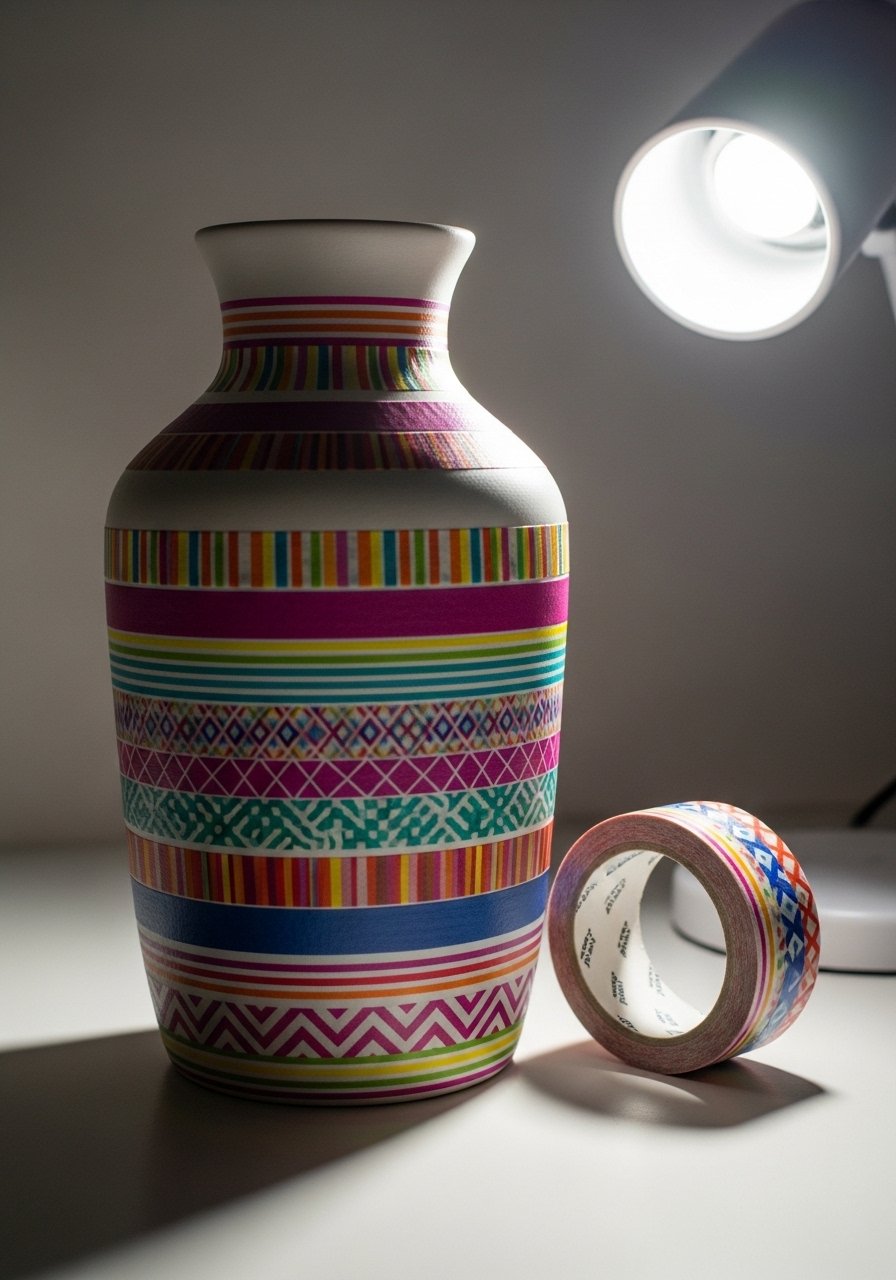
Washi tape is playful, removable, and clean—ideal for renters or seasonally switching looks. It’s smooth to the touch and great for quick styling.
Materials
- Vase
- Assorted washi tape rolls
- Scissors or craft knife
- Ruler
- Clear sealer (optional)
Instructions
- Clean the vase and plan tape placement.
- Apply washi tape strips neatly, trimming ends for a tight fit.
- Smooth seams with a bone folder.
- Seal with a light spray if you want permanence; otherwise leave removable.
How to Display or Gift It
Perfect for classroom gifts or quick party decor. Pack with extra tape rolls in a gift box.
- Leaf-Impression Clay Medallions
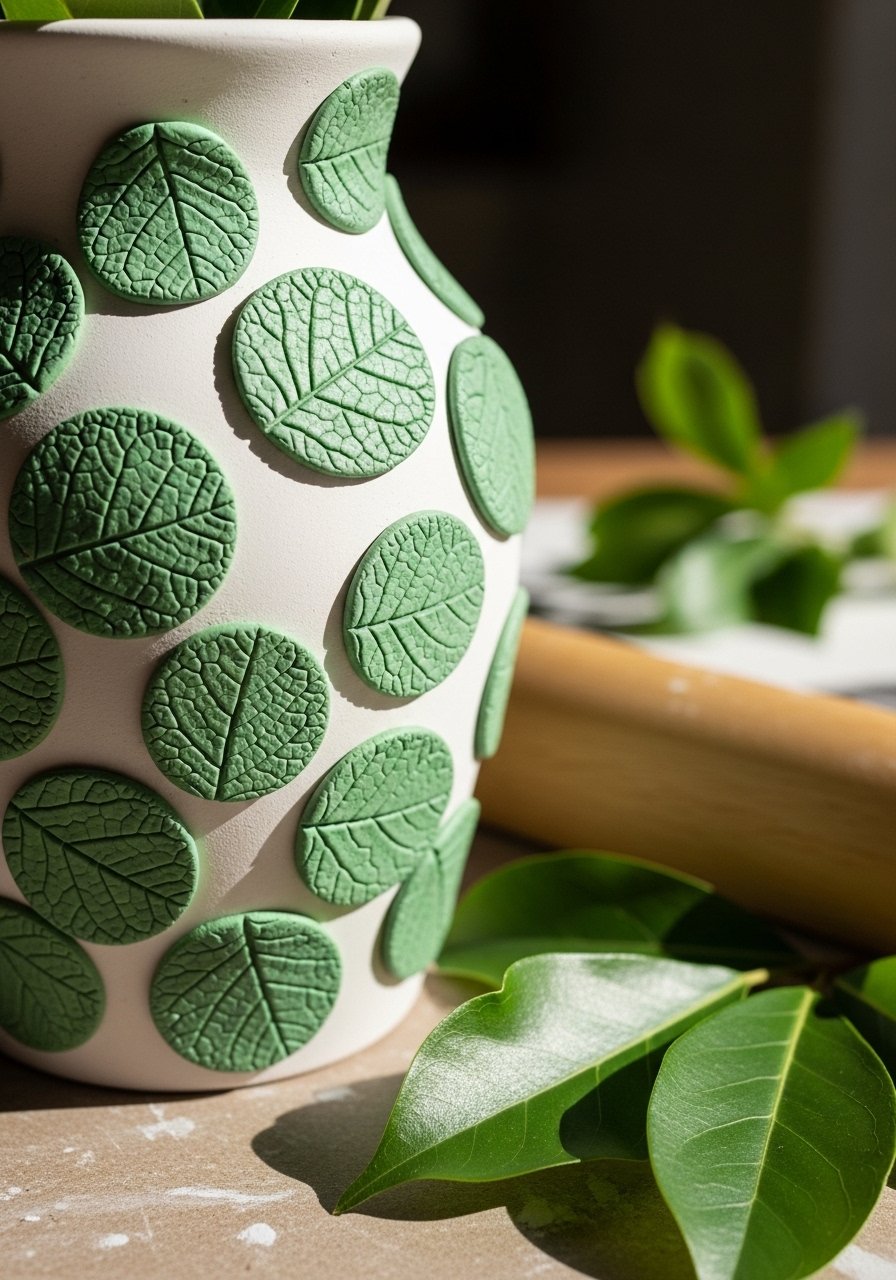
Leaf-impression medallions give organic detail and tactile relief. Press real leaves into clay for lovely veined textures, then paint and glue.
Materials
- Air-dry clay, 4–6 oz
- Small round cookie cutter
- Fresh leaves for texture
- Acrylic paint or wash
- Craft glue
- Sealer
Instructions
- Roll clay to 1/8-inch thickness and cut medallions.
- Press leaves gently to imprint veins; remove leaf.
- Allow clay to dry 24–48 hours.
- Paint a soft wash and seal once dry.
- Glue medallions to vase and let set 24 hours.
How to Display or Gift It
These look great clustered in groups. Tuck in tissue and box for gifting. Store leftover clay in airtight container.
- Glue Gun Paint Resist Doodle Vase
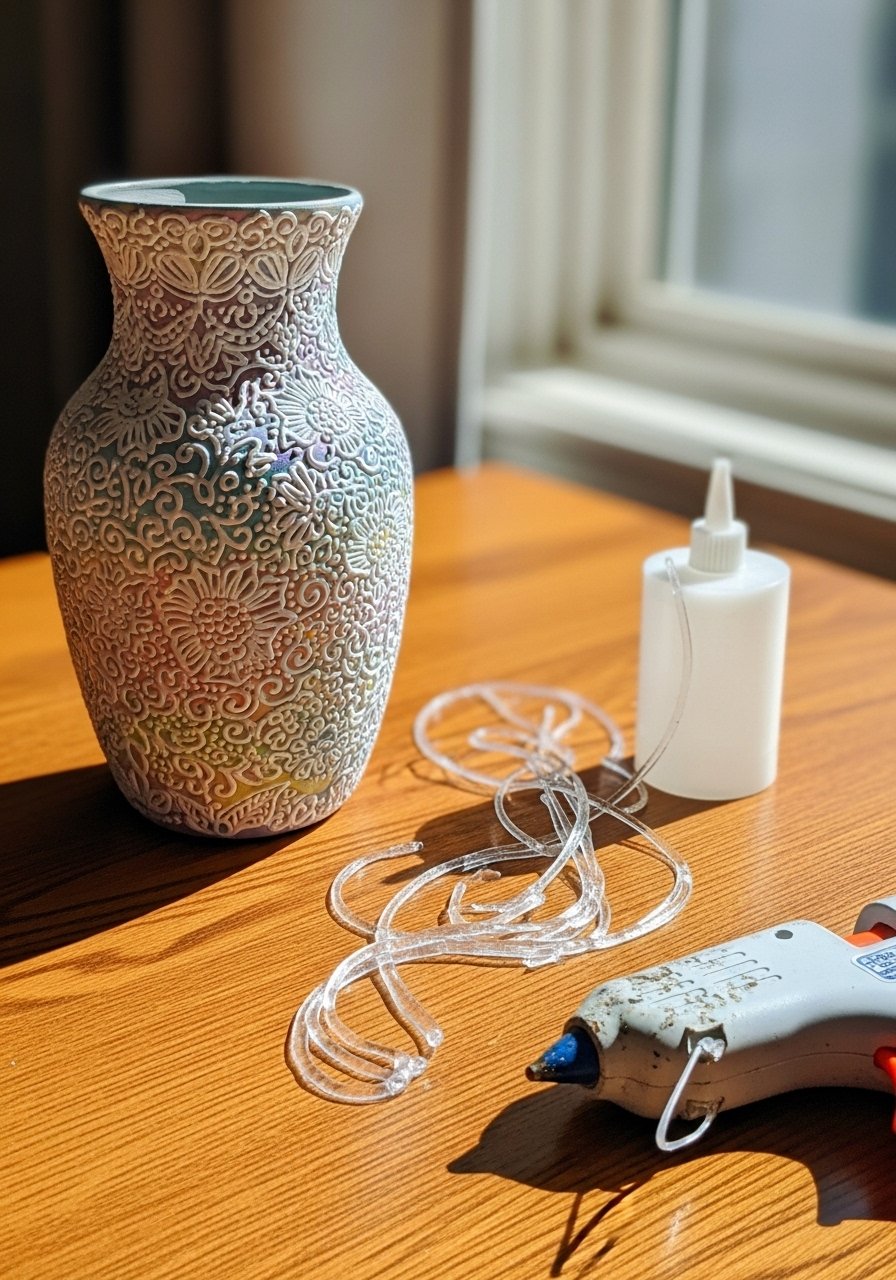
Use hot glue to doodle a raised resist pattern and paint over it for raised, tactile designs. The pattern adds sculptural interest and a satisfying feel.
Materials
- Vase
- Low-temp hot glue gun
- Acrylic paint
- Thin detail brush
- Paper towels
- Sealer
Instructions
- Sketch a light pencil guide if desired.
- Draw raised designs with hot glue and let fully cool (5–10 minutes).
- Paint over the surface; glue will resist paint.
- Add highlights to glue ridges with a dry brush.
- Seal lightly and cure 24 hours.
How to Display or Gift It
This playful piece is great for casual rooms. Pack safely with cushioning for shipping.
- Metallic Paint Dipped Base
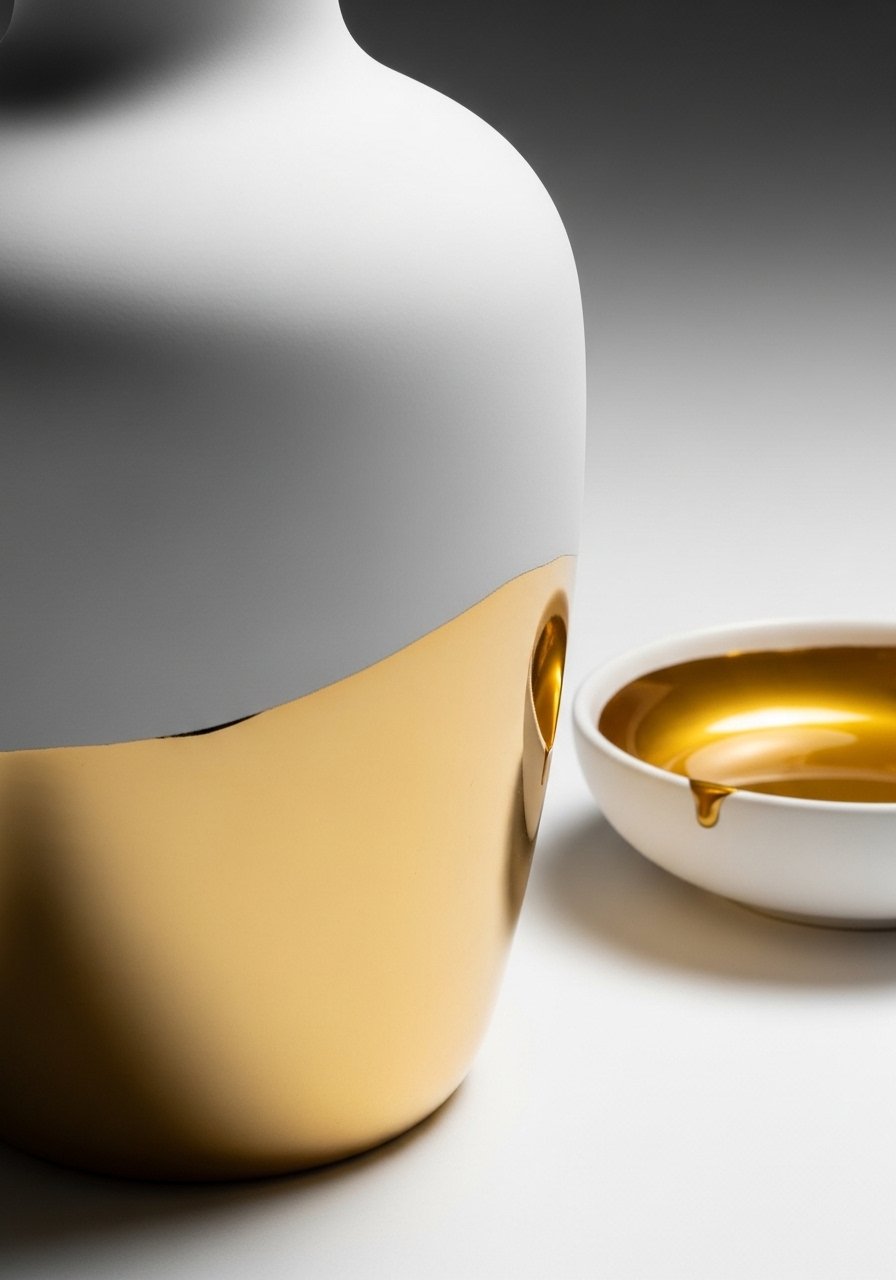
A metallic dipped base offers instant glam—clean lines if you tape the dip or go raw for a painterly effect. The metallic base catches light and feels luxe.
Materials
- Vase
- Metallic acrylic paint (gold or brass), 1 oz
- Painter’s tape (optional)
- Foam brush
- Drop cloth
- Sealer
Instructions
- Tape a straight line if you want a clean dip edge, or freehand for a painterly roll.
- Dip or paint the lower third with metallic paint in thin coats.
- Allow 30–45 minutes between coats; 2 coats often suffice.
- Remove tape while paint is wet for crisp line.
- Seal with a clear topcoat; cure 24 hours.
How to Display or Gift It
Place near mirrors or lamps to catch reflected light. Wrap in metallic tissue for gifting.
- Mosaic Mirror Tile Accent

Mirror tiles add sparkle and reflect light, creating a glamorous focal point. Use small mirrored mosaic squares and grout carefully—cleaning as you go avoids haze.
Materials
- Vase
- Small mirrored mosaic tiles
- Tile adhesive or E6000
- Grout, small amount
- Sponge and soft cloth
- Safety gloves
Instructions
- Plan mirror tile layout and cut pieces as needed.
- Glue each tile in place allowing spacing for grout.
- After adhesive cures 24 hours, apply grout and wipe excess.
- Clean mirror surfaces carefully once grout begins to set.
- Cure grout 48–72 hours before handling.
How to Display or Gift It
This vase makes a dazzling accent for evening tables. Pack well with bubble wrap and a supportive box for shipping.
You made it through 29 different vase decorating ideas for home decor—everything from quick washi tape refreshes to weekend resin work. Each project gives you a distinct aesthetic: boho macramé, cottagecore decoupage, minimalist geometric paint, and more. Pick one that matches the room you want to update or try a handful for a shelf-styling series.
Save or pin the ones you love and try one this weekend—small changes like a twine wrap or a gold-dipped base can shift a whole shelf’s mood. Want a tool that helps across nearly all these projects? I recommend a good-quality hot glue gun with temperature control; it’s been the single tool that improved speed and finish for so many of my builds. Which style will you make first—textured or glossy? Share with a friend who likes to craft and swap project pics when you’re done.
Hot glue gun with temperature control


