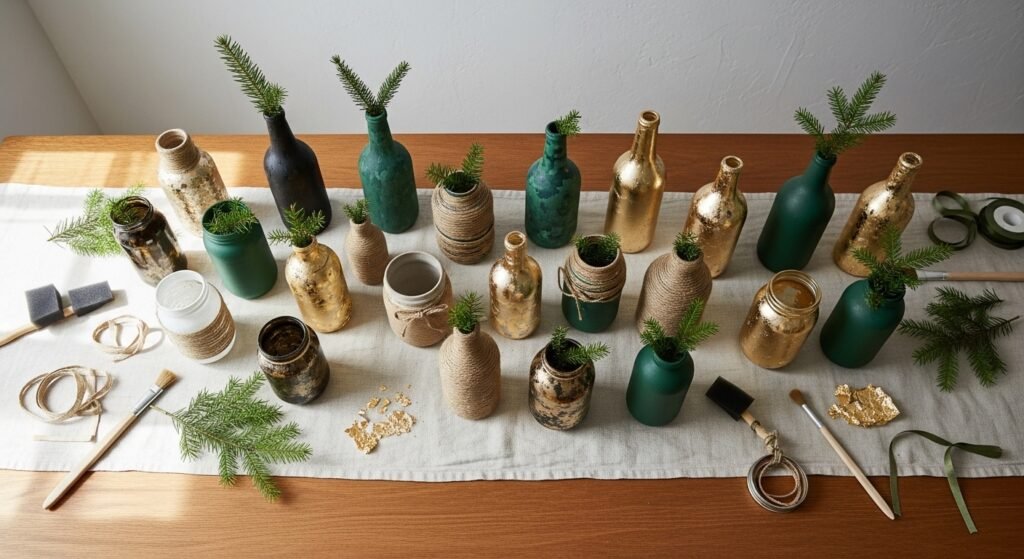
Holiday vase decorating ideas are the quickest way to make your table feel intentional and festive without spending hours. Whether you're hosting a holiday dinner or just want seasonal cheer on your mantle, a simple vase refresh can be the difference between "nice" and "party-ready." These 28 projects cover styles from rustic farmhouse to minimalist Japandi and cozy cottagecore, so you can pick one that fits your home and skill level.
I start many of these projects by cutting materials with my Cricut Explore cutting machine for clean, repeatable shapes. For quick bonds, a temperature-controlled hot glue gun keeps things tidy and fast. Read through and pin the ideas that speak to you—each one includes exact materials, step-by-step instructions, drying times, and simple display tips so you can get crafting right away.
- Painted Winter White Minimalist Vase
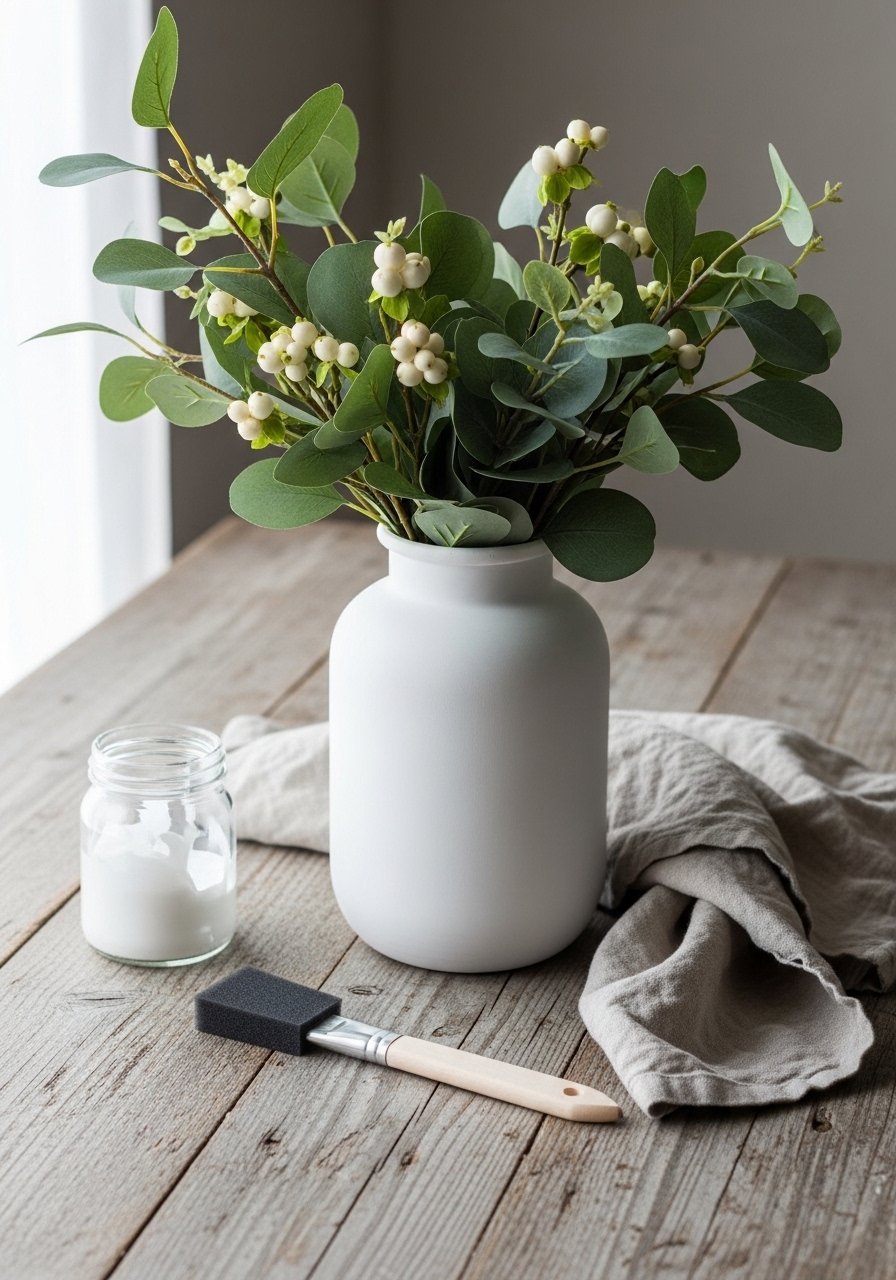
This clean, matte white vase brings a calm, Scandinavian vibe to holiday settings. The chalky finish hides labels and imperfections on thrifted glass. It's ideal for japandi or modern minimalist tables and looks smooth to the touch.
Materials
- One recycled glass vase or bottle (12–10 inches tall)
- Chalk paint (4 oz, white)
- Matte Mod Podge (2 oz)
- Fine-grit sandpaper (220 grit)
- Flat foam brush (1-inch)
- Painter’s tape (1 inch)
- Rubbing alcohol and lint-free cloth
- Clear matte sealer spray (1 can)
Instructions
- Clean the vase with rubbing alcohol. Remove labels and residue.
- Sand glossy spots lightly (30 seconds per area) so paint adheres.
- Tape any areas you want to keep clear (rim or bottom).
- Apply the first thin coat of chalk paint with the flat foam brush—brush in one direction. Let dry 30 minutes.
- Apply a second coat for full coverage. Dry 30–45 minutes.
- Lightly sand between coats if you want a smoother finish.
- Apply a thin layer of matte Mod Podge and let cure 24 hours.
- Finish with two light sprays of matte sealer. Let cure 2 hours before handling.
How to Display or Gift It
- Pair with muted eucalyptus and white berries for a calming centerpiece.
- Tie a loop of natural twine around the neck for rustic charm.
- Store extra painted vases in a stackable craft organizer until the sealer cures.
- Make several ahead for place settings—they stack well in a cool, dry spot.
- Gold-Dipped Glam Holiday Vase
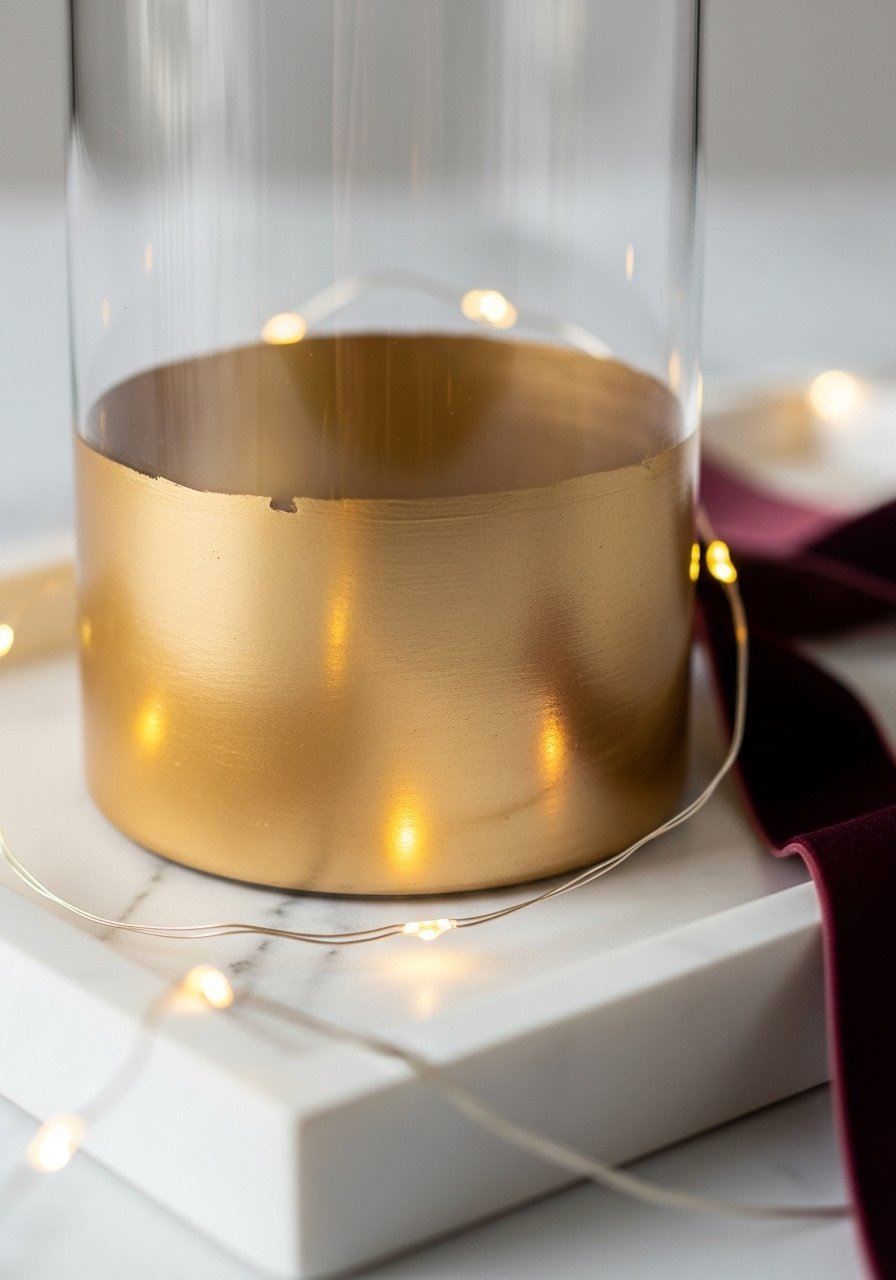
A half-dipped gold vase instantly reads festive and sophisticated. It’s great for parties and pairs beautifully with deep reds or evergreen arrangements. Beginners will love how forgiving the drip lines can be.
Materials
- Glass cylinder vase (8 x 4 inches)
- Metallic gold spray paint (satin)
- Painter’s tape (1 inch)
- Cardboard and newspaper for masking
- Nitrile gloves
- Clear glossy sealer spray (1 can)
- Foam brush for spot corrections
Instructions
- Clean vase with alcohol and let dry.
- Mark the dip line with painter’s tape, removing the tape for a soft edge or leaving it for a sharp edge.
- Work in a ventilated area. Shake the spray paint well.
- Spray the bottom half evenly from 8–10 inches away. Let dry 20 minutes.
- Apply a second thin coat if needed. Dry 20 minutes.
- Remove tape carefully after one hour.
- Touch any spots with a foam brush and metallic paint.
- Spray two light coats of glossy sealer. Cure 2 hours.
How to Display or Gift It
- Group three varying heights for an instant focal cluster.
- Fill with battery-operated fairy string lights for a soft glow.
- Wrap in tissue and tuck into a kraft gift box for an elegant present.
- Twine-Wrapped Cozy Farmhouse Vase
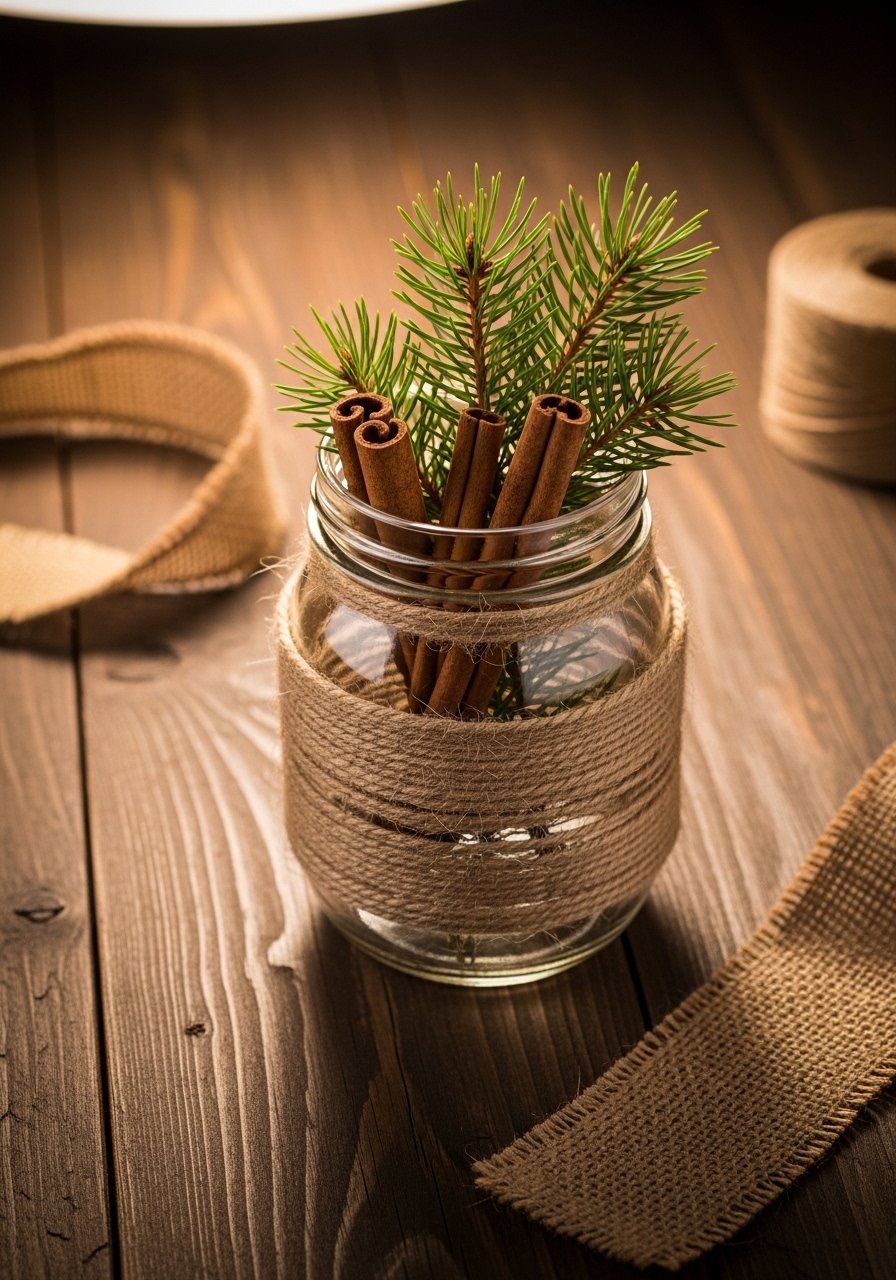
Twine-wrapping gives jars a warm farmhouse feel and is a budget-friendly way to dress up thrift finds. The texture feels cozy and handcrafted—perfect for cottagecore or farmhouse holiday tables.
Materials
- Mason jar or recycled jar (16 oz)
- Natural jute twine (50 feet, 2 mm)
- Hot glue sticks (mini)
- Temperature-controlled hot glue gun
- Scissors
- Cinnamon sticks (6)
- Dried orange slices (6)
- Small clothespins (optional)
Instructions
- Heat your hot glue gun (2–3 minutes).
- Add a small dab of glue at the jar base; press the twine end down.
- Wrap the twine tightly around, adding a small glue dot every 2 inches.
- Continue until you reach the top rim—trim and glue the end.
- Tuck cinnamon sticks and dried orange slices under a twine wrap and secure with a bit of glue.
- Add a sprig of evergreen in the jar. No water needed with dried botanicals.
- If gifting, clip a small kraft tag with a clothespin.
How to Display or Gift It
- Cluster several twine vases with pillar candles for a mantel vignette.
- Store extra twine in a craft storage bin with labels.
- Make a batch for hostess gifts—add a sachet of tea tucked inside.
- Snowflake Stenciled Glass Vase (keyword included)
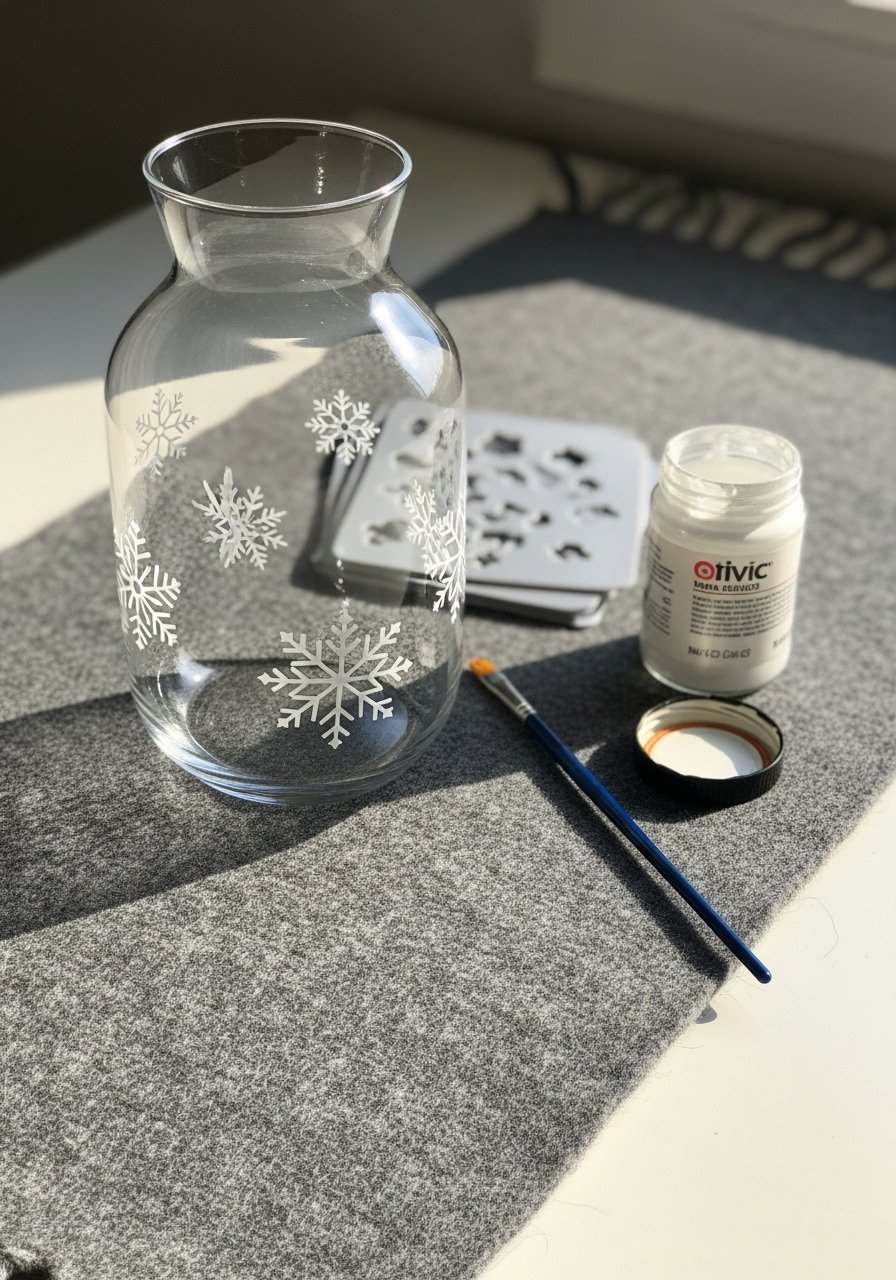
This stencled idea is one of the best holiday vase decorating ideas for a frosty, handmade look. The snowflake pattern adds seasonal charm while keeping the vase airy and elegant.
Materials
- Clear glass vase (10 inches)
- Snowflake stencil set (vinyl or reusable)
- White acrylic craft paint (2 oz)
- Stencil brush or sponge (small)
- Painter’s tape
- Rubbing alcohol
- Clear gloss spray (optional)
Instructions
- Clean glass with rubbing alcohol and let dry.
- Position stencils and hold with painter’s tape.
- Dab paint lightly with a stencil brush—use minimal paint to avoid bleed.
- Remove the stencil carefully after a minute.
- Let paint dry 30 minutes.
- Apply a second light coat if any spots are translucent. Dry 30 minutes.
- Seal with a clear gloss spray if vases will be handled often. Cure 1 hour.
How to Display or Gift It
- Fill with white twigs and cotton stems for a snowy look.
- Wrap in tissue and place in a gift box for winter hostess gifts.
- Store extra stencils flat in a stencil organizer folder.
- Glitter Ombre Holiday Vase
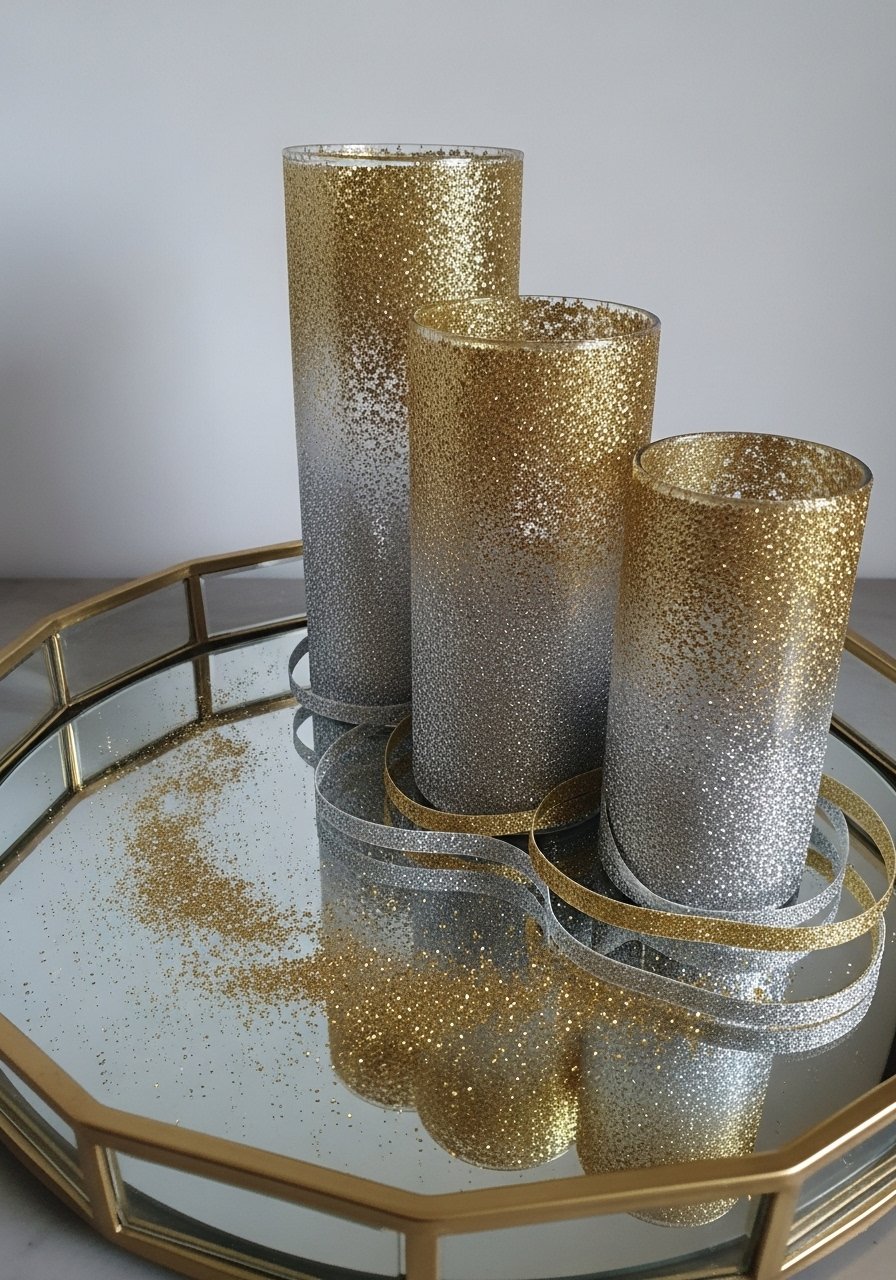
Glitter ombré is playful yet upscale when done in metallics. It’s a fun holiday vase decorating idea that’s great for New Year’s gatherings or glam holiday tables.
Materials
- Glass vases (set of 3)
- Mod Podge (gloss, 4 oz)
- Fine glitter (gold and silver, 2 oz each)
- Foam brush
- Painter’s tape
- Large shallow dish for glitter
- Clear spray sealer
Instructions
- Tape off a line if you want a neat gradient start point.
- Brush a thin layer of Mod Podge where you want the heaviest glitter.
- Sprinkle glitter generously. Tap to remove excess.
- Blend the next color slightly above the first for ombré. Work quickly.
- Let dry 15–20 minutes, then add another glue-dense coat for durability.
- After full dry (1 hour), spray with clear sealer outdoors.
- Let cure 2 hours before moving.
How to Display or Gift It
- Place on a mirrored tray to double the sparkle.
- Use battery candles inside for safe candlelit shimmer.
- Wrap in tissue for gifting and tuck a small glitter jar as a craft treat.
- Birch Bark Wrapped Rustic Vase
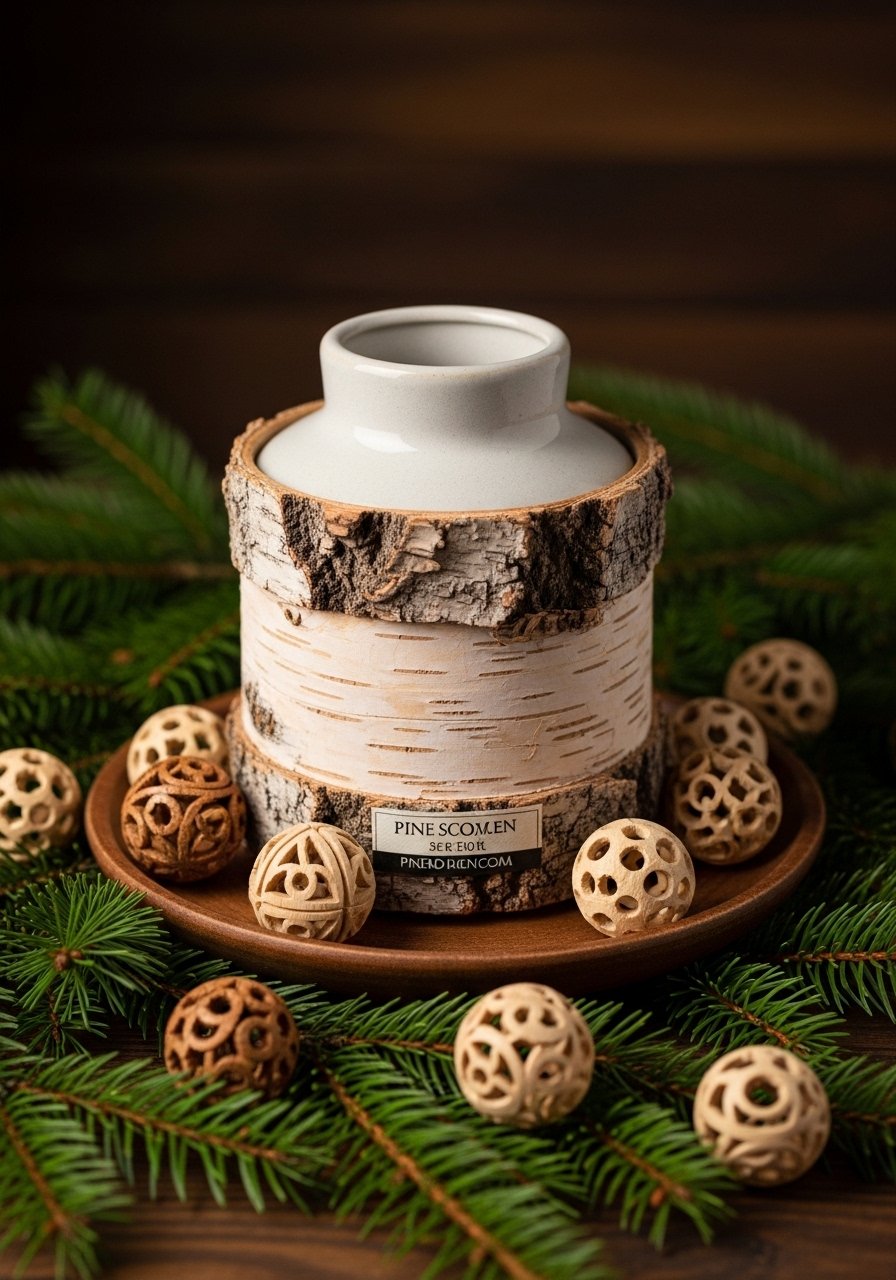
Birch bark lends instant woodland charm. It’s tactile and perfect for rustic holiday tables and pairs well with pine, cranberries, and linen.
Materials
- Ceramic vase (6–8 inches)
- Birch bark strips (pre-cut, 1/2 inch overlap)
- Clear-drying craft glue or E6000 (small tube)
- Jute twine (10 feet)
- Scissors and craft knife
- Ruler and pencil
Instructions
- Measure the vase circumference and cut birch bark with a small overlap.
- Apply a bead of clear craft glue along the bark edge.
- Press bark onto vase and hold for 30 seconds.
- Secure seam with a wrap of jute twine and knot neatly.
- Trim excess bark or tuck under seam.
- Let glue set 24 hours before filling with water or florals.
- For added protection, apply a thin coat of clear matte sealer and dry 2 hours.
How to Display or Gift It
- Pair with deep red berries and short conifer stems.
- Wrap in tissue and box for a natural-style gift.
- Store extra bark in a dry container to prevent warping.
- Resin-Encased Holiday Keepsake Vase

Resin adds a glossy, professional finish and lets you embed tiny holiday keepsakes—dried rosemary, glitter, or tiny pinecones. Resin projects need patience but look gallery-ready.
Materials
- Glass vase (10 inches)
- Clear epoxy resin kit (1 part A/1 part B, makes 8 oz)
- Disposable mixing cups and stir sticks
- Nitrile gloves
- Dried rosemary sprigs, tiny pinecones, and gold leaf flakes
- Fine sandpaper (400 grit)
- Heat gun (for removing bubbles)
Instructions
- Clean vase and plan placement of keepsakes.
- Mix resin exactly per kit instructions (usually 3 minutes stirring).
- Pour a thin band where you want to embed items.
- Place dried botanicals gently using tweezers.
- Use a heat gun for 2–3 seconds to pop bubbles.
- Let cure 24 hours for tack-free; full cure 72 hours.
- Lightly sand any sharp resin edges and polish if desired.
How to Display or Gift It
- Use as a memorial or recipe marker holder (tiny recipe cards).
- Ship carefully wrapped in bubble wrap inside a sturdy box.
- Keep extra resin supplies in a sealed storage tub to prevent spills.
- Hand-Lettered Name Tag Vase (keyword included)

Turn mini vases into place cards by adding hand-lettered name tags. This is one of the easiest holiday vase decorating ideas for table seating that doubles as a take-home favor.
Materials
- Small bud vases (4 inches), one per guest
- Chalkboard paint or matte black spray (4 oz)
- Kraft paper tags (10)
- Gold paint pen
- Twine (20 feet)
- Fine-tip brush
- Ruler and pencil
Instructions
- Paint vases in one or two thin coats of chalkboard paint. Dry 30 minutes between coats.
- Punch tags and write names with a gold paint pen.
- Thread twine through the tag and tie around vase neck.
- Fill with a single stem or sprig.
- Allow paint to cure 24 hours before handling.
How to Display or Gift It
- Use as place settings — guests take their vase home.
- Store spare tags in a tag organizer.
- Make sets in the same palette to coordinate with table linens.
- Burlap Ribbon Holiday Wrap
Burlap adds texture and a cozy farmhouse feel. The ribbon wrap is forgiving and hides jars’ uneven finishes—great for mass-producing decorations.
Materials
- Tapered vase or jar (8–10 inches)
- Burlap ribbon (2-inch width, 3 yards)
- Hot glue gun and glue sticks
- Scissors
- Sprigs of holly or faux berries
- Floral wire (12 gauge)
Instructions
- Measure ribbon length against the vase and cut with 2 inches extra.
- Glue one end at the vase base and wrap snugly upward.
- Secure the end with glue at the top seam.
- Tuck a sprig of holly under the ribbon and anchor with a short piece of floral wire.
- Let glue set 10 minutes before arranging flowers.
How to Display or Gift It
- Pair with warm brass candle holders.
- Ship in a kraft gift box with tissue for rustic presents.
- Make ahead and store flat to avoid crushing the ribbon.
- Macramé Hanging Vase
Hanging vases add vertical interest and free up table space. This macramé hanger with beads is perfect for cottagecore or boho holiday décor and is beginner-friendly with square knots.
Materials
- Small glass bottle (6 inches)
- Macramé cord (3mm, 50 feet)
- Wooden beads (10 mm, 6 pieces)
- Scissors
- Ruler
- Small key ring or metal hanger
Instructions
- Cut four cords, each 10 feet long.
- Fold cords and attach to key ring with a lark’s head knot.
- Create a square knot section 3 inches down.
- Thread wooden beads onto cords, spacing evenly.
- Make another square knot section to secure the base.
- Test hold by placing the bottle in and adjusting knot snugness.
- Trim ends and add a decorative tassel if desired.
How to Display or Gift It
- Hang near windows for greenery that catches light.
- Use as a hostess gift—include a small instruction card.
- Store macramé hangers flat in a rope storage bag.
- Dried Citrus and Bay Leaf Layered Vase
Layering dried citrus and bay leaves creates a fragrant, visual holiday statement. It’s great for non-floral arrangements and lasts through the season.
Materials
- Tall clear glass vase (10 inches)
- Dried citrus slices (20, 1/4-inch thick)
- Bay leaves (20)
- Thin wooden skewers (for spacing)
- Floral tweezers
- Clear mineral oil (optional, 1 oz) for sheen
Instructions
- Dehydrate citrus slices ahead (or buy pre-dried). Slices should be slightly flexible.
- Starting at the bottom, press a bay leaf flat against the glass.
- Lay a citrus slice and repeat, alternating to form an attractive pattern.
- Use wooden skewers vertically if needed to hold pieces in place.
- Optional: brush slices lightly with mineral oil for a glossy finish.
- Fill center with dried grasses or faux stems. No water required.
How to Display or Gift It
- Place on the dining table with cinnamon sticks around the base.
- Wrap in cellophane and include care instructions for gifting.
- Store extra dried citrus in an airtight container.
- Metallic Leaf Accent Vase
Gold leaf adds delicate luxury without heavy cost. Use it as an accent band for a subtle glam holiday touch.
Materials
- Short glass vase (6–8 inches)
- Adhesive gold leaf sizing (1 oz)
- 24K imitation gold leaf sheets (5 sheets)
- Soft brush for applying leaf
- Cotton gloves
- Clear acrylic sealer
Instructions
- Apply sizing to the vase band with a small brush; wait until tacky (per product, usually 10–15 minutes).
- Gently lay gold leaf sheet over sizing, press lightly with a soft brush.
- Brush away excess leaf with a dry brush.
- Patch any thin areas with spare leaf.
- Seal with clear acrylic sealer; dry 1 hour.
- Cure fully 24 hours before use.
How to Display or Gift It
- Pair with white and evergreen stems for luxe holiday styling.
- Store leaf sheets flat in a metal leaf storage folder.
- Wrap in tissue and a gift box for an upscale present.
- Napkin-Decoupaged Patterned Vase
Using printed napkins gives you instant pattern without painting. This decoupage method is perfect for cottagecore or vintage holiday looks.
Materials
- Glass vase (10 inches)
- Holiday printed napkins (pack of 20)
- Mod Podge (matte, 4 oz)
- Soft foam brush
- Scissors
- Sanding sponge (fine)
Instructions
- Separate napkin layers and cut designs out.
- Brush a thin Mod Podge layer on vase area.
- Carefully lay napkin piece and smooth with a foam brush.
- Brush another thin layer over the top to seal. Work from center outward.
- Let dry 30 minutes; add a second coat if needed.
- Lightly sand any raised edges, then final coat and cure 24 hours.
How to Display or Gift It
- Use patterned vases as seasonal accent pieces on shelves.
- Wrap in kraft paper and tie with ribbon for gifting.
- Store leftover napkins with projects in a flat craft drawer.
- Embossed Clay Appliqué Vase
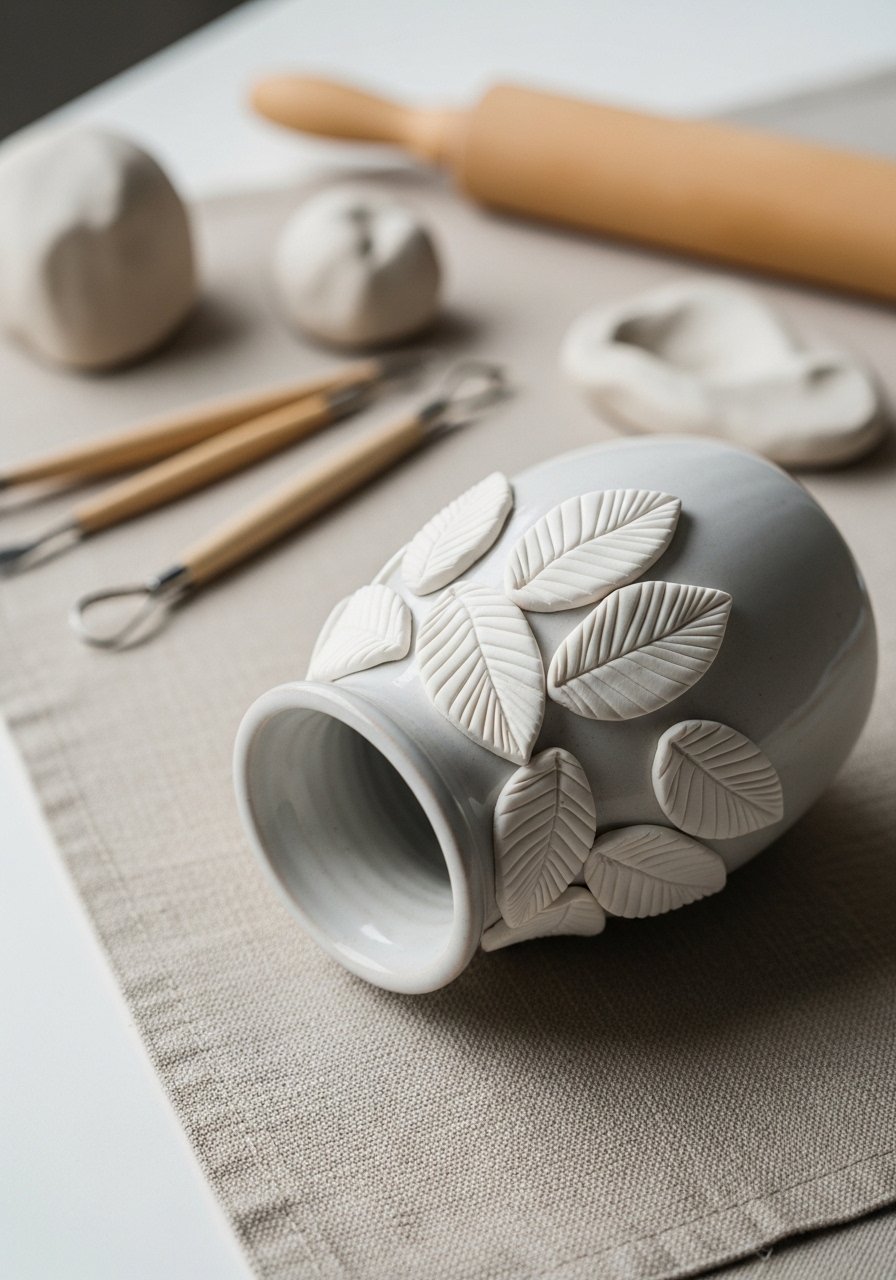
Clay appliqués add a sculptural element. You can create festive shapes—stars, leaves, or snowflakes—and press them onto vases for a tactile finish.
Materials
- Ceramic vase (pre-fired, 8 inches)
- Polymer clay (white, 2 oz)
- Clay tools and rolling pin
- Blade and fine grit sandpaper
- Craft glue (E6000 for stronger bond)
- Oven (for baking polymer clay)
- Acrylic sealant spray
Instructions
- Roll clay to 1/8 inch thickness.
- Cut shapes with small cutters or freehand with a blade.
- Bake clay per manufacturer (usually 130°C/275°F for 15–30 minutes).
- Lightly sand baked pieces for smooth edges.
- Attach to vase with E6000 and let set 24 hours.
- Seal lightly with spray and dry 1 hour before handling.
How to Display or Gift It
- These vases make elegant hostess gifts—wrap in tissue and a sturdy box.
- Display on a mantel with a group of varied textures.
- Keep extra baked clay shapes in a small parts organizer.
- Plaid Fabric Wrapped Holiday Vase
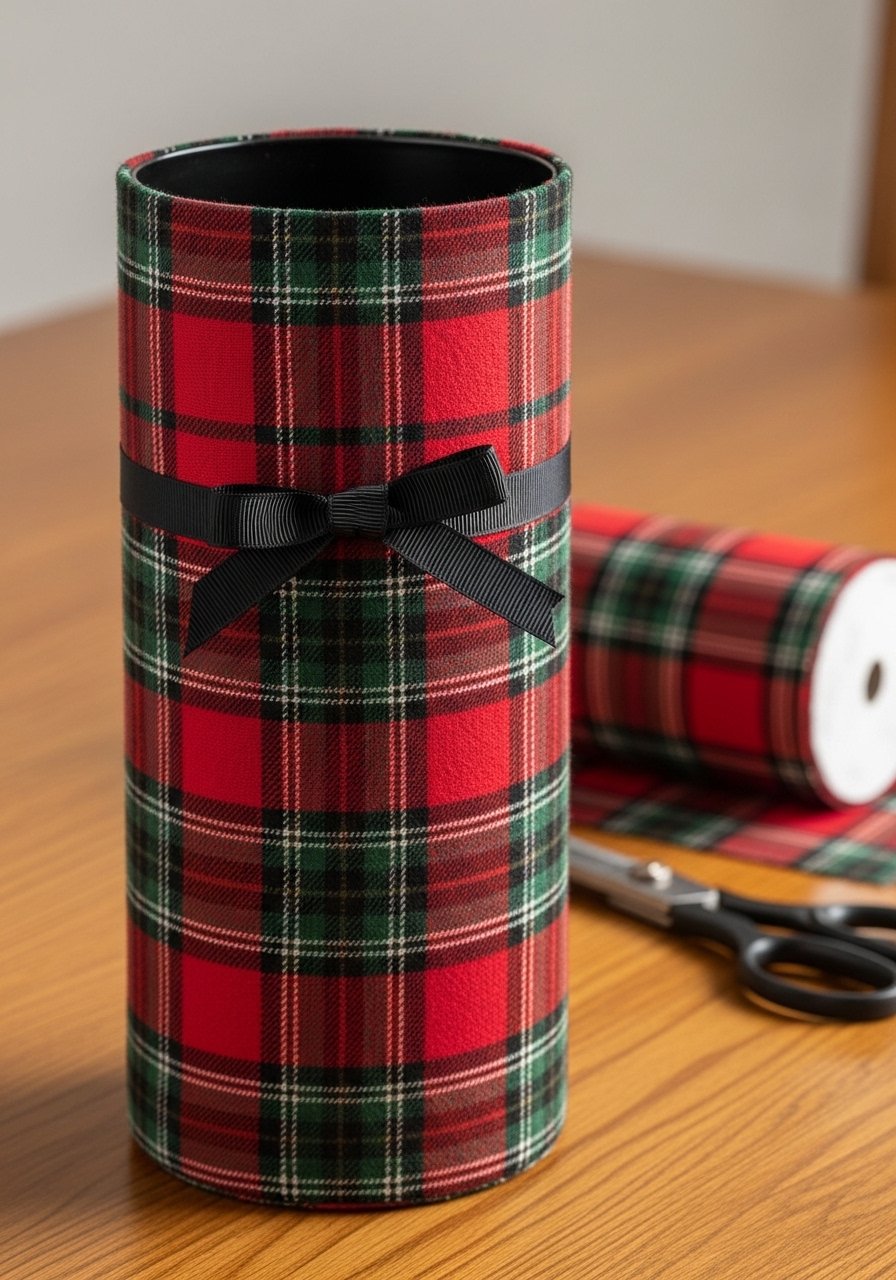
Plaid fabric gives a warm, traditional holiday look. It’s great for cottage-style tables and works well on taller vases.
Materials
- Tall vase (10–12 inches)
- Plaid cotton fabric (1/2 yard)
- Fabric glue or hot glue
- Scissors and ruler
- Grosgrain ribbon (1/2 inch)
- Seam allowance pins
Instructions
- Measure circumference and add 1 inch for seam.
- Cut fabric to size and hem the edges with fabric glue or a quick stitch.
- Wrap fabric snugly around vase and glue seam.
- Fold raw edges at the top and glue for a clean finish.
- Tie grosgrain ribbon around neck to hide raw edges.
- Let fabric glue set 2 hours before use.
How to Display or Gift It
- Combine with warm wood accents and tapered candles.
- Store leftover fabric in a fabric storage bin.
- Make multiple in coordinating fabrics for holiday markets.
- Beaded Garland Wrapped Vase
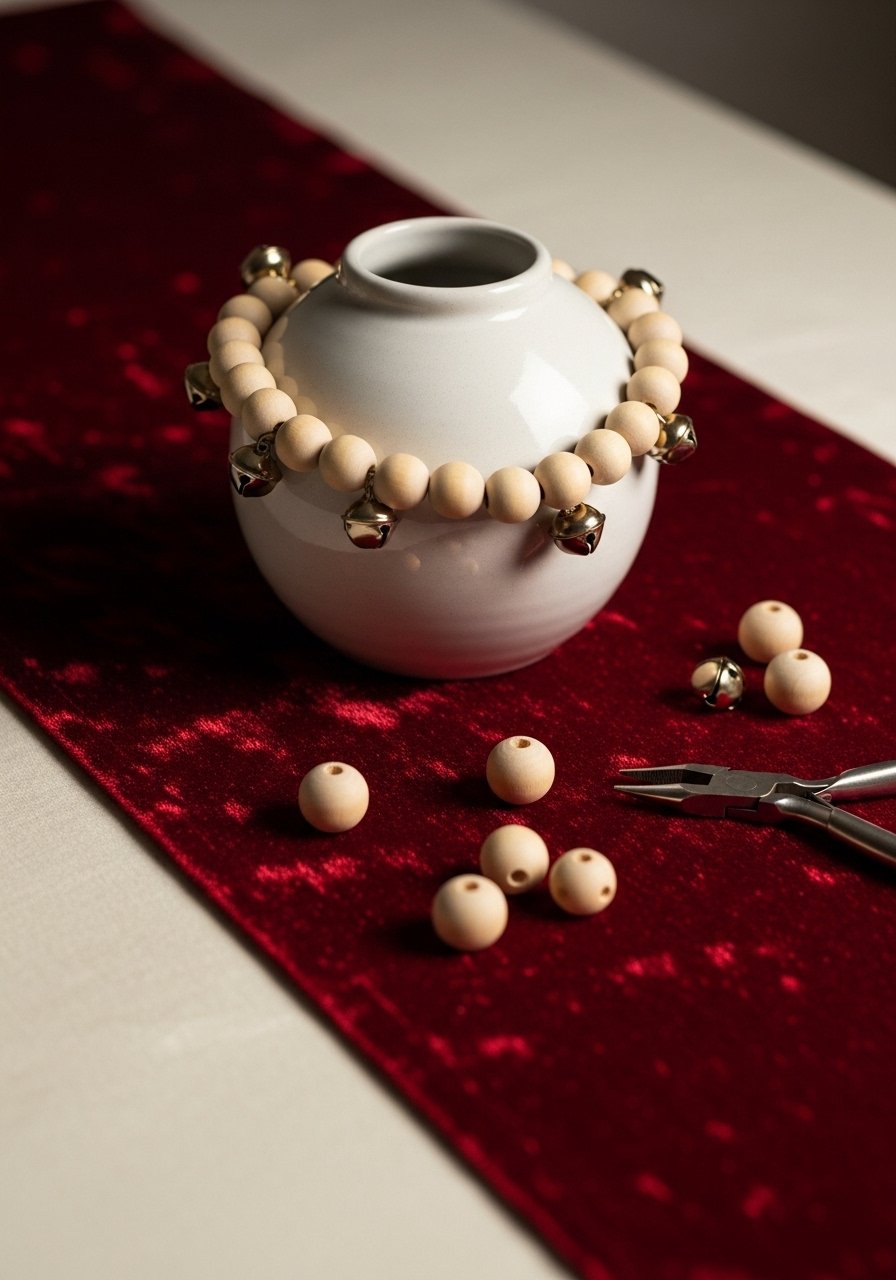
A beaded garland adds rhythm and charm. You can change it seasonally—swap bells for pinecones after the holidays.
Materials
- Round vase (6–8 inches)
- Wooden bead garland (pre-strung, 6 feet) or loose beads and twine
- Small jingle bells (10)
- Pliers and needle
- Hot glue gun
Instructions
- If making a garland, string beads on twine and secure ends with a knot and bead.
- Wrap garland around vase, adjusting beads to sit neatly.
- Attach a few jingle bells with thin wire and pliers.
- Secure with a dab of hot glue at the seam.
- Tuck trailing ends under the garland for a polished look.
- Let glue set 10 minutes.
How to Display or Gift It
- Pair with linen napkins and wooden place cards for rustic elegance.
- Store leftover garlands in a jewelry tray or craft box.
- Make sets for gifting with matching soaps or tea.
- Painted Chalkboard Label Vases (keyword included)
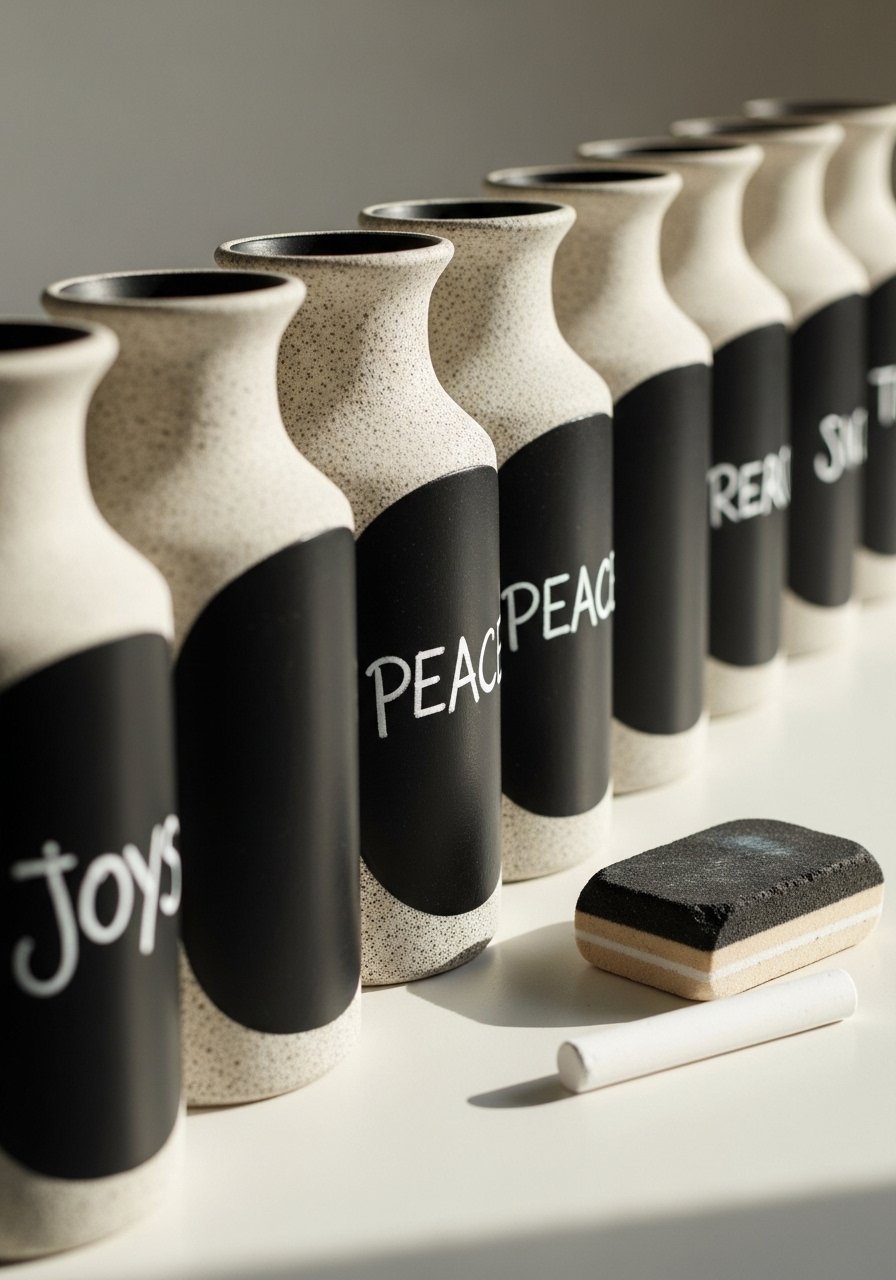
Chalkboard panels let you personalize vases for parties—write messages, table numbers, or holiday puns. Swappable and interactive.
Materials
- Small vases or jars (4 inches)
- Chalkboard paint (2 oz)
- Chalk marker or stick
- Painter’s tape
- Foam brush
- Rubbing alcohol
Instructions
- Clean jars and plan label size.
- Tape off label panel and apply two thin coats of chalkboard paint. Dry 30 minutes between coats.
- Remove tape and let cure 24 hours before marking.
- Write names or messages with a chalk pen.
- Wipe clean with a damp cloth to change messages.
How to Display or Gift It
- Use for place cards or cocktail stations.
- Store spare chalk markers in a desk organizer.
- Make sets as party favors with a small chalk and eraser.
- Mini Terrarium Vase with Pine Moss

Mini terrariums feel fresh and organic. This low-water arrangement with preserved moss is long-lasting and smells faintly forest-like.
Materials
- Short clear vase (5 inches)
- Preserved sheet moss (4 oz)
- Small faux cranberries (12)
- Mini pine sprigs (6)
- Long tweezers
- Spray mister (empty, 2 oz)
Instructions
- Place moss in the bottom and press to shape.
- Add mini pine sprigs and arrange with tweezers.
- Tuck cranberries into moss gaps.
- Mist lightly if using live moss—preserved moss does not need water.
- Keep out of direct sun to avoid drying.
- Refresh cranberries seasonally.
How to Display or Gift It
- Use as favors or place cluster centerpieces.
- Store in a cool, dry place if gifting.
- Pack terrariums in a sturdy shipping box with padding.
- Salt-Sprayed Coastal Holiday Vase
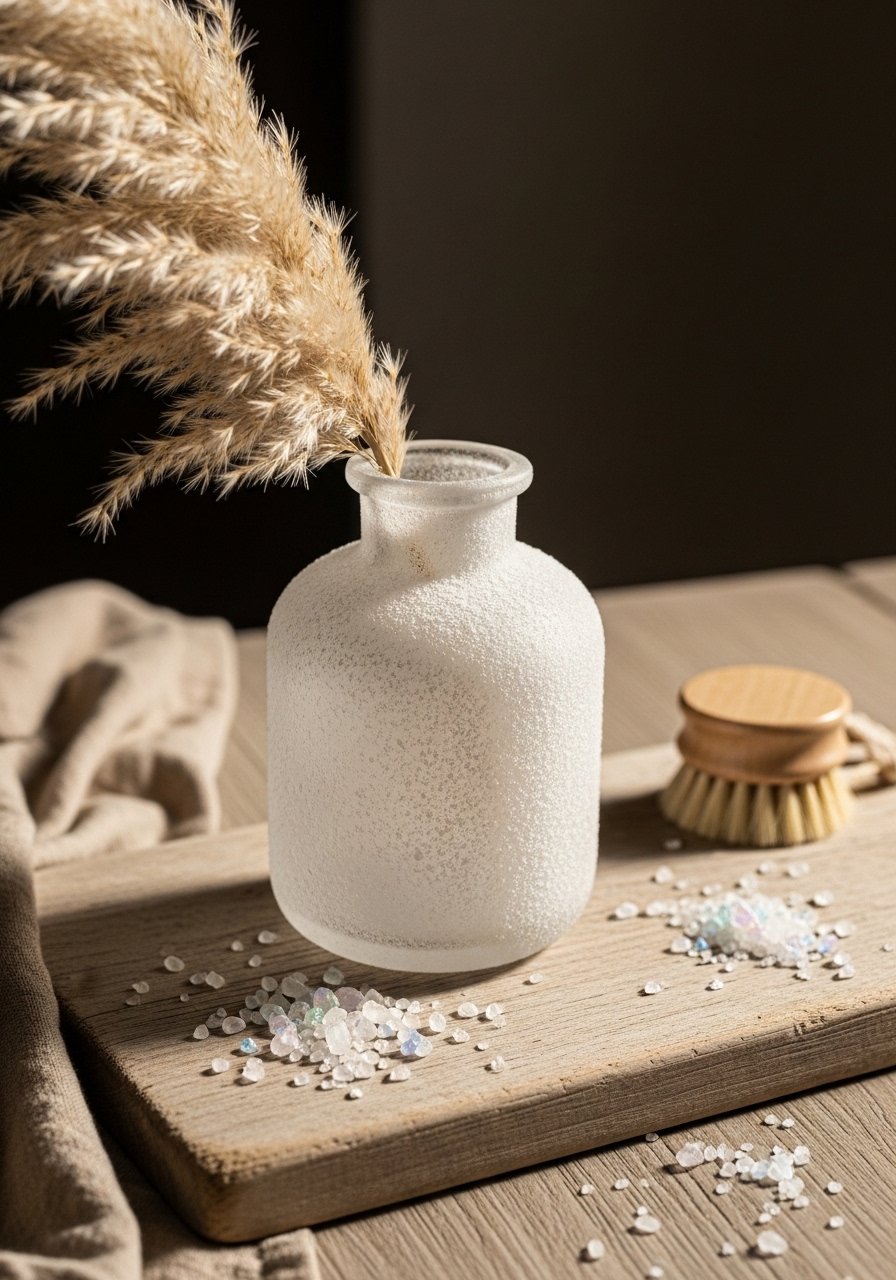
Salt-sprayed finishes marry coastal vibes with winter whites—perfect for beachy holiday homes. The textured feel looks artisan-crafted.
Materials
- Frosted glass vase (8–10 inches)
- Epsom salt (1 cup)
- Mod Podge (matte, 4 oz)
- Small stiff brush
- Mixing bowl and spoon
- Clear matte sealer
Instructions
- Brush Mod Podge onto areas for texture.
- Sprinkle Epsom salt generously and press lightly.
- Let dry 1 hour, then shake off loose salt.
- Apply another thin layer of Mod Podge to lock texture.
- Seal with a matte sealer and dry 2 hours.
- Gently brush away excess salt after full cure.
How to Display or Gift It
- Pair with neutral linens and driftwood accents.
- Send in a box with packing peanuts for safe transport.
- Keep extra Epsom salt in a kitchen canister.
- Pom-Pom Garland Around Vase
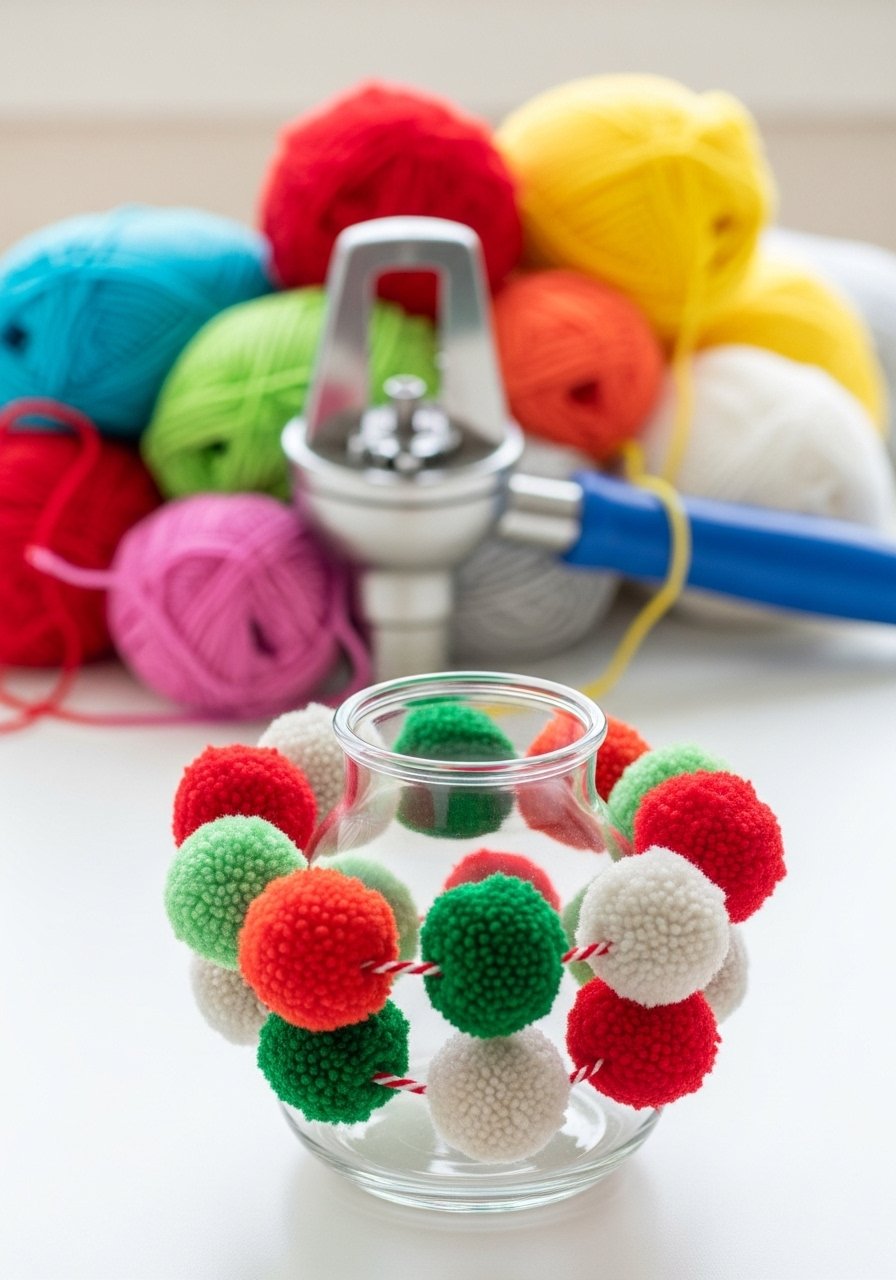
Pom-poms add whimsy to holiday vases—kids love this simple craft. Use soft wool for a cozy look or acrylic yarn for long-wearing garlands.
Materials
- Vase (any size)
- Yarn in holiday colors (50 g each)
- Pom-pom maker (medium size)
- Needle and thread
- Scissors
Instructions
- Make pom-poms using the pom-pom maker, trimming for shape.
- Thread pom-poms onto a length of yarn using a needle.
- Tie secure knots between pom-poms to space evenly.
- Wrap the garland around the vase and tuck in ends.
- Fluff pom-poms before display.
How to Display or Gift It
- Use as mantel decoration or child-friendly place settings.
- Pack pom-pom garlands flat in a fabric pouch for gifting.
- Make multiple colorways for themed parties.
- Faux Snow Frosted Vase with Twinkle Lights
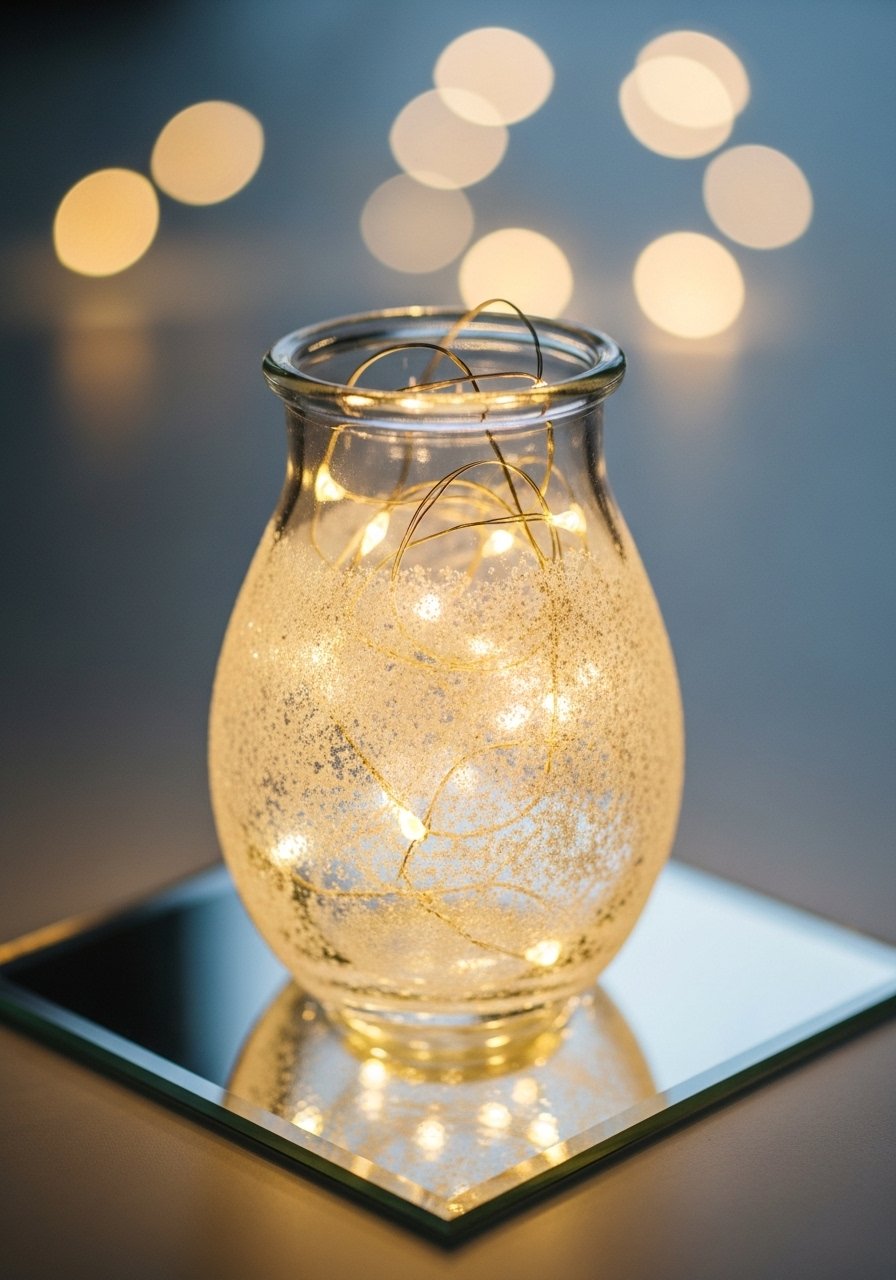
A snow-paste texture plus twinkle lights gives a magical glow. Ideal for cozy evenings and holiday parties—safe with battery lights.
Materials
- Clear glass vase (10 inches)
- Snow paste or texture paste (2 oz)
- Palette knife
- Battery-powered micro fairy lights (warm white)
- Sandpaper (400 grit)
- Clear matte sealer
Instructions
- Apply snow paste with a palette knife for a textured look.
- Smooth or peak with the knife for desired texture.
- Let texture dry 2–4 hours depending on paste.
- Sand gently if you want a softer finish.
- Place fairy lights inside and hide battery pack at the base.
- Seal lightly on outside with matte sealer and dry 1 hour.
How to Display or Gift It
- Cluster with other lighted vases for a cozy centerpiece.
- Use battery lights for safe transport when gifting.
- Store lights and battery packs separately in a small electronics organizer.
- Leather Strap Accent Vase
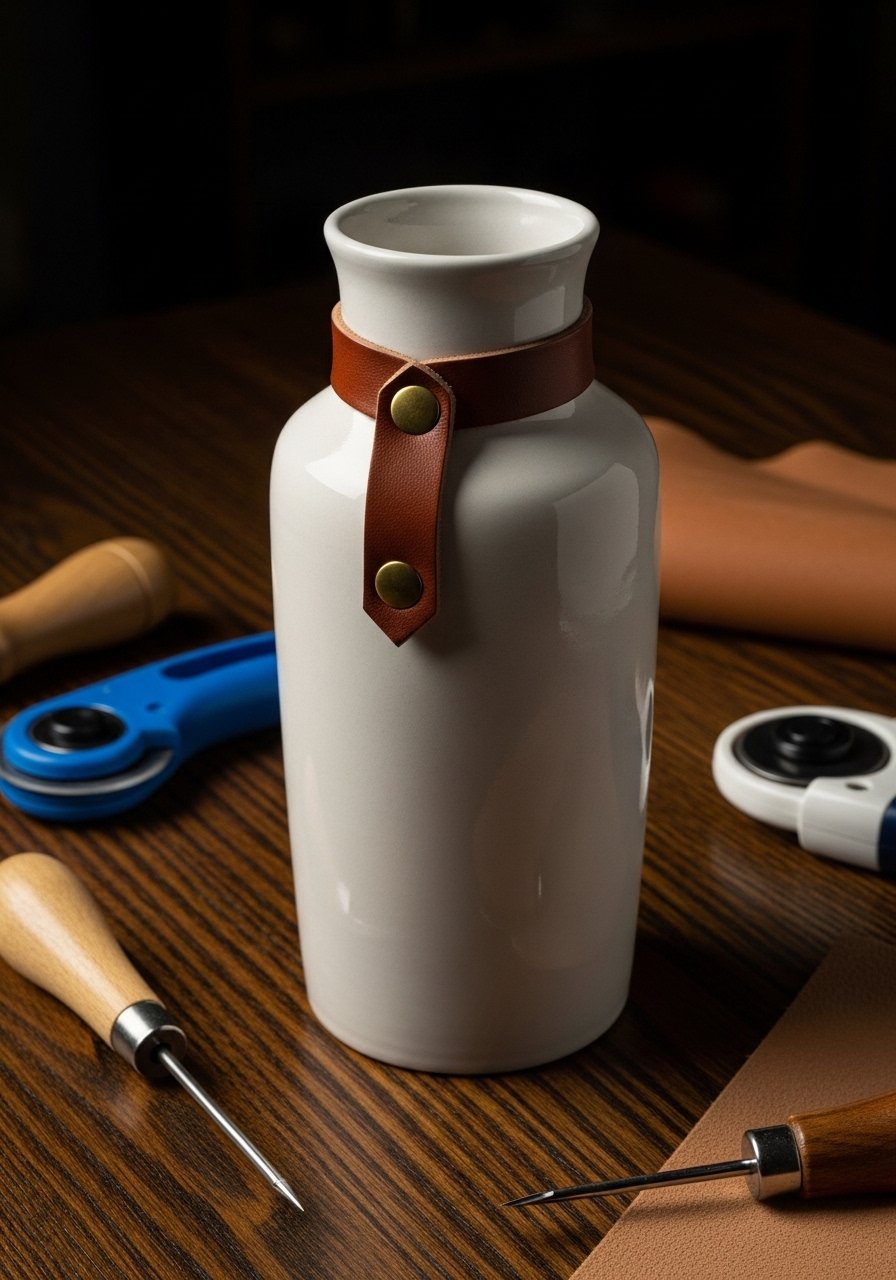
Leather adds unexpected sophistication and pairs well with darker, moody holiday palettes—think deep greens and burgundies.
Materials
- Ceramic vase (10 inches)
- Vegetable-tanned leather strap (1/2 inch wide, 12 inches)
- Brass rivets (4)
- Leather punch and rivet setter
- Scissors
- Leather conditioner (small bottle)
Instructions
- Cut leather to fit around the neck with overlap.
- Punch rivet holes and set rivets with a rivet setter.
- Condition leather lightly for a soft finish.
- Loop strap and secure rivets.
- Trim any excess and polish hardware.
- Wait 30 minutes for conditioner to absorb before display.
How to Display or Gift It
- Combine with rich velvet ribbons for a luxe look.
- Keep extra leather straps in a small tool chest.
- Attach a small leather tag for personalized gifts.
- Ribbon Pleat Wrap Vase

Pleated ribbon wraps read tailored and refined—great when you want holiday sophistication without metallics.
Materials
- Tall glass vase (10 inches)
- Satin ribbon (1-inch, 3 yards)
- Hot glue gun
- Seamstress pins
- Scissors
Instructions
- Start at the base and fold ribbon into even pleats.
- Secure each pleat with a small dab of hot glue as you wrap upward.
- Finish at the neck and tuck the end under an existing pleat.
- Allow glue to set 10 minutes before filling.
- Press pleats with fingers for crispness.
How to Display or Gift It
- Pair with champagne-toned ornaments for a cohesive palette.
- Store ribbon-wrapped vases flat in a long cardboard box.
- Make several in a matching set for host gifts.
- Cork Mosaic Vase
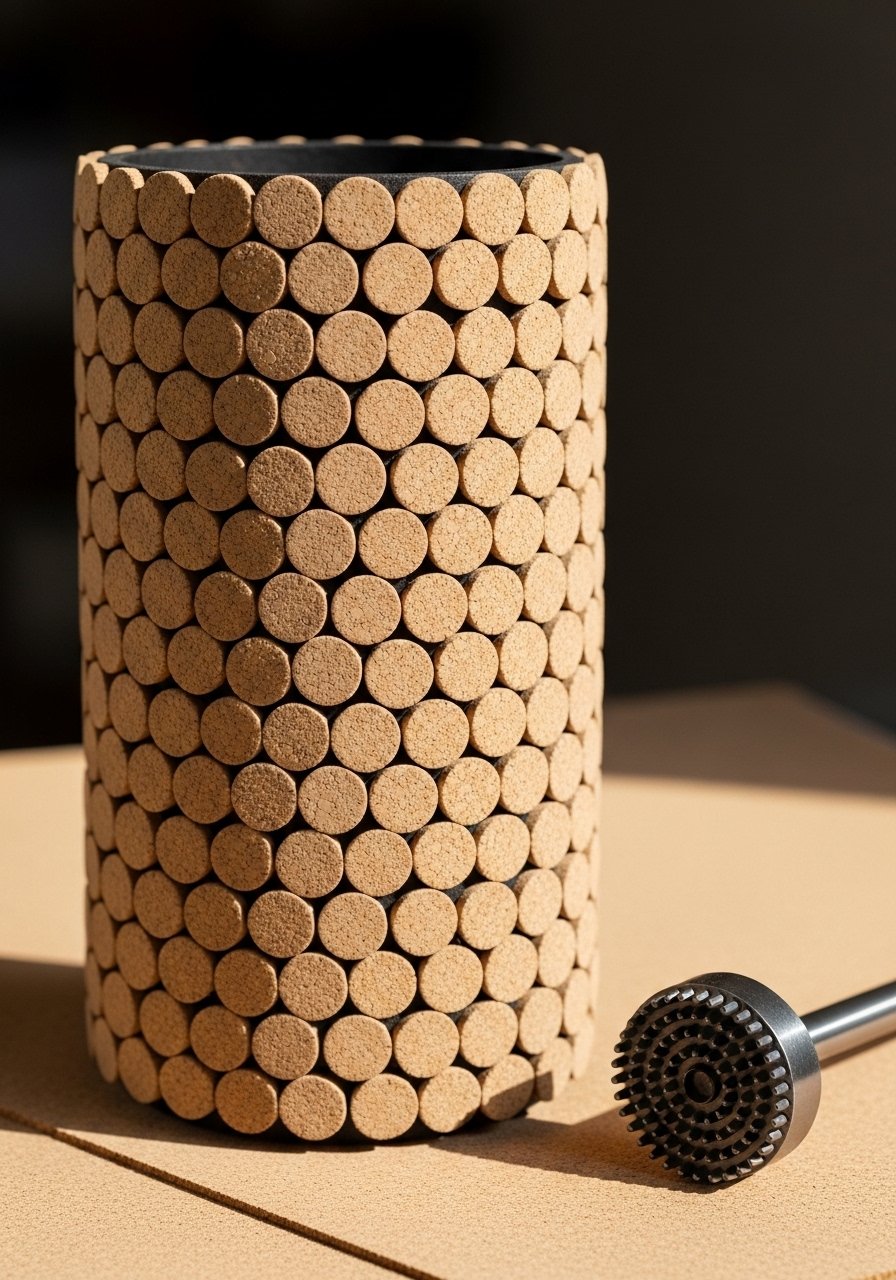
Cork tiles add texture and warmth and are surprisingly easy to apply. The mosaic look is durable and casual-chic.
Materials
- Glass or ceramic vase (8 inches)
- Cork sheet (6 x 12 inches)
- Circle punch (1/2 inch)
- Craft glue (contact type)
- Scissors and ruler
- Clear sealer (optional)
Instructions
- Punch cork circles from the sheet.
- Apply glue to vase and press cork circles in rows.
- Keep seams staggered for a mosaic look.
- Trim cork at the top and bottom edges.
- Seal with a clear coat for added durability. Dry 1 hour.
- Let cure 24 hours before filling.
How to Display or Gift It
- Place on a wood slice with small candles.
- Store spare cork circles in a small craft box.
- Wrap finished vases in tissue for gifting.
- Stamped Metallic Paint Vase

Stamping gives repeated pattern interest without advanced brush skills. Metallic ink on dark bases is unexpectedly festive.
Materials
- Matte painted vase (navy, prepped)
- Foam stamp (leaf or star shape)
- Metallic paint pad (copper or gold)
- Small sponge for touch-ups
- Painter’s tape for guides
Instructions
- Paint vase matte navy and cure 24 hours.
- Ink foam stamp with metallic paint pad.
- Stamp evenly around vase, rotating as you go.
- Touch up any gaps with a small sponge.
- Let metallic ink dry 30 minutes.
- Seal with a spray sealer and dry 1 hour.
How to Display or Gift It
- Group with metallic accents and bone dinnerware.
- Store stamps flat in a stamp storage binder.
- Make small sets for hostess gifts with matching napkins.
- Painted Pinecone Collage Vase
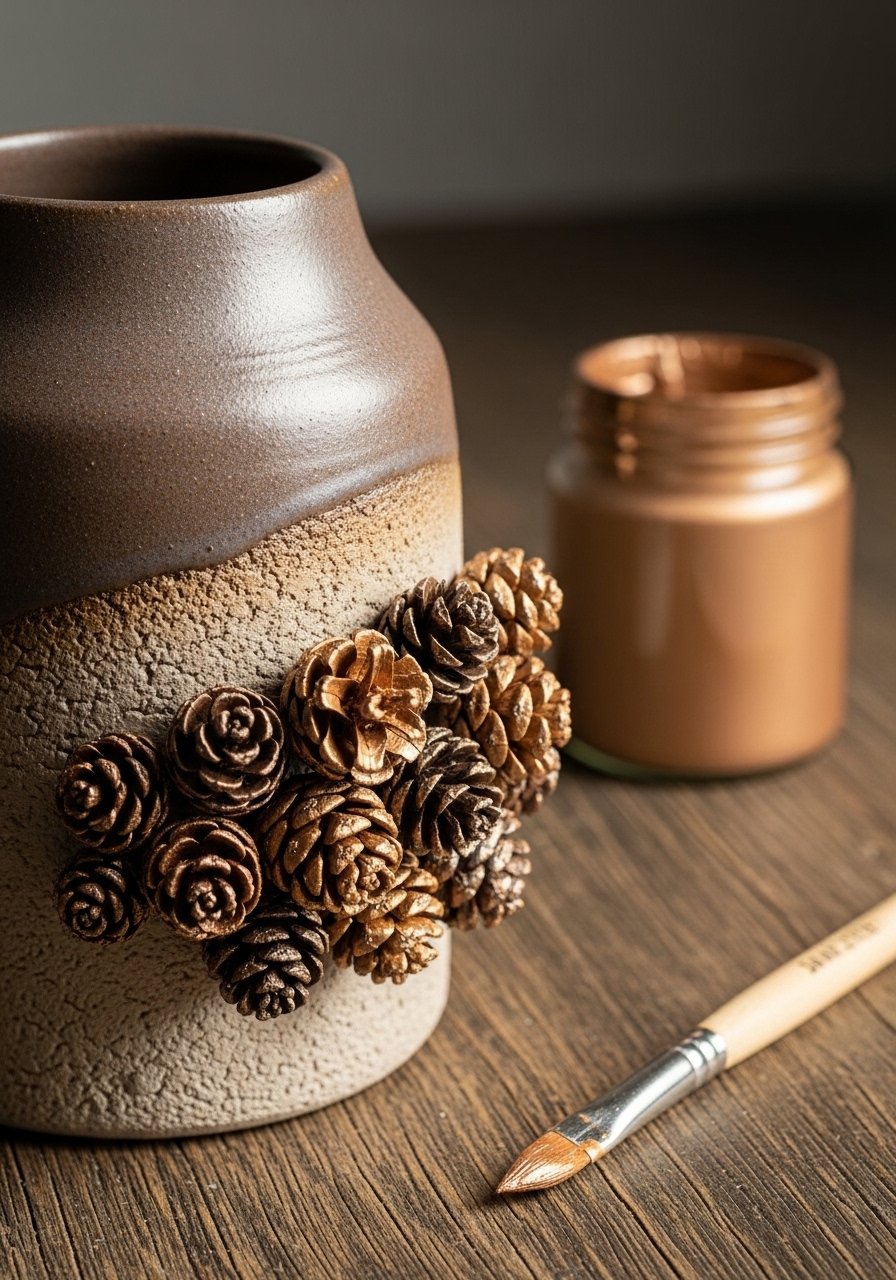
Pinecone collages add three-dimensional texture and a woodland feel. Use miniature cones for a lightweight finish.
Materials
- Glass vase (8 inches)
- Small pinecones (20)
- Bronze acrylic paint (2 oz)
- Hot glue gun
- Foam brush
- Tweezers
Instructions
- Paint pinecones with bronze acrylic and let dry 30 minutes.
- Arrange cones around vase to fit aesthetically.
- Glue cones with hot glue in place, holding each for 10 seconds.
- Fill any gaps with smaller pinecones or beads.
- Let glue fully set 1 hour before handling.
How to Display or Gift It
- Pair with burlap runners and natural napkins.
- Store extra painted cones in a plastic craft box.
- Make in batches for markets or gifts.
- Stenciled Metallic Snow Scene Vase
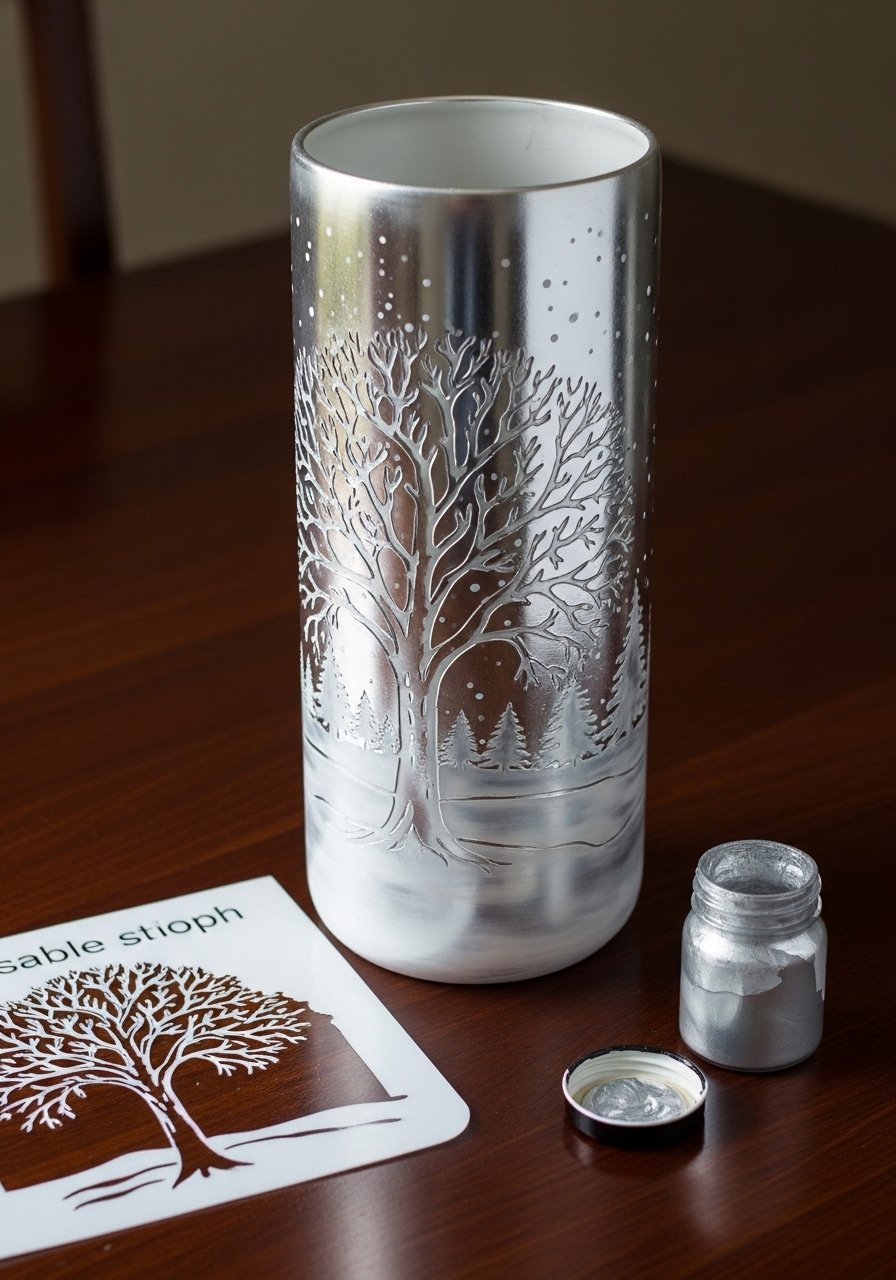
A stenciled metallic scene balances drama and simplicity. It works well with single-stem focal flowers or bare branches.
Materials
- Tall glass vase (10 inches)
- Vinyl stencil of trees (reusable)
- Metallic silver paint (2 oz)
- Stencil brush
- Painter’s tape
- Matte sealer spray
Instructions
- Clean vase and position stencil with painter’s tape.
- Load stencil brush minimally and dab over the design.
- Remove stencil carefully; let dry 30 minutes.
- Add a second coat if any areas are translucent. Dry 30 minutes.
- Seal with matte spray and dry 1 hour.
- Use bare branches or single blooms to complement the scene.
How to Display or Gift It
- Place on a console with a matching stenciled runner.
- Ship carefully in a bubble wrap kit.
- Pair with a handwritten note describing the scene.
- Etched Glass Winter Pattern Vase (keyword included)
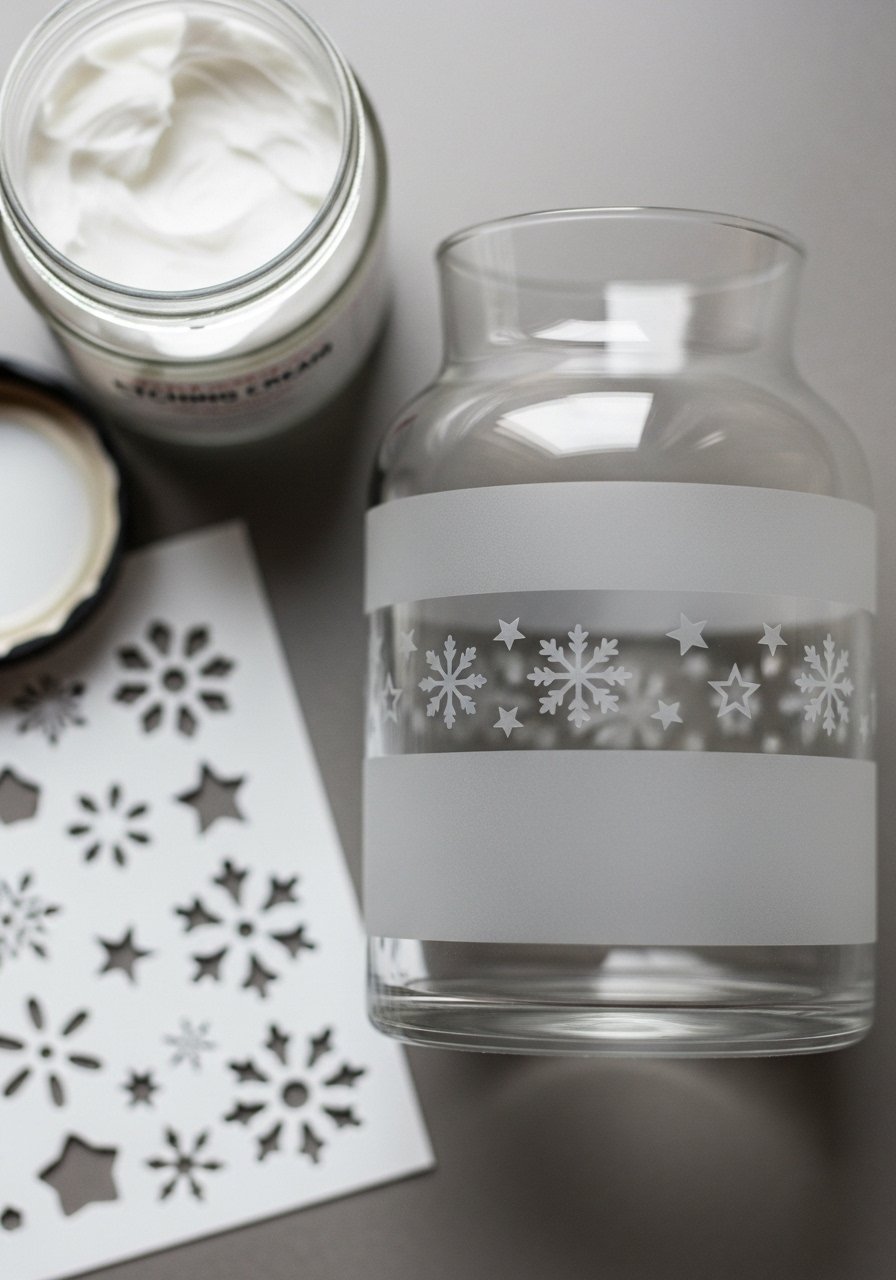
Glass etching creates a permanent, frosted pattern that reads like grown-up winter lace. It’s one of the holiday vase decorating ideas that feels both elegant and durable.
Materials
- Glass vase (10 inches)
- Glass etching cream (1 oz)
- Vinyl stencil (winter motifs)
- Painter’s tape
- Rubber gloves and safety goggles
- Soft brush and plenty of water for rinsing
Instructions
- Clean glass and apply stencil securely with tape.
- Apply etching cream per label (usually 1–5 minutes—follow product instructions exactly).
- Rinse under running water thoroughly while wearing gloves.
- Remove stencil and dry.
- Repeat for deeper etch if desired, waiting 24 hours between applications.
- Wash gently before use.
How to Display or Gift It
- Fill with tall white stems or simple evergreens.
- Wrap in tissue and a sturdy box with instructions not to scrub etched areas.
- Store etching supplies in a locked craft drawer away from children.
Thank you for crafting alongside me—this collection of 28 holiday vase decorating ideas covers cozy, modern, rustic, and glam looks so you can find a project for any table or host. Try one for tonight’s centerpiece or plan a crafting afternoon to make several gifts at once. Save or pin the ideas you love and share which style you'll try first—I’d love to hear which project becomes your holiday go-to.
Trust me, picking up a quality temperature-controlled hot glue gun changed how every single one of these projects turned out — no more stringy mess, no more burns.


