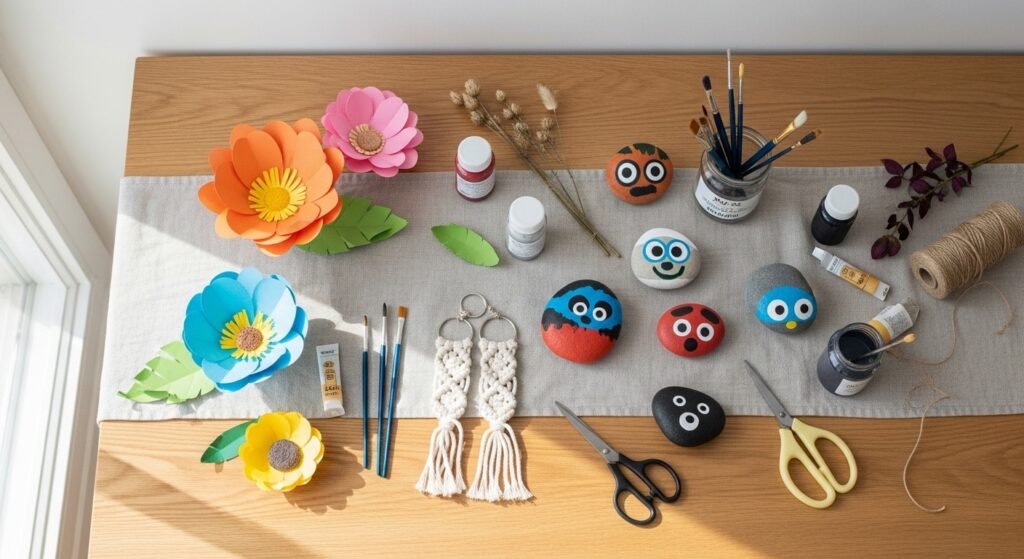
You know that feeling when the kids ask for "something crafty" and you want a project that actually looks lovely and keeps them busy? These 25 craft ideas for kids are practical, playful, and flexible for any age or skill level — from preschool finger-paint fun to crafty projects older kids can gift.
Inside you'll find easy-to-follow projects with exact materials, realistic drying times, and troubleshooting tips. I often start simple cuts with my Cricut Joy cutting machine for crisp shapes, but a craft knife works fine too. Grab a low-temperature hot glue gun and let's make something colorful.
These crafts cover seasonal decor, sensory play, and keepsakes — including rustic, boho, and cottagecore looks that photograph beautifully for Pinterest. Each project lists quantities, step-by-step instructions, drying times, and a quick display or gifting idea so your finished pieces feel polished.
- Painted Paper Plate Sunflowers — a sunny craft idea for kids
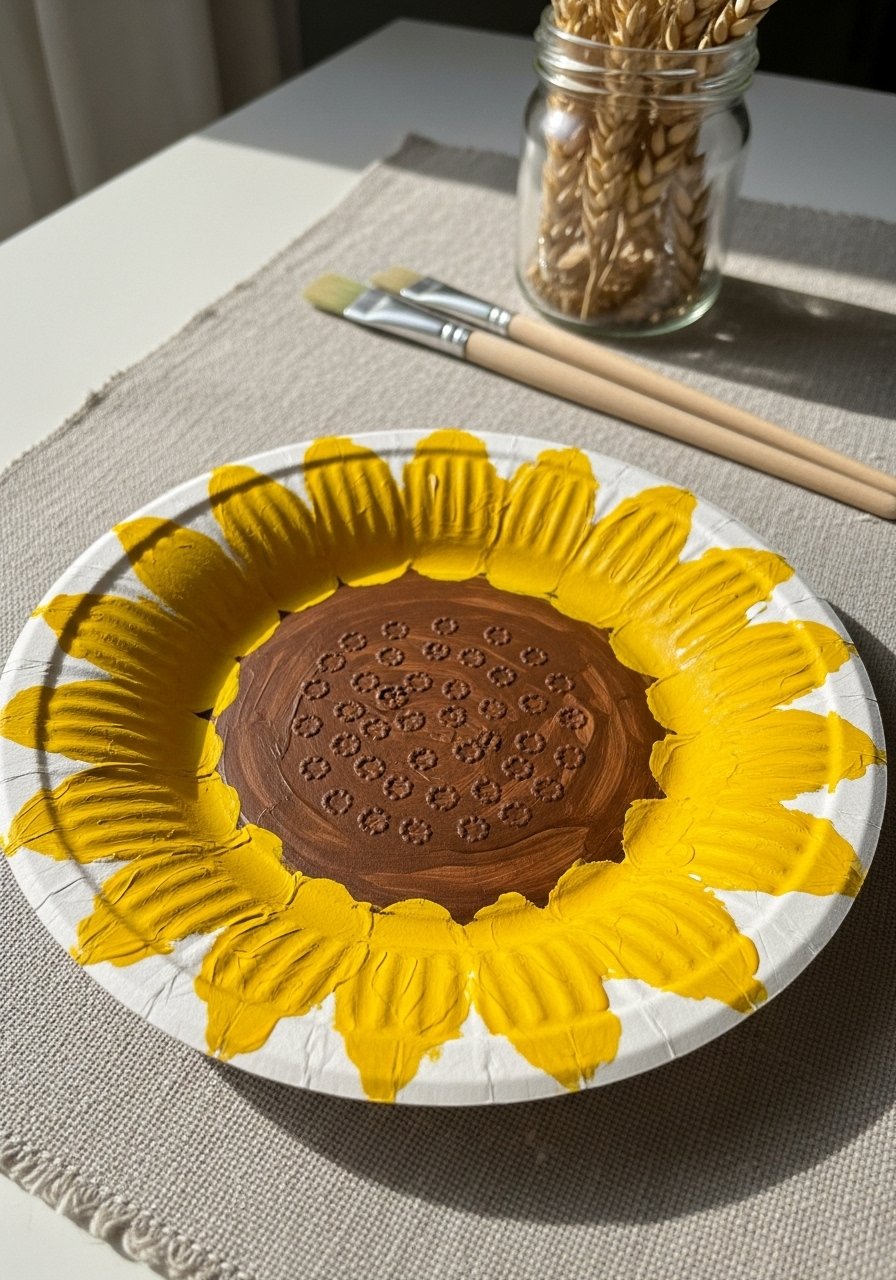
This paper plate sunflower is tactile, bright, and perfect for little hands. It looks great on a classroom wall or taped to a door for a seasonal touch. Kids love layering paint and pressing textured tools into the center to make seed dots.
Materials
- 1 paper plate (9–10 inch)
- Acrylic craft paint: yellow, orange, brown (2 oz each)
- Foam brush, 1-inch
- Round sponge or bottle cap for stamping
- Child-safe scissors
- Pencil and ruler
- Hot glue sticks, 1–2
- String or yarn, 12 inches for hanging
Instructions
- Flatten the paper plate lightly. Draw a circle in the center about 3 inches diameter.
- Cut petal slits around the rim: make 12–16 evenly spaced cuts about 2–2.5 inches long.
- Paint the petals yellow, adding an orange wash near the base for depth. Let dry 20–30 minutes.
- Paint the center circle brown. While wet, stamp small dots with a round sponge dipped in darker brown for seed texture.
- Add a second coat if needed; allow 30 minutes between coats until fully opaque.
- Thread yarn through two small holes at the top, tie a loop. Use a hot glue gun to reinforce if needed; cool for 5 minutes.
How to Display or Gift It
- Tape a cluster of sunflowers on a classroom bulletin board for a cheerful display.
- Mount on a small wooden easel for a giftable mini-portrait using a small wooden easel.
- Store flat in a craft organizer until ready to hang.
- Salt-Dough Handprint Ornaments — keepsake craft ideas for kids
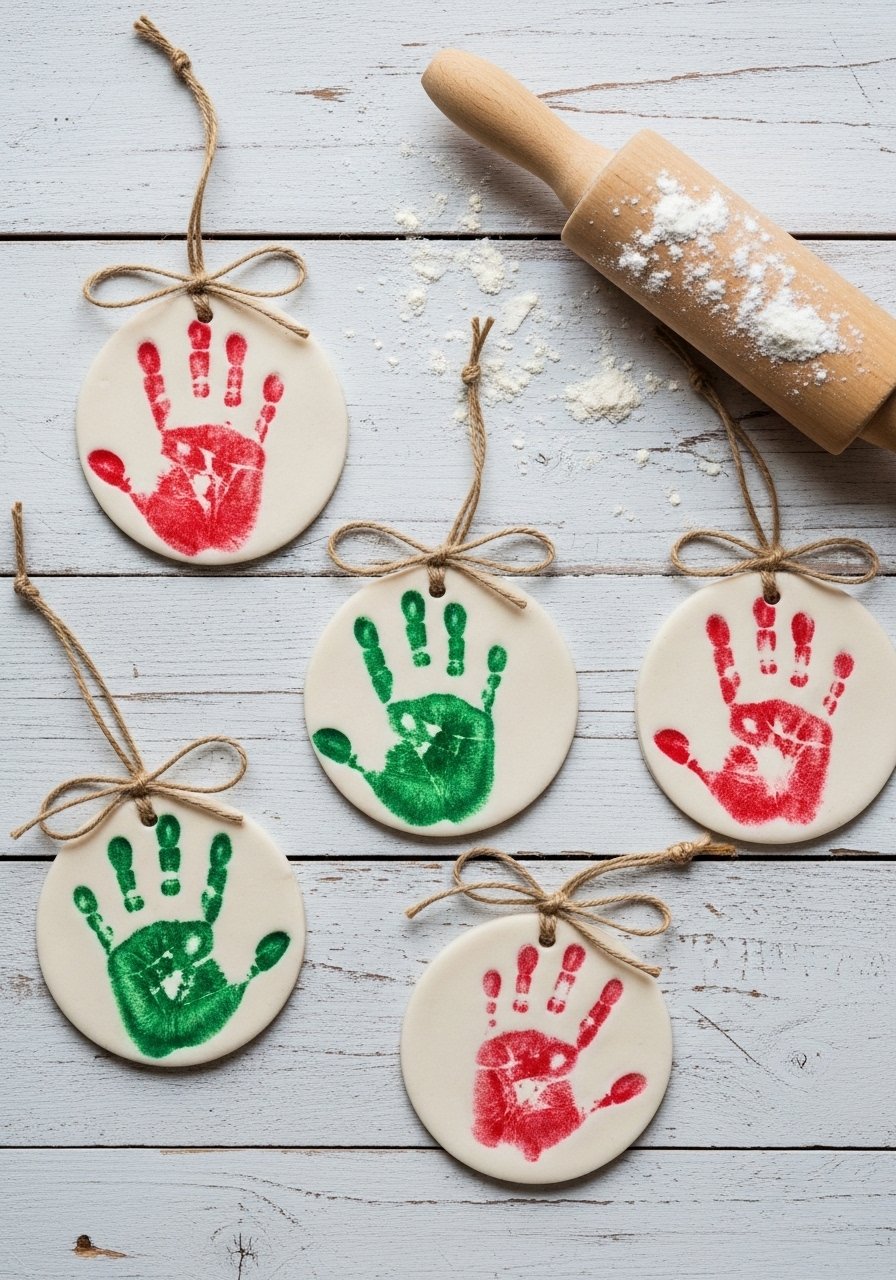
Handprint ornaments are classic keepsakes that feel personal. Salt dough is forgiving and tactile, so kids can press their prints easily. These dry firm and paint beautifully, fitting farmhouse or cottagecore decor.
Materials
- 2 cups all-purpose flour
- 1 cup fine salt
- 1 cup warm water
- Rolling pin, child-sized
- Cookie cutter or round biscuit cutter (2–3 inch)
- Straw for hanging hole
- Acrylic paint set, small tubes
- Clear acrylic sealer spray (optional)
Instructions
- Mix flour and salt, then add warm water gradually to form a pliable dough.
- Knead briefly until smooth. Wrap and rest 10 minutes.
- Roll dough to 1/4 inch thickness. Cut shapes with cutter.
- Press child's hand into the dough gently. Use a straw to make a hanging hole.
- Bake on a parchment-lined tray at 250°F (120°C) for 2–3 hours until firm. Cool completely.
- Paint designs; allow 1 hour drying between coats. Seal with clear spray and cure 24 hours.
How to Display or Gift It
- Thread twine and hang on small branches for a rustic wreath.
- Gift in a kraft box with tissue paper; store ornaments flat in craft boxes between use.
- Use a craft organizer tray to keep finished ornaments wrinkle-free.
- Puffy Paint Galaxy Canvas — messy, sensory craft ideas for kids
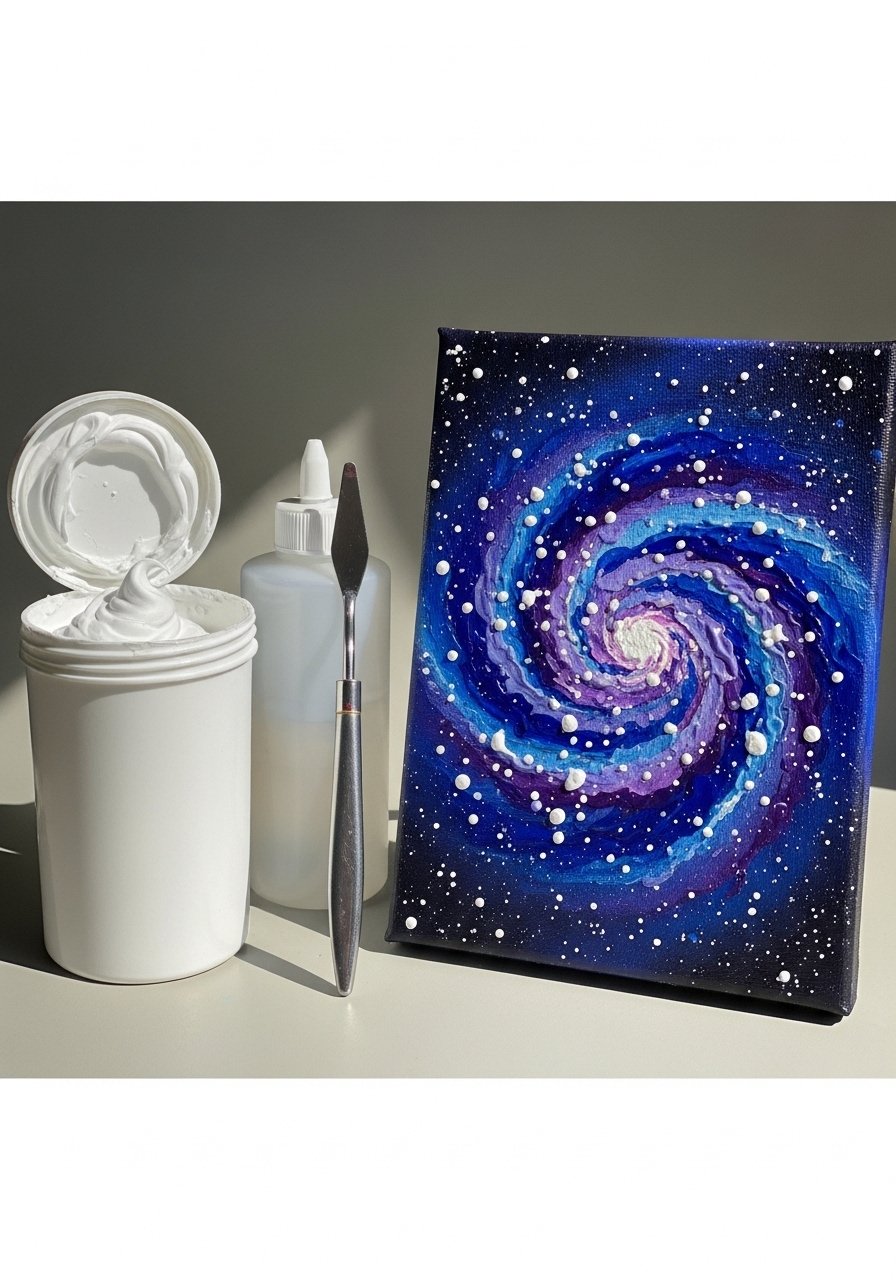
Puffy paint made from glue and shaving cream creates a fluffy, cloud-like texture perfect for galaxy art. It’s sensory and dramatic and shows off vibrant acrylic inks and metallic star splatters.
Materials
- 6×6 inch stretched canvas
- 1/2 cup white craft glue (PVA)
- 1/2 cup shaving cream (foam)
- Acrylic craft paints: navy, purple, teal, white (small tubes)
- Metallic paint pen for stars
- Palette knife or popsicle sticks
- Plastic cups for mixing
- Protective smock and surface cover
Instructions
- Mix glue and shaving cream 1:1 in a cup until lightly whipped.
- Add a small scoop of paint to the mixture to create colored puffy paint (start with 1 tsp paint).
- Spread onto canvas with a palette knife, layering colors while wet for blended edges.
- For star splatters, flick white paint with a stiff brush over the canvas after puffy layers set 20–30 minutes.
- Let fully dry 12–24 hours until firm to the touch.
- Add metallic star details with a paint pen; cure 24 hours.
How to Display or Gift It
- Lean on a shelf with other small canvases for a boho gallery.
- Wrap in tissue and place in a shallow gift box. Use a craft organizer drawer for storage.
- Nature Collage Bookmarks — eco-friendly craft ideas for kids
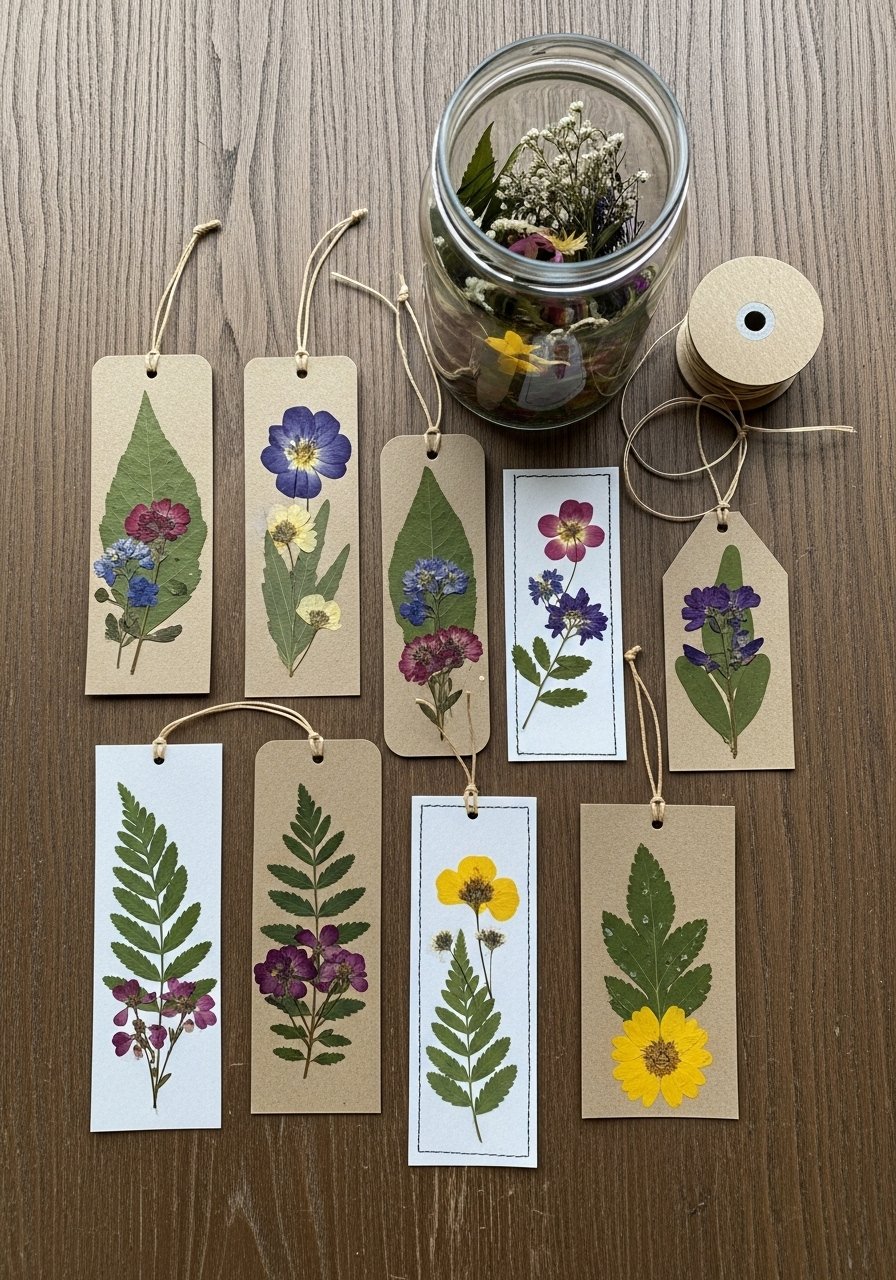
Bookmakers let kids combine outdoor treasures with paper skills. Pressing flowers ahead of time gives flat, delicate layers. These fit cottagecore and neutral palettes beautifully.
Materials
- Kraft cardstock, cut to 2×6 inches, 10 pieces
- Pressed leaves and flowers, assorted
- Clear contact paper or laminator sheets (2 sheets per bookmark)
- Hole punch and ribbon, 6 inches per bookmark
- Glue stick for placement
- Bone folder or ruler for smoothing
Instructions
- Arrange pressed botanicals on a kraft card. Keep elements within edges.
- Adhere with a glue stick sparingly; avoid overgluing which puffs.
- Cover with clear contact paper or run through a laminator; trim excess.
- Punch a hole and thread ribbon. Press edges with a bone folder to seal.
- Let set 5 minutes; laminated edges bond instantly.
- Label with a date or note on the back with a fine-tip pen.
How to Display or Gift It
- Tie a set with twine and tuck into a paperback for gifting.
- Store in an archival box to keep florals from curling.
- Use a small wooden easel to display one special bookmark on your desk.
- Mini Macramé Keychains — fiber craft ideas for kids (age 8+)
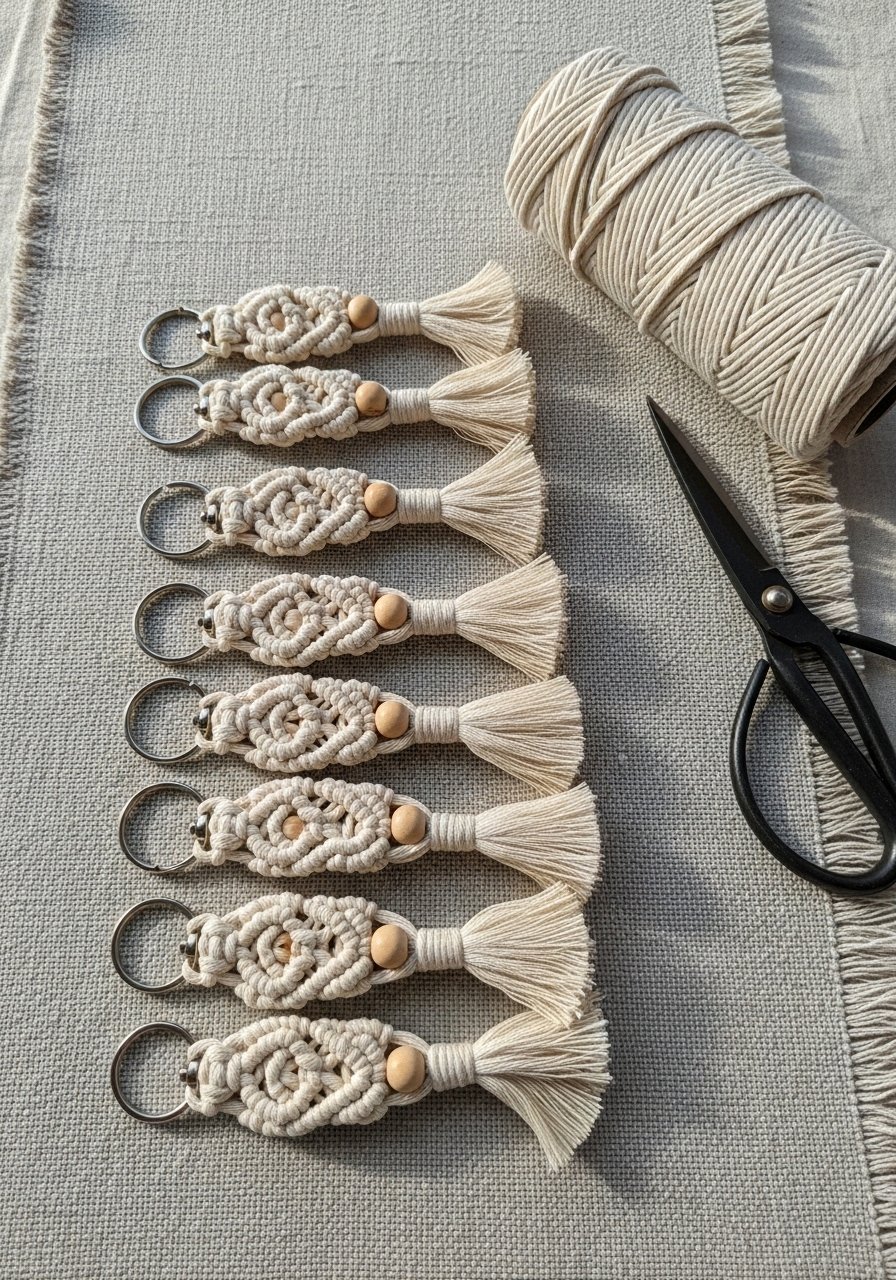
Mini macramé introduces kids to knotting basics with instant results. The texture is soft and the wooden beads add a boho touch. Great for older kids learning pattern repetition.
Materials
- 3mm single-strand macramé cord, 10 yards
- Small keychain rings, 5 pieces
- Wooden beads (10mm), 5 pieces
- Sharp scissors
- Tape to secure working piece
- Comb to fray tassels
Instructions
- Cut 3 strands of cord, each 24 inches. Fold in half and loop through keyring.
- Secure with tape to your work surface. Tie square knots for 2–3 inches.
- Thread a wooden bead, pull snug, then finish with a knot.
- Trim ends to form a tassel; comb gently to fluff.
- Repeat for additional keychains. Total make time 15–25 minutes each.
- Melt ends are not needed with natural cord; knot tight for durability.
How to Display or Gift It
- Clip to a wrapped gift as an added keepsake.
- Store finished keychains in a small craft organizer tray.
- Pair several on a gift card ring as friendship tokens.
- Puffy Foil Leaf Prints — metallic craft ideas for kids
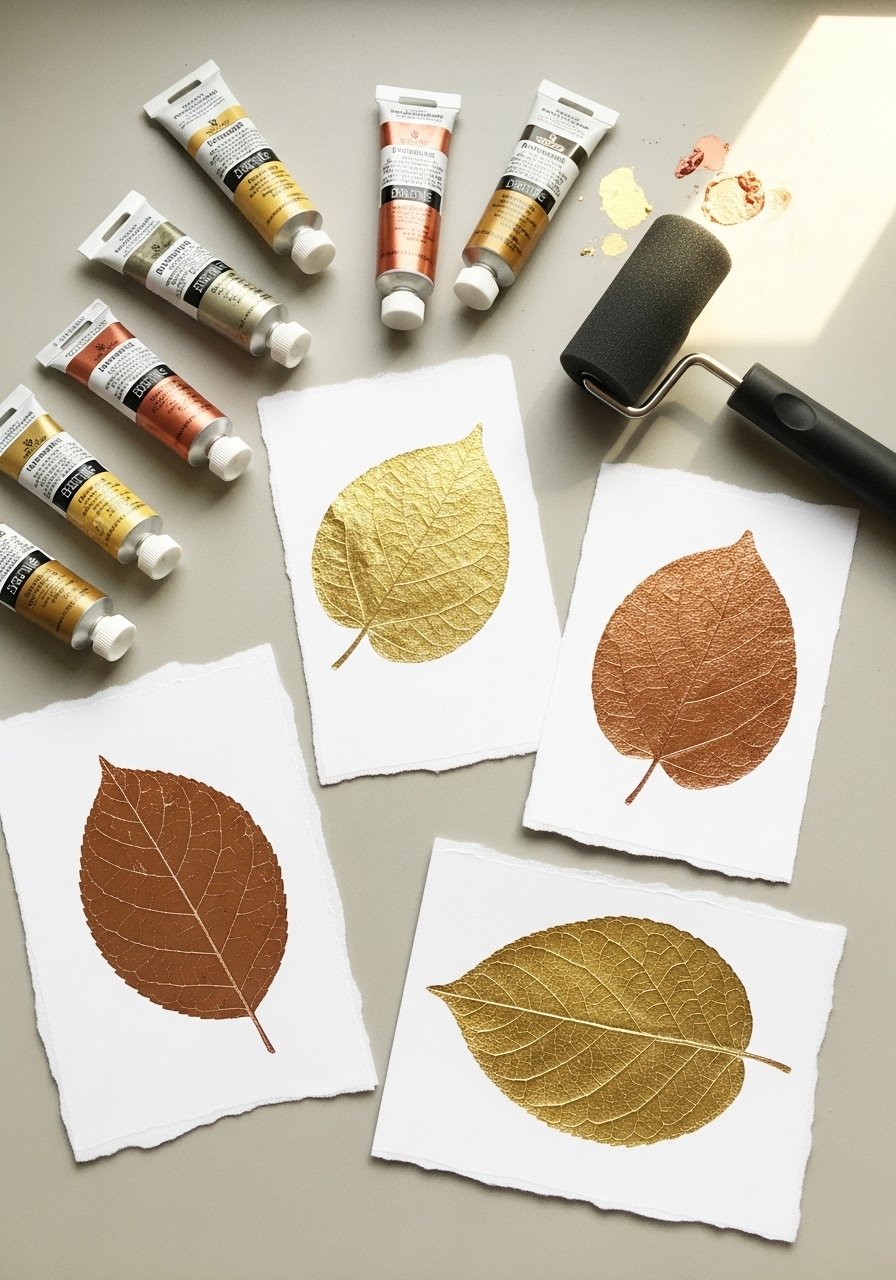
Foil leaf prints pair metallic paints with simple leaf shapes for a luxe look. Kids will love the shimmer, and the technique works well for seasonal decor or handmade cards.
Materials
- Cardstock, 5 sheets, 5×7 inches
- Leaves or paper leaf stencils
- Metallic acrylic paint (gold, copper), 1 oz each
- Brayer roller for smooth application
- Foam brush
- Paper towels for cleanup
Instructions
- Place leaf under cardstock and paint over with metallic acrylic using a brayer for even coverage.
- Press firmly and peel back to reveal a metallic silhouette.
- For layered color, wait 15 minutes between layers to avoid smudging.
- Add painted veins with a fine brush if desired; dry 30–45 minutes.
- Trim edges for a handmade card look.
How to Display or Gift It
- Frame several prints in a thrifted frame for an instant gallery.
- Use kraft bags and tuck two prints inside as stationery gifts.
- Store flat in an archival portfolio to keep metallic shine pristine.
- Foam Stamped Tote Bags — wearable craft ideas for kids
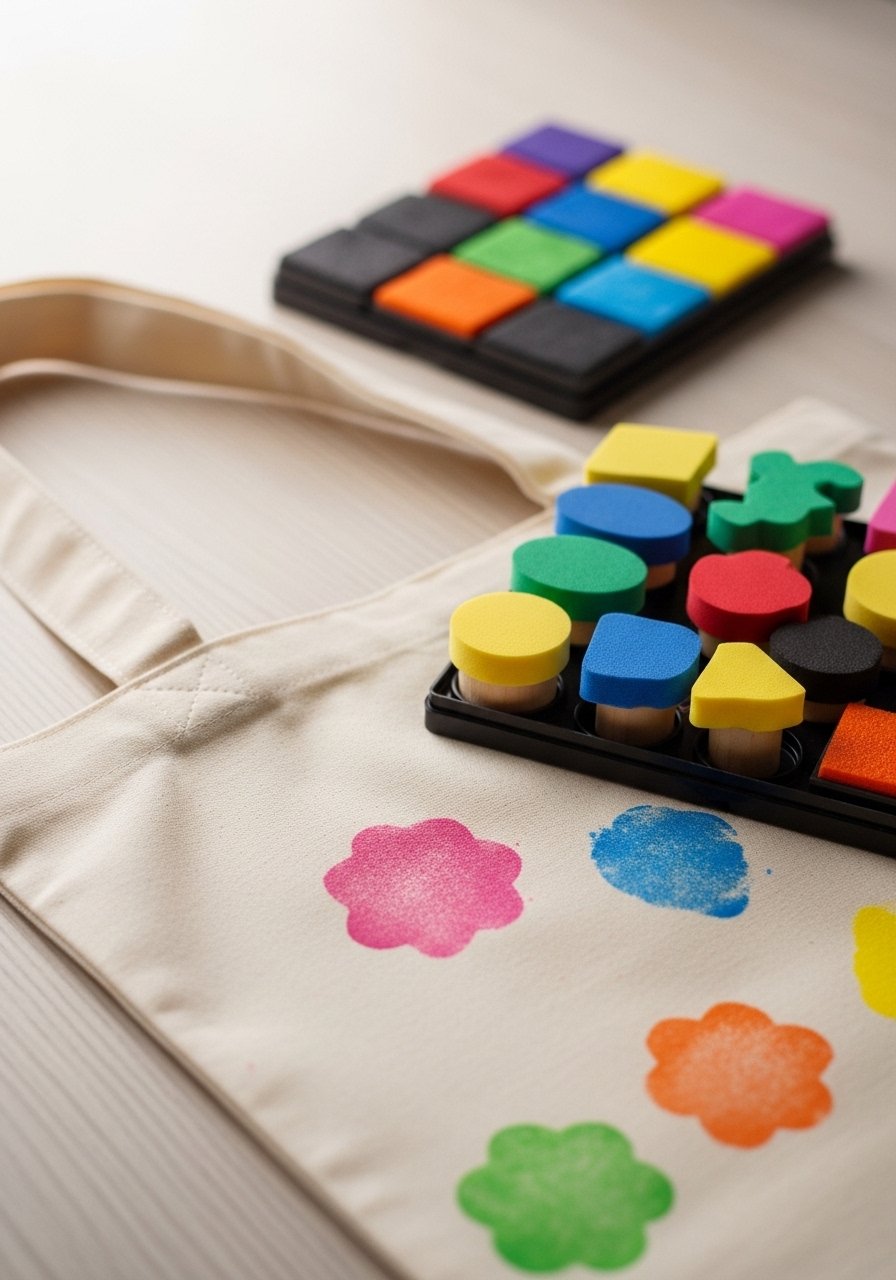
Stamping a tote is a fun way for kids to design something functional. Fabric paint gives long-lasting results. This makes a great gift for grandparents or a library tote.
Materials
- Cotton tote bag, pre-washed, 1
- Fabric paint set (6 colors), 1 set
- Foam stamps or craft foam cut into shapes
- Foam brush or rolling sponge
- Cardboard insert to prevent bleed-through
- Iron for heat-setting
Instructions
- Insert cardboard inside the tote. Arrange stamps to plan layout.
- Dab fabric paint onto stamp with a foam brush; press firmly onto fabric.
- Let prints dry 30–60 minutes, then heat-set with an iron (follow paint label; usually 3 minutes on medium).
- For layered prints, wait 1 hour between layers.
- Wash inside-out on a gentle cycle after 72 hours cure time.
How to Display or Gift It
- Fill the tote with small books and tie with ribbon for gifting.
- Hang on a pegboard in a craft room for daily use.
- Use a craft storage box to keep tote and paints together.
- Simple Sewing Felt Animals — beginner sewing craft ideas for kids
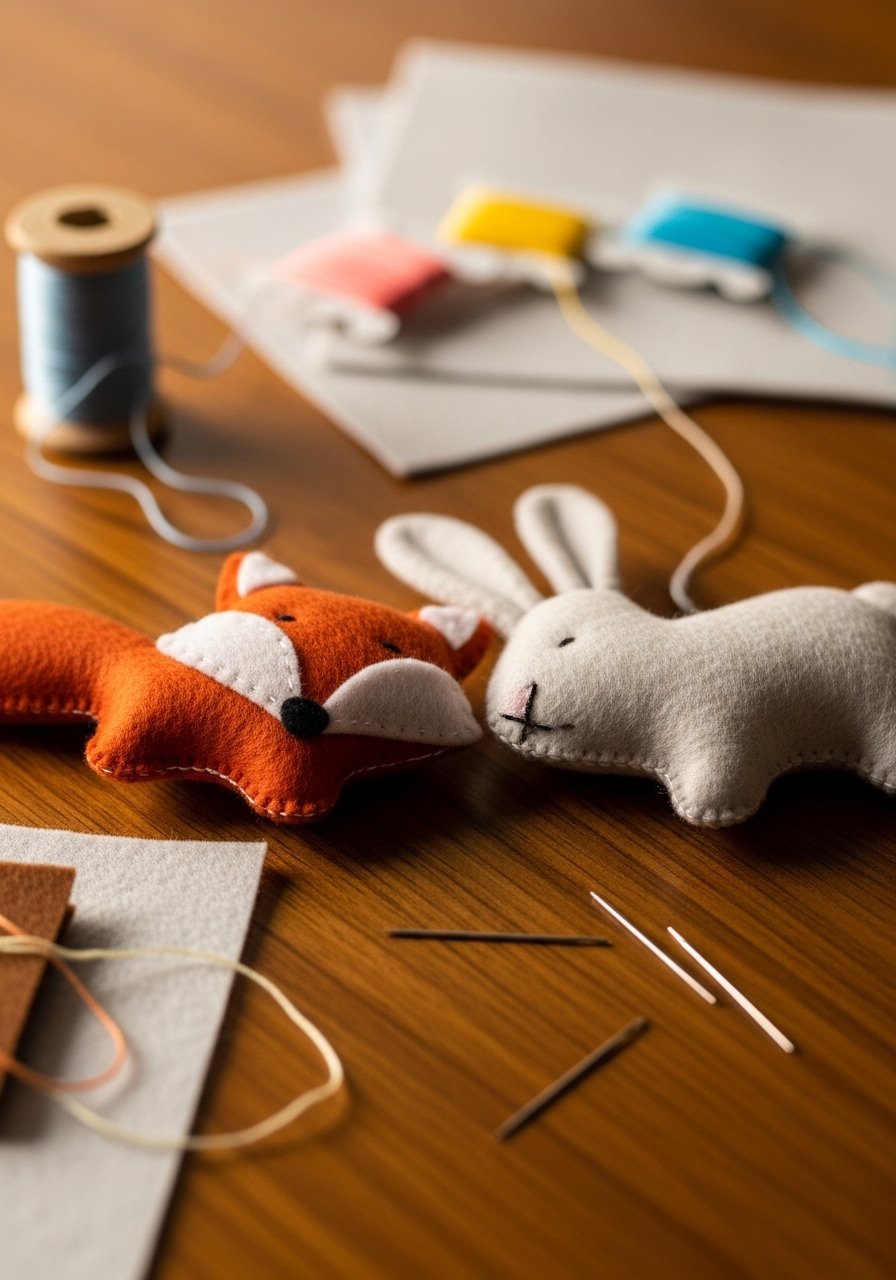
Big-eyed felt animals teach hand stitching and basic shapes. Felt doesn’t fray, making it perfect for young sewists. A simple running stitch and stuffing create a soft, huggable result.
Materials
- Felt sheets, assorted colors, 9×12 inches each
- Embroidery floss, 6-strand, 1 skein per color
- Embroidery needles (blunt), 2
- Fiberfill stuffing, 1 cup per toy
- Scissors
- Paper pattern, small (3–4 inches)
- Pins to hold layers
Instructions
- Trace pattern twice onto felt and cut out both pieces.
- With wrong sides together, whipstitch or running stitch around edges, leaving a 1 inch gap.
- Stuff gently with fiberfill to desired fullness.
- Stitch gap closed and knot securely.
- Add embroidered eyes or glued-on felt features; allow glue 30 minutes to set if used.
- Trim loose threads and check seams for gaps.
How to Display or Gift It
- Tuck a felt animal into a gift box with kraft tissue.
- Keep in a decorative basket for playroom storage.
- Display on a small shelf or attach to a backpack clip.
- DIY Chalk Paint Sidewalk Colors — outdoor craft ideas for kids (craft idea for kids)
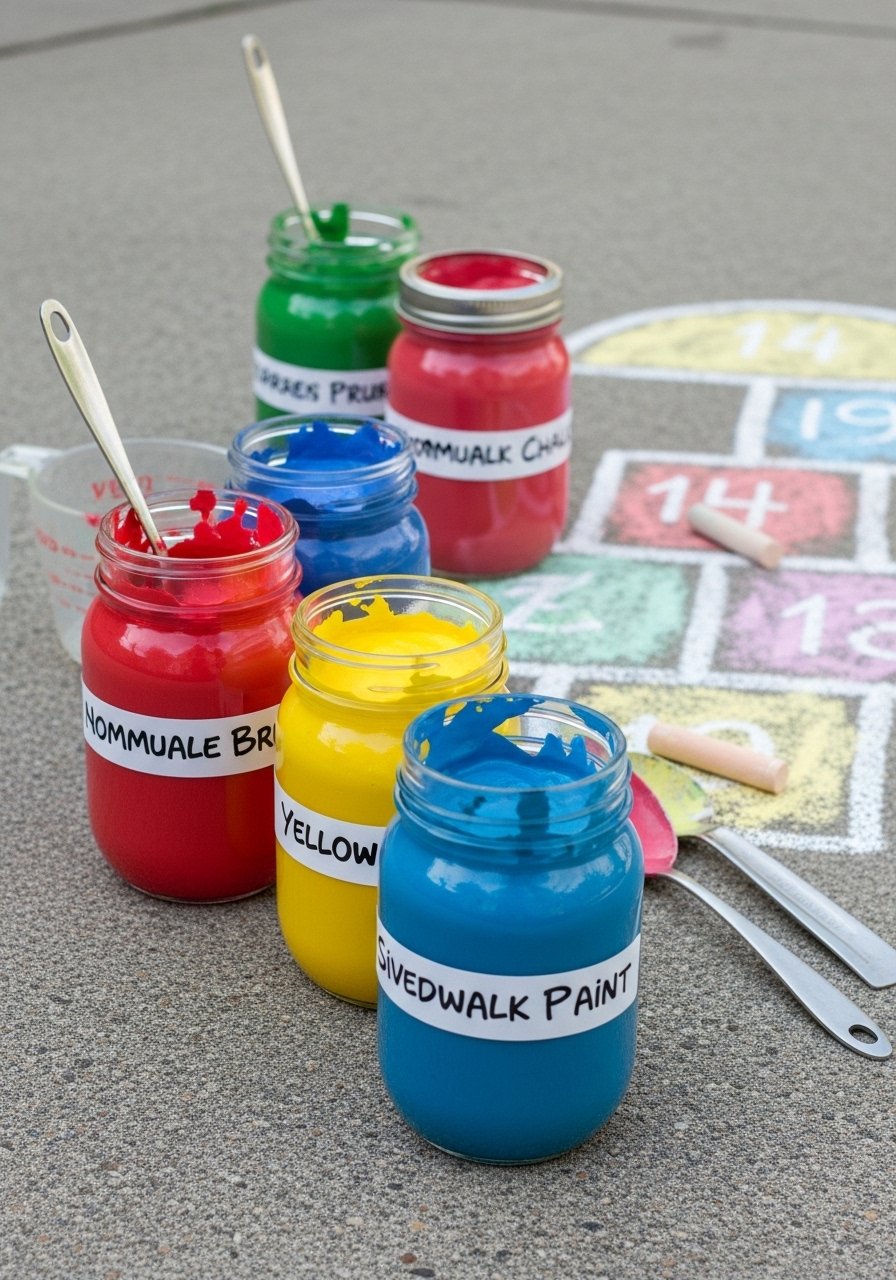
Homemade sidewalk chalk paint brightens playtime and washes away with water. This low-mess recipe is perfect for energetic outdoor creativity and giant murals.
Materials
- 1 cup cornstarch
- 1 cup water (per color)
- Food coloring or liquid tempera, 1–2 tsp per batch
- Mason jars (8 oz), 4–6
- Stir sticks
- Measuring cups
Instructions
- Mix 1/2 cup cornstarch with 1/2 cup cold water until smooth.
- Transfer to a saucepan and heat over low, stirring until thick (about 2–3 minutes).
- Remove from heat, stir in food coloring or tempera until desired hue.
- Pour into jars and let cool 30 minutes.
- Use with brushes or pour into molds to make chalk blocks; dry 24 hours for firm chalk.
- Rinse concrete with hose after play; colors are water-soluble.
How to Display or Gift It
- Fill small jars with different colors for a summertime craft gift.
- Store in mason jars in the pantry until next outdoor session.
- Painted Rock Pets — tactile craft ideas for kids
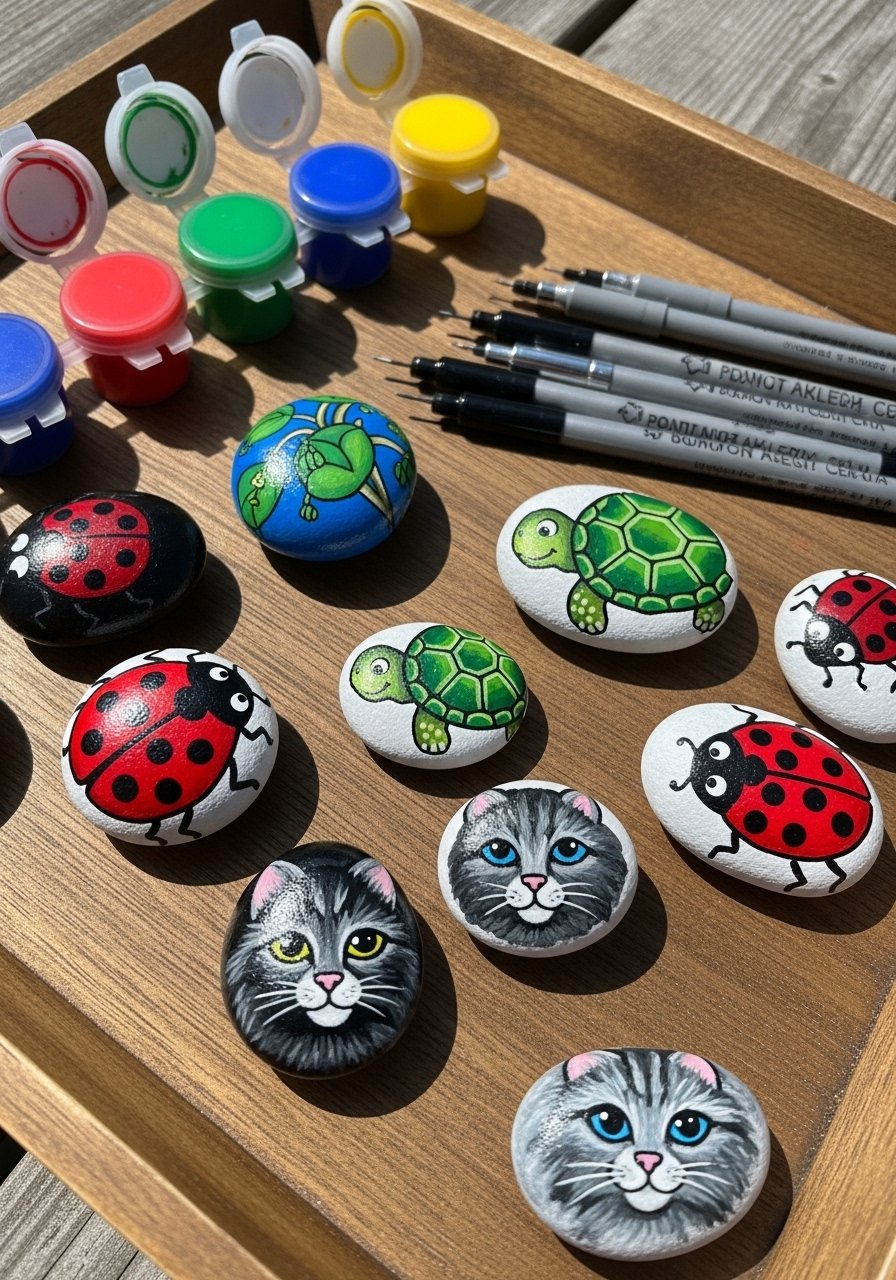
Painted rocks are durable, tiny canvases. Kids can practice fine motor skills with paint pens to add tiny eyes and patterns. These make cute garden markers or desk buddies.
Materials
- Smooth river rocks, 10–15, assorted sizes
- Acrylic paint set, assorted colors
- Fine-tip paint pens for details
- Flat foam brush for base coats
- Clear outdoor sealer spray (matte)
- Paper towels for wiping
Instructions
- Wash and dry rocks fully before painting.
- Apply a base coat with a flat foam brush; dry 30 minutes.
- Add patterns and details with paint pens; work in layers with 15–20 minutes drying between.
- Let cure 24 hours, then spray with a clear sealer outdoors and let dry 1–2 hours.
- Let sealer cure 24 hours before handling.
How to Display or Gift It
- Arrange painted rock pets along a windowsill or garden potted plants.
- Pack in a small kraft box as a handmade set.
- Store in a shallow craft drawer when not displayed.
- Sun Catcher Suncatcher with Contact Paper — bright craft ideas for kids
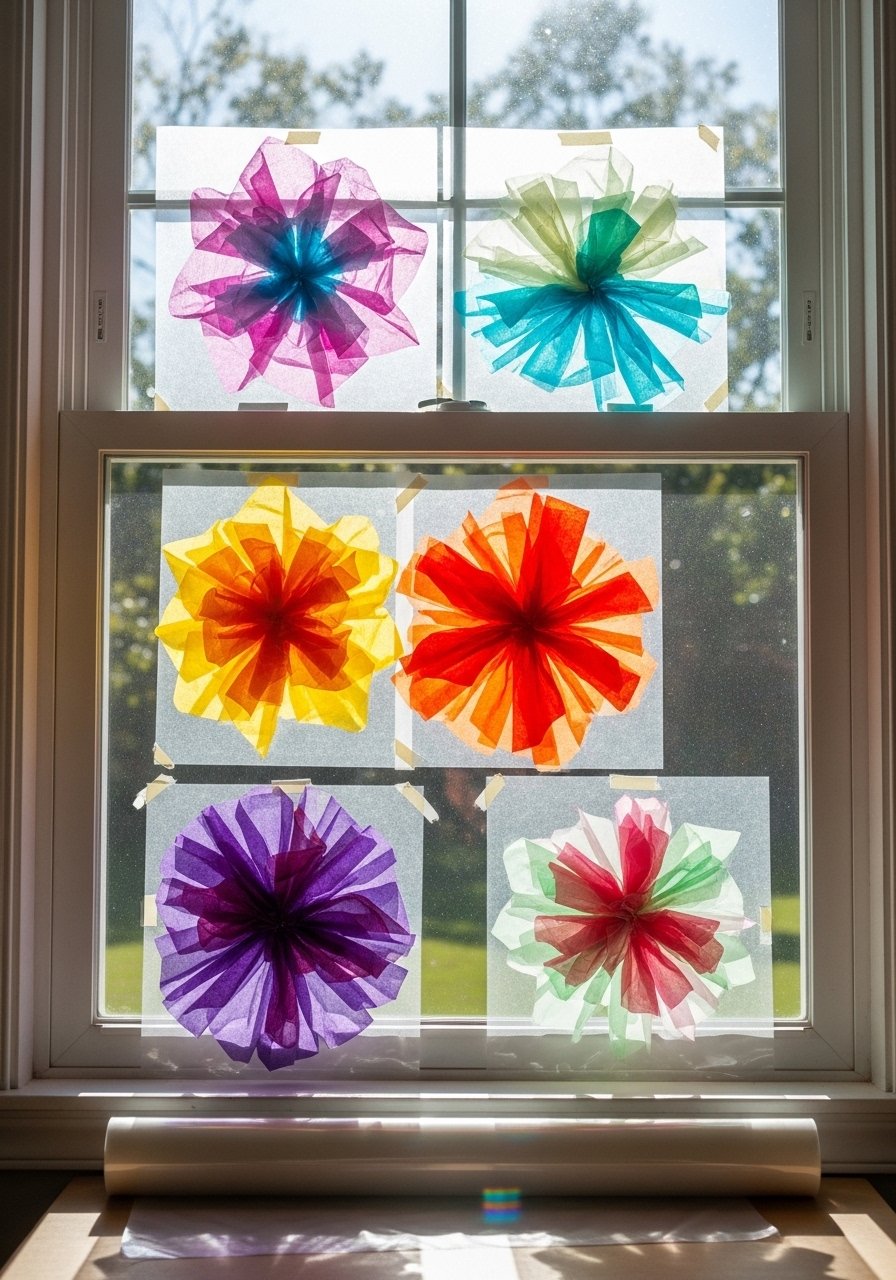
Suncatchers are simple and mesmerizing. Kids tear tissue paper for a stained-glass look; these are safe, no-heat crafts that catch light beautifully.
Materials
- Clear contact paper, 12×12 inch pieces (2 per suncatcher)
- Colored tissue paper, small squares, 1 sheet per color
- Construction paper for frames, 1 sheet per suncatcher
- Hole punch and ribbon for hanging
- Scissors
Instructions
- Cut contact paper to size and peel backing; sticky side up.
- Arrange tissue paper pieces on sticky side until desired coverage.
- Place a second contact sheet on top, sealing edges.
- Cut into shape and back with a construction paper frame to hide edges.
- Punch a hole and thread ribbon; hang in a sunny window.
- These bond instantly; no drying time required.
How to Display or Gift It
- Hang a row in a sunny window for color play.
- Wrap flat with tissue and include a ribbon for gifting.
- Bubble Wrap Print Trees — textured craft ideas for kids (craft ideas for kids)
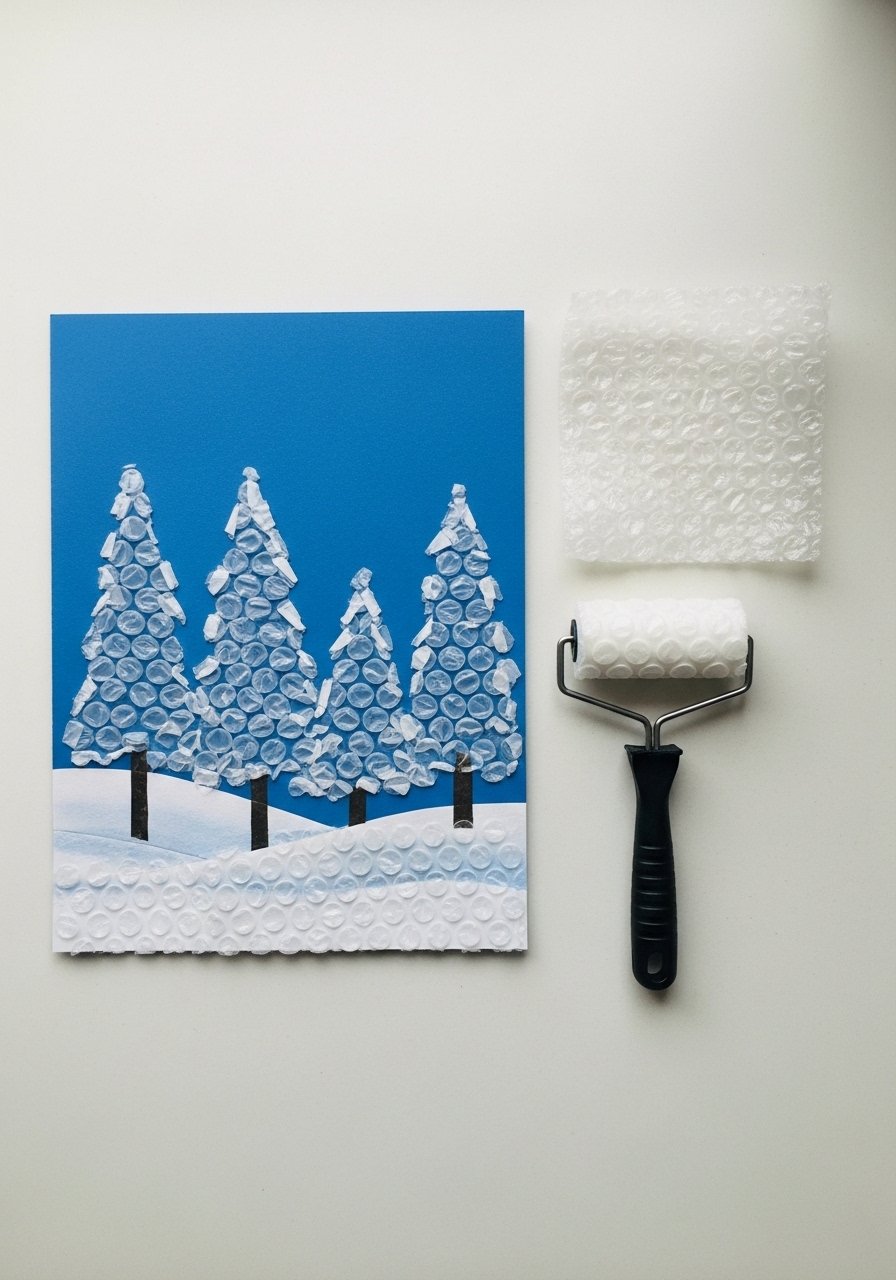
Bubble wrap printing creates a dotted texture that looks great for abstract trees or snow effects. It’s tactile and surprisingly satisfying for kids of all ages.
Materials
- Bubble wrap sheet, cut into manageable pieces
- Acrylic paint in green, brown, white
- Foam roller
- Cardstock or poster board, 11×14 inches
- Scissors, masking tape
Instructions
- Tape bubble wrap onto a block or work surface convex side out.
- Roll paint onto bubble wrap with a foam roller—thin, even coat.
- Press onto cardstock and lift to reveal print. Repeat for layers with different colors.
- Add tree trunks and details once layers dry 15–30 minutes.
- Allow full dry 1 hour before framing.
How to Display or Gift It
- Frame as a playful gallery piece.
- Store prints flat in a portfolio to avoid creasing.
- Recycled Cardboard Marble Run — STEM craft ideas for kids
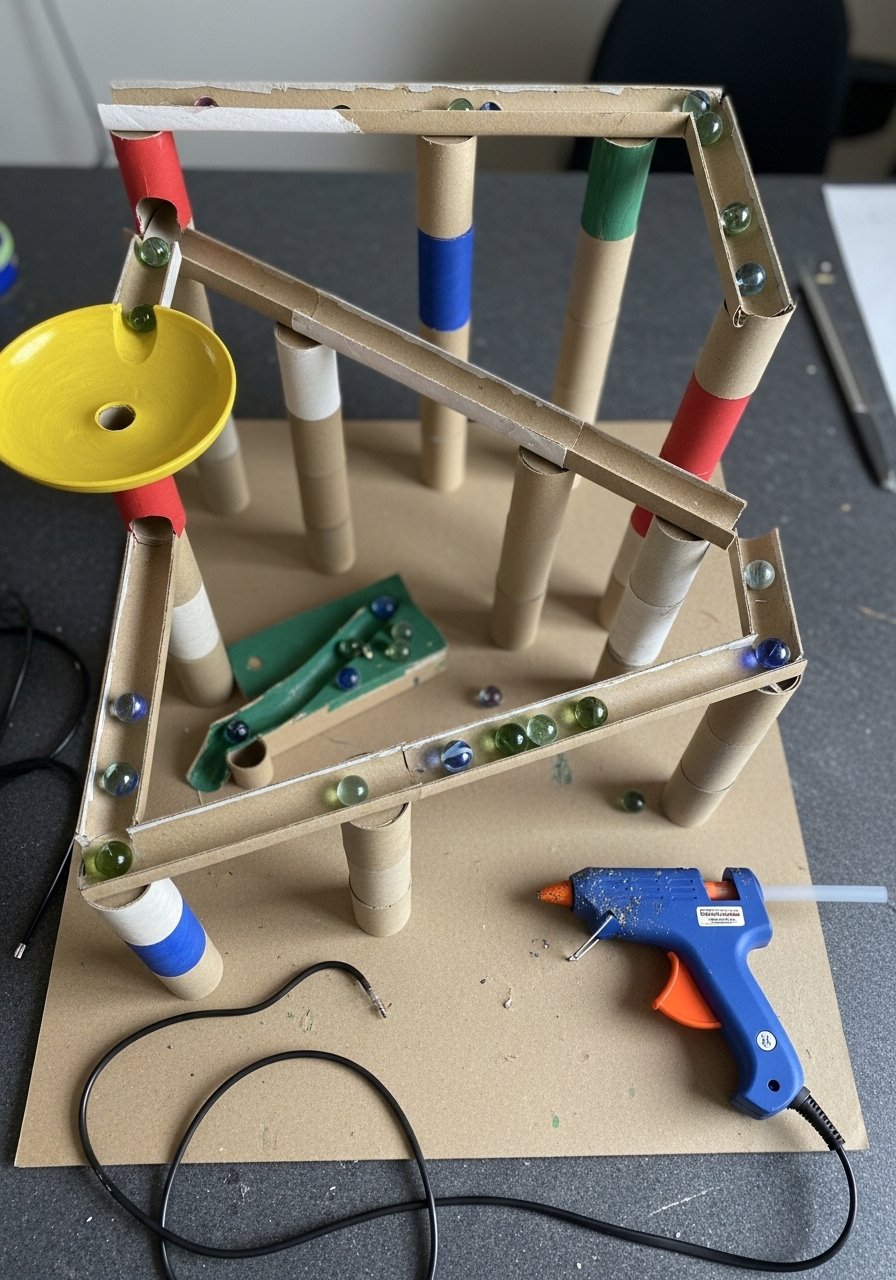
Marble runs combine building and physics. Using recycled cardboard teaches resourcefulness. Older kids will enjoy designing iterations to change speed and drops.
Materials
- Cardboard tubes (paper towel & toilet paper rolls), 6–12
- Cardboard sheet for base, 12×12 inches
- Hot glue gun and glue sticks
- Scissors and craft knife
- Marbles, 3–5
- Tape and paint for decoration
Instructions
- Cut tubes in half lengthwise to create ramps. Paint and let dry 30–60 minutes.
- Plan layout on base; test ramp angles with marbles.
- Glue ramps to base using hot glue; allow glue to cool 5–10 minutes.
- Reinforce with tape where needed.
- Test runs and adjust angles for speed; expect tweaks and re-gluing.
- Supervise with craft knife use if kids help cut.
How to Display or Gift It
- Use as a tabletop toy. Disassemble and store in a craft organizer drawer.
- Gift as a DIY kit with extra marbles in a kraft box.
- Washi Tape Name Plates — personalized craft ideas for kids
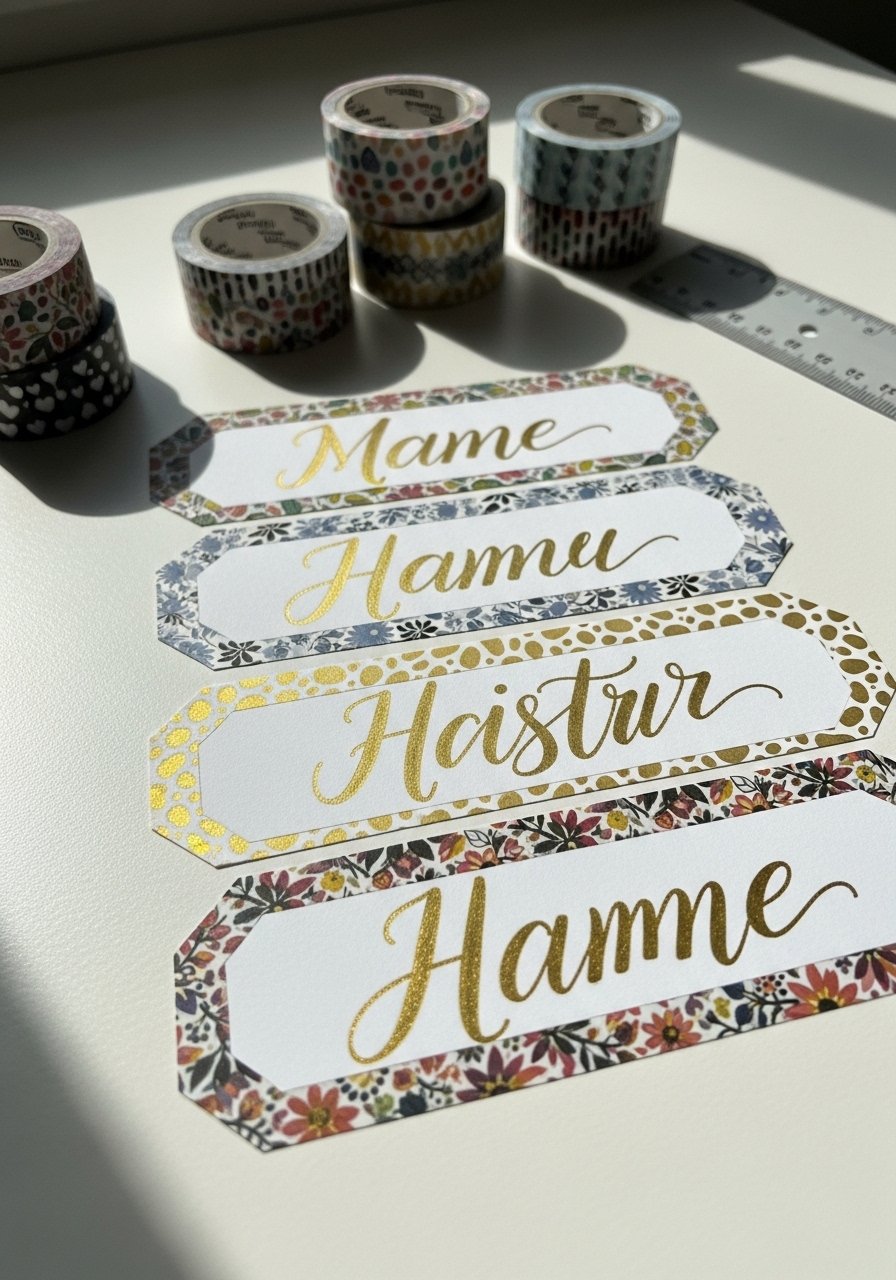
Washi tape lets kids design instantly stylish nameplates. They’re useful for desks, bedroom doors, or party seating. The tape peels without damage for repositioning.
Materials
- Cardstock, cut to 3×8 inches, 10 pieces
- Washi tape assortment, 5 rolls
- Gold paint pen or marker
- Ruler and pencil for spacing
- Scissors
Instructions
- Plan tape design by layering strips across cardstock.
- Press edges down firmly with a bone folder for adhesion.
- Write names with a paint pen after tape is applied.
- Seal edges with a thin strip of clear tape if plates will be handled frequently.
- No drying time required; ink sets in 10 minutes.
How to Display or Gift It
- Clip to bedroom doors with a clothespin for easy swaps.
- Use as place cards for kid-friendly parties.
- Store finished plates flat in a craft organizer.
- Button Mosaic Picture Frames — tactile gift craft ideas for kids
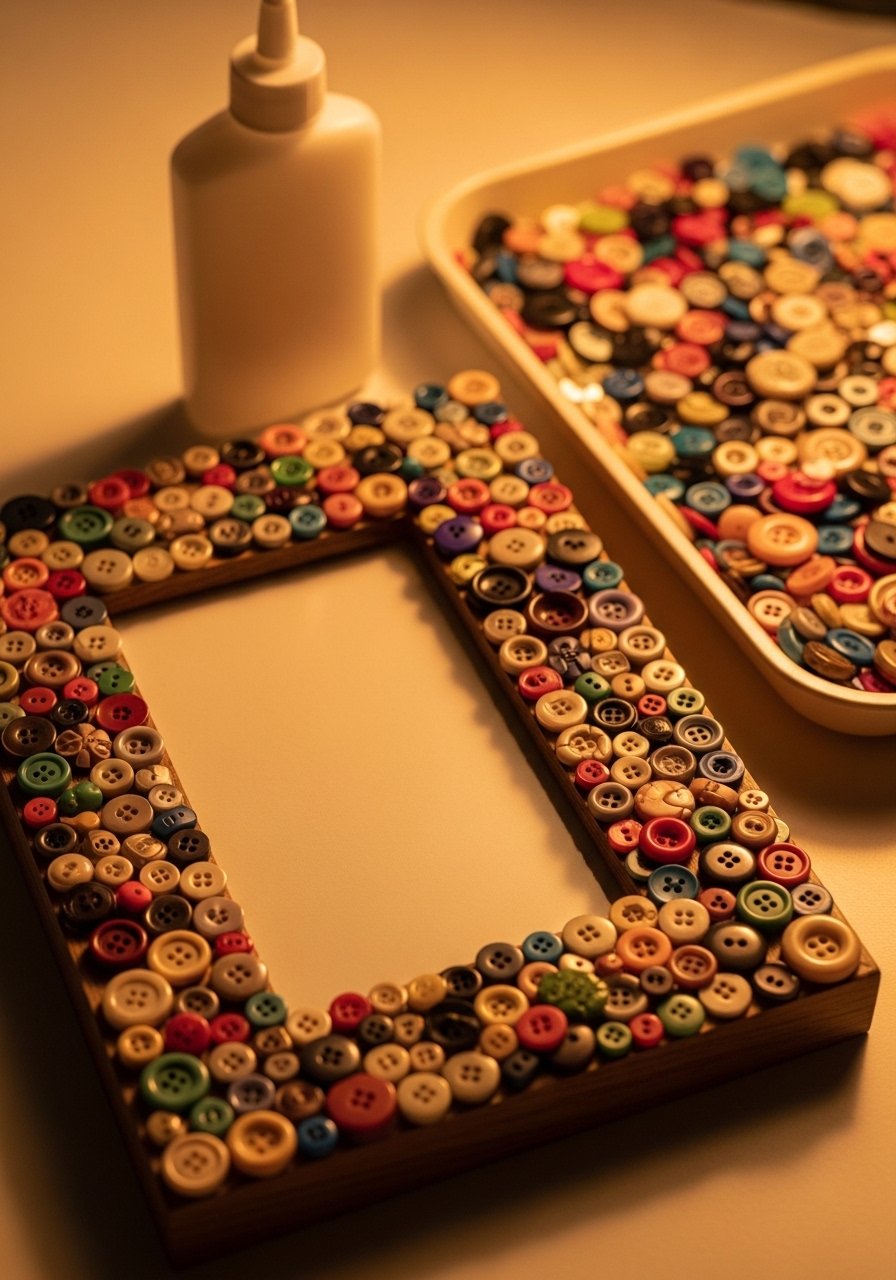
Button mosaics are forgiving and colorful. Kids practice placement and patterns, and the finished frames make touching, cheerful gifts for grandparents.
Materials
- Wooden frame (4×6 inches), 1
- Assorted buttons, 100–150
- White craft glue or tacky glue, 1 oz
- Toothpicks for glue application
- Paper plate for sorting buttons
Instructions
- Lay out buttons around the frame to plan color grouping.
- Apply small glue dots with a toothpick and press buttons into place.
- Work in small sections to keep edges neat.
- Let glue dry 2–4 hours until firm.
- Add a clear sealer for outdoor display; cure 24 hours.
How to Display or Gift It
- Insert a child’s photo and wrap in cellophane for gifting.
- Store spare buttons in a divided craft organizer jar.
- Tie-Dye Bandanas — classic craft ideas for kids
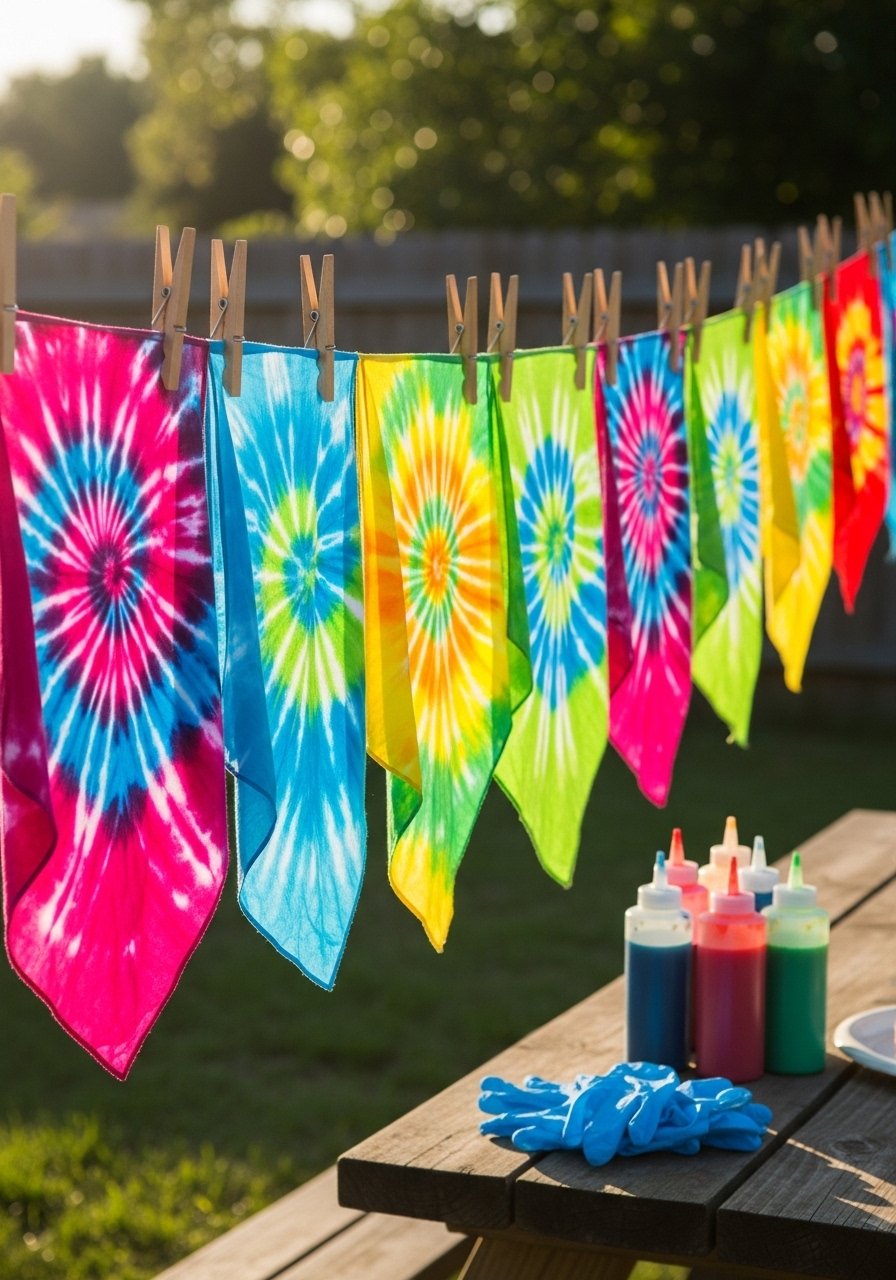
Tie-dye bandanas are energetic and customizable. Kids can learn pattern folding and color mixing. Use fiber-reactive dyes for lasting, vivid colors.
Materials
- Cotton bandanas, pre-washed, 1–2
- Fiber-reactive dye set (3 colors)
- Plastic squeeze bottles
- Rubber bands
- Plastic table cover and gloves
- Zip-top bag for dyeing step
Instructions
- Twist bandana into desired pattern and secure with rubber bands.
- Mix dye according to package instructions in bottles.
- Apply dye to sections; keep colors separate to avoid muddiness.
- Place dyed bandana in a zip bag and let set 6–8 hours or overnight for rich color.
- Rinse under cold water until water runs clear; wash separately.
- Dry and wear. Expect some dye transfer for first few washes.
How to Display or Gift It
- Fold and tie with twine as an upbeat gift wrap accent.
- Store in a fabric drawer once dry.
- Painted Clothespin Puppets — storytelling craft ideas for kids (craft ideas for kids)
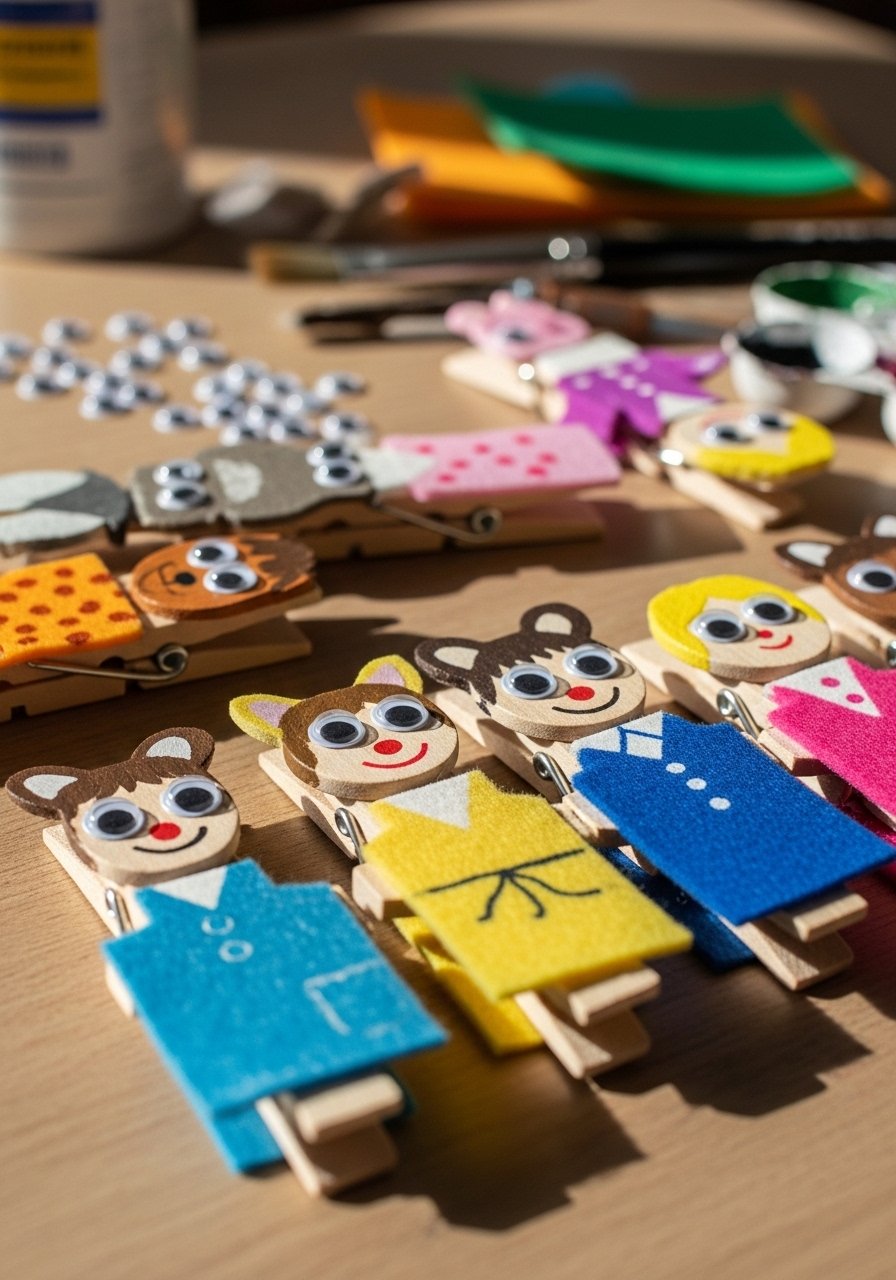
Clothespin puppets encourage imaginative play and fine motor skills. Kids can paint faces and glue on felt clothing. They’re small, portable, and great for puppet shows.
Materials
- Wooden clothespins, 12
- Acrylic paint set (small tubes)
- Googly eyes and small felt scraps
- Tacky glue
- Fine-tip paintbrush
- Markers for details
Instructions
- Paint clothespin bodies with a base color; dry 20–30 minutes.
- Glue on felt clothes and googly eyes; allow glue 30 minutes to set.
- Add facial details with markers or fine brushes.
- Let fully cure 24 hours before play to ensure durability.
- Repair loose bits with additional glue as needed.
How to Display or Gift It
- Stage a mini puppet show on a cardboard box theater.
- Bundle a set in a gift bag with a small storybook.
- Foam Crown Dress-Up — party craft ideas for kids
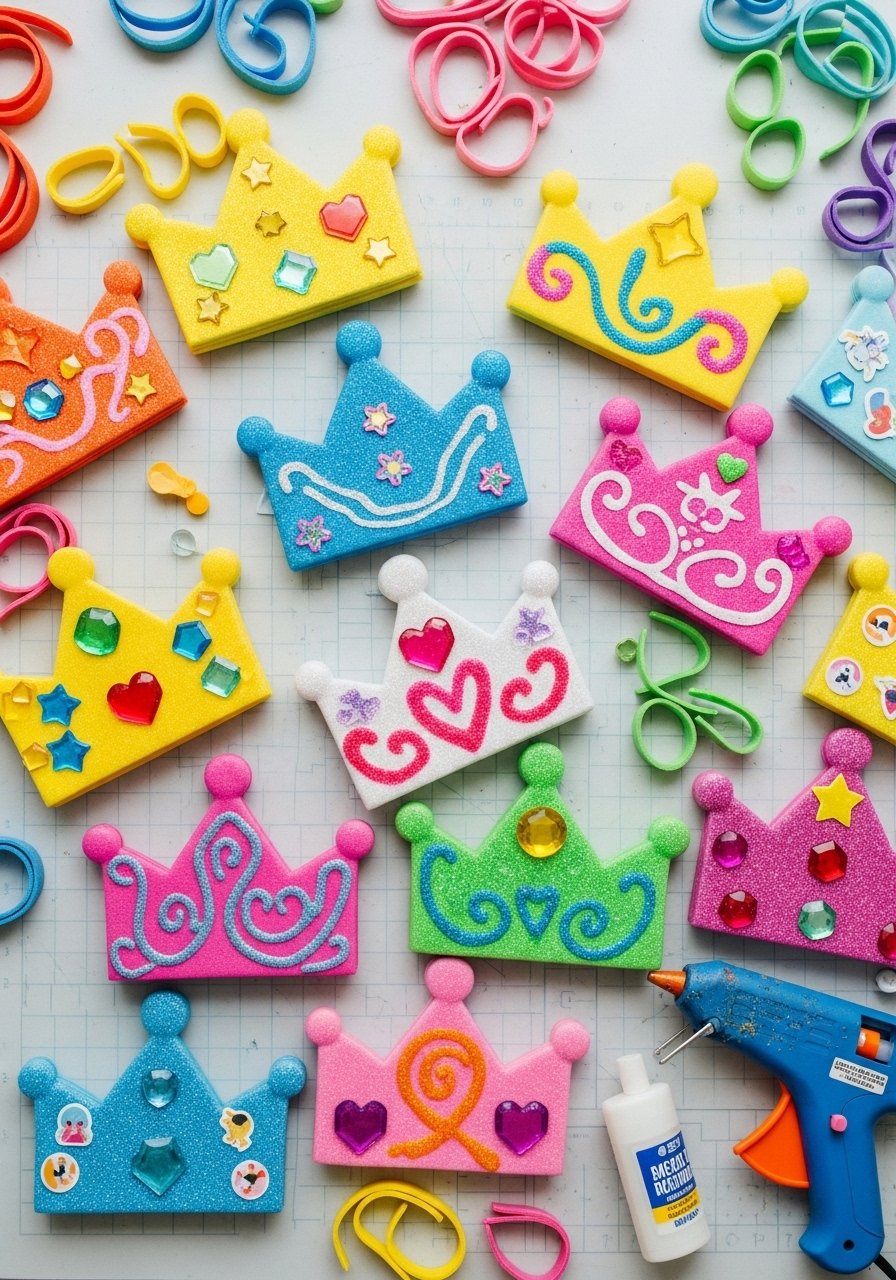
Foam crowns are fast to assemble and endlessly customizable. They’re great for birthdays or imaginative play and hold up well with foam’s resilience.
Materials
- Craft foam sheets, assorted colors, 9×12 inches
- Elastic cord, 12–14 inches per crown
- Foam adhesive stickers, gems and stars
- Scissors
- Glue gun for strong attachment (adult use)
Instructions
- Cut crown shape from foam (approx 22 inches length around head).
- Decorate with stickers and glue on gems using a low-temp glue gun if needed—adult supervision recommended.
- Attach elastic ends inside crown for a snug fit.
- Let cool and set 10 minutes if glue used.
- Store flat to avoid bending.
How to Display or Gift It
- Tie a set together with ribbon for a party favor pack.
- Keep in a labeled bin in your dress-up area.
- Stamped Clay Jewelry Dishes — pottery-adjacent craft ideas for kids
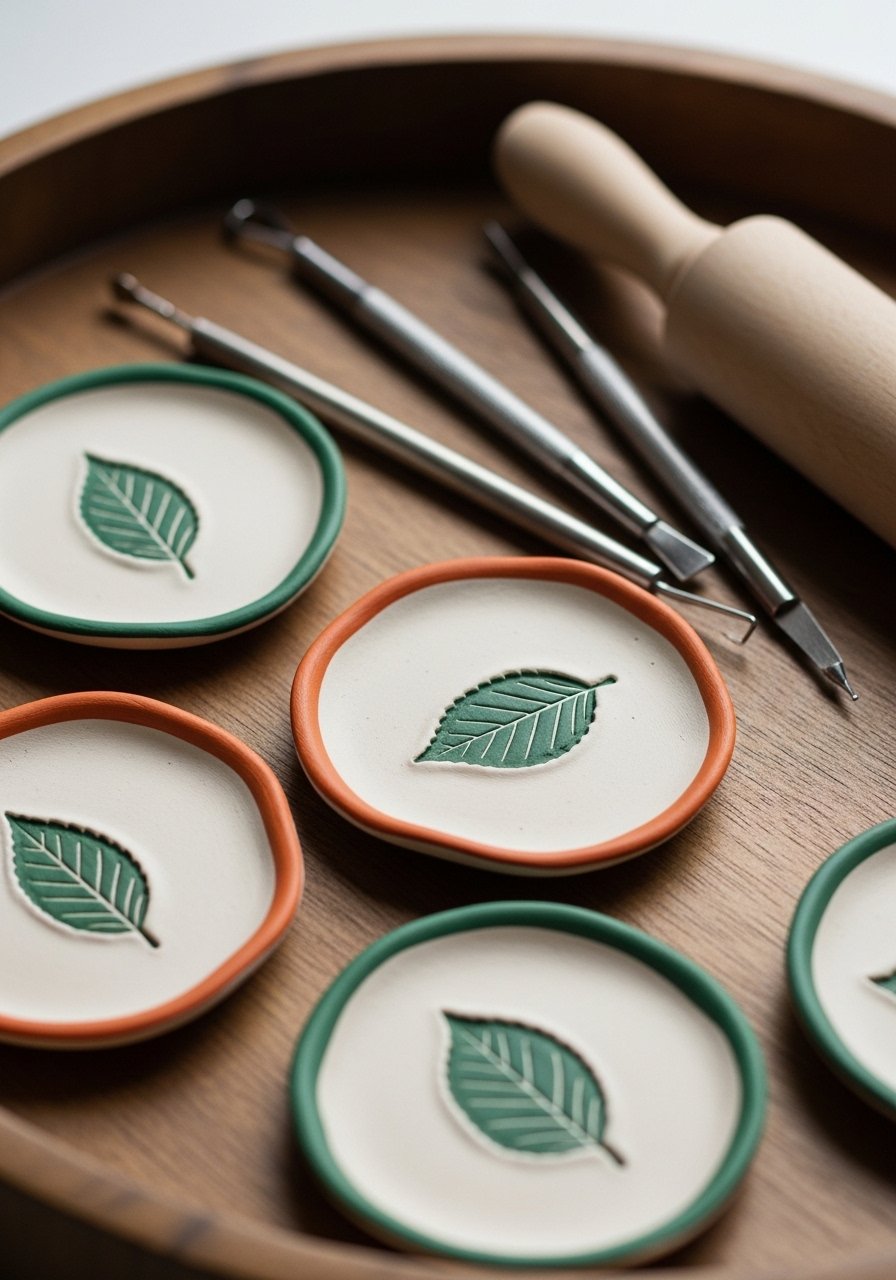
Air-dry or polymer clay dishes are simple and elegant. Kids can press textures and paint rims for a polished look. These are practical and double as giftable trinket dishes.
Materials
- Air-dry clay or polymer clay, 8 oz
- Rolling pin
- Leaf or texture stamps
- Acrylic paint for edges (1 oz)
- Clear sealer for finishing
- Small paintbrushes
Instructions
- Roll clay to 1/4 inch thickness. Press a shallow bowl shape over a mold or cup.
- Stamp texture into the center before edges firm.
- Smooth edges with a damp finger; let air-dry 24–48 hours depending on thickness.
- Paint rims and allow 30 minutes between coats. Apply two coats for opacity.
- Seal with a clear sealer; cure 24 hours.
How to Display or Gift It
- Fill with small candies or trinkets and gift in a box with tissue.
- Store stacked with tissue in craft drawers.
- Pom-Pom Critter Magnets — fridge-friendly craft ideas for kids
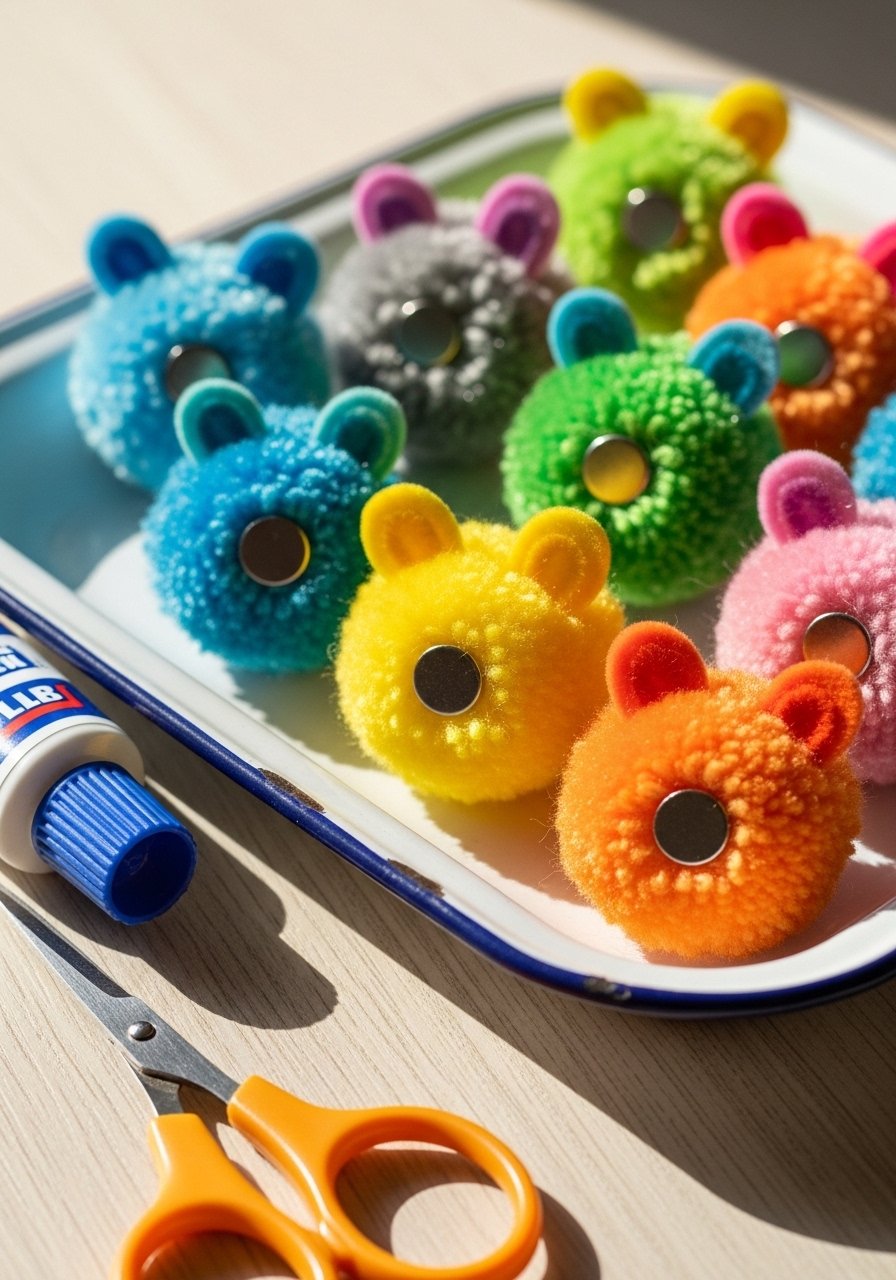
Pom-pom critters are soft and quick. Kids can glue on eyes and felt shapes to create animals, then add magnet backs for a functional fridge buddy.
Materials
- Pom-pom maker or DIY cardboard circles
- Yarn, small amount per critter
- Small magnet discs, 0.5 inch, one each
- Googly eyes, small
- Tacky glue
- Felt scraps for ears
Instructions
- Make pom-poms using a pom-pom maker or cardboard method.
- Trim to shape and glue on felt ears and googly eyes.
- Attach magnet to the back with tacky glue; let dry 1–2 hours.
- Test adhesion and re-glue if needed; full cure 24 hours.
How to Display or Gift It
- Stick on the fridge and rotate seasons.
- Pack in small kraft boxes with a note for gifting.
- Yarn-Wrapped Letters — room decor craft ideas for kids (craft ideas for kids)
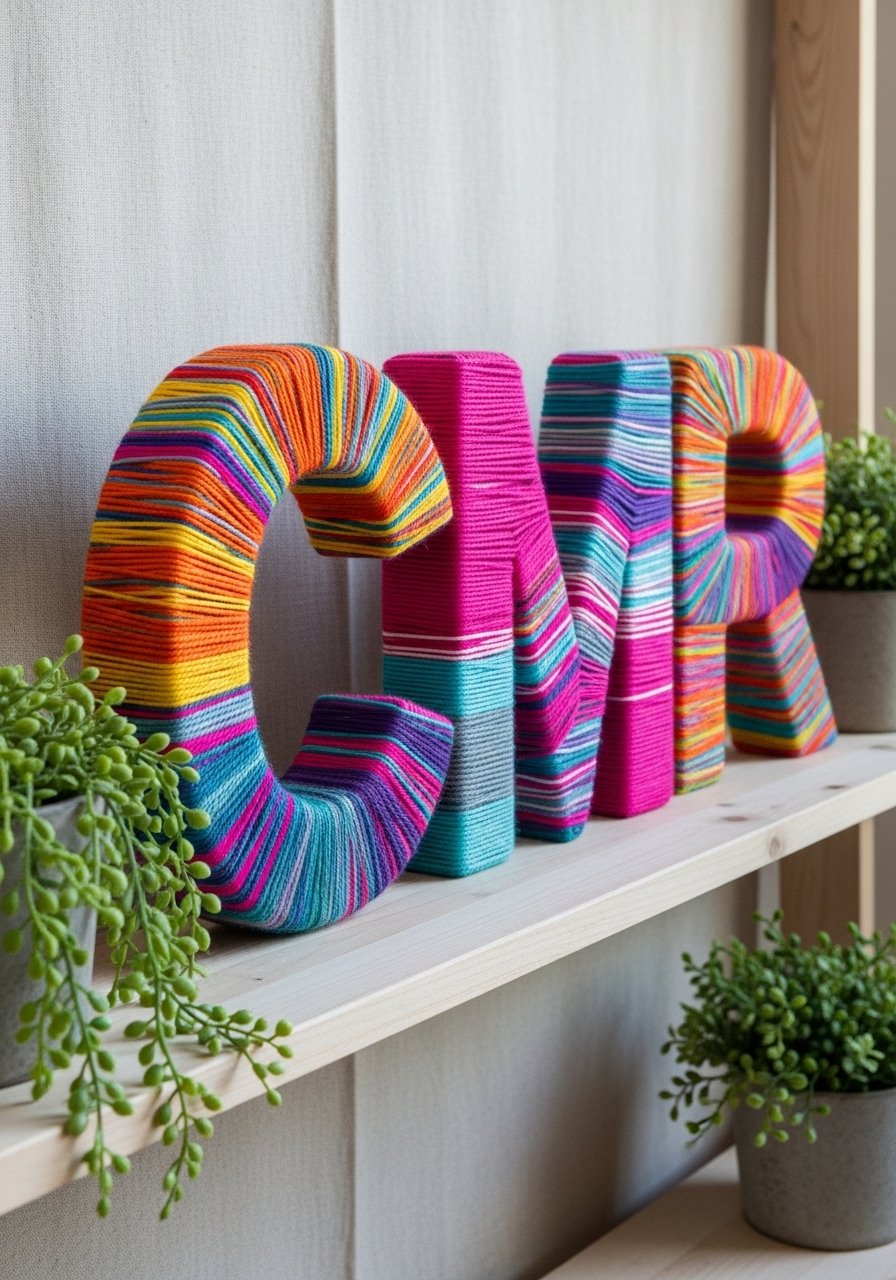
Yarn-wrapped letters are a bold way to personalize rooms. Wrapping is repetitive and calming for kids, and the result fits boho and Japandi styles depending on yarn choice.
Materials
- Chipboard letters, 6–8 inches
- Yarn, bulky or medium weight, 1–2 skeins depending on size
- PVA glue or hot glue for ends
- Scissors
- Tweezers for tucking ends (optional)
Instructions
- Secure yarn end to the back with glue and start wrapping tightly around the letter.
- Keep tension even and change colors as desired; glue ends down securely.
- Trim and tuck wrapped ends; re-glue loose spots.
- No drying time if hot glue used; PVA glue benefits from 30 minutes set.
How to Display or Gift It
- Lean letters on shelves or hang with small picture hooks.
- Wrap letters in tissue and add ribbon as a personalized gift.
- Scratch Art Greeting Cards — reveal-style craft ideas for kids
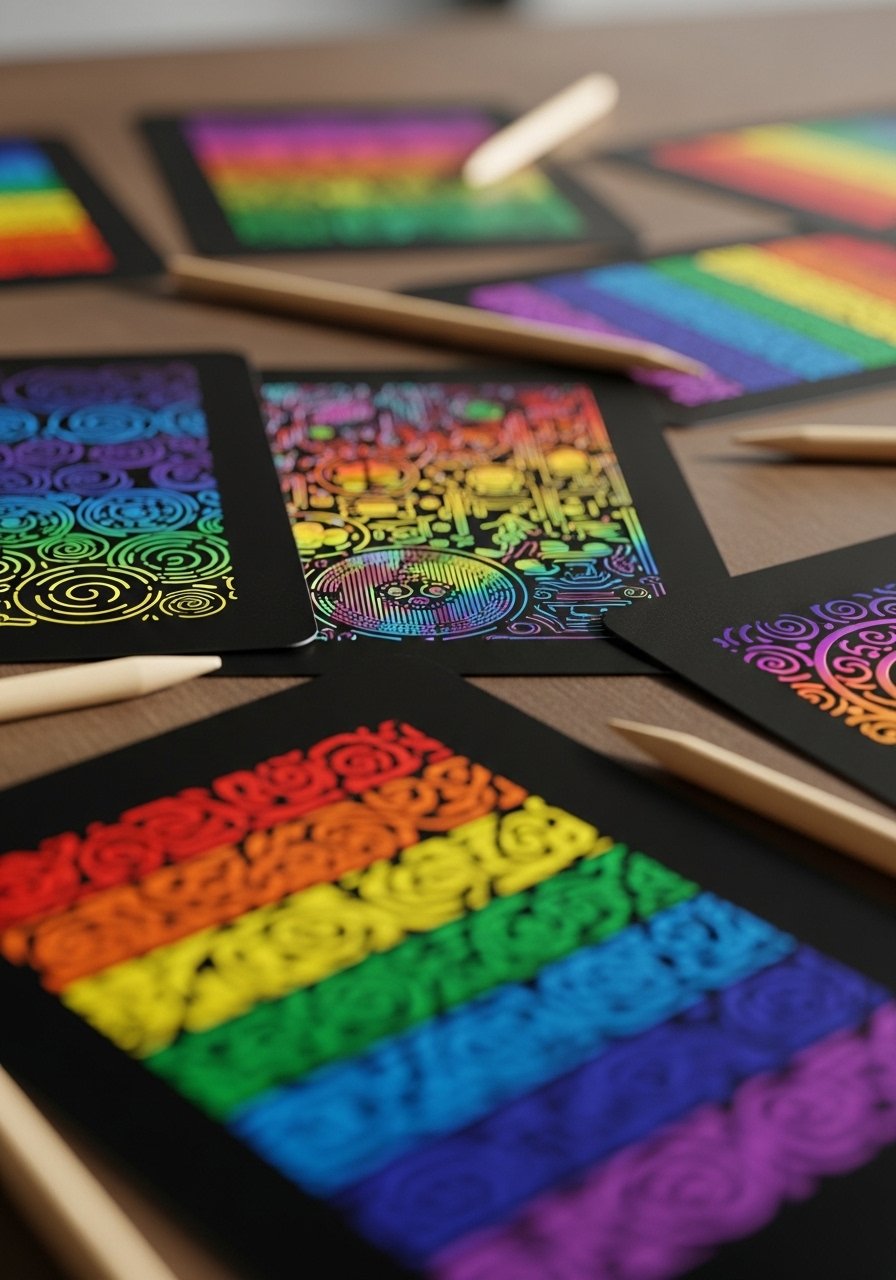
Scratch art is instantly rewarding. Kids create high-contrast designs by revealing colors below a black layer. It’s simple, portable, and makes striking cards.
Materials
- White cardstock, colored with crayons in rainbow layers
- Black tempera paint mixed with a drop of dish soap (for scratchability)
- Wooden styluses or popsicle sticks
- Paintbrush
- Pencil for sketching
Instructions
- Color a sheet of cardstock with heavy, even crayon layers. Cover completely.
- Mix black tempera with a tiny drop of dish soap and paint over crayon surface; dry 30–45 minutes.
- Use a wooden stylus to scratch away the black to reveal colors beneath.
- Fold into cards and write inside after scratch layer is fully dry.
- No long curing time needed.
How to Display or Gift It
- Send as handmade greeting cards for birthdays.
- Stack completed cards in a craft organizer box.
- Button Wind Chime — outdoor craft ideas for kids
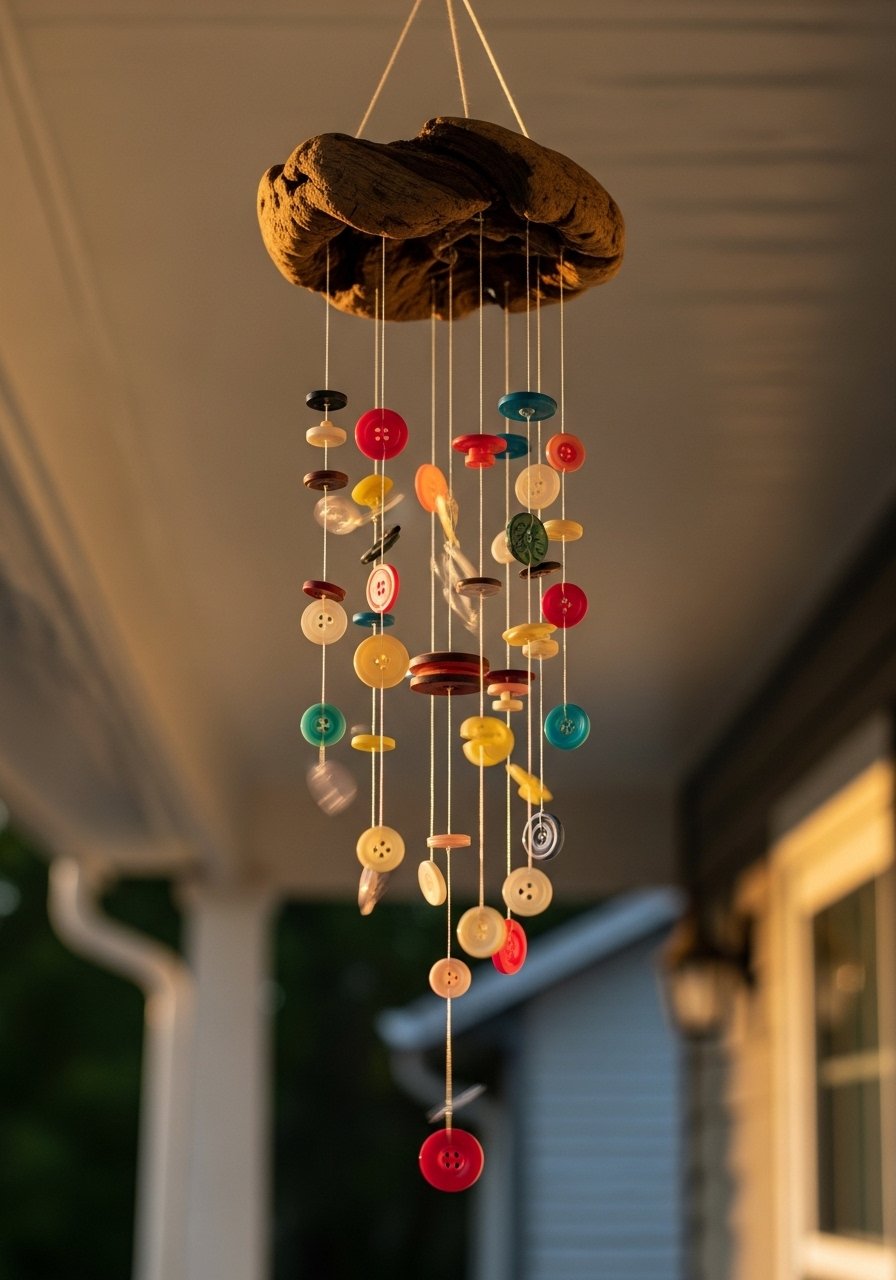
Button wind chimes are lightweight and jingly. Use fishing line and beads or buttons for colorful strands that catch light and make soft sound.
Materials
- Driftwood or stick, 10–12 inches
- Assorted buttons, 50–100
- Fishing line or clear thread, 1 spool
- Small wooden beads, optional
- Scissors
- Hot glue to secure knots
Instructions
- Cut fishing line into varying lengths (8–18 inches).
- Thread buttons and beads in a pattern, knotting every few buttons to secure.
- Tie each line to driftwood and test balance.
- Secure knots with a dot of hot glue; let dry 5–10 minutes.
- Hang outdoors in a sheltered spot to avoid heavy weather.
How to Display or Gift It
- Hang on a porch or near a window where breeze can move it.
- Wrap with ribbon and attach a card for gifting.
- Recycled Bottle Bird Feeders — nature-themed craft ideas for kids
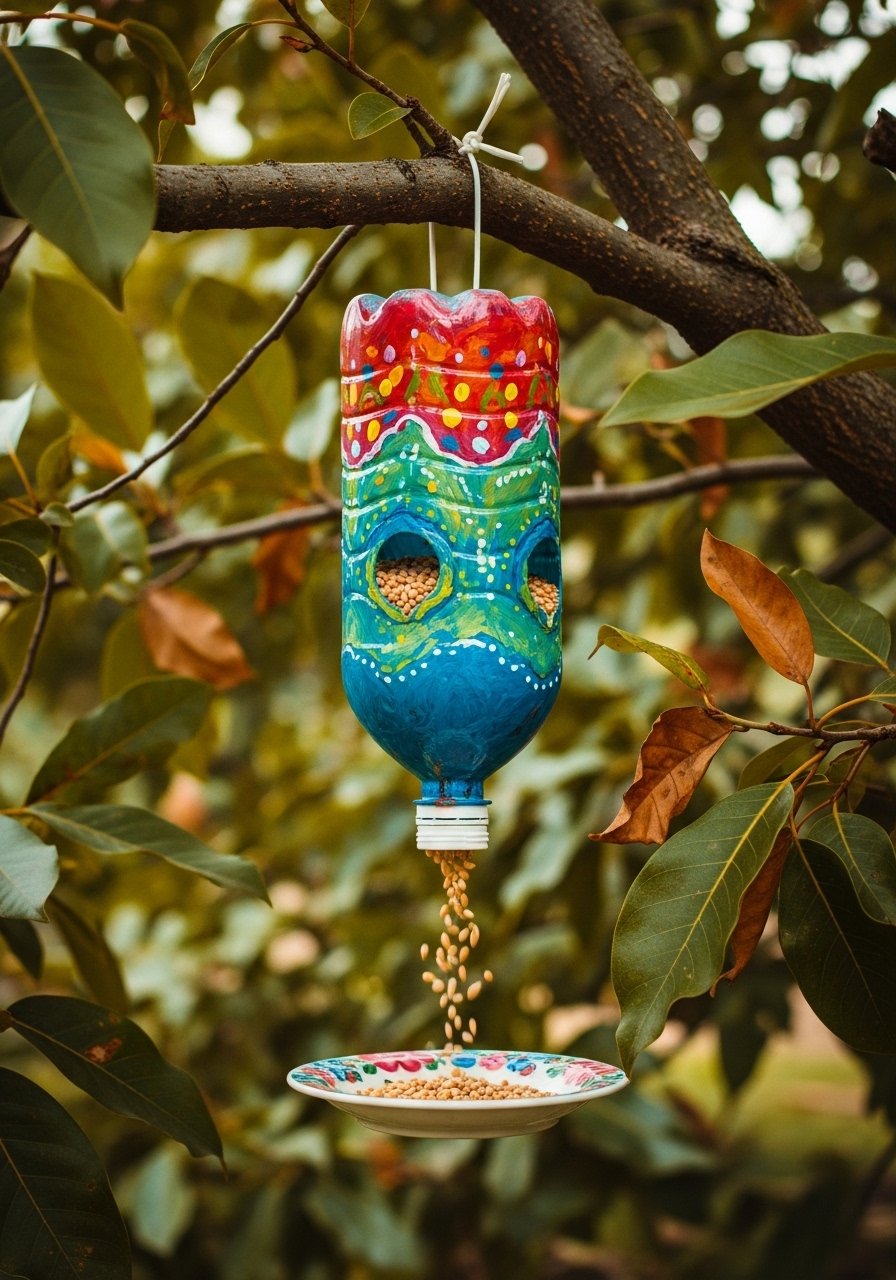
Recycled bottle feeders teach sustainability and invite wildlife to the yard. They’re simple to assemble and can be painted for added color.
Materials
- Plastic bottle, 16–24 oz, cleaned
- Wooden dowel or stick for perch, 6 inches
- Acrylic paint for decoration
- Sharp awl or craft knife (adult use)
- Birdseed, 2–4 cups
- Twine for hanging
Instructions
- Paint and decorate the bottle; let dry 30–60 minutes.
- Poke two holes opposite each other near base for the perch; insert dowel.
- Make small holes above the perch area for seed flow.
- Fill with birdseed and hang with twine in a sheltered spot.
- Check seed level daily and refill as needed.
How to Display or Gift It
- Hang near a window for bird-watching.
- Gift as a nature activity kit with extra seed in a mason jar.
- Memory Jar Time Capsules — reflective craft ideas for kids (craft ideas for kids)
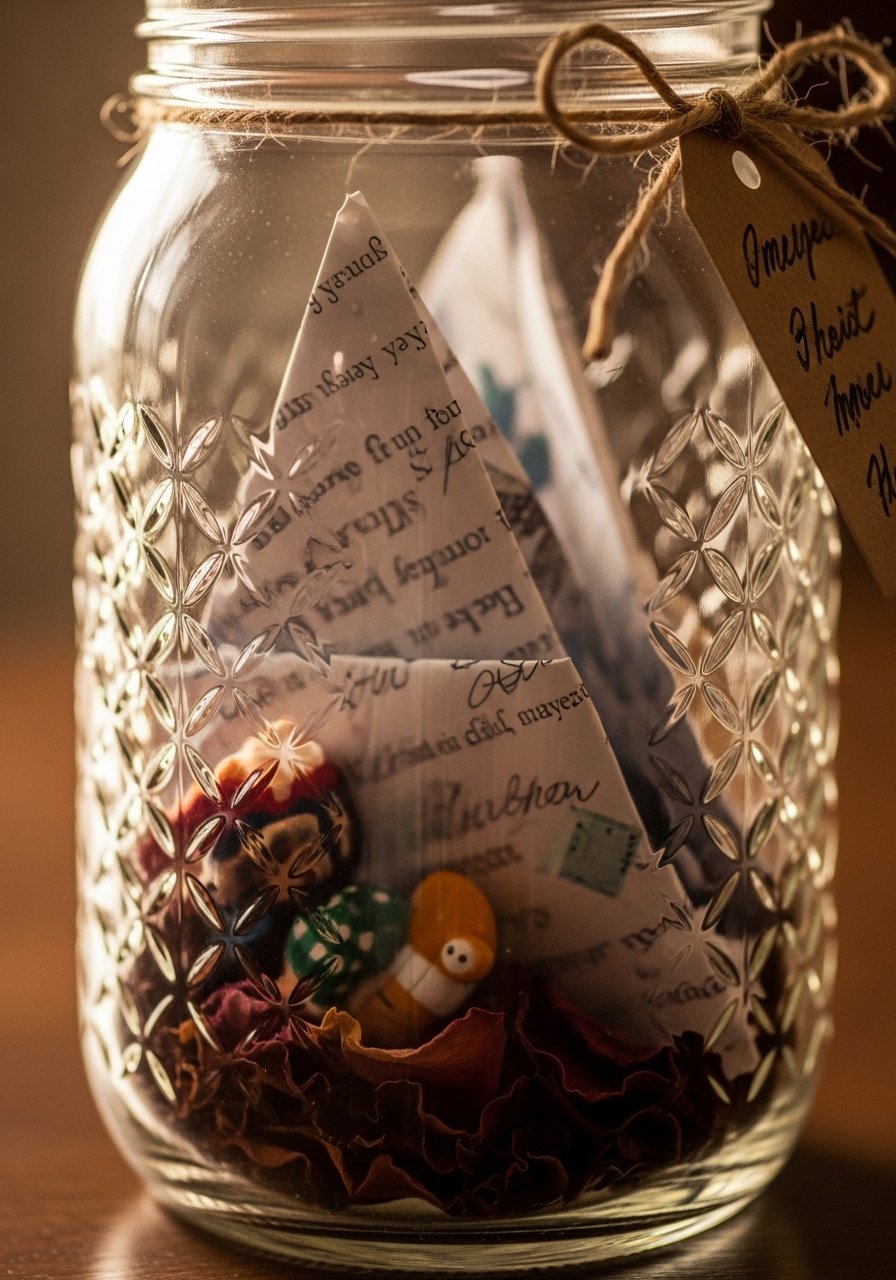
Memory jars are simple projects with big emotional payoff. Kids collect notes, drawings, and small mementos to open later. It’s a lovely practice for family reflection.
Materials
- Mason jar (16 oz) with lid
- Small index cards or paper strips, 20–30
- Pens and colored pencils
- Decorative ribbon or twine
- Small keepsakes (stickers, pressed flowers)
- Label tag
Instructions
- Decorate the jar with ribbon and a label for the intended open date.
- Fold notes, drawings, or small mementos and add them to the jar.
- Seal and store in a cool, dry place until the chosen date.
- For gifts, include a list of suggested prompts on the first card.
- No drying time required.
How to Display or Gift It
- Present as a birthday or end-of-year gift with instructions for when to open.
- Store in a memory box for safekeeping.
Thanks for staying with me through all 25 craft ideas for kids — from quick afternoon projects to keepsakes that last years. You’ve got a mix of messy sensory play, beginner-friendly sewing, fiber crafts, and eco-conscious builds that cover tastes like cottagecore, boho, and modern minimalism. Pin this list so you can come back when the next rainy day hits, and share your favorites with a crafty friend.
Trust me, picking up a quality hot glue gun with temperature control changed how every single one of these projects turned out — less stringy glue and faster set times. Which project are you trying first?


